ElasticSearch数据备份还原
使用Elasticsearch的API导出数据
Elasticsearch并没有内置的数据导出工具,但是可以使用多种方法来导出数据,包括使用Elasticsearch的API或者使用外部工具。这是一个使用Elasticsearch的API进行数据导出的基本步骤:
- 使用Elasticsearch的
_scrollAPI获取你想要导出的数据。这是一个基本的curl命令,可以获取你的数据:
curl -X GET "localhost:9200/your_index/_search?scroll=1m" -H 'Content-Type: application/json' -d'
{
  "size": 1000,
  "query": {
    "match_all": {}
  }
}
'
这个命令会返回一个_scroll_id,你需要保存这个ID,以便于接下来的步骤。
- 使用
_scrollAPI和上一步得到的_scroll_id获取下一批数据:
curl -X GET "localhost:9200/_search/scroll" -H 'Content-Type: application/json' -d'
{
  "scroll" : "1m",
  "scroll_id" : "the_scroll_id_from_last_step"
}
'
-
重复第2步,直到你获取了所有的数据。
-
当你获取了所有数据之后,需要清除
_scroll_id:
curl -X DELETE "localhost:9200/_search/scroll" -H 'Content-Type: application/json' -d'
{
  "scroll_id" : ["the_scroll_id_from_last_step"]
}
'
以上是一个基本的例子,你可能需要根据你的具体需求进行修改。例如,你可能需要修改query以获取你想要的数据,或者修改size来控制一次获取的数据量。
另外,也有一些外部工具可以帮助你导出数据,例如elasticdump,Logstash等。具体的使用方法你可以查看这些工具的文档。
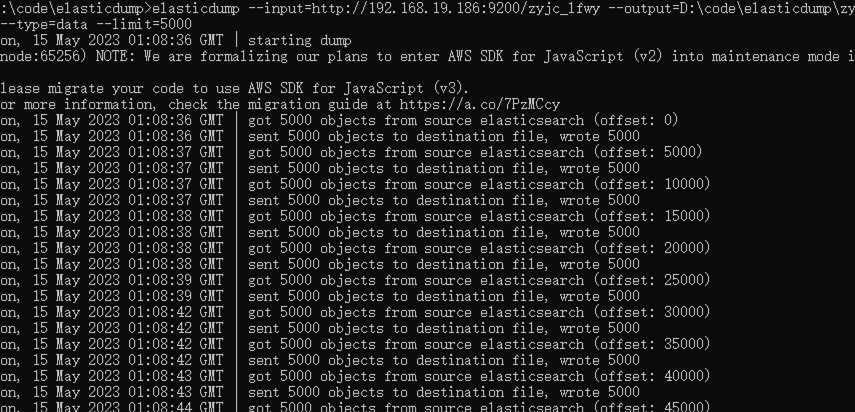
使用elasticdump工具导出数据
elasticdump是一个非常好的工具,可以用来从Elasticsearch导出数据。在使用之前,你需要先安装它。如果你已经安装了Node.js和npm,你可以使用以下命令
安装elasticdump
npm install elasticdump -g
数据导出
安装完成后,你可以使用以下命令导出数据:
elasticdump \
  --input=http://localhost:9200/my_index \
  --output=/path/to/my_data.json \
  --type=data
在这个命令中:
--input参数是你的Elasticsearch索引的URL,
--output参数是你想要保存数据的文件路径,
--type参数是你想要导出的类型,data表示你想要导出数据。
这个命令会将数据导出为JSON格式。你可以使用任何可以处理JSON格式的工具来处理这些数据。
如果你的Elasticsearch集群需要认证,你可以在URL中包含你的用户名和密码:
elasticdump \
  --input=https://username:password@localhost:9200/my_index \
  --output=/path/to/my_data.json \
  --type=data
这些命令都是基本的用法,elasticdump还有很多其他的选项,可以让你更加精细地控制数据导出。你可以在elasticdump的文档中找到更多的信息。
my_index在这个例子中代表Elasticsearch中的索引名称。索引是Elasticsearch中存储数据的地方,相当于关系数据库中的"表"。你可以将其视为存储数据的容器。
使用elasticdump工具导入数据
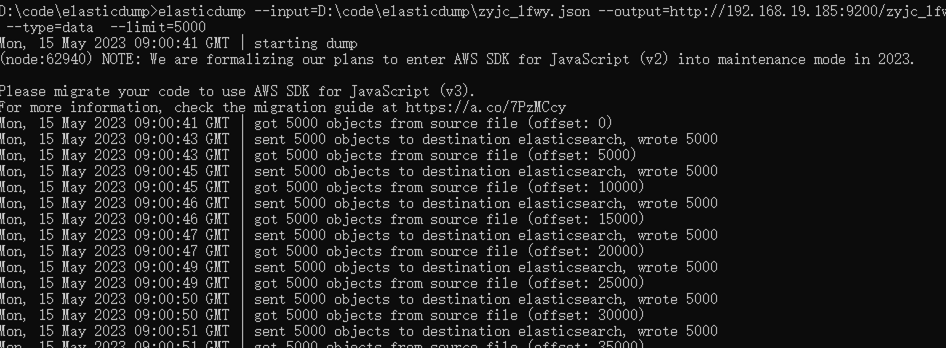
使用elasticdump导入数据和导出数据非常类似。你仍然需要提供一个输入和一个输出。但是这次,输入将是你的数据文件,输出将是你的Elasticsearch索引。以下是一个基本的命令示例:
elasticdump \
  --input=/path/to/my_data.json \
  --output=http://localhost:9200/my_index \
  --type=data
在这个命令中,--input参数是你的数据文件的路径,--output参数是你的Elasticsearch索引的URL,--type参数是你想要导入的类型,data表示你想要导入数据。
如果你的Elasticsearch集群需要认证,你可以在URL中包含你的用户名和密码:
elasticdump \
  --input=/path/to/my_data.json \
  --output=https://username:password@localhost:9200/my_index \
  --type=data
这些命令都是基本的用法,elasticdump还有很多其他的选项,可以让你更加精细地控制数据导入。你可以在elasticdump的文档中找到更多的信息。
提高数据处理速度
导出数据
elasticdump提供了一些选项可以帮助你提高导出数据的速度。
首先,你可以尝试增加每个请求的数据大小。默认情况下,elasticdump每个请求处理500条记录。你可以使用--limit选项来增加这个数字。例如,以下命令每个请求处理5000条记录:
elasticdump \
  --input=http://localhost:9200/my_index \
  --output=/path/to/my_data.json \
  --type=data \
  --limit=5000
请注意,增加这个限制可能会使你的Elasticsearch节点内存压力增大,所以请根据你的硬件情况适当调整。
其次,elasticdump支持并行处理。你可以同时运行多个elasticdump进程来导出不同的数据。你可以使用--offset选项来指定每个进程开始导出的位置。例如,你可以运行以下两个命令来同时导出数据:
elasticdump \
  --input=http://localhost:9200/my_index \
  --output=/path/to/my_data1.json \
  --type=data \
  --limit=5000 \
  --offset=0

elasticdump \
  --input=http://localhost:9200/my_index \
  --output=/path/to/my_data2.json \
  --type=data \
  --limit=5000 \
  --offset=5000
这两个命令会同时运行,分别导出不同的数据。
最后,如果你的数据非常大,你可能需要考虑使用更强大的硬件,或者将你的数据分布在多个Elasticsearch节点上,然后使用多个elasticdump进程来并行导出数据。
导入数据
elasticdump`在导入数据时也可以使用类似的选项来提高速度。
首先,你可以尝试增加每个请求的数据大小。你可以使用--limit选项来增加这个数字。例如,以下命令每个请求处理5000条记录:
elasticdump \
  --input=/path/to/my_data.json \
  --output=http://localhost:9200/my_index \
  --type=data \
  --limit=5000
其次,elasticdump支持并行处理。你可以同时运行多个elasticdump进程来导入不同的数据。这需要你的数据文件已经被分割成多个文件。例如,你可以运行以下两个命令来同时导入数据:
elasticdump \
  --input=/path/to/my_data1.json \
  --output=http://localhost:9200/my_index \
  --type=data \
  --limit=5000

elasticdump \
  --input=/path/to/my_data2.json \
  --output=http://localhost:9200/my_index \
  --type=data \
  --limit=5000
这两个命令会同时运行,分别导入不同的数据。
最后,如果你的数据非常大,你可能需要考虑使用更强大的硬件,或者将你的数据分布在多个Elasticsearch节点上,然后使用多个elasticdump进程来并行导入数据。

