@RequestMapping
⽤来注册接⼝的路由映射。当⽤户访问⼀个 url 时,将⽤户的请求对应到程序中某个类的某个⽅法的过程就叫路由映射。
@Controller //类注解不能忘
@RequestMapping("/webcontroller")
public class WebController {

    @RequestMapping("/sayhi")
    public String sayHi() {
        return "Hi~";
    }
}
通过输入网址localhost:8080/webcontroller/sayhi就可以访问到。但是实际上你看到的又不一样。

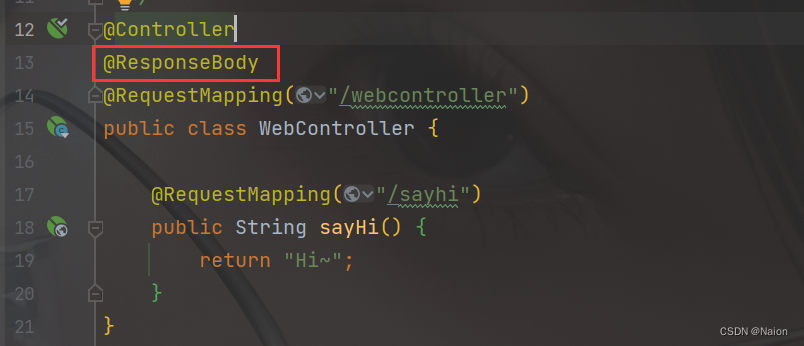
对于上述的情况,在确定你的URL正确的情况下,我们需要另外加一个注解:@ResponseBody,加在类上。就可以让页面打印出来Hi~。

@ResponseBody
@ResponseBody的作用是将Java对象转为某种格式的数据,用来返回JSON数据或者XML数据。SpringMVC模型如下:
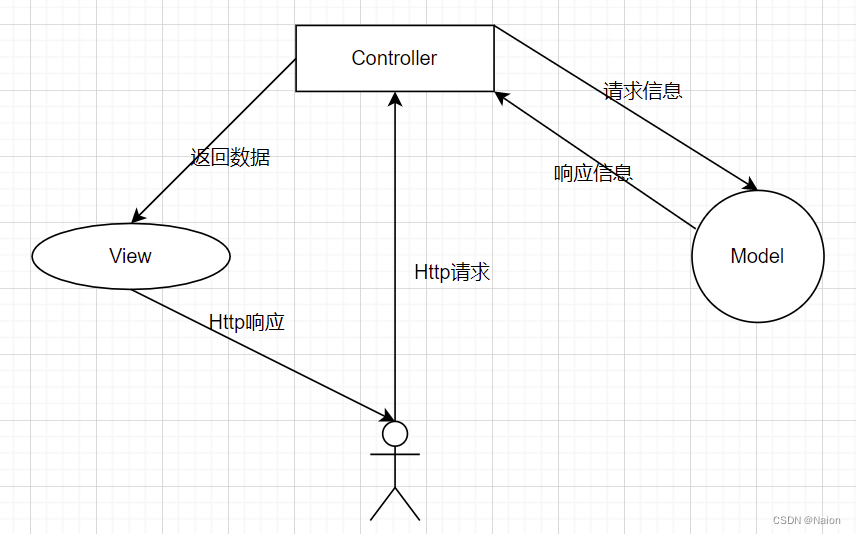
没有加这个注解的时候,Controller返回的数据将经过View,经过View转发后返回给客户端,而加了注解,相当于将数据直接返回给客户端。View表示视图的意思,也就是说,如果没有加该注解,View希望拿到一个html页面。
现在写一个简单的html页面,后端返回该页面。看看没有加@ResponseBody:
@Controller
// @ResponseBody
@RequestMapping("/webcontroller")
public class WebController {

    @RequestMapping("/sayhi")
    public Object sayHi() {
        return "/index.html";
    }
}
<!doctype html>
<html lang="en">
<head>
<meta charset="UTF-8">
<meta name="viewport"
content="width=device-width, user-scalable=no, initial-scale=1.0, maximum-scale=1.0, minimum-scale=1.0">
<meta http-equiv="X-UA-Compatible" content="ie=edge">
<title>Document</title>
</head>
<body>
<div>
<h1>Hello World!</h1>
</div>
</body>
</html>
加了@ResponseBody:

当然,如果我们这样写代码:
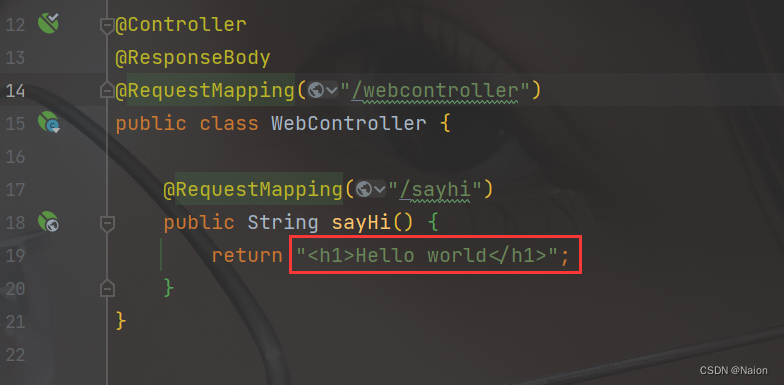

这是浏览器自动解析的结果。
@ResponseBody注解使用的地方非常多,和@Controller组合起来一个新的注解叫@RestController,起到@ResponseBody+@Controller的作用。

@RequestMapping是post请求还是get请求
前面我们说@RequestMapping注解,那么他是post请求还是get请求?使用PostMan快速测试。


可以看出, @RequestMapping既可以是post也可以是get请求。但是一般情况下,我们并不希望一个方法可以解析多个请求,要么只解析get请求,要么只解析post请求。我们可以通过method来指定。

发送get请求:

更简单的写法:@GetMapping 和 PostMapping
@GetMapping 和 PostMapping
@Controller
@ResponseBody
@RequestMapping("/webcontroller")
public class WebController {

    @GetMapping("/getmapping")
    public String getMapping() {
        return "getMapping";
    }
}
发送get请求:

@Controller
@ResponseBody
@RequestMapping("/webcontroller")
public class WebController {

    @PostMapping("/postmapping")
    public String postMapping() {
        return "postMapping";
    }
}
发送post请求:

传递参数
以前什么传递参数,现在仍然什么传递参数,非常的方便。可以传单个参数,也可以传多个参数,还可以传一个对象,这里不在演示。
    @GetMapping("/getmapping")
    public String getMapping(String name) {
        return "name: " + name;
    }
@RequestParam后端参数重命名
某些特殊的情况下,前端传递的参数 key 和我们后端接收的 key 不⼀致,这个时候,我们可以使用@RequestParam注解来重命名。

但是这样的话,他只能获取前端传来的prename。如果前端传来别的参数,也会报错,所以需要另外加一个required属性,值为false,用来指定prename是不是必须要传的。
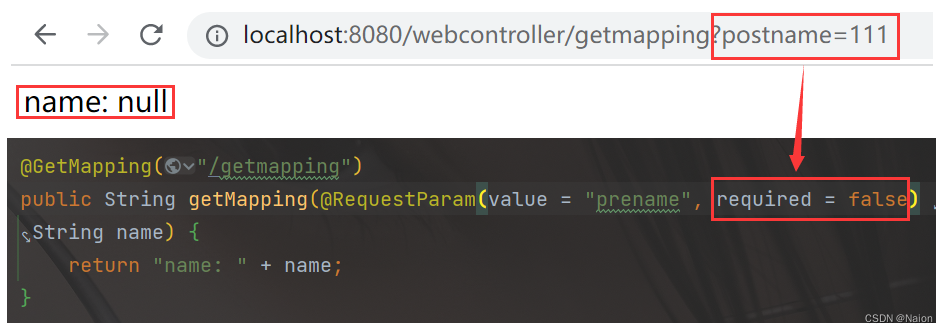
@RequestBody
用来接受json格式的对象。如果不加该注解,是获取不到参数的。同时,需要传给一个对象。

使用HashMap作为返回值的原因是他也是key-value格式,返回给前端就会被转化成json。当然,你返回User的对象也是可以的,符合key-value的格式。
@Data //需要添加lombok支持
public class User {

    private String name;
    private Integer password;
}
    @RequestMapping("/jsonlogin")
    public User jsonLogin(@RequestBody User user) {
        User user1 = new User();
        user1.setName(user.getName());
        user1.setPassword(user.getPassword());
        return user1;
    }
@PathVariable
这个参数用来获取URL中的参数。

    @RequestMapping("/pathvariable/{name}/{password}")
    public String pathVariable(@PathVariable String name,@PathVariable Integer password) {
        return "name: " + name + " | password: " + password;
    }
@RequestPart
用来上传文件。
    @RequestMapping("/requestpart")
    public String requestPart(String name, @RequestPart("myfile") MultipartFile file) {
        try {
            file.transferTo(new File("E:\\Git\\java-learning\\22_java_12\\java_12_01\\java120101\\src\\main\\resources\\static\\image\\img.png"));
        } catch (IOException e) {
            e.printStackTrace();
        }

        return "success!";
    }
@CookieValue
获取cookie。
    @RequestMapping("/getcookie")
    public String getCookie(@CookieValue("name") String name,
                            @CookieValue("password") Integer password) {
        return "name: " + name + " | password: " + password;
    }
读取Session
@SessionAttribute用来获取session。
    //先设置session
    @RequestMapping("/setsess")
    @ResponseBody
    public String setSess(HttpServletRequest request) {
        HttpSession httpSession = request.getSession(true);
        if (httpSession != null) {
            httpSession.setAttribute("name", "111");
        }
        return "session";
    }

    @RequestMapping("getsess")
    @ResponseBody
    public String getSess(@SessionAttribute(value = "name", required = false) String name) {
        return name;
    }
读取请求头
使用@RequestHeader注解。
    @RequestMapping("/getheader")
    public String getHeader(@RequestHeader("user-Agent") String userAgent) {
        return userAgent;
    }


