router路由配置,使用
在vue-cli构建的vue单页面应用中,需要借助vue-router库实现路由功能
配置路由 (构建项目时要下载)
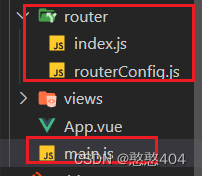
router文件夹下创建:index.js,routerConfig.js配置路由
路由懒加载:
按需加载:当你实际访问哪个路由,路由对应的组件文件才会加载,提升了应用访问速度,提升用户体验
为什么用路由懒加载 ? npm run build 不用路由懒加载,会打包成一个js,一个css文件,不易加载 ;路由懒加载后,每个组件都会生成一个js文件
views中写路由组件:main.js下导入路由管理对象,应用路由,配置路由表
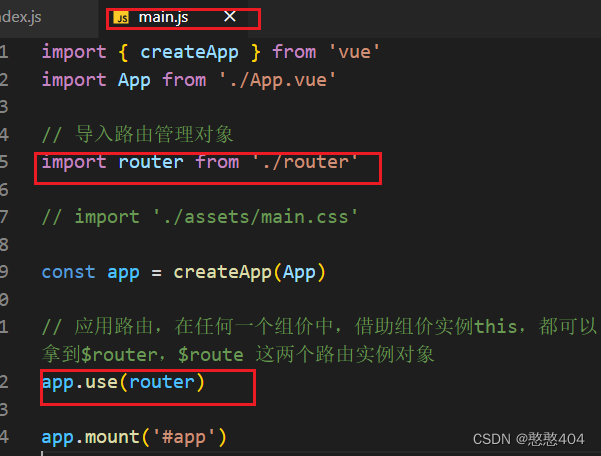
index.js
// index.js
import { createRouter, createWebHistory,createWebHashHistory } from 'vue-router'

// 导入路由配置表
import routes from './routerConfig'

const router = createRouter({
  history: createWebHistory(import.meta.env.BASE_URL),//路由模式
  routes, //应用路由配置表
})

export default router
routerConfig.js
单条路由配置 嵌套路由配置 重定向:path: '/home', redirect: 'homepage' 404页面
// import Index from '../views/Index.vue'
// import Login from '../views/Login.vue'
// import NotFound from '../views/NotFound.vue'
// import Detail from '../views/Detail.vue'

// import Home from '../views/Index/Home.vue'
// import GWC from '../views/Index/GWC.vue'
// import Mine from '../views/Index/Mine.vue'

// 路由懒加载/延迟加载

// 用懒加载导入的方式处理每个组件, 每个组件都会单独生成一个js文件, 当你实际访问哪个路由, 对应的组件文件才会加载, 否则不加载
var Index = ()=> import( "../views/Index.vue" )
var Login = ()=> import( "../views/Login.vue" )
var NotFound = ()=> import( "../views/NotFound.vue" )
var Detail = ()=> import( "../views/Detail.vue" )

var Home = ()=> import( "../views/Index/Home.vue" )
var GWC = ()=> import( "../views/Index/GWC.vue" )
var Mine = ()=> import( "../views/Index/Mine.vue" )

//路由配置表
export default [
    {
        path:'/index',
        component: Index,
        children:[ //嵌套路由
            {
                path:'/index/home',
                component: Home,
            },
            {
                path:'/index/gwc',
                component: GWC,
            },
            {
                path:'/index/mine',
                component: Mine,
            },
            {
                path:'/index',
                redirect:'/index/home' //重定向
            },
            {
                // path:'*', //VueRouter3中的写法
                path:'/index/:error(.*)',
                component: NotFound, //404
            },
        ]
    },
    {
        path:'/login',
        component: Login
    },
    {
        // path:'/detail/:id',
        path:'/detail',
        component: Detail
    },
    {
        path:'/',
        redirect:'/index' //重定向
    },
    {
        path:'/:error(.*)',
        component: NotFound, //404
    },

]
路由组件:
<router-view /> :充当 路由渲染出口
<router-link /> :用来跳转:最终渲染 成 a 标签
路由实例
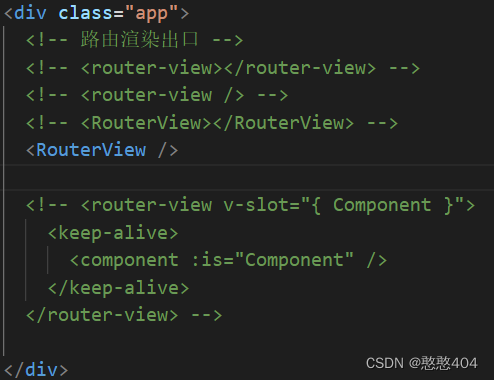
$router 路由管理对象,负责跳路由
$route 路由对象,负责存储路由信息(地址,参数)
-
跳路由两种方式
-
标签式导航: 借助router-link 渲染的a标签来跳路由:<router-link to="/index/home">首页</router-link>
-
编程式导航: <div @click="toGWC">购物车</div> 点击后动态路由传参
-
跳路由传参:建议动态路由传参
this.$router.go() 跳转一个路由 this.$router.replace() 跳转一个路由,不会向history中添加新的记录
一:动态路由传参
接参 this.$route.params.id
二:固定路由传参query
传参 this.$router.push( { path:"/detail",query:{参数id:id } } )
接参 this.$route.query.id
// 跳转路由传参
methods: {
        toDetail(id) {
            console.log(id);
            //方式一:动态路由,路由地址需要接收 添加/:id
            // 跳转的地址需要route 接收: this.$route.params.id
            this.$router.push('/detail/'+id)

            //方式二:固定路由,query
            // this.$router.push({ path:'/detail',query: {id} })
        }
    }
接收
<template>
    <div class="detail">
        <!-- 动态路由接收参数 -->
        详情页面-{{ this.$route.params.id }}
        <!-- 固定路由接收参数 -->
        <!-- 详情页面-{{ this.$route.query.id }} -->
    </div>
</template>

<script>
export default {
    // 查看挂载没
    mounted() {
        console.log(this.$route.params.id)
    },

    methods: {

    },
};
</script>
页面顶部加载进度条:
nprogress:插件实现,页面顶部进度条

npm中搜索安装使用:

npm install nprogress --save

在俩守卫函数配置插件使用
NProgress.start();
NProgress.done();
路由守卫/导航守卫/路由钩子/路由卫士
他是一组钩子函数 就是再路由跳转的特定阶段自动执行的函数
主要对页面的跳转功能进行限制(没有登录就不能进入制定页面)
守卫函数:
全局前置守卫函数 beforeEach
router.beforeEach((to, from, next) => {
to -- 去哪里
from -- 从哪里来
next() -- (放不放行)
})
router.beforeEach((to,from,next)=>{
  console.log(to)
  console.log(from)
  if(to.path=="/denglu"||to.path=="/zhuce"){
    next()
  }else{
      alert("当前未vip页面请您登录后再访问")
      next("/denglu")
  }

})
全局后置守卫函数 afterEach
router.afterEach((to, from)=>{
})
 beforeRouteEnter(to,from,next){
        console.log(to);
        console.log(from);
        next()

    },
    beforeRouteLeave(to,from,next){
           console.log(to);
           console.log(from);

           if(confirm("确定离开吗")){
            next()
           }else{
                next(false)
           }
    }

}
路由独享守卫 beforeEnter
{
    path: '/shop',
    name: 'Shop',
    component: Shop,
    beforeEnter(to,from,next){
      console.log(to);
      console.log(from);
      alert("您没有登录请你登录后访问")
      next("/denglu")
    }
  },


