⭐️前面的话⭐️
本文已经收录到《Spring框架全家桶系列》专栏,本文将介绍在Spring环境下整合mybatis。
📒博客主页:未见花闻的博客主页
🎉欢迎关注🔎点赞👍收藏⭐️留言📝
📌本文由未见花闻原创,CSDN首发!
📆首发时间:🌴2023年5月11日🌴
✉️坚持和努力一定能换来诗与远方!
💭推荐书籍:📚《无》
💬参考在线编程网站:🌐牛客网🌐力扣🌐acwing
博主的码云gitee,平常博主写的程序代码都在里面。
博主的github,平常博主写的程序代码都在里面。
🍭作者水平很有限,如果发现错误,一定要及时告知作者哦!感谢感谢!
📌导航小助手📌
- 1.项目结构与项目所需依赖
- 2.整合Mybatis
- 2.1基本工作
- 2.2创建配置类
- 2.3基于配置文件完成SQL
- 2.4整合junit完成单元测试
- 2.5基于注解完成SQL

1.项目结构与项目所需依赖
第一步,创建Maven项目
第二步,在pom中导入相关依赖
本项目使用的依赖如下:
        <!--  spring框架依赖 -->
        <dependency>
            <groupId>org.springframework</groupId>
            <artifactId>spring-context</artifactId>
            <version>5.3.15</version>
        </dependency>
        <!-- druid数据库连接池依赖 -->
        <dependency>
            <groupId>com.alibaba</groupId>
            <artifactId>druid</artifactId>
            <version>1.1.16</version>
        </dependency>
        <!--   mybatis依赖-->
        <dependency>
            <groupId>org.mybatis</groupId>
            <artifactId>mybatis</artifactId>
            <version>3.5.2</version>
        </dependency>
        <!--    spring整合mybatis依赖-->
        <dependency>
            <groupId>org.mybatis</groupId>
            <artifactId>mybatis-spring</artifactId>
            <version>2.0.7</version>
        </dependency>
        <!--  jdbc依赖  -->
        <dependency>
            <groupId>org.springframework</groupId>
            <artifactId>spring-jdbc</artifactId>
            <version>5.3.15</version>
        </dependency>
        <!--  mysql驱动依赖  -->
        <!-- https://mvnrepository.com/artifact/mysql/mysql-connector-java -->
        <dependency>
            <groupId>mysql</groupId>
            <artifactId>mysql-connector-java</artifactId>
            <version>5.1.47</version>
        </dependency>
        <!--  lombok依赖 用于快速生成setter getter 和 toString  -->
        <!-- https://mvnrepository.com/artifact/org.projectlombok/lombok -->
        <dependency>
            <groupId>org.projectlombok</groupId>
            <artifactId>lombok</artifactId>
            <version>1.18.26</version>
            <scope>provided</scope>
        </dependency>
        <!-- 整合junit -->
        <!-- https://mvnrepository.com/artifact/junit/junit -->
        <dependency>
            <groupId>junit</groupId>
            <artifactId>junit</artifactId>
            <version>4.13.2</version>
            <scope>test</scope>
        </dependency>
        <!-- spring test环境-->
        <dependency>
            <groupId>org.springframework</groupId>
            <artifactId>spring-test</artifactId>
            <version>5.2.10.RELEASE</version>
        </dependency>
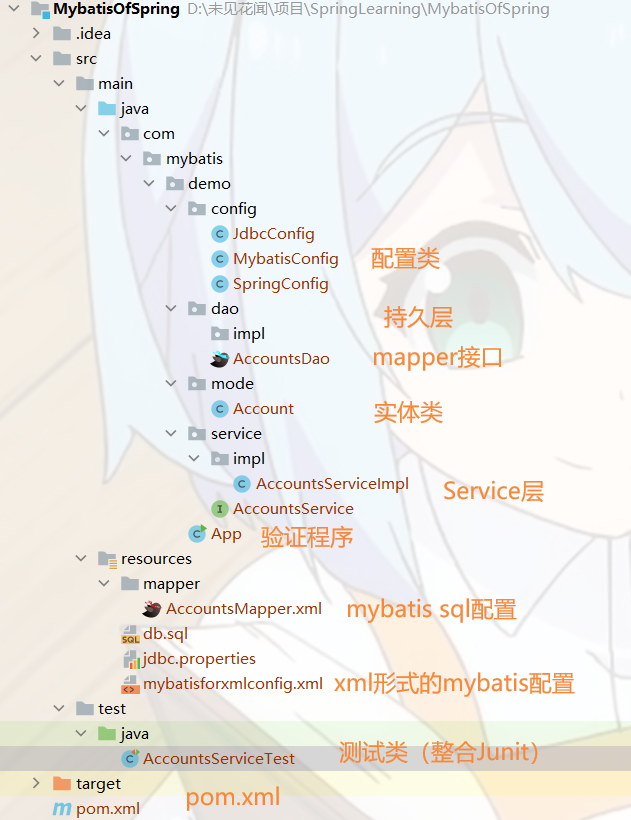
第三步,创建服务层service, 配置层config,实体层mode,持久层dao
第四步,创建properties文件,用来配置数据库信息
jdbc.properties文件内容如下:
jdbc.driver=com.mysql.jdbc.Driver
jdbc.url=jdbc:mysql://localhost:3306/accounts?useSSL=false&serverTimezone=GMT%2B8&characterEncoding=utf-8
jdbc.username=root
jdbc.password=123456
第五步,创建验证类
App类
2.整合Mybatis
2.1基本工作
编写sql语句,进行建数据库,建数据表,我们创建一个银行账户表为例,数据库为accounts,数据表为account。
相关SQL语句如下:
create database if not exists accounts;
use accounts;
-- 创建银行账户表
drop table if exists account;
create table account (
    -- 用户编号uid
                         uid int primary key auto_increment,
    -- 身份证号
                         id varchar(32) unique,
    -- 姓名
                         username varchar(32),
    -- 年龄
                         age int,
    -- 性别
                         sex varchar(4),
    -- 住址
                         address varchar(256),
    -- 电话
                         telephone varchar(24),
    -- 余额
                         money double(8, 2) not null default 0
    );

insert into account values (null, '120321202011111232', '小明', 32, '男', '上海市', '12345678900', 1222.56);
insert into account values (null, '430321202011111242', '小花', 18, '女', '湖南省长沙市', '12345678901', 12466.56);
insert into account values (null, '310321202011111252', '小卷', 32, '男', '福建省厦门市', '12345678902', 31222.56);
2.2创建配置类
第一步,创建Spring配置类
创建SpringConfig类,加上@Configuration注解,配置基础扫描包@ComponentScan("com.mybatis.demo"),加载properties配置文件@PropertySource("classpath:jdbc.properties")
@Configuration
@PropertySource("classpath:jdbc.properties")
@ComponentScan("com.mybatis.demo")
public class SpringConfig {
}
第二步,配置连接数据库连接池和配置DataSource
创建一个JdbcConfig配置类,加上dataSource方法用于产生DataSource对象,在配置mybatis配置类需要使用到。
public class JdbcConfig {
    @Value("${jdbc.driver}")
    private String drive;
    @Value("${jdbc.url}")
    private String url;
    @Value("${jdbc.username}")
    private String username;
    @Value("${jdbc.password}")
    private String password;
    //配置数据源
    @Bean
    public DataSource dataSource() {
        DruidDataSource druidDataSource = new DruidDataSource();
        druidDataSource.setDriverClassName(drive);
        druidDataSource.setUrl(url);
        druidDataSource.setUsername(username);
        druidDataSource.setPassword(password);
        return druidDataSource;
    }
}
第三步,创建Mybatis配置类
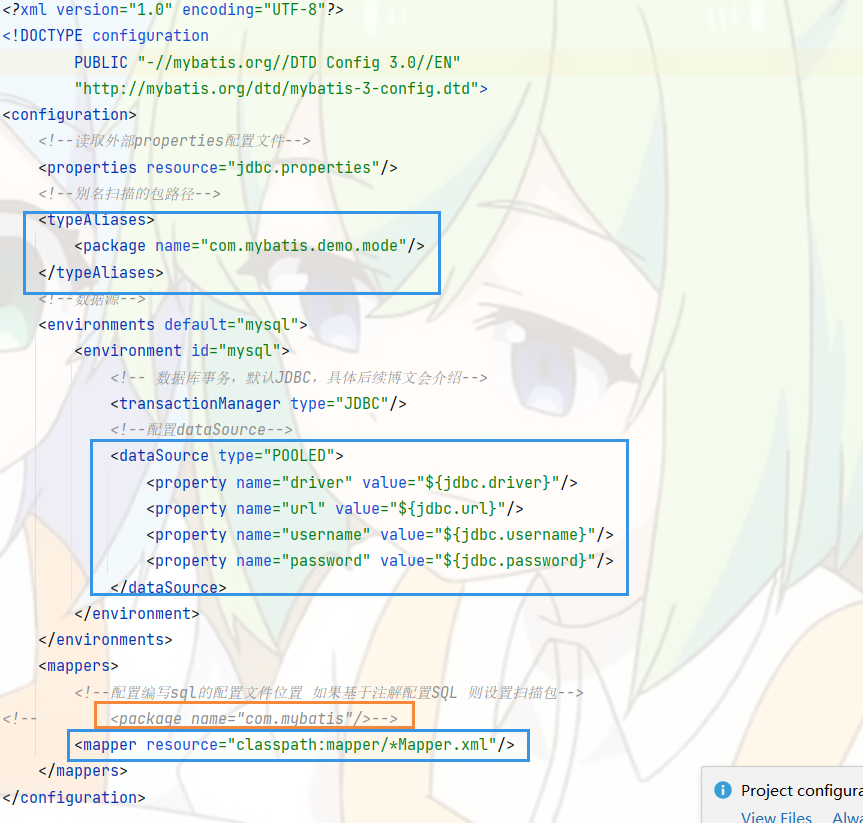
首先我们来回个一下mybatis配置文件的格式,大致如下:
我们需要将mybatis的xml文件转换为配置类,在此之前,我们来了解一下mybatis的进行sql操作的流程:
- 创建SqlSessionFactoryBuilder对象,用于建设SqlSessionFactory对象。
- 加载mybatis的xml配置文件,并读取到流当中。
- 通过SqlSessionFactoryBuilder对象和保存的配置流创建SqlSessionFactory对象,用于造SqlSession对象。
- 获取SqlSession,用于获取mybatis中的mapper接口“对象”。
- 获取相关的mapper接口对象,调用查询方法进行查询,获取结果。
翻译成代码就是如下:
// 1. 创建SqlSessionFactoryBuilder对象
SqlSessionFactoryBuilder sqlSessionFactoryBuilder = new SqlSessionFactoryBuilder();
// 2. 加载SqlMapConfig.xml配置文件
InputStream inputStream = Resources.getResourceAsStream("mybatis-config-xml.xml");
// 3. 创建SqlSessionFactory对象
SqlSessionFactory sqlSessionFactory = sqlSessionFactoryBuilder.build(inputStream);
// 4. 获取SqlSession
SqlSession sqlSession = sqlSessionFactory.openSession();
// 5. 执行SqlSession对象执行查询,获取结果
AccountDao accountDao = sqlSession.getMapper(AccountDao.class);
//验证查询方法
Account account = accountDao.findByUid(1);
System.out.println(account);
所以我们创建mybatis配置类时最起码需要将DataSource数据源配置好交给SqlSessionFactory,对于 SqlSessionFactory对象,在spring整合mybatis包中有一个SqlSessionFactoryBean类可以用于生产SqlSessionFactory对象,所以我们实例化并配置SqlSessionFactoryBean类对象即可,当然SqlSessionFactory类需要数据源初始化,那对于SqlSessionFactoryBean类对象也得给它数据源。
数据源通过setDataSource方法进行配置。
加载properties配置文件在SpringConfig已经做过了,并且已经生成了DataSource对象,所以这里就不需要额外配置了。
对于mybatis配置文件中有个typeAliase标签,该标签其实就是给项目中对应的类(包含包)改名。我们知道在项目中,一个包含包的类名字那是长的不得了,这不,mybatis来帮我们省力气了。
    <!-- 配置别名:在MyBatis中为一个类取别名   配置别名是为了在对象映射文件中接收参数类型和返回参数类型时使用-->
    <typeAliases>
        <!--
            设置这个包下面的所有类的别名  默认是类名小写
            <package name="cn.itsource.domain"/>
        -->

        <!--
            设置单个类的别名
            alias:取的别名
            type:这个别名所对应的Java类    别名使用的时候与大小写无关
        -->
        <typeAlias alias="Product" type="cn.itsource.domain.Product"/>
    </typeAliases>
下面来通过一个例子来说明typeAliase的作用:
例如模糊查询示例,当不使用别名,而使用全路径时,配置示例代码如下:
<select id="findUserByUsername" parameterType="java.lang.String" resultType="cn.com.mybatis.pojo.User">
    SELECT * FROM USER WHERE username LIKE '%${value}%'
</select>
当通过设置 MyBatis 的全局配置文件 SqlMapConfig 中的 typeAliases 属性后,就可以为 sql 映射文件中的输入或输出参数设置类型别名,然后在 sql 映射配置文件中指定输入输出参数类型时使用的别名。首先,SqlMapConfig 配置文件示例如下:
<typeAliases>
    <typeAlias alias="user" type="cn.com.mybatis.pojo.User"/>
    <typeAlias alias="str" type="java.lang.String"/>
</typeAliases>
这样就可以在 sql 映射配置文件中使用别名来指定输入 / 输出参数的类型了,其示例代码如下:
<select id="findUserByUsername" parameterType="str" resultType="user">
    SELECT * FROM USER WHERE username LIKE '%${value}%'
</select>
设置package标签后,会自动将所设置包下所有的类,都取一个别名,默认名字为类名的小驼峰形式。
不使用typeAliases:
<!--    根据uid查询-->
    <select id="selectByUid" resultType="com.mybatis.demo.mode.Account">
        select * from Account where uid = #{uid}
    </select>
typeAliases配置,将所设置包下所有的类自动取别名。
    <typeAliases>
        <package name="com.mybatis.demo.mode"/>
    </typeAliases>
使用typeAliases:
<!--    根据uid查询-->
    <select id="selectByUid" resultType="account">
        select * from Account where uid = #{uid}
    </select>
一般使用package比较多,因为方便简单,功能强大。
这个配置也是在SqlSessionFactoryBean类对象中配置的,使用setTypeAliasesPackage进行设置。
至于事务配置先不管,不设置会默认使用JDBC事务。
最后还有一个mapper标签,对于加载mapper配置文件加载SQL则需要在SqlSessionFactoryBean类对象中使用setMapperLocations方法设置对应mapper配置文件路径。
如果使用通过注解加载SQL,需要再设置一个实例化一个MapperScannerConfigurer来设置扫描的包,使用setBasePackage方法配置即可。
综上所述,MybatisConfig配置类如下:
public class MybatisConfig {
    //配置mybatis
    @Bean
    public SqlSessionFactoryBean getSqlSessionFactoryBean(DataSource dataSource) {
        SqlSessionFactoryBean sqlSessionFactoryBean = new SqlSessionFactoryBean();
        sqlSessionFactoryBean.setDataSource(dataSource);
        sqlSessionFactoryBean.setTypeAliasesPackage("com.mybatis.demo.mode");
        //设置mapper文件路径
        sqlSessionFactoryBean.setMapperLocations(new ClassPathResource("mapper/AccountsMapper.xml"));
        return sqlSessionFactoryBean;
    }
    //配置dao扫描包
    @Bean
    public MapperScannerConfigurer getMapperScannerConfigurer() {
        MapperScannerConfigurer mapperScannerConfigurer = new MapperScannerConfigurer();
        mapperScannerConfigurer.setBasePackage("com.mybatis.demo.dao");
        return mapperScannerConfigurer;
    }
}
最后在SpringConfig将这俩配置类加载即可。
@Configuration
@PropertySource("classpath:jdbc.properties")
@ComponentScan("com.mybatis.demo")
@Import({MybatisConfig.class, JdbcConfig.class})
public class SpringConfig {
}
2.3基于配置文件完成SQL
这个就比较简单了,在resources文件夹中创建配置文件,然后将路径正确配置到mybatis配置类即可。
配置文件内容如下:
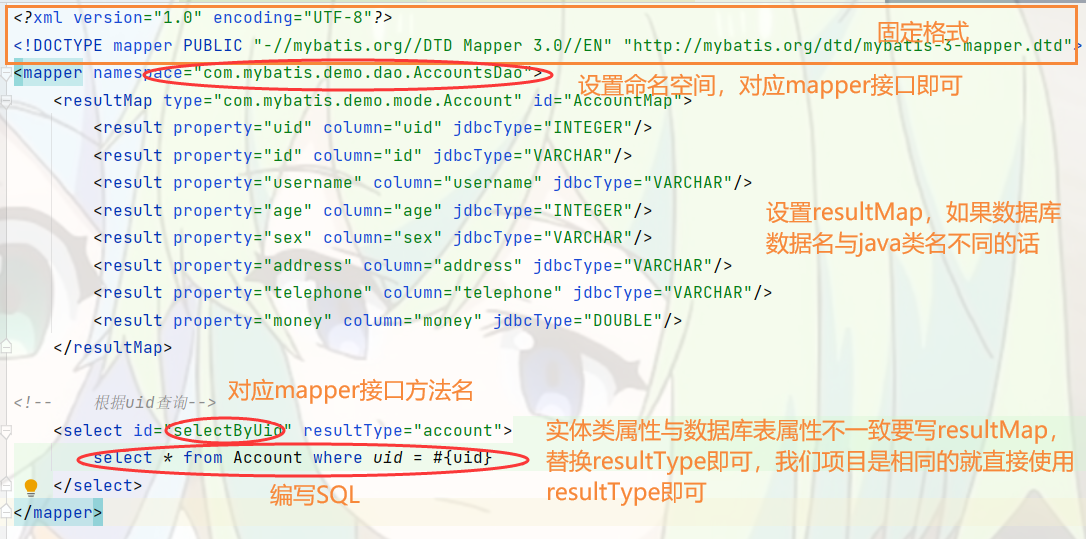
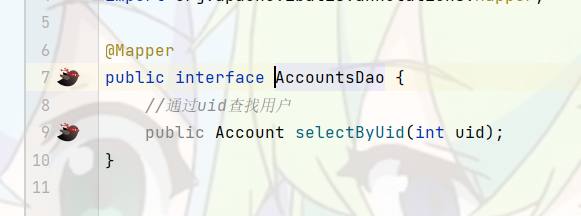
具体都在图上了,我就不多说了,对应的mapper接口如下:
包路径如下:

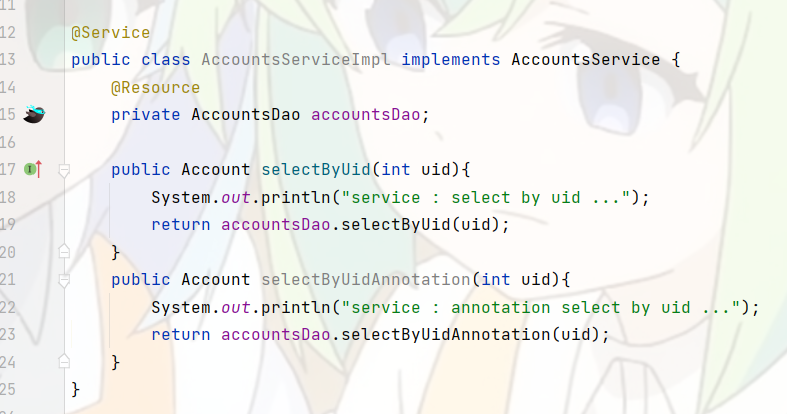
Service层对应类实现如下:
@Service
public class AccountsServiceImpl implements AccountsService {
    @Resource
    private AccountsDao accountsDao;

    public Account selectByUid(int uid){
        System.out.println("service : select by uid ...");
        return accountsDao.selectByUid(uid);
    }
}
最后我们编写一下测试类App:
public class App {
    public static void main(String[] args) {
        ApplicationContext context = new AnnotationConfigApplicationContext(SpringConfig.class);
        AccountsService service = context.getBean(AccountsService.class);
        Account account = service.selectByUid(1);
        System.out.println(account);
    }
}
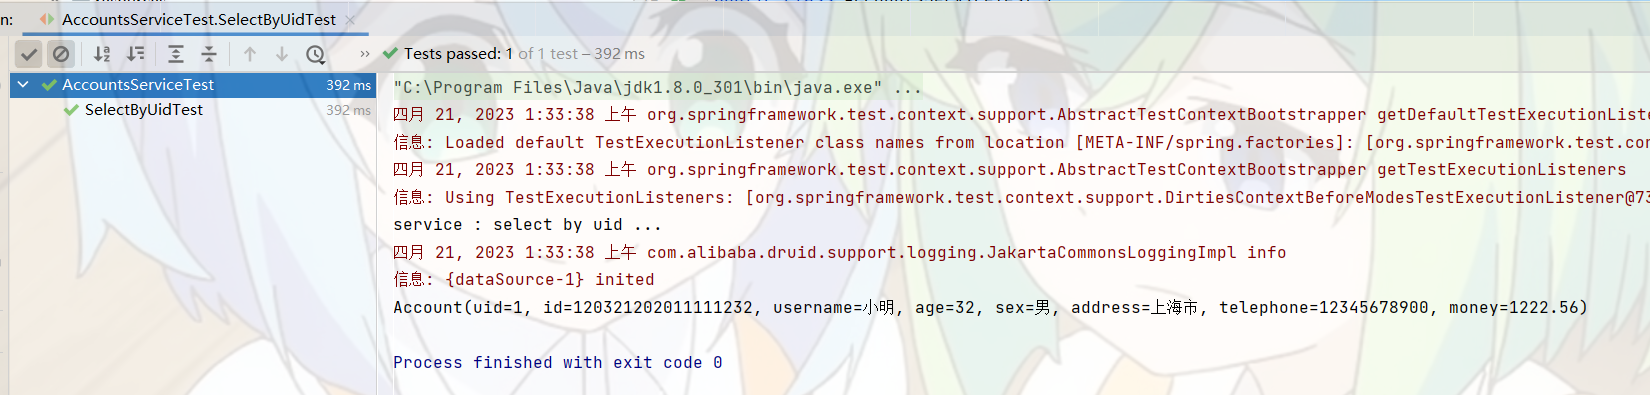
运行结果:
service : select by uid ...
四月 21, 2023 1:26:19 上午 com.alibaba.druid.support.logging.JakartaCommonsLoggingImpl info
信息: {dataSource-1} inited
Account(uid=1, id=120321202011111232, username=小明, age=32, sex=男, address=上海市, telephone=12345678900, money=1222.56)

Process finished with exit code 0
2.4整合junit完成单元测试
我们直接使用一个测试类运行main方法,其实会运行全部项目模块,其实没有必要,在实际开发中常常使用单元测试进行测试,最出名的单元测试就是junit,下面我们来进行整合。
第一步,导入相关依赖
        <!-- 整合junit -->
        <!-- https://mvnrepository.com/artifact/junit/junit -->
        <dependency>
            <groupId>junit</groupId>
            <artifactId>junit</artifactId>
            <version>4.13.2</version>
            <scope>test</scope>
        </dependency>
        <!-- spring test环境-->
        <dependency>
            <groupId>org.springframework</groupId>
            <artifactId>spring-test</artifactId>
            <version>5.2.10.RELEASE</version>
        </dependency>
第二步,在test目录下的java文件夹中创建测试类
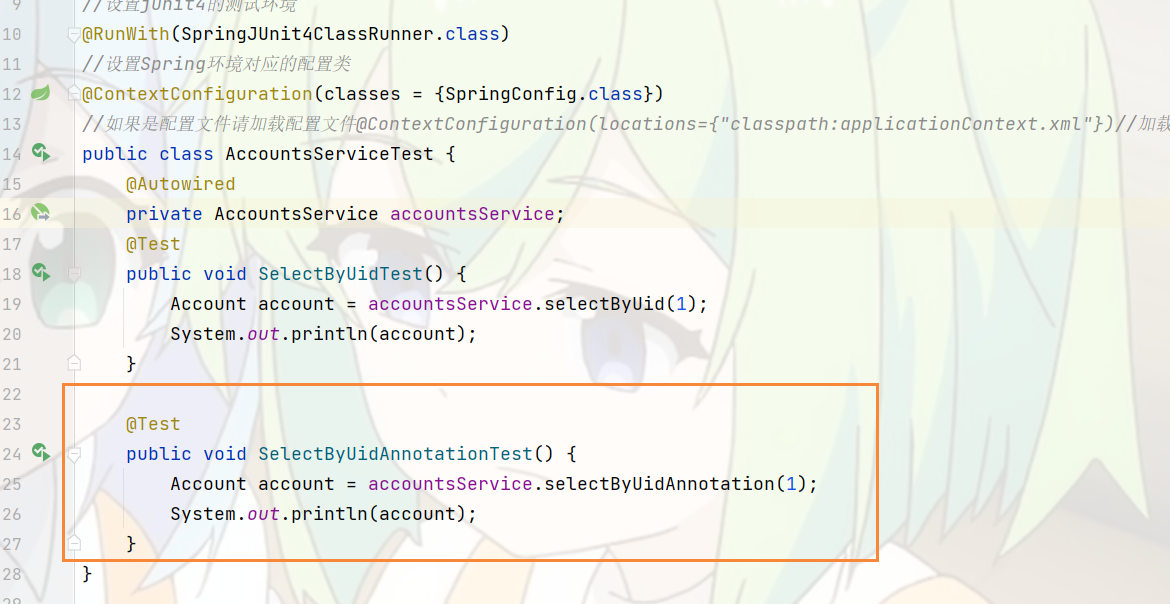
现在我们要测试我们刚才的查询操作是否正确,我们可以创建一个AccountsServiceTest类,要使用的话,需要一些配置:
第一,设置junit测试环境,加上以下注解
//设置junit4的测试环境
@RunWith(SpringJUnit4ClassRunner.class)
第二,设置Spring环境对应的配置类
@ContextConfiguration(classes = {SpringConfig.class})
如果是配置文件请加载配置文件
@ContextConfiguration(locations={"classpath:applicationContext.xml"})//加载配置文件
编写方法,加上@Test注解标记为单元测试方法,测试过程中,需要使用AccountsService对象,直接注入即可,具体测试代码如下:
//设置junit4的测试环境
@RunWith(SpringJUnit4ClassRunner.class)
//设置Spring环境对应的配置类
@ContextConfiguration(classes = {SpringConfig.class})
//如果是配置文件请加载配置文件@ContextConfiguration(locations={"classpath:applicationContext.xml"})//加载配置文件
public class AccountsServiceTest {
    @Autowired
    private AccountsService accountsService;
    @Test
    public void SelectByUidTest() {
        Account account = accountsService.selectByUid(1);
        System.out.println(account);
    }
}
运行结果:
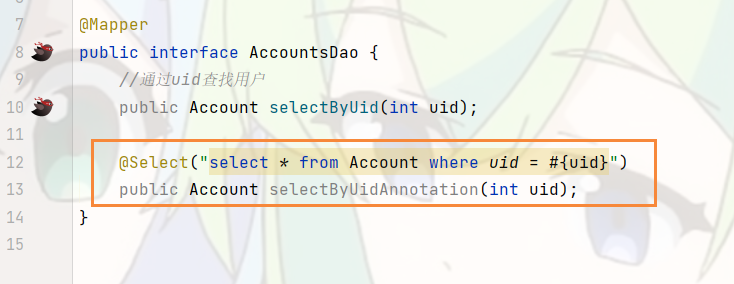
2.5基于注解完成SQL
这个其实很简单,使用配置文件我们需要创建配置文件,然后指定是那个文件,而使用注解加载SQL,直接在对应接口上面加上对应操作的注解,括号里面的属性填好SQL属性即可,注意要将配置的扫描的路径包含这个接口类的位置。
对应操作注解也就对应SQL的增删查改,分别为:
- @Select,查询
- @Update,更新/修改
- @Delete,删除
- @Insert,插入/新增
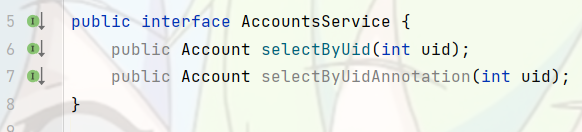
将上面基于配置文件的查询改为基于注解的代码为:
服务层实现代码:
单元测试:
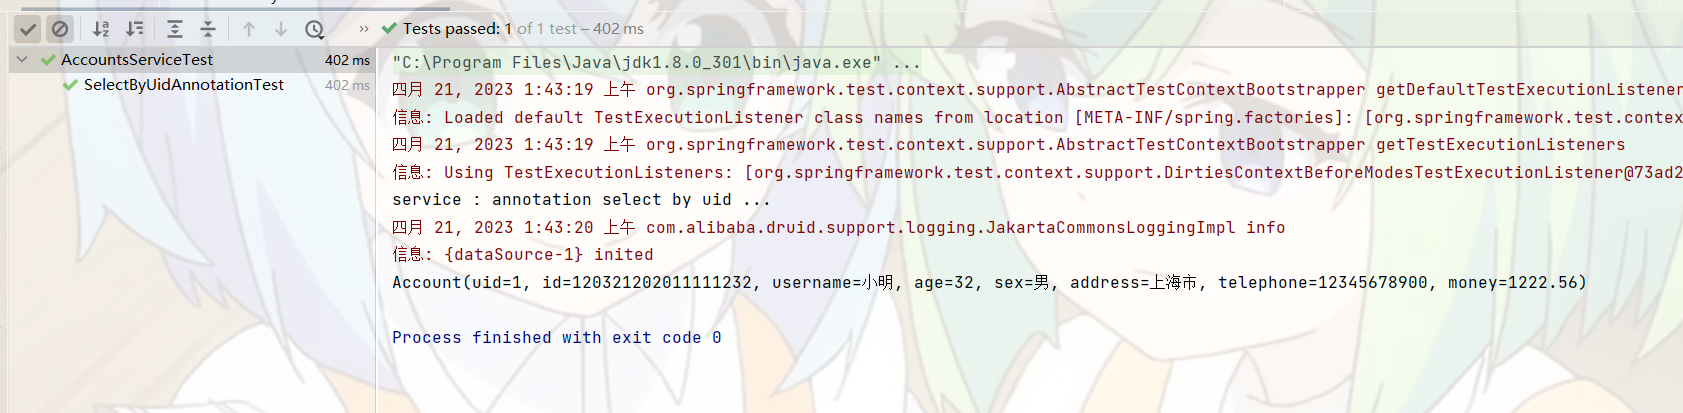
单元测试结果:
OK,没有任何问题,本文整合mybatis只使用了一个查询方法演示,其实其他操作是一模一样的,整合过程完全一样,唯一的区别就是要重新写SQL和测试类。


![[golang gin框架] 30.Gin 商城项目- 购物车商品确认页面以及收货地址的增删改查](https://img-blog.csdnimg.cn/img_convert/77656e947ab57644d73d04c5a373837f.png)