Packet Tracer - 使用 CLI 配置并验证站点间 IPsec VPN
地址分配表
| 设备 | 接口 | IP 地址 | 子网掩码 | 默认网关 | 交换机端口 |
| R1 | G0/0 | 192.168.1.1 | 255.255.255.0 | 不适用 | S1 F0/1 |
| S0/0/0 (DCE) | 10.1.1.2 | 255.255.255.252 | 不适用 | 不适用 | |
| R2 | G0/0 | 192.168.2.1 | 255.255.255.0 | 不适用 | S2 F0/2 |
| S0/0/0 | 10.1.1.1 | 255.255.255.252 | 不适用 | 不适用 | |
| S0/0/1 (DCE) | 10.2.2.1 | 255.255.255.252 | 不适用 | 不适用 | |
| R3 | G0/0 | 192.168.3.1 | 255.255.255.0 | 不适用 | S3 F0/5 |
| S0/0/1 | 10.2.2.2 | 255.255.255.252 | 不适用 | 不适用 | |
| PC-A | NIC | 192.168.1.3 | 255.255.255.0 | 192.168.1.1 | S1 F0/2 |
| PC-B | NIC | 192.168.2.3 | 255.255.255.0 | 192.168.2.1 | S2 F0/1 |
| PC-C | NIC | 192.168.3.3 | 255.255.255.0 | 192.168.3.1 | S3 F0/18 |
目标
· 检验整个网络中的连接。
· 配置 R1,以支持与 R3 的站点间 IPsec VPN。
拓扑图
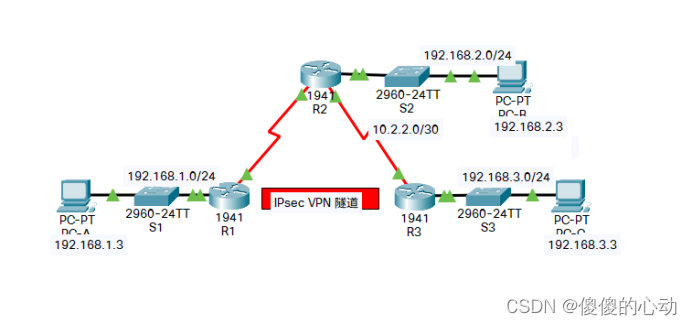
背景/ 场景
网络拓扑显示了三台路由器。您的任务是 配置 R1 和 R3,以便当流量在 其各自的 LAN 之间流动时支持站点间 IPsec VPN。IPsec VPN 隧道是从 R1 到 R2 通过 R3。R2 充当 透传设备,不了解 VPN 的任何信息。IPsec 可通过 互联网等未受保护的网络安全地 传输敏感信息。IPsec 在网络层起作用,保护并认证思科路由器等参与 IPsec 的设备(也称为对等设备)之间的 IP 数据包。
IPsec 第 1 阶段策略参数
| 参数 | R1 | R3 | |
| 密钥分配方法 | 手动或 ISAKMP | ISAKMP | ISAKMP |
| 加密算法 | DES、3DES 或 AES | AES 256 | AES 256 |
| 散列算法 | MD5 或 SHA-1 | SHA-1 | SHA-1 |
| 认证方法 | 预共享密钥或 RSA | 预共享 | 预共享 |
| 密钥交换 | DH 组 1、2 或 5 | DH 5 | DH 5 |
| IKE SA 寿命 | 86400 秒或更短 | 86400 | 86400 |
| ISAKMP 密钥 | vpnpa55 | vpnpa55 | |
注意:粗体参数为默认值。只有非粗体的 参数必须进行明确配置。
IPsec 第 2 阶段的策略参数
| 参数 | R1 | R3 |
| 转换集名称 | VPN-SET | VPN-SET |
| ESP 转换加密 | esp-aes | esp-aes |
| ESP 转换认证 | esp-sha-hmac | esp-sha-hmac |
| 对等 IP 地址 | 10.2.2.2 | 10.1.1.2 |
| 要加密的流量 | 访问列表 110(源地址:192.168.1.0,目的地址:192.168.3.0) | 访问列表 110(源地址:192.168.3.0,目的地址:192.168.1.0) |
| 加密映射名称 | VPN-MAP | VPN-MAP |
| SA 创建 | ipsec-isakmp | ipsec-isakmp |
路由器已采用以下信息进行预配置:
· 控制台线路密码:ciscoconpa55
· vty 线路密码:ciscovtypa55
· 启用密码:ciscoenpa55
· SSH 用户名和密码:SSHadmin/ciscosshpa55
· OSPF 101
第 1 部分:在 R1 上配置 IPSec 参数
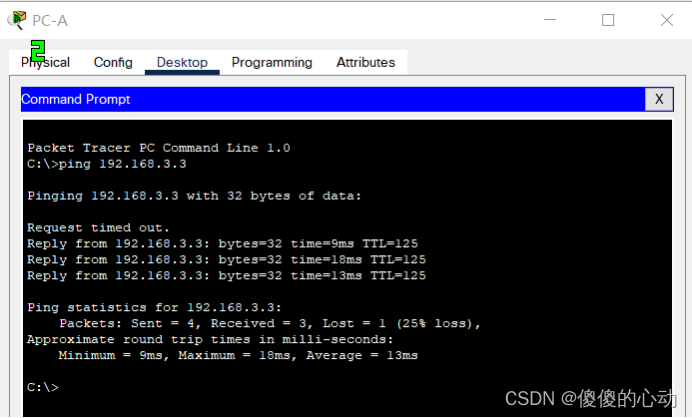
步骤 1:测试 连接。
从 PC-A 对 PC-C 执行 ping 操作。
步骤 2:启用 安全技术包。
- 在 R1 上,发出 show version 命令以查看安全技术 包许可证信息。
R1#show version
Cisco IOS Software, C1900 Software (C1900-UNIVERSALK9-M), Version 15.1(4)M4, RELEASE SOFTWARE (fc2)
Technical Support: http://www.cisco.com/techsupport
Copyright (c) 1986-2007 by Cisco Systems, Inc.
Compiled Wed 23-Feb-11 14:19 by pt_team
ROM: System Bootstrap, Version 15.1(4)M4, RELEASE SOFTWARE (fc1)
cisco1941 uptime is 7 minutes, 53 seconds
System returned to ROM by power-on
System image file is "flash0:c1900-universalk9-mz.SPA.151-1.M4.bin"
Last reload type: Normal Reload
This product contains cryptographic features and is subject to United
States and local country laws governing import, export, transfer and
use. Delivery of Cisco cryptographic products does not imply
third-party authority to import, export, distribute or use encryption.
Importers, exporters, distributors and users are responsible for
compliance with U.S. and local country laws. By using this product you
agree to comply with applicable laws and regulations. If you are unable
to comply with U.S. and local laws, return this product immediately.
A summary of U.S. laws governing Cisco cryptographic products may be found at:
http://www.cisco.com/wwl/export/crypto/tool/stqrg.html
If you require further assistance please contact us by sending email to
export@cisco.com.
Cisco CISCO1941/K9 (revision 1.0) with 491520K/32768K bytes of memory.
Processor board ID FTX152400KS
2 Gigabit Ethernet interfaces
2 Low-speed serial(sync/async) network interface(s)
DRAM configuration is 64 bits wide with parity disabled.
255K bytes of non-volatile configuration memory.
249856K bytes of ATA System CompactFlash 0 (Read/Write)
License Info:
License UDI:
-------------------------------------------------
Device# PID SN
-------------------------------------------------
*0 CISCO1941/K9 FTX1524F8G8
Technology Package License Information for Module:'c1900'
----------------------------------------------------------------
Technology Technology-package Technology-package
Current Type Next reboot
-----------------------------------------------------------------
ipbase ipbasek9 Permanent ipbasek9
security disable None None
data disable None None
Configuration register is 0x2102
R1#
b. 如果安全技术包尚未启用,请使用 以下命令启用技术包。
R1(config)#license boot module c1900 technology-package securityk9
- 接受最终用户许可协议。
PLEASE READ THE FOLLOWING TERMS CAREFULLY. INSTALLING THE LICENSE OR
LICENSE KEY PROVIDED FOR ANY CISCO PRODUCT FEATURE OR USING SUCH
PRODUCT FEATURE CONSTITUTES YOUR FULL ACCEPTANCE OF THE FOLLOWING
TERMS. YOU MUST NOT PROCEED FURTHER IF YOU ARE NOT WILLING TO BE BOUND
BY ALL THE TERMS SET FORTH HEREIN.
Use of this product feature requires an additional license from Cisco,
together with an additional payment. You may use this product feature
on an evaluation basis, without payment to Cisco, for 60 days. Your use
of the product, including during the 60 day evaluation period, is
subject to the Cisco end user license agreement
http://www.cisco.com/en/US/docs/general/warranty/English/EU1KEN_.html
If you use the product feature beyond the 60 day evaluation period, you
must submit the appropriate payment to Cisco for the license. After the
60 day evaluation period, your use of the product feature will be
governed solely by the Cisco end user license agreement (link above),
together with any supplements relating to such product feature. The
above applies even if the evaluation license is not automatically
terminated and you do not receive any notice of the expiration of the
evaluation period. It is your responsibility to determine when the
evaluation period is complete and you are required to make payment to
Cisco for your use of the product feature beyond the evaluation period.
Your acceptance of this agreement for the software features on one
product shall be deemed your acceptance with respect to all such
software on all Cisco products you purchase which includes the same
software. (The foregoing notwithstanding, you must purchase a license
for each software feature you use past the 60 days evaluation period,
so that if you enable a software feature on 1000 devices, you must
purchase 1000 licenses for use past the 60 day evaluation period.)
Activation of the software command line interface will be evidence of
your acceptance of this agreement.
ACCEPT? [yes/no]: yes
% use 'write' command to make license boot config take effect on next boot
R1(config)#: %IOS_LICENSE_IMAGE_APPLICATION-6-LICENSE_LEVEL: Module name = C1900 Next reboot level = securityk9 and License = securityk9
- 保存运行配置并重新加载该路由器以启用安全 许可证。
R1(config)#end
R1#
%SYS-5-CONFIG_I: Configured from console by console
R1#write
Building configuration...
[OK]
R1#reload
- 使用 show version 命令验证是否启用了安全技术包。
R1#show version
Cisco IOS Software, C1900 Software (C1900-UNIVERSALK9-M), Version 15.1(4)M4, RELEASE SOFTWARE (fc2)
Technical Support: http://www.cisco.com/techsupport
Copyright (c) 1986-2007 by Cisco Systems, Inc.
Compiled Wed 23-Feb-11 14:19 by pt_team
ROM: System Bootstrap, Version 15.1(4)M4, RELEASE SOFTWARE (fc1)
cisco1941 uptime is 1 minutes, 13 seconds
System returned to ROM by power-on
System image file is "flash0:c1900-universalk9-mz.SPA.151-1.M4.bin"
Last reload type: Normal Reload
This product contains cryptographic features and is subject to United
States and local country laws governing import, export, transfer and
use. Delivery of Cisco cryptographic products does not imply
third-party authority to import, export, distribute or use encryption.
Importers, exporters, distributors and users are responsible for
compliance with U.S. and local country laws. By using this product you
agree to comply with applicable laws and regulations. If you are unable
to comply with U.S. and local laws, return this product immediately.
A summary of U.S. laws governing Cisco cryptographic products may be found at:
http://www.cisco.com/wwl/export/crypto/tool/stqrg.html
If you require further assistance please contact us by sending email to
export@cisco.com.
Cisco CISCO1941/K9 (revision 1.0) with 491520K/32768K bytes of memory.
Processor board ID FTX152400KS
2 Gigabit Ethernet interfaces
2 Low-speed serial(sync/async) network interface(s)
DRAM configuration is 64 bits wide with parity disabled.
255K bytes of non-volatile configuration memory.
249856K bytes of ATA System CompactFlash 0 (Read/Write)
License Info:
License UDI:
-------------------------------------------------
Device# PID SN
-------------------------------------------------
*0 CISCO1941/K9 FTX1524F8G8
Technology Package License Information for Module:'c1900'
----------------------------------------------------------------
Technology Technology-package Technology-package
Current Type Next reboot
-----------------------------------------------------------------
ipbase ipbasek9 Permanent ipbasek9
security securityk9 Evaluation securityk9
data disable None None
Configuration register is 0x2102
R1#
步骤 3:确定 R1 上的 需要关注的流量。
配置 ACL 110 以确定从 R1 上 LAN 到 R3 上 LAN 的流量为需要关注的流量。 当 R1 与 R3 的 LAN 之间有流量通过时,该需要关注的流量将触发 IPsec VPN 的实施。 所有其他来自 LAN 的流量都不会被加密。由于 暗含 deny all,因此无需配置 deny ip any any 语句。
R1(config)#access-list 110 permit ip 192.168.1.0 0.0.0.255 192.168.3.0 0.0.0.255
步骤 4:在 R1 上配置 IKE 第 1 阶段 ISAKMP 策略。
在 R1 上配置 crypto ISAKMP policy 10 属性以及共享加密密钥 vpnpa55。有关要配置的具体参数,请参考 ISAKMP 第 1 阶段表。默认值 无需配置。因此,只需要配置加密方法、密钥 交换方法和 DH 方法。
注意:目前 Packet Tracer 支持的最高的 DH 组是组 5。在生产网络中,您将配置至少 DH 14。
R1(config)#crypto isakmp policy 10
R1(config-isakmp)#encryption aes 256
R1(config-isakmp)#authentication pre-share
R1(config-isakmp)#group 5
R1(config-isakmp)#exit
R1(config)#crypto isakmp key vpnpa55 address 10.2.2.2
步骤 5:在 R1 上配置 IKE 第 2 阶段 IPSec 策略。
a. 创建转换集VPN-SET 以使用 esp-aes 和 esp-sha-hmac。
R1(config)#crypto ipsec transform-set VPN-SET esp-aes esp-sha-hmac
b. 创建将所有第 2 阶段参数 捆绑在一起的加密映射 VPN-MAP 使用序号 10 并将其确定为 ipsec-isakmp 映射。
R1(config)#crypto map VPN-MAP 10 ipsec-isakmp
R1(config-crypto-map)#description VPN connection to R3
R1(config-crypto-map)#set peer 10.2.2.2
R1(config-crypto-map)#set transform-set VPN-SET
R1(config-crypto-map)#match address 110
R1(config-crypto-map)#exit
步骤 6:在传出接口上配置 加密映射。
将 VPN-MAP 加密映射绑定到传出串行接口 0/0/0。
R1(config)#interface s0/0/0
R1(config-if)#crypto map VPN-MAP
第 2 部分:在 R3 上配置 IPSec 参数
步骤 1:启用 安全技术包。
a. 在 R3 上,发出 show version 命令以查看安全 技术包许可证信息是否已启用。
b. 如果安全技术包尚未启用,请启用 技术包并重新加载 R3。
步骤 2:配置路由器 R3 以支持与 R1 的站点间 VPN。
在 R3 上配置往复式参数。配置ACL 110 以确定从 R3 上 LAN 到 R1 上 LAN 的流量为需要关注的流量。
R3(config)#access-list 110 permit ip 192.168.3.0 0.0.0.255 192.168.1.0 0.0.0.255
步骤 3:在 R3 上配置 IKE 第 1 阶段 ISAKMP 属性。
在 R3 上配置 ccrypto ISAKMP policy 10 属性 以及共享加密密钥 vpnpa55。
R3(config)#crypto isakmp policy 10
R3(config-isakmp)#encryption aes 256
R3(config-isakmp)#authentication pre-share
R3(config-isakmp)#group 5
R3(config-isakmp)#exit
R3(config)#crypto isakmp key vpnpa55 address 10.1.1.2
步骤 4:在 R3 上配置 IKE 第 2 阶段 IPSec 策略。
a. 创建转换集VPN-SET 以使用 esp-aes 和 esp-sha-hmac。
R3(config)#crypto ipsec transform-set VPN-SET esp-aes esp-sha-hmac
b. 创建将所有第 2 阶段参数 捆绑在一起的加密映射 VPN-MAP 使用序号 10 并将其确定为 ipsec-isakmp 映射。
R3(config)#crypto map VPN-MAP 10 ipsec-isakmp
R3(config-crypto-map)#description VPN connection to R1
R3(config-crypto-map)#set peer 10.1.1.2
R3(config-crypto-map)#set transform-set VPN-SET
R3(config-crypto-map)#match address 110
R3(config-crypto-map)# exit
步骤 5:在传出接口上配置 加密映射。
将 VPN-MAP 加密映射绑定到传出串行接口 0/0/1。注意:此操作不予评分。
R3(config)#interface s0/0/1
R3(config-if)#crypto map VPN-MAP
第 3 部分:验证 IPsec VPN
步骤 1:检验 需要关注的流量之前的隧道。
在 R1 上发出 show crypto ipsec sa 命令。 请注意,将封装、加密、解封和 解密的数据包数量都设置为 0。
R1#show crypto ipsec sa
interface: Serial0/0/0
Crypto map tag: VPN-MAP, local addr 10.1.1.2
protected vrf: (none)
local ident (addr/mask/prot/port): (192.168.1.0/255.255.255.0/0/0)
remote ident (addr/mask/prot/port): (192.168.3.0/255.255.255.0/0/0)
current_peer 10.2.2.2 port 500
PERMIT, flags={origin_is_acl,}
#pkts encaps: 0, #pkts encrypt: 0, #pkts digest: 0
#pkts decaps: 0, #pkts decrypt: 0, #pkts verify: 0
#pkts compressed: 0, #pkts decompressed: 0
#pkts not compressed: 0, #pkts compr. failed: 0
#pkts not decompressed: 0, #pkts decompress failed: 0
#send errors 0, #recv errors 0
local crypto endpt.: 10.1.1.2, remote crypto endpt.:10.2.2.2
path mtu 1500, ip mtu 1500, ip mtu idb Serial0/0/0
current outbound spi: 0x0(0)
inbound esp sas:
inbound ah sas:
inbound pcp sas:
outbound esp sas:
outbound ah sas:
outbound pcp sas:
R1#
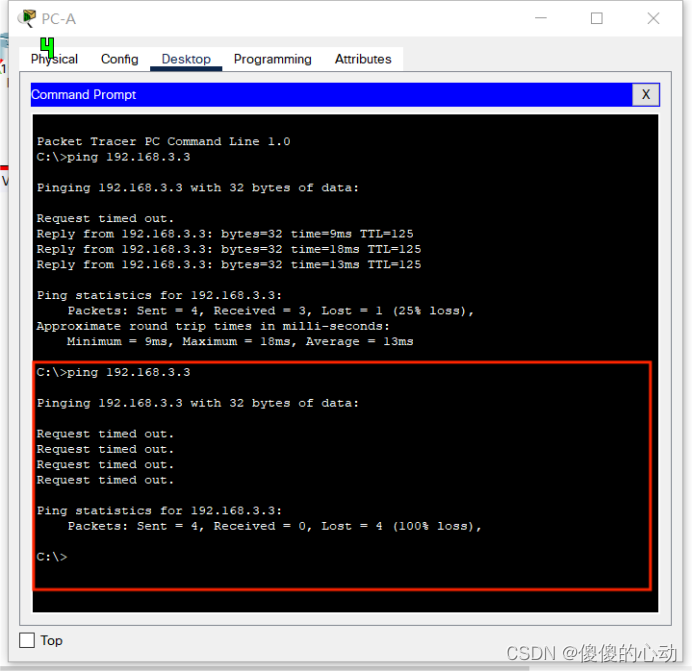
步骤 2:创建 需要关注的流量。
从 PC-A 对 PC-C 执行 ping 操作。
步骤 3:检验需要关注的流量之后的隧道。
在 R1 上,再次发出 show crypto ipsec sa 命令。请注意, 数据包数量大于 0,表明 IPsec VPN 隧道正在运行。
R1#show crypto ipsec sa
interface: Serial0/0/0
Crypto map tag: VPN-MAP, local addr 10.1.1.2
protected vrf: (none)
local ident (addr/mask/prot/port): (192.168.1.0/255.255.255.0/0/0)
remote ident (addr/mask/prot/port): (192.168.3.0/255.255.255.0/0/0)
current_peer 10.2.2.2 port 500
PERMIT, flags={origin_is_acl,}
#pkts encaps: 0, #pkts encrypt: 0, #pkts digest: 0
#pkts decaps: 0, #pkts decrypt: 0, #pkts verify: 0
#pkts compressed: 0, #pkts decompressed: 0
#pkts not compressed: 0, #pkts compr. failed: 0
#pkts not decompressed: 0, #pkts decompress failed: 0
#send errors 0, #recv errors 0
local crypto endpt.: 10.1.1.2, remote crypto endpt.:10.2.2.2
path mtu 1500, ip mtu 1500, ip mtu idb Serial0/0/0
current outbound spi: 0x0(0)
inbound esp sas:
inbound ah sas:
inbound pcp sas:
outbound esp sas:
outbound ah sas:
outbound pcp sas:
R1#
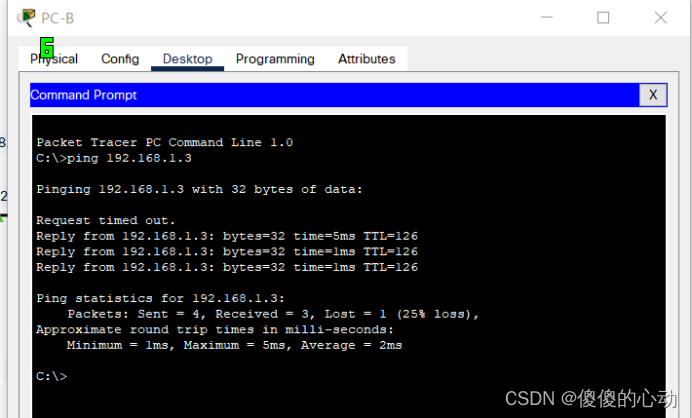
步骤 4:创建 不需要关注的流量。
从 PC-B ping 通 PC-A。注意:从 路由器 R1 向 PC-C 或从 R3 向 PC-A 发出的 ping 请求不属于需要关注的流量。
步骤 5:检验 隧道。
在 R1 上,再次发出 show crypto ipsec sa 命令。请注意, 数据包的数量尚未更改,表示没有加密不需要关注的 流量。
R1#show crypto ipsec sa
interface: Serial0/0/0
Crypto map tag: VPN-MAP, local addr 10.1.1.2
protected vrf: (none)
local ident (addr/mask/prot/port): (192.168.1.0/255.255.255.0/0/0)
remote ident (addr/mask/prot/port): (192.168.3.0/255.255.255.0/0/0)
current_peer 10.2.2.2 port 500
PERMIT, flags={origin_is_acl,}
#pkts encaps: 0, #pkts encrypt: 0, #pkts digest: 0
#pkts decaps: 0, #pkts decrypt: 0, #pkts verify: 0
#pkts compressed: 0, #pkts decompressed: 0
#pkts not compressed: 0, #pkts compr. failed: 0
#pkts not decompressed: 0, #pkts decompress failed: 0
#send errors 0, #recv errors 0
local crypto endpt.: 10.1.1.2, remote crypto endpt.:10.2.2.2
path mtu 1500, ip mtu 1500, ip mtu idb Serial0/0/0
current outbound spi: 0x0(0)
inbound esp sas:
inbound ah sas:
inbound pcp sas:
outbound esp sas:
outbound ah sas:
outbound pcp sas:
R1#
步骤 6:检查 结果。
完成比例应为 100%。点击 Check Results(检查结果)以查看反馈并验证已 完成的所需组件。
实验具体步骤:
R1:
R1>en

Password:ciscoenpa55

R1#conf t

Enter configuration commands, one per line. End with CNTL/Z.

R1(config)#access-list 110 permit ip 192.168.1.0 0.0.0.255 192.168.3.0 0.0.0.255

R1(config)#crypto isakmp policy 10

R1(config-isakmp)#encryption aes 256

R1(config-isakmp)#authentication pre-share

R1(config-isakmp)#group 5

R1(config-isakmp)#exit

R1(config)#crypto isakmp key vpnpa55 address 10.2.2.2

R1(config)#crypto ipsec transform-set VPN-SET esp-aes esp-sha-hmac

R1(config)#crypto map VPN-MAP 10 ipsec-isakmp

% NOTE: This new crypto map will remain disabled until a peer

and a valid access list have been configured.

R1(config-crypto-map)#description VPN connection to R3

R1(config-crypto-map)#set peer 10.2.2.2

R1(config-crypto-map)#set transform-set VPN-SET

R1(config-crypto-map)#match address 110

R1(config-crypto-map)#exit

R1(config)#interface s0/0/0

R1(config-if)#crypto map VPN-MAP

*Jan 3 07:16:26.785: %CRYPTO-6-ISAKMP_ON_OFF: ISAKMP is ON

R1(config-if)#end

R1#

%SYS-5-CONFIG_I: Configured from console by console


R1#wr

R1#write

Building configuration...

[OK]

R1#
R2:
R3>en

Password: ciscoenpa55

R3#conf t

Enter configuration commands, one per line. End with CNTL/Z.

R3(config)#access-list 110 permit ip 192.168.3.0 0.0.0.255 192.168.1.0 0.0.0.255

R3(config)#crypto isakmp policy 10

R3(config-isakmp)#encryption aes 256

R3(config-isakmp)#authentication pre-share

R3(config-isakmp)#group 5

R3(config-isakmp)#exit

R3(config)#crypto isakmp key vpnpa55 address 10.1.1.2

R3(config)#crypto ipsec transform-set VPN-SET esp-aes esp-sha-hmac

R3(config)#crypto map VPN-MAP 10 ipsec-isakmp

% NOTE: This new crypto map will remain disabled until a peer

and a valid access list have been configured.

R3(config-crypto-map)#description VPN connection to R1

R3(config-crypto-map)#set peer 10.1.1.2

R3(config-crypto-map)#set transform-set VPN-SET

R3(config-crypto-map)#match address 110

R3(config-crypto-map)# exit

R3(config)#interface s0/0/1

R3(config-if)#crypto map VPN-MAP

*Jan 3 07:16:26.785: %CRYPTO-6-ISAKMP_ON_OFF: ISAKMP is ON

R3(config-if)#end

R3#write

Building configuration...

[OK]

R3#
实验链接:https://pan.baidu.com/s/1oyfbcF6x-MBTWnecLtVOKw?pwd=8412
提取码:8412
--来自百度网盘超级会员V2的分享


