目录
1、搭建一个测试场景
2、建立画布设置移动按钮
3、编写脚本绑定按钮
AxisTouchButton :
ButtonHandler :
4、编写脚本绑定角色
原来的按键移动
修改为触摸按钮
5、导出为APK文件,手机下载进行测试
1、搭建一个测试场景
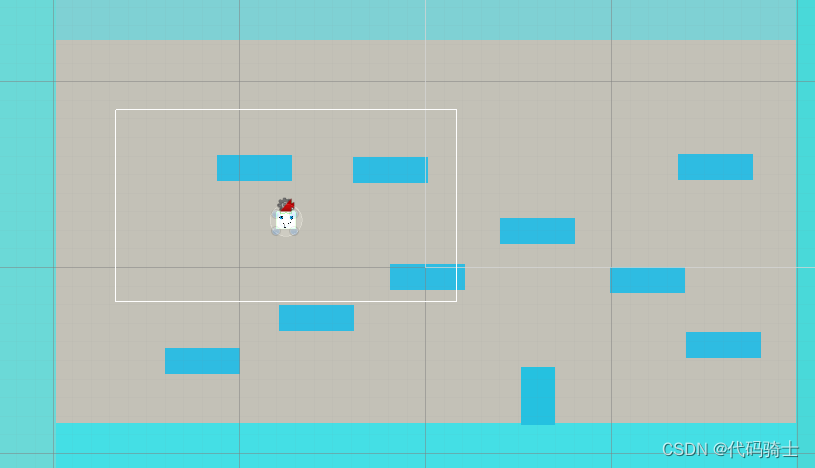
2、建立画布设置移动按钮
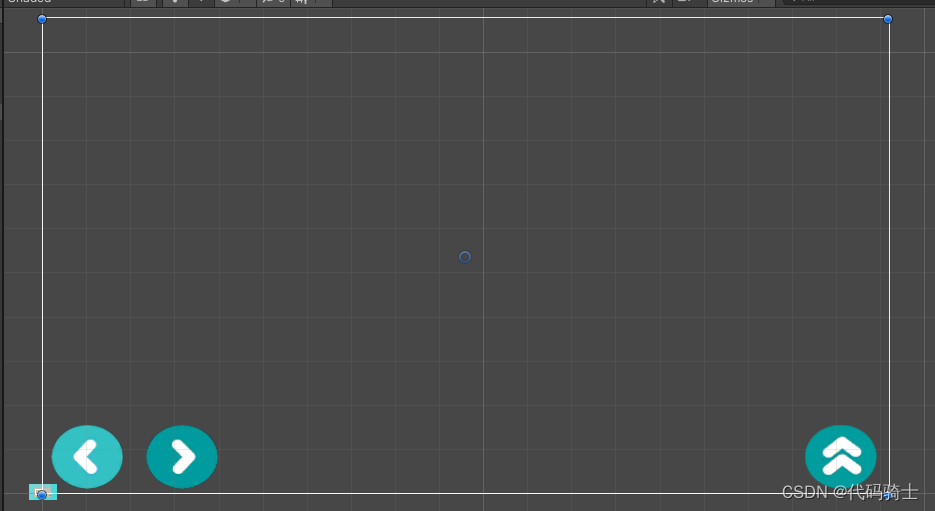
3、编写脚本绑定按钮
脚本资源来自:

因为资源已经弃用了,资源商店搜是搜不到的。但是我之前下载过,所以有些还能用。
本次学习只需要以下代码即可:
左右移动按钮挂载同一个脚本:
AxisTouchButton :
using System;
using UnityEngine;
using UnityEngine.EventSystems;

namespace UnityStandardAssets.CrossPlatformInput
{
	public class AxisTouchButton : MonoBehaviour, IPointerDownHandler, IPointerUpHandler
	{
		// designed to work in a pair with another axis touch button
		// (typically with one having -1 and one having 1 axisValues)
		public string axisName = "Horizontal"; // The name of the axis
		public float axisValue = 1; // The axis that the value has
		public float responseSpeed = 3; // The speed at which the axis touch button responds
		public float returnToCentreSpeed = 3; // The speed at which the button will return to its centre

		AxisTouchButton m_PairedWith; // Which button this one is paired with
		CrossPlatformInputManager.VirtualAxis m_Axis; // A reference to the virtual axis as it is in the cross platform input

		void OnEnable()
		{
			if (!CrossPlatformInputManager.AxisExists(axisName))
			{
				// if the axis doesnt exist create a new one in cross platform input
				m_Axis = new CrossPlatformInputManager.VirtualAxis(axisName);
				CrossPlatformInputManager.RegisterVirtualAxis(m_Axis);
			}
			else
			{
				m_Axis = CrossPlatformInputManager.VirtualAxisReference(axisName);
			}
			FindPairedButton();
		}

		void FindPairedButton()
		{
			// find the other button witch which this button should be paired
			// (it should have the same axisName)
			var otherAxisButtons = FindObjectsOfType(typeof(AxisTouchButton)) as AxisTouchButton[];

			if (otherAxisButtons != null)
			{
				for (int i = 0; i < otherAxisButtons.Length; i++)
				{
					if (otherAxisButtons[i].axisName == axisName && otherAxisButtons[i] != this)
					{
						m_PairedWith = otherAxisButtons[i];
					}
				}
			}
		}

		void OnDisable()
		{
			// The object is disabled so remove it from the cross platform input system
			m_Axis.Remove();
		}


		public void OnPointerDown(PointerEventData data)
		{
			if (m_PairedWith == null)
			{
				FindPairedButton();
			}
			// update the axis and record that the button has been pressed this frame
			m_Axis.Update(Mathf.MoveTowards(m_Axis.GetValue, axisValue, responseSpeed * Time.deltaTime));
		}


		public void OnPointerUp(PointerEventData data)
		{
			m_Axis.Update(Mathf.MoveTowards(m_Axis.GetValue, 0, responseSpeed * Time.deltaTime));
		}
	}
}
左边设置

右边设置

跳跃按钮挂载这个脚本:
ButtonHandler :
using System;
using UnityEngine;

namespace UnityStandardAssets.CrossPlatformInput
{
    public class ButtonHandler : MonoBehaviour
    {

        public string Name;

        void OnEnable()
        {

        }

        public void SetDownState()
        {
            CrossPlatformInputManager.SetButtonDown(Name);
        }


        public void SetUpState()
        {
            CrossPlatformInputManager.SetButtonUp(Name);
        }


        public void SetAxisPositiveState()
        {
            CrossPlatformInputManager.SetAxisPositive(Name);
        }


        public void SetAxisNeutralState()
        {
            CrossPlatformInputManager.SetAxisZero(Name);
        }


        public void SetAxisNegativeState()
        {
            CrossPlatformInputManager.SetAxisNegative(Name);
        }

        public void Update()
        {

        }
    }
}
跳跃脚本设置

4、编写脚本绑定角色
原来的按键移动
using System.Collections;
using System.Collections.Generic;
using System.Collections.Specialized;
using UnityEngine;

public class Char : MonoBehaviour
{
    private Rigidbody2D rb;
    private float moveSpeed;
    private float dirX;
    private bool facingRight = true;
    private Vector3 localScale;

    private void Start()
    {
        rb = GetComponent<Rigidbody2D>();
        localScale = transform.localScale;
        moveSpeed = 5f;
    }

    private void Update()
    {
        dirX = Input.GetAxisRaw("Horizontal") * moveSpeed;

        if (Input.GetButtonDown("Jump") && rb.velocity.y == 0)
            rb.AddForce(Vector2.up * 700f);
    }

    private void FixedUpdate()
    {
        rb.velocity = new Vector2(dirX, rb.velocity.y);
    }

    private void LateUpdate()
    {
        if (dirX > 0)
            facingRight = true;
        else if (dirX < 0)
            facingRight = false;

        if (((facingRight) && (localScale.x < 0)) || ((!facingRight) && (localScale.x > 0)))
            localScale.x *= -1;
        transform.localScale = localScale;
    }
}
修改为触摸按钮
using System.Collections;
using System.Collections.Generic;
using System.Collections.Specialized;
using UnityEngine;
using UnityStandardAssets.CrossPlatformInput;

public class Character : MonoBehaviour
{
    private Rigidbody2D rb;
    private float moveSpeed;
    private Animator anim;
    private float dirX;
    private bool facingRight = true;
    private Vector3 localScale;

    private void Start()
    {
        rb = GetComponent<Rigidbody2D>();
        anim = GetComponent<Animator>();
        localScale = transform.localScale;
        moveSpeed = 15f;
    }

    private void Update()
    {
        dirX = CrossPlatformInputManager.GetAxisRaw("Horizontal") * moveSpeed;

        if (CrossPlatformInputManager.GetButton("Jump"))
        {
            // if ( && rb.velocity.y == 0)
            rb.AddForce(Vector2.up * 5f);
            anim.SetBool("isjump", true);
        }

        if (rb.velocity.y == 0)
            anim.SetBool("isjump", false);
    }

    private void FixedUpdate()
    {
        rb.velocity = new Vector2(dirX, rb.velocity.y);
    }

    private void LateUpdate()
    {
        if (dirX > 0)
            facingRight = true;
        else if (dirX < 0)
            facingRight = false;

        if (((facingRight) && (localScale.x < 0)) || ((!facingRight) && (localScale.x > 0)))
            localScale.x *= -1;
        transform.localScale = localScale;
    }
}
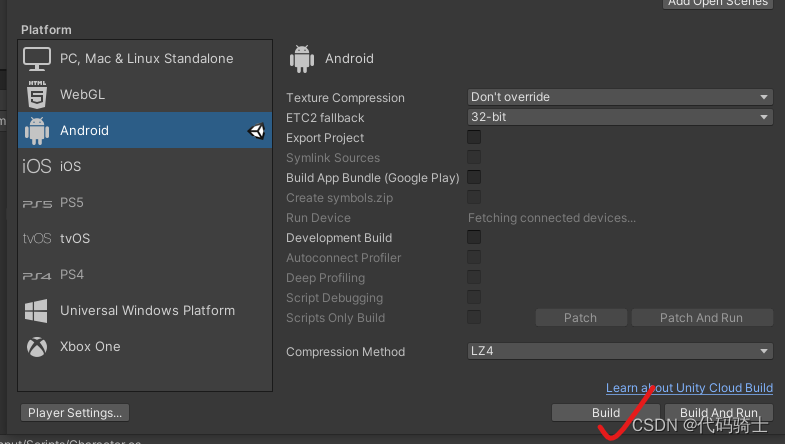
5、导出为APK文件,手机下载进行测试





![[附源码]Python计算机毕业设计Django工程施工多层级管理架构](https://img-blog.csdnimg.cn/b8383b4394bb46d78e62464324d1764a.png)
