
文章目录
- 1、前言
- 2、leds_init分析
- 2.1 相关数据结构
- 2.1.1 class
- 2.2 实现流程
- 3、leds_class_dev_pm_ops分析
- 3.1 相关数据结构
- 3.1.1 dev_pm_ops
- 3.2 相关实现
- 4、led_groups分析
- 4.1 相关数据结构
- 4.1.1 attribute_group
- 4.1.2 attribute
- 4.2 相关实现
- 4.3 扩展
- 4.3.1 DEVICE_ATTR_RW分析
- 5、led class的注册注销分析
- 5.1 相关实现
- 5.1.1 devm_of_led_classdev_register
- 5.1.2 of_led_classdev_register
- 5.1.3 led_classdev_next_name
- 6、总结
1、前言
上篇文章我们了解了子系统的硬件驱动层,下面我们来分析驱动框架中核心层的实现以及作用。
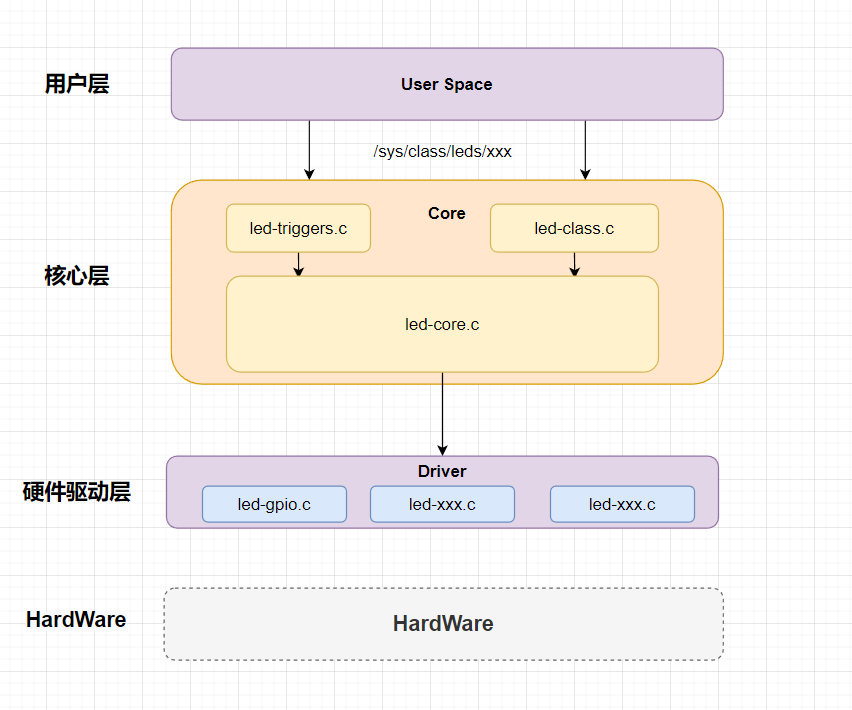
在LED子系统框架中,核心层包括几个部分:核心层的实现部分(led-core.c)、sysfs文件节点创建(led-class.c)、触发功能实现(led-triggers.c、driver/leds/triggers/led-xxx.c)
其中,触发功能部分较为独立,我们暂且先不去分析。
我们先从led-class.c文件开始分析
2、leds_init分析
该函数其主要是为了创建
LED设备文件节点,方便用户通过节点直接访问。
该文件,我们直接拉下底部,我们直接看入口函数:leds_init
2.1 相关数据结构
2.1.1 class
/**
 * struct class - device classes
 * @name:	Name of the class.
 * @owner:	The module owner.
 * @class_groups: Default attributes of this class.
 * @dev_groups:	Default attributes of the devices that belong to the class.
 * @dev_kobj:	The kobject that represents this class and links it into the hierarchy.
 * @dev_uevent:	Called when a device is added, removed from this class, or a
 *		few other things that generate uevents to add the environment
 *		variables.
 * @devnode:	Callback to provide the devtmpfs.
 * @class_release: Called to release this class.
 * @dev_release: Called to release the device.
 * @shutdown_pre: Called at shut-down time before driver shutdown.
 * @ns_type:	Callbacks so sysfs can detemine namespaces.
 * @namespace:	Namespace of the device belongs to this class.
 * @get_ownership: Allows class to specify uid/gid of the sysfs directories
 *		for the devices belonging to the class. Usually tied to
 *		device's namespace.
 * @pm:		The default device power management operations of this class.
 * @p:		The private data of the driver core, no one other than the
 *		driver core can touch this.
 *
 * A class is a higher-level view of a device that abstracts out low-level
 * implementation details. Drivers may see a SCSI disk or an ATA disk, but,
 * at the class level, they are all simply disks. Classes allow user space
 * to work with devices based on what they do, rather than how they are
 * connected or how they work.
 */
struct class {
    const char		*name;
    struct module		*owner;

    const struct attribute_group	**class_groups;
    const struct attribute_group	**dev_groups;
    struct kobject			*dev_kobj;

    int (*dev_uevent)(struct device *dev, struct kobj_uevent_env *env);
    char *(*devnode)(struct device *dev, umode_t *mode);

    void (*class_release)(struct class *class);
    void (*dev_release)(struct device *dev);

    int (*shutdown_pre)(struct device *dev);

    const struct kobj_ns_type_operations *ns_type;
    const void *(*namespace)(struct device *dev);

    void (*get_ownership)(struct device *dev, kuid_t *uid, kgid_t *gid);

    const struct dev_pm_ops *pm;

    struct subsys_private *p;
};
结构体名称:class
文件位置:include/linux/device.h
主要作用:设备类,表示某一类设备,在此是为了创建led设备类,源代码为:static struct class *leds_class;
2.2 实现流程
static int __init leds_init(void)
{
    leds_class = class_create(THIS_MODULE, "leds");			//	创建leds文件节点
    if (IS_ERR(leds_class))
        return PTR_ERR(leds_class);
    leds_class->pm = &leds_class_dev_pm_ops;
    leds_class->dev_groups = led_groups;
    return 0;
}

static void __exit leds_exit(void)
{
    class_destroy(leds_class);
}

subsys_initcall(leds_init);
module_exit(leds_exit);

MODULE_AUTHOR("John Lenz, Richard Purdie");
MODULE_LICENSE("GPL");
MODULE_DESCRIPTION("LED Class Interface");
函数介绍:leds_init该函数在内核在加载的时候执行,调用class_create创建LED设备类,用于管理该类设备。
实现思路:
- 调用
class_create创建led类设备 - 赋值结构体
leds_class->pm,leds_class_dev_pm_ops配置电源管理接口,用于休眠唤醒, - 赋值结构体
leds_class->dev_groups,设置该类设备的文件属性。
3、leds_class_dev_pm_ops分析
上面我们在创建
led类的时候,赋值了leds_class_dev_pm_ops电源管理接口,那么该接口是怎么定义的呢?
3.1 相关数据结构
3.1.1 dev_pm_ops
struct dev_pm_ops {
    int (*prepare)(struct device *dev);
    void (*complete)(struct device *dev);
    int (*suspend)(struct device *dev);
    int (*resume)(struct device *dev);
    int (*freeze)(struct device *dev);
    int (*thaw)(struct device *dev);
    int (*poweroff)(struct device *dev);
    int (*restore)(struct device *dev);
    int (*suspend_late)(struct device *dev);
    int (*resume_early)(struct device *dev);
    int (*freeze_late)(struct device *dev);
    int (*thaw_early)(struct device *dev);
    int (*poweroff_late)(struct device *dev);
    int (*restore_early)(struct device *dev);
    int (*suspend_noirq)(struct device *dev);
    int (*resume_noirq)(struct device *dev);
    int (*freeze_noirq)(struct device *dev);
    int (*thaw_noirq)(struct device *dev);
    int (*poweroff_noirq)(struct device *dev);
    int (*restore_noirq)(struct device *dev);
    int (*runtime_suspend)(struct device *dev);
    int (*runtime_resume)(struct device *dev);
    int (*runtime_idle)(struct device *dev);
};
结构体名称:dev_pm_ops
文件位置:include/linux/pm.h
主要作用:主要定义了设备电源管理的回调函数接口,我们一般使用suspend和resume两个,用于休眠,唤醒。
3.2 相关实现
/**
 * led_classdev_suspend - suspend an led_classdev.
 * @led_cdev: the led_classdev to suspend.
 */
void led_classdev_suspend(struct led_classdev *led_cdev)
{
    led_cdev->flags |= LED_SUSPENDED;
    led_set_brightness_nopm(led_cdev, 0);						//	灯灭
}
EXPORT_SYMBOL_GPL(led_classdev_suspend);

/**
 * led_classdev_resume - resume an led_classdev.
 * @led_cdev: the led_classdev to resume.
 */
void led_classdev_resume(struct led_classdev *led_cdev)
{
    led_set_brightness_nopm(led_cdev, led_cdev->brightness);	//	灯亮

    if (led_cdev->flash_resume)
        led_cdev->flash_resume(led_cdev);

    led_cdev->flags &= ~LED_SUSPENDED;
}
EXPORT_SYMBOL_GPL(led_classdev_resume);

#ifdef CONFIG_PM_SLEEP
static int led_suspend(struct device *dev)
{
    struct led_classdev *led_cdev = dev_get_drvdata(dev);

    if (led_cdev->flags & LED_CORE_SUSPENDRESUME)
        led_classdev_suspend(led_cdev);

    return 0;
}

static int led_resume(struct device *dev)
{
    struct led_classdev *led_cdev = dev_get_drvdata(dev);

    if (led_cdev->flags & LED_CORE_SUSPENDRESUME)
        led_classdev_resume(led_cdev);

    return 0;
}
#endif

static SIMPLE_DEV_PM_OPS(leds_class_dev_pm_ops, led_suspend, led_resume);

/*
 * Use this if you want to use the same suspend and resume callbacks for suspend
 * to RAM and hibernation.
 */
#define SIMPLE_DEV_PM_OPS(name, suspend_fn, resume_fn) \
const struct dev_pm_ops name = { \
    SET_SYSTEM_SLEEP_PM_OPS(suspend_fn, resume_fn) \
}
函数介绍:代码的这一部分,主要用于实现休眠唤醒功能,然后将相关函数赋值给dev_pm_ops结构体中的回调函数
实现思路:
- 定义了几个函数
led_suspend、led_resume、led_classdev_resume、led_classdev_suspend作为休眠唤醒的实现 - 通过宏定义
SIMPLE_DEV_PM_OPS将函数绑定到leds_class->pm中,作为该类设备的休眠唤醒管理。
这里
SIMPLE_DEV_PM_OPS宏定义较为简单,自行翻阅源码查看即可!
4、led_groups分析
上面我们在创建
led类的时候,将led_groups赋值给了struct attribute_group属性组结构体,那么led_groups是怎么定义的呢?
4.1 相关数据结构
4.1.1 attribute_group
/**
 * struct attribute_group - data structure used to declare an attribute group.
 * @name:	Optional: Attribute group name
 *		If specified, the attribute group will be created in
 *		a new subdirectory with this name.
 * @is_visible:	Optional: Function to return permissions associated with an
 *		attribute of the group. Will be called repeatedly for each
 *		non-binary attribute in the group. Only read/write
 *		permissions as well as SYSFS_PREALLOC are accepted. Must
 *		return 0 if an attribute is not visible. The returned value
 *		will replace static permissions defined in struct attribute.
 * @is_bin_visible:
 *		Optional: Function to return permissions associated with a
 *		binary attribute of the group. Will be called repeatedly
 *		for each binary attribute in the group. Only read/write
 *		permissions as well as SYSFS_PREALLOC are accepted. Must
 *		return 0 if a binary attribute is not visible. The returned
 *		value will replace static permissions defined in
 *		struct bin_attribute.
 * @attrs:	Pointer to NULL terminated list of attributes.
 * @bin_attrs:	Pointer to NULL terminated list of binary attributes.
 *		Either attrs or bin_attrs or both must be provided.
 */
struct attribute_group {
    const char		*name;
    umode_t			(*is_visible)(struct kobject *,
                          struct attribute *, int);
    umode_t			(*is_bin_visible)(struct kobject *,
                          struct bin_attribute *, int);
    struct attribute	**attrs;
    struct bin_attribute	**bin_attrs;
};
结构体名称:attribute_group
文件位置:include/linux/sysfs.h
主要作用:定义一个属性组,其中包括一组属性和二进制属性,这些属性可以与内核对象相关联,以便用户的访问。
4.1.2 attribute
struct attribute {
    const char		*name;
    umode_t			mode;
#ifdef CONFIG_DEBUG_LOCK_ALLOC
    bool			ignore_lockdep:1;
    struct lock_class_key	*key;
    struct lock_class_key	skey;
#endif
};
结构体名称:attribute
文件位置:include/linux/sysfs.h
主要作用:代表一个属性
4.2 相关实现
static ssize_t brightness_show(struct device *dev,
        struct device_attribute *attr, char *buf)
{
    struct led_classdev *led_cdev = dev_get_drvdata(dev);

    /* no lock needed for this */
    led_update_brightness(led_cdev);

    return sprintf(buf, "%u\n", led_cdev->brightness);
}

static ssize_t brightness_store(struct device *dev,
        struct device_attribute *attr, const char *buf, size_t size)
{
    struct led_classdev *led_cdev = dev_get_drvdata(dev);
    unsigned long state;
    ssize_t ret;

    mutex_lock(&led_cdev->led_access);

    if (led_sysfs_is_disabled(led_cdev)) {
        ret = -EBUSY;
        goto unlock;
    }

    ret = kstrtoul(buf, 10, &state);
    if (ret)
        goto unlock;

    if (state == LED_OFF)
        led_trigger_remove(led_cdev);
    led_set_brightness(led_cdev, state);

    ret = size;
unlock:
    mutex_unlock(&led_cdev->led_access);
    return ret;
}
static DEVICE_ATTR_RW(brightness);

static ssize_t max_brightness_show(struct device *dev,
        struct device_attribute *attr, char *buf)
{
    struct led_classdev *led_cdev = dev_get_drvdata(dev);

    return sprintf(buf, "%u\n", led_cdev->max_brightness);
}
static DEVICE_ATTR_RO(max_brightness);

#ifdef CONFIG_LEDS_TRIGGERS
static DEVICE_ATTR(trigger, 0644, led_trigger_show, led_trigger_store);

//	属性文件
static struct attribute *led_trigger_attrs[] = {
    &dev_attr_trigger.attr,
    NULL,
};
static const struct attribute_group led_trigger_group = {
    .attrs = led_trigger_attrs,
};
#endif

//	属性文件
static struct attribute *led_class_attrs[] = {
    &dev_attr_brightness.attr,
    &dev_attr_max_brightness.attr,
    NULL,
};

static const struct attribute_group led_group = {
    .attrs = led_class_attrs,
};

static const struct attribute_group *led_groups[] = {
    &led_group,
#ifdef CONFIG_LEDS_TRIGGERS
    &led_trigger_group,
#endif
    NULL,
};
代码介绍:该部分代码主要用于创建LED属性组,并且负责实现用户空间操作的接口。
实现思路:
- 定义一个
led_groups属性组的二维数组,管理该类设备的所有属性 - 这个
led_groups二维数组,其中又包括两个属性组:led_group、和led_trigger_group,一个用于LED亮度控制,一个用于触发控制。 led_group属性组中又包括多个属性,如:dev_attr_brightness.attr、dev_attr_max_brightness.attr,分别表示LED亮度和最大亮度的设置。led_trigger_group属性组包括一个属性,如:dev_attr_trigger.attr,用于控制触发属性- 定义完属性后,需要提供操作属性的接口,就是上面的
led_trigger_show、led_trigger_store、max_brightness_show、brightness_show、brightness_store,其中xxx_show表示读属性,xxx_store表示写属性 - 至此,所有的属性定义完毕,并且将其读写属性的接口与该属性进行了绑定
- 最后,通过在
leds_init接口中,调用leds_class->dev_groups = led_groups;,将属性组注册到LED类中进行管理。
阅读代码时,从下网上看,更容易理解!
4.3 扩展
可能代码中有些地方对于初学者不太容易理解,如:为什么没有找到
brightness_store和brightness_show与属性绑定的地方?为什么函数要定义成这个名字?
解答这个问题,也是涉及到了Linux内核的设计模式,其中充斥着大量的宏定义,主要用作字符串的拼接,最终生成想要的定义!
4.3.1 DEVICE_ATTR_RW分析
static ssize_t brightness_show(struct device *dev,
        struct device_attribute *attr, char *buf)
{
    struct led_classdev *led_cdev = dev_get_drvdata(dev);

    /* no lock needed for this */
    led_update_brightness(led_cdev);

    return sprintf(buf, "%u\n", led_cdev->brightness);
}

static ssize_t brightness_store(struct device *dev,
        struct device_attribute *attr, const char *buf, size_t size)
{
    struct led_classdev *led_cdev = dev_get_drvdata(dev);
    unsigned long state;
    ssize_t ret;

    mutex_lock(&led_cdev->led_access);

    if (led_sysfs_is_disabled(led_cdev)) {
        ret = -EBUSY;
        goto unlock;
    }

    ret = kstrtoul(buf, 10, &state);
    if (ret)
        goto unlock;

    if (state == LED_OFF)
        led_trigger_remove(led_cdev);
    led_set_brightness(led_cdev, state);

    ret = size;
unlock:
    mutex_unlock(&led_cdev->led_access);
    return ret;
}
static DEVICE_ATTR_RW(brightness);
代码介绍:上面定义了两个函数(brightness_show,brightness_store)和一个属性名称(brightness),并且通过DEVICE_ATTR_RW宏定义将属性和函数关联起来。
实现思路:
我们分析一下
DEVICE_ATTR_RW的宏定义
//	static DEVICE_ATTR_RW(brightness);

#define DEVICE_ATTR_RW(_name) \
    struct device_attribute dev_attr_##_name = __ATTR_RW(_name)

//	static struct device_attribute dev_attr_brightness = __ATTR_RW(brightness)

#define __ATTR_RW(_name) __ATTR(_name, 0644, _name##_show, _name##_store)

//	static struct device_attribute dev_attr_brightness = __ATTR(brightness, 0644, brightness_show, brightness_store)

#define __ATTR(_name, _mode, _show, _store) {				\
    .attr = {.name = __stringify(_name),				\
         .mode = VERIFY_OCTAL_PERMISSIONS(_mode) },		\
    .show	= _show,						\
    .store	= _store,						\
}

//	static struct device_attribute dev_attr_brightness = {
//	.attr = {
//		.name = __stringify(brightness),
//		.mode = VERIFY_OCTAL_PERMISSIONS(0644),
//	}
//	.show = brightness_show,
//	.store = brightness_store,
//}
上面屏蔽的内容就是static DEVICE_ATTR_RW(brightness)展开的原貌,这样就与上面的两个函数(brightness_show,brightness_store)关联了起来!
5、led class的注册注销分析
在
led-class.c还剩下一部分代码,那就是负责提供注册,注销led设备的相关接口
5.1 相关实现
5.1.1 devm_of_led_classdev_register
/**
 * devm_of_led_classdev_register - resource managed led_classdev_register()
 *
 * @parent: parent of LED device
 * @led_cdev: the led_classdev structure for this device.
 */
int devm_of_led_classdev_register(struct device *parent,
                  struct device_node *np,
                  struct led_classdev *led_cdev)
{
    struct led_classdev **dr;
    int rc;

    dr = devres_alloc(devm_led_classdev_release, sizeof(*dr), GFP_KERNEL);
    if (!dr)
        return -ENOMEM;

    rc = of_led_classdev_register(parent, np, led_cdev);		//	注册到子系统
    if (rc) {
        devres_free(dr);
        return rc;
    }

    *dr = led_cdev;
    devres_add(parent, dr);

    return 0;
}
EXPORT_SYMBOL_GPL(devm_of_led_classdev_register);
函数介绍:devm_of_led_classdev_register是of_led_classdev_register函数的资源管理版本。即:在of_led_classdev_register之上,进行了资源的管理。
实现思路:
- 先通过
struct led_classdev **dr创建一个新对象,并将其与给定的设备节点关联 - 该函数分配了一个
devres结构来管理led_classdev对象的生命周期。 - 如果注册成功,则
led_classdev对象将存储在devres结构中,并与父设备关联。
5.1.2 of_led_classdev_register
/**
 * of_led_classdev_register - register a new object of led_classdev class.
 *
 * @parent: parent of LED device
 * @led_cdev: the led_classdev structure for this device.
 * @np: DT node describing this LED
 */
int of_led_classdev_register(struct device *parent, struct device_node *np,
                struct led_classdev *led_cdev)
{
    char name[LED_MAX_NAME_SIZE];
    int ret;

    ret = led_classdev_next_name(led_cdev->name, name, sizeof(name));		//	生成唯一的节点名称
    if (ret < 0)
        return ret;

    mutex_init(&led_cdev->led_access);
    mutex_lock(&led_cdev->led_access);
    led_cdev->dev = device_create_with_groups(leds_class, parent, 0,
                led_cdev, led_cdev->groups, "%s", name);					//	关联属性文件
    if (IS_ERR(led_cdev->dev)) {
        mutex_unlock(&led_cdev->led_access);
        return PTR_ERR(led_cdev->dev);
    }
    led_cdev->dev->of_node = np;

    if (ret)
        dev_warn(parent, "Led %s renamed to %s due to name collision",
                led_cdev->name, dev_name(led_cdev->dev));

    if (led_cdev->flags & LED_BRIGHT_HW_CHANGED) {
        ret = led_add_brightness_hw_changed(led_cdev);
        if (ret) {
            device_unregister(led_cdev->dev);
            mutex_unlock(&led_cdev->led_access);
            return ret;
        }
    }

    led_cdev->work_flags = 0;
#ifdef CONFIG_LEDS_TRIGGERS
    init_rwsem(&led_cdev->trigger_lock);
#endif
#ifdef CONFIG_LEDS_BRIGHTNESS_HW_CHANGED
    led_cdev->brightness_hw_changed = -1;
#endif
    /* add to the list of leds */
    down_write(&leds_list_lock);
    list_add_tail(&led_cdev->node, &leds_list);
    up_write(&leds_list_lock);

    if (!led_cdev->max_brightness)
        led_cdev->max_brightness = LED_FULL;

    led_update_brightness(led_cdev);

    led_init_core(led_cdev);					//	核心层初始化

#ifdef CONFIG_LEDS_TRIGGERS
    led_trigger_set_default(led_cdev);
#endif

    mutex_unlock(&led_cdev->led_access);

    dev_dbg(parent, "Registered led device: %s\n",
            led_cdev->name);

    return 0;
}
函数介绍:of_led_classdev_register注册一个新的led_classdev对象。
led_classdev该结构体在上一篇文章中有介绍到,我们在led-gpio.c中创建并初始化,随后我们会调用注册函数devm_of_led_classdev_register来将创建的led_classdev对象注册到LED子系统中,也就是该函数的作用。
实现思路:
- 通过
led_classdev_next_name来对LED名字添加序号,生成唯一名称 - 使用
device_create_with_groups接口,将led_classdev对象与leds_class关联,创建一个新的设备 - 最后调用
led_init_core接口,初始化了LED核心并为设备设置了默认触发器。
led_init_core就是在led-core.c中实现的啦,我们下一篇文章分析。
5.1.3 led_classdev_next_name
static int led_classdev_next_name(const char *init_name, char *name,
                  size_t len)
{
    unsigned int i = 0;
    int ret = 0;
    struct device *dev;

    strlcpy(name, init_name, len);

    while ((ret < len) &&
           (dev = class_find_device(leds_class, NULL, name, match_name))) {
        put_device(dev);
        ret = snprintf(name, len, "%s_%u", init_name, ++i);
    }

    if (ret >= len)
        return -ENOMEM;

    return i;
}
函数介绍:led_classdev_next_name,该函数根据提供的初始名称,生成一个唯一的 LED 设备名称。它通过在初始名称后添加下划线和数字来实现。
实现思路:
- 调用
strlcpy接口,将初始名称拷贝到name缓冲区中 - 调用
class_find_device去循环检查leds_class类中是否已经存在一个具有当前name的设备。 - 如果存在,则将调用
snprintf在init_name后面添加下划线和数字
6、总结
led-class.c该文件的详细分析如上文,我们回顾一下其主要作用:
- 创建
leds_class,并且初始化相关字段,如:pm电源管理,dev_groups设备属性 - 定义
suspend、resume函数,用于LED类设备的休眠唤醒;定义多个属性组,多个属性,并且实现对应的函数,如:brightness_show、brightness_store等,并将其注册到LED类中,以便LED属性在用户空间的读写 - 提供注册注销函数:
devm_of_led_classdev_register、devm_led_classdev_unregister,为了底层将创建的led_classdev与leds_class关联,注册进入子系统
点赞+关注,永远不迷路


