多表查询:
一对一:一篇博客对应着一个作者
一对多:一个作者对应着多篇博客
ResultMap和ResultType的区别:
1)字段映射不同:resultType适用于数据库字段名和实体类的名字是相同的,但是假设实体类的名字叫做username,但是数据库的名字是name,这时候数据库字段名和实体类的名字是不一样的,所以我们需要使用ResultMap----字段名不一致的时候进行映射的处理
2)多表查询不同:多表查询适用于ResultMap
指定别名的作用:通常给第二张表的相同字段指定别名
如果说进行连表查询的时候两张表有相同的字段,那么在你不指定别名的情况下,第二张表重复的字段将会被第一张表重复的字段属性所覆盖,如果多张表的两张表的字段全部不一样,那么刺史部设置前缀不会有任何问题
下面我们来进行演示一下一对一多表查询:
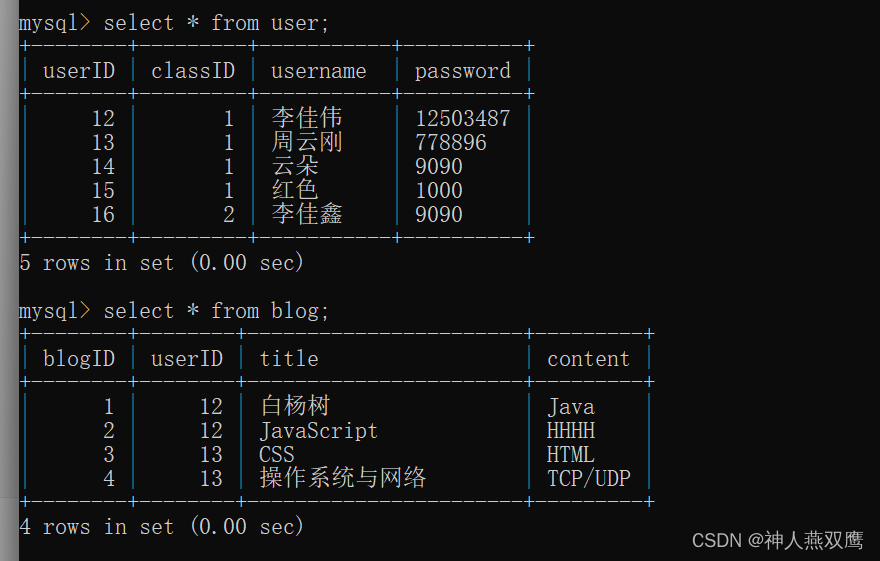
1)在上面我们已经完成了多表查询,现在我们在进行创建一张表,叫做blog表(博客表)
我们既然要进行一对一的多表查询,一对一映射,因为一篇博客值对应着一个作者
2)设置前缀的作用:因为我们知道,在实际的工作环境中,我们的博客表和用户表很有可能是存在相同的字段名的,很有可能是说我们的User表里面,有一个唯一的用户身份标识叫做ID,还有一个唯一的博客身份标识也叫做ID,那么这时候我们进行连表查询的时候就会出现严重的问题,所以我们要进行设置一个别名;
3)因为一篇博客对应着唯一的作者,所以我们在博客列表对应的Java代码中,我们要进行设置一个User属性,下面是我们的数据库建表操作和创建实体类,我们还要安装MyBatisX这个插件
 create table blog(
       blogID int primary key auto_increment,
       userID int,
       title varchar(30),
       content varchar(30));
package com.example.demo;
import lombok.Data;
@Data
public class Blog {
    int blogID;
    int userIDl
    String title;
    String content;
    User user;
}

此时我们写一下Java代码:
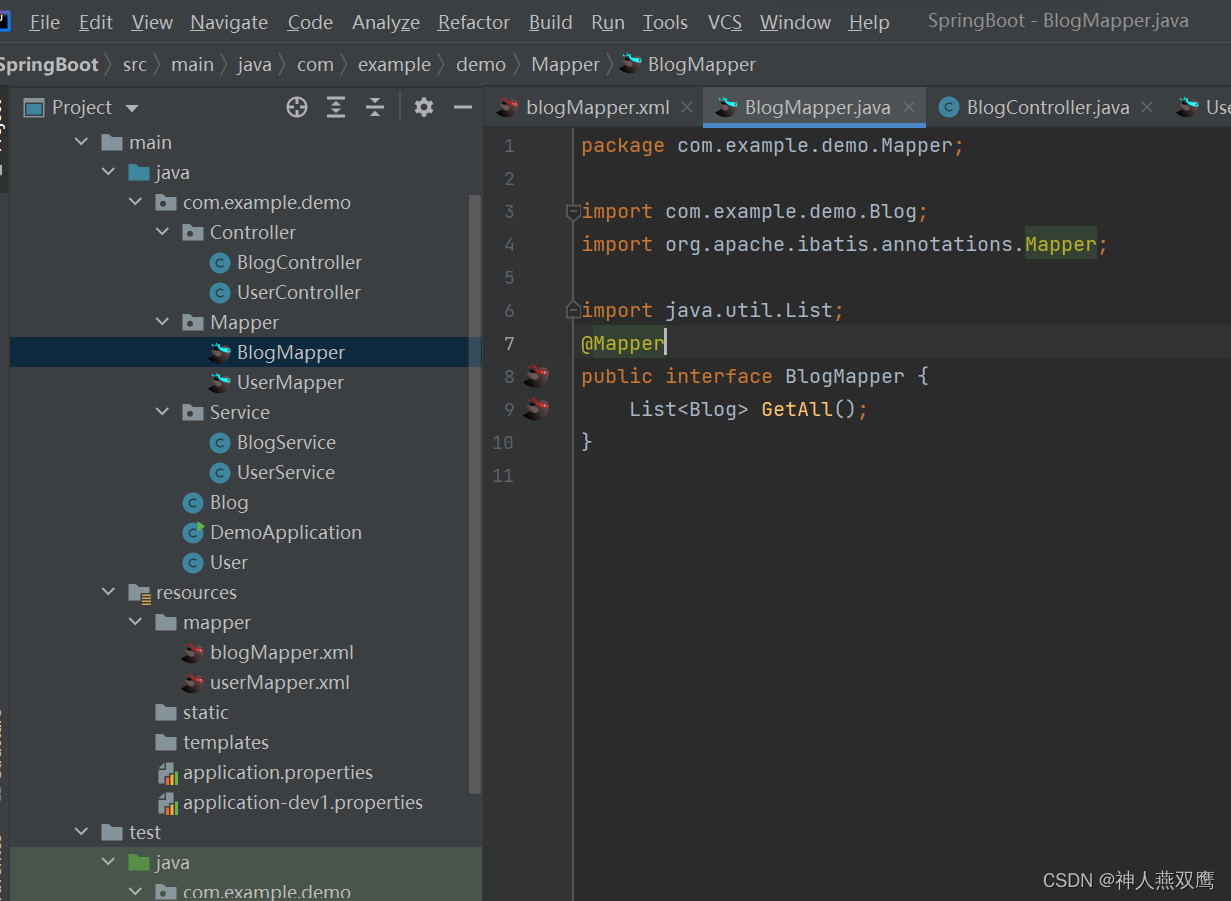
1)我们写的BlogController里面的代码:
package com.example.demo.Controller;

import com.example.demo.Blog;
import com.example.demo.Service.BlogService;
import com.example.demo.Service.UserService;
import org.springframework.beans.factory.annotation.Autowired;
import org.springframework.stereotype.Controller;
import org.springframework.web.bind.annotation.RequestMapping;
import org.springframework.web.bind.annotation.ResponseBody;
import java.util.List;
@Controller
public class BlogController {
    @Autowired
    BlogService blogService;
   @RequestMapping("/GetAll")
   @ResponseBody
    public List<Blog> GetAll()
    {
        return blogService.GetAll();
    }

}
2)我们写的BlogService里面的代码:
package com.example.demo.Service;
import com.example.demo.Blog;
import com.example.demo.Mapper.BlogMapper;
import org.springframework.beans.factory.annotation.Autowired;
import org.springframework.stereotype.Service;
import java.util.List;
@Service
public class BlogService {
    @Autowired
    BlogMapper mapper;
    public List<Blog> GetAll() {
        return mapper.GetAll();
    }
}
3)我们写的BlogMapper接口里面的代码和blogMapper.XML文件里面的代码:
这个是接口里面的代码:
package com.example.demo.Mapper;
import com.example.demo.Blog;
import org.apache.ibatis.annotations.Mapper;
import java.util.List;
@Mapper
public interface BlogMapper {
    List<Blog> GetAll();
}
这个是XML文件里面的代码:
<?xml version="1.0" encoding="UTF-8"?>
<!DOCTYPE mapper PUBLIC "-//mybatis.org//DTD com.example.demo.Mapper1 3.0//EN"
        "http://mybatis.org/dtd/mybatis-3-mapper.dtd">
<mapper namespace="com.example.demo.Mapper.BlogMapper">
    <select id="GetAll" resultType="com.example.demo.Blog">
        select * from blog left join user on user.userID=blog.userID;
    </select>
</mapper>
1)我们在这个XML文件里面我们用namespace指定了我们实现接口的位置换句话来说就是实现接口的路径
2)我们用resultType表示了我们要返回的类型,换句话说就是我们数据库表对应的实体类的路径
3)但是我们要注意一下,在整个XML文件里面,我们都没有进行指定User实体类的路径(因为在我们blog类中还有User这样的属性,由于XML文件中没有这样的指定位置,所以我们无法得到User对象,所以我们看到当我们使用浏览器进行访问的时候,我们无法得到user对象
4)所以我们使用resultType的方法是不行的,我们尝试用一下resultMap
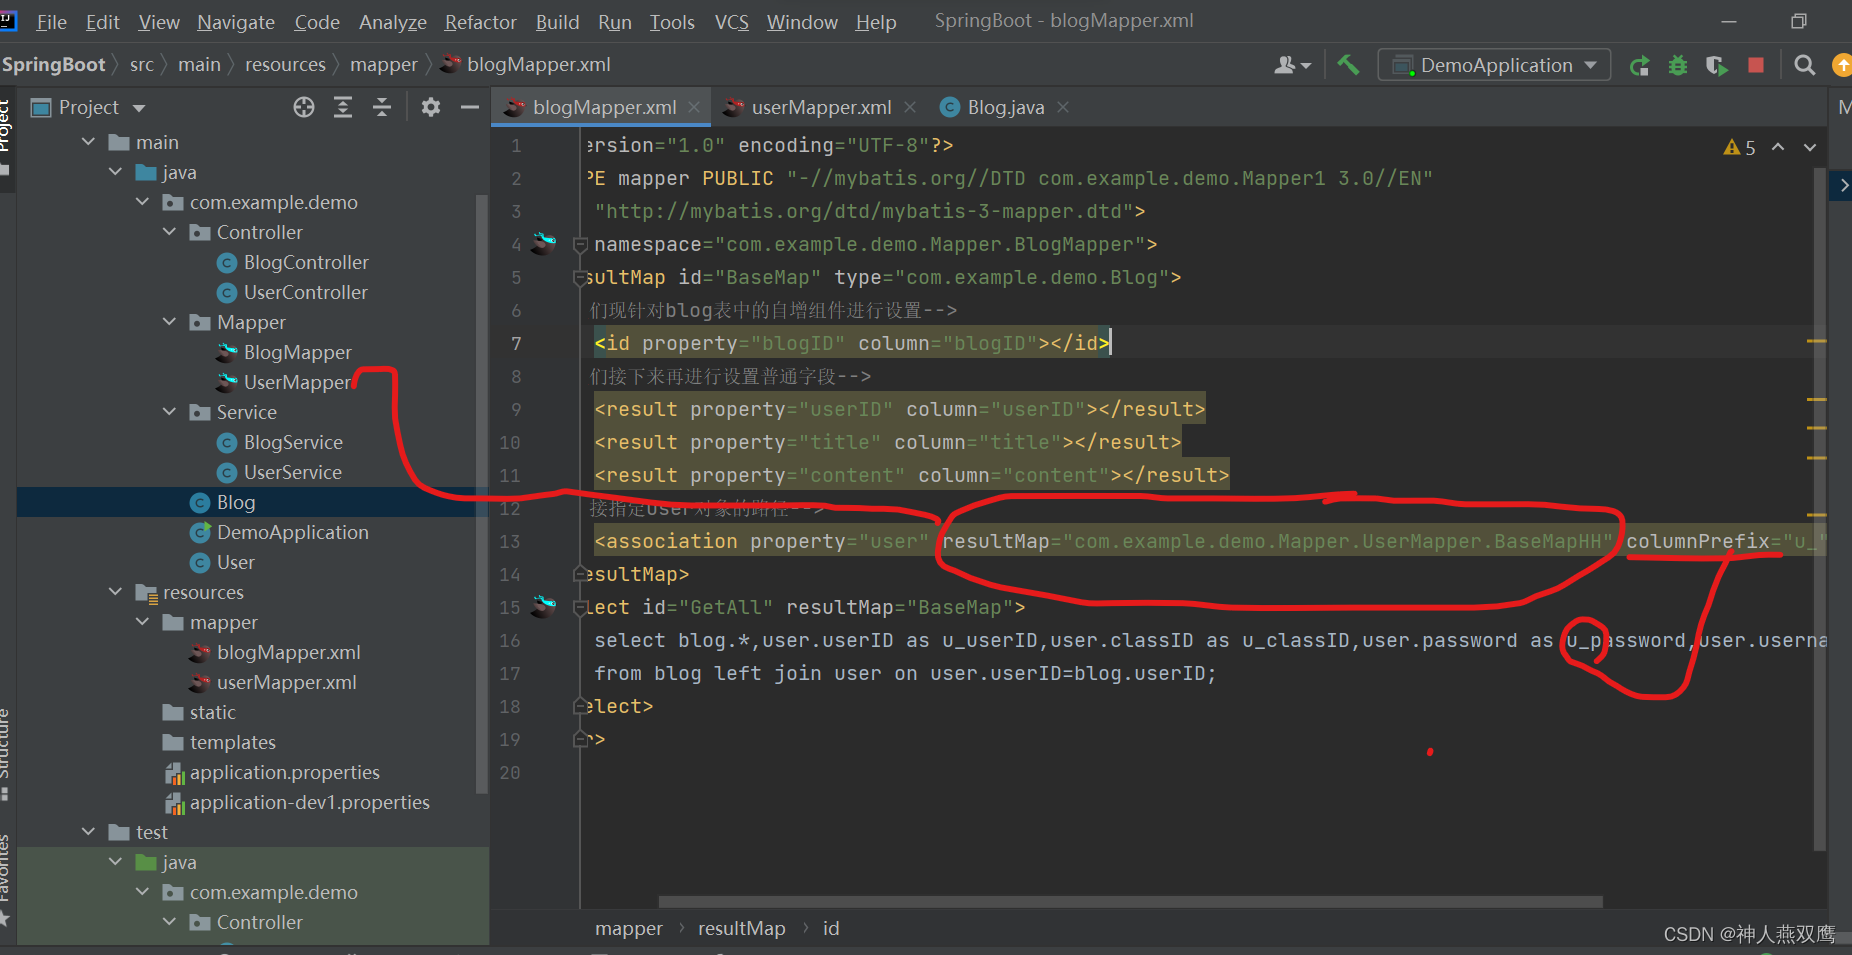
<assocation>标签的用法:
第一个字段property的参数指定的是我们blog表中要进行关联的属性
第二个字段resultMap,表示User表中的resultMap的位置:
第三个参数表示前缀,我们想要查询User对象的所有字段的属性都要加上前缀:
blogMapper.xml文件里面的代码:
<?xml version="1.0" encoding="UTF-8"?>
<!DOCTYPE mapper PUBLIC "-//mybatis.org//DTD com.example.demo.Mapper1 3.0//EN"
        "http://mybatis.org/dtd/mybatis-3-mapper.dtd">
<mapper namespace="com.example.demo.Mapper.BlogMapper">
    <resultMap id="BaseMap" type="com.example.demo.Blog">
<!--1.我们现针对blog表中的自增组件进行设置-->
        <id property="blogID" column="blogID"></id>
<!--2.我们接下来再进行设置普通字段-->
        <result property="userID" column="userID"></result>
        <result property="title" column="title"></result>
        <result property="content" column="content"></result>
<!--3.直接指定User对象的路径-->
        <association property="user" resultMap="com.example.demo.Mapper.UserMapper.BaseMapHH" columnPrefix="u_"></association>
    </resultMap>
    <select id="GetAll" resultMap="BaseMap">
        select blog.*,user.userID as u_userID,user.classID as u_classID,user.password as u_password,user.username as u_username
        from blog left join user on user.userID=blog.userID;
    </select>
</mapper>
我们写的UserMapper.xml里面的代码:
<?xml version="1.0" encoding="UTF-8"?>
<!DOCTYPE mapper PUBLIC "-//mybatis.org//DTD com.example.demo.Mapper1 3.0//EN"
        "http://mybatis.org/dtd/mybatis-3-mapper.dtd">
<mapper namespace="com.example.demo.Mapper.UserMapper">
  <resultMap id="BaseMapHH" type="com.example.demo.User">
<!--先进行设置自增主键-->
    <id column="userID" property="userID"></id>
<!--再进行设置普通字段-->
    <result column="classID" property="classID"></result>
    <result column="username" property="username"></result>
    <result column="password" property="password"></result>
  </resultMap>
</mapper>
我们此时进行创建方法,我们进行返回的是一个List<blog>集合,里面包含了若干个blog,里面都包含了唯一的作者,所以说我们是不能使用resultType会导致我们的自定义的对象没有值
1)resultMap:所以说我们一定要在我们所关联对象的XML文件里面建立一个resultMap,他是不能指定一个resultType,所以说我们要存放管理属性的字典映射
2)别忘了写前缀,如果说我们在进行多表查询的时候两张表出现了相同的字段,如果没设置前缀,那么查询的结果就是错误的,防止多张表出现相同字段查询问题;

现在我们使用一下一对多查询:
1)咱们说上面我们进行多表查询的时候,我们的一篇博客是对应着一个作者,这是一对一的关系,但是从另一个角度来说:我们的一个作者又是对应着多篇博客的,所以我们针对一对多来进行查询;
2)因为一个作者是对应着多篇博客的,所以我们要在user表里面加上一个字段List<blog>
package com.example.demo;
import lombok.Getter;
import lombok.Setter;
import lombok.ToString;

import java.util.List;

@Setter
@Getter
@ToString
public class User {
    private int ClassID;
    private int userID;
    private String username;
    private String password;
    List<Blog> list;
}
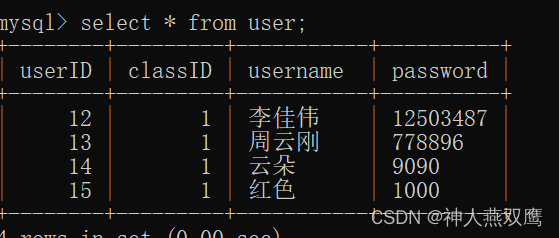
我们可以先写一个SQL语句进行验证一下:
展示代码:
1)我们写的UserController里面的代码:
package com.example.demo.Controller;
import com.example.demo.Service.UserService;
import com.example.demo.User;
import netscape.security.UserTarget;
import org.springframework.beans.factory.InitializingBean;
import org.springframework.beans.factory.annotation.Autowired;
import org.springframework.stereotype.Controller;
import org.springframework.web.bind.annotation.RequestBody;
import org.springframework.web.bind.annotation.RequestMapping;
import org.springframework.web.bind.annotation.RequestParam;
import org.springframework.web.bind.annotation.ResponseBody;
import javax.servlet.http.HttpServletRequest;
import javax.servlet.http.HttpSession;
import java.util.HashMap;
import java.util.List;
@Controller
public class UserController {
    @Autowired
    UserService userService;
      @RequestMapping("/Get")
      @ResponseBody
     public List<User> GetAll()
     {
         return userService.GetAll();
     }

}
2)咱们的UserService和UserMapper里面的代码如下:
package com.example.demo.Service;
import com.example.demo.Blog;
import com.example.demo.Mapper.UserMapper;
import com.example.demo.User;
import org.springframework.beans.factory.annotation.Autowired;
import org.springframework.stereotype.Service;
import java.util.List;
@Service
public class UserService {
        @Autowired
        private UserMapper mapper;
    public List<User> GetAll() {
        return mapper.GetAll();
    }
}
package com.example.demo.Mapper;
import com.example.demo.Blog;
import com.example.demo.User;
import org.apache.ibatis.annotations.Mapper;
import java.util.List;
@Mapper
public interface UserMapper {
    List<User> GetAll();
}
3)咱们的blogXML文件中的代码如下:
<?xml version="1.0" encoding="UTF-8"?>
<!DOCTYPE mapper PUBLIC "-//mybatis.org//DTD com.example.demo.Mapper1 3.0//EN"
        "http://mybatis.org/dtd/mybatis-3-mapper.dtd">
<mapper namespace="com.example.demo.Mapper.BlogMapper">
    <resultMap id="BaseMap" type="com.example.demo.Blog">
<!--1.我们现针对blog表中的自增组件进行设置-->
        <id property="blogID" column="blogID"></id>
<!--2.我们接下来再进行设置普通字段-->
        <result property="userID" column="userID"></result>
        <result property="title" column="title"></result>
        <result property="content" column="content"></result>
<!--3.直接指定User对象的路径-->
        <association property="user" resultMap="com.example.demo.Mapper.UserMapper.BaseMap" columnPrefix="u_"></association>
    </resultMap>
    <select id="GetAll" resultMap="BaseMap">
        select blog.*,user.userID as u_userID,user.classID as u_classID,user.password as u_password,user.username as u_username
        from blog left join user on user.userID=blog.userID;
    </select>
</mapper>
4)在们的blogMapper.xml中的代码如下:
<?xml version="1.0" encoding="UTF-8"?>
<!DOCTYPE mapper PUBLIC "-//mybatis.org//DTD com.example.demo.Mapper1 3.0//EN"
        "http://mybatis.org/dtd/mybatis-3-mapper.dtd">
<mapper namespace="com.example.demo.Mapper.UserMapper">
  <resultMap id="BaseMap" type="com.example.demo.User">
<!--先进行设置自增主键-->
    <id column="userID" property="userID"></id>
<!--再进行设置普通字段-->
    <result column="classID" property="classID"></result>
    <result column="username" property="username"></result>
    <result column="password" property="password"></result>
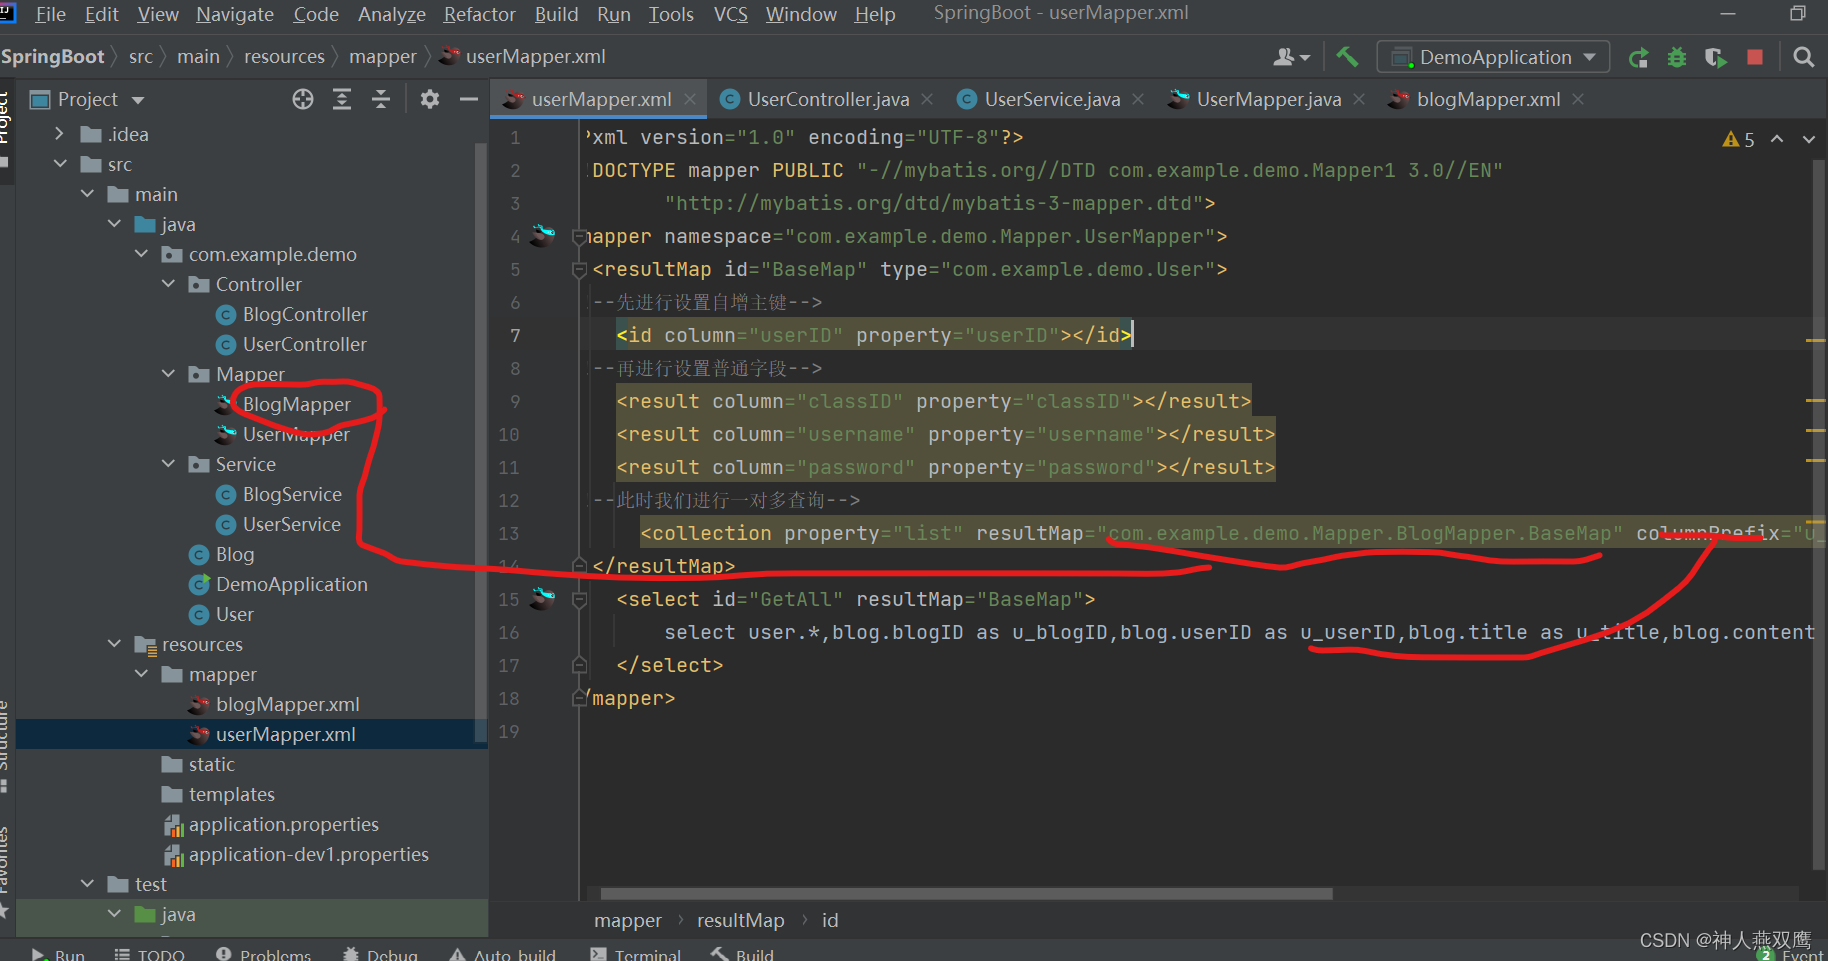
<!--此时我们进行一对多查询-->
      <collection property="list" resultMap="com.example.demo.Mapper.BlogMapper.BaseMap" columnPrefix="u_"></collection>
  </resultMap>
    <select id="GetAll" resultMap="BaseMap">
        select user.*,blog.blogID as u_blogID,blog.userID as u_userID,blog.title as u_title,blog.content as u_content from user join blog on blog.userID=user.userID;
    </select>
</mapper>
结果:
logging.level.com.example.demo=debug





![[附源码]计算机毕业设计JAVAjsp闲置物品线上交易系统](https://img-blog.csdnimg.cn/3bb6a04cc9b1433cb514adb16dcd99b1.png)


