目录
一、服务治理介绍
什么是服务治理?
二、nacos简介
三、nacos实战入门
1.搭建nacos环境
2.将商品、订单、微服务注册到nacos
四、实现服务调用的负载均衡
1.什么是负载均衡
2. DiscoveryClient实现负载均衡
3.Ribbon实现负载均衡
Ribbon支持的负载均衡策略
五、基于Feign实现服务调用
1.什么是Feign
2.Feign的基本使用
六、Feign参数传参
一、服务治理介绍
先来思考一个问题
通过上一章的操作,我们已经可以实现微服务之间的调用。但是我们把服务提供者的网络地址 (ip,端口)等硬编码到了代码中,这种做法存在许多问题:
-
一旦服务提供者地址变化,就需要手工修改代码
-
一旦是多个服务提供者,无法实现负载均衡功能
-
一旦服务变得越来越多,人工维护调用关系困难
那么应该怎么解决呢, 这时候就需要通过注册中心动态的实现服务治理。
什么是服务治理?
服务治理是微服务架构中最核心最基本的模块。用于实现各个微服务的自动化注册与发现。
-
服务注册:在服务治理框架中,都会构建一个注册中心,每个服务单元向注册中心登记自己提供服 务的详细信息。并在注册中心形成一张服务的清单,服务注册中心需要以心跳的方式去监测清单中 的服务是否可用,如果不可用,需要在服务清单中剔除不可用的服务。
-
服务发现:服务调用方向服务注册中心咨询服务,并获取所有服务的实例清单,实现对具体服务实 例的访问。

通过上面的调用图会发现,除了微服务,还有一个组件是服务注册中心,它是微服务架构非常重要 的一个组件,在微服务架构里主要起到了协调者的一个作用。注册中心一般包含如下几个功能:
-
服务发现:
-
服务注册:保存服务提供者和服务调用者的信息
-
服务订阅(发现):服务调用者订阅服务提供者的信息,注册中心向订阅者推送提供者的信息
-
-
服务配置:
-
配置订阅:服务提供者和服务调用者订阅微服务相关的配置
-
配置下发:主动将配置推送给服务提供者和服务调用者
-
-
服务健康检测
-
检测服务提供者的健康情况,如果发现异常,执行服务剔除
-
常见的注册中心
-
Zookeeper zookeeper是一个分布式服务框架,是Apache Hadoop 的一个子项目,它主要是用来解决分布式 应用中经常遇到的一些数据管理问题,如:统一命名服务、状态同步服务、集群管理、分布式应用 配置项的管理等。
-
Eureka Eureka是Springcloud Netflix中的重要组件,主要作用就是做服务注册和发现。但是现在已经闭 源
-
Consul Consul是基于GO语言开发的开源工具,主要面向分布式,服务化的系统提供服务注册、服务发现 和配置管理的功能。Consul的功能都很实用,其中包括:服务注册/发现、健康检查、Key/Value 存储、多数据中心和分布式一致性保证等特性。Consul本身只是一个二进制的可执行文件,所以 安装和部署都非常简单,只需要从官网下载后,在执行对应的启动脚本即可。
-
Nacos Nacos是一个更易于构建云原生应用的动态服务发现、配置管理和服务管理平台。它是 Spring Cloud Alibaba 组件之一,负责服务注册发现和服务配置,可以这样认为nacos=eureka+config。
二、nacos简介
Nacos 致力于帮助您发现、配置和管理微服务。Nacos 提供了一组简单易用的特性集,帮助您快速 实现动态服务发现、服务配置、服务元数据及流量管理。 从上面的介绍就可以看出,nacos的作用就是一个注册中心,用来管理注册上来的各个微服务。
三、nacos实战入门
接下来,我们就在现有的环境中加入nacos,并将我们的两个微服务注册上去。
1.搭建nacos环境
第一步:安装nacos
下载地址: https://github.com/alibaba/nacos/releases
下载zip格式的安装包,然后进行解压缩操作
这是我安装好了放的位置。

第2步:修改startup.cmd文件,将集群模式改为单击模式
没改之前是 set MODE="cluster" 集群模式
直接修改:set MODE="standalone" 保存即可。单击模式

第3步:启动nacos
#切换目录
cd nacos/bin
#命令启动
startup.cmd -m standalone

第4步:访问nacos
打开浏览器输入、http://localhost:8848/nacos,即可访问服务, 默认密码是nacos/nacos

2.将商品、订单、微服务注册到nacos
接下来开始修改shop-product 模块的代码, 将其注册到nacos服务上
注意在父模块中是否导入了alibaba
<!-- SpringCloud 依赖配置 -->
<dependency>
    <groupId>org.springframework.cloud</groupId>
    <artifactId>spring-cloud-dependencies</artifactId>
    <version>${spring-cloud.version}</version>
    <type>pom</type>
    <scope>import</scope>
</dependency>
<!-- SpringCloud alibaba 依赖配置 -->
<dependency>
    <groupId>com.alibaba.cloud</groupId>
    <artifactId>spring-cloud-alibaba-dependencies</artifactId>
    <version>${spring-cloud-alibaba.version}</version>
    <type>pom</type>
    <scope>import</scope>
</dependency>
注意:父模块中是否把子模块挂载了

<?xml version="1.0" encoding="UTF-8"?>
<project xmlns="http://maven.apache.org/POM/4.0.0"
         xmlns:xsi="http://www.w3.org/2001/XMLSchema-instance"
         xsi:schemaLocation="http://maven.apache.org/POM/4.0.0 http://maven.apache.org/xsd/maven-4.0.0.xsd">
    <modelVersion>4.0.0</modelVersion>

    <groupId>com.jwj</groupId>
    <artifactId>springcloud-shop</artifactId>
    <version>1.0-SNAPSHOT</version>
    <modules>
        <module>shop-common</module>
        <module>shop-order</module>
        <module>shop-product</module>
        <module>shop-user</module>
    </modules>
    <packaging>pom</packaging>
    <!--依赖版本的锁定-->
    <properties>
        <java.version>1.8</java.version>
        <project.build.sourceEncoding>UTF-8</project.build.sourceEncoding>
        <project.reporting.outputEncoding>UTF-8</project.reporting.outputEncoding>
        <spring-boot.version>2.3.2.RELEASE</spring-boot.version>
        <spring-cloud.version>Hoxton.SR9</spring-cloud.version>
        <spring-cloud-alibaba.version>2.2.6.RELEASE</spring-cloud-alibaba.version>
    </properties>

<!--  dependencyManagement:锁定版本  锁定spring-boot.version -->
    <dependencyManagement>
        <dependencies>
            <!-- SpringBoot 依赖配置 -->
            <dependency>
                <groupId>org.springframework.boot</groupId>
                <artifactId>spring-boot-dependencies</artifactId>
                <version>${spring-boot.version}</version>
                <type>pom</type>
                <scope>import</scope>
            </dependency>
            <!-- SpringCloud 依赖配置 -->
            <dependency>
                <groupId>org.springframework.cloud</groupId>
                <artifactId>spring-cloud-dependencies</artifactId>
                <version>${spring-cloud.version}</version>
                <type>pom</type>
                <scope>import</scope>
            </dependency>
            <!-- SpringCloud alibaba 依赖配置 -->
            <dependency>
                <groupId>com.alibaba.cloud</groupId>
                <artifactId>spring-cloud-alibaba-dependencies</artifactId>
                <version>${spring-cloud-alibaba.version}</version>
                <type>pom</type>
                <scope>import</scope>
            </dependency>
        </dependencies>

    </dependencyManagement>

</project>
1.在shop-common(公共)模块的pom.xml中添加nacos的依赖
<!--nacos客户端-->
<dependency>
	<groupId>com.alibaba.cloud</groupId>
	<artifactId>spring-cloud-starter-alibaba-nacos-discovery</artifactId>
</dependency>
2.在主类上添加@EnableDiscoveryClient注解
在启动类上去添加我们的开启远程连接的注解
@SpringBootApplication
@EnableDiscoveryClient
public class ProductApplication

3.在application.yml中添加nacos服务的地址
spring:
cloud:
nacos:
discovery:
server-addr: localhost:8848

4.启动服务,观察nacos的控制面板中是否有注册上来的商品微服务


这种方式是不可取的,因为我们是直接通过我们的id和端口直接转发的

四、实现服务调用的负载均衡
1.什么是负载均衡
通俗的讲, 负载均衡就是将负载(工作任务,访问请求)进行分摊到多个操作单元(服务器,组件)上 进行执行。 根据负载均衡发生位置的不同,一般分为服务端负载均衡和客户端负载均衡。 服务端负载均衡指的是发生在服务提供者一方,比如常见的nginx负载均衡 而客户端负载均衡指的是发生在服务请求的一方,也就是在发送请求之前已经选好了由哪个实例处理请 求。
我们在微服务调用关系中一般会选择客户端负载均衡,也就是在服务调用的一方来决定服务由哪个提供 者执行。
2. DiscoveryClient实现负载均衡
1.通过idea再启动一个shop-Product 微服务,设置其端口为8081


运行起来。
2.通过nacos查看微服务的启动情况
能访问。


3.修改shop-order 的代码,实现负载均衡
OrderController.java 第一种负载均衡,不好,不推荐
package com.jwj.shoporder;

import com.jwj.model.Order;
import com.jwj.model.Product;
import com.jwj.model.User;
import org.springframework.beans.factory.annotation.Autowired;
import org.springframework.cloud.client.ServiceInstance;
import org.springframework.cloud.client.discovery.DiscoveryClient;
import org.springframework.web.bind.annotation.PathVariable;
import org.springframework.web.bind.annotation.RequestMapping;
import org.springframework.web.bind.annotation.RestController;
import org.springframework.web.client.RestTemplate;

import java.util.List;
import java.util.Random;

/**
 * @author 敢敢
 * @site www.javajwj.com
 * @company xxx公司
 * @create  2022-11-25 17:39
 */
@RestController
@RequestMapping("/order")
public class OrderController {
    @Autowired
    private RestTemplate restTemplate;

    @Autowired
    private DiscoveryClient discoveryClient;

    @RequestMapping("/get/{uid}/{pid}")
    public Order get(@PathVariable("uid") Integer uid,
                     @PathVariable("pid")  Integer pid){
//        我们可以通过服务名,拿到多个节点的信息
        List<ServiceInstance> instances = discoveryClient.getInstances("shop-product");
//        随机产生0或者1的整数
        int index = new Random().nextInt(instances.size());
        ServiceInstance serviceInstance = instances.get(index);
        String url = serviceInstance.getHost() + ":" +
                serviceInstance.getPort();


        /*
        要在订单微服务中调用 用户微服务、商品微服务。 也就意味这跨项目调用
         */
        //通过restTemplate调用用户/商品微服务
        User u = restTemplate.getForObject("http://localhost:8070/user/get/" + uid, User.class);
        Product p = restTemplate.getForObject("http://"+url+"/product/get/" + pid, Product.class);
        Order order = new Order();
        order.setUsername(u.getUsername());
        order.setUid(u.getUid());
        order.setPprice(p.getPprice());
        order.setPname(p.getPname());
        order.setPid(p.getPid());
        order.setOid(System.currentTimeMillis());//订单号随机生成
        order.setNumber(p.getStock());//数量,全包了
        return order;
    }
}
ProductController.java 打印了一下启动的到底是哪个端口号
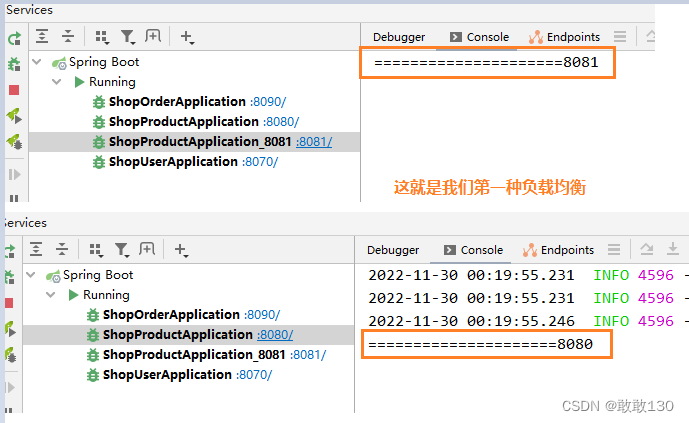
package com.jwj.shopproduct.controller;

import com.jwj.model.Product;
import org.springframework.web.bind.annotation.PathVariable;
import org.springframework.web.bind.annotation.RequestMapping;
import org.springframework.web.bind.annotation.RestController;

import javax.servlet.http.HttpServletRequest;

/**
 * @author 敢敢
 * @site www.javajwj.com
 * @company xxx公司
 * @create  2022-11-25 17:51
 */
@RestController
@RequestMapping("/product")
public class ProductController {
    @RequestMapping("/get/{pid}")
    public Product get(@PathVariable("pid") Integer pid, HttpServletRequest request){
        System.out.println("====================="+request.getServerPort());
        return new Product(pid,"西游记",66d,20);
    }
}
4.启动服务,运行同一个页面,多次访问测试效果如下所示:

这里我们备份一份OrderController.java
3.Ribbon实现负载均衡
Ribbon是Spring Cloud的一个组件, 它可以让我们使用一个注解就能轻松的搞定负载均衡
第1步:在RestTemplate 的生成方法上添加@LoadBalanced注解
ShopOrderApplocation.java
package com.jwj.shoporder;

import org.springframework.boot.SpringApplication;
import org.springframework.boot.autoconfigure.SpringBootApplication;
import org.springframework.cloud.client.discovery.EnableDiscoveryClient;
import org.springframework.cloud.client.loadbalancer.LoadBalanced;
import org.springframework.context.annotation.Bean;
import org.springframework.web.client.RestTemplate;

//@SpringBootApplication:这个注解本身就包含了配置类的注解
// 点进去找到这个@SpringBootConfiguration 里面就有 @Configuration
//也就是说当前这个启动类可以当成配置类来使用
@EnableDiscoveryClient
@SpringBootApplication
public class ShopOrderApplication {

    public static void main(String[] args) {
        SpringApplication.run(ShopOrderApplication.class, args);
    }

//    ribbon 负载均衡添加
    @LoadBalanced
    @Bean
    public RestTemplate restTemplate(){
        return new RestTemplate();
    }
}
第2步:修改服务调用的方式
package com.jwj.shoporder;

import com.jwj.model.Order;
import com.jwj.model.Product;
import com.jwj.model.User;
import org.springframework.beans.factory.annotation.Autowired;
import org.springframework.cloud.client.ServiceInstance;
import org.springframework.cloud.client.discovery.DiscoveryClient;
import org.springframework.web.bind.annotation.PathVariable;
import org.springframework.web.bind.annotation.RequestMapping;
import org.springframework.web.bind.annotation.RestController;
import org.springframework.web.client.RestTemplate;

import java.util.List;
import java.util.Random;

/**
 * @author 敢敢
 * @site www.javajwj.com
 * @company xxx公司
 * @create  2022-11-25 17:39
 */
@RestController
@RequestMapping("/order")
public class OrderController {
    @Autowired
    private RestTemplate restTemplate;

    @RequestMapping("/get/{uid}/{pid}")
    public Order get(@PathVariable("uid") Integer uid,
                     @PathVariable("pid")  Integer pid){

        /*
        要在订单微服务中调用 用户微服务、商品微服务。 也就意味这跨项目调用
         */
//        当采用http://shop-user/user/get/方式访问第三方服务,那么localhost:8080/user/get方式就用不了也不能用了,主机的方式也不行
        User u = restTemplate.getForObject("http://shop-user/user/get/" + uid, User.class);
        Product p = restTemplate.getForObject("http://shop-product/product/get/" + pid, Product.class);
        Order order = new Order();
        order.setUsername(u.getUsername());
        order.setUid(u.getUid());
        order.setPprice(p.getPprice());
        order.setPname(p.getPname());
        order.setPid(p.getPid());
        order.setOid(System.currentTimeMillis());//订单号随机生成
        order.setNumber(p.getStock());//数量,全包了
        return order;
    }
}
运行效果如图所示:

Ribbon支持的负载均衡策略
Ribbon内置了多种负载均衡策略,内部负载均衡的顶级接口为com.netflix.loadbalancer.IRule , 具体的负载策略如下图所示:
| 规则名 | 策略描述实 | 备注 |
|---|---|---|
| RoundRobinRule | 线性轮询 | 轮询index,选择index对应位置的server |
| WeightedResponseTimeRule | 根据rt分配一个权重值,rt时间越长,weight越小,被选中的可能性就越低 | 使用一个后台线程默认每30s重新计算一次权重值 |
| BestAvailableRule | 选择一个活跃请求数最小的Server | 忽略已经被熔断的Server |
| PredicateBasedRule | 基于断言器实现的规则 | 本类为抽象类,具体过滤规则交给子类 |
| AvailabilityFilteringRule | 过滤掉已熔断or活跃请求数太高的Server后,剩下的执行线性轮询 | 依赖于AvailabilityPredicate这个断言器实现过滤 |
| ZoneAvoidanceRule | 复合判断。先选出可用区,然后在按上规则筛选出复合条件的Server们,执行线性轮询 | 使用ZoneAvoidancePredicate和AvailabilityPredicate两个主断言器实现过滤 |
| RandomRule | 随机选择一个server | 在index上随机,选择index对应位置的server |
| RetryRule | 对任何IRule包一层重试机制 | 在一个配置时间段内当选择server不成功,则一直尝试使用subRule的方式选择一个可用的server |
我们可以通过修改配置来调整Ribbon的负载均衡策略,具体代码如下:
service-product: # 调用的提供者的名称
ribbon:
NFLoadBalancerRuleClassName: com.netflix.loadbalancer.RandomRule
五、基于Feign实现服务调用
1.什么是Feign
Feign是Spring Cloud提供的一个声明式的伪Http客户端, 它使得调用远程服务就像调用本地服务 一样简单, 只需要创建一个接口并添加一个注解即可。 Nacos很好的兼容了Feign, Feign默认集成了 Ribbon, 所以在Nacos下使用Fegin默认就实现了负 载均衡的效果。
2.Feign的基本使用
1.加入Feign的依赖 pom.xml(shop-common)
<!--fegin组件-->
<dependency>
	<groupId>org.springframework.cloud</groupId>
	<artifactId>spring-cloud-starter-openfeign</artifactId>
</dependency>
2.在主类上添加Feign的注解 shop-order
@SpringBootApplication
@EnableDiscoveryClient
@EnableFeignClients//开启Fegin
public class OrderApplication {}
3.创建一个service,并使用Feign实现微服务调用
package com.jwj.shoporder.service;

import com.jwj.model.Product;
import org.springframework.cloud.openfeign.FeignClient;
import org.springframework.web.bind.annotation.PathVariable;
import org.springframework.web.bind.annotation.RequestMapping;

import javax.servlet.http.HttpServletRequest;

/**
 * @author 敢敢
 * @site www.javajwj.com
 * @company xxx公司
 * @create  2022-11-30 1:55
 *
 * 帮助消费者 shop-order 调用生产者 shop-product
 */
@FeignClient("shop-product")//声明调用的提供者的name
public interface ProductService {
//    接口定义,完全遵守restful接口规范,controller怎么写,这里就怎么写
//    注意:记得加上controller上的载化路径
    //指定调用提供者的哪个方法
    //@FeignClient+@GetMapping 就是一个完整的请求路径
    //http://serviceproduct/product/{pid}
@RequestMapping("/product/get/{pid}")
public Product get(@PathVariable("pid") Integer pid);

}
4.修改OrderController代码,并启动验证
这里用户我们就没有弄了
package com.jwj.shoporder;

import com.jwj.model.Order;
import com.jwj.model.Product;
import com.jwj.model.User;
import com.jwj.shoporder.service.ProductService;
import org.springframework.beans.factory.annotation.Autowired;
import org.springframework.cloud.client.ServiceInstance;
import org.springframework.cloud.client.discovery.DiscoveryClient;
import org.springframework.web.bind.annotation.PathVariable;
import org.springframework.web.bind.annotation.RequestMapping;
import org.springframework.web.bind.annotation.RestController;
import org.springframework.web.client.RestTemplate;

import javax.servlet.http.HttpServletRequest;
import java.util.List;
import java.util.Random;

/**
 * @author 敢敢
 * @site www.javajwj.com
 * @company xxx公司
 * @create  2022-11-25 17:39
 */
@RestController
@RequestMapping("/order")
public class OrderController {
    @Autowired
    private ProductService productService;
    @Autowired
    private RestTemplate restTemplate;

    @RequestMapping("/get/{uid}/{pid}")
    public Order get(@PathVariable("uid") Integer uid,
                     @PathVariable("pid")  Integer pid){
        /*
        要在订单微服务中调用 用户微服务、商品微服务。 也就意味这跨项目调用
         */
//        当采用http://shop-user/user/get/方式访问第三方服务,那么localhost:8080/user/get方式就用不了了
        User u = restTemplate.getForObject("http://shop-user/user/get/" + uid, User.class);
        Product p = productService.get(pid);

        Order order = new Order();
        order.setUsername(u.getUsername());
        order.setUid(u.getUid());
        order.setPprice(p.getPprice());
        order.setPname(p.getPname());
        order.setPid(p.getPid());
        order.setOid(System.currentTimeMillis());//订单号随机生成
        order.setNumber(p.getStock());//数量,全包了
        return order;
    }
}
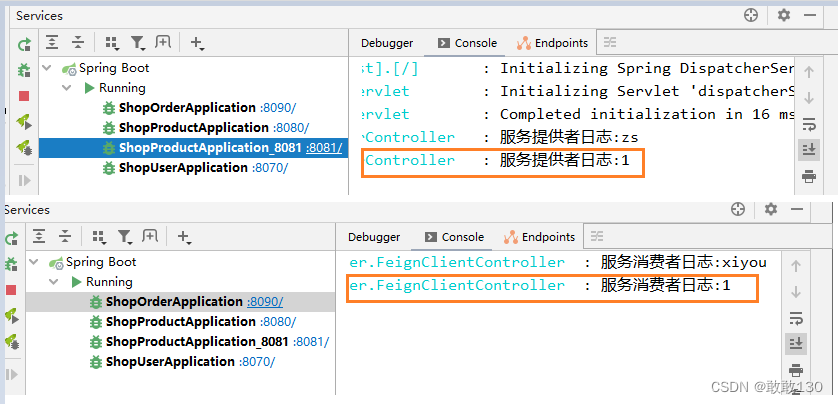
5.重启ShopOrderApplication.java,运行效果如下:

6.重启order微服务,查看效果
FeignClient接口,不能使用@GettingMapping之类的组合注解
FeignClient接口中,如果使用到@PathVariable必须指定其value
只要参数是复杂对象,即使指定了是GET方法,feign依然会以POST方法进行发送请求,同时生产者必须支持POST请求并给参数添加@RequestBody注解 建议使用公共vo+@RequestBody方式
4.springcloud中feign访问其他服务并传参数出现错误的问题:status 405 reading LogisticsOrderService#getLogistics(Integer,String,Integer,Integer) 当使用feign传参数的时候,需要加上@RequestParam注解,否则对方服务无法识别参数; @GetMapping("/order/getLogistics") public ResponseObj getLogistics( @RequestParam(value = "logisticsType") Integer logisticsType, @RequestParam(value="token") String token, @RequestParam(value = "currentPage", defaultValue = "1") Integer currentPage, @RequestParam(value = "pageSize", defaultValue = "10") Integer pageSize);
六、Feign参数传参
加到我们服务的提供方,商品微服务 shop-product
FeignServerController.java
package com.jwj.shopproduct.controller;

import com.jwj.model.Product;
import lombok.extern.slf4j.Slf4j;
import org.springframework.web.bind.annotation.*;

@Slf4j
@RestController
@RequestMapping("/feign")
public class FeignServerController {
    @RequestMapping("/findByParameter")
    public String findByParameter(String name,Double price){
        log.info("服务提供者日志:{}",name);
        return "hello:"+name;
    }
    @RequestMapping("/findByParameter2")
    public String findByParameter2(
            @RequestParam("name") String name,
            @RequestParam("price") Double price){
        log.info("服务提供者日志:{},{}",name,price);
        return "hello:"+name+price;
    }
    @RequestMapping("/findByPathVariable/{name}")
    public String findByPathVariable(@PathVariable String name){
        log.info("服务提供者日志:{}",name);
        return "hello:"+name;
    }
    @RequestMapping("/findByRequestBody")
    public Product findByRequestBody(@RequestBody Product product){
        log.info("服务提供者日志:{}",product.getPname());
        return product;
    }
}
ProductService.java 接口
package com.jwj.shoporder.service;

import com.jwj.model.Product;
import org.springframework.cloud.openfeign.FeignClient;
import org.springframework.web.bind.annotation.PathVariable;
import org.springframework.web.bind.annotation.RequestBody;
import org.springframework.web.bind.annotation.RequestMapping;
import org.springframework.web.bind.annotation.RequestParam;

import javax.servlet.http.HttpServletRequest;

/**
 * @author 敢敢
 * @site www.javajwj.com
 * @company xxx公司
 * @create  2022-11-30 1:55
 *
 * 帮助消费者 shop-order 调用生产者 shop-product
 */
@FeignClient("shop-product")//声明调用的提供者的name
public interface ProductService {
//    接口定义,完全遵守restful接口规范,controller怎么写,这里就怎么写
//    注意:记得加上controller上的载化路径
    //指定调用提供者的哪个方法
    //@FeignClient+@GetMapping 就是一个完整的请求路径
    //http://serviceproduct/product/{pid}
    @RequestMapping("/product/get/{pid}")
    public Product get(@PathVariable("pid") Integer pid);

    @RequestMapping("/feignServer/findByParameter")
    public String findByParameter(@RequestParam("name")String name,
                                  @RequestParam("price")Double price);

    @RequestMapping("/feignServer/findByParameter2")
    public String findByParameter2(
            @RequestParam("name") String name,
            @RequestParam("price") Double price);

    @RequestMapping("/feignServer/findByPathVariable/{name}")
    public String findByPathVariable(@PathVariable("name") String name);

    @RequestMapping("/feignServer/findByRequestBody")
    public Product findByRequestBody(@RequestBody Product product);

}
FeignClientController.java(shop-order)
package com.jwj.shoporder;

import com.jwj.model.Product;
import com.jwj.shoporder.service.ProductService;
import lombok.extern.slf4j.Slf4j;
import org.springframework.beans.factory.annotation.Autowired;
import org.springframework.web.bind.annotation.*;

@Slf4j
@RestController
@RequestMapping("/feignClient")
public class FeignClientController {
    @Autowired
    private ProductService productService;
    @RequestMapping("/findByParameter")
    public String findByParameter(@RequestParam("name") String name,
                                  @RequestParam("price") Double price){
        log.info("服务消费者日志:{}",name);
        return productService.findByParameter(name,price);//运行ShopOrderApplocation的时候这个会报错
    }
    @RequestMapping("/findByParameter2")
    public String findByParameter2(
            @RequestParam("name") String name,
            @RequestParam("price") Double price){
        log.info("服务消费者日志:{},{}",name,price);
        return productService.findByParameter2(name,price);
    }
    @RequestMapping("/findByPathVariable/{name}")
    public String findByPathVariable(@PathVariable("name") String name){
        log.info("服务消费者日志:{}",name);
        return productService.findByPathVariable(name);
    }
    @RequestMapping("/findByRequestBody")
    public Product findByRequestBody(@RequestBody Product product){
        log.info("服务消费者日志:{}",product.getPname());
        return productService.findByRequestBody(product);
    }
}
运行效果如图所示:


路径传参


打开我们的Eolink,因为我们的@RequestBody要传一个json对象,我们不能直接传一个串。


![[附源码]计算机毕业设计springboot环境保护宣传网站](https://img-blog.csdnimg.cn/d555f404e4ca4036975da00314b28766.png)