Spring IOC目录
- 主要内容
- Spring 框架介绍
- Spring 框架的优势(对比以前项目的缺点)
- Spring 框架引入
- 历史发展
- 框架学习三要素
- Spring 模块介绍
- Spring IoC/DI - 引入
- IoC/DI 概念辨析
- 使用IoC/DI的好处
- IoC/DI具体应用场景
- Spring IoC/DI - 代码实现
- 环境准备
- Spring 框架环境搭建
- 创建Maven聚合工程
- 新建 Maven 项目(模块)
- 在pom.xml中添加spring的依赖
- 随意创建一个类:创建Person类
- 添加Spring 配置文件
- 加载配置文件,获取实例化对象
- Spring IoC/DI - 容器 Bean 对象实例化模拟
- 构建实体类Person类和User类
- 准备自定义配置文件
- 定义 Bean 属性对象
- 添加 dom4j 坐标依赖
- 定义 Bean 工厂接口
- 定义 Bean 接口的实现类
- 测试自定义 IOC 容器
- Spring IoC/DI - Bean 对象实例化方式
- 方式1:通过构造方法进行实例化
- 工厂模式介绍
- 工厂实例化介绍
- 方式2:实例化工厂实例化
- 方式3:静态工厂实例化
- Spring IoC/DI - 属性注入
- 构造注入
- 定义Bean类和有参构造方法
- 配置bean
- 编写测试类并观察控制台运行结果
- 设值注入(setter注入)
- 定义Bean类和Setter方法
- 配置Bean
- 编写测试类并观察控制台结果
- 注入方式的选择
- p名称空间的使用
- 不同属性类型注入对应的写法
- 定义People类和setter方法
- 配置bean
- 测试
- 循环依赖
- 自动注入
- Spring IoC/DI - bean标签的scope属性
- Spring IoC/DI - Bean的生命周期
- Bean 的初始化
- Bean 的使用
- Bean 的销毁
- Spring整合MyBatis
- 数据库创建表
- 构建web项目
- 添加依赖坐标、插件
- 补全java目录并添加包结构
- 创建User实体类
- mapper层处理
- 整合mybatis的处理
- 业务层实现
- 控制层实现
- index.jsp
- login.jsp
- 解决项目缺陷
- 日志处理
- 方式1:保留mybatis.xml
- 方式2:修改日志类型换为slf4j
- Spring IoC/DI - 注解的支持
- Spring现有代码问题分析和解决方法
- @Component注解的子注解
- 属性注入相关的注解
- 普通数据类型的属性的赋值 @Value注解
主要内容
![[外链图片转存失败,源站可能有防盗链机制,建议将图片保存下来直接上传(img-TX2jinQt-1682532373362)(01-Spring IOC.assets/Spring-48.png)]](https://img-blog.csdnimg.cn/f32a88be90f64e81b468a67abdb849e9.png)
Spring 框架介绍
Spring 框架的优势(对比以前项目的缺点)
(1)单纯使用Mybatis框架,业务层代码复杂,需要用大量的代码自行解析mybatis.xml配置文件,压力都给到了业务层代码,如下代码:
public class Test2 {
    public static void main(String[] args) throws IOException {
        //指定核心配置文件的路径:
        String resource = "mybatis.xml";
        //获取加载配置文件的输入流:
        InputStream inputStream = Resources.getResourceAsStream(resource);
        //加载配置文件,创建工厂类
        SqlSessionFactory sqlSessionFactory = new SqlSessionFactoryBuilder().build(inputStream);
        //通过工厂类获取一个会话:
        SqlSession sqlSession = sqlSessionFactory.openSession();
        //代理
        BookMapper mapper = sqlSession.getMapper(BookMapper.class);
        //Book book = mapper.selectOneBook("项目驱动零起点学Java", "马士兵、赵珊珊");
        Book b = new Book();
        b.setName("项目驱动零起点学Java");
        b.setAuthor("马士兵、赵珊珊");
        //Book book = mapper.selectOneBook2(b);
        Book book = mapper.selectOneBook3("项目驱动零起点学Java", b);

        System.out.println(book.getName());
        //关闭资源:
        sqlSession.close();
    }
}
学习了spring以后,mybaits的使用会更加简单,会简化业务层处理的代码。
(2)层与层之间的耦合性太高了。比如在分层思想中,controller层调用service层,service层调用mapper层(dao层),controller层中调用service层的对象的时候,需要构建service层对象,此时如果service改变,那么controller层中所有new service层对象的位置全部需要改变。学了spring以后,你看不到new对象了,创建对象交由spring来完成,就是我们要学习的ioc/di部分。
(3)mybatis中处理事务的方式与传统JDBC是一样的,事务管理不够方便,现在可以交由Spring来管理。就是我们要学习的tx部分。
(4)目前的项目没有扩展性而言。比如我们写好的项目部署的话,需要把项目的war包发到服务器上,但是war包中都是class文件,没有办法修改,你想要对某个功能进行扩展是做不到的,学了spring以后,就可以在不改变原有代码的情况下,在它基础上做扩展,就是我们要学习的aop部分。
(5)spring可以整合各种优秀的框架。spring也叫框架的框架,如整合springmvc,mybatis,就是我们常用的SSM框架。很多年前:SSH框架。
综上所述:Spring是一个全功能栈框架,功能非常全。
Spring 框架引入
Spring 框架(Spring Framework)前身是interface21,由Rod Johnson于2002年研发。

Spring 是众多开源java项目中的一员,基于分层的javaEE应用一站式轻量级开源框架,主要核心是 IOC/DI与 AOP两大技术,实现项目在开发过程中的轻松解耦,提高项目的开发效率。(上节课优势中我们已经说明了)
Spring最初火的原因是——轮子理论。
历史发展
- 2002年大约有3万行代码,interface21出现
- 2003年Rod Johnson和朋友在interface21基础上研发了Spring
- 2004年3月,Spring 1.0发布
- 2006年10月,Spring 2.0发布
- 2007年11月,更名为 SpringSource,同时发布了 Spring 2.5。
- 2009年12月,Spring 3.0 发布。同时把Spring由一个jar包拆分成多个jar包,真正实现模块化。
- 2013年12 月,Spring 框架 4.0发布
- 2017年9月,Spring框架5.0发布。
- 2022年11月,Spring框架6.0发布。 (里程碑版本,未来十年的开端)
到文档制作时,Spring框架最新版为6.0.5。
spring官网:https://spring.io/
![[外链图片转存失败,源站可能有防盗链机制,建议将图片保存下来直接上传(img-UvzHjN2x-1682532373364)(01-Spring IOC.assets/Spring-12.png)]](https://img-blog.csdnimg.cn/e40731f246f84e1caf9ef811d759b027.png)
![[外链图片转存失败,源站可能有防盗链机制,建议将图片保存下来直接上传(img-DEobc7fo-1682532373364)(01-Spring IOC.assets/Spring-13.png)]](https://img-blog.csdnimg.cn/7c7d3df8531f48b38368d8e8cbaa39ba.png)
框架学习三要素
框架学习三要素:jar包、API、源码。
(1)jar包:使用的时候去Maven仓库中查找即可。
注意:2009年12月,Spring 3.0 发布。同时把Spring由一个jar包拆分成多个jar包,真正实现模块化。
随着Spring框架的不断发展,在Spring官方压缩包中包含的模块对应的jar也越来越多。学习Spring其实就是在分别学习Spring所有模块的功能。
如果希望下载官方压缩包,查看所有jar包,可以通过下面链接下载。在Maven项目中,不需要单独下载下面内容:
https://repo.spring.io/libs-release-local/org/springframework/spring/ (下载spring的官方压缩包)
(2)API:
在https://spring.io/中查看:
![[外链图片转存失败,源站可能有防盗链机制,建议将图片保存下来直接上传(img-V6PGxDNY-1682532373365)(01-Spring IOC.assets/Spring-14.png)]](https://img-blog.csdnimg.cn/0e5b59e4b7764244a8fbd277139cd3fe.png)
![[外链图片转存失败,源站可能有防盗链机制,建议将图片保存下来直接上传(img-UpWqKch3-1682532373366)(01-Spring IOC.assets/Spring-15.png)]](https://img-blog.csdnimg.cn/6bce3367eb654fbcb2153eb14fa551ed.png)
![[外链图片转存失败,源站可能有防盗链机制,建议将图片保存下来直接上传(img-3VIcN06I-1682532373367)(01-Spring IOC.assets/Spring-16.png)]](https://img-blog.csdnimg.cn/d06d5b36cbf54fa5b32e5a588643b7f3.png)
(3)源码:
开源的,可自行下载源码:
https://github.com/spring-projects/spring-framework/tags (下载源码)
Spring 模块介绍
Spring是一个全功能栈框架,学习Spring其实就是在分别学习Spring所有模块的功能。Spring模块(Spring的组成部分)如下划分:
[外链图片转存失败,源站可能有防盗链机制,建议将图片保存下来直接上传(img-vnhbTCCe-1682532373368)(.\01-Spring IOC.assets/Spring-01.png)]
Spring 总共大约有20个模块,由1300多个不同的文件构成。而这些组件被分别整合在核心容器(Core Container)、Aop(Aspect Oriented Programming)和设备支持(Instrmentation)、数据访问及集成(Data Access/Integeration)、Web、报文发送(Messaging)、测试模块集合中。
-
核心容器:Spring-beans 和 Spring-core 模块是 Spring 框架的核心模块,包含控制反转(Inversion of Control, IoC)和依赖注入(Dependency Injection, DI),核心容器提供 Spring 框架的基本功能。核心容器的主要组件是 BeanFactory,工厂模式的实现。BeanFactory 使用控制反转(IOC) 思想将应用程序的配置和依赖性规范与实际的应用程序代码分开。
Spring Context -Spring 上下文:Spring 上下文是一个配置文件,向 Spring 框架提供上下文信息。Spring 上下文包括企业服务,例如 JNDI、EJB、电子邮件、国际化、校验和调度功能。
Spring-Expression 模块是统一表达式语言(unified EL)的扩展模块,可以查询、管理运行中的对象,同时也方便的可以调用对象方法、操作数组、集合等。它的语法类似于传统EL,但提供了额外的功能,最出色的要数函数调用和简单字符串的模板函数。
-
Spring-AOP:Spring-aop是Spring的另一个核心模块, 在Spring中,他是以JVM的动态代理技术为基础,然后设计出了一系列的Aop横切实现,比如前置通知、返回通知、异常通知等。通过其配置管理特性,Spring AOP 模块直接将面向切面的编程功能集成到了 Spring 框架中。所以,可以很容易地使 Spring 框架管理的任何对象支持 AOP。
-
Spring Data Access(数据访问):由Spring-jdbc、Spring-tx、Spring-orm、Spring-jms和Spring-oxm 5个模块组成 。
Spring-jdbc 模块是 Spring 提供的JDBC抽象框架的主要实现模块,用于简化 Spring JDBC。
Spring-tx 模块是SpringJDBC事务控制实现模块。使用Spring框架,它对事务做了很好的封装,通过它的Aop配置,可以灵活的配置在任何一层。
Spring-Orm 模块是ORM框架支持模块,主要集成 hibernate, Java Persistence API (JPA) 和 Java Data Objects (JDO) 用于资源管理、数据访问对象(DAO)的实现和事务策略。
Spring-Jms 模块(Java Messaging Service)能够发送和接受信息。
Spring-Oxm 模块主要提供一个抽象层以支撑OXM(OXM 是 Object-to-XML-Mapping 的缩写,它是一个O/M-mapper,将java对象映射成 XML 数据,或者将 XML 数据映射成 java 对象),例如:JAXB, Castor, XMLBeans, JiBX 和 XStream 等。
-
Web 模块:由Spring-web、Spring-webmvc、Spring-websocket和Spring-webmvc-portlet 4个模块组成,Web 上下文模块建立在应用程序上下文模块之上,为基于 Web 的应用程序提供了上下文。Web 模块还简化了处理多部分请求以及将请求参数绑定到域对象的工作。(这部分就是学习SpringMVC,这里可以看出,Springmvc是包含于spring的框架。)
-
报文发送:即Spring-messaging模块。
Spring-messaging是Spring4 新加入的一个模块,主要职责是为Spring 框架集成一些基础的报文传送应用。
-
单元测试:即Spring-test模块。Spring-test模块主要为单元测试提供支持 。
Spring IoC/DI - 引入
IoC/DI 概念辨析
【1】IoC/DI
IoC(Inversion of Control)中文名称:控制反转,也被称为DI(dependency injection ):依赖注入,属于同一件事情的两个名称。(一定注意,是一个事,不是两个事)
IoC/DI是指一个过程:创建对象的权利,或者是控制的位置,由JAVA代码转移到spring容器,由spring的容器控制对象的创建,就是控制反转,spring创建对象时,会读取配置文件中的信息,然后使用反射给我们创建好对象之后在容器(其实就是一个map集合)中存储起来,当我们需要某个对象时,通过id获取对象即可,不需要我们自己去new。
一句话:创建对象交给容器去做。
由于控制反转概念比较含糊,所以在 2004 年大师级人物Martin Fowler又给出了一个新的名字:“依赖注入”,相对loC而言,“依赖注入”明确描述了“被注入对象依赖loC容器来配置依赖对象”,Dl(英文全称为Dependency Injection,中文译名为依赖注入)是loC的别名。可以简单理解为,容器创建某个依赖对象,并将该依赖对象注入到需要该依赖对象的地方(也可称之为被注入对象)。
【2】容器(Container)
spring容器,放置所有管理对象的对象。其本质是在容器对象里面有一个全局Map对象,map对象中放置所有被管理的对象。Spring中容器是指ApplicationContext接口及子接口或实现类。
【3】bean
容器中所有被管理的对象称为beans,如果单说其中一个对象可称为bean。
使用IoC/DI的好处
Spring IoC/DI使用后可以管理项目中相关对象,让对象管理的事情和业务分离(解耦)。同时程序员也不管理对象的依赖关系,所有的依赖关系交给Spring容器进行管理。
案例:
没有使用spring之前:
![[外链图片转存失败,源站可能有防盗链机制,建议将图片保存下来直接上传(img-SvBbMNiF-1682532373368)(01-Spring IOC.assets/Spring-22.png)]](https://img-blog.csdnimg.cn/fb0fe41777474c9baab31bfdaa34f92d.png)
使用spring-IoC/DI以后:
![[外链图片转存失败,源站可能有防盗链机制,建议将图片保存下来直接上传(img-pQkBHXlI-1682532373369)(01-Spring IOC.assets/Spring-23.png)]](https://img-blog.csdnimg.cn/e41853d3e20f4a978326e775420b44bf.png)
以后如果改变实现类,只需要修改配置文件即可,不需要去java代码中操作了。
要注意我们改都是改实现类,不会改接口,接口是规范,就像灯坏了我们一般换灯泡,不会把灯拆了。
IoC/DI具体应用场景
IoC/DI 主要作用就是管理对象的实例化和对象之间依赖关系。项目中以前需要自己实例化的层对象、需要自己实例化框架或工具包的入口类都可以交给Spring 容器进行管理。
- 层对象:PeopleMapper 接口代理对象、PeopleDaoImpl、PeopleServiceImpl
- 框架入口类:SqlSessionFactory等
下图中对应普通类PeopleMapper、PeopleServiceImpl这些不同层中普通都可以交给Spring容器进行管理。放入到容器中的对象可以相互直接依赖。但是Servlet只能被Tomcat管理(由Tomcat帮助实例化创建的),所以Spring容器是无法管理Servlet的。但是Servlet可以从Spring容器中取出对象。
![[外链图片转存失败,源站可能有防盗链机制,建议将图片保存下来直接上传(img-cteWrl22-1682532373370)(01-Spring IOC.assets/Spring-24.png)]](https://img-blog.csdnimg.cn/403e49be7550455a9c4ba666029ac1e4.png)
Spring IoC/DI - 代码实现
环境准备
(1)idea版本:IntelliJ IDEA 2022.3.1
(2)Maven版本:3.6+
确定Maven环境:
![[外链图片转存失败,源站可能有防盗链机制,建议将图片保存下来直接上传(img-HzT4E4PZ-1682532373370)(01-Spring IOC.assets/Spring-17.png)]](https://img-blog.csdnimg.cn/a759e628cf844d85b8a17ffb4f7b7314.png)
(3)Spring6要求JDK为17以上:
安装JDK17:
![[外链图片转存失败,源站可能有防盗链机制,建议将图片保存下来直接上传(img-vW86ZvkE-1682532373371)(01-Spring IOC.assets/Spring-18.png)]](https://img-blog.csdnimg.cn/6c96e551d6a9467db2a6d092ac0faa27.png)
在idea中设置jdk:
![[外链图片转存失败,源站可能有防盗链机制,建议将图片保存下来直接上传(img-NNKt75RN-1682532373372)(01-Spring IOC.assets/Spring-19.png)]](https://img-blog.csdnimg.cn/40fe44d22aed4dbcb3eedc0e7cd61dbc.png)
(4)spring版本:6.0.5
Spring 框架环境搭建
实现案例:创建Person类,让Spring帮我们管理对象。
创建Maven聚合工程
使用聚合工程以后,以后的项目创建在聚合工程中,以模块的形式存在即可。
创建Maven聚合工程:

因为聚合工程中不需要写java代码,所以可以将src删除:

新建 Maven 项目(模块)
聚合项目Spring6–》右键—》New—》Module:
Spring项目不需要依赖tomcat,所以构建普通java项目即可:
![[外链图片转存失败,源站可能有防盗链机制,建议将图片保存下来直接上传(img-psxT5Sfa-1682532373372)(01-Spring IOC.assets/Spring-25.png)]](https://img-blog.csdnimg.cn/c4887aa1d8e24bfd90da42e828600060.png)
创建好以后变为如下:
![[外链图片转存失败,源站可能有防盗链机制,建议将图片保存下来直接上传(img-2w8OMsWZ-1682532373373)(01-Spring IOC.assets/Spring-26.png)]](https://img-blog.csdnimg.cn/53fc14e53e374d3aa1c2a671763aca60.png)
在pom.xml中添加spring的依赖
在Spring6Demo01模块下的pom.xml中添加spring的依赖。
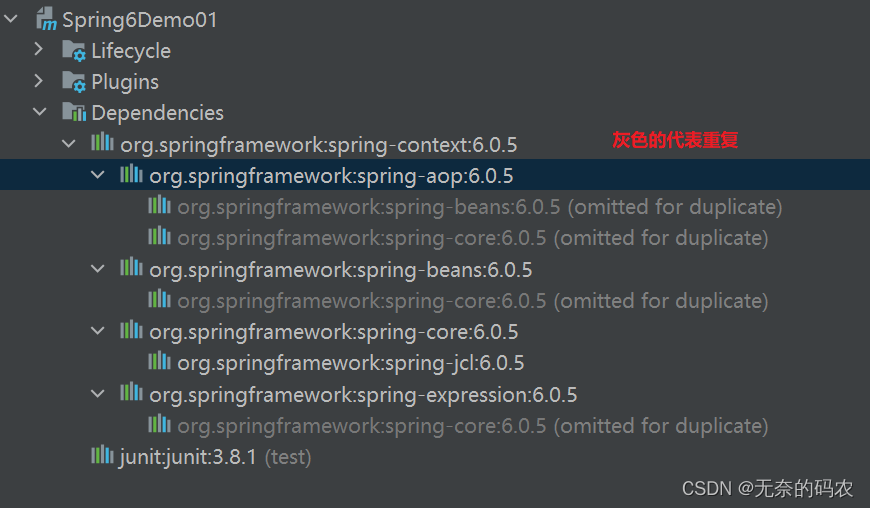
Spring项目的最基本依赖包含:
- spring-context.jar。spring上下文依赖,它依赖了下面的四个jar。
- spring-core.jar。Spring 核心jar包。它依赖了spring-jcl.jar
- spring-aop.jar。Spring AOP面向切面编程的基本支持。
- spring-expression.jar。Spring的表达式语言支持。
- spring-beans.jar。Spring容器的bean管理,创建对象非常重要的包。
- spring-jcl.jar。内置的日志包,Spring 4版本时使用的还是common-logging.jar呢,但是从5开始Spring自己对日志进行了封装。
但是在Maven项目中想要使用Spring框架只需要在项目中导入spring-context就可以了,其他的jar包根据Maven依赖传递性都可以导入进来。
<project xmlns="http://maven.apache.org/POM/4.0.0" xmlns:xsi="http://www.w3.org/2001/XMLSchema-instance"
         xsi:schemaLocation="http://maven.apache.org/POM/4.0.0 http://maven.apache.org/xsd/maven-4.0.0.xsd">
    <modelVersion>4.0.0</modelVersion>
    <parent>
        <groupId>com.msb</groupId>
        <artifactId>Spring6</artifactId>
        <version>1.0-SNAPSHOT</version>
    </parent>

    <artifactId>Spring6Demo01</artifactId>
    <packaging>jar</packaging>

    <name>Spring6Demo01</name>
    <url>http://maven.apache.org</url>

    <properties>
        <project.build.sourceEncoding>UTF-8</project.build.sourceEncoding>
    </properties>

    <dependencies>
        <!--添加spring-context依赖-->
        <dependency>
            <groupId>org.springframework</groupId>
            <artifactId>spring-context</artifactId>
            <version>6.0.5</version>
        </dependency>

        <dependency>
            <groupId>junit</groupId>
            <artifactId>junit</artifactId>
            <version>3.8.1</version>
            <scope>test</scope>
        </dependency>
    </dependencies>
</project>
查看项目依赖为:
随意创建一个类:创建Person类
package com.msb.pojo;

/**
 * @Author: zhaoss
 */
public class Person {
    // 属性
    private int age;
    private String name;
    private double height;

    public int getAge() {
        return age;
    }
    // 提供setter\getter方法
    public void setAge(int age) {
        this.age = age;
    }

    public String getName() {
        return name;
    }

    public void setName(String name) {
        this.name = name;
    }

    public double getHeight() {
        return height;
    }

    public void setHeight(double height) {
        this.height = height;
    }

    public Person() {
        System.out.println("空参构造器");
}

    public Person(int age, String name, double height) {
        System.out.println("有参构造器");
        this.age = age;
        this.name = name;
        this.height = height;
    }

    @Override
    public String toString() {
        return "Person{" +
                "age=" + age +
                ", name='" + name + '\'' +
                ", height=" + height +
                '}';
    }
}
添加Spring 配置文件
在 src\main\下新建resources 目录。
在 src\main\resources 目录下新建 applicationContext.xml 文件,并拷贝官网文档提供的模板内容到 xml 中。
文件名称没有强制要求。官方示例中配置文件名称叫做applicationContext.xml,所以我们也把Spring配置文件叫做applicationContext.xml
配置 bean 到 xml 中,把对应 bean 纳入到 Spring 容器来管理
applicationContext.xml
<?xml version="1.0" encoding="UTF-8"?>
<beans xmlns="http://www.springframework.org/schema/beans"
    xmlns:xsi="http://www.w3.org/2001/XMLSchema-instance"
    xsi:schemaLocation="http://www.springframework.org/schema/beans
        https://www.springframework.org/schema/beans/spring-beans.xsd">
    <!--
            id:bean对象的id,唯一标识。一般是Bean对象的名称的首字母小写
            class:bean对象的类路径
    -->
    <bean id="p" class="com.zss.pojo.Person"></bean>

</beans>
PS :上面的文档头和约束,可以从官方文档中粘贴过来就行:https://docs.spring.io/spring-framework/docs/current/reference/html/core.html#beans-factory-metadata
![[外链图片转存失败,源站可能有防盗链机制,建议将图片保存下来直接上传(img-9gxUK3f6-1682532373373)(01-Spring IOC.assets/Spring-28.png)]](https://img-blog.csdnimg.cn/87a0682f692e4e57a836ab9d200f3161.png)
项目结构:

加载配置文件,获取实例化对象
import com.zss.pojo.Person;
import org.springframework.context.ApplicationContext;
import org.springframework.context.support.ClassPathXmlApplicationContext;

public class App {
    public static void main(String[] args) {
        // Spring通过加载配置文件,创建Spring容器。
        ApplicationContext ac = new ClassPathXmlApplicationContext("applicationContext.xml");
        // 从容器中取出叫做p的bean
        // 第二个参数设置取出Bean的类型。如果没有第二个参数,返回值类型为Object
        Person p = ac.getBean("p", Person.class);//这种方式不需要强转
        Person p2 = (Person)ac.getBean("p");//这种方式需要强转
        System.out.println(p == p2);//这个结果为true,证明从容器中获取的对象是同一个对象
        System.out.println(p);
        System.out.println(p2);
    }
}
可以自己验证一下,将其余代码注释,只留下ApplicationContext ac = new ClassPathXmlApplicationContext(“applicationContext.xml”);这句话执行以后,无参构造器就会调用了,侧面验证出在解析xml文件以后会先将各个bean放入容器供给我们使用。
上述代码结果:
![[外链图片转存失败,源站可能有防盗链机制,建议将图片保存下来直接上传(img-FlaNws8L-1682532373374)(01-Spring IOC.assets/Spring-30.png)]](https://img-blog.csdnimg.cn/4259728e1e22482bb7149b01a9f8d37d.png)
Spring IoC/DI - 容器 Bean 对象实例化模拟
之前已经明白了IOC的原理:
![[外链图片转存失败,源站可能有防盗链机制,建议将图片保存下来直接上传(img-TRX4kij2-1682532373374)(01-Spring IOC.assets/Spring-23.png)]](https://img-blog.csdnimg.cn/5db2ce78a1db4c20a42ab2a54d2deafe.png)
在不依赖spring的情况下,自己模拟bean对象实例化的过程。
新建Spring6Demo02项目(Maven-jar项目)
思路:
(1)定义xml文件,里面定义bean标签,因为后续每个bean标签会被解析为一个对象
(2)解析xml文件(dom4j),解析的时候,会解析xml文件中的bean标签,每个bean标签转换为一个bean对象,此对象包含两个属性:id、class,此对象用来存放bean的id和class值。
(3)因为xml文件中bean标签可能是多个,所以定义一个List集合,存储bean对象。
(4)遍历List集合,得到每一个bean对象,通过bean对象的class属性,反射创建对应的对象。
(5)对象创建好以后,将bean对象的id和反射创建的对象,放入map集合中。
(6)定义一个工厂,(2)-(5)步骤放在工厂的构造器中完成
(7)工厂中定义获取对象的方法,通过id从map集合中获取对象。
构建实体类Person类和User类
package com.msb.pojo;

/**
 * @Author: zhaoss
 */
public class Person {
    private int age;
    private String name;

    public int getAge() {
        return age;
    }

    public void setAge(int age) {
        this.age = age;
    }

    public String getName() {
        return name;
    }

    public void setName(String name) {
        this.name = name;
    }

    public Person() {
        System.out.println("Person空构造器");
    }

    public Person(int age, String name) {
        System.out.println("Person有参构造器");
        this.age = age;
        this.name = name;
    }

    @Override
    public String toString() {
        return "Person{" +
                "age=" + age +
                ", name='" + name + '\'' +
                '}';
    }

    public void eat(){
        System.out.println("Person.eat");
    }
}
package com.msb.pojo;

/**
 * @Author: zhaoss
 */
public class User {
    private String uname;
    private String pwd;

    public String getUname() {
        return uname;
    }

    public void setUname(String uname) {
        this.uname = uname;
    }

    public String getPwd() {
        return pwd;
    }

    public void setPwd(String pwd) {
        this.pwd = pwd;
    }

    public User() {
        System.out.println("User空构造器");
    }

    public User(String uname, String pwd) {
        System.out.println("User有参构造器");
        this.uname = uname;
        this.pwd = pwd;
    }

    @Override
    public String toString() {
        return "User{" +
                "uname='" + uname + '\'' +
                ", pwd='" + pwd + '\'' +
                '}';
    }

    public void sleep(){
        System.out.println("User.sleep");
    }
}
准备自定义配置文件
applicationContext.xml:
<?xml version="1.0" encoding="utf-8" ?>
<beans>
    <bean id="person" class="com.msb.pojo.Person"></bean>
    <bean id="user" class="com.msb.pojo.User"></bean>
</beans>
此时目录结构为:

定义 Bean 属性对象
package com.msb.spring;


/**
 * @Author: zhaoss
 * bean对象
 *      用来接收配置文件中bean标签的id与class属性值
 */
public class MyBean {

    private String id; //bean标签的id的属性值
    private String clazz; //bean标签的class的属性值

    public MyBean() {
    }

    public MyBean(String id, String clazz) {
        this.id = id;
        this.clazz = clazz;
    }

    public String getId() {
        return id;
    }

    public void setId(String id) {
        this.id = id;
    }

    public String getClazz() {
        return clazz;
    }

    public void setClazz(String clazz) {
        this.clazz = clazz;
    }
}
添加 dom4j 坐标依赖
<!-- dom4j -->
<dependency>
    <groupId>dom4j</groupId>
    <artifactId>dom4j</artifactId>
    <version>1.6.1</version>
</dependency>
<!-- XPath :XPath即为XML路径语言(XML Path Language),它是一种用来确定XML文档中某部分位置的语言。
Jaxen是Java的通用XPath引擎。-->
<dependency>
    <groupId>jaxen</groupId>
    <artifactId>jaxen</artifactId>
    <version>1.1.6</version>
</dependency>
定义 Bean 工厂接口
package com.msb.spring;

/**
 * Bean 工厂接口定义
 */
public interface MyFactory {
    // 通过id值获取对象
    public Object getBean(String id);
}
定义 Bean 接口的实现类
package com.msb.spring;

import org.dom4j.Document;
import org.dom4j.DocumentException;
import org.dom4j.Element;
import org.dom4j.XPath;
import org.dom4j.io.SAXReader;
import java.net.URL;
import java.util.ArrayList;
import java.util.HashMap;
import java.util.List;
import java.util.Map;

/**
 * 模拟Spring的实现
 *  1、通过构造器得到相关配置文件
 *  2、通过dom4j解析xml文件,得到List   存放id和class
 *  3、通过反射实例化得到对象   Class.forName(类的全路径).newInstance(); 通过Map<id,Class>存储
 *  4、得到指定的实例化对象
 */
public class MyClassPathXmlApplicationContext implements BeanFactory {

    private Map beans = new HashMap(); // 实例化后的对象放入map
    private List<MyBean> myBeans; // 存放已读取bean 配置信息

    /* 1、通过构造器得到相关配置文件 */
    public MyClassPathXmlApplicationContext(String fileName) {

        /* 2、通过dom4j解析xml文件,得到List (存放id和class) */
        this.parseXml(fileName);

        /* 3、通过反射实例化得到对象Class.forName(类路径).newInstance();  通过Map存储 */
        this.instanceBean();

    }

    /**
     * 通过dom4j解析xml文件,得到List   存放id和class
     *  1、获取解析器
     *  2、得到配置文件的URL
     *  3、通过解析器解析xml文件(applicationContext.xml)
     *  4、通过xpath语法,获取beans标签下的所有bean标签
     *  5、通过指定语法解析文档对象,返回集合
     *  6、判断集合是否为空,遍历集合
     *  7、获取标签元素中的属性
     *  8、得到Bean对象,将Bean对象设置到集合中
     * @param fileName
     */
    private void parseXml(String fileName) {
        // 1、获取解析器
        SAXReader reader = new SAXReader();
        // 2、得到配置文件的URL
        URL url = this.getClass().getClassLoader().getResource(fileName);
        try {
            // 3、通过解析器解析xml文件(applicationContext.xml)
            Document document = reader.read(url);
            // 4、通过xpath语法,获取beans标签下的所有bean标签
            XPath xPath = document.createXPath("beans/bean");
            // 通过指定语法解析文档对象,返回集合
            List<Element> list = xPath.selectNodes(document);
            // 每个文档对象Element可以看一下长什么样:
            for(Element el : list) {
                System.out.println(el + "--------");
            }
            // 判断集合是否为空,遍历集合 :把文档对象转为 MyBean对象
            if (list != null && list.size() > 0) {
                myBeans = new ArrayList<>();
                for(Element el : list) {
                    // 获取标签元素中的属性
                    String id = el.attributeValue("id"); // id 属性值
                    String clazz = el.attributeValue("class"); // class 属性值
                    System.out.println(el.attributeValue("id"));
                    System.out.println(el.attributeValue("class"));
                    // 得到Bean对象
                    MyBean bean = new MyBean(id, clazz);
                    // 将Bean对象设置到集合中
                    myBeans.add(bean);
                }
            }
        } catch (DocumentException e) {
            e.printStackTrace();
        }
    }

    /**
     * 通过反射实例化得到对象
     * 	Class.forName(类的全路径).newInstance();
     *	通过Map<id,Class>存储
     */
    private void instanceBean() {
        // 判断bean集合是否为空,不为空遍历得到对应Bean对象
        if (myBeans != null && myBeans.size() > 0) {
            for (MyBean bean : myBeans){
                try {
                    // 通过类的全路径实例化对象
                    Object object = Class.forName(bean.getClazz()).newInstance();
                    // 将id与实例化对象设置到map对象中
                    beans.put(bean.getId(), object);
                } catch (Exception e) {
                    e.printStackTrace();
                }
            }
        }
    }

    /**
     * 通过key获取map中的指定value
     * @param id
     * @return
     */
    @Override
    public Object getBean(String id) {
        Object object = beans.get(id);
        return object;
    }
}
此时目录结构为:
![[外链图片转存失败,源站可能有防盗链机制,建议将图片保存下来直接上传(img-84iRMQJH-1682532373375)(01-Spring IOC.assets/Spring-32.png)]](https://img-blog.csdnimg.cn/fa7984480c8a4440a27360959a57f857.png)
测试自定义 IOC 容器
测试是否可以获取实例化的Bean对象
package com.msb;

import com.msb.pojo.Person;
import com.msb.pojo.User;
import com.msb.springdiy.MyClassPathXmlApplicationContext;
import com.msb.springdiy.MyFactory;

/**
 * Hello world!
 *
 */
public class App
{
    public static void main( String[] args )
    {
       // 构建工厂对象:
        MyFactory factory = new MyClassPathXmlApplicationContext("applicationContext.xml");
        // 获取对象:
        Person person = (Person)factory.getBean("person");
        User user = (User)factory.getBean("user");
        // 调用对象的方法:
        person.eat();
        user.sleep();

    }
}
测试结果:
![ [外链图片转存失败,源站可能有防盗链机制,建议将图片保存下来直接上传(img-wZyKYpgF-1682532373376)(01-Spring IOC.assets/Spring-34.png)]](https://img-blog.csdnimg.cn/57ab719627644a5c9890ab708002551d.png)
大致完成了模拟:在启动的时候 读取xml配置信息,并对配置的 bean 进行实例化(这里模拟的比较简单,仅用于帮助大家理解),同时通过上下文对象提供的 getBean() 方法拿到我们配置的 bean 对象,从而实现外部容器自动化维护并创建 bean 的效果。
![[外链图片转存失败,源站可能有防盗链机制,建议将图片保存下来直接上传(img-knQutnIE-1682532373376)(01-Spring IOC.assets/Spring-33.png)]](https://img-blog.csdnimg.cn/5446cb7825284991aff2fc1698a3c0ba.png)
Spring IoC/DI - Bean 对象实例化方式
在Spring中实例化Bean有三种方式:
- 通过构造方法进行实例化。默认使用无参构造。这种方式和以前new的方式是等效的。上面的入门Spring项目其实就是这种,只需要在XML中通过
<bean>的class属性指定类的全限定路径,然后就可以实例化对象。 - 通过工厂进行实例化。其中包含两种,可以通过静态工厂和实例工厂进行实例化。这种方式完全是根据设计模式中工厂模式的思想而研发出的。Spring考虑到如果需要频繁实例化某个类的对象,工厂模式无疑是一个好选择。
方式1:通过构造方法进行实例化
注:通过默认构造器创建 空构造方法必须存在 否则创建失败
创建项目、导入依赖过程省略,关键代码:
-
设置配置文件 applicationContext.xml
<?xml version="1.0" encoding="UTF-8"?> <beans xmlns="http://www.springframework.org/schema/beans" xmlns:xsi="http://www.w3.org/2001/XMLSchema-instance" xsi:schemaLocation="http://www.springframework.org/schema/beans https://www.springframework.org/schema/beans/spring-beans.xsd"> <bean id="person" class="com.msb.pojo.Person"></bean> </beans> -
创建测试类,获取实例化对象
package com.msb;

import com.msb.pojo.Person;
import org.springframework.context.ApplicationContext;
import org.springframework.context.support.ClassPathXmlApplicationContext;

/**
 * Hello world!
 *
 */
public class App
{
    public static void main( String[] args )
    {
        //  解析xml:
        ApplicationContext ac = new ClassPathXmlApplicationContext("applicationContext.xml");
        // 获取对象:
        Person person = ac.getBean("person", Person.class);
        person.eat();
    }
}
工厂模式介绍
通常我们构建对象的时候都是随处new对象使用,使用工厂模式它提供了一种创建对象的最佳方式,工厂模式(Factory Pattern)是 Java 中最常用的设计模式之一。创建对象这事,交由工厂去做,你需要某个对象,从工厂中取即可。
在工厂模式中,创建对象不会对客户端暴露创建逻辑,并且是通过使用一个共同的接口来指向新创建的对象。
使用工厂模式的好处
(1)解耦
通过工厂模式可以把对象的创建和使用过程分割开来。比如说 Class A 想调用 Class B的方法,那么我们无需关心B是如何创建的,直接去工厂获取就行。
(2)减少代码量,易于维护
如果我们直接new一个对象时,如果需要的对象构造方法比较复杂,那么可能需要一连串的代码去创建对象,如果在别的类中又需要创建该对象,那么代码的重复度肯定不小。通过工厂模式的话,我们把对象创建的具体逻辑给隐藏起来了,交给工厂统一管理,这样不仅减少了代码量,以后如果想改代码的话,只需要改一处即可,也方便我们日常的维护。
工厂模式使用的场景
对象实例创建的过程比较复杂,并且需要准备很多参数的时候。
类具有很多子类,并且这些类的创建过程在业务中容易发生改变,如果没有工厂,需要在创建对象处一一修改,有了工厂以后只要在工厂中修改即可。
案例:宠物店买宠物
接口:
package com.msb.factory;

/**
 * @Author: zhaoss
 */
public interface Animal {
}
实现类:
package com.msb.factory;

/**
 * @Author: zhaoss
 */
public class Dog implements Animal {

}
package com.msb.factory;

/**
 * @Author: zhaoss
 */
public class Cat implements Animal{
}
工厂:
package com.msb.factory;

/**
 * @Author: zhaoss
 * 宠物店,需要动物的话就去宠物店购买:
 */
public class PetStore {//工厂类
    public Animal getAnimal(String petName){
        if ("猫".equals(petName)){
            return new Cat();
        }else if ("狗".equals(petName)){
            return new Dog();
        }else{
            return null;
        }
    }

    public static Animal getAnimal2(String petName){
        if ("猫".equals(petName)){
            return new Cat();
        }else if ("狗".equals(petName)){
            return new Dog();
        }else{
            return null;
        }
    }
}
测试:
package com.msb.factory;

/**
 * @Author: zhaoss
 */
public class Test {
    public static void main(String[] args) {
        // 从工厂中获取动物:
        PetStore ps = new PetStore();
        // 调用工厂中普通方法:
        Animal an = ps.getAnimal("猫");
        Animal an2 = ps.getAnimal("狗");

        // 调用工厂中静态方法:不需要构建工厂对象
        Animal an3 = PetStore.getAnimal2("猫");
    }
}
工厂实例化介绍
Spring也提供了对工厂实例化的简化,但是你一定要明确简化的是什么。它并不是把工厂代替了,工厂还是原来的工厂,对工厂没有影响的,只是把调用工厂的过程简化了。
当我们指定Spring使用工厂方法来创建Bean实例时,Spring将先解析配置文件,并根据配置文件指定的信息,通过反射调用工厂类的工厂方法,并将该工厂方法的返回值作为Bean实例,在这个过程中,Spring不再负责创建Bean实例,Bean实例是由用户提供的工厂方法提供的。
方式2:实例化工厂实例化
实例化工厂实例化:
- 工厂方法为非静态方法
- 需要配置工厂bean,并在业务bean中配置factory-bean,factory-method属性
- 工厂类
使用工厂模式中的工厂即可
- 设置配置文件applicationContext.xml
<?xml version="1.0" encoding="UTF-8"?>
<beans xmlns="http://www.springframework.org/schema/beans"
       xmlns:xsi="http://www.w3.org/2001/XMLSchema-instance"
       xsi:schemaLocation="http://www.springframework.org/schema/beans
        https://www.springframework.org/schema/beans/spring-beans.xsd">

    <!--
		实例化工厂
			1.定义实例化工厂bean
    		 2.业务bean中引用工厂bean,指定工厂创建方法(方法为非静态)
	-->
    <!--帮助我们完成PetStore的实例化:替代PetStore ps = new PetStore()-->
    <bean id="factory" class="com.msb.factory.PetStore"></bean>
    <!--替代: Animal an = ps.getAnimal("猫"); -->
    <bean id="a" factory-bean="factory" factory-method="getAnimal">
    	<constructor-arg name="petName" value="猫"></constructor-arg>
    </bean>

</beans>
- 获取实例化对象
ApplicationContext ac = new ClassPathXmlApplicationContext("applicationContext.xml");
Animal an = (Animal) ac.getBean("a");
PS:可能你觉得这个配置比我们自己去使用工厂麻烦,那是因为当前工厂是你自己写的,实际用的工厂都是别人提供的,spring提供了调用工厂的这种配置。
方式3:静态工厂实例化
静态工厂实例化
- 要有该工厂类及工厂方法
- 工厂方法为静态的
-
工厂类
使用工厂模式中的工厂即可
-
设置配置文件 spring.xml
<?xml version="1.0" encoding="UTF-8"?> <beans xmlns="http://www.springframework.org/schema/beans" xmlns:xsi="http://www.w3.org/2001/XMLSchema-instance" xsi:schemaLocation="http://www.springframework.org/schema/beans https://www.springframework.org/schema/beans/spring-beans.xsd"> <!--静态工厂替代:Animal an3 = PetStore.getAnimal2("猫");--> <bean id="a2" class="com.msb.factory.PetStore" factory-method="getAnimal2"> <constructor-arg name="petName" value="猫"></constructor-arg> </bean> </beans> -
获取实例化对象
ApplicationContext ac = new ClassPathXmlApplicationContext("applicationContext.xml");
Animal an = (Animal) ac.getBean("a2");
项目开发基本采用第一种方式实例化bean,交给Spring托管,使用时直接拿来使用即可。另外两种了解
Spring IoC/DI - 属性注入
Bean对象实例化讲解的是如何实例化Bean,下面讲解的是如果给Bean对象的属性进行赋值。
Spring中给Bean对象属性赋值也称为注入,有两种方式:
- 构造注入(Constructor-based Dependency Injection):通过构造方法给bean的属性赋值。所以要求bean的类中必须提供对应参数的构造方法。相当于以前创建对象时new Person(18,“丽丽”);
- 设值注入,又称setter注入(Setter-based Dependency Injection):通过Bean的setter方法赋值。所以要求Bean中属性必须提供setter方法。相当于以前的:Person p = new Person(); p.setAge(18); p.setName(“丽丽”);
构造注入
构造注入要求必须在Bean中提供有参构造方法(无参数最好也提供上,这个位置不用。但是其他位置如果没有通过构造注入,默认是调用无参构造)。
定义Bean类和有参构造方法
班级类:
package com.msb.pojo;

/**
 * @Author: zhaoss
 * 班级类
 */
public class Clazz {
    // 属性:
    private int cid;
    private String cname;
    /* 在本次案例中,省去setter、getter方法,因为我们练习的是构造注入,需要有参构造器
    * 但是为了防止代码出错,一般会加入setter、getter方法*/

    public Clazz(int cid, String cname) {
        System.out.println("Clazz的有参构造器1");
        this.cid = cid;
        this.cname = cname;
    }

    /*当前构造注入的时候,不需要使用空构造器,但是为了防止代码出错,一般我们会加入空构造器*/
    public Clazz() {
    }

    @Override
    public String toString() {
        return "Clazz{" +
                "cid=" + cid +
                ", cname='" + cname + '\'' +
                '}';
    }
}
学生类:
package com.msb.pojo;

/**
 * @Author: zhaoss
 */
public class Student {
    private int age;
    private String name;
    private Clazz clazz;

	/* 在本次案例中,省去setter、getter方法,因为我们练习的是构造注入,需要有参构造器
    * 但是为了防止代码出错,一般会加入setter、getter方法*/


    public Student(int age, String name, Clazz clazz) {
        this.age = age;
        this.name = name;
        this.clazz = clazz;
    }


    @Override
    public String toString() {
        return "Student{" +
                "age=" + age +
                ", name='" + name + '\'' +
                ", clazz=" + clazz +
                '}';
    }
}
配置bean
在配置文件applicationContext.xml中可以通过<bean>的子标签<constructor-arg>设置构造方法中一个参数的值。
解释说明:
constructor-arg 里面有5个属性,这5个属性分为2类。
(1)用来确定给哪个属性进行赋值
name:参数名称
index:参数索引。从0开始算起。
type:参数类型。8大基本数据类型可以直接写关键字。其他类型需要写类型的全限定路径。
这三个属性如果只需要用到一个就能精确的告诉Spring,要设置的构造方法参数是哪个,就可以使用一个。如果无法精确到某个构造方法参数,可以多个一起结合使用。
(2)设置属性的值
value:简单数据类型(String、基本数据类型)直接设置。Spring会自动进行类型转换。
ref:需要引用另一个bean的id。也就是说这个参数是一个类类型,且这个类的对象也被Spring容器管理。

<?xml version="1.0" encoding="UTF-8"?>
<beans xmlns="http://www.springframework.org/schema/beans"
       xmlns:xsi="http://www.w3.org/2001/XMLSchema-instance"
       xsi:schemaLocation="http://www.springframework.org/schema/beans
        https://www.springframework.org/schema/beans/spring-beans.xsd">

    <!--利用这种方式,底层会去寻找空构造器-->
    <bean id="c1" class="com.msb.pojo.Clazz"></bean>
    <!--利用构造注入的方式,对属性进行初始化操作-->
    <!--通过name属性,通过参数的名字进行赋值-->
    <bean id="c2" class="com.msb.pojo.Clazz">
        <constructor-arg name="cid" value="1"></constructor-arg>
        <constructor-arg name="cname" value="java506班"></constructor-arg>
    </bean>
    <!--通过index属性,通过参数的索引进行赋值-->
    <bean id="c3" class="com.msb.pojo.Clazz">
        <constructor-arg index="0" value="2"></constructor-arg>
        <constructor-arg index="1" value="java302班"></constructor-arg>
    </bean>
    <!--通过type属性,通过参数的类型进行赋值-->
    <bean id="c4" class="com.msb.pojo.Clazz">
        <constructor-arg type="int" value="3"></constructor-arg>
        <constructor-arg type="java.lang.String" value="java816班"></constructor-arg>
    </bean>
    <!--name属性用的最多,index、type用的少-->
    <!--name\type\index属性可以单独使用,也可以配合使用-->
    <bean id="c5" class="com.msb.pojo.Clazz">
        <constructor-arg type="int" index="0" name="cid" value="4"></constructor-arg>
        <constructor-arg type="java.lang.String" index="1" name="cname" value="java999班"></constructor-arg>
    </bean>

    <!--构建Student对象
	ref:需要引用另一个bean的id。也就是说这个参数是一个类类型,且这个类的对象也被Spring容器管理。
	-->

    <bean id="stu" class="com.msb.pojo.Student">
        <constructor-arg name="age" value="18"></constructor-arg>
        <constructor-arg name="name" value="露露"></constructor-arg>
        <constructor-arg name="clazz" ref="c5"></constructor-arg>
    </bean>
</beans>
编写测试类并观察控制台运行结果
package com.msb;

import com.msb.pojo.Clazz;
import com.msb.pojo.Student;
import org.springframework.context.ApplicationContext;
import org.springframework.context.support.ClassPathXmlApplicationContext;

/**
 * Hello world!
 *
 */
public class App
{
    public static void main( String[] args )
    {
        // 解析xml
        ApplicationContext ac = new ClassPathXmlApplicationContext("applicationContext.xml");
        // 获取对象:
        Clazz c1 = ac.getBean("c1", Clazz.class);
        System.out.println(c1);
        Clazz c2 = ac.getBean("c2", Clazz.class);
        System.out.println(c2);
        Clazz c3 = ac.getBean("c3", Clazz.class);
        System.out.println(c3);
        Clazz c4 = ac.getBean("c4", Clazz.class);
        System.out.println(c4);

        Student stu = ac.getBean("stu", Student.class);
        System.out.println(stu);
    }
}
结果:

设值注入(setter注入)
定义Bean类和Setter方法
班级类:
package com.msb.pojo;

/**
 * @Author: zhaoss
 */
public class Clazz {
    private int cid;
    private String cname;
    /*当前案例,是设置注入,与构造器无关,所以不加入构造*/
    /*当前案例,是设置注入,所以我们只增加setter方法*/

    public void setCid(int cid) {
        this.cid = cid;
    }

    public void setCname(String cname) {
        this.cname = cname;
    }

    @Override
    public String toString() {
        return "Clazz{" +
                "cid=" + cid +
                ", cname='" + cname + '\'' +
                '}';
    }
}
学生类:
package com.msb.pojo;

/**
 * @Author: zhaoss
 */
public class Student {
    private int age;
    private String name;
    private Clazz clazz;

    public void setAge(int age) {
        this.age = age;
    }

    public void setName(String name) {
        this.name = name;
    }

    public void setClazz(Clazz clazz) {
        this.clazz = clazz;
    }

    @Override
    public String toString() {
        return "Student{" +
                "age=" + age +
                ", name='" + name + '\'' +
                ", clazz=" + clazz +
                '}';
    }
}
配置Bean
在配置文件applicationContext.xml中可以通过<bean>的子标签<property>标签调用类的setter方法。
- name:属性名称。name值如果是a,那么就会去找setA方法,一定要注意,name的值不是和属性对应,是和set方法名字对应。
- value:属性值。
- ref:引用另一个bean标签的id属性。
<?xml version="1.0" encoding="UTF-8"?>
<beans xmlns="http://www.springframework.org/schema/beans"
       xmlns:xsi="http://www.w3.org/2001/XMLSchema-instance"
       xsi:schemaLocation="http://www.springframework.org/schema/beans
        https://www.springframework.org/schema/beans/spring-beans.xsd">
    <!--创建班级对象-->
    <bean id="c" class="com.msb.pojo.Clazz">
        <property name="cid" value="1"></property>
        <property name="cname" value="java302班"></property>
    </bean>
    <!--创建学生对象-->
    <bean id="stu" class="com.msb.pojo.Student">
        <!--name属性的值与set方法的名字有关,与类的属性名字无关-->
        <property name="age" value="18"></property>
        <property name="name" value="露露"></property>
        <property name="clazz" ref="c"></property>
    </bean>
</beans>
编写测试类并观察控制台结果
在测试类中获取bean对象,并输出到控制台,查看是否包含设置的值。
package com.msb;

import com.msb.pojo.Student;
import org.springframework.context.ApplicationContext;
import org.springframework.context.support.ClassPathXmlApplicationContext;

/**
 * Hello world!
 *
 */
public class App
{
    public static void main( String[] args )
    {
        // 解析xml:
        ApplicationContext ac = new ClassPathXmlApplicationContext("applicationContext.xml");
        // 获取对象:
        Student s = ac.getBean("stu", Student.class);
        System.out.println(s);
    }
}
结果:
![[外链图片转存失败,源站可能有防盗链机制,建议将图片保存下来直接上传(img-qu8pqPiH-1682532373377)(01-Spring IOC.assets/Spring-37.png)]](https://img-blog.csdnimg.cn/a4761ff1e1044275b3f1c0fa9a26e32d.png)
注意:以后用设值注入方式多,更灵活。构造注入方式不够灵活,构造器的参数需要制定,你调用构造器的时候需要去匹配。
注入方式的选择
开发项目中set方式注入首选
使用构造注入可以在构建对象的同时一并完成依赖关系的建立,对象一建立则所有的一切也就准备好了,但如果要建立的对象关系很多,使用构造器注入会在构建函数上留下一长串的参数,且不易记忆,这时使用Set注入会是个不错的选择。
使用Set注入可以有明确的名称,可以了解注入的对象会是什么,像setXXX()这样的名称,会比记忆Constructor上某个参数的位置代表某个对象更好。
p名称空间的使用
spring2.5以后,为了简化setter方法属性注入,引用p名称空间的概念,可以将 子元素,简化为元素属性配置。
在配置文件 spring.xml 引入 p 名称空间
xmlns:p="http://www.springframework.org/schema/p"
<?xml version="1.0" encoding="UTF-8"?>
<beans xmlns="http://www.springframework.org/schema/beans"
       xmlns:xsi="http://www.w3.org/2001/XMLSchema-instance"
       xmlns:p="http://www.springframework.org/schema/p"
       xsi:schemaLocation="http://www.springframework.org/schema/beans
        https://www.springframework.org/schema/beans/spring-beans.xsd">
    <!--
		p:属性名:="xxx"		引入简单类型属性值
		p:属性名-ref:="xxx"	引入其他Bean对象的id属性值
	-->

    <!--创建班级对象-->
    <bean id="c" class="com.msb.pojo.Clazz" p:cid="1" p:cname="java302班" >
    </bean>
    <!--创建学生对象-->

    <bean id="stu" class="com.msb.pojo.Student" p:age="18" p:name="露露"  p:clazz-ref="c" / >

</beans>
不同属性类型注入对应的写法
无论是构造注入还是设值注入都提供了value和ref进行设置值,这两个属性只能给属性赋予简单数据类型或其他bean的引用。如果类的属性是数组、集合等类型需要通过下面方式进行设置。
这些标签都是<property>或<constructor-args>的子标签。
一旦使用了下面子标签方式,就不能对<property>或<constructor-args>设置value属性或ref属性。且需要在People类中提供对应名称,对应类型的属性。
案例:People类提供对应类型,对应名称属性的代码。
定义People类和setter方法
package com.msb.pojo;

import java.util.Arrays;
import java.util.List;
import java.util.Map;
import java.util.Set;

/**
 * @Author: zhaoss
 */
public class Person {
    // 属性:
    private String[] arr;
    private List<String> list;
    private Set<String> set;
    private Map<Integer,String> map;

    public void setArr(String[] arr) {
        this.arr = arr;
    }

    public void setList(List<String> list) {
        this.list = list;
    }

    public void setSet(Set<String> set) {
        this.set = set;
    }

    public void setMap(Map<Integer, String> map) {
        this.map = map;
    }

    @Override
    public String toString() {
        return "Person{" +
                "arr=" + Arrays.toString(arr) +
                ", list=" + list +
                ", set=" + set +
                ", map=" + map +
                '}';
    }
}
配置bean
Array类型\List类型\Set类型\Map类型\ Null值类型
<?xml version="1.0" encoding="UTF-8"?>
<beans xmlns="http://www.springframework.org/schema/beans"
xmlns:xsi="http://www.w3.org/2001/XMLSchema-instance"
xsi:schemaLocation="http://www.springframework.org/schema/beans
https://www.springframework.org/schema/beans/spring-beans.xsd">
<!--构建Person对象,对不同类型的属性进行赋值,进行属性注入,利用设置注入的方式-->
<bean id="p" class="com.msb.pojo.Person">
<!--可以利用设置注入,也可以利用构造注入,只是我当前的案例是利用设置注入-->
<!--对数组类型进行注入-->
<property name="arr" >
<array>
<value>aaa</value>
<value>bbb</value>
<value>ccc</value>
</array>
</property>
<!--对List集合赋值:-->
<property name="list">
<list>
<value>aaa</value>
<value>bbb</value>
<value>ccc</value>
</list>
</property>
<!--对Set集合赋值:-->
<property name="set">
<set>
<value>aaa</value>
<value>bbb</value>
<value>ccc</value>
</set>
</property>
<!--对Map集合赋值:-->
<!--<property name="map">
<map>
<entry>
<!–key标签中不可以直接加入属性值,而是必须再套用value标签–>
<key><value>18</value></key>
<value>露露</value>
</entry>
<entry>
<!–key标签中不可以直接加入属性值,而是必须再套用value标签–>
<key><value>21</value></key>
<value>菲菲</value>
</entry>
<!–也可以利用entry的属性赋值–>
<entry key="22" value="小明" ></entry>
</map>
</property>-->
<!--对Map集合赋空值-->
<property name="map">
<null></null>
</property>
</bean>
</beans>
测试
public class App2 {
    public static void main(String[] args) {
        ApplicationContext ac = new ClassPathXmlApplicationContext("applicationContext02.xml");
        Person p = ac.getBean("p", Person.class);
        System.out.println(p);
    }
}
运行结果:

循环依赖
有时会遇到如下场景:

代码:
A类:
package com.msb.pojo;

/**
 * @Author: zhaoss
 */
public class A {
    // 属性:
    private B b;
    // 构造器:

    public A(B b) {
        this.b = b;
    }

}
B类:
package com.msb.pojo;

/**
 * @Author: zhaoss
 */
public class B {
    // 属性:
    private A a;
    // 构造器:

    public B(A a) {
        this.a = a;
    }


}
配置bean:
<?xml version="1.0" encoding="UTF-8"?>
<beans xmlns="http://www.springframework.org/schema/beans"
       xmlns:xsi="http://www.w3.org/2001/XMLSchema-instance"
       xsi:schemaLocation="http://www.springframework.org/schema/beans
        https://www.springframework.org/schema/beans/spring-beans.xsd">
    <!--创建A对象-->
    <bean id="a" class="com.msb.pojo.A" scope="singleton">
        <constructor-arg name="b" ref="b"></constructor-arg>
    </bean>
    <!--创建B对象-->
    <bean id="b" class="com.msb.pojo.B">
        <constructor-arg name="a" ref="a"></constructor-arg>
    </bean>
</beans>
测试:
public class App3 {
    public static void main(String[] args) {
        ApplicationContext ac = new ClassPathXmlApplicationContext("applicationContext03.xml");
    }
}
运行结果报错:
![[外链图片转存失败,源站可能有防盗链机制,建议将图片保存下来直接上传(img-hdvT5ijs-1682532373378)(01-Spring IOC.assets/Spring-40.png)]](https://img-blog.csdnimg.cn/2d4ad760d767400eb366741318512737.png)
出错原因:
循环依赖问题,当两个类都是用构造注入时,没有等当前类实例化完成就需要注入另一个类,而另一个类没有实例化完整还需要注入当前类,所以这种情况是无法解决循环注入问题的的。会出现BeanCurrentlyInCreationException异常。
解决方式:
使用setter方式注入,并且bean标签默认有个属性省略不写了:scope=“singleton” ,singleton:默认值,意味着bean是单例的,每次获取Bean都是同一个对象。因为单例默认下有三级缓存(DefaultSingletonBeanRegistry),可以暂时缓存没有被实例化完成的Bean。三级缓存只有在setter方式下才有,因为构造注入的话没有需要缓存的对象,所以不需要使用三级缓存。
三级缓存:暂存没有创建好的对象,比如在当前案例中,A中想要注入b,b没创建好呢,将b放入缓存中,等b创建好了再从缓存中把b拿出来注入A即可。
代码:
A类:
package com.msb.pojo;

/**
 * @Author: zhaoss
 */
public class A {
    // 属性:
    private B b;
    // 构造器:

    public A(B b) {
        this.b = b;
    }

    // 加入setter方法:

    public void setB(B b) {
        this.b = b;
    }

    // 加入空构造器:

    public A() {
    }
}
B类:
package com.msb.pojo;

/**
 * @Author: zhaoss
 */
public class B {
    // 属性:
    private A a;
    // 构造器:

    public B(A a) {
        this.a = a;
    }

    // 加入setter方法:

    public void setA(A a) {
        this.a = a;
    }

    // 加入空构造器:

    public B() {
    }
}
配置bean:
<?xml version="1.0" encoding="UTF-8"?>
<beans xmlns="http://www.springframework.org/schema/beans"
       xmlns:xsi="http://www.w3.org/2001/XMLSchema-instance"
       xsi:schemaLocation="http://www.springframework.org/schema/beans
        https://www.springframework.org/schema/beans/spring-beans.xsd">
    <!--创建A对象-->
    <bean id="a" class="com.msb.pojo.A" scope="singleton">
        <!--<constructor-arg name="b" ref="b"></constructor-arg>-->
        <property name="b" ref="b"></property>
    </bean>
    <!--创建B对象-->
    <bean id="b" class="com.msb.pojo.B">
        <!--<constructor-arg name="a" ref="a"></constructor-arg>-->
        <property name="a" ref="a"></property>
    </bean>
</beans>
测试:
public class App3 {
    public static void main(String[] args) {
        ApplicationContext ac = new ClassPathXmlApplicationContext("applicationContext03.xml");
        A a = ac.getBean("a", A.class);
        B b = ac.getBean("b", B.class);

    }
}
自动注入
在Spring中,允许Bean的自动注入。有两种方式进行配置:default-autowire和autowire,底层也是基于构造注入或者设置注入的。
-
在根标签
<bean>中配置autowire属性,此标签代表整个Spring中自动注入的策略。autowire属性取值有5个。default:默认值。不自动注入。
no:不自动注入。
byName:通过名称自动注入。会自动寻找容器中id的名字 与当前属性同名的bean进行注入。(底层调用的是setter方法)
byType:通过类型自动注入。会自动寻找容器中bean的类型 与当前bean类型匹配的bean进行注入。如果有多个相同类型的bean注入会出现异常。(底层调用的是setter方法)
constructor:通过构造方法进行注入。寻找bean的构造方法中是否有合适的构造器。如果有自动注入进去。类型先byType后byName,如果没找到不注入。注:构造方法类型和其他Bean的类型相同。(底层调用的是构造器)
byName案例:
<?xml version="1.0" encoding="UTF-8"?>
<beans xmlns="http://www.springframework.org/schema/beans"
       xmlns:xsi="http://www.w3.org/2001/XMLSchema-instance"
       xsi:schemaLocation="http://www.springframework.org/schema/beans
        https://www.springframework.org/schema/beans/spring-beans.xsd"

    <bean id="s" class="com.msbt.pojo.Student" autowire="byName" ></bean>
</beans>
package com.msb.pojo;

/**
 * @Author: zhaoss
 */
public class Clazz {
    private String cname;

    public String getCname() {
        return cname;
    }

    public void setCname(String cname) {
        this.cname = cname;
    }

    public Clazz(String cname) {
        this.cname = cname;
    }

    public Clazz() {
    }

    @Override
    public String toString() {
        return "Clazz{" +
                "cname='" + cname + '\'' +
                '}';
    }
}
package com.msb.pojo;

/**
 * @Author: zhaoss
 */
public class Student {
    private Clazz clazz;

    public Clazz getClazz() {
        return clazz;
    }

    public void setClazz(Clazz clazz) {
        this.clazz = clazz;
    }

    public Student() {
    }

    public Student(Clazz clazz) {
        this.clazz = clazz;
    }

    @Override
    public String toString() {
        return "Student{" +
                "clazz=" + clazz +
                '}';
    }
}
测试:
public class App
{
    public static void main( String[] args )
    {
        ApplicationContext ac = new ClassPathXmlApplicationContext("applicationContext.xml");
        Student s = ac.getBean("s", Student.class);
        System.out.println(s);
    }
}
![[外链图片转存失败,源站可能有防盗链机制,建议将图片保存下来直接上传(img-Obee2gmw-1682532373378)(01-Spring IOC.assets/Spring-41.png)]](https://img-blog.csdnimg.cn/b5f5ec4dd6be401299912f19913dfa9f.png)
byType案例:
<?xml version="1.0" encoding="UTF-8"?>
<beans xmlns="http://www.springframework.org/schema/beans"
       xmlns:xsi="http://www.w3.org/2001/XMLSchema-instance"
       xsi:schemaLocation="http://www.springframework.org/schema/beans
        https://www.springframework.org/schema/beans/spring-beans.xsd">
    <bean id="s" class="com.msbt.pojo.Student" autowire="byType" ></bean>
</beans>
![[外链图片转存失败,源站可能有防盗链机制,建议将图片保存下来直接上传(img-10DzcZcm-1682532373379)(01-Spring IOC.assets/Spring-42.png)]](https://img-blog.csdnimg.cn/40a310aeb5c544c395cc488cf1a3a726.png)
constructor案例:
<?xml version="1.0" encoding="UTF-8"?>
<beans xmlns="http://www.springframework.org/schema/beans"
       xmlns:xsi="http://www.w3.org/2001/XMLSchema-instance"
       xsi:schemaLocation="http://www.springframework.org/schema/beans
        https://www.springframework.org/schema/beans/spring-beans.xsd">
    <bean id="s" class="com.msbt.pojo.Student" autowire="constructor" ></bean>
</beans>
![[外链图片转存失败,源站可能有防盗链机制,建议将图片保存下来直接上传(img-qCB4ACkp-1682532373379)(01-Spring IOC.assets/Spring-43.png)]](https://img-blog.csdnimg.cn/85724d1c4d0f473988ed7d08ba21d756.png)
- 在
<beans>标签中配置default-autowire属性。和autowire取值相同。唯一注意default表示全局default-autowire的值。如果autowire和default-autowire同时存在,autowire生效。
<bean id="s" class="com.msbt.pojo.Student" autowire="byType"></bean>
<?xml version="1.0" encoding="UTF-8"?>
<beans xmlns="http://www.springframework.org/schema/beans"
       xmlns:xsi="http://www.w3.org/2001/XMLSchema-instance"
       xsi:schemaLocation="http://www.springframework.org/schema/beans
        https://www.springframework.org/schema/beans/spring-beans.xsd"
       default-autowire="byType">
    <bean id="s" class="com.msbt.pojo.Student" ></bean>
</beans>
Spring IoC/DI - bean标签的scope属性
Spring中<bean>的scope控制的是Bean的有效范围。
一共有6个可取值,官方截图如下:

里面的singleton和prototype在Spring最基本的环境中就可以使用,不需要web环境。
但是里面的request、session、application、websocket都只有在web环境才能使用。
此处我们的案例都是普通java项目,所以我们重点讲解singleton和prototype,request、session、application、websocket配置方式和singleton和prototype相同,只是必须要有web环境支持,并配置相应的容器监听器或拦截器从而能应用这些作用域,目前先熟悉概念,后续集成web时讲解具体使用,大家只需要知道有这些作用域就可以了。
案例:
package com.msb.pojo;

/**
 * @Author: zhaoss
 */
public class Person {
    private String name;

    public Person() {
        System.out.println("这是一个Person的空构造器");
    }
}
<?xml version="1.0" encoding="UTF-8"?>
<beans xmlns="http://www.springframework.org/schema/beans"
       xmlns:xsi="http://www.w3.org/2001/XMLSchema-instance"
       xsi:schemaLocation="http://www.springframework.org/schema/beans
        https://www.springframework.org/schema/beans/spring-beans.xsd"
>

    <!--构建Person对象:
    lazy-init="true" 懒加载:改变创建对象的时机 ,如果没有设置为true那么解析xml的时候就会构建bean对象
    但是现在设置了懒加载,就会在第一次getBean的时候进行桂香的构建。

    scope="singleton" 单例  构建对象的时候,对象只会创建一次,每次取出都是同一个对象
    scope="prototype" 多例  每次向Spring容器请求获取Bean都返回一个全新的Bean,每次getBean的时候都会帮我们构建对象,每次取出的都是不同的对象。
    -->
    <!--<bean id="p" class="com.msb.pojo.Person" scope="singleton" lazy-init="true">
    </bean>-->
    <bean id="p" class="com.msb.pojo.Person" scope="prototype" lazy-init="true">
    </bean>

</beans>
public class App02
{
    public static void main( String[] args )
    {
        ApplicationContext ac = new ClassPathXmlApplicationContext("applicationContext02.xml");
        Person s1 = ac.getBean("p", Person.class);
        Person s2 = ac.getBean("p", Person.class);
        System.out.println(s1 == s2);
    }
}
细节补充:
(1)lazy-init属性(懒加载)
如果为false,则在IOC容器启动时会实例化bean对象,默认false
如果为true,则IOC容器启动时不会实例化Bean对象,在使用bean对象时才会实例化
(2)lazy-init设置为false有什么好处?
1)可以提前发现潜在的配置问题
2)Bean 对象存在于缓存中,使用时不用再去实例化bean,加快程序运行效率
(3)Spring 中 Bean是否是线程安全的?
如果bean的scope是单例的,bean不是线程安全的。
如果bean的scope是prototype,bean是线程安全的。
(4)什么对象适合作为单例对象?
一般来说对于无状态或状态不可改变的对象适合使用单例模式。(不存在会改变对象状态的成员变量)
比如:controller层、service层、dao层
(5)什么是无状态或状态不可改变的对象?
实际上对象状态的变化往往均是由于属性值得变化而引起的,比如user类 姓名属性会有变化,属性姓名的变化一般会引起user对象状态的变化。对于我们的程序来说,无状态对象没有实例变量的存在,保证了线程的安全性,service 层业务对象即是无状态对象。线程安全的。
Spring IoC/DI - Bean的生命周期
Spring容器管理的bean也存在生命周期的概念,在Spring中,Bean的生命周期包括Bean的定义、初始化、使用和销毁4个阶段。
Bean 的初始化
默认在IOC容器加载时,实例化对象。
Spring bean 初始化有两种方式:
**方式一:**在配置文档中通过指定 init-method 属性来完成。
public class Person {
    // 定义初始化时需要被调用的方法
    public void init() {
        System.out.println("Person init...");
    }
}
<!-- 通过init-method属性指定方法 -->
<bean id="p" class="com.msb.pojo.Person" init-method="init"></bean>
方式二: 实现 org.springframework.beans.factory.InitializingBean 接口。
public class Person implements InitializingBean {

    @Override
    public void afterPropertiesSet() throws Exception {
        System.out.println("Person init...");
    }
}
<bean id="p" class="com.msb.pojo.Person" ></bean>
Bean对象实例化过程是在Spring容器初始化时被实例化的,但也不是不可改变的,可以通过 lazy-init=“true” 属性延迟bean对象的初始化操作,此时再调用getBean 方法时才会进行bean的初始化操作
Bean 的使用
// 得到Spring的上下文环境
BeanFactory factory = new ClassPathXmlApplicationContext("spring.xml");
Person p = (Person) factory.getBean("Person");
Bean 的销毁
实现销毁方式(Spring容器会维护bean对象的管理,可以指定bean对象的销毁所要执行的方法)。
定义销毁方法:
public class Person {

    public void destroy() {
        System.out.println("Person destroy...");
    }
}
实现销毁方式(Spring容器会维护bean对象的管理,可以指定bean对象的销毁所要执行的方法)
<bean id="roleService" class="com.yjxxt.service.RoleService" destroy-method="destroy"></bean>
通过 AbstractApplicationContext 对象,调用其close方法实现bean的销毁过程
AbstractApplicationContext ctx=new ClassPathXmlApplicationContext("spring.xml");
ctx.close();
Spring整合MyBatis
案例:Spring整合MyBatis完成登录功能。
重点:学会整合。
数据库创建表
创建User表,定义字段username,password
构建web项目
有页面,需要用servlet,需要建立web项目。
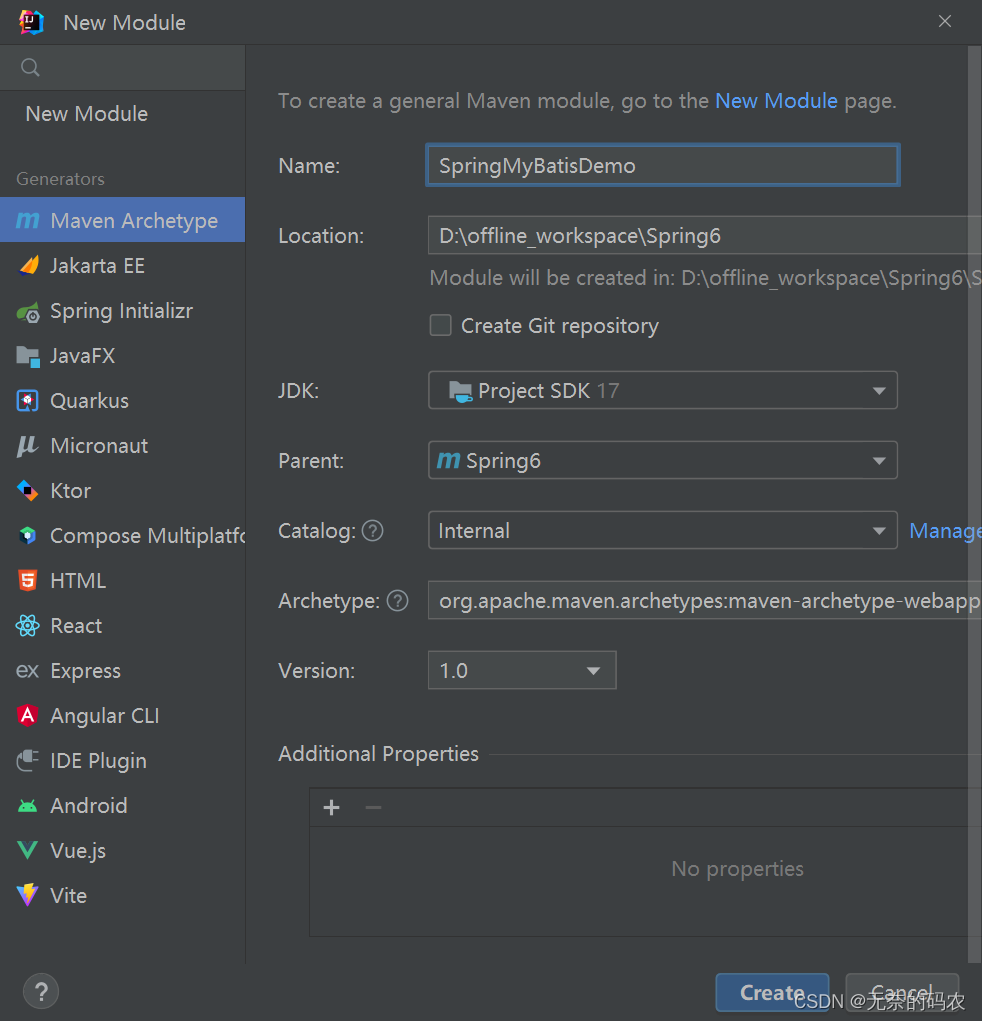
添加依赖坐标、插件
【1】mybatis的依赖
【2】连接mysql的依赖
【3】log4j的依赖
【4】servlet的依赖
【5】spring的依赖
【6】springjdbc依赖:利用这个依赖管理数据库
【7】spring整合mybatis的依赖:需要用3.0+版本:https://mybatis.org/spring/index.html
【8】添加tomcat插件
【9】添加资源拷贝插件
<project xmlns="http://maven.apache.org/POM/4.0.0" xmlns:xsi="http://www.w3.org/2001/XMLSchema-instance"
         xsi:schemaLocation="http://maven.apache.org/POM/4.0.0 http://maven.apache.org/maven-v4_0_0.xsd">
    <modelVersion>4.0.0</modelVersion>
    <parent>
        <groupId>com.msb</groupId>
        <artifactId>Spring6</artifactId>
        <version>1.0-SNAPSHOT</version>
    </parent>
    <artifactId>SMDemo</artifactId>
    <packaging>war</packaging>
    <name>SMDemo Maven Webapp</name>
    <url>http://maven.apache.org</url>
    <dependencies>
        <dependency>
            <groupId>junit</groupId>
            <artifactId>junit</artifactId>
            <version>3.8.1</version>
            <scope>test</scope>
        </dependency>
        <!--  【1】mybatis的依赖  -->
        <dependency>
            <groupId>org.mybatis</groupId>
            <artifactId>mybatis</artifactId>
            <version>3.5.9</version>
        </dependency>
        <!--  【2】连接mysql的依赖  -->
        <dependency>
            <groupId>mysql</groupId>
            <artifactId>mysql-connector-java</artifactId>
            <version>8.0.28</version>
        </dependency>
        <!--  【3】log4j的依赖  -->
        <dependency>
            <groupId>log4j</groupId>
            <artifactId>log4j</artifactId>
            <version>1.2.17</version>
        </dependency>
        <!--  【4】servlet的依赖  -->
        <dependency>
            <groupId>javax.servlet</groupId>
            <artifactId>javax.servlet-api</artifactId>
            <version>4.0.1</version>
            <scope>provided</scope>
        </dependency>
        <!--  【5】spring的依赖  -->
        <dependency>
            <groupId>org.springframework</groupId>
            <artifactId>spring-context</artifactId>
            <version>6.0.5</version>
        </dependency>
        <!--  【6】springjdbc依赖-->
        <dependency>
            <groupId>org.springframework</groupId>
            <artifactId>spring-jdbc</artifactId>
            <version>6.0.5</version>
        </dependency>
        <!--  【7】spring整合mybatis的依赖  -->
        <dependency>
            <groupId>org.mybatis</groupId>
            <artifactId>mybatis-spring</artifactId>
            <version>3.0.1</version>
        </dependency>
    </dependencies>
    <build>
        <finalName>SMDemo</finalName>
        <plugins>
            <!-- tomcat7插件 -->
            <plugin>
                <groupId>org.apache.tomcat.maven</groupId>
                <artifactId>tomcat7-maven-plugin</artifactId>
                <version>2.2</version>
                <configuration>
                    <path>/testssm</path>
                    <port>8888</port>
                </configuration>
            </plugin>
        </plugins>
        <!-- 加入资源拷贝插件 -->
        <resources>
            <resource>
                <directory>src/main/java</directory>
                <includes>
                    <include>**/*.xml</include>
                </includes>
            </resource>
            <resource>
                <directory>src/main/resources</directory>
                <includes>
                    <include>**/*.txt</include>
                    <include>**/*.xml</include>
                    <include>**/*.properties</include>
                </includes>
            </resource>
        </resources>
    </build>
</project>
补全java目录并添加包结构

创建User实体类
在com.msb.pojo包下构建实体类:
package com.msb.pojo;

/**
 * @Author: zhaoss
 */
public class User {
    private int id;
    private String username;
    private String password;

    public int getId() {
        return id;
    }

    public void setId(int id) {
        this.id = id;
    }

    public String getUsername() {
        return username;
    }

    public void setUsername(String username) {
        this.username = username;
    }

    public String getPassword() {
        return password;
    }

    public void setPassword(String password) {
        this.password = password;
    }

    public User() {
    }

    public User(int id, String username, String password) {
        this.id = id;
        this.username = username;
        this.password = password;
    }

    @Override
    public String toString() {
        return "User{" +
                "id=" + id +
                ", username='" + username + '\'' +
                ", password='" + password + '\'' +
                '}';
    }
}
mapper层处理
构建UserMapper接口:
package com.msb.mapper;

import com.msb.pojo.User;

/**
 * @Author: zhaoss
 */
public interface UserMapper {
    public abstract User selectOneUser(String uname, String pwd);
}
创建映射文件 UserMapper.xml:
<?xml version="1.0" encoding="UTF-8" ?>
<!DOCTYPE mapper
        PUBLIC "-//mybatis.org//DTD Mapper 3.0//EN"
        "https://mybatis.org/dtd/mybatis-3-mapper.dtd">
<mapper namespace="com.msb.mapper.UserMapper">
    <select id="selectOneUser" resultType="user">
        select * from t_user where username=#{param1} and password=#{param2}
    </select>
</mapper>
整合mybatis的处理
以前使用mybatis的时候需要在resources目录下添加mybatis的配置文件:mybatis.xml
<?xml version="1.0" encoding="UTF-8" ?>
<!DOCTYPE configuration
PUBLIC "-//mybatis.org//DTD Config 3.0//EN"
"https://mybatis.org/dtd/mybatis-3-config.dtd">
<configuration>
<!-- 别名处理 -->
<typeAliases>
<!-- 指定包 -->
<package name="com.msb.pojo"/>
</typeAliases>
<environments default="mysql">
<environment id="mysql">
<!--配置事务管理器 -->
<transactionManager type="JDBC"></transactionManager>
<!-- 配置数据源-->
<dataSource type="POOLED">
<property name="driver" value="com.mysql.cj.jdbc.Driver"/>
<property name="url" value="jdbc:mysql://localhost:3306/springmybatis?useUnicode=true&characterEncoding=utf-8&useSSL=false&serverTimezone=GMT%2B8&allowPublicKeyRetrieval=true"/>
<property name="username" value="root"/>
<property name="password" value="root"/>
</dataSource>
</environment>
</environments>
<!-- 解析UserMapper.xml -->
<mappers>
<mapper resource="mapper/UserMapper.xml"/>
</mappers>
</configuration>
spring整合mybatis以后这个文件就会发生翻天覆地的变化。现在交由spring来管理,这套配置就改变了。但即使再变,以前的几部分也是存在的。
以前数据库连接部分测试类:
package com.msb.test;

import com.msb.mapper.BookMapper;
import org.apache.ibatis.io.Resources;
import org.apache.ibatis.session.SqlSession;
import org.apache.ibatis.session.SqlSessionFactory;
import org.apache.ibatis.session.SqlSessionFactoryBuilder;

import java.io.IOException;
import java.io.InputStream;
import java.util.List;

public class Test {
    public static void main(String[] args) throws IOException {
        String resource = "mybatis.xml";
        InputStream inputStream = Resources.getResourceAsStream(resource);
        SqlSessionFactory sqlSessionFactory = new SqlSessionFactoryBuilder().build(inputStream);
        SqlSession sqlSession = sqlSessionFactory.openSession();

        /*
         getMapper方法采用了动态代理模式,根据你传入的接口,动态产生实现类,
         那么你想:要想产生实现类肯定是匹配到了对应的映射文件了。这些Mybatis框架都自动帮我们做了,
         而我们要做的就是要将底层该配置的配置好,否则mybatis找不到东西也完成不了效果了。
         这里其实就相当于以前的:BookMapper b = new BookMapperImpl(); --》多态

         */
        UserMapper mapper = sqlSession.getMapper(UserMapper.class);
        //看上去用接口在调用selectAllBooks,实际走的肯定是实现类的selectAllBooks,也就是映射文件中对应的方法。
        User user = mapper.selectOneUser("lili","123123");


        sqlSession.close();

    }
}
现在怎么做呢?
在resources目录下添加spring的配置文件 applicationContext.xml:
<?xml version="1.0" encoding="UTF-8"?>
<beans xmlns="http://www.springframework.org/schema/beans"
xmlns:xsi="http://www.w3.org/2001/XMLSchema-instance"
xsi:schemaLocation="http://www.springframework.org/schema/beans
https://www.springframework.org/schema/beans/spring-beans.xsd">
<!--【1】通过配置bean对象,给对象属性注入值来配置连接数据库数据源
DriverManagerDataSource属于spring-jdbc包-->
<bean id="dataSource" class="org.springframework.jdbc.datasource.DriverManagerDataSource">
<!--这个name属性都可以在DriverManagerDataSource中找到对应的setter方法-->
<property name="driverClassName" value="com.mysql.cj.jdbc.Driver"/>
<property name="url"
value="jdbc:mysql://localhost:3306/springmybatis?useUnicode=true&characterEncoding=utf-8&useSSL=false&serverTimezone=GMT%2B8&allowPublicKeyRetrieval=true"/>
<property name="username" value="root"/>
<property name="password" value="root"/>
</bean>
<!--【2】配置SqlSessionFactory对象
SqlSessionFactoryBean属于mybatis-spring包-->
<bean id="factory" class="org.mybatis.spring.SqlSessionFactoryBean">
<!--工厂依赖数据源,需要注入数据源对应的对象-->
<property name="dataSource" ref="dataSource"/>
<property name="typeAliasesPackage" value="com.msb.pojo"></property>
</bean>
<!--【3】扫描UserMapper文件-->
<bean class="org.mybatis.spring.mapper.MapperScannerConfigurer">
<!--需要注入工厂,因为以前都是:sqlSession.getMapper()-->
<property name="sqlSessionFactoryBeanName" value="factory"></property>
<!--扫描的文件-->
<property name="basePackage" value="com.msb.mapper"></property>
</bean>
</beans>
业务层实现
接口层:
public interface UserService {
    public abstract User selectOneUser(String uname, String pwd);
}
实现类:
package com.msb.service.impl;

import com.msb.mapper.UserMapper;
import com.msb.pojo.User;
import com.msb.service.UserService;
import org.springframework.context.ApplicationContext;
import org.springframework.context.support.ClassPathXmlApplicationContext;

/**
 * @Author: zhaoss
 */
public class UserServiceImpl implements UserService {
    @Override
    public User selectOneUser(String uname, String pwd) {
        ApplicationContext ac = new ClassPathXmlApplicationContext("applicationContext.xml");
        UserMapper userMapper = (UserMapper)ac.getBean("userMapper");
        return userMapper.selectOneUser(uname,pwd);
    }

    /**
     * 创建测试方法,看看spring到底帮我们构建多少对象:
     * @param args
     */
    public static void main(String[] args) {

        ApplicationContext ac = new ClassPathXmlApplicationContext("applicationContext.xml");
        //
        String[] beanDefinitionNames = ac.getBeanDefinitionNames();
        for (String name : beanDefinitionNames) {
            System.out.println(name);
        }
    }
}
main方法结果:
我们在 applicationContext.xml中配置了
<property name="basePackage" value="com.msb.mapper"></property>
扫描这个包以后,那么spring就会帮我们去自动构建这个包下的接口对应的实现类对象:userMapper对象,这样你在业务层就可以直接使用userMappr了。(对象名是接口名称首字母小写)
![[外链图片转存失败,源站可能有防盗链机制,建议将图片保存下来直接上传(img-JjgprMkl-1682532373381)(01-Spring整合MyBatis.assets/sm-03.png)]](https://img-blog.csdnimg.cn/b92f6c237f744b159cf26699efbd74e0.png)
控制层实现
package com.msb.controller;

import com.msb.pojo.User;
import com.msb.service.UserService;
import com.msb.service.impl.UserServiceImpl;

import javax.servlet.ServletException;
import javax.servlet.annotation.WebServlet;
import javax.servlet.http.HttpServlet;
import javax.servlet.http.HttpServletRequest;
import javax.servlet.http.HttpServletResponse;
import java.io.IOException;

/**
 * @Author: zhaoss
 */
@WebServlet("/loginServlet")
public class UserServlet extends HttpServlet {
    UserService userService = new UserServiceImpl();
    @Override
    protected void service(HttpServletRequest req, HttpServletResponse resp) throws ServletException, IOException {
        // 解决乱码问题:
        // 设置请求信息的解码格式:
        req.setCharacterEncoding("UTF-8");
        // 设置响应信息的编码格式:
        resp.setCharacterEncoding("UTF-8");
        // 设置浏览器的编码格式:
        resp.setContentType("text/html;charset=UTF-8");
        // 获取前台参数:
        String uname = req.getParameter("uname");
        String pwd = req.getParameter("pwd");
        User user = userService.selectOneUser(uname, pwd);
        // 对参数处理:
        if (user != null){
            req.getRequestDispatcher("index.jsp").forward(req,resp);
        }else{
            resp.getWriter().write("登录失败");
        }
    }
}
index.jsp
<%@ page contentType="text/html;charset=UTF-8" language="java" %>
<html>
<body>
<h2>Hello World!项目首页</h2>
</body>
</html>
login.jsp
<%--
  Created by IntelliJ IDEA.
  User: zhaoss-msb
  Date: 2023/3/2
  Time: 21:28
  To change this template use File | Settings | File Templates.
--%>
<%@ page contentType="text/html;charset=UTF-8" language="java" %>
<html>
<head>
    <title>Title</title>
</head>
<body>
  <%--定义表单--%>
  <form action="loginServlet" method="post">
    用户名:<input type="text" name="uname"> <br>
    密码:<input type="password" name="pwd"> <br>
    <input type="submit" value="登录">
  </form>
</body>
</html>
访问:http://localhost:8888/testssm/login.jsp
登录:

登录成功:

登录失败:

解决项目缺陷
目前业务层中:
public class UserServiceImpl implements UserService {
    @Override
    public User selectOneUser(String uname, String pwd) {
        ApplicationContext ac = new ClassPathXmlApplicationContext("applicationContext.xml");
        UserMapper userMapper = (UserMapper)ac.getBean("userMapper");
        return userMapper.selectOneUser(uname,pwd);
    }
}
难道业务层每个方法都要解析xml然后getBean吗?那也太麻烦了,咱们学spring可以帮我们管理对象啊!
解决:
修改业务层:
package com.msb.service.impl;

import com.msb.mapper.UserMapper;
import com.msb.pojo.User;
import com.msb.service.UserService;
import org.springframework.context.ApplicationContext;
import org.springframework.context.support.ClassPathXmlApplicationContext;

/**
 * @Author: zhaoss
 */
public class UserServiceImpl implements UserService {
    private UserMapper userMapper;

    public void setUserMapper(UserMapper userMapper) {
        this.userMapper = userMapper;
    }

    @Override
    public User selectOneUser(String uname, String pwd) {
        return userMapper.selectOneUser(uname,pwd);
    }
}
userMappr利用spring创建UserServiceImpl对象,然后利用setter注入将userMapper对象注入进来,在applicationContext.xml中增加:
<?xml version="1.0" encoding="UTF-8"?>
<beans xmlns="http://www.springframework.org/schema/beans"
xmlns:xsi="http://www.w3.org/2001/XMLSchema-instance"
xsi:schemaLocation="http://www.springframework.org/schema/beans
https://www.springframework.org/schema/beans/spring-beans.xsd">
<bean id="dataSource" class="org.springframework.jdbc.datasource.DriverManagerDataSource" >
<property name="driverClassName" value="com.mysql.cj.jdbc.Driver"></property>
<property name="url" value="jdbc:mysql://localhost:3306/sm?useUnicode=true&characterEncoding=utf-8&useSSL=false&serverTimezone=GMT%2B8&allowPublicKeyRetrieval=true"></property>
<property name="username" value="root"></property>
<property name="password" value="root"></property>
</bean>
<bean id="factory" class="org.mybatis.spring.SqlSessionFactoryBean">
<property name="dataSource" ref="dataSource"></property>
<property name="typeAliasesPackage" value="com.msb.pojo"></property>
</bean>
<bean class="org.mybatis.spring.mapper.MapperScannerConfigurer">
<property name="sqlSessionFactoryBeanName" value="factory"></property>
<property name="basePackage" value="com.msb.mapper"></property>
</bean>
<!--加入UserServiceImpl构建对象-->
<bean id="userServiceImpl" class="com.msb.service.impl.UserServiceImpl" >
<property name="userMapper" ref="userMapper"></property>
</bean>
</beans>
既然构建了UserServiceImpl对象,那么控制层也可以简化为:
package com.msb.controller;

import com.msb.pojo.User;
import com.msb.service.UserService;
import com.msb.service.impl.UserServiceImpl;
import org.springframework.context.ApplicationContext;
import org.springframework.context.support.ClassPathXmlApplicationContext;

import javax.servlet.ServletException;
import javax.servlet.annotation.WebServlet;
import javax.servlet.http.HttpServlet;
import javax.servlet.http.HttpServletRequest;
import javax.servlet.http.HttpServletResponse;
import java.io.IOException;

/**
 * @Author: zhaoss
 */
@WebServlet("/loginServlet")
public class UserServlet extends HttpServlet {
    private UserService us;

    @Override
    public void init() throws ServletException {
        // 解析applicationContext.xml:
        ApplicationContext ac = new ClassPathXmlApplicationContext("applicationContext.xml");
        // 获取UserServiceImpl对象:
        us = (UserServiceImpl)ac.getBean("userServiceImpl");
    }

    @Override
    protected void service(HttpServletRequest req, HttpServletResponse resp) throws ServletException, IOException {
        // 处理乱码:
        req.setCharacterEncoding("utf-8");
        resp.setCharacterEncoding("utf-8");
        resp.setContentType("text/html;charset=utf-8");
        // 接收前台参数:
        String uname = req.getParameter("uname");
        String pwd = req.getParameter("pwd");
        System.out.println(uname);
        System.out.println(pwd);
        // 调用service层
        User user = us.selectOneUser(uname, pwd);
        // 对user判断:
        if (user != null){// 数据查询到了
            // 跳转到首页:
            req.getRequestDispatcher("index.jsp").forward(req,resp);
        }else{
            resp.getWriter().write("登录失败!");
        }
    }
}
日志处理
目前项目并没有日志输出,所以需要加入日志的处理,有两种方式
方式1:保留mybatis.xml
(1)在resources目录下加入log4j.properties
# log4j中定义的级别:fatal(致命错误) > error(错误) >warn(警告) >info(普通信息) >debug(调试信息)>trace(跟踪信息)
log4j.rootLogger = DEBUG , console , D

### console ###
log4j.appender.console = org.apache.log4j.ConsoleAppender
log4j.appender.console.Target = System.out
log4j.appender.console.layout = org.apache.log4j.PatternLayout
log4j.appender.console.layout.ConversionPattern = [%p] [%-d{yyyy-MM-dd HH\:mm\:ss}] %C.%M(%L) | %m%n
(2)在resources目录下创建Mybatis配置文件mybatis.xml,文件里面编写启用日志。
<?xml version="1.0" encoding="UTF-8" ?>
<!DOCTYPE configuration
        PUBLIC "-//mybatis.org//DTD Config 3.0//EN"
        "http://mybatis.org/dtd/mybatis-3-config.dtd">
<configuration>
    <settings>
        <setting name="logImpl" value="LOG4J"/>
    </settings>
</configuration>
<?xml version="1.0" encoding="UTF-8"?>
<beans xmlns="http://www.springframework.org/schema/beans"
xmlns:xsi="http://www.w3.org/2001/XMLSchema-instance"
xsi:schemaLocation="http://www.springframework.org/schema/beans
https://www.springframework.org/schema/beans/spring-beans.xsd">
<bean id="dataSource" class="org.springframework.jdbc.datasource.DriverManagerDataSource" >
<property name="driverClassName" value="com.mysql.cj.jdbc.Driver"></property>
<property name="url" value="jdbc:mysql://localhost:3306/sm?useUnicode=true&characterEncoding=utf-8&useSSL=false&serverTimezone=GMT%2B8&allowPublicKeyRetrieval=true"></property>
<property name="username" value="root"></property>
<property name="password" value="root"></property>
</bean>
<bean id="factory" class="org.mybatis.spring.SqlSessionFactoryBean">
<property name="dataSource" ref="dataSource"></property>
<property name="typeAliasesPackage" value="com.msb.pojo"></property>
<!--加入配置,解析mybatis.xml-->
<property name="configLocation" value="classpath:mybatis.xml"></property>
</bean>
<bean class="org.mybatis.spring.mapper.MapperScannerConfigurer">
<property name="sqlSessionFactoryBeanName" value="factory"></property>
<property name="basePackage" value="com.msb.mapper"></property>
</bean>
<bean id="userServiceImpl" class="com.msb.service.impl.UserServiceImpl" >
<property name="userMapper" ref="userMapper"></property>
</bean>
</beans>
这种方式的好处:mybatis二级缓存、驼峰转化都需要在mybatis.xml中配置,spring中没有提供,所以这种可以保留mybatix.xml文件。
方式2:修改日志类型换为slf4j
此时就不需要mybatis.xml文件了,升级日志类型为slf4j
增加两个依赖:slf4j和slf4j-log4j
<dependency>
<groupId>org.slf4j</groupId>
<artifactId>slf4j-api</artifactId>
<version>1.6.1</version>
</dependency>

<dependency>
<groupId>org.slf4j</groupId>
<artifactId>slf4j-log4j12</artifactId>
<version>1.7.2</version>
</dependency>
Spring IoC/DI - 注解的支持
这部分主要讲解的是关于IoC/DI 的注解,注解的作用简化xml的配置。
Spring现有代码问题分析和解决方法
之前整合的代码中,如果分层的话,为了创建UserServiceImpl对象,需要在applicationContext.xml中配置bean标签:
	<!--加入UserServiceImpl构建对象-->
    <bean id="userServiceImpl" class="com.msb.service.impl.UserServiceImpl" >
        <property name="userMapper" ref="userMapper"></property>
    </bean>
对于上面这种写法,完全可以使用注解@Component进行简化。
利用之前整合的案例,修改:
现在要构建UserServiceImpl对象,在UserServiceImpl类中加入@Component注解:
@Component注解及子注解使用时,如果没有明确指定bean的名称,默认名称都是类名首字母变小写
/**
 * @Author: zhaoss
 * @Component注解的作用:简化了applicationContext.xml中对这个创建对象的配置 ,而创建对象这件事还是spring来管理。
 * 帮我们构建对象,默认的名字就是类名的首字母小写: UserServiceImpl  ---》 userServiceImpl
 * 我们也可以指定对象的名字:通过传入参数的形式:@Component("usi")
 */
@Component
public class UserServiceImpl implements UserService {
    private UserMapper userMapper;

    public void setUserMapper(UserMapper userMapper) {
        this.userMapper = userMapper;
    }

    @Override
    public User selectOneUser(String uname, String pwd) {
        return userMapper.selectOneUser(uname,pwd);
    }

}
加入@Component之后,就无需在applicationContext.xml中指定bean标签了,就可以帮我们构建对象了,帮我们构建的对象的名字是:类名首字母变小写,当然如果想要自己指定名字为usi也可以啊:
@Component("usi")
public class UserServiceImpl implements UserService {
    private UserMapper userMapper;

    public void setUserMapper(UserMapper userMapper) {
        this.userMapper = userMapper;
    }

    @Override
    public User selectOneUser(String uname, String pwd) {
        return userMapper.selectOneUser(uname,pwd);
    }

}
需要注意的是,任何注解想要生效,必须对这个注解进行扫描:
注解在哪个包下?要想找到这些注解,需要将注解所在的包进行扫描:设置需要扫描的包,如果需要扫描多个包,包路径之间使用逗号分隔。并且需要在applicationContext.xml中添加context命名空间(每个命名空间需要添加三行)。顺序不能乱,中间不能间隔。context命名空间去spring文档中找,随便粘贴一个过来改一改就行
![[外链图片转存失败,源站可能有防盗链机制,建议将图片保存下来直接上传(img-GRduZuoG-1682532373382)(01-Spring IOC.assets/Spring-45.png)]](https://img-blog.csdnimg.cn/9da1241a801b402f9c5e733b247173d6.png)
<?xml version="1.0" encoding="UTF-8"?>
<beans xmlns="http://www.springframework.org/schema/beans"
    xmlns:xsi="http://www.w3.org/2001/XMLSchema-instance"
    xmlns:context="http://www.springframework.org/schema/context"
    xsi:schemaLocation="http://www.springframework.org/schema/beans
        https://www.springframework.org/schema/beans/spring-beans.xsd
        http://www.springframework.org/schema/context
        https://www.springframework.org/schema/context/spring-context.xsd">

    <!-- 多个包使用逗号分隔,下面也可以只写com.msb -->
    <context:component-scan base-package="com.msb.service,com.msb.mapper"></context:component-scan>

</beans>
@Component注解的子注解
下面@Repository、@Service、@Controller、@Configuration都是@Component注解的子注解,作用相同:创建对象。主要的区别是语义上的区别,不同的注解放在不同层的类中。但是不按照语义去做,非把@Service用在持久层,也是有效果的。但是这样却是不规范的。
| 注解名称 | 解释 |
|---|---|
| @Component | 实例化Bean,默认名称为类名收字母变小写。支持自定义名称 |
| @Repository | @Component子标签。作用和@Component一样。用在持久层 |
| @Service | @Component子标签。作用和@Component一样。用在业务层 |
| @Controller | @Component子标签。作用和@Component一样。用在控制器层 |
| @Configuration | @Component子标签。作用和@Component一样。用在配置类上,以后结合SpringBoot使用。 |
在我们spring整合mybatis的案例中,我们可以使用哪个注解呢?
mapper层 不需要我们构建对象,spring来管理,所以这层暂时不需要注解@Repository。
controller层 我们使用的是servlet,tomcat管理,所以这层暂时不需要注解@Controller。
目前业务层可以把@Component替换为@Service即可。
@Service
public class UserServiceImpl implements UserService {
    private UserMapper userMapper;

    public void setUserMapper(UserMapper userMapper) {
        this.userMapper = userMapper;
    }

    @Override
    public User selectOneUser(String uname, String pwd) {
        return userMapper.selectOneUser(uname,pwd);
    }

}
属性注入相关的注解
上节课我们已经用@Component注解简化了xml中的配置,再次使用mybatis和spring整合的案例,启动服务器测试登录效果:

发现点击登录按钮请求后台报错:
![[外链图片转存失败,源站可能有防盗链机制,建议将图片保存下来直接上传(img-ZgK9SqyU-1682532373382)(01-Spring IOC.assets/Spring-47.png)]](https://img-blog.csdnimg.cn/477245ca75314db58c2642e5ad986bd1.png)
发现userMapper对象是空的,意味着我们刚才创建UserMapperImpl对象但是属性并没有注入,意味着@Component注解只是简化了创建对象的xml配置,但是属性注入的配置没有帮我们做,此时需要使用属性注入相关的注解:
| 注解名称 | 解释 |
|---|---|
| @Autowired | 自动注入。默认byType,如果多个同类型bean,使用byName。spring的注解。 |
| @Resource | 非Spring注解。默认byName,如果没找到,使用byType。JDK中javax包的注解,一般不用,用spring的注解 |
| @Value | 给普通数据类型(八种基本数据类型+String)属性赋值。spring的注解。 |
重点:@Autowired 。
@Autowired注解:会根据类型到容器中去寻找对应的对象,默认byType,如果多个同类型bean,使用byName,找到后给当前属性赋值,并且不需要依赖set方法,属性类型可以是接口,会自动匹配对应的实现类对象,比如你写:private UserMapper userMapper;使用接口也没有问题的。
那么问题来了,如果容器中有多个 UserMapper接口的实现类怎么办呢?也就是说按照类型匹配到了多个实现类对象,比如有两个实现类: UserMapperImplA, UserMapperImplB,那么此时就需要搭配另一个注解@Qualifier(value=“bean名称”),执行需要注入的Bean名称:这样就会按照名字来找容器中的对象了:value=可以省略不写。
package com.msb.service.impl;

import com.msb.mapper.UserMapper;
import com.msb.pojo.User;
import com.msb.service.UserService;
import org.springframework.beans.factory.annotation.Autowired;
import org.springframework.beans.factory.annotation.Qualifier;
import org.springframework.context.ApplicationContext;
import org.springframework.context.support.ClassPathXmlApplicationContext;
import org.springframework.stereotype.Component;
import org.springframework.stereotype.Service;

@Service("usi")
public class UserServiceImpl implements UserService {
    /*
    * 加入@Autowired注解的作用:帮我们在创建对象以后完成属性的注入,此时我们不需要提供setter方法
    * 注入形式:先按照类型从spring容器中去找匹配的对象注入进来。
    * 如果容器中存在多个相同类型的对象,那么就按照名字去找。
    * 比如容器中UserMapper实现类对象1 :um1   还有UserMapper实现类对象2:um2
    * 此时就需要搭配另一个注解:@Qualifier("um1")  来指定你需要的那个对象
    * 使用了 @Qualifier("um1")注解后@Autowired是不能省略的,因为@Autowired帮我们完成属性注入,
    * @Qualifier只是定位到你需要注入的对象,必须搭配使用
    * */
    @Autowired
    /*@Qualifier("um1")*/
    private UserMapper userMapper;
    /*加入@Autowired注解以后,底层会自动帮我们定义setter方法,无需我们自己创建这个方法*/
    /*public void setUserMapper(UserMapper userMapper) {
        this.userMapper = userMapper;
    }*/

    @Override
    public User selectOneUser(String uname, String pwd) {
        return userMapper.selectOneUser(uname,pwd);
    }

}
普通数据类型的属性的赋值 @Value注解
上面11.3节中是给类对象进行属性注入,那么普通类型的属性如何注入赋值呢?
定义类:使用@Component和 @Value
package com.msb.test;

import org.springframework.beans.factory.annotation.Value;
import org.springframework.stereotype.Component;

/**
 * @Author: zhaoss
 */
@Component
public class Person {
    @Value("18")
    private int age;
    @Value("lili")
    private String name;

    @Override
    public String toString() {
        return "Person{" +
                "age=" + age +
                ", name='" + name + '\'' +
                '}';
    }
}
在applicationContext.xml中配置扫描注解所在的包:
<?xml version="1.0" encoding="UTF-8"?>
<beans xmlns="http://www.springframework.org/schema/beans"
       xmlns:xsi="http://www.w3.org/2001/XMLSchema-instance"
       xmlns:context="http://www.springframework.org/schema/context"
       xsi:schemaLocation="http://www.springframework.org/schema/beans
        https://www.springframework.org/schema/beans/spring-beans.xsd
        http://www.springframework.org/schema/context
        https://www.springframework.org/schema/context/spring-context.xsd" >

    <!--加入扫描注解所在的包:多个包用逗号分隔开-->
    <context:component-scan base-package="com.msb.test"></context:component-scan>

</beans>
测试:
public class Test {
    public static void main(String[] args) {
        ApplicationContext ac = new ClassPathXmlApplicationContext("applicationContext.xml");
        Person person = ac.getBean("person", Person.class);
        System.out.println(person);
    }
}
但是上面的写法,将属性值写死了,我们一般不这样用,我们都是配合属性文件来使用,@Value最大的作用就是读取配置文件,后续配合配置中心(如Nacos)来使用,现在先学习用法即可。
在resources目录下定义a.properties属性文件:
age=19
name=feifei
扫描属性文件,在applicationContext.xml中加入扫描properties的配置:
<?xml version="1.0" encoding="UTF-8"?>
<beans xmlns="http://www.springframework.org/schema/beans"
       xmlns:xsi="http://www.w3.org/2001/XMLSchema-instance"
       xmlns:context="http://www.springframework.org/schema/context"
       xsi:schemaLocation="http://www.springframework.org/schema/beans
        https://www.springframework.org/schema/beans/spring-beans.xsd
        http://www.springframework.org/schema/context
        https://www.springframework.org/schema/context/spring-context.xsd" >


    <!--加入扫描注解所在的包:多个包用逗号分隔开-->
    <context:component-scan base-package="com.msb.service,com.msb.mapper,com.msb.test"></context:component-scan>
    <!--加入properties文件的扫描,扫描以后,spring容器中就会有一处专门存放a.properties中的键值对-->
    <context:property-placeholder location="classpath:a.properties"></context:property-placeholder>
</beans>
这样容器扫描的时候,a.properties中内容就会被读取,容器中就会专门有一处来放a.properties的键值对,键值对怎么赋值给属性中呢?可以使用${}这种表达式获取系统的变量值 或者是.properties属性配置文件中的值
package com.msb.test;

import org.springframework.beans.factory.annotation.Value;
import org.springframework.stereotype.Component;

/**
 * @Author: zhaoss
 */
@Component
public class Person {
    @Value("${age}")
    private int age;
    @Value("${name}")
    private String name;

    @Override
    public String toString() {
        return "Person{" +
                "age=" + age +
                ", name='" + name + '\'' +
                '}';
    }
}
###  普通数据类型的属性的赋值 @Value注解

上面11.3节中是给类对象进行属性注入,那么普通类型的属性如何注入赋值呢?

定义类:使用@Component和 @Value

```java
package com.msb.test;

import org.springframework.beans.factory.annotation.Value;
import org.springframework.stereotype.Component;

/**
 * @Author: zhaoss
 */
@Component
public class Person {
    @Value("18")
    private int age;
    @Value("lili")
    private String name;

    @Override
    public String toString() {
        return "Person{" +
                "age=" + age +
                ", name='" + name + '\'' +
                '}';
    }
}
在applicationContext.xml中配置扫描注解所在的包:
<?xml version="1.0" encoding="UTF-8"?>
<beans xmlns="http://www.springframework.org/schema/beans"
       xmlns:xsi="http://www.w3.org/2001/XMLSchema-instance"
       xmlns:context="http://www.springframework.org/schema/context"
       xsi:schemaLocation="http://www.springframework.org/schema/beans
        https://www.springframework.org/schema/beans/spring-beans.xsd
        http://www.springframework.org/schema/context
        https://www.springframework.org/schema/context/spring-context.xsd" >

    <!--加入扫描注解所在的包:多个包用逗号分隔开-->
    <context:component-scan base-package="com.msb.test"></context:component-scan>

</beans>
测试:
public class Test {
    public static void main(String[] args) {
        ApplicationContext ac = new ClassPathXmlApplicationContext("applicationContext.xml");
        Person person = ac.getBean("person", Person.class);
        System.out.println(person);
    }
}
但是上面的写法,将属性值写死了,我们一般不这样用,我们都是配合属性文件来使用,@Value最大的作用就是读取配置文件,后续配合配置中心(如Nacos)来使用,现在先学习用法即可。
在resources目录下定义a.properties属性文件:
age=19
name=feifei
扫描属性文件,在applicationContext.xml中加入扫描properties的配置:
<?xml version="1.0" encoding="UTF-8"?>
<beans xmlns="http://www.springframework.org/schema/beans"
       xmlns:xsi="http://www.w3.org/2001/XMLSchema-instance"
       xmlns:context="http://www.springframework.org/schema/context"
       xsi:schemaLocation="http://www.springframework.org/schema/beans
        https://www.springframework.org/schema/beans/spring-beans.xsd
        http://www.springframework.org/schema/context
        https://www.springframework.org/schema/context/spring-context.xsd" >


    <!--加入扫描注解所在的包:多个包用逗号分隔开-->
    <context:component-scan base-package="com.msb.service,com.msb.mapper,com.msb.test"></context:component-scan>
    <!--加入properties文件的扫描,扫描以后,spring容器中就会有一处专门存放a.properties中的键值对-->
    <context:property-placeholder location="classpath:a.properties"></context:property-placeholder>
</beans>
这样容器扫描的时候,a.properties中内容就会被读取,容器中就会专门有一处来放a.properties的键值对,键值对怎么赋值给属性中呢?可以使用${}这种表达式获取系统的变量值 或者是.properties属性配置文件中的值
package com.msb.test;

import org.springframework.beans.factory.annotation.Value;
import org.springframework.stereotype.Component;

/**
 * @Author: zhaoss
 */
@Component
public class Person {
    @Value("${age}")
    private int age;
    @Value("${name}")
    private String name;

    @Override
    public String toString() {
        return "Person{" +
                "age=" + age +
                ", name='" + name + '\'' +
                '}';
    }
}


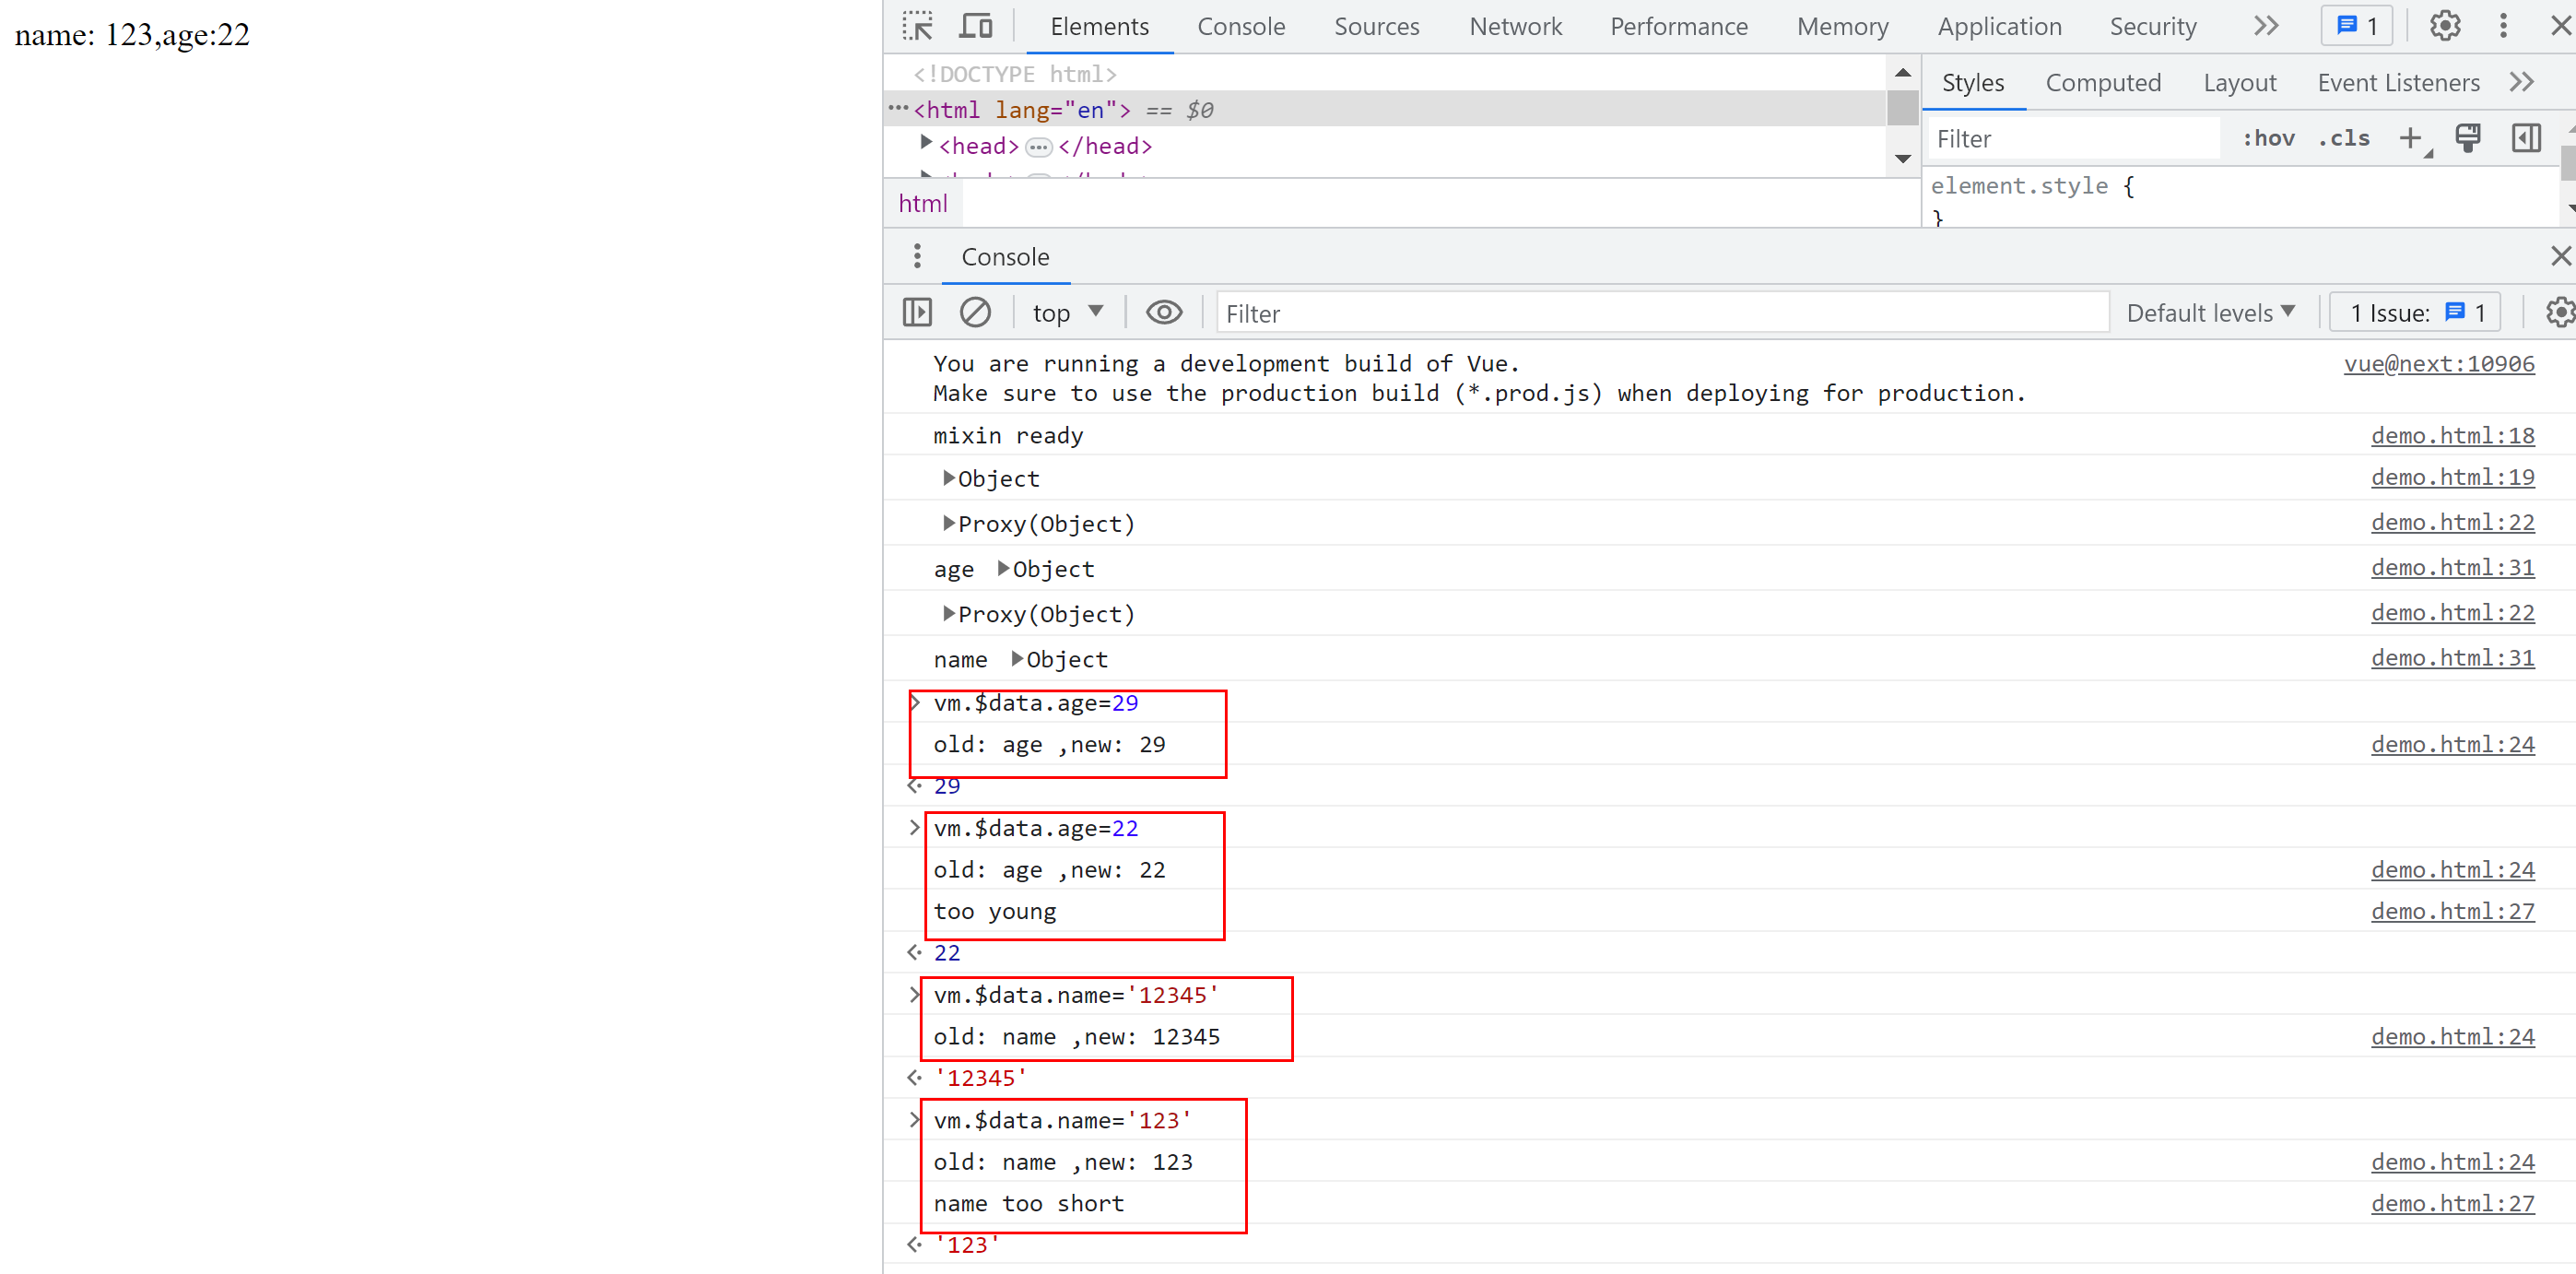


![[NISACTF 2022]level-up](https://img-blog.csdnimg.cn/68fbfe3bbfe64cb190a03defc7959db9.png)


