监控报警
本文介绍如何为 StarRocks 设置监控报警。
StarRocks 提供两种监控报警的方案。企业版用户可以使用内置的 StarRocksManager,其自带的 Agent 从各个 Host 采集监控信息,上报至 Center Service,然后做可视化展示。StarRocksManager 提供邮件和 Webhook 的方式发送报警通知。你也可以使用开源 Prometheus+Grafana 方案,StarRocks 提供了兼容 Prometheus 的信息采集接口,可以通过直接连接 BE 或 FE 的 HTTP 端口来获取集群的监控信息。
Prometheus 是一个拥有多维度数据模型的、灵活的查询语句的时序数据库。它可以通过 Pull 或 Push 采集被监控系统的监控项,存入自身的时序数据库中。并且通过丰富的多维数据查询语言,满足用户的不同需求。
Grafana 是一个开源的 Metric 分析及可视化系统。支持多种数据源,详情可参考官网文档。通过对应的查询语句,从数据源中获取展现数据。通过灵活可配置的 Dashboard,快速的将这些数据以图表的形式展示给用户。
监控架构
Prometheus 通过 Pull 方式访问 FE 或 BE 的 Metric 接口,然后将监控数据存入时序数据库。用户可以通过 Grafana 配置 Prometheus 为数据源,自定义绘制 Dashboard。Alertmanage 匹配采集到的数据对比starrocks_rules阈值触发告警推送。
部署 Prometheus + Grafana + Alertmanage
从 Prometheus 官网下载最新版本的 Prometheus。(安装部署略)
从 Grafana 官网 下载最新版本的 Grafana(安装部署略)
从 下载最新版本的 alertmanager(安装部署略)
配置 Prometheus
在 prometheus.yml 中添加 StarRocks 监控相关的配置
global:
  scrape_interval:     15s # Set the scrape interval to every 15 seconds. Default is every 1 minute.
  evaluation_interval: 15s # Evaluate rules every 15 seconds. The default is every 1 minute.
  # scrape_timeout is set to the global default (10s).
# Alertmanager configuration
alerting:
  alertmanagers:
  - static_configs:
    - targets: ['localhost:9093']
      # - alertmanager:9093
rule_files:
  - "./rules/starrocks_rules.yml"
scrape_configs:
  # The job name is added as a label `job=<job_name>` to any timeseries scraped from this config.
  - job_name: 'StarRocks_Cluster01' # 每一个集群称之为一个job,可以自定义名字作为StarRocks集群名
    metrics_path: '/metrics'    # 指定获取监控项目的Restful Api
    static_configs:
      - targets: ['fe_host1:http_port','fe_host3:http_port','fe_host3:http_port']
        labels:
          group: fe # 这里配置了 fe 的 group,该 group 中包含了 3 个 Frontends
      - targets: ['be_host1:webserver_port', 'be_host2:webserver_port', 'be_host3:webserver_port']
        labels:
          group: be # 这里配置了 be 的 group,该 group 中包含了 3 个 Backends
  - job_name: 'StarRocks_Cluster02' # 可以在Prometheus中监控多个StarRocks集群
    metrics_path: '/metrics'
    static_configs:
      - targets: ['fe_host1:http_port','fe_host3:http_port','fe_host3:http_port']
        labels:
          group: fe
      - targets: ['be_host1:webserver_port', 'be_host2:webserver_port', 'be_host3:webserver_port']
        labels:
          group: be
配置 StarRocks Dashboard 模版
说明:StarRocks 1.19.0 和 2.4.0 版本的监控 Metric Name 有调整,需要下载下面对应版本 DashBoard 模版。
- StarRocks-1.19.0 之前版本 Dashboard 模版
- StarRocks-1.19.0 开始到 StarRocks-2.4.0 之前版本 DashBoard 模版
- StarRocks-2.4.0 及其之后版本 DashBoard 模版
确认数据源可用后,点击左边导航栏的 + 号以添加 Dashboard。这里我们使用上文下载的 StarRocks 的 Dashboard 模板。依次点击左边的导航栏 + 号,Import,和 Upload Json File,导入 JSON 文件。
导入后,可以命名 Dashboard,默认是 StarRocks Overview。同时,需要选择数据源,这里选择之前创建的 starrocks_monitor。
点击 Import 完成导入。至此,您可以看到 StarRocks 的 Dashboard 展示。
理解 Dashboard
本小节简要介绍 StarRocks Dashboard。
注意:Dashboard 的内容可能会随版本升级,不断更新,请参考上文 Dashboard 模版。
顶栏

页面左上角为 Dashboard 名称,右上角显示当前监控时间范围。您可以下拉选择不同的时间范围,还可以指定定时刷新页面间隔。
cluster_name: 即 Prometheus 配置文件中的各个 job_name,代表一个 StarRocks 集群。如果选择不同的 Cluster,下方的图表将展示对应集群的监控信息。
fe_master: 对应集群的 Leader FE 节点。
fe_instance: 对应集群的所有 FE 节点。选择不同的 FE,下方的图表将展示对应 FE 的监控信息。
be_instance: 对应集群的所有 BE 节点。选择不同的 BE,下方的图表将展示对应 BE 的监控信息。
interval: 部分图表展示了速率相关的监控项,这里可选择以特定间隔进行采样计算速率。
当前 Dashboard 有如下 Row(持续更新中):
Overview: 所有 StarRocks 集群的汇总展示。
Cluster Overview: 选定集群的汇总展示。
Query Statistic: 选定集群的查询相关监控。
Jobs: 导入任务相关监控。
Transaction: 事务相关监控。
FE JVM: 选定 FE 的 JVM 监控。
BE: 选定集群 BE 的汇总展示。
BE Task: 选定集群 BE 的任务信息展示。
部分图标展示
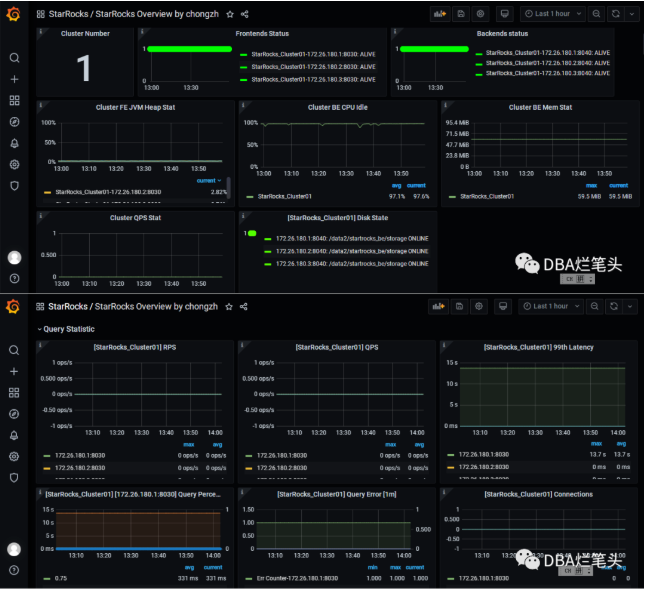
详细监控指标含义见:监控报警 @ Monitor_and_Alert @ StarRocks Docs
配置 StarRocks 的 Alertmanager
#alertmanager的告警邮件配置
 cat /opt/alertmanager/alertmanager.yml
global:
  resolve_timeout: 5m
  smtp_smarthost: 'mail-xxx.xxx.com.cn:25'
  smtp_from: 'prometheusxxx@dflxxx.com.cn'
  smtp_auth_username: 'prometheusxx@xx.com.cn'
  smtp_auth_password: 'xxxx'
  smtp_require_tls: false
route:
  group_by: ['alertname','status']
  group_wait: 30s
  group_interval: 30s
  repeat_interval: 30m
  receiver: 'dba_group'

  routes:
    - receiver: 'dba_group'
      continue: true
      match_re:
        alertname: ".*"
receivers:
  - name: 'dba_group'
    email_configs:
    - send_resolved: true
      to: 'chongzh@szlanyou.com'
# starrocks 告警规则配置
# design by chongzh  2023/4/26
cat /opt/prometheus/rules/starrocks_rules.yml
groups:
- name: for_common
  rules:
  - alert: StarRocks-fe-down
    expr: up{group="fe"} != 1
    for: 0m
    labels:
      level: 3
    annotations:
      cur_value: '{{ $value | printf "%.2f" }}'
      description: 'StarRocks-fe,have some problem.'
  - alert: StarRocks-de-down
    expr: up{group="be"} != 1
    for: 0m
    labels:
      level: 3
    annotations:
      cur_value: '{{ $value | printf "%.2f" }}'
      description: 'StarRocks-de,have some problem.'
  - alert: StarRocks-FE-JVM-Heap-Stat
    expr: sum(jvm_heap_size_bytes{group="fe",type="used"} * 100) by (instance,job)/sum(jvm_heap_size_bytes{group="fe", type="max"}) by (instance,job) >= 90
    for: 0m
    labels:
      level: 3
    annotations:
      cur_value: '{{ $value | printf "%.2f" }}'
      description: 'StarRocks Cluster FE JVM Heap Stat 使用率超90% '
  - alert: StarRocks-Cluster-Disk-State
    expr: starrocks_be_disks_state != 1
    for: 0m
    labels:
      level: 3
    annotations:
      cur_value: '{{ $value | printf "%.2f" }}'
      description: 'StarRocks-BE-Disk-State,have some problem.'
  - alert: StarRocks-Cluster-BDBJE Write
    expr: starrocks_fe_editlog_write_latency_ms{quantile="0.99"} > 5000
    for: 1m
    labels:
      level: 2
    annotations:
      cur_value: '{{ $value | printf "%.2f" }}'
      description: 'starrocks_fe_editlog_write too slow (ms) '
  - alert: StarRocks-be_max_disk_io_util_percent
    expr: starrocks_be_max_disk_io_util_percent > 80
    for: 1m
    labels:
      level: 2
    annotations:
      cur_value: '{{ $value | printf "%.2f" }}'
      description: 'starrocks_be_max_disk_io_util_percent 超80% '
  - alert: starrocks_fe_query_latency_ms
    expr: sum(starrocks_fe_query_latency_ms{quantile="0.99"}) by (instance) > 5000
    for: 1m
    labels:
      level: 2
    annotations:
      cur_value: '{{ $value | printf "%.2f" }}'
      description: 'starrocks_fe_query_latency_ms 超5秒 '
  - alert: StarRocks-Cluster-BE-CPU-Idle
    expr: (sum(rate(starrocks_be_cpu{mode="idle"}[5m])) by (job))/(sum(rate(starrocks_be_cpu[5m])) by (job))*100 < 20
    for: 0m
    labels:
      level: 3
    annotations:
      cur_value: '{{ $value | printf "%.2f" }}'
      description: 'StarRocks Cluster BE CPU Idle 小于 20% '
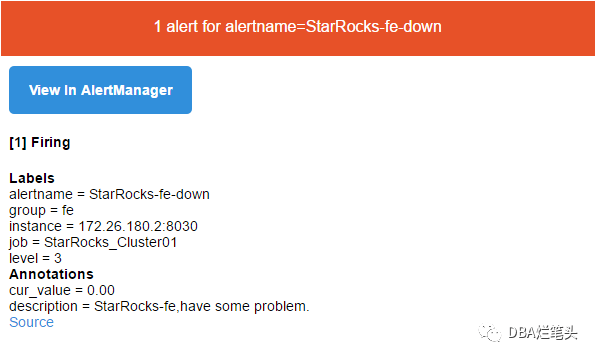
告警测试
![[陇剑杯 2021]之Misc篇(NSSCTF)刷题记录⑤](https://img-blog.csdnimg.cn/245cc2864ca747e2a6d68460873daa3e.png)


