用户体验:性能,交互方式,骨架屏,反馈,需求分析等
组件库:通用表单,表格,弹窗,组件库设计,表单等
项目质量:单元测试,规范,监控,报警,monorepo等
性能优化:性能指标,代码更快,文件加载更快,框架优化,优化方案分析等
普通项目:登录注册,布局,增删改查等
研发效率:脚手架,组件库,开发规范,联调效率,自动化等
vue3+ts:vue3,vite,pinia,组件库,vue-router等
工具库:axios,工程化,工具库,pnpm,typescript等
大数据量
如果直接渲染1W行列表,不出意外你的页面就要卡了,比较常见的优化方案就是虚拟滚动,就是只渲染你能看到的视窗中的几十行,然后通过监听滚动来更新这几十个dom
可视区的高度固定 viewHeight (clientHeight
每个列表高度height (固定
可视区域的数据索引start和end (scrollTop / height
基于startIndex计算出offset偏移(scrollTop - (scrollTop % height);
渲染数据 & 监听滚动事件
// 列表容器的dom
  const container = useRef<HTMLDivElement>(null)
  // 开始位置
  const [start, setStart] = useState(0)
  // 视图中的数据
  const [visibleData, setVisibleData] = useState<VirtualProps['list']>([])
  // 控制偏移量
  const [viewTransfrom, setViewTransfrom] = useState('translate3d(0,0,0)')
  useEffect(() => {
    const containerDom = container.current
    const viewHeight = containerDom?.clientHeight || 500 // 视窗高度
    const visibleCount = Math.ceil(viewHeight / HEIGHT) // 视窗内有几个元素
    const end = start + visibleCount
    setVisibleData(list.slice(start, end))
  }, [])
  function handleScroll(e: React.UIEvent<HTMLDivElement, UIEvent>) {
    const scrollTop = e.currentTarget.scrollTop // 滚动的距离
    const containerDom = container.current
    const viewHeight = containerDom?.clientHeight || 500 // 视窗高度

    const start = Math.floor(scrollTop / HEIGHT)
    const end = start + Math.ceil(viewHeight / HEIGHT)
    setVisibleData(list.slice(start, end))
    setStart(start)
    setViewTransfrom(`translate3d(0,${start * HEIGHT}px,0)`)
  }
// 预估高度60
const PREDICT_HEIGHT = 60
// 不定高数组,维护一个位置数据
const [positions, setPosition] = useState<{ top: number;height: number }[]>([])
// 渲染数组之后,更新positions数组
Array.from(listDom?.children).forEach((node, index) => {
const { height } = node.getBoundingClientRect()
// console.log(start+index, node.id)
if (height !== positions[start + index].height) {
setPosition((prev) => {
const newPos = [...prev]
newPos[start + index].height = height
for (let k = index + 1; k < prev.length; k++)
newPos[k].top = newPos[k - 1].top + newPos[k - 1].height
return newPos
})
}
})
}, [visibleData])文件上传
文件切片 + 秒传 + 暂停
文件计算hash值,就像文件的身份证号,用来问后端有没有切片存在
计算hash的卡顿 可以使用
web-worker,时间切片,抽样Hash三种解决方案上传文件切片
async handleVerify(req, res) {
 const data = await resolvePost(req)
 const { filename, hash } = data
 const ext = extractExt(filename)
 const filePath = path.resolve(this.UPLOAD_DIR, `${hash}${ext}`)

 //文件是否存在
 let uploaded = false
 let uploadedList = []
 if (fse.existsSync(filePath)) {
  uploaded = true
 } else {
  // 文件没有完全上传完毕,但是可能存在部分切片上传完毕了
  uploadedList = await getUploadedList(path.resolve(this.UPLOAD_DIR, hash))
 }
 res.end(
  JSON.stringify(
   uploaded,
   uploadedList // 过滤诡异的隐藏文件
  })
 )
}
web-worker计算md5
async calculateHash(chunks) {
 return new Promise(resolve => {
  // web-worker 防止卡顿主线程
  this.container.workder = new Worker("/hash.js");
  this.container.workder.postMessage({ chunks });
  // 等通知
  this.container.workder.onmessage = e => {
   const { progress, hash } = e.data
   this.hashProgress = Number(progress.toFixed(2));
   if (hash) {
    resolve(hash);
   }
  };
 });
}

const workLoop = async deadline => {
 // 有任务,并且当前帧还没有结束
 while (count < chunks.length && deadline.timeRemaining() > 1) {
  await appendToSpark(chunks[count].file);
  count++;
  // 没有了 计算完毕
  if (count < chunks.length) {
   // 计算中
   this.hashProgress = Number(
    ((100 * count) / chunks.length).toFixed(2)
   );
  } esle {
   this.hashProgress = 100;
   // 计算任务结束
   resolve(spark.end());
  }
 }
 // 当前帧没有时间了,说明浏览又渲染任务了
 window.requestIdleCallback(workLoop);
 };
 window.requestIdleCallback(workLoop);
});
function limit(maxCount) {
// 任务队列
let queue = []
let activeCount = 0
const next = () => {
// 下一个任务
activeCount--
if(queue.length>0) {
queue.shift()()
}
}
const run = async (fn,resolve,args) => {
// 执行一个函数
activeCount++
const result = (async() => fn(...args))()
resolve(result)
await result
next()
}
const push = async (fn,resolve,args) => {
queue.push(run.bind(null, fn, resolve, args))
if (activeCount < maxCount && queue.length > 0) {
// 队列没满,并且还有任务,启动任务
queue.shift()()
}
}
let runner = (fn, ...args) => {
return new Promise((resolve) => {
push(fn, resolve, args)
})
}
return runner
}
async function asyncPool({
limit,
items,
fn
}) {
const promises = []
const pool = new Set()
for (const item of items) {
const promise = fn(item)
promises.push(promise)
pool.add(promise)
const clean = () => pool.delete(promise)
promise.then(clean, clean)
if (pool.size >= limit) await Promise.race(pool)
}
return Promise.all(promises)
}完整的构建打包流程/服务(统一的脚手架、上线服务等)、完整的测试环境、前端错误日志管理系统(收集、统计、报警)、前端资源离线化管理、前端资源增量下载服务以及针对Node应用的日志(完整调用链)、性能和错误监控平台等等。
runner的执行方式有很多种, 目前最流行的就是作为一个docker容器,其内部集成了gitlab的一些基础环境, 注册阶段就是将其与gitlab主任务做关联(runner通常不跟gitlab服务器部署在同一台服务器),而yaml中配置的任务,就是在runner中具体执行, 然后将结果发送回gitlab服务器。
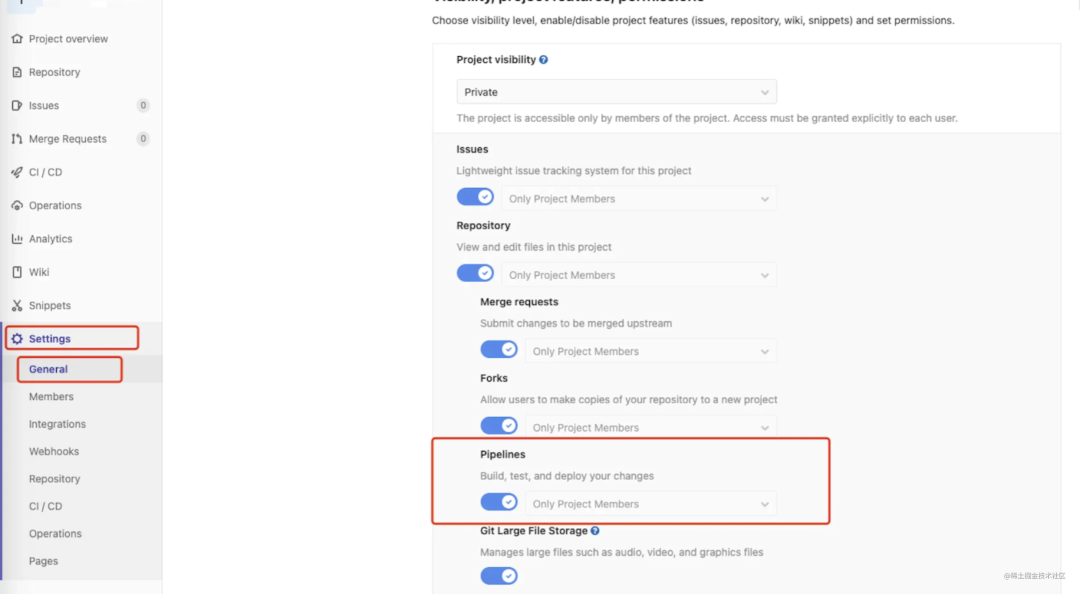
最后项目需要在setttings中开启enable shared runner或者specific runner.
使用Node搭建服务,托管静态资源,以及代理请求的转发。
runner中执行yaml中的task
资源构建
针对测试环境打包:npm run build -e test上传资源到node 服务器。
将该服务抽离为npm 包, 执行festaging-scripts命令,上传的资源有两类:构建出的静态资源
必要的请求代理配置
function buildUrl(prefix) {}

var originXHROPEN = XMLHttpRequest.prototype.open;
XMLHttpRequest.prototype.open = function (method, url, async, user, password) {
 return originXHROpen.call(this, method, buildUrl(url, '${prefix}'), async, user, password);

if (window.fetch) {
 var originFetch = window.fetch;
 window.fetch = function () {
  var input = arguments[0];
  if (typeof input === 'string') {
   arguments[0] = buildUrl(input, '${prefix}');
  }
  return originFetch.apply(this, arguments);
 };
}
统一项目新建入口、项目开发模板,项目开发流程。节省新成员上手成本。
团队成员可以通过输入项目名、GitLab 组、项目模板等字段直接创建 GitLab 仓库,并根据选择的模板及名称等信息在已创建的 GitLab 仓库里进行项目初始化。
量化团队代码质量,统计团队工作量,监测业务吞吐量变化等。
在团队中推行 Commit 提交规范。
获取团队成员的 Git Commit 信息,并存入数据库,以 Commit 信息数据为基础做数据统计分析。
fix、feat、style、refactor 等开头的 Commit 可绘制饼图进行统计对比
需要注意的有
有些操作或导致 Commit 重复,所以对于同一个人的 Commit 需要做去重。
GitLab Events 只会存近一年的数据。所以运行当天也只能统计近一年的代码。
一定要按人进行 Push 时间划分,这样第一次运行之后,后面就可以只取上次取的最后一次 Push 的时间之后的 Commit 了。请求数可以减少很多。
执行过代码之后发现了一些问题,比如:团队成员误操作将 node_modules 文件夹上传等。这造成了统计代码行数过多,解决办法是过滤掉大于 10000 行(这个可以自由指定)的 commit 。
持续集成基本概念
在传统开发过程中,代码的集成工作通常是在所有工程师们工作完成后进行的,需要单独构建,这往往会花费大量的时间和精力。持续集成是一种将集成工作放在软件开发阶段的做法,以便更加有规律地构建、测试和集成代码。
持续集成可以在开发人员提交了新代码后,立即进行构建、单元测试,可以根据测试结果确定新代码或配置环境是否正确。
服务器相关操作
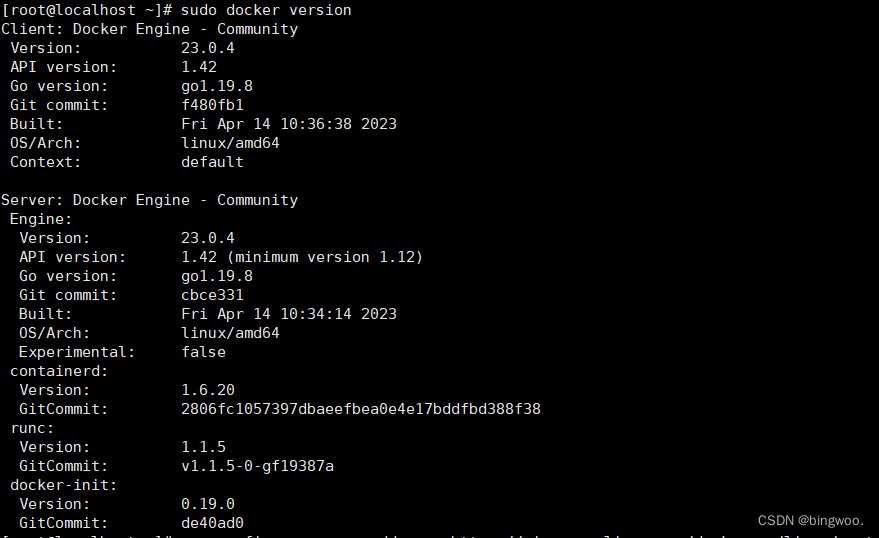
安装docker
具体可参考官网:docs.docker.com/engine/inst…[1]
安装gitlab-runer
docker方式安装
# 拉取镜像
docker pull gitlab/gitlab-runner:latest
# 运行镜像
docker run -d --name gitlab-runner --restart always \
        -v /var/run/docker.sock:/var/run/docker.sock \
        -v /srv/gitlab-runner/config:/etc/gitlab-runner \
        gitlab/gitlab-runner
添加用户组及权限
# 添加 用户组及用户
useradd -m -g gitlab-runner gitlab-runner

# 查看系统用户
sudo vim /etc/passwd

# 将下图蓝框内的数字改为0:0,和root保持一致
注册gitlab-runner
# 使用一次性容器来注册 gitlab-runer, --rm 容器推出时清理用户数据
docker run --rm  -it -v /srv/gitlab-runner/config:/etc/gitlab-runner gitlab/gitlab-runner register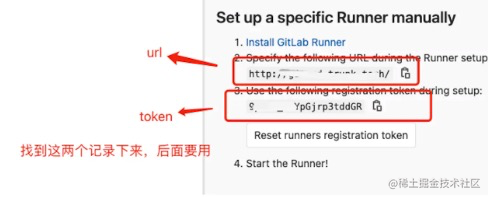
# 输入域名或者服务器ip地址,就是步骤三的url,如果gitlab和要部署的服务器地址不一致,需要做个地址映射哦,自行百度下
Please enter the gitlab-ci coordinator URL (e.g. https://gitlab.com/):
# 输入token
Please enter the gitlab-ci token for this runner:
# 输入runner描述,可写可不写
Please enter the gitlab-ci description for this runner:
# 给这个Runner指定tags,可以写多个,英文逗号隔开即可
Please enter the gitlab-ci tags for this runner (comma separated):
# 选择Runner是否接受未指定tags的任务,稍后可修改,默认值为false,可写可不写
Whether to run untagged builds [true/false]:
# 选择是否为当前项目锁定Runner,通常用于被指定为某个项目的Runner,默认值为true,可写可不写
Whether to lock the Runner to current project [true/false]:
# 选择Runner executor(Runner执行器),这里我们选docker哈
Please enter the executor: docker, shell, virtualbox, kubernetes, docker-ssh, parallels, ssh, docker+machine, docker-ssh+machine:
docker
# docker版本选最新版
Please enter the default Docker image (e.g. ruby:2.6):
docker:latest

# 好了到这一步,看到输出以下语句,就算注册完了,接下来去CI/CD界面下的Runners选项里,看看有没有成功;
Runner registered successfully. Feel free to start it, but if it's running already the config should be automatically reloaded!

docker restart gitlab-runner

 cd ~/.ssh # 查看是否存在密钥
 ssh-keygen -t rsa # 生成密钥
 cat id_rsa    #查看私钥
 cat id_rsa.pub # 查看公钥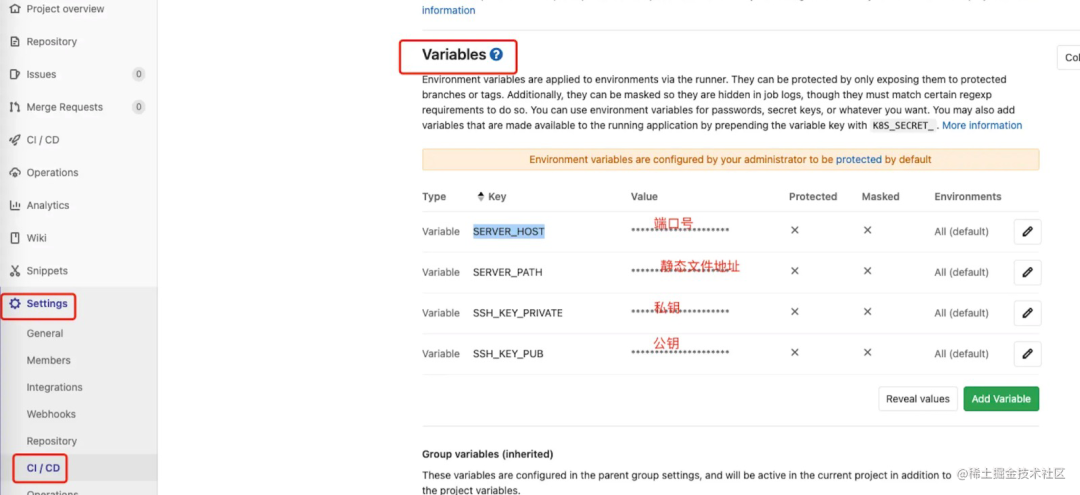
在项目根目录下新增文件gitlab-ci.yml,将以下代码粘贴过去,然后提交代码到test分支
test:build:
    stage: test
    script:
      - docker build -t fast_api .
      - if [ $(docker ps -aq --filter name=trunkverse_service) ]; then docker rm -f trunkverse_service; fi
      - docker run -d -p 8098:8098 --restart=always --name fast_api fast_api
      - echo 'docker run 完成'
    only:
      - test # 指定test分支一更新则立即构建
    tags:
      - fastApi # 对应每个runner注册时定义的tag

test:deploy:
  image: alpine:3.7
  stage: deploy
  script:
    - echo "http://mirrors.aliyun.com/alpine/v3.7/main/" > /etc/apk/repositories # 下载镜像
    - apk add --no-cache rsync openssh # 安装rsync openssh
    - mkdir -p ~/.ssh
    - echo "$SSH_KEY_PRIVATE" >> /root/.ssh/id_rsa
    - echo "$SSH_KEY_PUB" >> /root/.ssh/id_rsa.pub
    - chmod 700 /root/.ssh/
    - chmod 600 /root/.ssh/id_rsa.pub
    - chmod 600 /root/.ssh/id_rsa
    - echo -e "Host *\n\t StrictHostKeyChecking no \n\n" > ~/.ssh/config
    - rsync -av --delete   ./  $SERVER_HOST:$SERVER_PATH
  only:
    - test
  tags:
    - fastApi
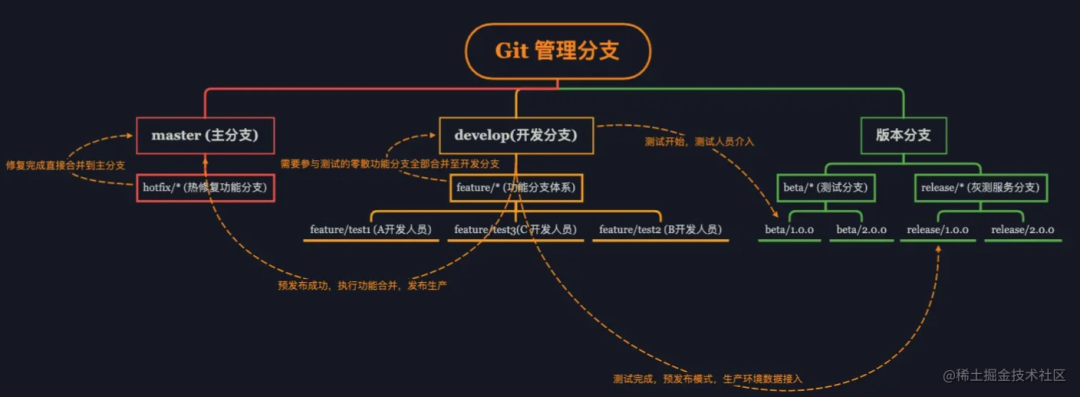
Git 管理方案
master 为生产分支 develop 为开发分支
develop 分支下存在多个功能分支,以 develop 做为基础切出,并会合并回 develop
版本分支 下存在多个环境的版本历史,以版本控制的严格程度分化为多个子分支
master 孑然一身,只有存在紧急 Bug 时,才会有 hotfix分支切入并合并回 master 与 develop
# 阶段
stages:
  - install
  - build
  - deploy
  # 缓存 node_modules 减少打包时间,默认会清除 node_modules 和 dist
cache:
  paths:
    - node_modules/

# 安装依赖
install:
  stage: install
  tags: # runner 标签(注册runner时设置的)
    - webpack-vue-cicd
  only:
    changes:
      - package.json
  script: # 执行脚本
    yarn

# 拉取项目,打包
build:
  stage: build # 阶段名称 对应,stages
  tags: # runner 标签(注册runner时设置的,可在 admin->runner中查看)
    - webpack-vue-cicd
  script: # 脚本(执行的命令行)
    - cd ${CI_PROJECT_DIR} # 拉取项目的根目录
    - npm install # 安装依赖
    - npm run build # 运行构建命令
  only:
    - main #拉取分支
  artifacts: # 把 dist 的内容传递给下一个阶
    paths:
      - dist/

# 部署
deploy:
  stage: deploy # 阶段名称 对应,stages
  tags: # runner 标签(注册runner时设置的)
    - webpack-vue-cicd
  script: # 脚本(执行的命令行)
    - rm -rf /www/wwwroot/webpack_vue_cicd/*
    - cp -rf ${CI_PROJECT_DIR}/dist/* /www/wwwroot/webpack_vue_cicd/ # 把包完成,复制 dist 下的文件到对应的项目位置
stages:
- test
- build
- deploy
test:
stage: test
tags:
- shell-g-fe-runner
script:
- npm install --no-optional --registry=https://registry.npm.taobao.org/
- npm run lintstages:
- test
- build
- deploy
test:
stage: test
tags:
- shell-g-fe-runner
script:
- npm install --no-optional --registry=https://registry.npm.taobao.org/
- npm run lint
build:
stage: build
tags:
- shell-g-fe-runner
script:
- sudo npm rebuild node-sass
- sudo npm run build
only:
- master
- /^beta\/.*$/
- /^release\/.*$/GitLab 的 CI 程序同时包含缓存机制,如果你想把你的编译产物缓存下来
build:
  stage: build
  tags:
    - shell-g-fe-runner
  script:
    - sudo npm rebuild node-sass
    - sudo npm run build
  artifacts:
    paths:
      - dist/
    expire_in: 60 mins
deploy_test:
stage: deploy
tags:
- shell-g-fe-runner
only:
- /^beta\/.*$/
environment:
name: Test
url: http://test.vue.com/
script:
- cp -R dist/* /data/html/vue-com/test/
deploy_uat:
stage: deploy
tags:
- shell-g-fe-runner
only:
- /^release\/.*$/
environment:
name: Uat
url: https://uat.vue.com/
script:
- cp -R dist/* /data/html/vue-com/uat/
deploy_prod:
stage: deploy
tags:
- shell-g-fe-runner
only:
- master
environment:
name: Production
url: https://vue.com/
script:
- cp -R dist/* /data/html/vue-com/prod/安装 rsync
deploy_prod:
  stage: deploy
  tags:
    - shell-g-fe-runner
  only:
    - master
  environment:
    name: Production
    url: https://vue.com/
  script:
    - rsync -ravtz --delete --password-file=/data/auth/rsync.pwd dist/* 192.168.1.1::vue-com-prod/
ref() 标注类型有三种方式:
通过泛型参数的形式来给
ref()增加类型
import { ref } from 'vue'

const initCode = ref<string | number>('200')
如果是遇到复杂点的类型,可以自定义
interface然后泛型参数的形式传入
import { ref } from 'vue'

interface User {
  name: string
  age: string | number
}

const user = ref<User>({
  name:'xxx',
  age: 20
})
通过使用
Ref这个类型为ref内的值指定一个更复杂的类型
import { ref } from 'vue'
import type { Ref } from 'vue'

const initCode: Ref<string | number> = ref('200')
reactive() 返回一个对象的响应式代理。
reactive()标注类型有两种方式:
直接给声明的变量添加类型
import { reactive } from 'vue'

interface User {
  name: string
  age: string | number
}

const user:User = reactive({
  name:"xxx",
  age:'20'
})
通过泛型参数的形式来给
reactive()增加类型
import { reactive } from 'vue'

interface User {
  name: string
  age: string | number
}

const user = reactive<User>({
  name:"xxx",
  age:'20'
})computed()标注类型有两种方式:
从其计算函数的返回值上推导出类型
import { ref, computed } from 'vue'

const count = ref<number>(0)

// 推导得到的类型:ComputedRef<string>
const user = computed(() => count.value + 'xxx')
通过泛型参数显式指定
computed()类型
const user = computed<string>(() => {
  // 若返回值不是 string 类型则会报错
  return 'xxx'
})
为了在声明 props 选项时获得完整的类型推断支持,我们可以使用 defineProps API,它将自动地在 script setup 中使用
从它的参数中推导类型:
const props = defineProps({
  name: { type: String, required: true },
  age: Number
})
通过泛型参数来定义
props的类型
const props = defineProps<{
  name: string
  age?: number
}>()
定义成一个单独的 interface
interface Props {
  name: string
  age?: number
}

const props = defineProps<Props>()
// vite.config.js
export default {
plugins: [
vue({
reactivityTransform: true
})
]
}通过对 defineProps() 的响应性解构来添加默认值:
<script setup lang="ts">
interface Props {
  name: string
  age?: number
}

const { name = 'xxx', age = 100 } = defineProps<Props>()
</script>
为了在声明 emits 选项时获得完整的类型推断支持,我们可以使用 defineEmits API,它将自动地在 script setup 中使用
defineEmits() 标注类型直接推荐泛型形式
import type { GlobalTheme } from 'naive-ui'

const emit = defineEmits<{
  (e: 'setThemeColor', val: GlobalTheme): void
}>()
为 defineExpose() 标注类型
defineExpose() 类型推导直接使用参数类型自动推到即可
<script setup>
import { ref } from 'vue'

const name = ref<string>('xxx')

defineExpose({
  name
})provide()供给一个值,可以被后代组件注入
为 provide() 标注类型, Vue 提供了一个 InjectionKey 接口,它是一个继承自 Symbol 的泛型类型,可以用来在提供者和消费者之间同步注入值的类型
import type { InjectionKey } from 'vue'

// 建议声明 key (name) 放到公共的文件中
// 这样就可以在 inject 的时候直接导入使用
const name = Symbol() as InjectionKey<string>

provide(name, 'xxx') // 若提供的是非字符串值会导致错误
以上方式是通过定义 key 的类型来标注类型的,还有一种方式直接 key 采用字符串的形式添加
provide('name', 'xxx')inject()注入一个由祖先组件或整个应用供给的值
provide() 的 key 的类型是声明式提供的话(provide()类型标注的第一种形式)
inject() 可以直接导入声明的 key 来获取父级组件提供的值
// 由外部导入
const name = Symbol() as InjectionKey<string>

const injectName = inject(name)
如果 provide() 的 key 直接使用的字符串形式添加的, 需要通过泛型参数声明
const injectName = inject<string>('name')模板 ref 需要通过一个显式指定的泛型参数和一个初始值 null 来创建:
<img ref="el" class="logo" :src="Logo" alt="" />

const el = ref<HTMLImageElement | null>(null)
<!-- Child.vue -->
<script setup lang="ts">
const handleLog = () => console.log('xxx')
defineExpose({
open
})
</script>
<!-- parent.vue -->
<script setup lang="ts">
import Child from './Child.vue'
// 为子组件 ref 声明类型
const child = ref<InstanceType<typeof Child> | null>(null)
// 调用子组件中的方法
const getChildHandleLog = () => {
child.value?.handleLog()
}
</script>Vue组件引入
<script setup lang="ts">
import HelloWorld from "./components/HelloWorld.vue";
</script>

<template>
  <HelloWorld msg="Vite + Vue" />
</template>
defineProps 在有两种定义方式
const props = defineProps({
  foo: { type: String, required: true },
  bar: Number,
});

<script setup lang="ts">
    interface Props {
        foo: string
        bar?: number
    }
    const props = defineProps<Props>()
</script>
默认值
// 第二种带默认值props
export interface ChildProps {
  foo: string
  bar?: number
}
const props = withDefaults(defineProps<ChildProps>(), {
   foo: "xxx"
   bar?: 3
})
<script setup lang="ts">
interface Book {
title: string;
author: string;
year: number;
}
const props = defineProps<{
book: Book;
}>();
</script>import type { PropType } from 'vue'
interface Book {
title: string;
author: string;
year: number;
}
const props = defineProps({
book: Object as PropType<Book>
})defineEmits和defineProps获取父组件传过来值和事件
// 第一种获取事件方法
const emit = defineEmits<{
  (e: 'change', id: number): void
  (e: 'update', value: string): void
}>()

// 第二种获取事件方法
const emit = defineEmits(["dosth"])
ref一般用于基本的数据类型,比如string,boolean
reactive一般用于对象
不能修改reactive设置的值
let state = reactive({ count: 0 })
// the above reference ({ count: 0 }) is no longer being tracked (reactivity connection // is lost!)
// 这里state如果重新赋值以后,vue就不能双向绑定
state = reactive({ count: 1 })
useAttrs 可以获取父组件传过来的id和class等值。 useSlots 可以获得插槽的内容。
<template>

    <div class="father">{{ fatherRef }}</div>

    <Child :fatherRef="fatherRef" @changeVal="changeVal" class="btn" id="111">

        <template #test1>

        <div>1223</div>

        </template>

    </Child>

</template>

<script setup lang="ts">

import { ref } from "vue";

import Child from "./Child.vue";

const fatherRef = ref("1");

function changeVal(val: string) {

    fatherRef.value = val;

}

</script>

<style lang="scss" scoped>

.father {

    margin-top: 40px;

    margin-bottom: 40px;

}

.btn {

    font-size: 20px;

    color: red;

}

</style>


<template>

    <!-- <div class="child">{{ props.fatherRef }}</div> -->

    <div v-bind="attrs">

        <slot name="test1">11</slot>

        <input type="text" v-model="inputVal" />

    </div>

</template>

<script setup lang="ts">

import { computed, useAttrs, useSlots } from "vue";

const props = defineProps<{

    fatherRef: string;

}>();

const emits = defineEmits(["changeVal"]);

const slots = useSlots();

const attrs = useAttrs();

console.log(122, attrs, slots);

const inputVal = computed({

    get() {

        return props.fatherRef;

    },

    set(val: string) {

        emits("changeVal", val);

    },

});

</script>


<style lang="scss" scoped>

.child {

}

</style>
自定义focus指令,命名就是vMyFocus,使用的就是v-my-focus
<script setup lang="ts">
const vMyFocus = {
  onMounted: (el: HTMLInputElement) => {
    el.focus();
    // 在元素上做些操作
  },
};
</script>
<template>
  <input v-my-focus value="111" />
</template>
使用defineExpose子组件传父组件
<template>

    <div class="child"></div>

</template>


<script setup lang="ts">

import { ref, reactive } from "vue";

function doSth() {

    console.log(333);

}

defineExpose({ doSth });

</script>


<style lang="scss" scoped>

.child {

}

</style>
<template>
<div class="father" @click="doSth1">222</div>
<Child ref="childRef"></Child>
</template>
<script setup lang="ts">
import { ref, reactive } from "vue";
import Child from "./Child.vue";
const childRef = ref();
function doSth1() {
childRef.value.doSth();
}
</script>
<style lang="scss" scoped>
.father {
}
</style>当从父组件向子组件传props的时候,必须使用toRefs或者toRef进行转一下 如果不使用toRefs转一次的话,当父组件中的props改变的时候,子组件如果使用了Es6的解析,会失去响应性。
解决办法
使用const { fatherRef } = toRefs(props);
在模版中中使用props.fatherRef
1. 可以在子组件中使用computed,实现双向绑定
<template>

    <div class="father">{{ fatherRef }}</div>

    <Child :fatherRef="fatherRef" @changeVal="changeVal"></Child>

</template>

<script setup lang="ts">

import { ref } from "vue";

import Child from "./Child.vue";

const fatherRef = ref("1");

function changeVal(val: string) {

    fatherRef.value = val;

}

</script>


<style lang="scss" scoped>

.father {

    margin-top: 40px;

    margin-bottom: 40px;

}

</style>

<template>

    <!-- <div class="child">{{ props.fatherRef }}</div> -->

    <input type="text" v-model="inputVal" />

</template>

<script setup lang="ts">

import { computed } from "vue";

const props = defineProps<{

    fatherRef: string;

}>();

const emits = defineEmits(["changeVal"]);


const inputVal = computed({

    get() {

        return props.fatherRef;

    },

    set(val: string) {

        emits("changeVal", val);

    },

});

</script>

<style lang="scss" scoped>

.child {

}

</style>
<template>
<Child :modelValue="searchText" @update:modelValue="changeVal"> </Child>
</template>
<script setup lang="ts">
import { ref } from "vue";
import Child from "./Child.vue";
const searchText = ref(1);
function changeVal(val: number) {
searchText.value = val;
}
</script>
<style lang="scss" scoped>
.father {
margin-top: 40px;
margin-bottom: 40px;
}
.btn {
font-size: 20px;
color: red;
}
</style><template>
<input v-model="modelValue" />
<Child
:modelValue="test"
@update:modelValue="changeTest"
v-if="modelValue > 2"
></Child>
</template>
<script setup lang="ts">
import { computed, useAttrs, useSlots, ref } from "vue";
const props = defineProps<{
modelValue: number;
}>();
const test = ref(0);
function changeTest(val: number) {
test.value = val;
}
// const emits = defineEmits(["changeVal"]);
</script>
<style lang="scss" scoped>
.child {
position: relative;
}
</style>加群联系作者vx:xiaoda0423
仓库地址:https://github.com/webVueBlog/WebGuideInterview
参考资料
[1]
https://docs.docker.com/engine/install/ubuntu/: https://link.juejin.cn/?target=https%3A%2F%2Fdocs.docker.com%2Fengine%2Finstall%2Fubuntu%2F






![[Linux]文件系统权限与访问控制](https://img-blog.csdnimg.cn/214df36c7c7141899696348f6bdaf236.png)
