一、Caffeine简介
Caffeine是一款高性能、最优缓存库。Caffeine是受Google guava启发的本地缓存(青出于蓝而胜于蓝),在Cafeine的改进设计中借鉴了 Guava 缓存和 ConcurrentLinkedHashMap,Guava缓存可以参考上篇:本地缓存解决方案GuavaCache | Spring Cloud 37,就和Mybatis与Mybatis Plus一样。Caffeine也是Spring5.X后使用的缓存框架,作为Spring推荐的缓存框架我们有必要了解一下。
Caffeine官网地址:https://github.com/ben-manes/caffeine/wiki/Home-zh-CN
以下为截取官网的部分测试结果:
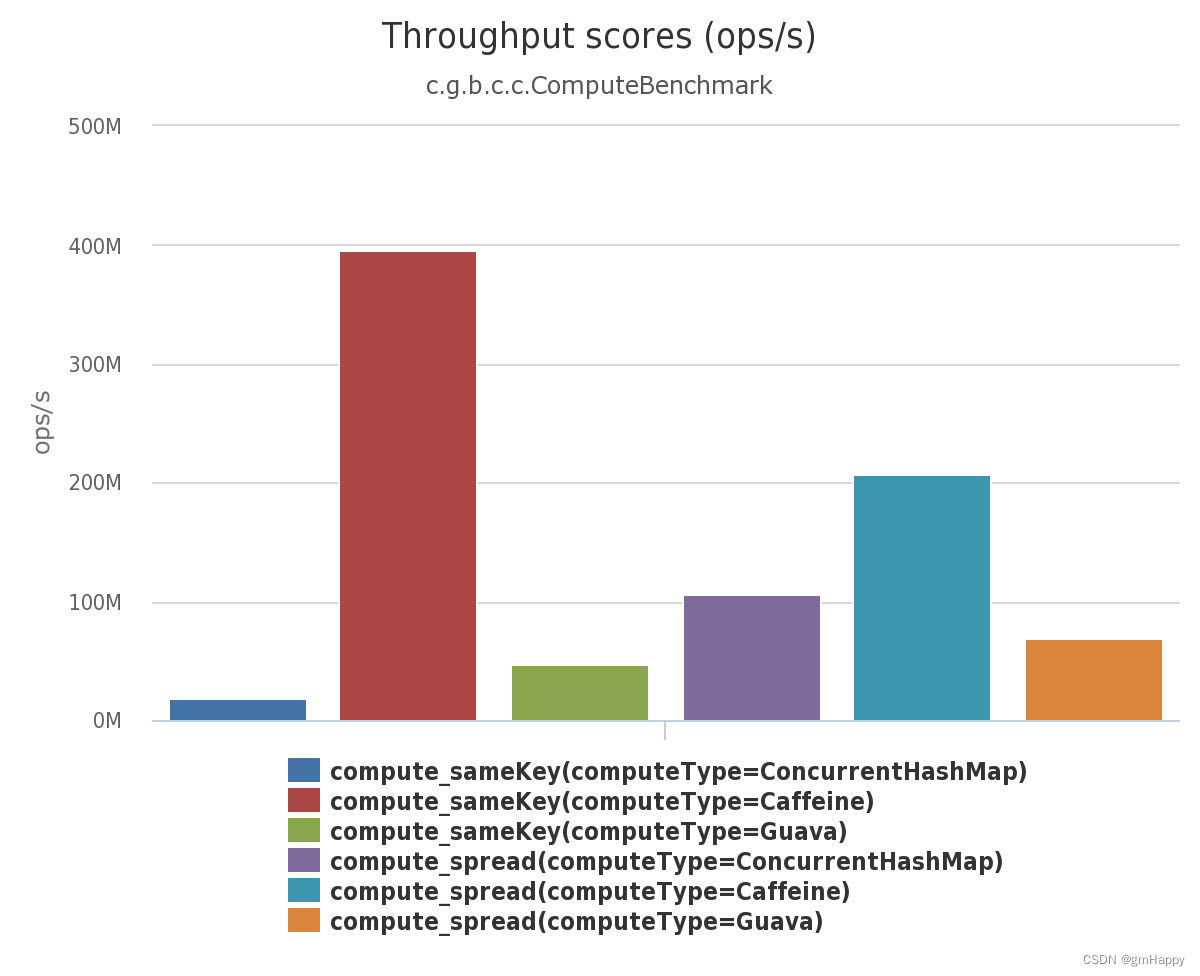
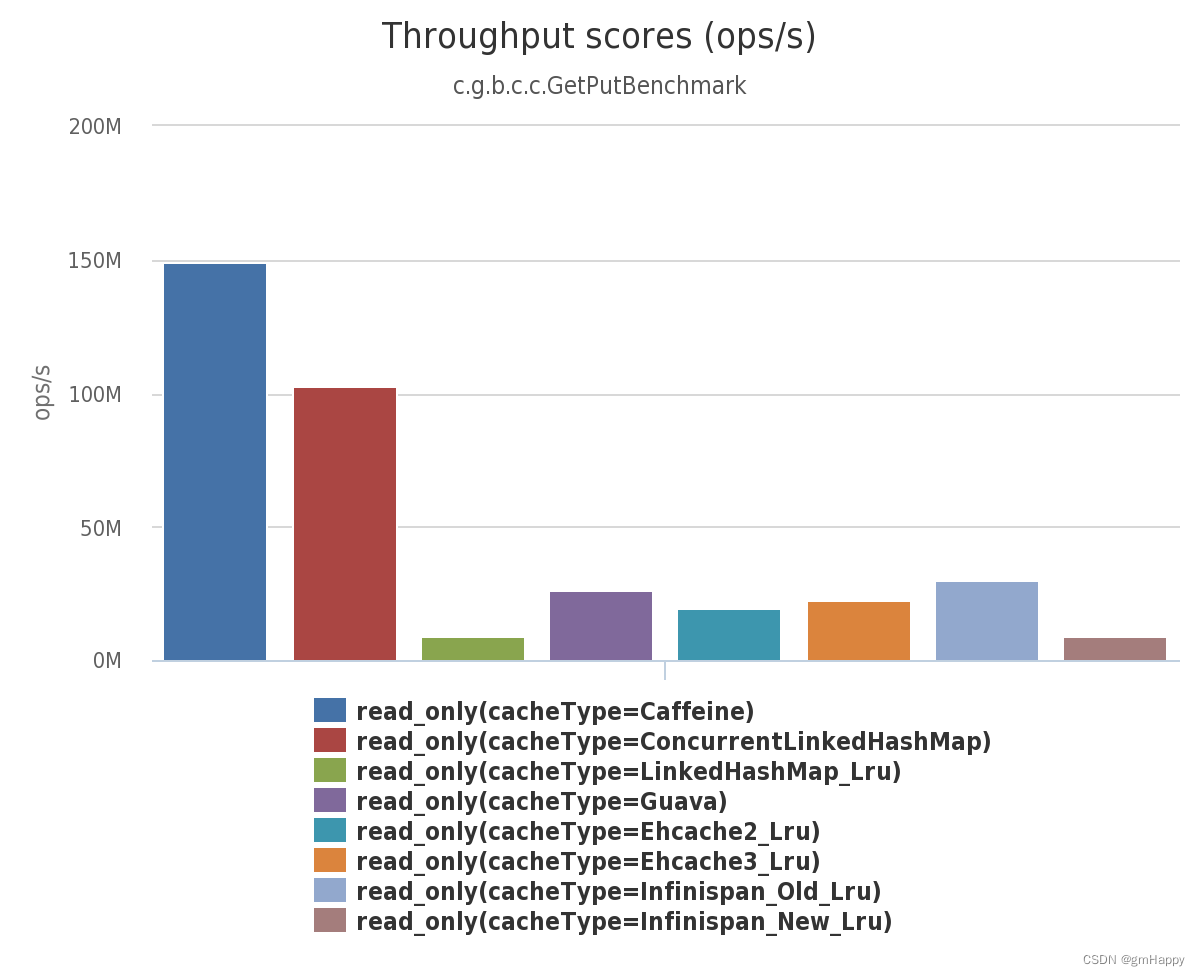
详细基准测试结果请见:https://github.com/ben-manes/caffeine/wiki/Benchmarks-zh-CN
二、应用及特性说明
2.1 Maven依赖
<dependency>
  <groupId>com.github.ben-manes.caffeine</groupId>
  <artifactId>caffeine</artifactId>
  <version>2.9.3</version>
</dependency>
注意
Caffeine的版本需要和JDK版本对应:
2.X版本对应JDK为83.X版本对应的JDK版本为11
2.2 缓存添加
Caffeine提供了四种缓存添加策略:手动加载,自动加载,手动异步加载和自动异步加载。
2.2.1 手动加载
private static void manual() {
    // 构建caffeine的缓存对象,并指定在写入后的10分钟内有效,且最大允许写入的条目数为10000
    Cache<String, String> cache = Caffeine.newBuilder()
            .expireAfterWrite(10, TimeUnit.MINUTES)
            .maximumSize(10_000)
            .build();
    String key = "hello";
    // 查找某个缓存元素,若找不到则返回null
    String str = cache.getIfPresent(key);
    System.out.println("cache.getIfPresent(key) ---> " + str);
    // 查找某个缓存元素,若找不到则调用函数生成,如无法生成则返回null
    str = cache.get(key, k -> create(key));
    System.out.println("cache.get(key, k -> create(key)) ---> " + str);
    // 添加或者更新一个缓存元素
    cache.put(key, str);
    System.out.println("cache.put(key, str) ---> " + cache.getIfPresent(key));
    // 移除一个缓存元素
    cache.invalidate(key);
    System.out.println("cache.invalidate(key) ---> " + cache.getIfPresent(key));
}

private static String create(Object key) {
    return key + " world";
}
Cache 接口提供了显式搜索查找、更新和移除缓存元素的能力。
缓存元素可以通过调用 cache.put(key, value)方法被加入到缓存当中。如果缓存中指定的key已经存在对应的缓存元素的话,那么先前的缓存的元素将会被直接覆盖掉。因此,通过 cache.get(key, k -> value) 的方式将要缓存的元素通过原子计算的方式 插入到缓存中,以避免和其他写入进行竞争。值得注意的是,当缓存的元素无法生成或者在生成的过程中抛出异常而导致生成元素失败,cache.get 也许会返回 null 。
当然,也可以使用Cache.asMap()所暴露出来的ConcurrentMap的方法对缓存进行操作。
2.2.2 自动加载
public static void loading() {
    LoadingCache<String, String> cache = Caffeine.newBuilder()
            .maximumSize(10_000)
            .expireAfterWrite(10, TimeUnit.MINUTES)
            .build(key -> create(key)); // 当调用get或者getAll时,若找不到缓存元素,则会统一调用create(key)生成
    String key = "hello";
    String str = cache.get(key);
    System.out.println("cache.get(key) ---> " + str);
    List<String> keys = Arrays.asList("a", "b", "c", "d", "e");
    // 批量查找缓存元素,如果缓存不存在则生成缓存元素
    Map<String, String> maps = cache.getAll(keys);
    System.out.println("cache.getAll(keys) ---> " + maps);
}

private static String create(Object key) {
    return key + " world";
}
LoadingCache是一个Cache 附加上 CacheLoader能力之后的缓存实现。
通过 getAll可以达到批量查找缓存的目的。 默认情况下,在getAll 方法中,将会对每个不存在对应缓存的key调用一次 CacheLoader.load 来生成缓存元素。 在批量检索比单个查找更有效率的场景下,你可以覆盖并开发CacheLoader.loadAll 方法来使你的缓存更有效率。
值得注意的是,你可以通过实现一个 CacheLoader.loadAll并在其中为没有在参数中请求的key也生成对应的缓存元素。打个比方,如果对应某个key生成的缓存元素与包含这个key的一组集合剩余的key所对应的元素一致,那么在loadAll中也可以同时加载剩下的key对应的元素到缓存当中。
2.2.3 手动异步加载
private static void asynchronous() {
    AsyncCache<String, String> cache = Caffeine.newBuilder()
            .expireAfterWrite(10, TimeUnit.MINUTES)
            .maximumSize(10_000)
            .buildAsync();
    String key = "Hello";
    // 查找某个缓存元素,若找不到则返回null
    CompletableFuture<String> value = cache.getIfPresent(key);
    // 查找某个缓存元素,若不存在则异步调用create方法生成
    value = cache.get(key, k -> create(key));
    // 添加或者更新一个缓存元素
    cache.put(key, value);
    // 移除一个缓存元素
    cache.synchronous().invalidate(key);
}

private static String create(Object key) {
    return key + " world";
}
AsyncCache 是 Cache 的一个变体,AsyncCache提供了在 Executor上生成缓存元素并返回 CompletableFuture的能力。这给出了在当前流行的响应式编程模型中利用缓存的能力。
synchronous()方法给 Cache提供了阻塞直到异步缓存生成完毕的能力。
当然,也可以使用 AsyncCache.asMap()所暴露出来的ConcurrentMap的方法对缓存进行操作。
默认的线程池实现是 ForkJoinPool.commonPool() ,当然你也可以通过覆盖并实现 Caffeine.executor(Executor)方法来自定义你的线程池选择。
2.2.4 自动异步加载
private static void asynchronouslyLoading() {
    AsyncLoadingCache<String, String> cache = Caffeine.newBuilder()
            .maximumSize(10_000)
            .expireAfterWrite(10, TimeUnit.MINUTES)
            // 异步构建一个同步的调用方法create(key)
            .buildAsync(key -> create(key));
    // 也可以使用下面的方式来异步构建缓存,并返回一个future
    // .buildAsync((key, executor) -> createAsync(key, executor));
    String key = "Hello";
    // 查找某个缓存元素,若找不到则会异步生成。
    CompletableFuture<String> value = cache.get(key);
    List<String> keys = Arrays.asList("a", "b", "c", "d", "e");
    // 批量查找某些缓存元素,若找不到则会异步生成。
    CompletableFuture<Map<String, String>> values = cache.getAll(keys);
}

private static String create(Object key) {
    return key + " world";
}
AsyncLoadingCache是一个 AsyncCache 加上 AsyncCacheLoader能力的实现。
在需要同步的方式去生成缓存元素的时候,CacheLoader是合适的选择。而在异步生成缓存的场景下, AsyncCacheLoader则是更合适的选择并且它会返回一个 CompletableFuture。
通过 getAll可以达到批量查找缓存的目的。 默认情况下,在getAll 方法中,将会对每个不存在对应缓存的key调用一次 AsyncCacheLoader.asyncLoad 来生成缓存元素。 在批量检索比单个查找更有效率的场景下,你可以覆盖并开发AsyncCacheLoader.asyncLoadAll 方法来使你的缓存更有效率。
值得注意的是,你可以通过实现一个 AsyncCacheLoader.asyncLoadAll并在其中为没有在参数中请求的key也生成对应的缓存元素。打个比方,如果对应某个key生成的缓存元素与包含这个key的一组集合剩余的key所对应的元素一致,那么在asyncLoadAll中也可以同时加载剩下的key对应的元素到缓存当中。
private static void timeBased() {
    // 自上一次写入或者读取缓存开始,在经过指定时间之后过期。
    LoadingCache<String, String> fixedAccess = Caffeine.newBuilder().expireAfterAccess(5, TimeUnit.MINUTES).build(key -> create(key));
    // 自缓存生成后,经过指定时间或者一次替换值之后过期。
    LoadingCache<String, String> fixedWrite = Caffeine.newBuilder().expireAfterWrite(5, TimeUnit.MINUTES).build(key -> create(key));
    // 自定义缓存过期策略,可以在创建时,写入后、读取时。
    LoadingCache<String, String> varying = Caffeine.newBuilder().expireAfter(new Expiry<String, String>() {
        public long expireAfterCreate(String key, String value, long currentTime) {
            return currentTime;
        }

        public long expireAfterUpdate(String key, String value, long currentTime, long currentDuration) {
            return currentDuration;
        }

        public long expireAfterRead(String key, String value, long currentTime, long currentDuration) {
            return currentDuration;
        }
    }).build(key -> create(key));
}
2.3 驱逐策略
Caffeine 提供了三种驱逐策略,分别是基于容量,基于时间和基于引用三种类型。
本文重点描述时间驱逐策略,其他驱逐策略请见官网:https://github.com/ben-manes/caffeine/wiki/Eviction-zh-CN
Caffeine提供了三种方法进行基于时间的驱逐策略:
-
expireAfterAccess(long, TimeUnit): 一个元素在上一次读写操作后一段时间之后,在指定的时间后没有被再次访问将会被认定为过期项。在当被缓存的元素时被绑定在一个session上时,当session因为不活跃而使元素过期的情况下,这是理想的选择。
-
expireAfterWrite(long, TimeUnit): 一个元素将会在其创建或者最近一次被更新之后的一段时间后被认定为过期项。在对被缓存的元素的时效性存在要求的场景下,这是理想的选择。
-
expireAfter(Expiry): 一个元素将会在指定的时间后被认定为过期项。当被缓存的元素过期时间受到外部资源影响的时候,这是理想的选择。
为了使过期更有效率,可以通过在你的Cache构造器中通过Scheduler接口和Caffeine.scheduler(Scheduler) 方法去指定一个调度线程代替在缓存活动中去对过期事件进行调度。使用Java 9以上版本的用户可以选择Scheduler.systemScheduler()利用系统范围内的调度线程。
在默认情况下,当一个缓存元素过期的时候,Caffeine 不会自动立即将其清理和驱逐。而它将会在写操作之后进行少量的维护工作,在写操作较少的情况下,也偶尔会在读操作之后进行。如果你的缓存吞吐量较高,那么你不用去担心你的缓存的过期维护问题。但是如果你的缓存读写操作都很少,可以额外通过一个线程使用 Cache.cleanUp() 方法在合适的时候触发清理操作。
private static void customTime() throws InterruptedException {
    LoadingCache<String, String> cache = Caffeine.newBuilder()
            .scheduler(Scheduler.forScheduledExecutorService(Executors.newScheduledThreadPool(1)))
            .evictionListener((String key, String value, RemovalCause cause) -> {
                log.info("EvictionListener key {} was removed {}", key, cause);
                try {
                    TimeUnit.SECONDS.sleep(2);
                } catch (InterruptedException e) {
                    throw new RuntimeException(e);
                }
            }).removalListener((String key, String value, RemovalCause cause) -> {
                log.info("RemovalListener key {} was removed {}", key, cause);
                try {
                    TimeUnit.SECONDS.sleep(2);
                } catch (InterruptedException e) {
                    throw new RuntimeException(e);
                }
            }).expireAfter(new Expiry<String, String>() {
                @Override
                public long expireAfterCreate(@NonNull String key, @NonNull String value, long currentTime) {
                    // 这里的currentTime由Ticker提供,默认情况下与系统时间无关,单位为纳秒
                    log.info("expireAfterCreate----key:{},value:{},currentTime:{}", key, value, currentTime);
                    return TimeUnit.SECONDS.toNanos(10);
                }

                @Override
                public long expireAfterUpdate(@NonNull String key, @NonNull String value, long currentTime, @NonNegative long currentDuration) {
                    // 这里的currentTime由Ticker提供,默认情况下与系统时间无关,单位为纳秒
                    log.info("expireAfterUpdate----key:{},value:{},currentTime:{},currentDuration:{}", key, value, currentTime, currentDuration);
                    return TimeUnit.SECONDS.toNanos(5);
                }

                @Override
                public long expireAfterRead(@NonNull String key, @NonNull String value, long currentTime, @NonNegative long currentDuration) {
                    // 这里的currentTime由Ticker提供,默认情况下与系统时间无关,单位为纳秒
                    log.info("expireAfterRead----key:{},value:{},currentTime:{},currentDuration:{}", key, value, currentTime, currentDuration);
                    return TimeUnit.SECONDS.toNanos(5);
                }
            }).build(key -> create(key));

    String one = cache.get("one");
    log.info("第一次获取one:{}", one);

    String two = cache.get("two");
    log.info("第一次获取two:{}", two);

    cache.put("one", one + "_new");

    log.info("---------------开始休眠5秒---------------");
    Thread.sleep(5000);
    log.info("---------------结束休眠5秒---------------");

    one = cache.get("one");
    log.info("第二次获取one:{}", one);

    two = cache.get("two");
    log.info("第二次获取two:{}", two);

    log.info("---------------开始休眠10秒---------------");
    Thread.sleep(10000);
    log.info("---------------结束休眠10秒---------------");

    one = cache.get("one");
    log.info("第三次获取one:{}", one);

    two = cache.get("two");
    log.info("第三次获取two:{}", two);

    Thread.sleep(20000);
    //cache.cleanUp();

    Thread.sleep(20000);
}

private static String create(String key) {
    log.info("自动加载数据:{}", key);
    return UUID.randomUUID().toString();
}
2.4 缓存移除
- 驱逐 缓存元素因为策略被移除
- 失效 缓存元素被手动移除
- 移除 由于驱逐或者失效而最终导致的结果
2.4.1 显式移除
在任何时候,你都可以手动去让某个缓存元素失效而不是只能等待其因为策略而被驱逐。
// 失效key
cache.invalidate(key)
// 批量失效key
cache.invalidateAll(keys)
// 失效所有的key
cache.invalidateAll()
2.4.2 移除监听器
Cache<Key, Graph> graphs = Caffeine.newBuilder()
	.evictionListener((String key, String value, RemovalCause cause) ->
	       log.info("EvictionListener key {} was removed {}", key, cause))
	.removalListener((String key, String value, RemovalCause cause) ->
	       log.info("RemovalListener key {} was removed {}", key, cause))
    .build();
你可以为你的缓存通过Caffeine.removalListener(RemovalListener)方法定义一个移除监听器在一个元素被移除的时候进行相应的操作。这些操作是使用 Executor 异步执行的,其中默认的 Executor 实现是 ForkJoinPool.commonPool() 并且可以通过覆盖Caffeine.executor(Executor)方法自定义线程池的实现。
当移除之后的自定义操作必须要同步执行的时候,你需要使用 Caffeine.evictionListener(RemovalListener) 。这个监听器将在 RemovalCause.wasEvicted() 为 true 的时候被触发。
使用
Caffeine.evictionListener(RemovalListener)监听器时,因是同步执行故对缓存添加操作造成影响。详见2.3中代码说明和示例。
2.5 缓存刷新
private static String create(String key) {
    log.info("自动加载数据:{}", key);
    return UUID.randomUUID().toString();
}

private static void refresh() throws InterruptedException {
    LoadingCache<String, String> cache = Caffeine.newBuilder()
            .scheduler(Scheduler.forScheduledExecutorService(Executors.newScheduledThreadPool(1)))
            .evictionListener((String key, String value, RemovalCause cause) -> {
                log.info("EvictionListener key {} was removed {}", key, cause);
            }).removalListener((String key, String value, RemovalCause cause) -> {
                log.info("RemovalListener key {} was removed {}", key, cause);
            }).expireAfterWrite(10, TimeUnit.SECONDS).
            build(key -> create(key));

    String one = cache.get("one");
    log.info("第一次获取one:{}", one);

    String two = cache.get("two");
    log.info("第一次获取two:{}", two);

    log.info("---------------开始休眠30秒---------------");
    Thread.sleep(30000);
    log.info("---------------结束休眠30秒---------------");

    one = cache.get("one");
    log.info("第二次获取one:{}", one);

    two = cache.get("two");
    log.info("第二次获取two:{}", two);
}
refresh只有在LoadingCache或者AsyncLoadingCache时才能使用,与驱逐不同之处,
异步为key对应的缓存元素刷新一个新的值。与驱逐不同的是,在刷新的时候如果查询缓存元素,其旧值将仍被返回,直到该元素的刷新完毕后结束后才会返回刷新后的新值。
与 expireAfterWrite相反,refreshAfterWrite 将会使在写操作之后的一段时间后允许key对应的缓存元素进行刷新,但是只有在这个key被真正查询到的时候才会正式进行刷新操作。所以打个比方,你可以在同一个缓存中同时用到 refreshAfterWrite和expireAfterWrite ,这样缓存元素的在被允许刷新的时候不会直接刷新使得过期时间被盲目重置。当一个元素在其被允许刷新但是没有被主动查询的时候,这个元素也会被视为过期。
一个CacheLoader可以通过覆盖重写 CacheLoader.reload(K, V) 方法使得在刷新中可以将旧值也参与到更新的过程中去,这也使得刷新操作显得更加智能。
更新操作将会异步执行在一个Executor上。默认的线程池实现是ForkJoinPool.commonPool()当然也可以通过覆盖Caffeine.executor(Executor)方法自定义线程池的实现。
2.6 Write
CacheWriter允许缓存充当一个底层资源的代理,当与CacheLoader结合使用时,所有对缓存的读写操作都可以通过Writer进行传播。Writer可以把操作缓存和操作外部资源扩展成一个同步的原子性操作。并且在缓存写入完成之前,它将会阻塞后续的更新缓存操作,但是读取(get)将直接返回原有的值。如果写入程序失败,那么原有的key和value的映射将保持不变,如果出现异常将直接抛给调用者。
CacheWriter可以同步的监听到缓存的创建、变更和删除操作。
加载(如
LoadingCache.get)、重新加载(如LoadingCache.refresh)和计算(如Map.computeIfPresent)的操作不会被CacheWriter监听到。
CacheWriter不能与weakKeys或AsyncLoadingCache结合使用。且不支持Caffeine 3.X版本。
2.6.1 可能的用例(Possible Use-Cases)
CacheWriter是复杂工作流的扩展点,需要外部资源来观察给定Key的更改顺序。Caffeine 支持这些用法,但不是内置的。
2.6.2 写模式(Write Modes)
CacheWriter可以用来实现一个直接写(write-through)或回写(write-back)缓存的操作。
-
write-through式缓存中,操作是同步执行的,只有写成功了才会去更新缓存。这避免了同时去更新资源和缓存的条件竞争。 -
write-back式缓存中,对外部资源的操作是在缓存更新后异步执行的。这样可以提高写入的吞吐量,避免数据不一致的风险,比如如果写入失败,则在缓存中保留无效的状态。这种方法可能有助于延迟写操作,直到指定的时间,限制写速率或批写操作。
通过对write-back进行扩展,我们可以实现以下特性:
- 批处理和合并操作
- 将操作延迟到一个时间窗口
- 如果超过阈值大小,则在定期刷新之前执行批处理
- 如果操作尚未刷新,则从后写缓冲区加载
- 根据外部资源的特性处理重试、速率限制和并发
2.6.3 分层(Layering)
CacheWriter可能用来集成多个缓存进而实现多级缓存。
多级缓存的加载和写入可以使用系统外部高速缓存。这允许缓存使用一个小并且快速的缓存去调用一个大的并且速度相对慢一点的缓存。典型的堆外缓存、基于文件的缓存和远程缓存。
受害者缓存是一个多级缓存的变体,其中被删除的数据被写入二级缓存。这个delete(K, V, RemovalCause) 方法允许检查为什么该数据被删除,并作出相应的操作。
2.6.4 同步监听器(Synchronous Listeners)
同步监听器会接收一个key在缓存中的进行了那些操作的通知。监听器可以阻止缓存操作,也可以将事件排队以异步的方式执行。这种类型的监听器最常用于复制或构建分布式缓存。


