URDF练习
需求描述:
创建一个四轮圆柱状机器人模型,机器人参数如下,底盘为圆柱状,半径 10cm,高 8cm,四轮由两个驱动轮和两个万向支撑轮组成,两个驱动轮半径为 3.25cm,轮胎宽度1.5cm,两个万向轮为球状,半径 0.75cm,底盘离地间距为 1.5cm(与万向轮直径一致)
实现流程:
创建机器人模型可以分步骤实现
新建 urdf 文件,并与 launch 文件集成

搭建底盘

在底盘上添加两个驱动轮

在底盘上添加两个万向轮
添加项目辅助包
urdf xacro
查看工作文档目录
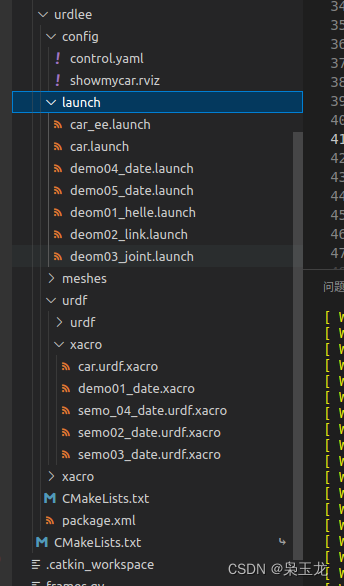
创建一个机器人模型:semo02_date.urdf.xacro
<!--
    使用 xacro 优化 URDF 版的小车底盘实现:

    实现思路:
    1.将一些常量、变量封装为 xacro:property
      比如:PI 值、小车底盘半径、离地间距、车轮半径、宽度 ....
    2.使用 宏 封装驱动轮以及支撑轮实现,调用相关宏生成驱动轮与支撑轮

-->
<!-- 根标签,必须声明 xmlns:xacro -->
<robot name="my_base" xmlns:xacro="http://www.ros.org/wiki/xacro">
    <!-- 封装变量、常量 -->
    <xacro:property name="PI" value="3.141"/>
    <!-- 宏:黑色设置 -->
    <material name="black">
        <color rgba="0.0 0.0 0.0 1.0" />
    </material>
    <!-- 底盘属性 -->
    <xacro:property name="base_footprint_radius" value="0.001" /> <!-- base_footprint 半径  -->
    <xacro:property name="base_link_radius" value="0.1" /> <!-- base_link 半径 -->
    <xacro:property name="base_link_length" value="0.08" /> <!-- base_link 长 -->
    <xacro:property name="earth_space" value="0.015" /> <!-- 离地间距 -->

    <!-- 底盘 -->
    <link name="base_footprint">
      <visual>
        <geometry>
          <sphere radius="${base_footprint_radius}" />
        </geometry>
      </visual>
    </link>

    <link name="base_link">
      <visual>
        <geometry>
          <cylinder radius="${base_link_radius}" length="${base_link_length}" />
        </geometry>
        <origin xyz="0 0 0" rpy="0 0 0" />
        <material name="yellow">
          <color rgba="0.5 0.3 0.0 0.5" />
        </material>
      </visual>
    </link>

    <joint name="base_link2base_footprint" type="fixed">
      <parent link="base_footprint" />
      <child link="base_link" />
      <origin xyz="0 0 ${earth_space + base_link_length / 2 }" />
    </joint>

    <!-- 驱动轮 -->
    <!-- 驱动轮属性 -->
    <xacro:property name="wheel_radius" value="0.0325" /><!-- 半径 -->
    <xacro:property name="wheel_length" value="0.015" /><!-- 宽度 -->
    <!-- 驱动轮宏实现 -->
    <xacro:macro name="add_wheels" params="name flag">
      <link name="${name}_wheel">
        <visual>
          <geometry>
            <cylinder radius="${wheel_radius}" length="${wheel_length}" />
          </geometry>
          <origin xyz="0.0 0.0 0.0" rpy="${PI / 2} 0.0 0.0" />
          <material name="black" />
        </visual>
      </link>

      <joint name="${name}_wheel2base_link" type="continuous">
        <parent link="base_link" />
        <child link="${name}_wheel" />
        <origin xyz="0 ${flag * base_link_radius} ${-(earth_space + base_link_length / 2 - wheel_radius) }" />
        <axis xyz="0 1 0" />
      </joint>
    </xacro:macro>
    <xacro:add_wheels name="left" flag="1" />
    <xacro:add_wheels name="right" flag="-1" />
    <!-- 支撑轮 -->
    <!-- 支撑轮属性 -->
    <xacro:property name="support_wheel_radius" value="0.0075" /> <!-- 支撑轮半径 -->

    <!-- 支撑轮宏 -->
    <xacro:macro name="add_support_wheel" params="name flag" >
      <link name="${name}_wheel">
        <visual>
            <geometry>
                <sphere radius="${support_wheel_radius}" />
            </geometry>
            <origin xyz="0 0 0" rpy="0 0 0" />
            <material name="black" />
        </visual>
      </link>

      <joint name="${name}_wheel2base_link" type="continuous">
          <parent link="base_link" />
          <child link="${name}_wheel" />
          <origin xyz="${flag * (base_link_radius - support_wheel_radius)} 0 ${-(base_link_length / 2 + earth_space / 2)}" />
          <axis xyz="1 1 1" />
      </joint>
    </xacro:macro>

    <xacro:add_support_wheel name="front" flag="1" />
    <xacro:add_support_wheel name="back" flag="-1" />

</robot>
创建摄像头xacro 文件:semo03_date.urdf.xacro
<!-- 摄像头相关的 xacro 文件 -->
<robot name="my_camera" xmlns:xacro="http://wiki.ros.org/xacro">
    <!-- 摄像头属性 -->
    <xacro:property name="camera_length" value="0.01" /> <!-- 摄像头长度(x) -->
    <xacro:property name="camera_width" value="0.025" /> <!-- 摄像头宽度(y) -->
    <xacro:property name="camera_height" value="0.025" /> <!-- 摄像头高度(z) -->
    <xacro:property name="camera_x" value="0.08" /> <!-- 摄像头安装的x坐标 -->
    <xacro:property name="camera_y" value="0.0" /> <!-- 摄像头安装的y坐标 -->
    <xacro:property name="camera_z" value="${base_link_length / 2 + camera_height / 2}" /> <!-- 摄像头安装的z坐标:底盘高度 / 2 + 摄像头高度 / 2  -->

    <!-- 摄像头关节以及link -->
    <link name="camera">
        <visual>
            <geometry>
                <box size="${camera_length} ${camera_width} ${camera_height}" />
            </geometry>
            <origin xyz="0.0 0.0 0.0" rpy="0.0 0.0 0.0" />
            <material name="black" />
        </visual>
    </link>

    <joint name="camera2base_link" type="fixed">
        <parent link="base_link" />
        <child link="camera" />
        <origin xyz="${camera_x} ${camera_y} ${camera_z}" />
    </joint>
</robot>
创建雷达xacro 文件:semo_04_date.urdf.xacro
<!--
    小车底盘添加雷达
-->
<robot name="my_laser" xmlns:xacro="http://wiki.ros.org/xacro">

    <!-- 雷达支架 -->
    <xacro:property name="support_length" value="0.15" /> <!-- 支架长度 -->
    <xacro:property name="support_radius" value="0.01" /> <!-- 支架半径 -->
    <xacro:property name="support_x" value="0.0" /> <!-- 支架安装的x坐标 -->
    <xacro:property name="support_y" value="0.0" /> <!-- 支架安装的y坐标 -->
    <xacro:property name="support_z" value="${base_link_length / 2 + support_length / 2}" /> <!-- 支架安装的z坐标:底盘高度 / 2 + 支架高度 / 2  -->

    <link name="support">
        <visual>
            <geometry>
                <cylinder radius="${support_radius}" length="${support_length}" />
            </geometry>
            <origin xyz="0.0 0.0 0.0" rpy="0.0 0.0 0.0" />
            <material name="red">
                <color rgba="0.8 0.2 0.0 0.8" />
            </material>
        </visual>
    </link>

    <joint name="support2base_link" type="fixed">
        <parent link="base_link" />
        <child link="support" />
        <origin xyz="${support_x} ${support_y} ${support_z}" />
    </joint>


    <!-- 雷达属性 -->
    <xacro:property name="laser_length" value="0.05" /> <!-- 雷达长度 -->
    <xacro:property name="laser_radius" value="0.03" /> <!-- 雷达半径 -->
    <xacro:property name="laser_x" value="0.0" /> <!-- 雷达安装的x坐标 -->
    <xacro:property name="laser_y" value="0.0" /> <!-- 雷达安装的y坐标 -->
    <xacro:property name="laser_z" value="${support_length / 2 + laser_length / 2}" /> <!-- 雷达安装的z坐标:支架高度 / 2 + 雷达高度 / 2  -->

    <!-- 雷达关节以及link -->
    <link name="laser">
        <visual>
            <geometry>
                <cylinder radius="${laser_radius}" length="${laser_length}" />
            </geometry>
            <origin xyz="0.0 0.0 0.0" rpy="0.0 0.0 0.0" />
            <material name="black" />
        </visual>
    </link>

    <joint name="laser2support" type="fixed">
        <parent link="support" />
        <child link="laser" />
        <origin xyz="${laser_x} ${laser_y} ${laser_z}" />
    </joint>
</robot>
组合底盘摄像头与雷达的 xacro 文件:car.urdf.xacro
<!-- 组合小车底盘与摄像头与雷达 -->
<robot name="my_car_camera" xmlns:xacro="http://wiki.ros.org/xacro">
    <xacro:include filename="semo02_date.urdf.xacro" />
    <xacro:include filename="semo03_date.urdf.xacro" />
    <xacro:include filename="semo_04_date.urdf.xacro" />
</robot>
创建launch 文件:car_ee.launch
<launch>
    <param name="robot_description" command="$(find xacro)/xacro $(find urdlee)/urdf/xacro/car.urdf.xacro" />

    <node pkg="rviz" type="rviz" name="rviz" args="-d $(find urdlee)/config/showmycar.rviz" />
    <node pkg="joint_state_publisher" type="joint_state_publisher" name="joint_state_publisher" output="screen" />
    <node pkg="robot_state_publisher" type="robot_state_publisher" name="robot_state_publisher" output="screen" />
    <node pkg="joint_state_publisher_gui" type="joint_state_publisher_gui" name="joint_state_publisher_gui" output="screen" />

    <node name="arbotix" pkg="arbotix_python" type="arbotix_driver" output="screen">
        <rosparam file="$(find urdlee)/config/control.yaml" command="load" />
        <param name="sim" value="true" />
    </node>


</launch>
上面使用的 /config/control.yaml
添加 arbotix 所需的配置文件:control.yaml
# 该文件是控制器配置,一个机器人模型可能有多个控制器,比如: 底盘、机械臂、夹持器(机械手)....
# 因此,根 name 是 controller
controllers: {
   # 单控制器设置
   base_controller: {
          #类型: 差速控制器
       type: diff_controller,
       #参考坐标
       base_frame_id: base_footprint,
       #两个轮子之间的间距
       base_width: 0.2,
       #控制频率
       ticks_meter: 2000,
       #PID控制参数,使机器人车轮快速达到预期速度
       Kp: 12,
       Kd: 12,
       Ki: 0,
       Ko: 50,
       #加速限制
       accel_limit: 1.0
    }
}
上面使用的:showmycar.rviz"
<node pkg="rviz" type="rviz" name="rviz" args="-d $(find urdlee)/config/showmycar.rviz" />
中的showmycar.rviz代码
Panels:
  - Class: rviz/Displays
    Help Height: 78
    Name: Displays
    Property Tree Widget:
      Expanded:
        - /Global Options1
        - /Status1
        - /RobotModel1
        - /RobotModel1/Status1
      Splitter Ratio: 0.5
    Tree Height: 719
  - Class: rviz/Selection
    Name: Selection
  - Class: rviz/Tool Properties
    Expanded:
      - /2D Pose Estimate1
      - /2D Nav Goal1
      - /Publish Point1
    Name: Tool Properties
    Splitter Ratio: 0.5886790156364441
  - Class: rviz/Views<node pkg="rviz" type="rviz" name="rviz" args="-d $(find urdlee)/config/showmycar.rviz" />

    Expanded:
      - /Current View1
    Name: Views
    Splitter Ratio: 0.5
  - Class: rviz/Time
    Name: Time
    SyncMode: 0
    SyncSource: ""
Preferences:
  PromptSaveOnExit: true
Toolbars:
  toolButtonStyle: 2
Visualization Manager:
  Class: ""
  Displays:
    - Alpha: 0.5
      Cell Size: 1
      Class: rviz/Grid
      Color: 160; 160; 164
      Enabled: true
      Line Style:
        Line Width: 0.029999999329447746
        Value: Lines
      Name: Grid
      Normal Cell Count: 0
      Offset:
        X: 0
        Y: 0
        Z: 0
      Plane: XY
      Plane Cell Count: 10
      Reference Frame: <Fixed Frame>
      Value: true
    - Alpha: 1
      Class: rviz/RobotModel
      Collision Enabled: false
      Enabled: true
      Links:
        All Links Enabled: true
        Expand Joint Details: false
        Expand Link Details: false
        Expand Tree: false
        Link Tree Style: Links in Alphabetic Order
        base_link:
          Alpha: 1
          Show Axes: false
          Show Trail: false
          Value: true
      Name: RobotModel
      Robot Description: robot_description
      TF Prefix: ""
      Update Interval: 0
      Value: true
      Visual Enabled: true
  Enabled: true
  Global Options:
    Background Color: 48; 48; 48
    Default Light: true
    Fixed Frame: base_link
    Frame Rate: 30
  Name: root
  Tools:
    - Class: rviz/Interact
      Hide Inactive Objects: true
    - Class: rviz/MoveCamera
    - Class: rviz/Select
    - Class: rviz/FocusCamera
    - Class: rviz/Measure
    - Class: rviz/SetInitialPose
      Theta std deviation: 0.2617993950843811
      Topic: /initialpose
      X std deviation: 0.5
      Y std deviation: 0.5
    - Class: rviz/SetGoal
      Topic: /move_base_simple/goal
    - Class: rviz/PublishPoint
      Single click: true
      Topic: /clicked_point
  Value: true
  Views:
    Current:
      Class: rviz/Orbit
      Distance: 10
      Enable Stereo Rendering:
        Stereo Eye Separation: 0.05999999865889549
        Stereo Focal Distance: 1
        Swap Stereo Eyes: false
        Value: false
      Field of View: 0.7853981852531433
      Focal Point:
        X: 0
        Y: 0
        Z: 0
      Focal Shape Fixed Size: true
      Focal Shape Size: 0.05000000074505806
      Invert Z Axis: false
      Name: Current View
      Near Clip Distance: 0.009999999776482582
      Pitch: 0.5103980302810669
      Target Frame: <Fixed Frame>
      Yaw: 5.4685821533203125
    Saved: ~
Window Geometry:
  Displays:
    collapsed: false
  Height: 1016
  Hide Left Dock: false
  Hide Right Dock: false
  QMainWindow State: 000000ff00000000fd0000000400000000000001560000035afc0200000008fb0000001200530065006c0065006300740069006f006e00000001e10000009b0000005c00fffffffb0000001e0054006f006f006c002000500072006f007000650072007400690065007302000001ed000001df00000185000000a3fb000000120056006900650077007300200054006f006f02000001df000002110000018500000122fb000000200054006f006f006c002000500072006f0070006500720074006900650073003203000002880000011d000002210000017afb000000100044006900730070006c006100790073010000003d0000035a000000c900fffffffb0000002000730065006c0065006300740069006f006e00200062007500660066006500720200000138000000aa0000023a00000294fb00000014005700690064006500530074006500720065006f02000000e6000000d2000003ee0000030bfb0000000c004b0069006e0065006300740200000186000001060000030c00000261000000010000010f0000035afc0200000003fb0000001e0054006f006f006c002000500072006f00700065007200740069006500730100000041000000780000000000000000fb0000000a00560069006500770073010000003d0000035a000000a400fffffffb0000001200530065006c0065006300740069006f006e010000025a000000b200000000000000000000000200000490000000a9fc0100000001fb0000000a00560069006500770073030000004e00000080000002e10000019700000003000007380000003efc0100000002fb0000000800540069006d0065010000000000000738000003bc00fffffffb0000000800540069006d00650100000000000004500000000000000000000004c70000035a00000004000000040000000800000008fc0000000100000002000000010000000a0054006f006f006c00730100000000ffffffff0000000000000000
  Selection:
    collapsed: false
  Time:
    collapsed: false
  Tool Properties:
    collapsed: false
  Views:
    collapsed: false
  Width: 1848
  X: 72
  Y: 27
使用命令运行
source ./devel/setup.bash
roslaunch urdlee car_ee.launch
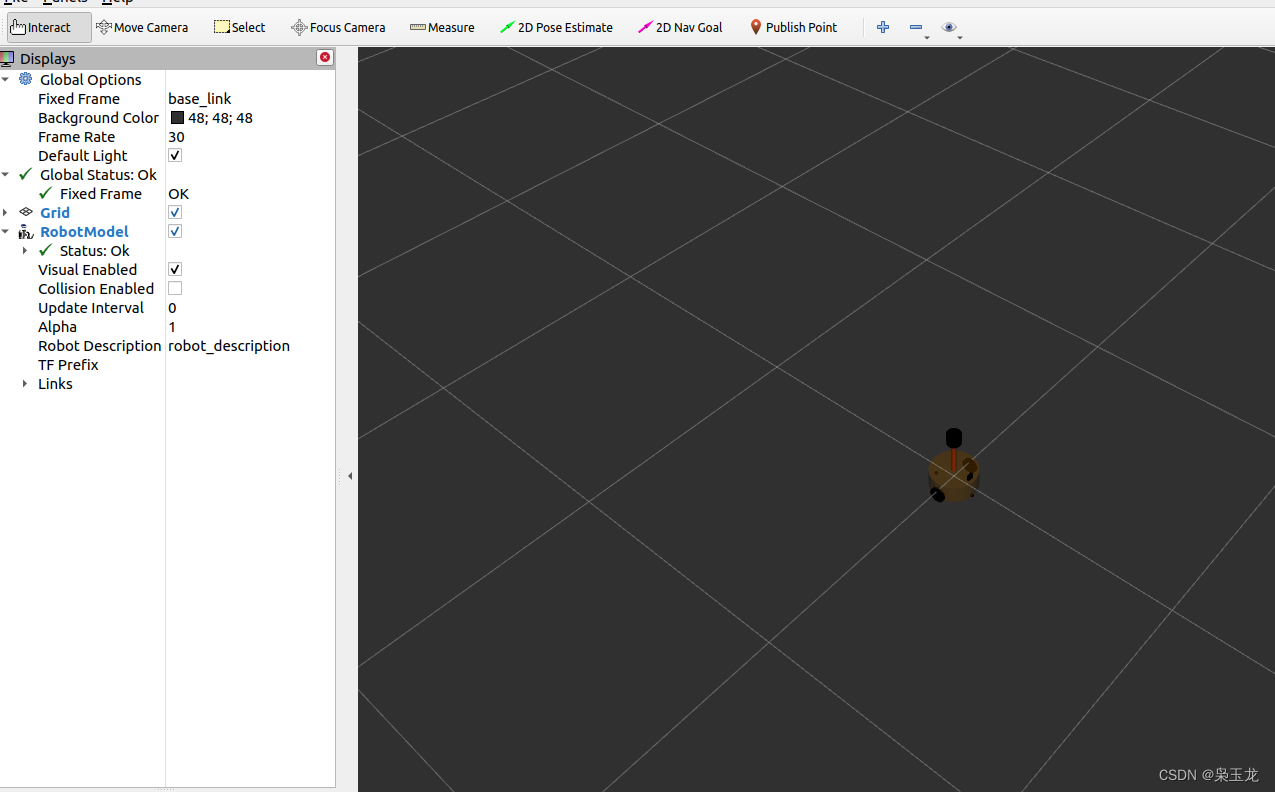
查看节点命令:rostopic list
/clicked_point
/cmd_vel
/diagnostics
/initialpose
/joint_states
/move_base_simple/goal
/odom
/rosout
/rosout_agg
/tf
/tf_static
使用:odom运行小车
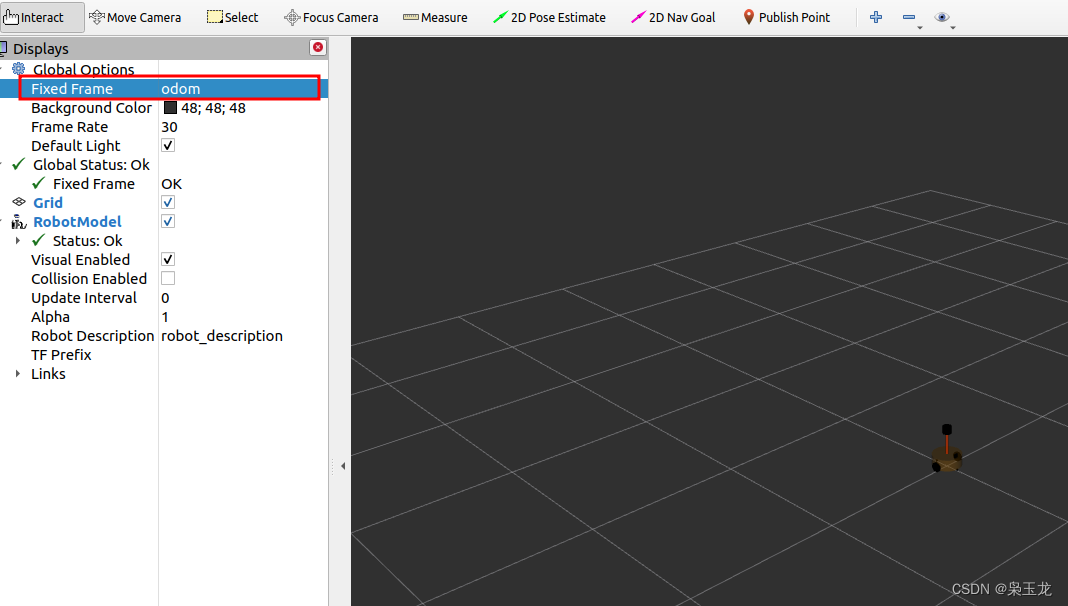
运行命令
代码自动运行
rostopic pub -r 10 /cmd_vel geometry_msgs/Twist '{linear: {x: 0.2, y: 0, z: 0}, angular: {x: 0, y: 0, z: 0.5}}'
键盘手动运行
rosrun teleop_twist_keyboard teleop_twist_keyboard.py
