总览:
Okio的两个基本概念:Source和Sink。Source对标基础io库中的InputStream,负责读数据。Sink对标OutputStream,负责写数据。
Source和Sink的内部实现,都是一个Buffer。Buffer从字面意思理解就是一个缓冲区,跟BufferInputStream的概念比较类似。缓冲区的作用,就是可以减少调用系统api的次数,等缓冲区装满数据之后,再一次性调用系统api接口。
而Buffer的底层实现是Segment链表。Segment指的是块的意思,每一个Segment内部都是一个固定的8k的字节数组。
以上,都似乎跟基础io库没有很大区别。但okio的高效就在于,将数据,分成了一个个Segment。
当流之间需要传输数据时,只需要以Segment为单位,进行数据的转移,即将一个Segment转移到另一个Buffer的Segment链表上去。跟传统的流传输数据,每一次传输都需要进行一次数据拷贝,明显链表的拆分会显得更高效。
所以这篇Okio的开篇,会讲述Okio的基本结构,Segment和Buffer。
Segment
Segment内部是一个8K的字节数组 byte[] data。
shared表明是否跟另一个Segment共享data,指的是,两个Segment指向同一个data数组。这时候,第一个Segment,owner=true,shared =false。
而通过sharedCopy获取到的Segment,owner=false,shared=true。并且本身的segment也变成了true。
同时所有的segment都身处一个linkedList当中,记载自己的prev和successor。
limit指的是可写的位置。
pos是下一个将要读的位置。
final class Segment {
  /** The size of all segments in bytes. */
  static final int SIZE = 8192;

  /** Segments will be shared when doing so avoids {@code arraycopy()} of this many bytes. */
  // split操作会用到。当split字节小于这个值,会直接使用arraycopy。否则从segmentpool,获取一个segment
  // 进行sharedCopy操作。
  static final int SHARE_MINIMUM = 1024;

  final byte[] data;

  /** The next byte of application data byte to read in this segment. */
  int pos;

  /** The first byte of available data ready to be written to. */
  int limit;

  /** True if other segments or byte strings use the same byte array. */
  boolean shared;

  /** True if this segment owns the byte array and can append to it, extending {@code limit}. */
  // 只有owner===true时,才能对data进行操作-->为什么呢?
  boolean owner;

  /** Next segment in a linked or circularly-linked list. */
  Segment next;

  /** Previous segment in a circularly-linked list. */
  Segment prev;

  Segment() {
    this.data = new byte[SIZE];
    this.owner = true;
    this.shared = false;
  }

  Segment(byte[] data, int pos, int limit, boolean shared, boolean owner) {
    this.data = data;
    this.pos = pos;
    this.limit = limit;
    this.shared = shared;
    this.owner = owner;
    }
}
Segment sharedCopy() {
shared = true;// 本身shared也变成true
return new Segment(data, pos, limit, true, false);// 两个Segment指向data
}
/** Returns a new segment that its own private copy of the underlying byte array. */
Segment unsharedCopy() {
return new Segment(data.clone(), pos, limit, false, true);// 只是数据的拷贝,data.clone得到的数组是一个内容相同,但地址不同的数组
}/**
* Splits this head of a circularly-linked list into two segments. The first
* segment contains the data in {@code [pos..pos+byteCount)}. The second
* segment contains the data in {@code [pos+byteCount..limit)}. This can be
* useful when moving partial segments from one buffer to another.
*
* <p>Returns the new head of the circularly-linked list.
*/
public Segment split(int byteCount) {
if (byteCount <= 0 || byteCount > limit - pos) throw new IllegalArgumentException();
Segment prefix;
// We have two competing performance goals:
// - Avoid copying data. We accomplish this by sharing segments.
// - Avoid short shared segments. These are bad for performance because they are readonly and
// may lead to long chains of short segments.
// To balance these goals we only share segments when the copy will be large.
if (byteCount >= SHARE_MINIMUM) {
prefix = sharedCopy();
} else {
prefix = SegmentPool.take();
System.arraycopy(data, pos, prefix.data, 0, byteCount);
}
prefix.limit = prefix.pos + byteCount;
pos += byteCount;// this segment的pos增加,表示pos+byteCount之前的数据都不可读了
prev.push(prefix);// 本来是,prev->this->next,push之后变成prev->prefix->this->next
return prefix;
}
// 相当于整合,将this segment整合到prev segment
public void compact() {
  if (prev == this) throw new IllegalStateException();
  if (!prev.owner) return; // Cannot compact: prev isn't writable.--》只有是owner,才能往data追加数据
  int byteCount = limit - pos;// this segment剩余未读字节
  // 如果prev是shared,那剩余的空间就是SIZE - (prev.limit-0) ,因为前面的字节有可能被split到其他segment
  // 否则剩余空间就应该是 SIZE - (prev.limit-prev.pos)
  int availableByteCount = SIZE - prev.limit + (prev.shared ? 0 : prev.pos);// prev segment剩余空间
  if (byteCount > availableByteCount) return; // Cannot compact: not enough writable space.
  writeTo(prev, byteCount);
  pop();
  SegmentPool.recycle(this);
}

/** Moves {@code byteCount} bytes from this segment to {@code sink}. */
public void writeTo(Segment sink, int byteCount) {
  if (!sink.owner) throw new IllegalArgumentException();
  if (sink.limit + byteCount > SIZE) {// 往前整合数据
    // We can't fit byteCount bytes at the sink's current position. Shift sink first.
    if (sink.shared) throw new IllegalArgumentException();
    if (sink.limit + byteCount - sink.pos > SIZE) throw new IllegalArgumentException();
    System.arraycopy(sink.data, sink.pos, sink.data, 0, sink.limit - sink.pos);
    sink.limit -= sink.pos;
    sink.pos = 0;
  }

  System.arraycopy(data, pos, sink.data, sink.limit, byteCount);
  sink.limit += byteCount;
  pos += byteCount;
}
compat方法总的来说就是将当前segment挪到prev segment的剩余部分当中
tail整合的规则,当调用tail.compat:

Buffer
buffer.read方法
// 读取所有数据
@Override public byte[] readByteArray() {
  try {
    return readByteArray(size);
  } catch (EOFException e) {
    throw new AssertionError(e);
  }
}

@Override public byte[] readByteArray(long byteCount) throws EOFException {
  checkOffsetAndCount(size, 0, byteCount);
  if (byteCount > Integer.MAX_VALUE) {
    throw new IllegalArgumentException("byteCount > Integer.MAX_VALUE: " + byteCount);
  }

  byte[] result = new byte[(int) byteCount];
  readFully(result);
  return result;
}

@Override public void readFully(byte[] sink) throws EOFException {
  int offset = 0;
  while (offset < sink.length) {
    int read = read(sink, offset, sink.length - offset);// 不断循环从segment中读取数据
    if (read == -1) throw new EOFException();
    offset += read;
  }
}
// 重点都在这个方法里
@Override public int read(byte[] sink, int offset, int byteCount) {
  checkOffsetAndCount(sink.length, offset, byteCount);

  Segment s = head;
  if (s == null) return -1;// 代表这个buffer里面已经没有数据了
  int toCopy = Math.min(byteCount, s.limit - s.pos);// 获取这个segment中所能获取到的字节(s.limit-s.pos)
  System.arraycopy(s.data, s.pos, sink, offset, toCopy);// 进行数组间的复制

  s.pos += toCopy;
  size -= toCopy;// 这个buffer中的可读数据的大小,称为size

  if (s.pos == s.limit) {// 如果这个segment已经读完
    head = s.pop();// 将这个segment从buffer移除,放入segmentPool,并且将head指向下一个segment
    SegmentPool.recycle(s);
  }

  return toCopy;
}
写入到另一个ByteBuffer-->实际也是数组
@Override public int read(ByteBuffer sink) throws IOException {
  Segment s = head;
  if (s == null) return -1;

  int toCopy = Math.min(sink.remaining(), s.limit - s.pos);
  sink.put(s.data, s.pos, toCopy);

  s.pos += toCopy;
  size -= toCopy;

  if (s.pos == s.limit) {
    head = s.pop();
    SegmentPool.recycle(s);
  }

  return toCopy;
}
buffer.clear
实际是,相当于移动指针。并且回收segment
public void clear() {
  try {
    skip(size);
  } catch (EOFException e) {
    throw new AssertionError(e);
  }
}

/** Discards {@code byteCount} bytes from the head of this buffer. */
@Override public void skip(long byteCount) throws EOFException {
  while (byteCount > 0) {
    if (head == null) throw new EOFException();

    int toSkip = (int) Math.min(byteCount, head.limit - head.pos);
    size -= toSkip;
    byteCount -= toSkip;
    head.pos += toSkip;

    if (head.pos == head.limit) {
      Segment toRecycle = head;
      head = toRecycle.pop();
      SegmentPool.recycle(toRecycle);
    }
  }
}
关于Buffer的写数据
最基础的写方法,将数组写入buffer(即自己)
将source[offset,offset+byteCount]写入到buffer
@Override public Buffer write(byte[] source, int offset, int byteCount) {
  if (source == null) throw new IllegalArgumentException("source == null");
  checkOffsetAndCount(source.length, offset, byteCount);

  int limit = offset + byteCount;
  while (offset < limit) {
    Segment tail = writableSegment(1);// 获取一个可写入的segment

    int toCopy = Math.min(limit - offset, Segment.SIZE - tail.limit);// 获取这次可写入segment的字节数
    System.arraycopy(source, offset, tail.data, tail.limit, toCopy);

    offset += toCopy;
    tail.limit += toCopy;
  }

  size += byteCount;
  return this;
}
// 写入数据,默认追加到segment的队尾,双端队列这时候就起作用了
// 通过head.prev很容易获取到segment的对尾
Segment writableSegment(int minimumCapacity) {
  if (minimumCapacity < 1 || minimumCapacity > Segment.SIZE) throw new IllegalArgumentException();

  if (head == null) {
    head = SegmentPool.take(); // Acquire a first segment.
    return head.next = head.prev = head;
  }

  Segment tail = head.prev;
  if (tail.limit + minimumCapacity > Segment.SIZE || !tail.owner) {// 看tail是不是已经写不进去了
    tail = tail.push(SegmentPool.take()); // Append a new empty segment to fill up.// 就从segmentPool里面获取一个segment
  }
  return tail;
}
基于segment.split方法的写数据
@Override public void write(Buffer source, long byteCount) {
  // Move bytes from the head of the source buffer to the tail of this buffer
  // while balancing two conflicting goals: don't waste CPU and don't waste
  // memory.
  //
  //
  // Don't waste CPU (ie. don't copy data around).
  //
  // Copying large amounts of data is expensive. Instead, we prefer to
  // reassign entire segments from one buffer to the other.
  //
  //
  // Don't waste memory.
  //
  // As an invariant, adjacent pairs of segments in a buffer should be at
  // least 50% full, except for the head segment and the tail segment.
  //
  // The head segment cannot maintain the invariant because the application is
  // consuming bytes from this segment, decreasing its level.
  //
  // The tail segment cannot maintain the invariant because the application is
  // producing bytes, which may require new nearly-empty tail segments to be
  // appended.
  //
  //
  // Moving segments between buffers
  //
  // When writing one buffer to another, we prefer to reassign entire segments
  // over copying bytes into their most compact form. Suppose we have a buffer
  // with these segment levels [91%, 61%]. If we append a buffer with a
  // single [72%] segment, that yields [91%, 61%, 72%]. No bytes are copied.
  //
  // Or suppose we have a buffer with these segment levels: [100%, 2%], and we
  // want to append it to a buffer with these segment levels [99%, 3%]. This
  // operation will yield the following segments: [100%, 2%, 99%, 3%]. That
  // is, we do not spend time copying bytes around to achieve more efficient
  // memory use like [100%, 100%, 4%].
  //
  // When combining buffers, we will compact adjacent buffers when their
  // combined level doesn't exceed 100%. For example, when we start with
  // [100%, 40%] and append [30%, 80%], the result is [100%, 70%, 80%].
  //
  //
  // Splitting segments
  //
  // Occasionally we write only part of a source buffer to a sink buffer. For
  // example, given a sink [51%, 91%], we may want to write the first 30% of
  // a source [92%, 82%] to it. To simplify, we first transform the source to
  // an equivalent buffer [30%, 62%, 82%] and then move the head segment,
  // yielding sink [51%, 91%, 30%] and source [62%, 82%].

  if (source == null) throw new IllegalArgumentException("source == null");
  if (source == this) throw new IllegalArgumentException("source == this");
  checkOffsetAndCount(source.size, 0, byteCount);

  while (byteCount > 0) {// 从source写byteCount个数据到this buffer
    // Is a prefix of the source's head segment all that we need to move?
    if (byteCount < (source.head.limit - source.head.pos)) {// 如果source.head已经有byteCount个字节的数据
      Segment tail = head != null ? head.prev : null;
      if (tail != null && tail.owner
          && (byteCount + tail.limit - (tail.shared ? 0 : tail.pos) <= Segment.SIZE)) {
          // 如果tail可写入,且tail的空间足够容纳byteCount个数据
        // Our existing segments are sufficient. Move bytes from source's head to our tail.
        source.head.writeTo(tail, (int) byteCount);
        source.size -= byteCount;
        size += byteCount;
        return;
      } else {// tail不可写入,或tail没有足够的空间容纳数据
        // We're going to need another segment. Split the source's head
        // segment in two, then move the first of those two to this buffer.
        // split将source.head分成byteCount->source.head-byteCount
        // 这里返回的source.head是含有byteCount个数据的segment
        source.head = source.head.split((int) byteCount);
      }
    }

    // Remove the source's head segment and append it to our tail.
    Segment segmentToMove = source.head;
    long movedByteCount = segmentToMove.limit - segmentToMove.pos;
    source.head = segmentToMove.pop();
    if (head == null) {
      head = segmentToMove;
      head.next = head.prev = head;
    } else {
      Segment tail = head.prev;
      tail = tail.push(segmentToMove);// 在tail后面追加segmentToMove,并且将tail设置为segmentToMove
      tail.compact();// 对数据进行整合,将tail的数据放到prev里
    }
    source.size -= movedByteCount;
    size += movedByteCount;
    byteCount -= movedByteCount;
  }
}
总结下buffer之间转移数据的过程,这也是okio最重要的优点:
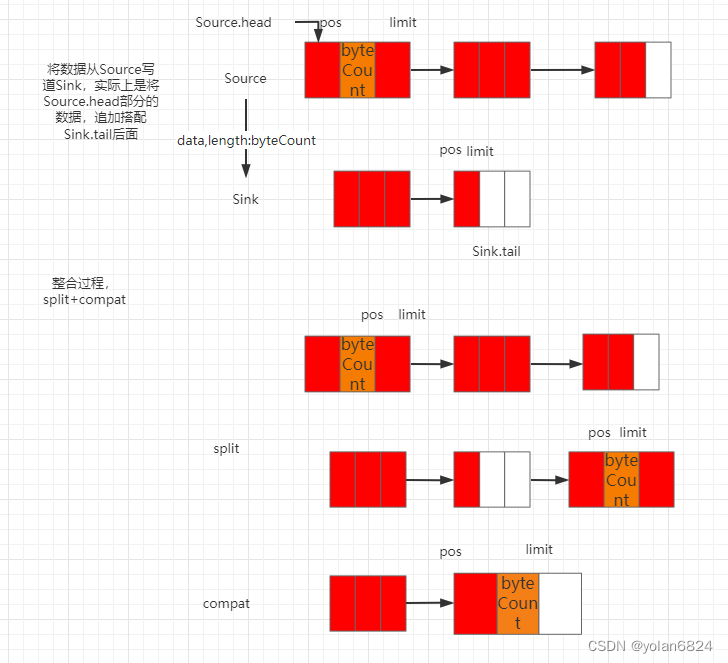
Stream读写数据与Okio读写数据的比较
public void readFileUseStream() {
    BufferedReader fileReader = null;
    try {
        fileReader = new BufferedReader(new FileReader(fileName));
        String content;
        while ((content = fileReader.readLine()) != null) {
            System.out.println("readFileUseStream line:"+content);
        }
        fileReader.close();
    } catch (EOFException e) {
        throw new RuntimeException(e);
    } catch (FileNotFoundException e) {
        throw new RuntimeException(e);
    } catch (IOException e) {
        throw new RuntimeException(e);
    }
}

public void readFileUseOkIo() {
    try {
        BufferedSource source = Okio.buffer(Okio.source(new File(fileName)));
        String content;
        while ((content = source.readUtf8Line()) != null) {
            System.out.println("readFileUseOkIo content:"+content);
        }
        source.close();
    } catch (IOException e) {
        throw new RuntimeException(e);
    }
}
可以看出
1.数据流读写数据,需要用到多个Reader类,而Okio就只有Source的概念。
2.okio在数据流之间传输数据显得更为高效,因为okio在流之间传输数据只需要移动Buffer,而流之间传输数据,每一次传输,都需要进行一次数据的拷贝。
