认证与授权(Authentication and Authorization)
一般意义来说的应用访问安全性,都是围绕认证(Authentication)和授权(Authorization)这两个核心概念来展开的。
即:
- 首先需要确定用户身份,
- 再确定这个用户是否有访问指定资源的权限。
认证这块的解决方案很多,主流的有CAS、SAML2、OAUTH2等(不巧这几个都用过-_-),我们常说的单点登录方案(SSO)说的就是这块,
授权的话主流的就是spring security和shiro。
shiro比较轻量级,相比较而言spring security确实架构比较复杂。但是shiro与 ss,掌握一个即可。
这里尼恩给大家做一下系统化、体系化的梳理,供后面的小伙伴参考,提升大家的 3高 架构、设计、开发水平。
注:本文以 PDF 持续更新,最新尼恩 架构笔记、面试题 的PDF文件,请从下面的链接获取: 码云
什么是OAuth2 ?
OAuth2是一个关于授权的开放标准,核心思路是通过各类认证手段(具体什么手段OAuth2不关心)认证用户身份,
并颁发token(令牌),使得第三方应用可以使用该令牌在限定时间、限定范围访问指定资源。
主要涉及的RFC规范有【RFC6749(整体授权框架)】、【RFC6750(令牌使用)】、【RFC6819(威胁模型)】这几个,一般我们需要了解的就是RFC6749。
获取令牌的方式主要有四种,分别是授权码模式、简单模式、密码模式、客户端模式,
总之:OAuth2是一个授权(Authorization)协议。
认证(Authentication)证明的你是不是这个人,
而授权(Authorization)则是证明这个人有没有访问这个资源(Resource)的权限。
下面这张图来源于OAuth 2.0 authorization framework RFC Document,是OAuth2的一个抽象流程。
     +--------+                               +---------------+
     |        |--(A)- Authorization Request ->|   Resource    |
     |        |                               |     Owner     |
     |        |<-(B)-- Authorization Grant ---|               |
     |        |                               +---------------+
     |        |
     |        |                               +---------------+
     |        |--(C)-- Authorization Grant -->| Authorization |
     | Client |                               |     Server    |
     |        |<-(D)----- Access Token -------|               |
     |        |                               +---------------+
     |        |
     |        |                               +---------------+
     |        |--(E)----- Access Token ------>|    Resource   |
     |        |                               |     Server    |
     |        |<-(F)--- Protected Resource ---|               |
     +--------+                               +---------------+
先来解释一下上图的名词:
Resource Owner:资源所有者,即用户
Client:客户端应用程序(Application)
Authorization Server:授权服务器
Resource Server:资源服务器
再来解释一下上图的大致流程:
(A) 用户连接客户端应用程序以后,客户端应用程序要求用户给予授权
(B) 用户同意给予客户端应用程序授权
(C) 客户端应用程序使用上一步获得的授权(Grant),向授权服务器申请令牌
(D) 授权服务器对客户端应用程序的授权(Grant)进行验证后,确认无误,发放令牌
(E) 客户端应用程序使用令牌,向资源服务器申请获取资源
(F) 资源服务器确认令牌无误,同意向客户端应用程序开放资源
从上面的流程可以看出,如何获取**授权(Grant)**才是关键。
在OAuth2中有4种授权类型:
- Authorization Code(授权码模式):
功能最完整、流程最严密的授权模式。通过第三方应用程序服务器与认证服务器进行互动。广泛用于各种第三方认证。
- Implicit(简化模式):
不通过第三方应用程序服务器,直接在浏览器中向认证服务器申请令牌,更加适用于移动端的App及没有服务器端的第三方单页面应用。
- Resource Owner Password(密码模式):
用户向客户端服务器提供自己的用户名和密码,用户对客户端高度信任的情况下使用,比如公司、组织的内部系统,SSO。
- Client Credentials(客户端模式):
客户端服务器以自己的名义,而不是以用户的名义,向认证服务器进行认证。
下面主要讲最常用的(1)和(3)。此外,还有一个模式叫Refresh Token,也会在下面介绍。
Resource Owner Password(密码模式)
     +----------+
     | Resource |
     |  Owner   |
     |          |
     +----------+
          v
          |    Resource Owner
         (A) Password Credentials
          |
          v
     +---------+                                  +---------------+
     |         |>--(B)---- Resource Owner ------->|               |
     |         |         Password Credentials     | Authorization |
     | Client  |                                  |     Server    |
     |         |<--(C)---- Access Token ---------<|               |
     |         |    (w/ Optional Refresh Token)   |               |
     +---------+                                  +---------------+

            Figure 5: Resource Owner Password Credentials Flow
它的步骤如下:
(A) 用户(Resource Owner)向客户端(Client)提供用户名和密码。
(B) 客户端将用户名和密码发给认证服务器(Authorization Server),向后者请求令牌。
(C) 认证服务器确认无误后,向客户端提供访问令牌。
Authorization Code(授权码模式)
     +----------+
     | Resource |
     |   Owner  |
     |          |
     +----------+
          ^
          |
         (B)
     +----|-----+          Client Identifier      +---------------+
     |         -+----(A)-- & Redirection URI ---->|               |
     |  User-   |                                 | Authorization |
     |  Agent  -+----(B)-- User authenticates --->|     Server    |
     |          |                                 |               |
     |         -+----(C)-- Authorization Code ---<|               |
     +-|----|---+                                 +---------------+
       |    |                                         ^      v
      (A)  (C)                                        |      |
       |    |                                         |      |
       ^    v                                         |      |
     +---------+                                      |      |
     |         |>---(D)-- Authorization Code ---------'      |
     |  Client |          & Redirection URI                  |
     |         |                                             |
     |         |<---(E)----- Access Token -------------------'
     +---------+       (w/ Optional Refresh Token)

   Note: The lines illustrating steps (A), (B), and (C) are broken into
   two parts as they pass through the user-agent.
它的步骤如下:
(A) 用户(Resource Owner)通过用户代理(User-Agent)访问客户端(Client),客户端索要授权,并将用户导向认证服务器(Authorization Server)。
(B) 用户选择是否给予客户端授权。
(C) 假设用户给予授权,认证服务器将用户导向客户端事先指定的"重定向URI"(redirection URI),同时附上一个授权码。
(D) 客户端收到授权码,附上早先的"重定向URI",向认证服务器申请令牌。这一步是在客户端的后台的服务器上完成的,对用户不可见。
(E) 认证服务器核对了授权码和重定向URI,确认无误后,向客户端发送访问令牌(access token)和更新令牌(refresh token)。这一步也对用户不可见。
令牌刷新(refresh token)
  +--------+                                           +---------------+
  |        |--(A)------- Authorization Grant --------->|               |
  |        |                                           |               |
  |        |<-(B)----------- Access Token -------------|               |
  |        |               & Refresh Token             |               |
  |        |                                           |               |
  |        |                            +----------+   |               |
  |        |--(C)---- Access Token ---->|          |   |               |
  |        |                            |          |   |               |
  |        |<-(D)- Protected Resource --| Resource |   | Authorization |
  | Client |                            |  Server  |   |     Server    |
  |        |--(E)---- Access Token ---->|          |   |               |
  |        |                            |          |   |               |
  |        |<-(F)- Invalid Token Error -|          |   |               |
  |        |                            +----------+   |               |
  |        |                                           |               |
  |        |--(G)----------- Refresh Token ----------->|               |
  |        |                                           |               |
  |        |<-(H)----------- Access Token -------------|               |
  +--------+           & Optional Refresh Token        +---------------+
当我们申请token后,Authorization Server不仅给了我们Access Token,还有Refresh Token。
当Access Token过期后,我们用Refresh Token访问/refresh端点就可以拿到新的Access Token了。
我们要和Spring Security的认证(Authentication)区别开来,
什么是Spring Security?
Spring Security是一套安全框架,可以基于RBAC(基于角色的权限控制)对用户的访问权限进行控制,
核心思想是通过一系列的filter chain来进行拦截过滤,对用户的访问权限进行控制,
spring security 的核心功能主要包括:
- 认证 (你是谁)
- 授权 (你能干什么)
- 攻击防护 (防止伪造身份)
其核心就是一组过滤器链,项目启动后将会自动配置。最核心的就是 Basic Authentication Filter 用来认证用户的身份,一个在spring security中一种过滤器处理一种认证方式。

比如,对于username password认证过滤器来说,
会检查是否是一个登录请求;
是否包含username 和 password (也就是该过滤器需要的一些认证信息) ;
如果不满足则放行给下一个。
下一个按照自身职责判定是否是自身需要的信息,basic的特征就是在请求头中有 Authorization:Basic eHh4Onh4 的信息。中间可能还有更多的认证过滤器。最后一环是 FilterSecurityInterceptor,这里会判定该请求是否能进行访问rest服务,判断的依据是 BrowserSecurityConfig中的配置,如果被拒绝了就会抛出不同的异常(根据具体的原因)。Exception Translation Filter 会捕获抛出的错误,然后根据不同的认证方式进行信息的返回提示。
注意:绿色的过滤器可以配置是否生效,其他的都不能控制。
二、入门项目
首先创建spring boot项目HelloSecurity,其pom主要依赖如下:
<dependencies>
    <dependency>
        <groupId>org.springframework.boot</groupId>
        <artifactId>spring-boot-starter-thymeleaf</artifactId>
    </dependency>
    <dependency>
        <groupId>org.springframework.boot</groupId>
        <artifactId>spring-boot-starter-test</artifactId>
        <scope>test</scope>
    </dependency>
    <dependency>
        <groupId>org.springframework.security</groupId>
        <artifactId>spring-security-test</artifactId>
        <scope>test</scope>
    </dependency>
</dependencies>
然后在src/main/resources/templates/目录下创建页面:
home.html
<!DOCTYPE html>
<html xmlns="http://www.w3.org/1999/xhtml" xmlns:th="http://www.thymeleaf.org" xmlns:sec="http://www.thymeleaf.org/thymeleaf-extras-springsecurity3">
    <head>
        <title>Spring Security Example</title>
    </head>
    <body>
        <h1>Welcome!</h1>

        <p>Click <a th:href="@{/hello}">here</a> to see a greeting.</p>
    </body>
</html>
我们可以看到, 在这个简单的视图中包含了一个链接: “/hello”. 链接到了如下的页面,Thymeleaf模板如下:
hello.html
<!DOCTYPE html>
<html xmlns="http://www.w3.org/1999/xhtml" xmlns:th="http://www.thymeleaf.org"
      xmlns:sec="http://www.thymeleaf.org/thymeleaf-extras-springsecurity3">
    <head>
        <title>Hello World!</title>
    </head>
    <body>
        <h1>Hello world!</h1>
    </body>
</html>
Web应用程序基于Spring MVC。 因此,你需要配置Spring MVC并设置视图控制器来暴露这些模板。 如下是一个典型的Spring MVC配置类。在src/main/java/hello目录下(所以java都在这里):
@Configuration
public class MvcConfig extends WebMvcConfigurerAdapter {
    @Override
    public void addViewControllers(ViewControllerRegistry registry) {
        registry.addViewController("/home").setViewName("home");
        registry.addViewController("/").setViewName("home");
        registry.addViewController("/hello").setViewName("hello");
        registry.addViewController("/login").setViewName("login");
    }
}
addViewControllers()方法(覆盖WebMvcConfigurerAdapter中同名的方法)添加了四个视图控制器。 两个视图控制器引用名称为“home”的视图(在home.html中定义),另一个引用名为“hello”的视图(在hello.html中定义)。 第四个视图控制器引用另一个名为“login”的视图。 将在下一部分中创建该视图。此时,可以跳过来使应用程序可执行并运行应用程序,而无需登录任何内容。然后启动程序如下:
@SpringBootApplication
public class Application {

    public static void main(String[] args) throws Throwable {
        SpringApplication.run(Application.class, args);
    }
}
2、加入Spring Security
假设你希望防止未经授权的用户访问“/ hello”。 此时,如果用户点击主页上的链接,他们会看到问候语,请求被没有被拦截。 你需要添加一个障碍,使得用户在看到该页面之前登录。您可以通过在应用程序中配置Spring Security来实现。 如果Spring Security在类路径上,则Spring Boot会使用“Basic认证”来自动保护所有HTTP端点。 同时,你可以进一步自定义安全设置。首先在pom文件中引入:
<dependencies>
    ...
        <dependency>
            <groupId>org.springframework.boot</groupId>
            <artifactId>spring-boot-starter-security</artifactId>
        </dependency>
    ...
</dependencies>
如下是安全配置,使得只有认证过的用户才可以访问到问候页面:
@Configuration
@EnableWebSecurity
public class WebSecurityConfig extends WebSecurityConfigurerAdapter {
    @Override
    protected void configure(HttpSecurity http) throws Exception {
        http
            .authorizeRequests()
                .antMatchers("/", "/home").permitAll()
                .anyRequest().authenticated()
                .and()
            .formLogin()
                .loginPage("/login")
                .permitAll()
                .and()
            .logout()
                .permitAll();
    }

    @Autowired
    public void configureGlobal(AuthenticationManagerBuilder auth) throws Exception {
        auth
            .inMemoryAuthentication()
                .withUser("user").password("password").roles("USER");
    }
}
WebSecurityConfig类使用了@EnableWebSecurity注解 ,以启用Spring Security的Web安全支持,并提供Spring MVC集成。它还扩展了WebSecurityConfigurerAdapter,并覆盖了一些方法来设置Web安全配置的一些细节。
configure(HttpSecurity)方法定义了哪些URL路径应该被保护,哪些不应该。具体来说,“/”和“/ home”路径被配置为不需要任何身份验证。所有其他路径必须经过身份验证。
当用户成功登录时,它们将被重定向到先前请求的需要身份认证的页面。有一个由 loginPage()指定的自定义“/登录”页面,每个人都可以查看它。
对于configureGlobal(AuthenticationManagerBuilder) 方法,它将单个用户设置在内存中。该用户的用户名为“user”,密码为“password”,角色为“USER”。
现在我们需要创建登录页面。前面我们已经配置了“login”的视图控制器,因此现在只需要创建登录页面即可:
login.html
<!DOCTYPE html>
<html xmlns="http://www.w3.org/1999/xhtml" xmlns:th="http://www.thymeleaf.org"
      xmlns:sec="http://www.thymeleaf.org/thymeleaf-extras-springsecurity3">
    <head>
        <title>Spring Security Example </title>
    </head>
    <body>
        <div th:if="${param.error}">
            Invalid username and password.
        </div>
        <div th:if="${param.logout}">
            You have been logged out.
        </div>
        <form th:action="@{/login}" method="post">
            <div><label> User Name : <input type="text" name="username"/> </label></div>
            <div><label> Password: <input type="password" name="password"/> </label></div>
            <div><input type="submit" value="Sign In"/></div>
        </form>
    </body>
</html>
你可以看到,这个Thymeleaf模板只是提供一个表单来获取用户名和密码,并将它们提交到“/ login”。 根据配置,Spring Security提供了一个拦截该请求并验证用户的过滤器。 如果用户未通过认证,该页面将重定向到“/ login?error”,并在页面显示相应的错误消息。 注销成功后,我们的应用程序将发送到“/ login?logout”,我们的页面显示相应的登出成功消息。最后,我们需要向用户提供一个显示当前用户名和登出的方法。 更新hello.html 向当前用户打印一句hello,并包含一个“注销”表单,如下所示:
<!DOCTYPE html>
<html xmlns="http://www.w3.org/1999/xhtml" xmlns:th="http://www.thymeleaf.org"
      xmlns:sec="http://www.thymeleaf.org/thymeleaf-extras-springsecurity3">
    <head>
        <title>Hello World!</title>
    </head>
    <body>
        <h1 th:inline="text">Hello [[${#httpServletRequest.remoteUser}]]!</h1>
        <form th:action="@{/logout}" method="post">
            <input type="submit" value="Sign Out"/>
        </form>
    </body>
</html>
三、参数详解
1、注解 @EnableWebSecurity
在 Spring boot 应用中使用 Spring Security,用到了 @EnableWebSecurity注解,官方说明为,该注解和 @Configuration 注解一起使用, 注解 WebSecurityConfigurer 类型的类,或者利用@EnableWebSecurity 注解继承 WebSecurityConfigurerAdapter的类,这样就构成了 Spring Security 的配置。
2、抽象类 WebSecurityConfigurerAdapter
一般情况,会选择继承 WebSecurityConfigurerAdapter 类,其官方说明为:WebSecurityConfigurerAdapter 提供了一种便利的方式去创建 WebSecurityConfigurer的实例,只需要重写 WebSecurityConfigurerAdapter 的方法,即可配置拦截什么URL、设置什么权限等安全控制。
3、方法 configure(AuthenticationManagerBuilder auth) 和 configure(HttpSecurity http)
Demo 中重写了 WebSecurityConfigurerAdapter 的两个方法:
/**
     * 通过 {@link #authenticationManager()} 方法的默认实现尝试获取一个 {@link AuthenticationManager}.
     * 如果被复写, 应该使用{@link AuthenticationManagerBuilder} 来指定 {@link AuthenticationManager}.
     *
     * 例如, 可以使用以下配置在内存中进行注册公开内存的身份验证{@link UserDetailsService}:
     *
     * // 在内存中添加 user 和 admin 用户
     * @Override
     * protected void configure(AuthenticationManagerBuilder auth) {
     *     auth
     *       .inMemoryAuthentication().withUser("user").password("password").roles("USER").and()
     *         .withUser("admin").password("password").roles("USER", "ADMIN");
     * }
     *
     * // 将 UserDetailsService 显示为 Bean
     * @Bean
     * @Override
     * public UserDetailsService userDetailsServiceBean() throws Exception {
     *     return super.userDetailsServiceBean();
     * }
     *
     */
protected void configure(AuthenticationManagerBuilder auth) throws Exception {
    this.disableLocalConfigureAuthenticationBldr = true;
}


/**
     * 复写这个方法来配置 {@link HttpSecurity}.
     * 通常,子类不能通过调用 super 来调用此方法,因为它可能会覆盖其配置。 默认配置为:
     *
     * http.authorizeRequests().anyRequest().authenticated().and().formLogin().and().httpBasic();
     *
     */
protected void configure(HttpSecurity http) throws Exception {
    logger.debug("Using default configure(HttpSecurity). If subclassed this will potentially override subclass configure(HttpSecurity).");

    http
        .authorizeRequests()
        .anyRequest().authenticated()
        .and()
        .formLogin().and()
        .httpBasic();
}
4、final 类 HttpSecurity
HttpSecurity 常用方法及说明:
| 方法 | 说明 |
|---|---|
openidLogin() | 用于基于 OpenId 的验证 |
headers() | 将安全标头添加到响应 |
cors() | 配置跨域资源共享( CORS ) |
sessionManagement() | 允许配置会话管理 |
portMapper() | 允许配置一个PortMapper(HttpSecurity#(getSharedObject(class))),其他提供SecurityConfigurer的对象使用 PortMapper 从 HTTP 重定向到 HTTPS 或者从 HTTPS 重定向到 HTTP。默认情况下,Spring Security使用一个PortMapperImpl映射 HTTP 端口8080到 HTTPS 端口8443,HTTP 端口80到 HTTPS 端口443 |
jee() | 配置基于容器的预认证。 在这种情况下,认证由Servlet容器管理 |
x509() | 配置基于x509的认证 |
rememberMe | 允许配置“记住我”的验证 |
authorizeRequests() | 允许基于使用HttpServletRequest限制访问 |
requestCache() | 允许配置请求缓存 |
exceptionHandling() | 允许配置错误处理 |
securityContext() | 在HttpServletRequests之间的SecurityContextHolder上设置SecurityContext的管理。 当使用WebSecurityConfigurerAdapter时,这将自动应用 |
servletApi() | 将HttpServletRequest方法与在其上找到的值集成到SecurityContext中。 当使用WebSecurityConfigurerAdapter时,这将自动应用 |
csrf() | 添加 CSRF 支持,使用WebSecurityConfigurerAdapter时,默认启用 |
logout() | 添加退出登录支持。当使用WebSecurityConfigurerAdapter时,这将自动应用。默认情况是,访问URL”/ logout”,使HTTP Session无效来清除用户,清除已配置的任何#rememberMe()身份验证,清除SecurityContextHolder,然后重定向到”/login?success” |
anonymous() | 允许配置匿名用户的表示方法。 当与WebSecurityConfigurerAdapter结合使用时,这将自动应用。 默认情况下,匿名用户将使用org.springframework.security.authentication.AnonymousAuthenticationToken表示,并包含角色 “ROLE_ANONYMOUS” |
formLogin() | 指定支持基于表单的身份验证。如果未指定FormLoginConfigurer#loginPage(String),则将生成默认登录页面 |
oauth2Login() | 根据外部OAuth 2.0或OpenID Connect 1.0提供程序配置身份验证 |
requiresChannel() | 配置通道安全。为了使该配置有用,必须提供至少一个到所需信道的映射 |
httpBasic() | 配置 Http Basic 验证 |
addFilterAt() | 在指定的Filter类的位置添加过滤器 |
5、类 AuthenticationManagerBuilder
/**
* {@link SecurityBuilder} used to create an {@link AuthenticationManager}. Allows for
* easily building in memory authentication, LDAP authentication, JDBC based
* authentication, adding {@link UserDetailsService}, and adding
* {@link AuthenticationProvider}'s.
*/
意思是,AuthenticationManagerBuilder 用于创建一个 AuthenticationManager,让我能够轻松的实现内存验证、LADP验证、基于JDBC的验证、添加UserDetailsService、添加AuthenticationProvider。
使用yaml文件定义的用户名、密码登录
在application.yaml中定义用户名密码:
spring:
  security:
    user:
      name: root
      password: root
使用root/root登录,可以正常访问/hello。
使用代码中指定的用户名、密码登录
- 使用configure(AuthenticationManagerBuilder) 添加认证。
- 使用configure(httpSecurity) 添加权限
@Configuration
public class MySecurityConfiguration extends WebSecurityConfigurerAdapter {
    @Override
    protected void configure(AuthenticationManagerBuilder auth) throws Exception {
        auth
                .inMemoryAuthentication()
                .withUser("admin") // 添加用户admin
                .password("{noop}admin")  // 不设置密码加密
                .roles("ADMIN", "USER")// 添加角色为admin,user
                .and()
                .withUser("user") // 添加用户user
                .password("{noop}user")
                .roles("USER")
            	.and()
            	.withUser("tmp") // 添加用户tmp
                .password("{noop}tmp")
            	.roles(); // 没有角色
    }
    @Override
    protected void configure(HttpSecurity http) throws Exception {
        http
                .authorizeRequests()
                .antMatchers("/product/**").hasRole("USER") //添加/product/** 下的所有请求只能由user角色才能访问
                .antMatchers("/admin/**").hasRole("ADMIN") //添加/admin/** 下的所有请求只能由admin角色才能访问
                .anyRequest().authenticated() // 没有定义的请求,所有的角色都可以访问(tmp也可以)。
                .and()
                .formLogin().and()
                .httpBasic();
    }
}
添加AdminController、ProductController
@RestController
@RequestMapping("/admin")
public class AdminController {
    @RequestMapping("/hello")
    public String hello(){
        return "admin hello";
    }
}
@RestController
@RequestMapping("/product")
public class ProductController {
    @RequestMapping("/hello")
    public String hello(){
        return "product hello";
    }
}
通过上面的设置,访问http://localhost:8080/admin/hello只能由admin访问,http://localhost:8080/product/hello admin和user都可以访问,http://localhost:8080/hello 所有用户(包括tmp)都可以访问。
使用数据库的用户名、密码登录
添加依赖
<dependency>
    <groupId>org.springframework.boot</groupId>
    <artifactId>spring-boot-starter-data-jpa</artifactId>
</dependency>
<dependency>
    <groupId>mysql</groupId>
    <artifactId>mysql-connector-java</artifactId>
</dependency>
添加数据库配置
spring:
  datasource:
    url: jdbc:mysql://localhost:3306/demo?useUnicode=true&characterEncoding=utf8&serverTimezone=Asia/Shanghai
    username: root
    password: root
    driver-class-name: com.mysql.cj.jdbc.Driver
配置spring-security认证和授权
@Configuration
public class MySecurityConfiguration extends WebSecurityConfigurerAdapter {

    @Autowired
    private UserDetailsService userDetailsService;

    @Override
    protected void configure(AuthenticationManagerBuilder auth) throws Exception {
        auth.userDetailsService(userDetailsService)// 设置自定义的userDetailsService
                .passwordEncoder(passwordEncoder());
    }

    @Override
    protected void configure(HttpSecurity http) throws Exception {
        http
                .authorizeRequests()
                .antMatchers("/product/**").hasRole("USER")
                .antMatchers("/admin/**").hasRole("ADMIN")
                .anyRequest().authenticated() //
                .and()
                .formLogin()
                .and()
                .httpBasic()
                .and().logout().logoutUrl("/logout");
    }

    @Bean
    public PasswordEncoder passwordEncoder() {
        return NoOpPasswordEncoder.getInstance();// 使用不使用加密算法保持密码
//        return new BCryptPasswordEncoder();
    }
}
如果需要使用BCryptPasswordEncoder,可以先在测试环境中加密后放到数据库中:
@Test
void encode() {
    BCryptPasswordEncoder bCryptPasswordEncoder = new BCryptPasswordEncoder();
    String password = bCryptPasswordEncoder.encode("user");
    String password2 = bCryptPasswordEncoder.encode("admin");
    System.out.println(password);
    System.out.println(password2);
}
配置自定义UserDetailsService来进行验证
@Component("userDetailsService")
public class CustomUserDetailsService implements UserDetailsService {

   @Autowired
   UserRepository userRepository;

   @Override
   public UserDetails loadUserByUsername(String login) throws UsernameNotFoundException {
         // 1. 查询用户
      User userFromDatabase = userRepository.findOneByLogin(login);
      if (userFromDatabase == null) {
         //log.warn("User: {} not found", login);
       throw new UsernameNotFoundException("User " + login + " was not found in db");
            //这里找不到必须抛异常
      }

       // 2. 设置角色
      Collection<GrantedAuthority> grantedAuthorities = new ArrayList<>();
      GrantedAuthority grantedAuthority = new SimpleGrantedAuthority(userFromDatabase.getRole());
      grantedAuthorities.add(grantedAuthority);

      return new org.springframework.security.core.userdetails.User(login,
            userFromDatabase.getPassword(), grantedAuthorities);
   }
}
配置JPA中的UserRepository
@Repository
public interface UserRepository extends JpaRepository<User, Long> {
    User findOneByLogin(String login);
}
添加数据库数据

CREATE TABLE `user` (
  `id` int(28) NOT NULL,
  `login` varchar(255) COLLATE utf8mb4_general_ci DEFAULT NULL,
  `password` varchar(255) COLLATE utf8mb4_general_ci DEFAULT NULL,
  `role` varchar(255) COLLATE utf8mb4_general_ci DEFAULT NULL,
  PRIMARY KEY (`id`)
) ENGINE=InnoDB DEFAULT CHARSET=utf8mb4 COLLATE=utf8mb4_general_ci;
INSERT INTO `demo`.`user`(`id`, `login`, `password`, `role`) VALUES (1, 'user', 'user', 'ROLE_USER');
INSERT INTO `demo`.`user`(`id`, `login`, `password`, `role`) VALUES (2, 'admin', 'admin', 'ROLE_ADMIN');
默认角色前缀必须是
ROLE_,因为spring-security会在授权的时候自动使用match中的角色加上ROLE_后进行比较。
四:获取登录信息
@RequestMapping("/info")
public String info(){
    String userDetails = null;
    Object principal = SecurityContextHolder.getContext().getAuthentication().getPrincipal();
    if(principal instanceof UserDetails) {
        userDetails = ((UserDetails)principal).getUsername();
    }else {
        userDetails = principal.toString();
    }
    return userDetails;
}
使用SecurityContextHolder.getContext().getAuthentication().getPrincipal();获取当前的登录信息。
五: Spring Security 核心组件
SecurityContext
SecurityContext是安全的上下文,所有的数据都是保存到SecurityContext中。
可以通过SecurityContext获取的对象有:
- Authentication
SecurityContextHolder
SecurityContextHolder用来获取SecurityContext中保存的数据的工具。通过使用静态方法获取SecurityContext的相对应的数据。
SecurityContext context = SecurityContextHolder.getContext();
Authentication
Authentication表示当前的认证情况,可以获取的对象有:
UserDetails:获取用户信息,是否锁定等额外信息。
Credentials:获取密码。
isAuthenticated:获取是否已经认证过。
Principal:获取用户,如果没有认证,那么就是用户名,如果认证了,返回UserDetails。
UserDetails
public interface UserDetails extends Serializable {

	Collection<? extends GrantedAuthority> getAuthorities();
	String getPassword();
	String getUsername();
	boolean isAccountNonExpired();
	boolean isAccountNonLocked();
	boolean isCredentialsNonExpired();
	boolean isEnabled();
}
UserDetailsService
UserDetailsService可以通过loadUserByUsername获取UserDetails对象。该接口供spring security进行用户验证。
通常使用自定义一个CustomUserDetailsService来实现UserDetailsService接口,通过自定义查询UserDetails。
AuthenticationManager
AuthenticationManager用来进行验证,如果验证失败会抛出相对应的异常。
PasswordEncoder
密码加密器。通常是自定义指定。
BCryptPasswordEncoder:哈希算法加密
NoOpPasswordEncoder:不使用加密
六:spring security session 无状态支持权限控制(前后分离)
spring security会在默认的情况下将认证信息放到HttpSession中。
但是对于我们的前后端分离的情况,如app,小程序,web前后分离等,httpSession就没有用武之地了。这时我们可以通过
configure(httpSecurity)设置spring security是否使用httpSession。
@Configuration
public class MySecurityConfiguration extends WebSecurityConfigurerAdapter {
    // code...
    @Override
    protected void configure(HttpSecurity http) throws Exception {
        http
                .sessionManagement()
            	//设置无状态,所有的值如下所示。
                .sessionCreationPolicy(SessionCreationPolicy.STATELESS)
                // code...
    }
    // code...
}
共有四种值,其中默认的是ifRequired。
- always – a session will always be created if one doesn’t already exist,没有session就创建。
- ifRequired – a session will be created only if required (default),如果需要就创建(默认)。
- never – the framework will never create a session itself but it will use one if it already exists
- stateless – no session will be created or used by Spring Security 不创建不使用session
由于前后端不通过保存session和cookie来进行判断,所以为了保证spring security能够记录登录状态,所以需要传递一个值,让这个值能够自我验证来源,同时能够得到数据信息。选型我们选择JWT。对于java客户端我们选择使用jjwt。
添加依赖
<dependency>
    <groupId>io.jsonwebtoken</groupId>
    <artifactId>jjwt-api</artifactId>
    <version>0.11.2</version>
</dependency>
<dependency>
    <groupId>io.jsonwebtoken</groupId>
    <artifactId>jjwt-impl</artifactId>
    <version>0.11.2</version>
    <scope>runtime</scope>
</dependency>
<dependency>
    <groupId>io.jsonwebtoken</groupId>
    <artifactId>jjwt-jackson</artifactId> <!-- or jjwt-gson if Gson is preferred -->
    <version>0.11.2</version>
    <scope>runtime</scope>
</dependency>
创建工具类JWTProvider
JWTProvider需要至少提供两个方法,一个用来创建我们的token,另一个根据token获取Authentication。
provider需要保证Key密钥是唯一的,使用init()构建,否则会抛出异常。
@Component
@Slf4j
public class JWTProvider {
    private Key key;	// 私钥
    private long tokenValidityInMilliseconds; // 有效时间
    private long tokenValidityInMillisecondsForRememberMe; // 记住我有效时间
    @Autowired
    private JJWTProperties jjwtProperties; // jwt配置参数
    @Autowired
    private UserRepository userRepository;
    @PostConstruct
    public void init() {
        byte[] keyBytes;
        String secret = jjwtProperties.getSecret();
        if (StringUtils.hasText(secret)) {
            log.warn("Warning: the JWT key used is not Base64-encoded. " +
                    "We recommend using the `jhipster.security.authentication.jwt.base64-secret` key for optimum security.");
            keyBytes = secret.getBytes(StandardCharsets.UTF_8);
        } else {
            log.debug("Using a Base64-encoded JWT secret key");
            keyBytes = Decoders.BASE64.decode(jjwtProperties.getBase64Secret());
        }
        this.key = Keys.hmacShaKeyFor(keyBytes); // 使用mac-sha算法的密钥
        this.tokenValidityInMilliseconds =
                1000 * jjwtProperties.getTokenValidityInSeconds();
        this.tokenValidityInMillisecondsForRememberMe =
                1000 * jjwtProperties.getTokenValidityInSecondsForRememberMe();
    }
    public String createToken(Authentication authentication, boolean rememberMe) {
        long now = (new Date()).getTime();
        Date validity;
        if (rememberMe) {
            validity = new Date(now + this.tokenValidityInMillisecondsForRememberMe);
        } else {
            validity = new Date(now + this.tokenValidityInMilliseconds);
        }
        User user = userRepository.findOneByLogin(authentication.getName());
        Map<String ,Object> map = new HashMap<>();
        map.put("sub",authentication.getName());
        map.put("user",user);
        return Jwts.builder()
                .setClaims(map) // 添加body
                .signWith(key, SignatureAlgorithm.HS512) // 指定摘要算法
                .setExpiration(validity) // 设置有效时间
                .compact();
    }
    public Authentication getAuthentication(String token) {
        Claims claims = Jwts.parserBuilder()
                .setSigningKey(key)
                .build()
                .parseClaimsJws(token).getBody(); // 根据token获取body
        User principal;
        Collection<? extends GrantedAuthority> authorities;
        principal = userRepository.findOneByLogin(claims.getSubject());
        authorities = principal.getAuthorities();
        return new UsernamePasswordAuthenticationToken(principal, token, authorities);
    }
}
注意这里我们创建的User需要实现UserDetails对象,这样我们可以根据
principal.getAuthorities()获取到权限,如果不实现UserDetails,那么需要自定义authorities并添加到UsernamePasswordAuthenticationToken中。
@Data
@Entity
@Table(name="user")
public class User implements UserDetails {
    @Id
    @Column
    private Long id;
    @Column
    private String login;
    @Column
    private String password;
    @Column
    private String role;
    @Override
    // 获取权限,这里就用简单的方法
    // 在spring security中,Authorities既可以是ROLE也可以是Authorities
    public Collection<? extends GrantedAuthority> getAuthorities() {
        return Collections.singleton(new SimpleGrantedAuthority(role));
    }
    @Override
    public String getUsername() {
        return login;
    }
    @Override
    public boolean isAccountNonExpired() {
        return true;
    }
    @Override
    public boolean isAccountNonLocked() {
        return false;
    }
    @Override
    public boolean isCredentialsNonExpired() {
        return true;
    }
    @Override
    public boolean isEnabled() {
        return true;
    }
}
创建登录成功,登出成功处理器
登录成功后向前台发送jwt。
认证成功,返回jwt:
public class MyAuthenticationSuccessHandler implements AuthenticationSuccessHandler{
    void onAuthenticationSuccess(HttpServletRequest request, HttpServletResponse response, Authentication authentication) throws IOException, ServletException{
        PrintWriter writer = response.getWriter();
        writer.println(jwtProvider.createToken(authentication, true));
    }
}
登出成功:
public class MyLogoutSuccessHandler implements LogoutSuccessHandler {
    void onLogoutSuccess(HttpServletRequest var1, HttpServletResponse var2, Authentication var3) throws IOException, ServletException{
        PrintWriter writer = response.getWriter();
        writer.println("logout success");
        writer.flush();
    }
}
设置登录、登出、取消csrf防护
登出无法对token进行失效操作,可以使用数据库保存token,然后在登出时删除该token。
@Configuration
public class MySecurityConfiguration extends WebSecurityConfigurerAdapter {
    // code...
    @Override
    protected void configure(HttpSecurity http) throws Exception {
       http
           // code...
           // 添加登录处理器
           .formLogin().loginProcessingUrl("/login").successHandler((request, response, authentication) -> {
           PrintWriter writer = response.getWriter();
           writer.println(jwtProvider.createToken(authentication, true));
       })
           // 取消csrf防护
           .and().csrf().disable()
           // code...
           // 添加登出处理器
           .and().logout().logoutUrl("/logout").logoutSuccessHandler((HttpServletRequest request, HttpServletResponse response, Authentication authentication) -> {
           PrintWriter writer = response.getWriter();
           writer.println("logout success");
           writer.flush();
       })
        	// code...
    }
    // code...
}
使用JWT集成spring-security
添加Filter供spring-security解析token,并向securityContext中添加我们的用户信息。
在UsernamePasswordAuthenticationFilter.class之前我们需要执行根据token添加authentication。关键方法是从jwt中获取authentication,然后添加到securityContext中。
在SecurityConfiguration中需要设置Filter添加的位置。
创建自定义Filter,用于jwt获取authentication:
@Slf4j
public class JWTFilter extends GenericFilterBean {

    private final static String HEADER_AUTH_NAME = "auth";

    private JWTProvider jwtProvider;

    public JWTFilter(JWTProvider jwtProvider) {
        this.jwtProvider = jwtProvider;
    }

    @Override
    public void doFilter(ServletRequest servletRequest, ServletResponse servletResponse, FilterChain filterChain) throws IOException, ServletException {
        try {
            HttpServletRequest httpServletRequest = (HttpServletRequest) servletRequest;
            String authToken = httpServletRequest.getHeader(HEADER_AUTH_NAME);
            if (StringUtils.hasText(authToken)) {
                // 从自定义tokenProvider中解析用户
                Authentication authentication = this.jwtProvider.getAuthentication(authToken);
                SecurityContextHolder.getContext().setAuthentication(authentication);
            }
            // 调用后续的Filter,如果上面的代码逻辑未能复原“session”,SecurityContext中没有想过信息,后面的流程会检测出"需要登录"
            filterChain.doFilter(servletRequest, servletResponse);
        } catch (Exception ex) {
            throw new RuntimeException(ex);
        }
    }
}
向HttpSecurity添加Filter和设置Filter位置:
public class MySecurityConfiguration extends WebSecurityConfigurerAdapter {
    // code...
    @Override
    protected void configure(HttpSecurity http) throws Exception {
        http
                .sessionManagement()
            	//设置添加Filter和位置
                .and().addFilterBefore(new JWTFilter(jwtProvider), UsernamePasswordAuthenticationFilter.class);
                // code...
    }
    // code...
}
MySecurityConfiguration代码
@Configuration
@EnableGlobalMethodSecurity(prePostEnabled = true)
public class MySecurityConfiguration extends WebSecurityConfigurerAdapter {
    @Autowired
    private UserDetailsService userDetailsService;
    @Autowired
    private JWTProvider jwtProvider;
    @Override
    protected void configure(AuthenticationManagerBuilder auth) throws Exception {
        auth.userDetailsService(userDetailsService)// 设置自定义的userDetailsService
                .passwordEncoder(passwordEncoder());
    }
    @Override
    protected void configure(HttpSecurity http) throws Exception {
        http
                .sessionManagement()
                .sessionCreationPolicy(SessionCreationPolicy.STATELESS)//设置无状态
                .and()
                .authorizeRequests() // 配置请求权限
                .antMatchers("/product/**").hasRole("USER") // 需要角色
                .antMatchers("/admin/**").hasRole("ADMIN")
                .anyRequest().authenticated() // 所有的请求都需要登录
                .and()
            	// 配置登录url,和登录成功处理器
                .formLogin().loginProcessingUrl("/login").successHandler((request, response, authentication) -> {
                    PrintWriter writer = response.getWriter();
                    writer.println(jwtProvider.createToken(authentication, true));
                })
            	// 取消csrf防护
                .and().csrf().disable()
                .httpBasic()
            	// 配置登出url,和登出成功处理器
				.and().logout().logoutUrl("/logout")
            	.logoutSuccessHandler((HttpServletRequest request, HttpServletResponse response, Authentication authentication) -> {
                    PrintWriter writer = response.getWriter();
                    writer.println("logout success");
                    writer.flush();
                })
            	// 在UsernamePasswordAuthenticationFilter之前执行我们添加的JWTFilter
                .and().addFilterBefore(new JWTFilter(jwtProvider), UsernamePasswordAuthenticationFilter.class);
    }
    @Bean
    public PasswordEncoder passwordEncoder() {
        return NoOpPasswordEncoder.getInstance();
    }
    @Override
    public void configure(WebSecurity web) {
        // 添加不做权限的URL
        web.ignoring()
                .antMatchers("/swagger-resources/**")
                .antMatchers("/swagger-ui.html")
                .antMatchers("/webjars/**")
                .antMatchers("/v2/**")
                .antMatchers("/h2-console/**");
    }
}
使用注解对方法进行权限管理
需要在
MySecurityConfiguration上添加@EnableGlobalMethodSecurity(prePostEnabled = true)注解,prePostEnabled默认为false,需要设置为true后才能全局的注解权限控制。
prePostEnabled设置为true后,可以使用四个注解:
添加实体类School:
@Data
public class School implements Serializable {
    private Long id;
    private String name;
    private String address;
}
- @PreAuthorize
在访问之前就进行权限判断
@RestController
public class AnnoController {
    @Autowired
    private JWTProvider jwtProvider;
    @RequestMapping("/annotation")
//    @PreAuthorize("hasRole('ADMIN')")
    @PreAuthorize("hasAuthority('ROLE_ADMIN')")
    public String info(){
        return "拥有admin权限";
    }
}
hasRole和hasAuthority都会对UserDetails中的getAuthorities进行判断区别是hasRole会对字段加上ROLE_后再进行判断,上例中使用了hasRole('ADMIN'),那么就会使用ROLE_ADMIN进行判断,如果是hasAuthority('ADMIN'),那么就使用ADMIN进行判断。
- @PostAuthorize
在请求之后进行判断,如果返回值不满足条件,会抛出异常,但是方法本身是已经执行过了的。
@RequestMapping("/postAuthorize")
@PreAuthorize("hasRole('ADMIN')")
@PostAuthorize("returnObject.id%2==0")
public School postAuthorize(Long id) {
    School school = new School();
    school.setId(id);
    return school;
}
returnObject是内置对象,引用的是方法的返回值。
如果returnObject.id%2==0为 true,那么返回方法值。如果为false,会返回403 Forbidden。
- @PreFilter
在方法执行之前,用于过滤集合中的值。
@RequestMapping("/preFilter")
@PreAuthorize("hasRole('ADMIN')")
@PreFilter("filterObject%2==0")
public List<Long> preFilter(@RequestParam("ids") List<Long> ids) {
    return ids;
}
filterObject是内置对象,引用的是集合中的泛型类,如果有多个集合,需要指定filterTarget。
@PreFilter(filterTarget="ids", value="filterObject%2==0")
public List<Long> preFilter(@RequestParam("ids") List<Long> ids,@RequestParam("ids") List<User> users,) {
    return ids;
}
filterObject%2==0会对集合中的值会进行过滤,为true的值会保留。
第一个例子返回的值在执行前过滤返回2,4。

- @PostFilter
会对返回的集合进行过滤。
@RequestMapping("/postFilter")
@PreAuthorize("hasRole('ADMIN')")
@PostFilter("filterObject.id%2==0")
public List<School> postFilter() {
    List<School> schools = new ArrayList<School>();
    School school;
    for (int i = 0; i < 10; i++) {
        school = new School();
        school.setId((long)i);
        schools.add(school);
    }
    return schools;
}
上面的方法返回结果为:id为0,2,4,6,8的School对象。
七、原理讲解
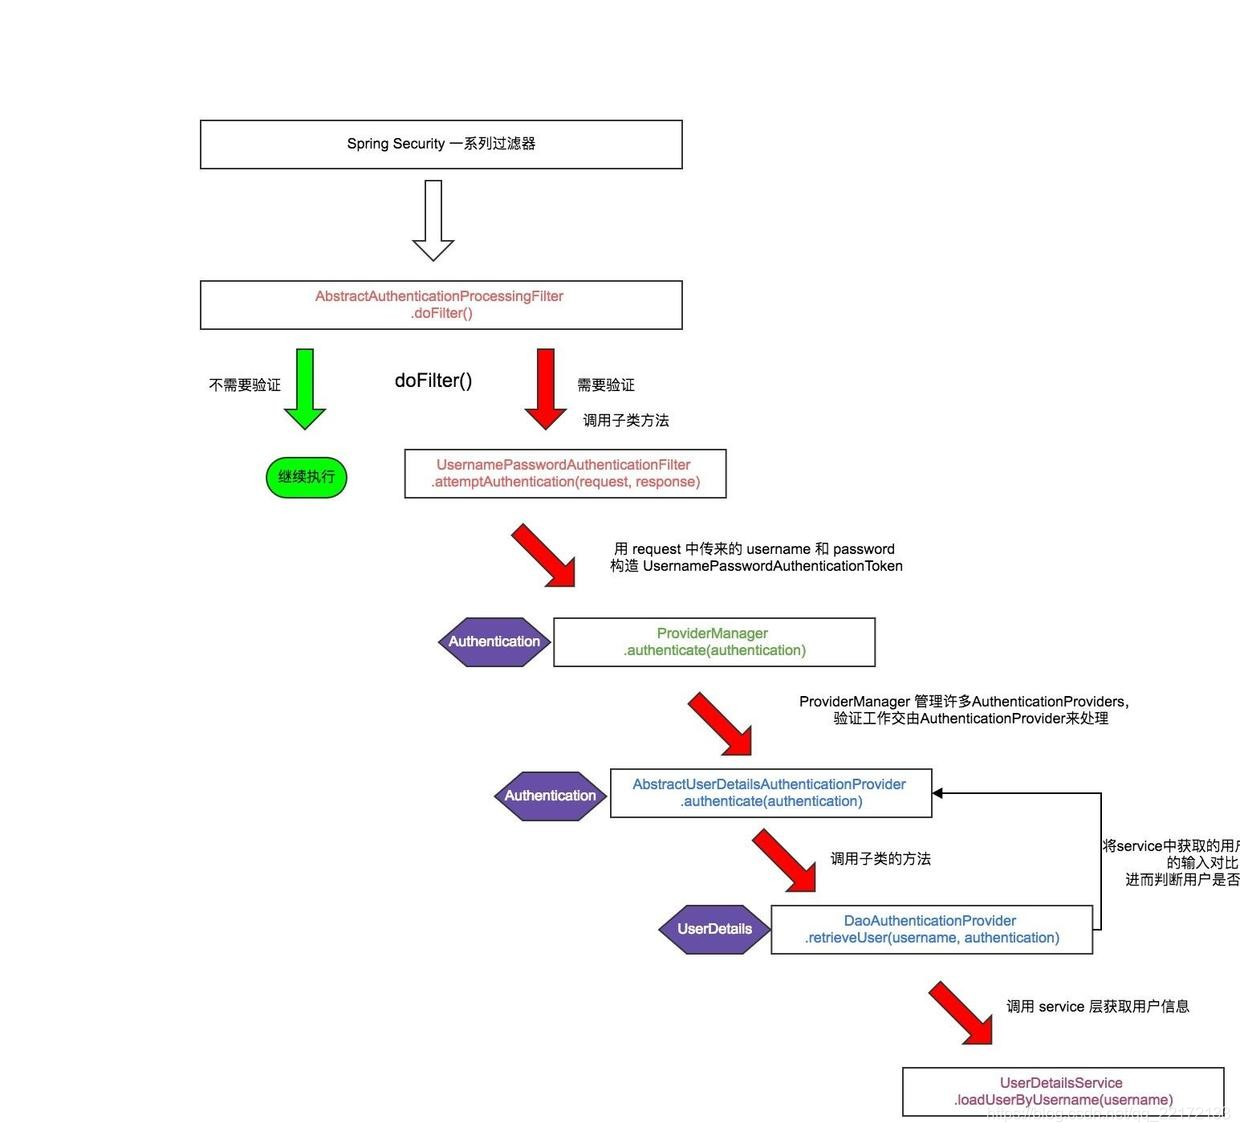
1、校验流程图
2、源码分析
- AbstractAuthenticationProcessingFilter 抽象类
public void doFilter(ServletRequest req, ServletResponse res, FilterChain chain)
    throws IOException, ServletException {

    HttpServletRequest request = (HttpServletRequest) req;
    HttpServletResponse response = (HttpServletResponse) res;

    if (!requiresAuthentication(request, response)) {
        chain.doFilter(request, response);

        return;
    }

    if (logger.isDebugEnabled()) {
        logger.debug("Request is to process authentication");
    }

    Authentication authResult;

    try {
        authResult = attemptAuthentication(request, response);
        if (authResult == null) {
            // return immediately as subclass has indicated that it hasn't completed
            // authentication
            return;
        }
        sessionStrategy.onAuthentication(authResult, request, response);
    }
    catch (InternalAuthenticationServiceException failed) {
        logger.error(
            "An internal error occurred while trying to authenticate the user.",
            failed);
        unsuccessfulAuthentication(request, response, failed);

        return;
    }
    catch (AuthenticationException failed) {
        // Authentication failed
        unsuccessfulAuthentication(request, response, failed);

        return;
    }

    // Authentication success
    if (continueChainBeforeSuccessfulAuthentication) {
        chain.doFilter(request, response);
    }

    successfulAuthentication(request, response, chain, authResult);
}
调用 requiresAuthentication(HttpServletRequest, HttpServletResponse) 决定是否需要进行验证操作。如果需要验证,则会调用 attemptAuthentication(HttpServletRequest, HttpServletResponse) 方法,有三种结果:
- 返回一个 Authentication 对象。配置的 SessionAuthenticationStrategy` 将被调用,然后 然后调用 successfulAuthentication(HttpServletRequest,HttpServletResponse,FilterChain,Authentication) 方法。
- 验证时发生 AuthenticationException。unsuccessfulAuthentication(HttpServletRequest, HttpServletResponse, AuthenticationException) 方法将被调用。
- 返回Null,表示身份验证不完整。假设子类做了一些必要的工作(如重定向)来继续处理验证,方法将立即返回。假设后一个请求将被这种方法接收,其中返回的Authentication对象不为空。
- UsernamePasswordAuthenticationFilter(AbstractAuthenticationProcessingFilter的子类)
public Authentication attemptAuthentication(HttpServletRequest request,
            HttpServletResponse response) throws AuthenticationException {
        if (postOnly && !request.getMethod().equals("POST")) {
            throw new AuthenticationServiceException(
                    "Authentication method not supported: " + request.getMethod());
        }

        String username = obtainUsername(request);
        String password = obtainPassword(request);

        if (username == null) {
            username = "";
        }

        if (password == null) {
            password = "";
        }

        username = username.trim();

        UsernamePasswordAuthenticationToken authRequest = new UsernamePasswordAuthenticationToken(
                username, password);

        // Allow subclasses to set the "details" property
        setDetails(request, authRequest);

        return this.getAuthenticationManager().authenticate(authRequest);
    }
attemptAuthentication () 方法将 request 中的 username 和 password 生成 UsernamePasswordAuthenticationToken 对象,用于 AuthenticationManager 的验证(即 this.getAuthenticationManager().authenticate(authRequest) )。默认情况下注入 Spring 容器的 AuthenticationManager 是 ProviderManager。
- ProviderManager(AuthenticationManager的实现类)
public Authentication authenticate(Authentication authentication)
    throws AuthenticationException {
    Class<? extends Authentication> toTest = authentication.getClass();
    AuthenticationException lastException = null;
    Authentication result = null;
    boolean debug = logger.isDebugEnabled();

    for (AuthenticationProvider provider : getProviders()) {
        if (!provider.supports(toTest)) {
            continue;
        }

        if (debug) {
            logger.debug("Authentication attempt using "
                         + provider.getClass().getName());
        }

        try {
            result = provider.authenticate(authentication);

            if (result != null) {
                copyDetails(authentication, result);
                break;
            }
        }
        catch (AccountStatusException e) {
            prepareException(e, authentication);
            // SEC-546: Avoid polling additional providers if auth failure is due to
            // invalid account status
            throw e;
        }
        catch (InternalAuthenticationServiceException e) {
            prepareException(e, authentication);
            throw e;
        }
        catch (AuthenticationException e) {
            lastException = e;
        }
    }

    if (result == null && parent != null) {
        // Allow the parent to try.
        try {
            result = parent.authenticate(authentication);
        }
        catch (ProviderNotFoundException e) {
            // ignore as we will throw below if no other exception occurred prior to
            // calling parent and the parent
            // may throw ProviderNotFound even though a provider in the child already
            // handled the request
        }
        catch (AuthenticationException e) {
            lastException = e;
        }
    }

    if (result != null) {
        if (eraseCredentialsAfterAuthentication
            && (result instanceof CredentialsContainer)) {
            // Authentication is complete. Remove credentials and other secret data
            // from authentication
            ((CredentialsContainer) result).eraseCredentials();
        }

        eventPublisher.publishAuthenticationSuccess(result);
        return result;
    }

    // Parent was null, or didn't authenticate (or throw an exception).

    if (lastException == null) {
        lastException = new ProviderNotFoundException(messages.getMessage(
            "ProviderManager.providerNotFound",
            new Object[] { toTest.getName() },
            "No AuthenticationProvider found for {0}"));
    }

    prepareException(lastException, authentication);

    throw lastException;
}
尝试验证 Authentication 对象。AuthenticationProvider 列表将被连续尝试,直到 AuthenticationProvider 表示它能够认证传递的过来的Authentication 对象。然后将使用该 AuthenticationProvider 尝试身份验证。如果有多个 AuthenticationProvider 支持验证传递过来的Authentication 对象,那么由第一个来确定结果,覆盖早期支持AuthenticationProviders 所引发的任何可能的AuthenticationException。 成功验证后,将不会尝试后续的AuthenticationProvider。如果最后所有的 AuthenticationProviders 都没有成功验证 Authentication 对象,将抛出 AuthenticationException。从代码中不难看出,由 provider 来验证 authentication, 核心点方法是:
Authentication result = provider.authenticate(authentication);
此处的 provider 是 AbstractUserDetailsAuthenticationProvider,AbstractUserDetailsAuthenticationProvider 是AuthenticationProvider的实现,看看它的 authenticate(authentication) 方法:
// 验证 authentication
public Authentication authenticate(Authentication authentication)
    throws AuthenticationException {
    Assert.isInstanceOf(UsernamePasswordAuthenticationToken.class, authentication,
                        messages.getMessage(
                            "AbstractUserDetailsAuthenticationProvider.onlySupports",
                            "Only UsernamePasswordAuthenticationToken is supported"));

    // Determine username
    String username = (authentication.getPrincipal() == null) ? "NONE_PROVIDED"
        : authentication.getName();

    boolean cacheWasUsed = true;
    UserDetails user = this.userCache.getUserFromCache(username);

    if (user == null) {
        cacheWasUsed = false;

        try {
            user = retrieveUser(username,
                                (UsernamePasswordAuthenticationToken) authentication);
        }
        catch (UsernameNotFoundException notFound) {
            logger.debug("User '" + username + "' not found");

            if (hideUserNotFoundExceptions) {
                throw new BadCredentialsException(messages.getMessage(
                    "AbstractUserDetailsAuthenticationProvider.badCredentials",
                    "Bad credentials"));
            }
            else {
                throw notFound;
            }
        }

        Assert.notNull(user,
                       "retrieveUser returned null - a violation of the interface contract");
    }

    try {
        preAuthenticationChecks.check(user);
        additionalAuthenticationChecks(user,
                                       (UsernamePasswordAuthenticationToken) authentication);
    }
    catch (AuthenticationException exception) {
        if (cacheWasUsed) {
            // There was a problem, so try again after checking
            // we're using latest data (i.e. not from the cache)
            cacheWasUsed = false;
            user = retrieveUser(username,
                                (UsernamePasswordAuthenticationToken) authentication);
            preAuthenticationChecks.check(user);
            additionalAuthenticationChecks(user,
                                           (UsernamePasswordAuthenticationToken) authentication);
        }
        else {
            throw exception;
        }
    }

    postAuthenticationChecks.check(user);

    if (!cacheWasUsed) {
        this.userCache.putUserInCache(user);
    }

    Object principalToReturn = user;

    if (forcePrincipalAsString) {
        principalToReturn = user.getUsername();
    }

    return createSuccessAuthentication(principalToReturn, authentication, user);
}
AbstractUserDetailsAuthenticationProvider 内置了缓存机制,从缓存中获取不到的 UserDetails 信息的话,就调用如下方法获取用户信息,然后和 用户传来的信息进行对比来判断是否验证成功。
// 获取用户信息
UserDetails user = retrieveUser(username,
 (UsernamePasswordAuthenticationToken) authentication);
retrieveUser() 方法在 DaoAuthenticationProvider 中实现,DaoAuthenticationProvider 是 AbstractUserDetailsAuthenticationProvider的子类。具体实现如下:
protected final UserDetails retrieveUser(String username,
                                         UsernamePasswordAuthenticationToken authentication)
    throws AuthenticationException {
    UserDetails loadedUser;

    try {
        loadedUser = this.getUserDetailsService().loadUserByUsername(username);
    }
    catch (UsernameNotFoundException notFound) {
        if (authentication.getCredentials() != null) {
            String presentedPassword = authentication.getCredentials().toString();
            passwordEncoder.isPasswordValid(userNotFoundEncodedPassword,
                                            presentedPassword, null);
        }
        throw notFound;
    }
    catch (Exception repositoryProblem) {
        throw new InternalAuthenticationServiceException(
            repositoryProblem.getMessage(), repositoryProblem);
    }

    if (loadedUser == null) {
        throw new InternalAuthenticationServiceException(
            "UserDetailsService returned null, which is an interface contract violation");
    }
    return loadedUser;
}
可以看到此处的返回对象 userDetails 是由 UserDetailsService 的 #loadUserByUsername(username) 来获取的。
八、玩转自定义登录
1. form 登录的流程
下面是 form 登录的基本流程:

只要是 form 登录基本都能转化为上面的流程。接下来我们看看 Spring Security 是如何处理的。
3. Spring Security 中的登录
默认它提供了三种登录方式:
formLogin()普通表单登录oauth2Login()基于OAuth2.0认证/授权协议openidLogin()基于OpenID身份认证规范
以上三种方式统统是 AbstractAuthenticationFilterConfigurer 实现的,
4. HttpSecurity 中的 form 表单登录
启用表单登录通过两种方式一种是通过 HttpSecurity 的 apply(C configurer) 方法自己构造一个 AbstractAuthenticationFilterConfigurer 的实现,这种是比较高级的玩法。 另一种是我们常见的使用 HttpSecurity 的 formLogin() 方法来自定义 FormLoginConfigurer 。我们先搞一下比较常规的第二种。
4.1 FormLoginConfigurer
该类是 form 表单登录的配置类。它提供了一些我们常用的配置方法:
- loginPage(String loginPage) : 登录 页面而并不是接口,对于前后分离模式需要我们进行改造 默认为
/login。 - loginProcessingUrl(String loginProcessingUrl) 实际表单向后台提交用户信息的
Action,再由过滤器UsernamePasswordAuthenticationFilter拦截处理,该Action其实不会处理任何逻辑。 - usernameParameter(String usernameParameter) 用来自定义用户参数名,默认
username。 - passwordParameter(String passwordParameter) 用来自定义用户密码名,默认
password - failureUrl(String authenticationFailureUrl) 登录失败后会重定向到此路径, 一般前后分离不会使用它。
- failureForwardUrl(String forwardUrl) 登录失败会转发到此, 一般前后分离用到它。 可定义一个
Controller(控制器)来处理返回值,但是要注意RequestMethod。 - defaultSuccessUrl(String defaultSuccessUrl, boolean alwaysUse) 默认登陆成功后跳转到此 ,如果
alwaysUse为true只要进行认证流程而且成功,会一直跳转到此。一般推荐默认值false - successForwardUrl(String forwardUrl) 效果等同于上面
defaultSuccessUrl的alwaysUse为true但是要注意RequestMethod。 - successHandler(AuthenticationSuccessHandler successHandler) 自定义认证成功处理器,可替代上面所有的
success方式 - failureHandler(AuthenticationFailureHandler authenticationFailureHandler) 自定义失败成功处理器,可替代上面所有的
failure方式 - permitAll(boolean permitAll) form 表单登录是否放开
知道了这些我们就能来搞个定制化的登录了。
5. Spring Security 聚合登录 实战
接下来是我们最激动人心的实战登录操作。 有疑问的可认真阅读 Spring 实战 的一系列预热文章。
5.1 简单需求
我们的接口访问都要通过认证,登陆错误后返回错误信息(json),成功后前台可以获取到对应数据库用户信息(json)(实战中记得脱敏)。
我们定义处理成功失败的控制器:
@RestController
@RequestMapping("/login")
public class LoginController {
    @Resource
    private SysUserService sysUserService;

    /**
      * 登录失败返回 401 以及提示信息.
      *
      * @return the rest
      */
    @PostMapping("/failure")
    public Rest loginFailure() {

        return RestBody.failure(HttpStatus.UNAUTHORIZED.value(), "登录失败了,老哥");
    }

    /**
      * 登录成功后拿到个人信息.
      *
      * @return the rest
      */
    @PostMapping("/success")
    public Rest loginSuccess() {
        // 登录成功后用户的认证信息 UserDetails会存在 安全上下文寄存器 SecurityContextHolder 中
        User principal = (User) SecurityContextHolder.getContext().getAuthentication().getPrincipal();
        String username = principal.getUsername();
        SysUser sysUser = sysUserService.queryByUsername(username);
        // 脱敏
        sysUser.setEncodePassword("[PROTECT]");
        return RestBody.okData(sysUser,"登录成功");
    }
}
然后 我们自定义配置覆写 void configure(HttpSecurity http) 方法进行如下配置(这里需要禁用crsf):
@Configuration
@ConditionalOnClass(WebSecurityConfigurerAdapter.class)
@ConditionalOnWebApplication(type = ConditionalOnWebApplication.Type.SERVLET)
public class CustomSpringBootWebSecurityConfiguration {

    @Configuration
    @Order(SecurityProperties.BASIC_AUTH_ORDER)
    static class DefaultConfigurerAdapter extends WebSecurityConfigurerAdapter {
        @Override
        protected void configure(AuthenticationManagerBuilder auth) throws Exception {
            super.configure(auth);
        }

        @Override
        public void configure(WebSecurity web) throws Exception {
            super.configure(web);
        }

        @Override
        protected void configure(HttpSecurity http) throws Exception {
            http.csrf().disable()
                .cors()
                .and()
                .authorizeRequests().anyRequest().authenticated()
                .and()
                .formLogin()
                .loginProcessingUrl("/process")
                .successForwardUrl("/login/success").
                failureForwardUrl("/login/failure");

        }
    }
}
使用 Postman 或者其它工具进行 Post 方式的表单提交 http://localhost:8080/process?username=Felordcn&password=12345 会返回用户信息:
{
    "httpStatus": 200,
    "data": {
        "userId": 1,
        "username": "Felordcn",
        "encodePassword": "[PROTECT]",
        "age": 18
    },
    "msg": "登录成功",
    "identifier": ""
}
把密码修改为其它值再次请求认证失败后 :
{
    "httpStatus": 401,
    "data": null,
    "msg": "登录失败了,老哥",
    "identifier": "-9999"
}
6. 多种登录方式的简单实现
就这么完了了么?现在登录的花样繁多。常规的就有短信、邮箱、扫码 ,第三方是以后我要讲的不在今天范围之内。 如何应对想法多的产品经理? 我们来搞一个可扩展各种姿势的登录方式。我们在上面 2. form 登录的流程 中的 用户 和 判定 之间增加一个适配器来适配即可。 我们知道这个所谓的 判定就是 UsernamePasswordAuthenticationFilter 。
我们只需要保证 uri 为上面配置的/process 并且能够通过 getParameter(String name) 获取用户名和密码即可 。
我突然觉得可以模仿 DelegatingPasswordEncoder 的搞法, 维护一个注册表执行不同的处理策略。当然我们要实现一个 GenericFilterBean 在 UsernamePasswordAuthenticationFilter 之前执行。同时制定登录的策略。
6.1 登录方式定义
定义登录方式枚举 ``。
public enum LoginTypeEnum {

    /**
       * 原始登录方式.
       */
    FORM,
    /**
       * Json 提交.
       */
    JSON,
    /**
       * 验证码.
       */
    CAPTCHA

}
6.2 定义前置处理器接口
定义前置处理器接口用来处理接收的各种特色的登录参数 并处理具体的逻辑。这个借口其实有点随意 ,重要的是你要学会思路。我实现了一个 默认的 form' 表单登录 和 通过RequestBody放入json` 的两种方式,篇幅限制这里就不展示了。具体的 DEMO 参见底部。
public interface LoginPostProcessor {

    /**
        * 获取 登录类型
        *
        * @return the type
        */
    LoginTypeEnum getLoginTypeEnum();

    /**
        * 获取用户名
        *
        * @param request the request
        * @return the string
        */
    String obtainUsername(ServletRequest request);

    /**
        * 获取密码
        *
        * @param request the request
        * @return the string
        */
    String obtainPassword(ServletRequest request);

}
6.3 实现登录前置处理过滤器
该过滤器维护了 LoginPostProcessor 映射表。 通过前端来判定登录方式进行策略上的预处理,最终还是会交给 UsernamePasswordAuthenticationFilter 。通过 HttpSecurity 的 addFilterBefore(preLoginFilter, UsernamePasswordAuthenticationFilter.class)方法进行前置。
package cn.felord.spring.security.filter;

import cn.felord.spring.security.enumation.LoginTypeEnum;
import org.springframework.security.web.util.matcher.AntPathRequestMatcher;
import org.springframework.security.web.util.matcher.RequestMatcher;
import org.springframework.util.Assert;
import org.springframework.util.CollectionUtils;
import org.springframework.web.filter.GenericFilterBean;

import javax.servlet.FilterChain;
import javax.servlet.ServletException;
import javax.servlet.ServletRequest;
import javax.servlet.ServletResponse;
import javax.servlet.http.HttpServletRequest;
import java.io.IOException;
import java.util.Collection;
import java.util.HashMap;
import java.util.Map;

import static org.springframework.security.web.authentication.UsernamePasswordAuthenticationFilter.SPRING_SECURITY_FORM_PASSWORD_KEY;
import static org.springframework.security.web.authentication.UsernamePasswordAuthenticationFilter.SPRING_SECURITY_FORM_USERNAME_KEY;

/**
  * 预登录控制器
  *
  * @author Felordcn
  * @since 16 :21 2019/10/17
  */
public class PreLoginFilter extends GenericFilterBean {


    private static final String LOGIN_TYPE_KEY = "login_type";


    private RequestMatcher requiresAuthenticationRequestMatcher;
    private Map<LoginTypeEnum, LoginPostProcessor> processors = new HashMap<>();


    public PreLoginFilter(String loginProcessingUrl, Collection<LoginPostProcessor> loginPostProcessors) {
        Assert.notNull(loginProcessingUrl, "loginProcessingUrl must not be null");
        requiresAuthenticationRequestMatcher = new AntPathRequestMatcher(loginProcessingUrl, "POST");
        LoginPostProcessor loginPostProcessor = defaultLoginPostProcessor();
        processors.put(loginPostProcessor.getLoginTypeEnum(), loginPostProcessor);

        if (!CollectionUtils.isEmpty(loginPostProcessors)) {
            loginPostProcessors.forEach(element -> processors.put(element.getLoginTypeEnum(), element));
        }

    }


    private LoginTypeEnum getTypeFromReq(ServletRequest request) {
        String parameter = request.getParameter(LOGIN_TYPE_KEY);

        int i = Integer.parseInt(parameter);
        LoginTypeEnum[] values = LoginTypeEnum.values();
        return values[i];
    }


    /**
      * 默认还是Form .
      *
      * @return the login post processor
      */
    private LoginPostProcessor defaultLoginPostProcessor() {
        return new LoginPostProcessor() {


            @Override
            public LoginTypeEnum getLoginTypeEnum() {

                return LoginTypeEnum.FORM;
            }

            @Override
            public String obtainUsername(ServletRequest request) {
                return request.getParameter(SPRING_SECURITY_FORM_USERNAME_KEY);
            }

            @Override
            public String obtainPassword(ServletRequest request) {
                return request.getParameter(SPRING_SECURITY_FORM_PASSWORD_KEY);
            }
        };
    }


    @Override
    public void doFilter(ServletRequest request, ServletResponse response, FilterChain chain) throws IOException, ServletException {
        ParameterRequestWrapper parameterRequestWrapper = new ParameterRequestWrapper((HttpServletRequest) request);
        if (requiresAuthenticationRequestMatcher.matches((HttpServletRequest) request)) {

            LoginTypeEnum typeFromReq = getTypeFromReq(request);

            LoginPostProcessor loginPostProcessor = processors.get(typeFromReq);


            String username = loginPostProcessor.obtainUsername(request);

            String password = loginPostProcessor.obtainPassword(request);


            parameterRequestWrapper.setAttribute(SPRING_SECURITY_FORM_USERNAME_KEY, username);
            parameterRequestWrapper.setAttribute(SPRING_SECURITY_FORM_PASSWORD_KEY, password);

        }

        chain.doFilter(parameterRequestWrapper, response);
    }
}
6.4 验证
通过 POST 表单提交方式 http://localhost:8080/process?username=Felordcn&password=12345&login_type=0 可以请求成功。或者以下列方式也可以提交成功:
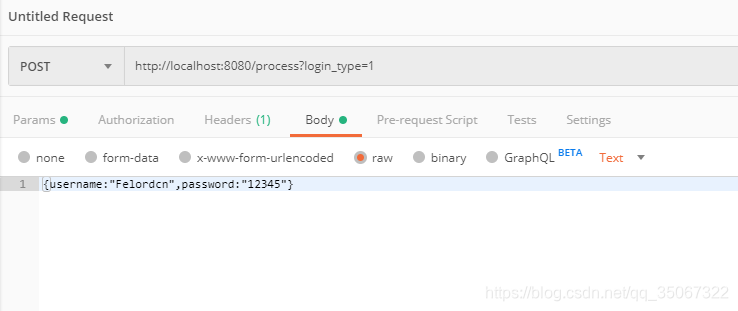
更多的方式 只需要实现接口 LoginPostProcessor 注入 PreLoginFilter
九 整合JWT做登录认证
JWT是JSON Web Token的缩写,是目前最流行的跨域认证解决方法。
互联网服务认证的一般流程是:
- 用户向服务器发送账号、密码
- 服务器验证通过后,将用户的角色、登录时间等信息保存到当前会话中
- 同时,服务器向用户返回一个session_id(一般保存在cookie里)
- 用户再次发送请求时,把含有session_id的cookie发送给服务器
- 服务器收到session_id,查找session,提取用户信息
上面的认证模式,存在以下缺点:
- cookie不允许跨域
- 因为每台服务器都必须保存session对象,所以扩展性不好
JWT认证原理是:
- 用户向服务器发送账号、密码
- 服务器验证通过后,生成token令牌返回给客户端(token可以包含用户信息)
- 用户再次请求时,把token放到请求头
Authorization里 - 服务器收到请求,验证token合法后放行请求
JWT token令牌可以包含用户身份、登录时间等信息,这样登录状态保持者由服务器端变为客户端,服务器变成无状态了;token放到请求头,实现了跨域
JWT的组成
eyJhbGciOiJIUzI1NiIsInR5cCI6IkpXVCJ9.eyJzdWIiOiIxMjM0NTY3ODkwIiwibmFtZSI6IkpvaG4gRG9lIiwiaWF0IjoxNTE2MjM5MDIyfQ.SflKxwRJSMeKKF2QT4fwpMeJf36POk6yJV_adQssw5c
JWT由三部分组成:
- Header(头部)
- Payload(负载)
- Signature(签名)
表现形式为:Header.Payload.Signature
Header 部分是一个 JSON 对象,描述 JWT 的元数据,通常是下面的样子:
{
  "alg": "HS256",
  "typ": "JWT"
}
上面代码中,alg属性表示签名的算法(algorithm),默认是 HMAC SHA256(写成 HS256);typ属性表示这个令牌(token)的类型(type),JWT 令牌统一写为JWT。
上面的 JSON 对象使用 Base64URL 算法转成字符串
Payload
Payload 部分也是一个 JSON 对象,用来存放实际需要传递的数据。JWT 规定了7个官方字段:
- iss (issuer):签发人
- exp (expiration time):过期时间
- sub (subject):主题
- aud (audience):受众
- nbf (Not Before):生效时间
- iat (Issued At):签发时间
- jti (JWT ID):编号
当然,用户也可以定义私有字段。
这个 JSON 对象也要使用 Base64URL 算法转成字符串
Signature
Signature 部分是对前两部分的签名,防止数据篡改
签名算法如下:
HMACSHA256(
  base64UrlEncode(header) + "." +
  base64UrlEncode(payload),
  your-256-bit-secret
)
算出签名以后,把 Header、Payload、Signature 三个部分拼成一个字符串,每个部分之间用"."分隔
JWT认证和授权
Security是基于AOP和Servlet过滤器的安全框架,为了实现JWT要重写那些方法、自定义那些过滤器需要首先了解security自带的过滤器。security默认过滤器链如下:
- org.springframework.security.web.context.request.async.WebAsyncManagerIntegrationFilter
- org.springframework.security.web.context.SecurityContextPersistenceFilter
- org.springframework.security.web.header.HeaderWriterFilter
- org.springframework.security.web.authentication.logout.LogoutFilter
- org.springframework.security.web.authentication.UsernamePasswordAuthenticationFilter
- org.springframework.security.web.savedrequest.RequestCacheAwareFilter
- org.springframework.security.web.servletapi.SecurityContextHolderAwareRequestFilter
- org.springframework.security.web.authentication.AnonymousAuthenticationFilter
- org.springframework.security.web.session.SessionManagementFilter
- org.springframework.security.web.access.ExceptionTranslationFilter
- org.springframework.security.web.access.intercept.FilterSecurityInterceptor
SecurityContextPersistenceFilter
这个过滤器有两个作用:
- 用户发送请求时,从session对象提取用户信息,保存到SecurityContextHolder的securitycontext中
- 当前请求响应结束时,把SecurityContextHolder的securitycontext保存的用户信息放到session,便于下次请求时共享数据;同时将SecurityContextHolder的securitycontext清空
由于禁用session功能,所以该过滤器只剩一个作用即把SecurityContextHolder的securitycontext清空。举例来说明为何要清空securitycontext:用户1发送一个请求,由线程M处理,当响应完成线程M放回线程池;用户2发送一个请求,本次请求同样由线程M处理,由于securitycontext没有清空,理应储存用户2的信息但此时储存的是用户1的信息,造成用户信息不符
UsernamePasswordAuthenticationFilter
UsernamePasswordAuthenticationFilter继承自AbstractAuthenticationProcessingFilter,处理逻辑在doFilter方法中:
- 当请求被
UsernamePasswordAuthenticationFilter拦截时,判断请求路径是否匹配登录URL,若不匹配继续执行下个过滤器;否则,执行步骤2 - 调用
attemptAuthentication方法进行认证。UsernamePasswordAuthenticationFilter重写了attemptAuthentication方法,负责读取表单登录参数,委托AuthenticationManager进行认证,返回一个认证过的token(null表示认证失败) - 判断token是否为null,非null表示认证成功,null表示认证失败
- 若认证成功,调用
successfulAuthentication。该方法把认证过的token放入securitycontext供后续请求授权,同时该方法预留一个扩展点(AuthenticationSuccessHandler.onAuthenticationSuccess方法),进行认证成功后的处理 - 若认证失败,同样可以扩展
uthenticationFailureHandler.onAuthenticationFailure进行认证失败后的处理 - 只要当前请求路径匹配登录URL,那么无论认证成功还是失败,当前请求都会响应完成,不再执行过滤器链
UsernamePasswordAuthenticationFilter的attemptAuthentication方法,执行逻辑如下:
- 从请求中获取表单参数。因为使用
HttpServletRequest.getParameter方法获取参数,它只能处理Content-Type为application/x-www-form-urlencoded或multipart/form-data的请求,若是application/json则无法获取值 - 把步骤1获取的账号、密码封装成
UsernamePasswordAuthenticationToken对象,创建未认证的token。UsernamePasswordAuthenticationToken有两个重载的构造方法,其中public UsernamePasswordAuthenticationToken(Object principal, Object credentials)创建未经认证的token,public UsernamePasswordAuthenticationToken(Object principal, Object credentials, Collection<? extends GrantedAuthority> authorities)创建已认证的token - 获取认证管理器
AuthenticationManager,其缺省实现为ProviderManager,调用其authenticate进行认证 ProviderManager的authenticate是个模板方法,它遍历所有AuthenticationProvider,直至找到支持认证某类型token的AuthenticationProvider,调用AuthenticationProvider.authenticate方法认证,AuthenticationProvider.authenticate加载正确的账号、密码进行比较验证AuthenticationManager.authenticate方法返回一个已认证的token
AnonymousAuthenticationFilter
AnonymousAuthenticationFilter负责创建匿名token:
public void doFilter(ServletRequest req, ServletResponse res, FilterChain chain) throws IOException, ServletException {
    if (SecurityContextHolder.getContext().getAuthentication() == null) {
        SecurityContextHolder.getContext().setAuthentication(this.createAuthentication((HttpServletRequest)req));
        if (this.logger.isTraceEnabled()) {
            this.logger.trace(LogMessage.of(() -> {
                return "Set SecurityContextHolder to " + SecurityContextHolder.getContext().getAuthentication();
            }));
        } else {
            this.logger.debug("Set SecurityContextHolder to anonymous SecurityContext");
        }
    } else if (this.logger.isTraceEnabled()) {
        this.logger.trace(LogMessage.of(() -> {
            return "Did not set SecurityContextHolder since already authenticated " + SecurityContextHolder.getContext().getAuthentication();
        }));
    }

    chain.doFilter(req, res);
}
如果当前用户没有认证,会创建一个匿名token,用户是否能读取资源交由FilterSecurityInterceptor过滤器委托给决策管理器判断是否有权限读取
实现思路
JWT认证思路:
- 利用Security原生的表单认证过滤器验证用户名、密码
- 验证通过后自定义
AuthenticationSuccessHandler认证成功处理器,由该处理器生成token令牌
JWT授权思路:
- 使用JWT目的是让服务器变成无状态,不用session共享数据,所以要禁用security的session功能(http.sessionManagement().sessionCreationPolicy(SessionCreationPolicy.STATELESS))
- token令牌数据结构设计时,payload部分要储存用户名、角色信息
- token令牌有两个作用:
- 认证, 用户发送的token合法即代表认证成功
- 授权,令牌验证成功后提取角色信息,构造认证过的token,将其放到securitycontext,具体权限判断交给security框架处理
- 自己实现一个过滤器,拦截用户请求,实现(3)中所说的功能
代码实现 创建JWT工具类
<dependency>
	<groupId>com.auth0</groupId>
	<artifactId>java-jwt</artifactId>
	<version>3.12.0</version>
</dependency>
我们对java-jwt提供的API进行封装,便于创建、验证、提取claim
@Slf4j
public class JWTUtil {
    // 携带token的请求头名字
    public final static String TOKEN_HEADER = "Authorization";
    //token的前缀
    public final static String TOKEN_PREFIX = "Bearer ";
    // 默认密钥
    public final static String DEFAULT_SECRET = "mySecret";
    // 用户身份
    private final static String ROLES_CLAIM = "roles";
    // token有效期,单位分钟;
    private final static long EXPIRE_TIME = 5 * 60 * 1000;
    // 设置Remember-me功能后的token有效期
    private final static long EXPIRE_TIME_REMEMBER = 7 * 24 * 60 * 60 * 1000;

    // 创建token
    public static String createToken(String username, List role, String secret, boolean rememberMe) {

        Date expireDate = rememberMe ? new Date(System.currentTimeMillis() + EXPIRE_TIME_REMEMBER) : new Date(System.currentTimeMillis() + EXPIRE_TIME);
        try {
            // 创建签名的算法实例
            Algorithm algorithm = Algorithm.HMAC256(secret);
            String token = JWT.create()
                .withExpiresAt(expireDate)
                .withClaim("username", username)
                .withClaim(ROLES_CLAIM, role)
                .sign(algorithm);
            return token;
        } catch (JWTCreationException jwtCreationException) {
            log.warn("Token create failed");
            return null;
        }
    }

    // 验证token
    public static boolean verifyToken(String token, String secret) {
        try{
            Algorithm algorithm = Algorithm.HMAC256(secret);
            // 构建JWT验证器,token合法同时pyload必须含有私有字段username且值一致
            // token过期也会验证失败
            JWTVerifier verifier = JWT.require(algorithm)
                .build();
            // 验证token
            DecodedJWT decodedJWT = verifier.verify(token);
            return true;
        } catch (JWTVerificationException jwtVerificationException) {
            log.warn("token验证失败");
            return false;
        }

    }

    // 获取username
    public static String getUsername(String token) {
        try {
            // 因此获取载荷信息不需要密钥
            DecodedJWT jwt = JWT.decode(token);
            return jwt.getClaim("username").asString();
        } catch (JWTDecodeException jwtDecodeException) {
            log.warn("提取用户姓名时,token解码失败");
            return null;
        }
    }

    public static List<String> getRole(String token) {
        try {
            // 因此获取载荷信息不需要密钥
            DecodedJWT jwt = JWT.decode(token);
            // asList方法需要指定容器元素的类型
            return jwt.getClaim(ROLES_CLAIM).asList(String.class);
        } catch (JWTDecodeException jwtDecodeException) {
            log.warn("提取身份时,token解码失败");
            return null;
        }
    }
}
代码实现认证
验证账号、密码交给UsernamePasswordAuthenticationFilter,不用修改代码
认证成功后,需要生成token返回给客户端,我们通过扩展AuthenticationSuccessHandler.onAuthenticationSuccess方法实现
@Component
public class JWTAuthenticationSuccessHandler implements AuthenticationSuccessHandler {
    @Override
    public void onAuthenticationSuccess(HttpServletRequest httpServletRequest, HttpServletResponse httpServletResponse, Authentication authentication) throws IOException, ServletException {
        ResponseData responseData = new ResponseData();
        responseData.setCode("200");
        responseData.setMessage("登录成功!");

        // 提取用户名,准备写入token
        String username = authentication.getName();
        // 提取角色,转为List<String>对象,写入token
        List<String> roles = new ArrayList<>();
        Collection<? extends GrantedAuthority> authorities = authentication.getAuthorities();
        for (GrantedAuthority authority : authorities){
            roles.add(authority.getAuthority());
        }

        // 创建token
        String token = JWTUtil.createToken(username, roles, JWTUtil.DEFAULT_SECRET, true);
        httpServletResponse.setCharacterEncoding("utf-8");
        // 为了跨域,把token放到响应头WWW-Authenticate里
        httpServletResponse.setHeader("WWW-Authenticate", JWTUtil.TOKEN_PREFIX + token);
		// 写入响应里
        ObjectMapper mapper = new ObjectMapper();
        mapper.writeValue(httpServletResponse.getWriter(), responseData);
    }
}
为了统一返回值,我们封装了一个ResponseData对象
代码实现 授权
自定义一个过滤器JWTAuthorizationFilter,验证token,token验证成功后认为认证成功
@Slf4j
public class JWTAuthorizationFilter extends OncePerRequestFilter {
    @Override
    protected void doFilterInternal(HttpServletRequest request, HttpServletResponse response, FilterChain chain) throws IOException, ServletException {

        String token = getTokenFromRequestHeader(request);
        Authentication verifyResult = verefyToken(token, JWTUtil.DEFAULT_SECRET);
        if (verifyResult == null) {
            // 即便验证失败,也继续调用过滤链,匿名过滤器生成匿名令牌
            chain.doFilter(request, response);
            return;
        } else {
            log.info("token令牌验证成功");
            SecurityContextHolder.getContext().setAuthentication(verifyResult);
            chain.doFilter(request, response);
        }
    }

    // 从请求头获取token
    private String getTokenFromRequestHeader(HttpServletRequest request) {
        String header = request.getHeader(JWTUtil.TOKEN_HEADER);
        if (header == null || !header.startsWith(JWTUtil.TOKEN_PREFIX)) {
            log.info("请求头不含JWT token, 调用下个过滤器");
            return null;
        }

        String token = header.split(" ")[1].trim();
        return token;
    }

    // 验证token,并生成认证后的token
    private UsernamePasswordAuthenticationToken verefyToken(String token, String secret) {
        if (token == null) {
            return null;
        }

        // 认证失败,返回null
        if (!JWTUtil.verifyToken(token, secret)) {
            return null;
        }

        // 提取用户名
        String username = JWTUtil.getUsername(token);
        // 定义权限列表
        List<GrantedAuthority> authorities = new ArrayList<>();
        // 从token提取角色
        List<String> roles = JWTUtil.getRole(token);
        for (String role : roles) {
            log.info("用户身份是:" + role);
            authorities.add(new SimpleGrantedAuthority(role));
        }
        // 构建认证过的token
        return new UsernamePasswordAuthenticationToken(username, null, authorities);
    }
}
OncePerRequestFilter`保证当前请求中,此过滤器只被调用一次,执行逻辑在`doFilterInternal
代码实现 security配置
@Configuration
@EnableWebSecurity
public class WebSecurityConfig extends WebSecurityConfigurerAdapter {

    @Autowired
    private AjaxAuthenticationEntryPoint ajaxAuthenticationEntryPoint;
    @Autowired
    private JWTAuthenticationSuccessHandler jwtAuthenticationSuccessHandler;

    @Autowired
    private AjaxAuthenticationFailureHandler ajaxAuthenticationFailureHandler;

    @Bean
    public PasswordEncoder passwordEncoder() {
        return new BCryptPasswordEncoder();
    }

    protected void configure(HttpSecurity http) throws Exception {
        http.csrf().disable()
                .authorizeRequests().anyRequest().authenticated()
                .and()
                .formLogin()
                .successHandler(jwtAuthenticationSuccessHandler)
                .failureHandler(ajaxAuthenticationFailureHandler)
                .permitAll()
                .and()
                .addFilterAfter(new JWTAuthorizationFilter(), UsernamePasswordAuthenticationFilter.class)
                .sessionManagement().sessionCreationPolicy(SessionCreationPolicy.STATELESS)
                .and()
                .exceptionHandling().authenticationEntryPoint(ajaxAuthenticationEntryPoint);

    }
}
配置里取消了session功能,把我们定义的过滤器添加到过滤链中;同时,定义ajaxAuthenticationEntryPoint处理未认证用户访问未授权资源时抛出的异常
@Component
public class AjaxAuthenticationEntryPoint implements AuthenticationEntryPoint {
    @Override
    public void commence(HttpServletRequest httpServletRequest, HttpServletResponse httpServletResponse, AuthenticationException e) throws IOException, ServletException {
        ResponseData responseData = new ResponseData();
        responseData.setCode("401");
        responseData.setMessage("匿名用户,请先登录再访问!");

        httpServletResponse.setCharacterEncoding("utf-8");
        ObjectMapper mapper = new ObjectMapper();
        mapper.writeValue(httpServletResponse.getWriter(), responseData);
    }
}
过滤器链(filter chain)的介绍
上一节中,主要讲了Spring Security认证和授权的核心组件及核心方法。但是,什么时候调用这些方法呢?答案就是Filter和AOP。Spring Security在我们进行用户认证以及授予权限的时候,通过各种各样的拦截器来控制权限的访问。
对于基于HttpRequest的方式对端点进行保护,我们使用一个Filter Chain来保护;对于基于方法调用进行保护,我们使用AOP来保护。本篇重点讲Spring Security中过滤器链的种类及过滤器中如何实现的认证和授权。
Spring Security会默认为我们添加15个过滤器,我们可以从WebSecurity(WebSecurity是Spring Security加载的一个重要对象,将在下节具体讲述)的performBuild()方法中看到过滤器链SecurityFilterChain的构建过程,并交由FilterChainProxy对象代理。我们从SecurityFilterChain的默认实现类DefaultSecurityFilterChain中的log看出,Spring Security由以下过滤器组成了过滤器链:
Creating filter chain: any request, [
  org.springframework.security.web.context.request.async.WebAsyncManagerIntegrationFilter@7f353a0f,
  org.springframework.security.web.context.SecurityContextPersistenceFilter@4735d6e5,
  org.springframework.security.web.header.HeaderWriterFilter@314a31b0,
  org.springframework.security.web.csrf.CsrfFilter@4ef2ab73,
  org.springframework.security.web.authentication.logout.LogoutFilter@57efc6fd,
  org.springframework.security.web.authentication.UsernamePasswordAuthenticationFilter@d88f893,
  org.springframework.security.web.authentication.ui.DefaultLoginPageGeneratingFilter@2cd388f5,
  org.springframework.security.web.authentication.ui.DefaultLogoutPageGeneratingFilter@7ea2412c,
  org.springframework.security.web.authentication.www.BasicAuthenticationFilter@2091833,
  org.springframework.security.web.savedrequest.RequestCacheAwareFilter@4dad0eed,
  org.springframework.security.web.servletapi.SecurityContextHolderAwareRequestFilter@16132f21,
  org.springframework.security.web.authentication.AnonymousAuthenticationFilter@1c93b51e,
  org.springframework.security.web.session.SessionManagementFilter@59edb4f5,
  org.springframework.security.web.access.ExceptionTranslationFilter@104dc1a2,
  org.springframework.security.web.access.intercept.FilterSecurityInterceptor@1de0641b
]
下面就是各个过滤器的功能,
其中SecurityContextPersistenceFilter,UsernamePasswordAuthenticationFilter及FilterSecurityInterceptor分别对应了SecurityContext,AuthenticationManager,AccessDecisionManager的处理。
[WebAsyncManagerIntegrationFilter] (异步方式)提供了对securityContext和WebAsyncManager的集成。
方式是通过SecurityContextCallableProcessingInterceptor的beforeConcurrentHandling(NativeWebRequest, Callable)方法来将SecurityContext设置到Callable上。
其实就是把SecurityContext设置到异步线程中,使其也能获取到用户上下文认证信息。
[SecurityContextPersistenceFilter] (同步方式)在请求之前从SecurityContextRepository(默认实现是HttpSessionSecurityContextRepository)获取信息并填充SecurityContextHolder(如果没有,则创建一个新的ThreadLocal的SecurityContext),并在请求完成并清空SecurityContextHolder并更新SecurityContextRepository。
在Spring Security中,虽然安全上下文信息被存储于Session中,但实际的Filter中不应直接操作Session(过滤器一般负责核心的处理流程,而具体的业务实现,通常交给其中聚合的其他实体类),而是用如HttpSessionSecurityContextRepository中loadContext(),saveContext()来存取session。
[HeaderWriterFilter] 用来给http响应添加一些Header,比如X-Frame-Options,X-XSS-Protection*,X-Content-Type-Options。
[CsrfFilter] 默认开启,用于防止csrf攻击的过滤器
[LogoutFilter] 处理注销的过滤器
[UsernamePasswordAuthenticationFilter] 表单提交了username和password,被封装成UsernamePasswordAuthenticationToken对象进行一系列的认证,便是主要通过这个过滤器完成的,即调用AuthenticationManager.authenticate()。在表单认证的方法中,这是最最关键的过滤器。具体过程是:
(1)调用AbstractAuthenticationProcessingFilter.doFilter()方法执行过滤器
(2)调用UsernamePasswordAuthenticationFilter.attemptAuthentication()方法
(3)调用AuthenticationManager.authenticate()方法(实际上委托给AuthenticationProvider的实现类来处理)
[DefaultLoginPageGeneratingFilter] & [DefaultLogoutPageGeneratingFilter] 如果没有配置/login及login page, 系统则会自动配置这两个Filter。
[BasicAuthenticationFilter] Processes a HTTP request’s BASIC authorization headers, putting the result into the SecurityContextHolder.
[RequestCacheAwareFilter] 内部维护了一个RequestCache,用于缓存request请求
[SecurityContextHolderAwareRequestFilter] 此过滤器对ServletRequest进行了一次包装,使得request具有更加丰富的API(populates the ServletRequest with a request wrapper which implements servlet API security methods)
[AnonymousAuthenticationFilter] 匿名身份过滤器,spring security为了兼容未登录的访问,也走了一套认证流程,只不过是一个匿名的身份。它位于身份认证过滤器(e.g. UsernamePasswordAuthenticationFilter)之后,意味着只有在上述身份过滤器执行完毕后,SecurityContext依旧没有用户信息,AnonymousAuthenticationFilter该过滤器才会有意义。
[SessionManagementFilter] 和session相关的过滤器,内部维护了一个SessionAuthenticationStrategy来执行任何与session相关的活动,比如session-fixation protection mechanisms or checking for multiple concurrent logins。
[ExceptionTranslationFilter] 异常转换过滤器,这个过滤器本身不处理异常,而是将认证过程中出现的异常(AccessDeniedException and AuthenticationException)交给内部维护的一些类去处理。它
位于整个springSecurityFilterChain的后方,用来转换整个链路中出现的异常,将其转化,顾名思义,转化以意味本身并不处理。一般其只处理两大类异常:AccessDeniedException访问异常和AuthenticationException认证异常。
它将Java中的异常和HTTP的响应连接在了一起,这样在处理异常时,我们不用考虑密码错误该跳到什么页面,账号锁定该如何,只需要关注自己的业务逻辑,抛出相应的异常便可。如果该过滤器检测到AuthenticationException,则将会交给内部的AuthenticationEntryPoint去处理,如果检测到AccessDeniedException,需要先判断当前用户是不是匿名用户,如果是匿名访问,则和前面一样运行AuthenticationEntryPoint,否则会委托给AccessDeniedHandler去处理,而AccessDeniedHandler的默认实现,是AccessDeniedHandlerImpl。
[FilterSecurityInterceptor] 这个过滤器决定了访问特定路径应该具备的权限,这些受限的资源访需要什么权限或角色,这些判断和处理都是由该类进行的。
(1)调用FilterSecurityInterceptor.invoke()方法执行过滤器
(2)调用AbstractSecurityInterceptor.beforeInvocation()方法
(3)调用AccessDecisionManager.decide()方法决策判断是否有该权限
参考
JSON Web Token 入门教程
Spring Security-5-认证流程梳理
Spring Security3源码分析(5)-SecurityContextPersistenceFilter分析
Spring Security addFilter() 顺序问题
前后端联调之Form Data与Request Payload,你真的了解吗?
Spring Boot 2 + Spring Security 5 + JWT 的单页应用 Restful 解决方案
SpringBoot实战派-第十章源码
https://www.cnblogs.com/cjsblog/p/9184173.html
https://www.cnblogs.com/storml/p/10937486.html
技术自由的实现路径 PDF 获取:
实现你的 架构自由:
《吃透8图1模板,人人可以做架构》
《10Wqps评论中台,如何架构?B站是这么做的!!!》
《阿里二面:千万级、亿级数据,如何性能优化? 教科书级 答案来了》
《峰值21WQps、亿级DAU,小游戏《羊了个羊》是怎么架构的?》
《100亿级订单怎么调度,来一个大厂的极品方案》
《2个大厂 100亿级 超大流量 红包 架构方案》
… 更多架构文章,正在添加中
实现你的 响应式 自由:
《响应式圣经:10W字,实现Spring响应式编程自由》
这是老版本 《Flux、Mono、Reactor 实战(史上最全)》
实现你的 spring cloud 自由:
《Spring cloud Alibaba 学习圣经》 PDF
《分库分表 Sharding-JDBC 底层原理、核心实战(史上最全)》
《一文搞定:SpringBoot、SLF4j、Log4j、Logback、Netty之间混乱关系(史上最全)》
实现你的 linux 自由:
《Linux命令大全:2W多字,一次实现Linux自由》
实现你的 网络 自由:
《TCP协议详解 (史上最全)》
《网络三张表:ARP表, MAC表, 路由表,实现你的网络自由!!》
实现你的 分布式锁 自由:
《Redis分布式锁(图解 - 秒懂 - 史上最全)》
《Zookeeper 分布式锁 - 图解 - 秒懂》
实现你的 王者组件 自由:
《队列之王: Disruptor 原理、架构、源码 一文穿透》
《缓存之王:Caffeine 源码、架构、原理(史上最全,10W字 超级长文)》
《缓存之王:Caffeine 的使用(史上最全)》
《Java Agent 探针、字节码增强 ByteBuddy(史上最全)》
实现你的 面试题 自由:
4000页《尼恩Java面试宝典 》 40个专题
以上尼恩 架构笔记、面试题 的PDF文件更新,请到《技术自由圈》公号获取↓↓↓
