一、npm init 初始化包管理
- 1.在使用该命令之前,创建一个文件夹,例如:reactDemo
- 2.使用在电脑终端命令行工具中,找到1创建的文件夹,并转到改文件夹指定目录;
- 3.执行 npm init
- 4.如图所示:

- 5.执行命令后,会在文件夹下创建一个package.json 文件,用于管理项目各种依赖和对应的配置参数

二、创建项目文档架构、添加依赖、配置webpack
1.一般地,工程化项目文件需要分模块,下面笔者进行如下的划分:
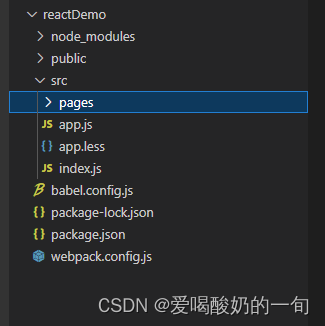
- 2.1 在项目根目录下,创建src文件夹
- 2.2 在src 创建 pages文件夹,用于存放各个模块页面
- 2.3 创建webpack.config.js 与 babel.config.js 分别用于 webpack 配置和babel 配置,配置具体内容在1.6介绍
- 1.4在正式配置webpack 之前,需要将需要用到的工具包进行下载,那么,我们在刚刚创建的package.json 中添加对应包,配置如下:
{
  "name": "reactdemo",
  "version": "1.0.0",
  "description": "",
  "main": "index.js",
  "scripts": {
    "test": "echo \"Error: no test specified\" && exit 1",
    "dev": "webpack-dev-server",
    "build": "webpack"
  },
  "author": "",
  "license": "ISC",
  "devDependencies": {
    "@babel/cli": "^7.21.0",
    "@babel/core": "^7.21.0",
    "@babel/preset-react": "^7.18.6",
    "babel-loader": "^9.1.2",
    "clean-webpack-plugin": "^4.0.0",
    "css-loader": "^6.7.3",
    "html-webpack-plugin": "^5.5.0",
    "i": "^0.3.7",
    "less-loader": "^11.1.0",
    "mini-css-extract-plugin": "^2.7.5",
    "react": "^18.2.0",
    "react-dom": "^18.2.0",
    "react-router": "^6.10.0",
    "react-router-dom": "^6.10.0",
    "style-loader": "^3.3.2",
    "terser-webpack-plugin": "^5.3.7",
    "webpack": "^5.76.2",
    "webpack-bundle-analyzer": "^4.8.0",
    "webpack-cli": "^5.0.1",
    "webpack-dev-server": "^4.11.1"
  }
}
其中,script 是配置webpack对应的构建命令行,执行 npm run dev 可以执行webpack-dev-server 本地命令
devDependencies选项为对应的依赖
- 1.5 配置好package.json 后,在命令行执行npm install ,便会把对应的文件下载到 node/modules 文件夹中,在项目按需引入对应的模块即可;
- 1.6 下面进行webpack 配置,配置如下所示:
const path = require("path")
const htmlWebpackPlugin = require("html-webpack-plugin")
const { CleanWebpackPlugin } = require("clean-webpack-plugin")
const miniCssExtractPlugin = require("mini-css-extract-plugin")
const TerserPlugin = require("terser-webpack-plugin")
const Anlyzer = require("webpack-bundle-analyzer").BundleAnalyzerPlugin;

module.exports = {
    entry: {
        index: {
            import: "./src/index.js",//webpack 打包入口
        },
        react: ['react'],
        "react-dom": ['react-dom'],
        "react-router-dom": ['react-router-dom'],
    },
    watch: false,
    output: {
        path: path.join(__dirname, "./dist"),
        filename: '[name].[chunkhash].js',
        publicPath: "/",
        asyncChunks: true,
        chunkFilename: `[name].[contenthash:8].async.js`
    },
    mode: "development",
    module: {
        rules: [
            {
                test: /\.(js|jsx)$/,
                use: {
                    loader: "babel-loader",
                    options: {
                        exclude: /node_modules/gi,
                        cacheDirectory: true,
                    }
                }
            }, {
                test: /\.(less)$/,
                use: [miniCssExtractPlugin.loader, 'css-loader', 'less-loader'],
                include: /src/
            }
        ]
    },
    optimization: {
        chunkIds: "deterministic",
        minimize: true,
        minimizer: [
            new TerserPlugin({
                terserOptions: {//压缩文件
                    format: {
                        comments: false,
                        max_line_len: true,
                        beautify: true,
                        ascii_only: true,
                        preserve_annotations: true,
                    }
                },
                extractComments: false
            })
        ],
        splitChunks: {
            chunks: "all"
        }
    },

    resolve: {
        extensions: ['.js', '.json', '.jsx']
    },
    plugins: [
        new htmlWebpackPlugin({
            template:"./public/index.html",//使用指定html作为模板,在文件中引入打包后的资源文件
        }),
        new CleanWebpackPlugin(),
        new miniCssExtractPlugin({
            filename: '[name].[contenthash:8].css',
            chunkFilename: '[name].[contenthash:8].chunk.css'
        }),
        // new Anlyzer()
    ],

    devServer: {
        server: "http",
        static: {
            directory: path.join(__dirname, "/"),
            watch: {
                ignored: "*.jsx",
                usePolling: false,
            },
            serveIndex: true
        },
        allowedHosts: ['.host.com'],
        port: "9000",
        hot: true,
        historyApiFallback: true
    }
}
- 1.7 babel 配置如下
module.exports={
    "presets":["@babel/preset-react"]
}
三、编写react代码
- 3.1 创建 app.js 文件,添加如下代码,代码创建了一个函数组件,具体内容如下
import React from "react";

function WelcomeClass({ props }) {
    return <h1>Hello,{props}</h1>
}

export default WelcomeClass
其中,props 是父组件向其传递的参数
- 3.2 创建index.js 创建一个根组件,并引入31创建的子组件,代码如下所示;
import React from "react"
import App from "./app"
import { createRoot }  from "react-dom/client"
const root = createRoot(document.getElementById("app"))
root.render(
    <React.StrictMode>
        <App props={'DD'}/>
    </React.StrictMode>
)
注意事项 document.getElementById(“app”) 需要在index 文件中,创建一个id 为app 的标签。
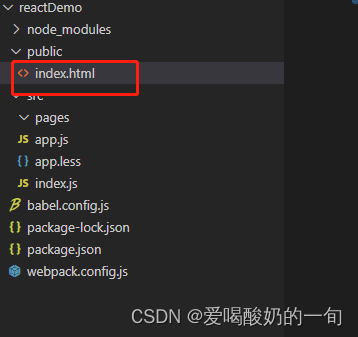
这个 html 文件,在**/public/index.html** 中,也是webpack 配置 中,hmlt-webpack-plugin 指定的文件
html文件如下所示
<!DOCTYPE html>
<html lang="en">
<head>
    <meta charset="UTF-8">
    <meta http-equiv="X-UA-Compatible" content="IE=edge">
    <meta name="viewport" content="width=device-width, initial-scale=1.0">
    <title>Document</title>
</head>
<body>
    <div id="app"></div>
</body>
</html>
四、启动项目
- 4.1 在 vscode 使用终端工具 打开对应项目执行 npm run dev 命令,如下图所示

4.2 等构建成功后,在浏览器打开http://localhost:9000/ 效果如下图:


