前言
单元测试技术的使用,是区分一个一般的开发者和好的开发者的重要指标。程序员经常有各种借口不写单元测试,但最常见的借口就是缺乏经验和知识。常见的单测框架有 JUnit , Mockito 和PowerMock 。本文就Junit展开介绍。
1.介绍
JUnit 是一个 Java 编程语言的单元测试框架。JUnit 促进了“先测试后编码”的理念,强调建立测试数据的一段代码,可以先测试,然后再应用。增加了程序员的产量和程序的稳定性,可以减少程序员的压力和花费在排错上的时间。
因为junit不同版本使用上面有一些差异,下面用junit4做展示
2.使用
2.1 简单demo
下面通过一个简单的demo演示,方法是计算一个人的年龄,我们需要对这个方法进行单元测试,这里只是说明如何使用junit,不需要关注具体的年龄计算代码细节。
public class UserAgeTest {

    public long getAge(Date birthday) {

        Date startDate = birthday;
        Date endDate = new Date();

        LocalDate localStart = null;
        LocalDate localEnd = null;
        ZoneId zoneId = ZoneId.systemDefault();
        if (startDate == null && endDate == null) {
            return 0;
        } else {
            if (startDate != null) {
                localStart = startDate.toInstant().atZone(zoneId).toLocalDate();
            }
            if (endDate != null) {
                localEnd = endDate.toInstant().atZone(zoneId).toLocalDate();
            }
            Period period = Period.between(localStart, localEnd);
            long year = (long) period.getYears();
            return year;
        }
    }
}
针对上面方法,写的测试类如下:
public  class TestJunit {
    @Test
    public void testadd() throws Exception{
        UserAgeTest userAgeTest = new UserAgeTest();
        Date birthday = new SimpleDateFormat("yyyy-MM-dd").parse("2019-01-01");
        long age = userAgeTest.getAge(birthday);
        System.out.println(age);
    }
}
最终输出方法运行结果,这里可以看到用junit的第一个好处是,我们代码中不用写一大堆main方法,而且代码复用性高,因为一个类只能有一个main方法,如果要测试其他方法,需要重新写main方法,测试方法复用性不高
在我们使用单元测试时候,单元测试类需要满足如下条件,否则运行会报错(这里是基于junit4,junit5限制条件会不一样)
- 测试的类不能是抽象类,且必须只含有一个构造器。
- 测试方法不能是抽象方法,而且不能有返回值
- 测试类和方法必须被public修饰
可以看到上面的测试代码满足这三个要求
2.2 其他注解
上面介绍了Test注解的使用,下面介绍其他注解:
| 注解名称 | 注解含义 |
|---|---|
| Test | 表示方法是测试方法。 |
| Before | 在每个测试用例之前执行 |
| After | 在每个测试用例之后执行 |
| BeforeClass | 初始化类级别的资源,与before功能类似,只会执行一次 |
| AfterClass | 初始化类级别的资源,与After功能类似,只会执行一次 |
| Ignore | 不会在测试期间运行,即某些没有实现的方法或者功能没有完善的方法 |
2.2.1 Test注解扩展
2.2.1.1 timeout
可以在注解上面添加超时时间,超出超时时间方法报错,超时值是以毫秒为单位指定的
    //方法执行超过200毫秒报错
    @Test(timeout = 200)
    public void testTimeout(){
         while (true){

         }
    }
//java.lang.Exception: test timed out after 200 milliseconds
2.2.1.2 expected
检查方法是否抛出特定的异常,可以在注解上添加期待异常,如果方法没有抛出指定异常,则会报错
@Test(expected = NullPointerException.class)
public void testExpect(){

}
//java.lang.AssertionError: Expected exception: java.lang.NullPointerException
抛出异常后,方法正常运行
@Test(expected = NullPointerException.class)
public void testExpect(){
    throw new NullPointerException();
}
2.2.2 Before和After
该注解添加的方法,会在所在测试类每个方法执行前后都运行
    @Before
    public void beforeRun(){
        System.out.println("每个test方法执行前运行");
    }

    @After
    public void afterRun(){
        System.out.println("每个方法执行后运行");
    }
    @Test
    public void testRun(){
        System.out.println("测试运行方法1");
    }
    @Test
    public void testRun2(){
        System.out.println("测试运行方法2");
    }
程序输出:
每个test方法执行前运行
测试运行方法2
每个方法执行后运行
2.2.3 BeforeClass 和 AfterClass
注意:
- beforeclass 和 AfterClass 修饰的方法必须是静态的,否则会报错。
- beforeclass ,afterclass, before,after 的执行顺序 可以留意一下
- beforeclass 是执行一次,before是每个方法前都会执行,类似数据库连接初始化之类的操作,不必每个方法之前前执行,可以使用beforeclass 提高执行效率
- afterclass 和beforeclass对应,一些释放资源的操作可以放到afterclass里面
    @Before
    public void beforeRun(){
        System.out.println("每个test方法执行前运行");
    }

    @BeforeClass
    public static void  beforeClass(){
        System.out.println("执行beforeclass方法");
    }

    @AfterClass
    public static void afterClass(){
        System.out.println("执行afterClass方法");
    }

    @After
    public void afterRun(){
        System.out.println("每个方法执行后运行");
    }
    @Test
    public void testRun(){
        System.out.println("测试运行方法1");
    }
    @Test
    public void testRun2(){
        System.out.println("测试运行方法2");
    }
程序运行执行结果:
执行beforeclass方法
每个test方法执行前运行
测试运行方法1
每个方法执行后运行
每个test方法执行前运行
测试运行方法2
每个方法执行后运行
执行afterClass方法
2.3.4 Ignore
igore注解标注的方法,不会执行,主要用于某些待完善功能方法。还不能测试,为了不影响整体测试用例运行,可以增加这个注解
@Test
@Ignore
public void testRun2(){
   System.out.println("测试运行方法2");
}
2.3.5 Runwith
junit 官方文档对runwith 解释如下:
When a class is annotated with @RunWith or extends a class annotated with @RunWith, JUnit will invoke the class it references to run the tests in that class instead of the runner built into JUnit.
翻译过来,就是如果一个类或者他的父类用runwith注解了,那么Junit会调用runwith属性指定的类来运行测试用例,而不是用内置的运行器。
JUnit中有一个默认的Runner,它的名字叫BlockJunit4ClassRunner,但这是在JUnit4.4之后才引入的,对于4.4之前版本的JUnit,它的名字叫Junit4ClassRunner
下面就几个常见的运行器做个简单介绍
2.3.5.1 Parameterized
参数化测试
/**
* <p>
* The custom runner <code>Parameterized</code> implements parameterized tests.
* When running a parameterized test class, instances are created for the
* cross-product of the test methods and the test data elements.
* </p>
* 翻译:当使用这个执行器的时候,可以创建基于测试数据和测试方法的组合测试用例,比如有五组数据,两个测试方法,那么会创建10个测试用例用于测试
*
* For example, to test a Fibonacci function, write:
*
* <pre>
* @RunWith(Parameterized.class)
* public class FibonacciTest {
* @Parameters
* public static List<Object[]> data() {
* return Arrays.asList(new Object[][] {
* { { 0, 0 }, { 1, 1 }, { 2, 1 }, { 3, 2 }, { 4, 3 }, { 5, 5 },
* { 6, 8 } } });
* }
*
* private int fInput;
*
* private int fExpected;
*
* public FibonacciTest(int input, int expected) {
* fInput= input;
* fExpected= expected;
* }
*
* @Test
* public void test() {
* assertEquals(fExpected, Fibonacci.compute(fInput));
* }
* }
* </pre>
*
* <p>
* Each instance of <code>FibonacciTest</code> will be constructed using the
* two-argument constructor and the data values in the
* <code>@Parameters</code> method.
* </p>
*/
上面是Parameterized的源码注释,可以看到里面用了斐波那契数列作为例子,讲了参数化测试的使用方式和场景。这里再使用一个案例加深印象,demo是从其他博客拷贝过来的,文末有参考文献
public class PriceCalculator {
  private int quantity;
  private double unitPrice;
  private double discount;

  public PriceCalculator(int quantity, double price, double discount){
    this.quantity = quantity;
    this.unitPrice = price;
    this.discount = discount;
  }

  public double getPrice(){
    return this.quantity * this.unitPrice *  ( this.discount / 100 );
  }
}

@RunWith(Parameterized.class)
public class TestRunwith {


    private int quantity;
    private double price;
    private double discount;
    private double expected;
    private PriceCalculator priceCalculator;

    public TestRunwith(int qty, double price, double discount, double expected){
        this.quantity = qty;
        this.price = price;
        this.discount = discount;
        this.expected = expected;
    }

    //配置测试数据,启动会逐条遍历,将每条数据通过构造器设置到类的成员变量里面
    @Parameterized.Parameters()
    public static Collection<Object[]> generateData()
    {
        return Arrays.asList(new Object[][] {
                { 5, 10, 90, 45 },
                { 4, 5, 80, 16 } });
    }

    //在方法调用前,将测试数据灌入待测试方法里面
    @Before
    public void setUp() throws Exception {
        this.priceCalculator = new PriceCalculator(this.quantity, this.price, this.discount);
    }

    @Test
    public void testPrice(){
        assertEquals("price calculated for test data", this.expected,
                this.priceCalculator.getPrice(), 0);
    }
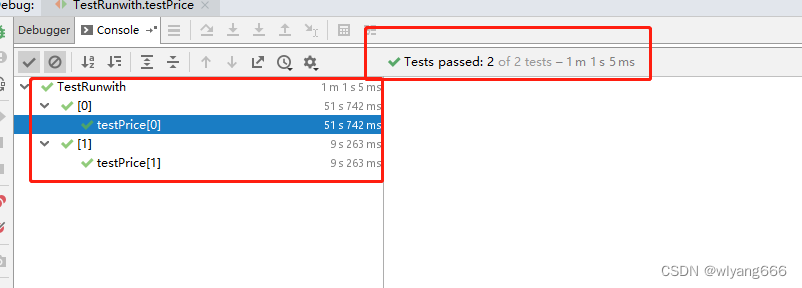
在IDEA的concole可以看到两条测试案例运行成功。
下面是paramters 类源码介绍
public class Parameterized extends Suite {
	/**
	 * Annotation for a method which provides parameters to be injected into the
	 * test class constructor by <code>Parameterized</code>
	 */
	@Retention(RetentionPolicy.RUNTIME)
	@Target(ElementType.METHOD)
	public static @interface Parameters {
	}

	//可以看到会维护一个内部类,继承BlockJUnit4ClassRunner,用于解析创建执行器
	private class TestClassRunnerForParameters extends
			BlockJUnit4ClassRunner {
			//第几个测试用例参数
		private final int fParameterSetNumber;
		//参数列表
		private final List<Object[]> fParameterList;

		TestClassRunnerForParameters(Class<?> type,
				List<Object[]> parameterList, int i) throws InitializationError {
			super(type);
			fParameterList= parameterList;
			fParameterSetNumber= i;
		}
		//创建测试用例,可以看到会用测试类的唯一构造方法
		@Override
		public Object createTest() throws Exception {
			return getTestClass().getOnlyConstructor().newInstance(
					computeParams());
		}
		//参数从参数列表获取
		private Object[] computeParams() throws Exception {
			try {
				return fParameterList.get(fParameterSetNumber);
			} catch (ClassCastException e) {
				throw new Exception(String.format(
						"%s.%s() must return a Collection of arrays.",
						getTestClass().getName(), getParametersMethod(
								getTestClass()).getName()));
			}
		}

		//第几个测试
		@Override
		protected String getName() {
			return String.format("[%s]", fParameterSetNumber);
		}

		//测试用例名称,方法名加第几次
		@Override
		protected String testName(final FrameworkMethod method) {
			return String.format("%s[%s]", method.getName(),
					fParameterSetNumber);
		}
		//校验测试类构造方法是否唯一,如果不唯一会报错,因为要用构造方法设置参数
		@Override
		protected void validateConstructor(List<Throwable> errors) {
			validateOnlyOneConstructor(errors);
		}

		@Override
		protected Statement classBlock(RunNotifier notifier) {
			return childrenInvoker(notifier);
		}
	}

	//执行器列表,其实就是根据参数列表,创建多个执行器,遍历执行,详见下文
	private final ArrayList<Runner> runners= new ArrayList<Runner>();

	/**
	 * Only called reflectively. Do not use programmatically.
	 */
	public Parameterized(Class<?> klass) throws Throwable {
		super(klass, Collections.<Runner>emptyList());
		List<Object[]> parametersList= getParametersList(getTestClass());
		for (int i= 0; i < parametersList.size(); i++)
			runners.add(new TestClassRunnerForParameters(getTestClass().getJavaClass(),
					parametersList, i));
	}

	//维护的执行器列表会交给父类遍历执行
	@Override
	protected List<Runner> getChildren() {
		return runners;
	}

	//这里可以看到,会根据测试类,找由Parameters注解标记的方法,然后反射调用获取方法返回结果
	@SuppressWarnings("unchecked")
	private List<Object[]> getParametersList(TestClass klass)
			throws Throwable {
		return (List<Object[]>) getParametersMethod(klass).invokeExplosively(
				null);
	}

	private FrameworkMethod getParametersMethod(TestClass testClass)
			throws Exception {
		List<FrameworkMethod> methods= testClass
				.getAnnotatedMethods(Parameters.class);
		//保证测试类parameters注解的方法,有静态的,公共的
		for (FrameworkMethod each : methods) {
			int modifiers= each.getMethod().getModifiers();
			if (Modifier.isStatic(modifiers) && Modifier.isPublic(modifiers))
				return each;
		}
		throw new Exception("No public static parameters method on class "
				+ testClass.getName());
	}
}
2.3.5.2 Suite
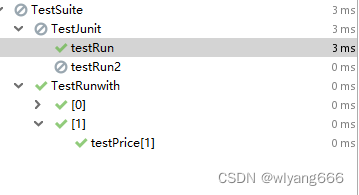
测试套件,其作用是使用JUnit执行一个测试套件。Suite类是JUnit自带的,意为套件,顾名思义,就是一套东西。通过它,可以把多个相关的测试类看做一个测试套件一起测试,@RunWith指定了Suite类,说明这个TestSuite类是一个套件。通过@Suite.SuiteClasses指定了要执行的测试类(这些类中的所有用例都会执行)。需要注意的是,这个TestSuite类本身用例则不会执行了(如下面的testSuite()方法)。
//使用套件测试
@RunWith(Suite.class)
//括号中填写你需要执行的类
@Suite.SuiteClasses({TestJunit.class,TestRunwith.class})
public class TestSuite {
    @Test
    public void testSuite(){
        System.out.println("测试suite");
    }
}
2.3.5.3 Categories
顾名思义,执行一个“类别”。和Suite类似,只是Suite是执行指定类中的所有用例,而Categories执行的范围更小,是在Suite的基础上只执行指定的“类别”的用例。这就需要事先在各个测试用例上用@Category标注该用例属于那些“类别”,之后便可以通过类别来选择执行某些用例
public  class TestJunit {
    @Test
    @Category({A.class})
    public void testRun(){
        System.out.println("测试运行方法A");
    }
    @Test
    @Category({B.class})
    public void testRun2(){
        System.out.println("测试运行方法B");
    }

    @Test
    @Category({A.class,B.class})
    public void testRun3(){
        System.out.println("测试运行方法A和B");
    }
}

@RunWith(Categories.class)
@Categories.IncludeCategory(A.class)
@Categories.ExcludeCategory(B.class)
@Suite.SuiteClasses({TestJunit.class,TestRunwith.class})
public class TestCategories {

}
运行结果:
测试运行方法A
2.3.5.4 Theories
提供一组参数的排列组合值作为待测方法的输入参数。同时注意到在使用Theories这个Runner的时候,我们的待测方法可以拥有输入参数,而这在其它的Runner中的测试方法是不行的。
@RunWith(Theories.class)
public class TestTheories {

    @DataPoints
    public static String[] names = {"Tony", "Jim"};
    @DataPoints
    public static int[] ages = {10, 20};

//    @DataPoints
//    public static double[] wewes = {223.23, 2323.5656};

    @Theory
    public void testMethod(String name, int age){
        System.out.println(String.format("%s's age is %s", name, age));

    }
}
代码输出结果:
Tony’s age is 10
Tony’s age is 20
Jim’s age is 10
Jim’s age is 20
2.3.5.5 SpringJUnit4ClassRunner
SpringJUnit4ClassRunner,其实这个类继承与JUnit默认的运行器BlockJUnit4ClassRunner,继承的好处就是可以完全保留默认的功能,并且提供了一套支持Spring上下文的框架,正如官方文档所说:
SpringJUnit4ClassRunner is a custom extension of JUnit’s BlockJUnit4ClassRunner which provides functionality of the Spring TestContext Framework to standard JUnit tests by means of the TestContextManager and associated support classes and annotations.
2.3 断言Assert
为什么会用断言?
以上面2.1 的demo为例,根据输入日期,输出年龄。我们运行测试方法发现其通过了测试。虽然我们能通过右侧结果的展示观察到计算年龄的结果是否正确,但对于大量测试来说,我们关注的重点应该是整体测试集合是否过了测试。于是我们引入断言。
简单来说,给程序运行结果给一个预期值,如果运行结果不是预期值,则直接报错,不再往下执行测试案例。
断言在我们程序中的很多地方都会用到,不止junit测试。
 @Test
 public void testAssert(){

     int i=2;
     int j=2;
     Assert.assertEquals("结果和预期不符",4,i+j);
     Assert.assertEquals("结果和预期不符",3,i+j);

     Assert.assertSame("结果和预期不符",4,i+j);
     Assert.assertNotSame("结果和预期不符",4,i+j);

     Assert.assertNull("结果为null",null);
     Assert.assertNotNull("结果为null",new TestAssert());

 }
2.4 假设Assume
什么是假设
3 集成构建系统
pom添加如下插件,然后在maven test或者package的时候,默认会执行所有单元测试用例
<build>
    <plugins>
        <plugin>
            <groupId>org.apache.maven.plugins</groupId>
            <artifactId>maven-surefire-plugin</artifactId>
            <version>2.22.2</version>
        </plugin>
    </plugins>
</build>
类似这样
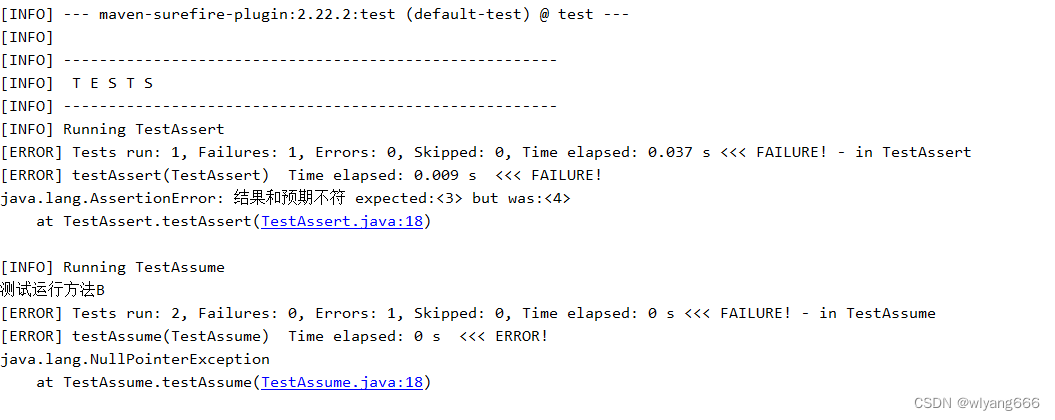
在idea编辑器中:
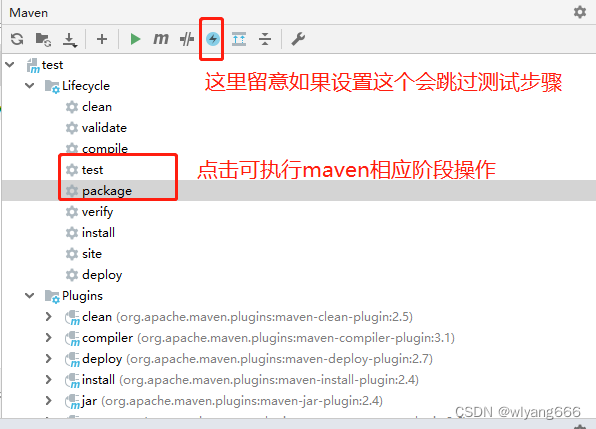
有时候Maven项目下存在test在执行test时却提示[INFO] No tests to run.,可能受以下几种情况影响:
- Test类命名不规范:
默认排除的测试类:Abstract*Test.java ,Abstract**TestCase.java- 存放test的目录不规范,非src/test/java/目录
- 项目打包类型是 pom
4. 结合spring
4.1 添加依赖
<dependency>
    <groupId>org.springframework</groupId>
    <artifactId>spring-test</artifactId>
    <version>4.3.5.RELEASE</version>
</dependency>
4.2 测试类添加注解
//替换运行器
@RunWith(SpringJUnit4ClassRunner.class)
//告知运行器配置文件
@ContextConfiguration(locations = "classpath:applicationContext.xml")
public class SpringTest {
	//注入bean
    @Resource(name = "accountDao")
    private AccountDao accountDao;
    @Test
    public void test01() {
        System.out.println(accountDao);
    }
}
5. 结合springboot
5.1 添加依赖
 <dependency>
     <groupId>org.springframework.boot</groupId>
     <artifactId>spring-boot-starter-test</artifactId>
     <scope>test</scope>
 </dependency>
5.2 测试类添加注解,配置启动类
@RunWith(SpringRunner.class)
@SpringBootTest(classes = DeDataServiceApplication.class)
@PropertySource(value = {"classpath:application.yml"}, encoding = "UTF-8")
public class TestModel {

}
参考文献:
Parameterized注解使用
