文章目录
- 依赖
- 准备数据集合
- 残差结构
- PatchEmbed模块
- Attention模块
- MLP
- Block
- VisionTransformer结构
- 模型定义
- 定义一个模型
- 训练
VISION TRANSFORMER简称ViT,是2020年提出的一种先进的视觉注意力模型,利用transformer及自注意力机制,通过一个标准图像分类数据集ImageNet,基本和SOTA的卷积神经网络相媲美。
我们这里利用简单的ViT进行猫狗数据集的分类,具体数据集可参考这个链接
猫狗数据集
依赖
from functools import partial
from collections import OrderedDict

import torch
import torch.nn as nn
import torchvision
from torchvision import datasets,transforms,models

import os
import matplotlib.pyplot as plt
import time

from torch.autograd import Variable # torch 中 Variable 模块

%matplotlib inline
准备数据集合
data_dir = "dogs-vs-cats"

data_tansform = { x:transforms.Compose([transforms.Resize([224,224]),   # 固定图像大小
                                       transforms.ToTensor(),
                                       transforms.Normalize(mean=[.5,.5,.5],std=[.5,.5,.5])])
                                       for x in ["train","valid"]}
image_datasets = {x:datasets.ImageFolder(root=os.path.join(data_dir,x),
                                        transform = data_tansform[x])
                                         for x in ["train","valid"]}
dataloader = {x:torch.utils.data.DataLoader(dataset=image_datasets[x],
                                           batch_size=16,
                                           shuffle=True)
              for x in ["train","valid"]}
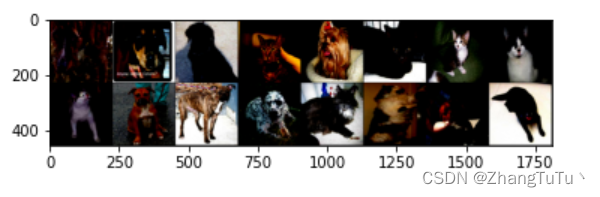
检查一下数据情况
# 获取一个批次,并进行数据预览和分析
x_example,y_example = next(iter(dataloader["train"]))
example_clasees = image_datasets["train"].classes

index_classes = image_datasets["train"].class_to_idx

img = torchvision.utils.make_grid(x_example)
img = img.numpy().transpose([1,2,0])
print([example_clasees[i] for i in y_example])
plt.imshow(img)
plt.show()
残差结构
在深度学习中,一种被广泛使用的技术是随机深度(Stochastic Depth),它可以在训练过程中随机丢弃网络中的一部分层,从而增强模型的鲁棒性。在Vision Transformer(ViT)中,随机深度被应用在了残差连接中,即在残差块的主路径中随机丢弃一些通道,以增加网络深度时的稳定性。
drop_path的函数,它用于在训练过程中应用随机深度。该函数需要传入的参数包括输入张量x、丢失路径的比例drop_prob和当前是否处于训练模式training,函数的返回值为一个经过随机深度处理后的输出张量output。
首先,函数会判断drop_prob是否为0或者当前不处于训练模式,如果是的话,直接返回输入张量x,不做任何处理。
如果不满足上述条件,则根据drop_prob计算出保留每个元素的概 keep_prob,即1-drop_prob。接下来,函数会获取输入张量的形状信息,并且生成一个相同形状的随机张量。其中,随机张量的每个元素取值为keep_prob和一个随机值之间的最大值。这里的操作有些类似于dropout,在训练时,我们会把神经元的输出乘以一个二元随机变量,从而随机地丢弃一些神经元,来增加模型的泛化能力和鲁棒性。
最后,函数使用生成的随机张量对输入张量进行二元操作,并且除以keep_prob,得到最终的输出。这里的随机维度上的值更有可能为0,因此输出张量的期望值保持一致,起到适应网络深度的剪枝效果。
DropPath的神经网络模块,用于实现随机深度(Stochastic Depth)中的路径丢弃。这个模块用于被主路径的残差块调用,通过随机丢弃一些神经元,减少了网络中的一些层,从而增强了模型的实用性和泛化性能。
DropPath类继承自PyTorch的nn.Module类,DropPath可以直接使用PyTorch提供的前向传播方法forward()。
在DropPath的构造函数__init__()中,定义了一个成员变量drop_prob,它将用于影响DropPath在前向传播的过程中对输入数据的随机丢弃比例。可以看出,这个变量是可选的,如果其值为None,则代表不进行丢弃。
在DropPath的前向传播方法forward()中,我们会调用上文中定义的drop_path()函数,来完成具体的随机丢弃操作。
Drop-path函数
def drop_path(x, drop_prob: float = 0., training: bool = False):
    if drop_prob == 0. or not training:
        return x
    keep_prob = 1 - drop_prob
    shape = (x.shape[0],) + (1,) * (x.ndim - 1)  # work with diff dim tensors, not just 2D ConvNets
    random_tensor = keep_prob + torch.rand(shape, dtype=x.dtype, device=x.device)
    random_tensor.floor_()  # binarize
    output = x.div(keep_prob) * random_tensor
    return output

class DropPath(nn.Module):
    """
    Drop paths (Stochastic Depth) per sample  (when applied in main path of residual blocks).
    """
    def __init__(self, drop_prob=None):
        super(DropPath, self).__init__()
        self.drop_prob = drop_prob

    def forward(self, x):
        return drop_path(x, self.drop_prob, self.training)
PatchEmbed模块
PatchEmbed是ViT模型的第一个模块,它的作用是将二维图像数据转换为一维序列数据,并进行特征提取和正则化。
Patch Embedding,即将2D图像划分为固定大小、不重叠的patch,,并把每个patch中的像素视为一个向量进行处理。这里对每个patch进行嵌入向量映射的方法是使用一个2D卷积层(nn.Conv2d)对patch进行卷积处理,然后将卷积结果展平成一维向量,进一步转置(transpose)成尺寸为(batch_size, num_patches, embedding_size)的输出序列。这个序列中的每个元素就是一个patch的嵌入向量。
这个序列的长度是设定的num_patches,即输入图像的面积除以patch面积。注意到这里的标准化操作使用了一个可选参数norm_layer,如果传入了一个标准化层,就会使用它来对嵌入向量进行标准化;否则就使用一个恒等映射层对嵌入向量保持不变。
img_size: 输入图像的大小(高度、宽度,均为整数)。默认值为224。patch_size:patch的大小(高度、宽度,均为整数)。默认值为16。
in_c: 输入图像的通道数(整数)。默认值为3。
embed_dim:patch嵌入后的维度(整数)。默认值为768。
norm_layer:可选参数,对嵌入向量进行标准化的层(标准化层或恒等映射层)。默认值为None,代表不进行标准化处理。
class PatchEmbed(nn.Module):
    """
    2D Image to Patch Embedding
    """
    def __init__(self, img_size=224, patch_size=16, in_c=3, embed_dim=768, norm_layer=None):
        super().__init__()
        img_size = (img_size, img_size)
        patch_size = (patch_size, patch_size)
        self.img_size = img_size
        self.patch_size = patch_size
        self.grid_size = (img_size[0] // patch_size[0], img_size[1] // patch_size[1])
        self.num_patches = self.grid_size[0] * self.grid_size[1]

        self.proj = nn.Conv2d(in_c, embed_dim, kernel_size=patch_size, stride=patch_size)
        self.norm = norm_layer(embed_dim) if norm_layer else nn.Identity()

    def forward(self, x):
        B, C, H, W = x.shape
        assert H == self.img_size[0] and W == self.img_size[1], \
            f"Input image size ({H}*{W}) doesn't match model ({self.img_size[0]}*{self.img_size[1]})."

        # flatten: [B, C, H, W] -> [B, C, HW]
        # transpose: [B, C, HW] -> [B, HW, C]
        x = self.proj(x).flatten(2).transpose(1, 2)
        x = self.norm(x)
        return x
Attention模块
class Attention(nn.Module):
    def __init__(self,
                 dim,   # 输入token的dim
                 num_heads=8,
                 qkv_bias=False,
                 qk_scale=None,
                 attn_drop_ratio=0.,
                 proj_drop_ratio=0.):
        super(Attention, self).__init__()
        self.num_heads = num_heads
        head_dim = dim // num_heads
        self.scale = qk_scale or head_dim ** -0.5
        self.qkv = nn.Linear(dim, dim * 3, bias=qkv_bias)
        self.attn_drop = nn.Dropout(attn_drop_ratio)
        self.proj = nn.Linear(dim, dim)
        self.proj_drop = nn.Dropout(proj_drop_ratio)

    def forward(self, x):
        # [batch_size, num_patches + 1, total_embed_dim]
        B, N, C = x.shape

        # qkv(): -> [batch_size, num_patches + 1, 3 * total_embed_dim]
        # reshape: -> [batch_size, num_patches + 1, 3, num_heads, embed_dim_per_head]
        # permute: -> [3, batch_size, num_heads, num_patches + 1, embed_dim_per_head]
        qkv = self.qkv(x).reshape(B, N, 3, self.num_heads, C // self.num_heads).permute(2, 0, 3, 1, 4)
        # [batch_size, num_heads, num_patches + 1, embed_dim_per_head]
        q, k, v = qkv[0], qkv[1], qkv[2]  # make torchscript happy (cannot use tensor as tuple)

        # transpose: -> [batch_size, num_heads, embed_dim_per_head, num_patches + 1]
        # @: multiply -> [batch_size, num_heads, num_patches + 1, num_patches + 1]
        attn = (q @ k.transpose(-2, -1)) * self.scale
        attn = attn.softmax(dim=-1)
        attn = self.attn_drop(attn)

        # @: multiply -> [batch_size, num_heads, num_patches + 1, embed_dim_per_head]
        # transpose: -> [batch_size, num_patches + 1, num_heads, embed_dim_per_head]
        # reshape: -> [batch_size, num_patches + 1, total_embed_dim]
        x = (attn @ v).transpose(1, 2).reshape(B, N, C)
        x = self.proj(x)
        x = self.proj_drop(x)
        return x
MLP
这段代码实现了ViT中MLP(多层感知机)的结构,用于处理每个位置的特征向量。
具体来说,这个MLP包含两个线性层(self.fc1和self.fc2)和一个激活函数(self.act),中间可能使用了Dropout层(self.drop)进行正则化。输入的特征向量通过线性层和激活函数得到一个隐藏特征向量,再通过第二个线性层得到最终的输出向量。
通常在每个位置的向量表示中使用,以提取和处理位置特有的特征。
class Mlp(nn.Module):
    """
    MLP as used in Vision Transformer, MLP-Mixer and related networks
    """
    def __init__(self, in_features, hidden_features=None, out_features=None, act_layer=nn.GELU, drop=0.):
        super().__init__()
        out_features = out_features or in_features
        hidden_features = hidden_features or in_features
        self.fc1 = nn.Linear(in_features, hidden_features)
        self.act = act_layer()
        self.fc2 = nn.Linear(hidden_features, out_features)
        self.drop = nn.Dropout(drop)

    def forward(self, x):
        x = self.fc1(x)
        x = self.act(x)
        x = self.drop(x)
        x = self.fc2(x)
        x = self.drop(x)
        return x
Block
了ViT(Vision Transformer)中的一个Block模块,包括自注意力机制和多层感知机(MLP)。
具体来说,对于输入特征 x,先对其进行 Layer Normalization,并输入自注意力机制(Attention)中,得到自注意力输出 attn_out;接着,将输入 x 加上带随机剪枝比例的 Dropout 的 attn_out,即 x + DropPath(attn_out),得到加强后的向量表示;
然后,再次进行 Layer Normalization,将加强后的向量表示输入到多层感知机(MLP)中,得到处理后的向量,再经过带随机剪枝比例的 Dropout,即 output + DropPath(output),返回最终的表示结果。
其中,可以通过传入不同的参数(dim, num_heads, mlp_ratio, drop_ratio, attn_drop_ratio, drop_path_ratio, act_layer, norm_layer)来控制模块的维度、头数、MLP隐层系数、Dropout比例等。整个模块的结构与 Transformer 的 Block 类似,但使用了 Drop Path(随机剪枝)技术,以便更好地防止过拟合。
class Block(nn.Module):
    def __init__(self,
                 dim,
                 num_heads,
                 mlp_ratio=4.,
                 qkv_bias=False,
                 qk_scale=None,
                 drop_ratio=0.,
                 attn_drop_ratio=0.,
                 drop_path_ratio=0.,
                 act_layer=nn.GELU,
                 norm_layer=nn.LayerNorm):
        super(Block, self).__init__()
        self.norm1 = norm_layer(dim)
        self.attn = Attention(dim, num_heads=num_heads, qkv_bias=qkv_bias, qk_scale=qk_scale,
                              attn_drop_ratio=attn_drop_ratio, proj_drop_ratio=drop_ratio)
        # NOTE: drop path for stochastic depth, we shall see if this is better than dropout here
        self.drop_path = DropPath(drop_path_ratio) if drop_path_ratio > 0. else nn.Identity()
        self.norm2 = norm_layer(dim)
        mlp_hidden_dim = int(dim * mlp_ratio)
        self.mlp = Mlp(in_features=dim, hidden_features=mlp_hidden_dim, act_layer=act_layer, drop=drop_ratio)

    def forward(self, x):
        x = x + self.drop_path(self.attn(self.norm1(x)))
        x = x + self.drop_path(self.mlp(self.norm2(x)))
        return x
VisionTransformer结构
class VisionTransformer(nn.Module):
    def __init__(self, img_size=224, patch_size=16, in_c=3, num_classes=1000,
                 embed_dim=768, depth=12, num_heads=12, mlp_ratio=4.0, qkv_bias=True,
                 qk_scale=None, representation_size=None, distilled=False, drop_ratio=0.,
                 attn_drop_ratio=0., drop_path_ratio=0., embed_layer=PatchEmbed, norm_layer=None,
                 act_layer=None):
        """
        Args:
            img_size (int, tuple): input image size
            patch_size (int, tuple): patch size
            in_c (int): number of input channels
            num_classes (int): number of classes for classification head
            embed_dim (int): embedding dimension
            depth (int): depth of transformer
            num_heads (int): number of attention heads
            mlp_ratio (int): ratio of mlp hidden dim to embedding dim
            qkv_bias (bool): enable bias for qkv if True
            qk_scale (float): override default qk scale of head_dim ** -0.5 if set
            representation_size (Optional[int]): enable and set representation layer (pre-logits) to this value if set
            distilled (bool): model includes a distillation token and head as in DeiT models
            drop_ratio (float): dropout rate
            attn_drop_ratio (float): attention dropout rate
            drop_path_ratio (float): stochastic depth rate
            embed_layer (nn.Module): patch embedding layer
            norm_layer: (nn.Module): normalization layer
        """
        super(VisionTransformer, self).__init__()
        self.num_classes = num_classes
        self.num_features = self.embed_dim = embed_dim  # num_features for consistency with other models
        self.num_tokens = 2 if distilled else 1
        norm_layer = norm_layer or partial(nn.LayerNorm, eps=1e-6)
        act_layer = act_layer or nn.GELU

        self.patch_embed = embed_layer(img_size=img_size, patch_size=patch_size, in_c=in_c, embed_dim=embed_dim)
        num_patches = self.patch_embed.num_patches

        self.cls_token = nn.Parameter(torch.zeros(1, 1, embed_dim))
        self.dist_token = nn.Parameter(torch.zeros(1, 1, embed_dim)) if distilled else None
        self.pos_embed = nn.Parameter(torch.zeros(1, num_patches + self.num_tokens, embed_dim))
        self.pos_drop = nn.Dropout(p=drop_ratio)

        dpr = [x.item() for x in torch.linspace(0, drop_path_ratio, depth)]  # stochastic depth decay rule
        self.blocks = nn.Sequential(*[
            Block(dim=embed_dim, num_heads=num_heads, mlp_ratio=mlp_ratio, qkv_bias=qkv_bias, qk_scale=qk_scale,
                  drop_ratio=drop_ratio, attn_drop_ratio=attn_drop_ratio, drop_path_ratio=dpr[i],
                  norm_layer=norm_layer, act_layer=act_layer)
            for i in range(depth)
        ])
        self.norm = norm_layer(embed_dim)

        # Representation layer
        if representation_size and not distilled:
            self.has_logits = True
            self.num_features = representation_size
            self.pre_logits = nn.Sequential(OrderedDict([
                ("fc", nn.Linear(embed_dim, representation_size)),
                ("act", nn.Tanh())
            ]))
        else:
            self.has_logits = False
            self.pre_logits = nn.Identity()

        # Classifier head(s)
        self.head = nn.Linear(self.num_features, num_classes) if num_classes > 0 else nn.Identity()
        self.head_dist = None
        if distilled:
            self.head_dist = nn.Linear(self.embed_dim, self.num_classes) if num_classes > 0 else nn.Identity()

        # Weight init
        nn.init.trunc_normal_(self.pos_embed, std=0.02)
        if self.dist_token is not None:
            nn.init.trunc_normal_(self.dist_token, std=0.02)

        nn.init.trunc_normal_(self.cls_token, std=0.02)
        self.apply(_init_vit_weights)

    def forward_features(self, x):
        # [B, C, H, W] -> [B, num_patches, embed_dim]
        x = self.patch_embed(x)  # [B, 196, 768]
        # [1, 1, 768] -> [B, 1, 768]
        cls_token = self.cls_token.expand(x.shape[0], -1, -1)
        if self.dist_token is None:
            x = torch.cat((cls_token, x), dim=1)  # [B, 197, 768]
        else:
            x = torch.cat((cls_token, self.dist_token.expand(x.shape[0], -1, -1), x), dim=1)

        x = self.pos_drop(x + self.pos_embed)
        x = self.blocks(x)
        x = self.norm(x)
        if self.dist_token is None:
            return self.pre_logits(x[:, 0])
        else:
            return x[:, 0], x[:, 1]

    def forward(self, x):
        x = self.forward_features(x)
        if self.head_dist is not None:
            x, x_dist = self.head(x[0]), self.head_dist(x[1])
            if self.training and not torch.jit.is_scripting():
                # during inference, return the average of both classifier predictions
                return x, x_dist
            else:
                return (x + x_dist) / 2
        else:
            x = self.head(x)
        return x
模型定义
定义一个模型
device = torch.device("cuda:0" if torch.cuda.is_available() else "cpu")
def vit_cat_vs_dog(num_classes: int = 2):

    model = VisionTransformer(img_size=224,
                              patch_size=16,
                              embed_dim=192,  # 原 768
                              depth=3,      # block 深度  原来12
                              num_heads=4,  # 原来 12
                              representation_size=None,
                              num_classes=num_classes)
    return model
model = vit_cat_vs_dog().to(device)
训练
loss_f = torch.nn.CrossEntropyLoss()
optimizer = torch.optim.Adam(model.parameters(),lr=.00001)

epoch_n = 10
time_open = time.time()

for epoch in range(epoch_n):
    print("Epoch{}/{}".format(epoch,epoch_n-1))
    print("-"*10)

    for phase in ["train","valid"]:
        if phase == "train":
            print("Training...")
            model.train(True)
        else:
            print("Validing...")
            model.train(False)

        running_loss = .0
        running_corrects = 0

        for batch,data in enumerate(dataloader[phase],1):
            x,y=data

#             if Use_gpu:
#                 x,y = Variable(x.cuda()),Variable(y.cuda())
#             else:
#                 x,y = Variable(X),Variable(y)
            x,y = Variable(x.to(device)),Variable(y.to(device))
            # print(x.shape)
            y_pred = model(x)

            _,pred = torch.max(y_pred.data,1)

            optimizer.zero_grad()

            loss = loss_f(y_pred,y)

            if phase == "train":
                loss.backward()
                optimizer.step()

            running_loss += loss.data.item()
            running_corrects += torch.sum(pred==y.data)

            if batch%500 == 0 and phase == "train":
                print("Batch{},Train Loss:{:.4f},Train ACC:{:.4f}".format(batch,running_loss/batch,100*running_corrects/(16*batch)))

        epoch_loss = running_loss*16/len(image_datasets[phase])
        epoch_acc = 100*running_corrects/len(image_datasets[phase])

        print("{} Loss:{:.4f} Acc:{:.4f}%".format(phase,epoch_loss,epoch_acc))

time_end = time.time() - time_open
print(time_end)
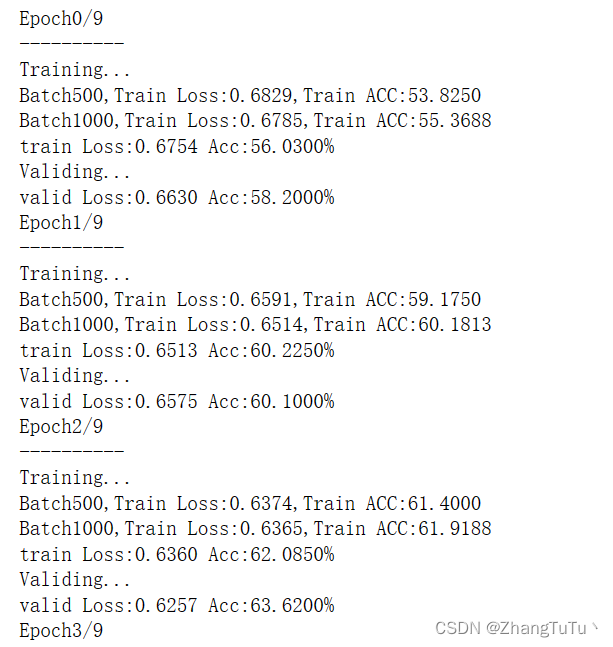
训练日志


![后缀数组的应用:[Leetcode] 321.拼接最大数(困难)](https://img-blog.csdnimg.cn/c40fb687fe394dfa852ad41781d17b11.png)