2022年11月,ns3官网发布了3.37版本,与3.36一样,运行、编译、配置的时候使用的都是ns3.37/ns3 这个脚本,但3.35以及3.35以前的版本使用的都是ns3.35/waf脚本,相应的3.35以及以前的版本与3.36以后的版本,新生成模块的流程也有了一些细微的变化

以下是3.37新生成模块的流程:
使用ns3的时候,我们需要调用很多模块,比如对wifi的简单功能进行仿真时,我们就用到了mobility、PointToPoint、csma、wifimac、wifiphty等等这些模块,那么当我需要仿真使用一个常用但ns3里面没有的模块的时候,我就需要新生成一个模块,或者把其他人写好的模块移植到当前环境——那么如果ns3版本不同的话,我们还是需要一些类似于新生成ns3模块的操作。https://blog.csdn.net/Mr_liu_666/article/details/128054390本文主要介绍3.35以及以前的版本,如何生成一个新的模块:
第一步 模块布局
除了Cmakefile.txt变成了wcscript以外,与3.37("3.36以及以后的版本" 与 "3.37"在本文中是同一个意思,都指的是3.37版本,也就是上面链接里面的版本)一致。
第二步 创建模块框架
也是用create-module.py来创建框架,与3.37一致
./utils/create-module.py new-module关于依赖库的指定。wscript和Cmakefile.txt有所不同(图是我自己博客粘贴过来的),以下是Cmakelist.txt(也就是3.36以及后面版本的写法):
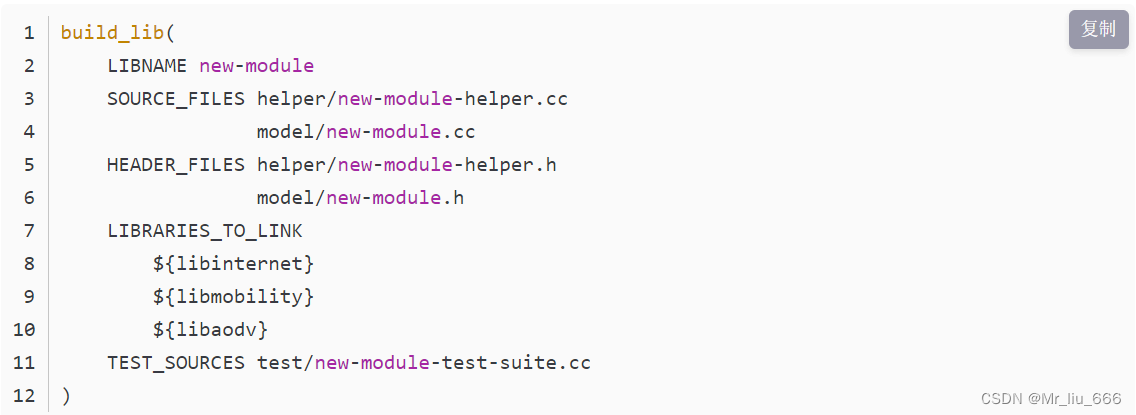
以下是3.35以及之前版本指定依赖的写法,新模块名字叫new-module,只依赖于core模块:
def build(bld):
	module = bld.create_ns3_module('new-module', ['core'])
如果新模块名字叫new-module,依赖于internet, mobility和aodv模块:
def build(bld):
	module = bld.create_ns3_module('new-module', ['internet', 'mobility', 'aodv'])
与3.37一致,internet等模块依赖于core,所以不用层叠调用core了。
第三步 声明源文件
与3.37一致,wscript也是声明源文件、头文件和test文件,以spectrum为例:
def build(bld):
    module = bld.create_ns3_module('spectrum', ['internet', 'propagation', 'antenna','applications'])
    module.source = [
        'model/spectrum-model.cc',
        'model/spectrum-value.cc',
            .
            .
            .
        'model/microwave-oven-spectrum-value-helper.cc',
        'helper/spectrum-helper.cc',
        'helper/adhoc-aloha-noack-ideal-phy-helper.cc',
        'helper/waveform-generator-helper.cc',
        'helper/spectrum-analyzer-helper.cc',
]
也是指定cc文件,不同的是,wscript把library 的指定和cc的列表放到了一起而Cmakelist.txt是单独列出了一个LIBRARIES_TO_LINK。
第四步 声明公共头文件
与3.37一致,公共头文件也是需要在wscript里面指定的,依然以spectrum为例:
headers = bld(features='ns3header')
headers.module = 'spectrum'
headers.source = [
    'model/spectrum-model.h',
    'model/spectrum-value.h',
        .
        .
        .
    'model/microwave-oven-spectrum-value-helper.h',
    'helper/spectrum-helper.h',
    'helper/adhoc-aloha-noack-ideal-phy-helper.h',
    'helper/waveform-generator-helper.h',
    'helper/spectrum-analyzer-helper.h',
]
不同的是,wscript需要通过headers = bld(features='ns3header')告诉waf哪些.h文件是公共的,可以大家直接#include "ns3/spectrum-model.h"调用的,而Cmakelist.txt不需要单独说明,只要放到Cmakelist.txt头文件列表里面,就可以#include "ns3/new-module.h"来调用了。
 第五步 声明Test
与3.37一致,指定test源文件即可,依旧以spectrum为例:
module_test = bld.create_ns3_module_test_library('spectrum')
module_test.source = [
    'test/spectrum-interference-test.cc',
    'test/spectrum-value-test.cc',
]
加了test之后可以用test.py --list查找到(由于我当前的环境是3.37,这里就贴3.37的图了),

也可以用test.py执行测试:

第六步 声明example
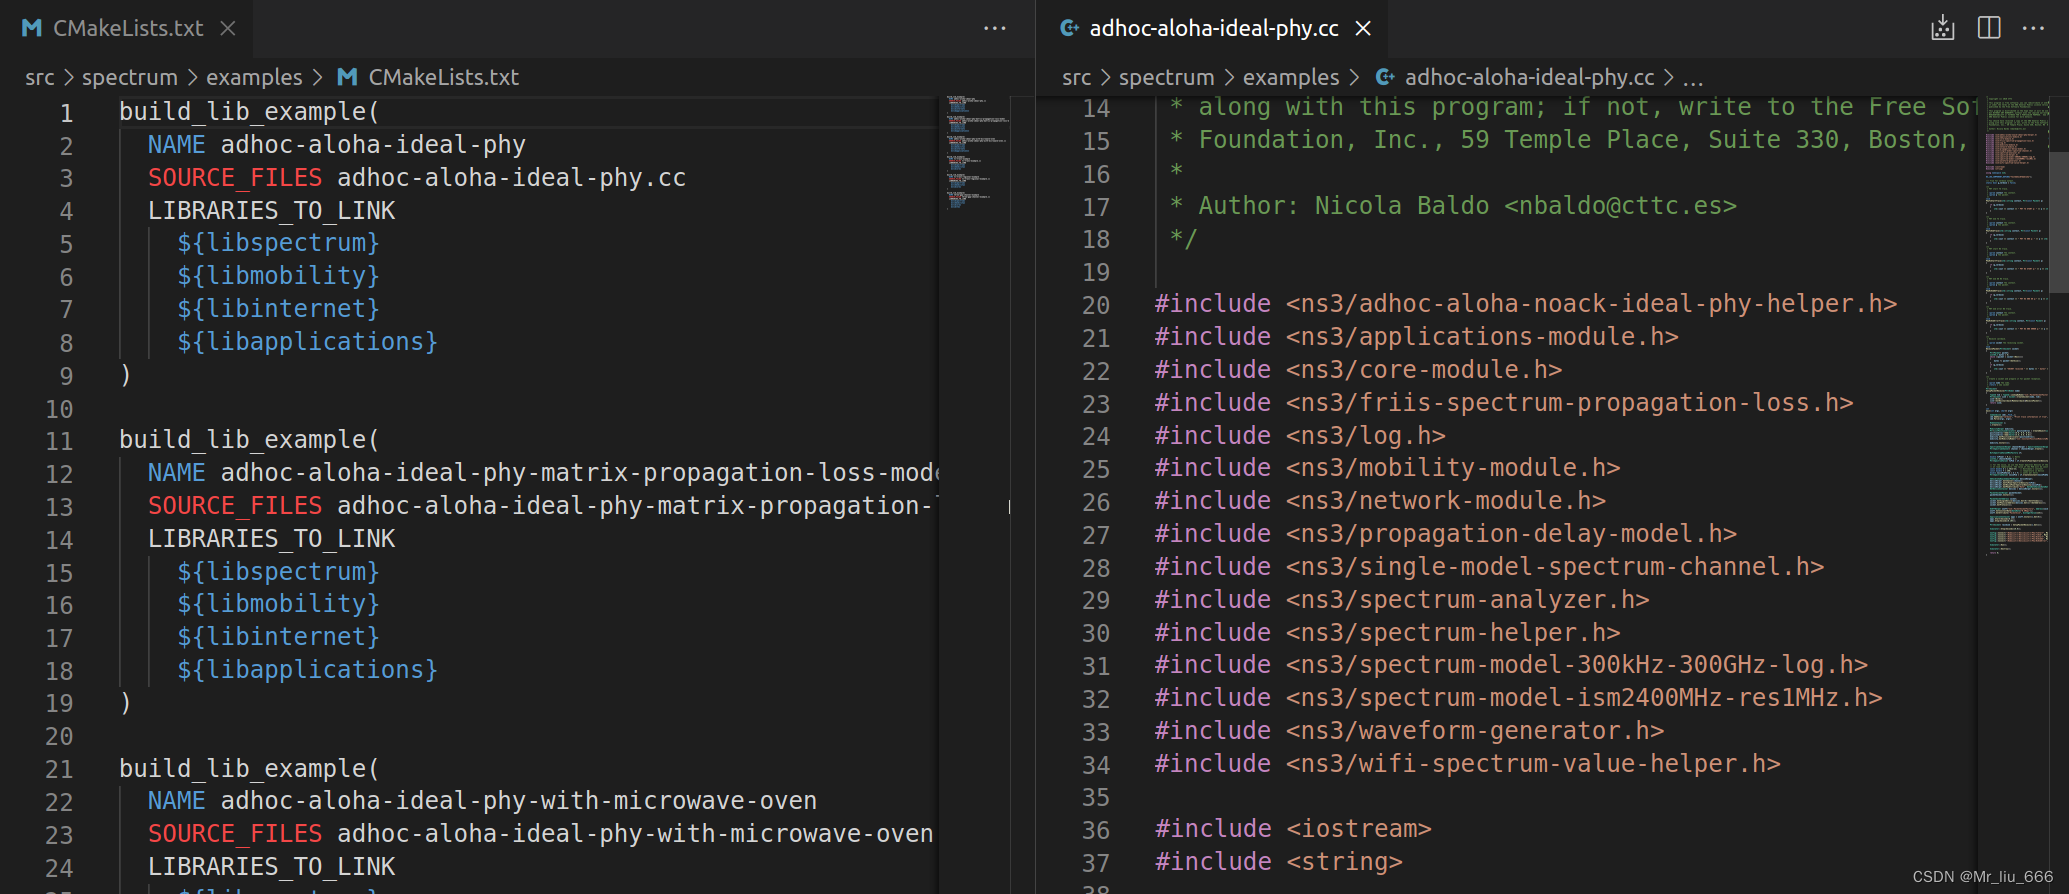
与3.37类似,example也需要在example/wscript(example/Cmakelist.txt)里面指定,也是指定example名字、链接库、源码列表,只不过格式稍微有些区别,以下代码是3.35的:
def build(bld):
    obj = bld.create_ns3_program('adhoc-aloha-ideal-phy',
                                 ['spectrum', 'mobility'])
    obj.source = 'adhoc-aloha-ideal-phy.cc'
下图是3.37的。
第七步 将example 作为 test执行
这一步3.35和3.37没有区别。需要在test的examples-to-run.py里面添加需要测试的example的源码文件名,依然以spectrum为例:
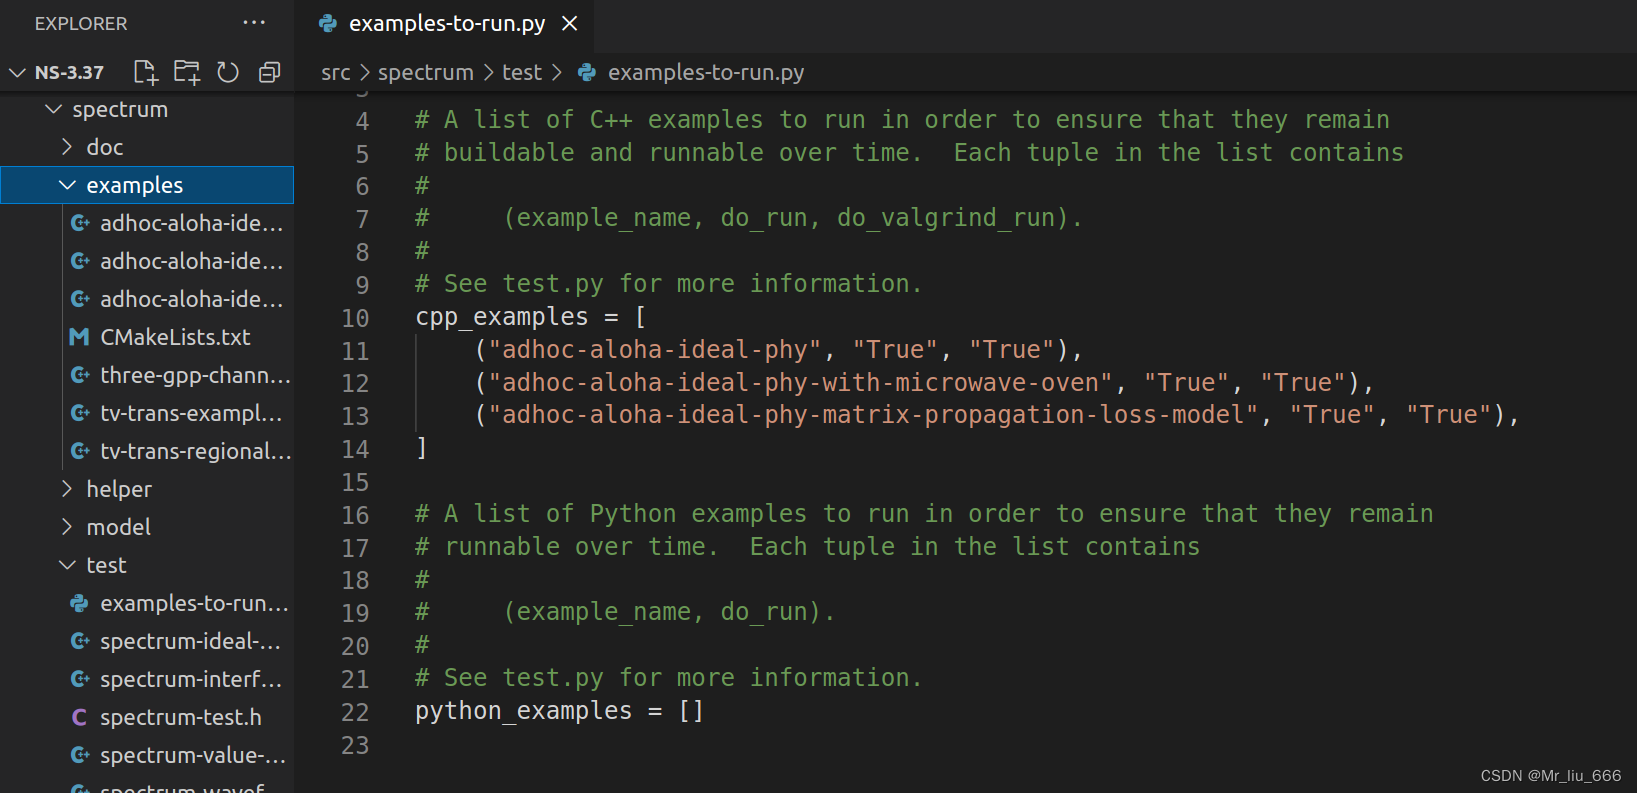
example_name是要运行的可执行文件
do_run是运行示例的条件
do_valgrind_run是在valgrind下运行示例的条件。
第八步 configure 和 build
新生成的wscript需要经过waf configure之后才能被读取、生成相应Makefile。有了Makefile之后运行waf biuld就可以把心添加的模块编译了。如果configure 的时候使能了test,那么test.py --list就可以看到新模块了,如果configure使能了example,那么waf --run 就能直接运行声明的example了。
3.37与3.35唯一的区别就是waf脚本现在叫ns3了。
第九步 添加Python Bindings
如果想用python的方式调用,就需要这个了,由于我使用c++,以上内容就够了


![面向OLAP的列式存储DBMS-13-[ClickHouse]的MergeTree表引擎原理解析](https://img-blog.csdnimg.cn/2b8d79bab17f4768b1eb4952576a4a2c.png)

