1. 下载安装mongoDB
首先我们需要在三台服务器上分别下载和安装mongoDB。
1.1. 打开服务器,创建目录
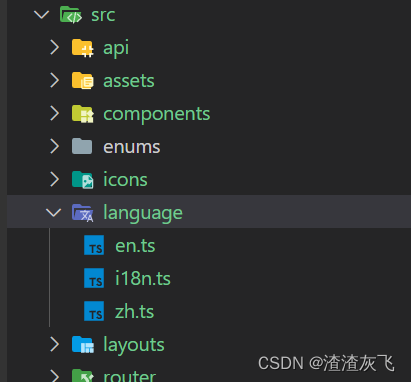
创建目录结构如下图所示:(日志文件会自动创建)

1.2. 下载mongoDB压缩包
把压缩包下载到指定目录(便于后期维护管理),然后解压。

相关命令参考菜鸟教程
wget https://fastdl.mongodb.org/linux/mongodb-linux-x86_64-ubuntu1604-4.2.8.tgz    # 下载
tar -zxvf mongodb-linux-x86_64-ubuntu1604-4.2.8.tgz                                    # 解压

mv mongodb-src-r4.2.8  /usr/local/mongodb4                          # 将解压包拷贝到指定目录
1.3. 配置文件
把配置文件下载到指定目录(便于后期维护管理)。

配置文件内容如下:
systemLog:
    #MongoDB发送所有日志输出的目标指定为文件
    destination: file
    #mongod或mongos应向其发送所有诊断日志记录信息的日志文件的路径
    path: "/root/mongoDB/myrs_27017/log/mongod.log"
    #当mongos或mongod实例重新启动时,mongos或mongod会将新条目附加到现有日志文件的末尾。
    logAppend: true
storage:
    #mongod实例存储其数据的目录。storage.dbPath设置仅适用于mongod。
    dbPath: "/root/mongoDB/myrs_27017/data/db"
    journal:
        #启用或禁用持久性日志以确保数据文件保持有效和可恢复。
        enabled: true
processManagement:
    #启用在后台运行mongos或mongod进程的守护进程模式。
    fork: true
    #指定用于保存mongos或mongod进程的进程ID的文件位置,其中mongos或mongod将写入其PID
    pidFilePath: "/root/mongoDB/myrs_27017/log/mongod.pid"
net:
    #服务实例绑定所有IP,有副作用,副本集初始化的时候,节点名字会自动设置为本地域名,而不是ip
    #bindIpAll: true
    #服务实例绑定的IP
    # 0.0.0.0 表示所有ip都能访问
    bindIp: 0.0.0.0
    #绑定的端口
    port: 27017
replication:
    #副本集的名称
    replSetName: myrs
其他配置信息可参考官方文档。
2. 开启服务器端口和安全组
Centos7开放及查看端口
(PS:别忘了开安全组(有的云服务器运营商中也称之为防火墙)中的端口)
3. 启动mongoDB并且进行连接
3.1. 根据配置文件,启动三个mongoDB
如下图所示,分别进入三个服务器的
/root/mongoDB/mongodb-linux-x86_64-4.0.10/bin
目录,然后执行
./mongod -f /root/mongoDB/myrs_27017/mongod.conf

(上述mongodb-linux-x86_64-4.0.10为文件名,自行修改)
3.2. 进入mongoDB,将三个数据库进行绑定
任意进入一个服务器,执行(0.0.0.0替换为自己服务器的外网ip,该ip可以是其他服务器的,不过这里推荐使用当前服务器的外网ip)
./mongo --host=0.0.0.0 --port=27017
3.2.1. 初始化新的副本集
rs.initiate()

1)“ok”的值为1,说明创建成功。
2)命令行提示符发生变化,变成了一个从节点角色,此时默认不能读写。稍等片刻,回车,变成主节点。
3.2.2. 查看副本集的配置内容
说明:
返回包含当前副本集配置的文档。
rs.conf()
myrs:PRIMARY> rs.conf()
{
        "_id" : "myrs",
        "version" : 1,
        "protocolVersion" : NumberLong(1),
        "writeConcernMajorityJournalDefault" : true,
        "members" : [
                {
                        "_id" : 0,
                        "host" : "VM-4-16-centos:27017",
                        "arbiterOnly" : false,
                        "buildIndexes" : true,
                        "hidden" : false,
                        "priority" : 1,
                        "tags" : {

                        },
                        "slaveDelay" : NumberLong(0),
                        "votes" : 1
                }
        ],
        "settings" : {
                "chainingAllowed" : true,
                "heartbeatIntervalMillis" : 2000,
                "heartbeatTimeoutSecs" : 10,
                "electionTimeoutMillis" : 10000,
                "catchUpTimeoutMillis" : -1,
                "catchUpTakeoverDelayMillis" : 30000,
                "getLastErrorModes" : {

                },
                "getLastErrorDefaults" : {
                        "w" : 1,
                        "wtimeout" : 0
                },
                "replicaSetId" : ObjectId("64362b90f9a5fe8e25868131")
        }
}
说明:
1) "_id" : "myrs" :副本集的配置数据存储的主键值,默认就是副本集的名字
2) "members" :副本集成员数组,此时只有一个: "host" : "180.76.159.126:27017" ,
该成员不是仲裁节点:"arbiterOnly" : false,
优先级(权重值):"priority" : 1,
3) "settings" :副本集的参数配置。
提示:副本集配置的查看命令,本质是查询的是system.replset的表中的数据:
myrs:PRIMARY> use local
switched to db local
myrs:PRIMARY> show collections
oplog.rs
replset.election
replset.minvalid
replset.oplogTruncateAfterPoint
startup_log
system.replset
system.rollback.id
myrs:PRIMARY> db.system.replset.find()
{ "_id" : "myrs", "version" : 1, "protocolVersion" : NumberLong(1), "writeConcernMajorityJournalDefault" : true, "members" : [ { "_id" : 0, "host" : "180.76.159.126:27017", "arbiterOnly" : false, "buildIndexes" : true, "hidden" : false, "priority" : 1, "tags" : { }, "slaveDelay" : NumberLong(0), "votes" : 1 } ], "settings" : { "chainingAllowed" : true, "heartbeatIntervalMillis" : 2000, "heartbeatTimeoutSecs" : 10, "electionTimeoutMillis" : 10000, "catchUpTimeoutMillis" : -1, "catchUpTakeoverDelayMillis" : 30000, "getLastErrorModes" : { }, "getLastErrorDefaults" : { "w" : 1, "wtimeout" : 0 }, "replicaSetId" : ObjectId("5d539bdcd6a308e600d126bb") } }
myrs:PRIMARY>
3.2.3. 查看副本集状态
说明:
返回包含状态信息的文档。此输出使用从副本集的其他成员发送的心跳包中获得的数据反映副本集的当前状态。
rs.status()
myrs:PRIMARY> rs.status()
{
        "set" : "myrs",
        "date" : ISODate("2023-04-12T03:55:20.107Z"),
        "myState" : 1,
        "term" : NumberLong(1),
        "syncingTo" : "",
        "syncSourceHost" : "",
        "syncSourceId" : -1,
        "heartbeatIntervalMillis" : NumberLong(2000),
        "optimes" : {
                "lastCommittedOpTime" : {
                        "ts" : Timestamp(1681271718, 1),
                        "t" : NumberLong(1)
                },
                "readConcernMajorityOpTime" : {
                        "ts" : Timestamp(1681271718, 1),
                        "t" : NumberLong(1)
                },
                "appliedOpTime" : {
                        "ts" : Timestamp(1681271718, 1),
                        "t" : NumberLong(1)
                },
                "durableOpTime" : {
                        "ts" : Timestamp(1681271718, 1),
                        "t" : NumberLong(1)
                }
        },
        "lastStableCheckpointTimestamp" : Timestamp(1681271698, 4),
        "members" : [
                {
                        "_id" : 0,
                        "name" : "VM-4-16-centos:27017",
                        "health" : 1,
                        "state" : 1,
                        "stateStr" : "PRIMARY",
                        "uptime" : 436,
                        "optime" : {
                                "ts" : Timestamp(1681271718, 1),
                                "t" : NumberLong(1)
                        },
                        "optimeDate" : ISODate("2023-04-12T03:55:18Z"),
                        "syncingTo" : "",
                        "syncSourceHost" : "",
                        "syncSourceId" : -1,
                        "infoMessage" : "could not find member to sync from",
                        "electionTime" : Timestamp(1681271696, 2),
                        "electionDate" : ISODate("2023-04-12T03:54:56Z"),
                        "configVersion" : 1,
                        "self" : true,
                        "lastHeartbeatMessage" : ""
                }
        ],
        "ok" : 1,
        "operationTime" : Timestamp(1681271718, 1),
        "$clusterTime" : {
                "clusterTime" : Timestamp(1681271718, 1),
                "signature" : {
                        "hash" : BinData(0,"AAAAAAAAAAAAAAAAAAAAAAAAAAA="),
                        "keyId" : NumberLong(0)
                }
        }
}
说明:
1)"set" : "myrs":副本集的名字
2) "myState" : 1:说明状态正常
3) "members" :副本集成员数组,此时只有一个: "name" : "180.76.159.126:27017" ,该成员的角色是 "stateStr" : "PRIMARY", 该节点是健康的: "health" : 1 。
3.2.4. 添加副本从节点
rs.add("ip:27017")
添加之后再执行rs.status()发现从节点的状态不对劲
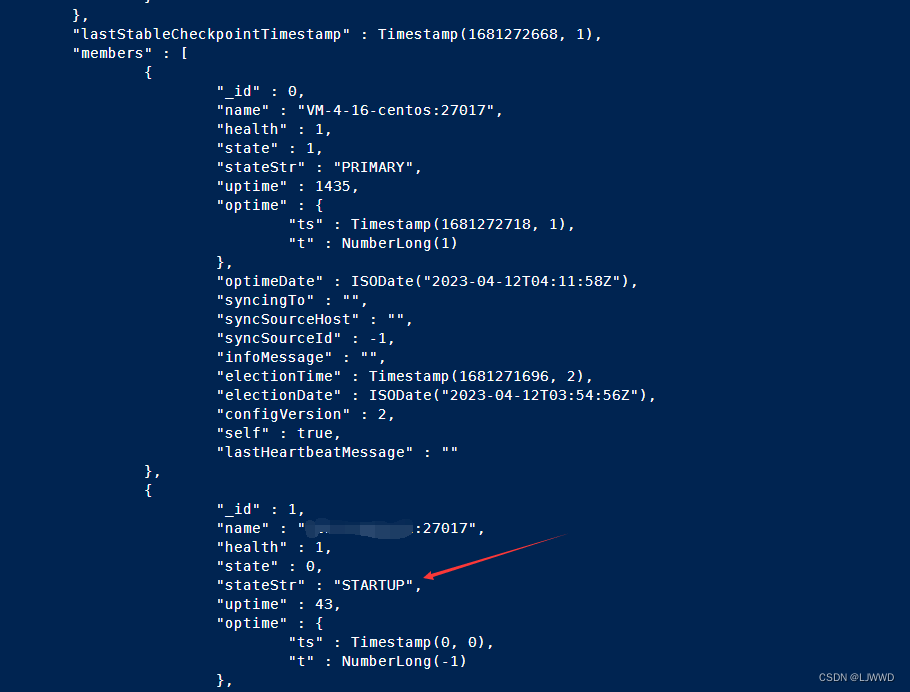
并且查看主节点所在服务器中的日志会发现,基本上每秒会产生1m错误日志。

后面发现这里的错误日志如下
2023-04-12T10:42:14.196+0800 I ASIO     [Replication] Failed to connect to VM-8-4-centos:27017 - HostUnreachable: Error connecting to VM-8-4-centos:27017 :: caused by :: Could not find address for VM-8-4-centos:27017: SocketException: Host not found (authoritative)
2023-04-12T10:42:14.196+0800 I CONNPOOL [Replication] Dropping all pooled connections to VM-8-4-centos:27017 due to HostUnreachable: Error connecting to VM-8-4-centos:27017 :: caused by :: Could not find address for VM-8-4-centos:27017: SocketException: Host not found (authoritative)
2023-04-12T10:42:14.196+0800 I REPL_HB  [replexec-2] Error in heartbeat (requestId: 96554) to VM-8-4-centos:27017, response status: HostUnreachable: Error connecting to VM-8-4-centos:27017 :: caused by :: Could not find address for VM-8-4-centos:27017: SocketException: Host not found (authoritative)
2023-04-12T10:42:14.196+0800 I ASIO     [Replication] Connecting to VM-8-4-centos:27017
2023-04-12T10:42:14.197+0800 I ASIO     [Replication] Failed to connect to VM-8-4-centos:27017 - HostUnreachable: Error connecting to VM-8-4-centos:27017 :: caused by :: Could not find address for VM-8-4-centos:27017: SocketException: Host not found (authoritative)
2023-04-12T10:42:14.197+0800 I CONNPOOL [Replication] Dropping all pooled connections to VM-8-4-centos:27017 due to HostUnreachable: Error connecting to VM-8-4-centos:27017 :: caused by :: Could not find address for VM-8-4-centos:27017: SocketException: Host not found (authoritative)
2023-04-12T10:42:14.197+0800 I REPL_HB  [replexec-1] Error in heartbeat (requestId: 96555) to VM-8-4-centos:27017, response status: HostUnreachable: Error connecting to VM-8-4-centos:27017 :: caused by :: Could not find address for VM-8-4-centos:27017: SocketException: Host not found (authoritative)
2023-04-12T10:42:14.197+0800 I ASIO     [Replication] Connecting to VM-8-4-centos:27017
2023-04-12T10:42:14.198+0800 I ASIO     [Replication] Failed to connect to VM-8-4-centos:27017 - HostUnreachable: Error connecting to VM-8-4-centos:27017 :: caused by :: Could not find address for VM-8-4-centos:27017: SocketException: Host not found (authoritative)
2023-04-12T10:42:14.198+0800 I CONNPOOL [Replication] Dropping all pooled connections to VM-8-4-centos:27017 due to HostUnreachable: Error connecting to VM-8-4-centos:27017 :: caused by :: Could not find address for VM-8-4-centos:27017: SocketException: Host not found (authoritative)
2023-04-12T10:42:14.198+0800 I REPL_HB  [replexec-2] Error in heartbeat (requestId: 96556) to VM-8-4-centos:27017, response status: HostUnreachable: Error connecting to VM-8-4-centos:27017 :: caused by :: Could not find address for VM-8-4-centos:27017: SocketException: Host not found (authoritative)
2023-04-12T10:42:14.198+0800 I ASIO     [Replication] Connecting to VM-8-4-centos:27017
这里直接每0.001秒产生四条日志。。。
通过日志可以发现,主要错误的地方是我们初始化第一个结点时,结点的host不对劲,导致连接失败。
因此以此执行下列命令,修改一下第一个结点的host即可。
(ip改为自己这个服务器的外网ip)
>cfg = rs.conf()
>cfg.members[0].host = "ip:27017"
>rs.reconfig(cfg)
通过rs.conf()可查看修改前后的变化。

再执行rs.status()可发现从节点的状态正常了。

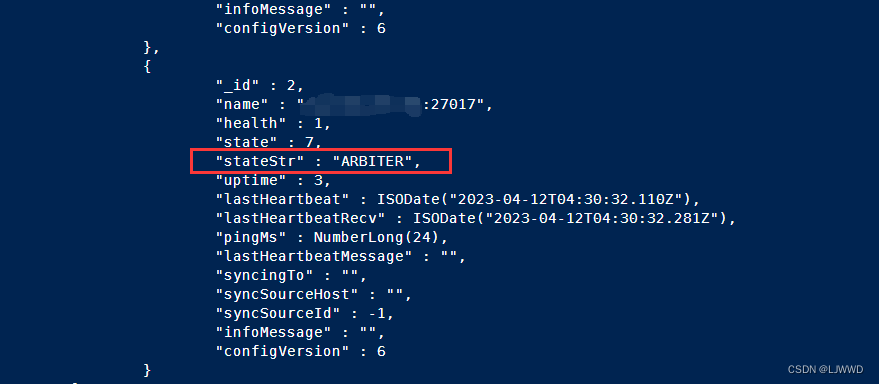
3.2.5. 添加仲裁从节点
rs.addArb("ip:27017")
执行rs.status()可发现,添加成功且状态正常。
4. 期间可能遇到的问题
4.1. 结点"name"中ip地址为内网ip,导致副本集之间连接失败。
>cfg = rs.conf()
>cfg.members[0].host = "ip:27017"
>rs.reconfig(cfg)
4.2. 强制将从节点升级为主节点
和4.1.同理,
>cfg=rs.conf()
>cfg.members=[cfg.members[0]]
>rs.reconfig(cfg, {force: true});
>rs.status()
4.3. 不小心初始化了两个主节点
将其中一个主节点的mongoDB数据库进程kill掉,然后删掉db和log文件夹下的文件,再重新执行上述流程。








![[2022 SP] Copy, Right? 深度学习模型版权保护的测试框架](https://img-blog.csdnimg.cn/img_convert/a92d3cb1785a4762013b2227dda689ed.gif)