color ui——组件使用
组件类型
-
ColorUI
-
Vant webapp
ColorUI
下载地址 Git地址 官网地址
简介
ColorUI是一个css库!!!在你引入样式后可以根据class来调用组件,一些含有交互的操作我也有简单写,可以为你开发提供一些思路。
可控性很强,如果不满意,可以按照自己的需求更改。该组件库本身就是一个小程序,我们在Github上下载源码之后,直接用微信开发者工具打开即可也可以使用HBuilderX运行微信开发者工具上进行浏览。

文件目录介绍
1.Jeecg-boot目录结构
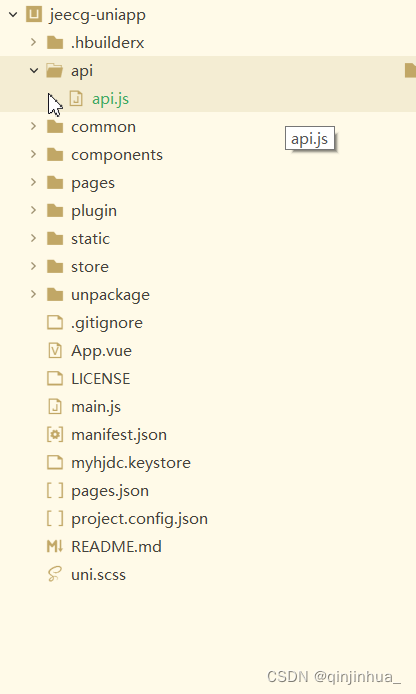
2..hbuilderx存放的是hbuilderx生成的文件目录

3.api存放的是接口地址

4.common文件目录
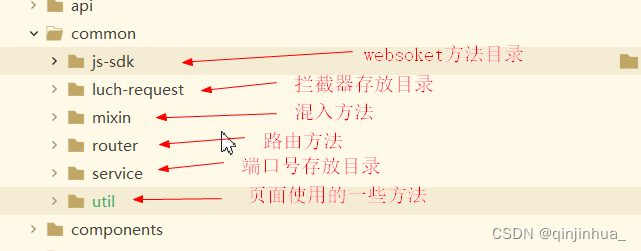
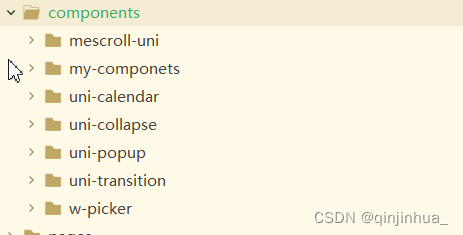
5.components组件列表 存放一些组件以及组件的CSS样式和一些js方法
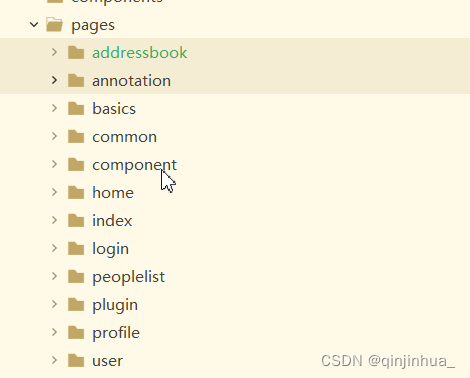
6.pages页面组件目录 每一个功能对应一个页面
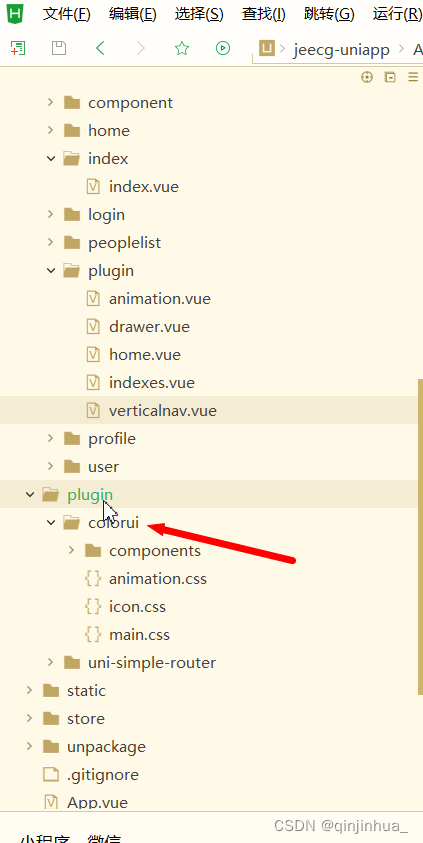
7.plugin存放的colorui的一些公用组件以及css样式

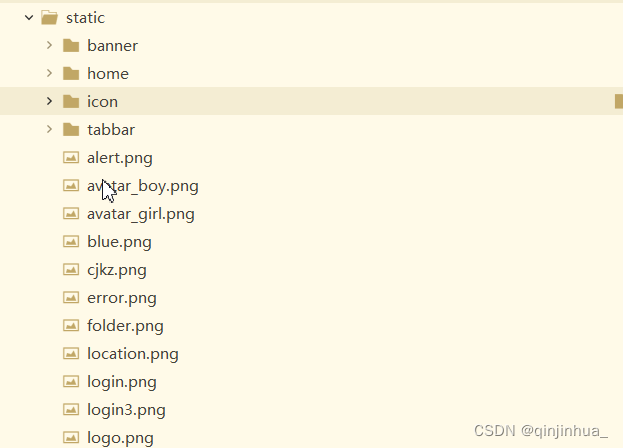
8.static存放静态资源的目录 (图片)
9.store存放vue来进行数据的统一管理

10.hbuilderx运行时候解析出来的文件

11.app.vue 存放的是公共的样式以及一些公共的js方法
app.vue中不但可以当做是网站首页,也可以写所有页面中公共需要的动画或者样式。不在上面写代码也可以。
app.vue是主组件,是页面入口文件,是vue页面资源的首加载项。所有的页面都是在app.vue中进行切换的。可以理解为所有的路由都是app.vue的子组件。
![]()
12.min.js 存放的是一些全局使用的方法以及以解全局组件页面
![]()
下载
下载Github上的组件之后,解压,复制
ColorUI-master\demo\下面的colorui文件夹到自己项目里的根目录即可或者也可以直接引用demo文件即可
样式引入
- 原生小程序样式引入
在app.wxss中引入colorui中的样式库,示例如下:
/**app.wxss**/
@import "colorui/main.wxss";
@import "colorui/icon.wxss";
@import "colorui/animation.wxss"; /** 最后这个看自己需求,如果需要使用微动画则可以引入**/- 存放color-ui的目录
- uniapp样式引入
/**
* 这里只引入了demo下的colorui
*/
@import "plugin/colorui/main.css";
@import "plugin/colorui/icon.css";
@import "plugin/colorui/animation.css"; /** 最后这个看自己需求,如果需要使用微动画则可以引入**/
使用
- 自定义导航栏的使用
colorui给我们提供了自定义的导航栏,需要在uniapp项目中做全局引入,使用步骤如下:
- 原生wx小程序全局引入
- 在
app.js获取系统信息(确定合适的导航栏高度)
- 在
wx.getSystemInfo({
	success: e => {
    	this.globalData.StatusBar = e.statusBarHeight;
        let capsule = wx.getMenuButtonBoundingClientRect();
        if (capsule) {
          this.globalData.Custom = capsule;
          this.globalData.CustomBar = capsule.bottom + capsule.top - e.statusBarHeight;
        } else {
          this.globalData.CustomBar = e.statusBarHeight + 50;
        }
      }
})- 在app.json中关闭默认导航栏样式和引入自定义导航栏
  "window": {
  "navigationBarBackgroundColor": "#39b54a",
  "navigationBarTitleText": "Color UI",
  "navigationStyle": "custom", //1 取消
  "navigationBarTextStyle": "white"
 },

  "usingComponents": { //2 引入
    "cu-custom":"/colorui/components/cu-custom"
},- 在页面中使用
// page.html
<cu-custom bgColor="bg-gradual-pink" isBack="{{true}}">
	<view slot="backText">返回</view>
	<view slot="content">导航栏</view>
</cu-custom>- 效果展示

- uniapp全局引入组件
import cuCustom from './plugin/colorui/components/cu-custom.vue'
Vue.component('cu-custom',cuCustom)- 页面使用
<cu-custom bgColor="bg-gradual-pink" :isBack="true">
    <view slot="backText">返回</view>
	<view slot="content">导航栏</view>
</cu-custom>- 效果展示

color ui——导航组件属性以及参数
| cu-custom 参数 | 作用 | 类型 | 默认 |
|---|---|---|---|
| bgColor | 背景颜色类名 | String | 空值 ‘’ |
| isCustom | 是否开启左侧 (箭头+房子图标) | Boolean | false |
| isBack | 是否开启左侧(箭头+backText) | Boolean | false |
| bgImage | 背景图片路径 | String | 空值 ‘’ |
| slot属性的值 | 作用 |
|---|---|
| backText | 返回时的文字 |
| content | 中间区域 |
| right | 右侧区域(小程序端可使用范围很窄!) |
注意 :
isCustom 页面跳转是: /pages/index/index
isBack 页面跳转是:上一页
1.页面样式属性
注意:
页面使用参数的时候使用clss属性来定义属性值
1.1 margin外边距
| xs | sm | df | lg | xl |
|---|---|---|---|---|
| 10upx | 20upx | 30upx | 40upx | 50upx |
| 5px | 10px | 15px | 20px | 25px |
.margin-0{margin:0}
.margin-xs{margin:10upx}
.margin-sm{margin:20upx}
.margin{margin:30upx}
.margin-lg{margin:40upx}
.margin-xl{margin:50upx}
.margin-top-xs{margin-top:10upx}
.margin-top-sm{margin-top:20upx}
.margin-top{margin-top:30upx}
.margin-top-lg{margin-top:40upx}
.margin-top-xl{margin-top:50upx}
.margin-right-xs{margin-right:10upx}
.margin-right-sm{margin-right:20upx}
.margin-right{margin-right:30upx}
.margin-right-lg{margin-right:40upx}
.margin-right-xl{margin-right:50upx}
.margin-bottom-xs{margin-bottom:10upx}
.margin-bottom-sm{margin-bottom:20upx}
.margin-bottom{margin-bottom:30upx}
.margin-bottom-lg{margin-bottom:40upx}
.margin-bottom-xl{margin-bottom:50upx}
.margin-left-xs{margin-left:10upx}
.margin-left-sm{margin-left:20upx}
.margin-left{margin-left:30upx}
.margin-left-lg{margin-left:40upx}
.margin-left-xl{margin-left:50upx}
.margin-lr-xs{margin-left:10upx;margin-right:10upx}
.margin-lr-sm{margin-left:20upx;margin-right:20upx}
.margin-lr{margin-left:30upx;margin-right:30upx}
.margin-lr-lg{margin-left:40upx;margin-right:40upx}
.margin-lr-xl{margin-left:50upx;margin-right:50upx}
.margin-tb-xs{margin-top:10upx;margin-bottom:10upx}
.margin-tb-sm{margin-top:20upx;margin-bottom:20upx}
.margin-tb{margin-top:30upx;margin-bottom:30upx}
.margin-tb-lg{margin-top:40upx;margin-bottom:40upx}
.margin-tb-xl{margin-top:50upx;margin-bottom:50upx}
1.2padding内边距
.padding-0{padding:0}
.padding-xs{padding:10upx}
.padding-sm{padding:20upx}
.padding{padding:30upx}
.padding-lg{padding:40upx}
.padding-xl{padding:50upx}
.padding-top-xs{padding-top:10upx}
.padding-top-sm{padding-top:20upx}
.padding-top{padding-top:30upx}
.padding-top-lg{padding-top:40upx}
.padding-top-xl{padding-top:50upx}
.padding-right-xs{padding-right:10upx}
.padding-right-sm{padding-right:20upx}
.padding-right{padding-right:30upx}
.padding-right-lg{padding-right:40upx}
.padding-right-xl{padding-right:50upx}
.padding-bottom-xs{padding-bottom:10upx}
.padding-bottom-sm{padding-bottom:20upx}
.padding-bottom{padding-bottom:30upx}
.padding-bottom-lg{padding-bottom:40upx}
.padding-bottom-xl{padding-bottom:50upx}
.padding-left-xs{padding-left:10upx}
.padding-left-sm{padding-left:20upx}
.padding-left{padding-left:30upx}
.padding-left-lg{padding-left:40upx}
.padding-left-xl{padding-left:50upx}
.padding-lr-xs{padding-left:10upx;padding-right:10upx}
.padding-lr-sm{padding-left:20upx;padding-right:20upx}
.padding-lr{padding-left:30upx;padding-right:30upx}
.padding-lr-lg{padding-left:40upx;padding-right:40upx}
.padding-lr-xl{padding-left:50upx;padding-right:50upx}
.padding-tb-xs{padding-top:10upx;padding-bottom:10upx}
.padding-tb-sm{padding-top:20upx;padding-bottom:20upx}
.padding-tb{padding-top:30upx;padding-bottom:30upx}
.padding-tb-lg{padding-top:40upx;padding-bottom:40upx}
.padding-tb-xl{padding-top:50upx;padding-bottom:50upx}
2 布局
2.1 Flex布局 Flex 布局教程:语法篇
在父级元素类名中添加
flexflex-wrap之后,在子级元素类名添加以下类名即可。
| class名 | class名 | class名 |
| flex | 弹性布局(必选) | display:flex; 给父级元素添加 |
| basis-{size} | 固定布局 | flex-basis:20%; |
| flex-{num} | 比例布局 | flex:1; |
| flex-direction | 按列排列 | flex-direction:column; |
| flex-wrap | 一行排不下,换行 | flex-wrap:wrap; |
| align-{vl} | 垂直对齐(items) | align-items:flex-start; |
| self-{v} | 元素内的某个项(self) | align-self:flex-start; |
| justify-{hl} | 水平对齐 | justify-content:flex-start; |
固定布局-size (5种)
| xs | sm | df | lg | xl |
|---|---|---|---|---|
| 20% | 40% | 50% | 60% | 80% |
| 加小 | 小号 | 默认 | 大号 | 加小 |
| extra | small | default | small | extra |
比例布局-num (3种)
| sub | twice | treble |
|---|---|---|
| 1(相同宽度) | 2(两倍宽度) | 3(50%宽度) |
垂直对齐-v (5种)
| start | end | center | stretch | baseline |
|---|---|---|---|---|
| 上对齐 | 下对齐 | 中间对齐 | 两端对齐 | 第1行文字对齐 |
| flex-start | flex-end | flex-center | stretch | baseline |
水平对齐-h (5种)
| start | end | center | between | around |
|---|---|---|---|---|
| 左对齐 | 右对齐 | 居中 | 左右间隔相等 | 项目两侧的间隔相等 |
| flex-start | flex-end | center | space-between | space-around |
flex布局代码
.flex{display:flex}

/* 对齐 */
.justify-start{justify-content:flex-start}
.justify-end{justify-content:flex-end}
.justify-center{justify-content:center}
.justify-between{justify-content:space-between}
.justify-around{justify-content:space-around}
.align-start{align-items:flex-start}
.align-end{align-items:flex-end}
.align-center{align-items:center}
.align-stretch{align-items:stretch}

/* 其他 */
.flex-direction{flex-direction:column}
.flex-wrap{flex-wrap:wrap}

/* 固定尺寸 */
.basis-xs{flex-basis:20%}
.basis-sm{flex-basis:40%}
.basis-df{flex-basis:50%}
.basis-lg{flex-basis:60%}
.basis-xl{flex-basis:80%}

/* 比例分布*/
.flex-sub{flex:1}
.flex-twice{flex:2}
.flex-treble{flex:3}

/* 自对齐 */
.self-start{align-self:flex-start}
.self-center{align-self:flex-center}
.self-end{align-self:flex-end}
.self-stretch{align-self:stretch}
.align-stretch{align-items:stretch}
2.2 Grid布局
| class名 | 内容 | 举例css内容 |
|---|---|---|
| grid | 栅格布局(必须) | display:flex;flex-wrap:wrap; |
| col-{num} | 等列 | 参数:1,2,3,4,5 |
| grid-square | 等高 |
<view class="grid col-2">
    <view>等分</view>
  <view></view>
</view>

<view class="grid col-2 grid-square">
    <view>等高</view>
  <view></view>
</view>
2.3辅助布局
| class名 | 作用 | 举例css内容 |
|---|---|---|
| margin-{size} | 外边距 | margin:10rpx; |
| magin-{position}-{size} | 外边距-具体一边 | margin-top:10rpx; |
| padding-{size} | 内边距 | padding:10rpx; |
| fl | 左浮动 | float:left; |
| fr | 右浮动 | float:right; |
辅助布局-size (6种)
| 0 | xs | sm | 默认 | lg | xl |
|---|---|---|---|---|---|
| 0 | 10rpx | 20rpx | 30rpx | 40rpx | 50rpx |
辅助布局-position (6种)
| top | right | bottom | left | lr | tb |
|---|---|---|---|---|---|
| 上 | 右 | 下 | 左 | left-right | top-bottom |
3.背景颜色Background
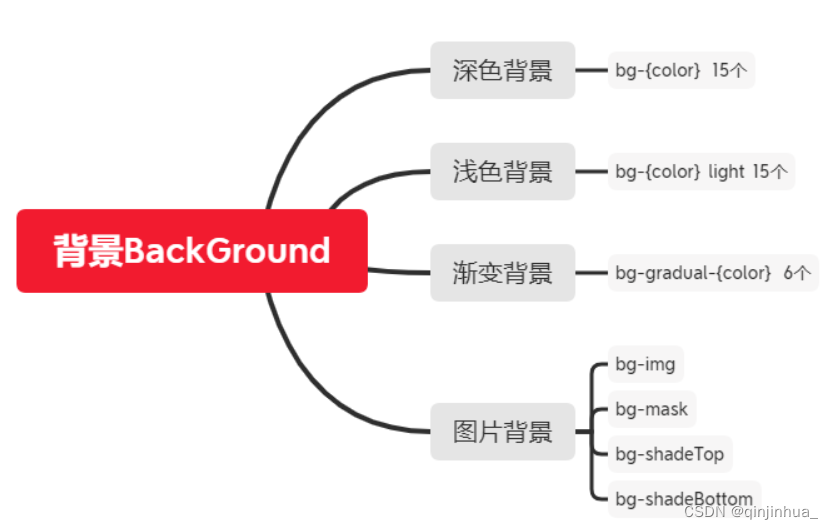
3.1深色背景 bg-{color} 15个
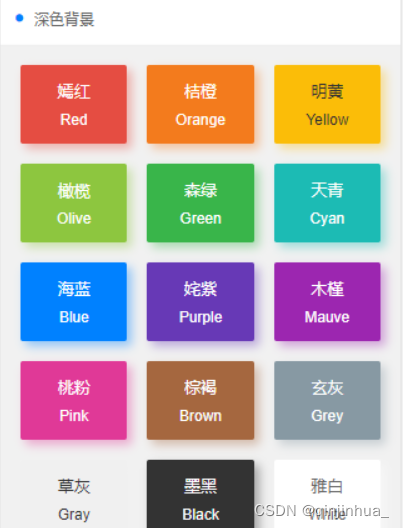
| .bg-red (嫣红) | .bg-orange(桔橙) | .bg-yellow(明黄) |
| .bg-olive(橄榄) | .bg-green(森绿) | .bg-cyan(天青) |
| .bg-blue(海蓝) | .bg-purple(姹紫) | .bg-mauve(木槿) |
| .bg-pink(桃粉) | .bg-brown(棕褐) | .bg-grey(玄灰) |
| .bg-gray(草灰) | .bg-black(墨黑) | .bg-white(雅白) |
3.2淡色背景 bg-{color}后面加.light 15个
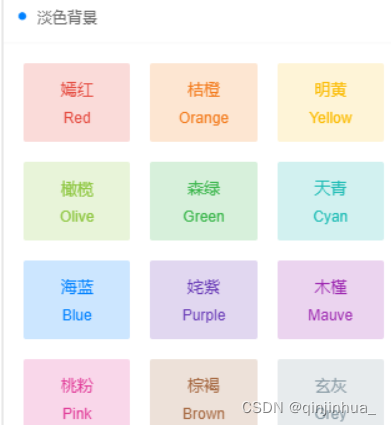
| .bg-red (嫣红) | .bg-orange(桔橙) | .bg-yellow(明黄) |
| .bg-olive(橄榄) | .bg-green(森绿) | .bg-cyan(天青) |
| .bg-blue(海蓝) | .bg-purple(姹紫) | .bg-mauve(木槿) |
| .bg-pink(桃粉) | .bg-brown(棕褐) | .bg-grey(玄灰) |
| .bg-gray(草灰) | .bg-black(墨黑) | .bg-white(雅白) |
3.3渐变 .bg-gradual-{color}
| .bg-gradual-red | .bg-gradual-orange |
| .bg-gradual-green | .bg-gradual-purple |
| .bg-gradual-pink | .bg-gradual-blue |
| .bg-shadeTop | .bg-shadeBottom |
4.图片背景
bg-img 把背景图片放大到适合元素容器的尺寸,图片比例不变。注意,超出容器的部分可能会裁掉。
bg-shadeTop 背景图片加一层黑色遮罩上面开始
bg-shadeBottom 背景图片加一层黑色遮罩下面开始写内置样式配合用
background-image
height
一个加了 遮罩,一个没有
<view class="bg-img"
style="background-image: url('图片路径;height: 414rpx;"></view>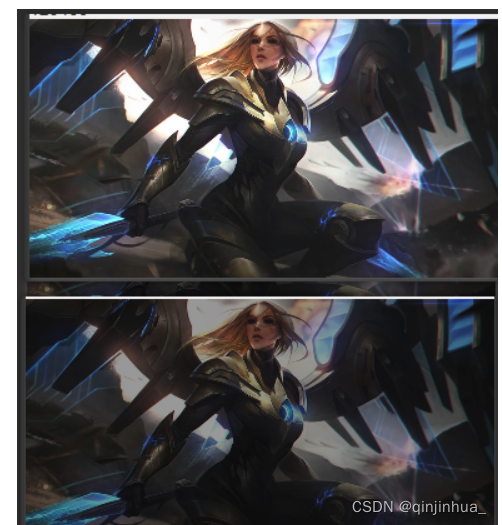
总结:
5.边框阴影颜色
| Class名 | 作用 | 举例CSS |
|---|---|---|
| line-{color} | 细边框颜色 | ::after伪元素 border-color:red; |
| lines-{color} | 粗边框颜色 | ::after伪元素 border-color:red; |
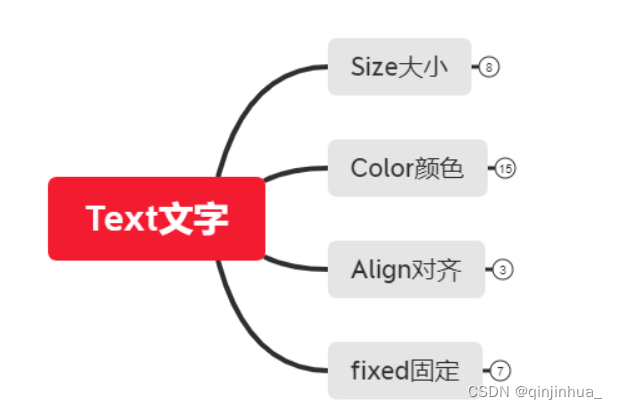
6.文字Text
| 文本 | 作用 | Class内容 |
|---|---|---|
| text-{size} | 文字大小 | font-size: 20rpx; |
| text-{color} | 文字颜色 | color: red; |
| text-{align} | 字体对齐 | text-align: center; |
| text-{Fixed} | 固定参数 | text-transform: Capitalize; |
大小Size (8种)
| size 参数 | 大小尺寸 | 说明 |
|---|---|---|
| xs | 20rpx | 说明文本,标签文字等关注度低的文字 |
| sm | 24rpx | 页面辅助信息,次级内容等 |
| df | 28rpx | 页面默认字号,用于摘要或阅读文本 |
| lg | 32rpx | 页面小标题,首要层级显示内容 |
| xl | 36rpx | 页面大标题,用于结果页等单一信息页 |
| xxl | 44rpx | 用于金额数字等信息 |
| sl | 80rpx | 用于图标、数字等较大显示 |
| xsl | 120rpx | 用于图标、数字等特大显示 |
颜色Color (15种)
color	颜色	内容
red	    嫣红 #e54d42	❤red
orange	桔橙 #f37b1d	❤orange
yellow	明黄 #fbbd08	❤yellow
olive	橄榄 #8dc63f	❤olive
green	森绿 #39b54a	❤green
cyan	天青 #1cbbb4	❤cyan
blue	海蓝 #0081ff	❤blue
purple	姹紫 #6739b6	❤purple
mauve	木槿 #9c26b0	❤mauve
pink	桃粉 #e03997	❤pink
brown	棕褐 #a5673f	❤brown
grey	玄灰 #8799a3	❤grey
gray	草灰 #aaaaaa	❤gray
black	墨黑 #333333	❤back
white	雅白 #ffffff	❤white
对齐Align (3种)
| 对齐 | 说明 |
|---|---|
| left | 左 |
| center | 中 |
| right | 右 |
固定Fixed (2+5种)
| 固定 | 说明 | 代码 |
|---|---|---|
| shadow | 文字阴影 | text-shadow:3px 3px 4px rgba(204,69,59,0.2) |
| bold | 文字加粗 | text-weight:100 |
| Abc | 首字母大写 | text-transform: Capitalize; |
| ABC | 全字母大写 | text-transform: Uppercase; |
| abc | 全字母小写 | text-transform: Lowercase; |
| price | 人民币 ¥ | content: “¥”;font-size: 80%;margin-right: 4rpx; |
| cut | 溢出部分,显示… | text-overflow: ellipsis;white-space: nowrap;overflow: hidden; |
总结:
参数形式 分为2种,一种是多个参数(大小,颜色,对齐),一种是固定参数(阴影,加粗,大小写等)
7.图标icon
7.1 culcon-{iconName} 直接设置图标
图标分为 内置和外置 (都来自 阿里巴巴 iconfont)
默认图标
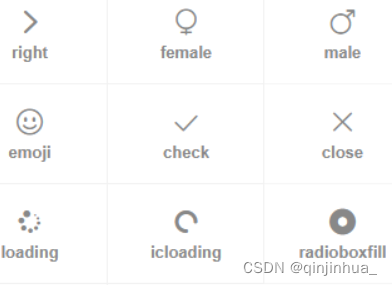
| 名称 10 | context |
|---|---|
| female | \e71a |
| male | \e71c |
| check | \e645 |
| close | \e646 |
| loading | \e7f1 |
| right | \e6a3 |
| radioboxfill | \e763 |
| roundclosefill | \e658 |
| emoji | \e64a |
| icloading | \e67a |
图标用法:
由于之前在app.vue引入了icon.css,因此在这里要使用的话,直接用即可。
使用方法:
text标签,类名:cuIcon-{{name}}
注意:其中,colorui的图标,大部分是有两个模式的,一个普通状态,一个fill状态。fill状态直接在普通状态的名字后面加上
fill即可。其他用法这里就不一一详述了,直接看源文件即可。
代码如下:
<text class="cuIcon-apps text-gray"></text>8.按钮Button
1.按钮必选 cu-btn
2.默认 cu-btn,round为圆角,cuIcon为圆形包裹图标
3.尺寸 默认, sm 小尺寸, lg大尺寸
4.颜色 bg-{{colorName}}
5.阴影 shadow
6.镂空 line-{{color}} 或 lines-{{colors}} 粗边框
7.块状 lg
8.禁用 disable
9.加图标 cuIcon-{{iconName}} 包裹在 button内注意:
button 记得去掉 “style”: “v2”,
9.标签 Tag
1.标签必选 cu-tag
2.默认 cu-tag,round为圆角,radius为圆角
3.尺寸 sm 小尺寸
4.颜色 bg-{{colorName}}
5.阴影 shadow
6.镂空 line-{{color}} 或 lines-{{colors}} 粗边框
7.胶囊 cu-capsule 用包裹
8.数字 badge
10.头像 Avatar
1.头像必选 cu-avatar
2.形状 round 圆形 radius方形
3.尺寸 sm 默认 lg xl 4种
4.内嵌文字(图标) 用包裹
5.颜色 bg-{colorName}
6.组 cu-avatar 添加 cu-avatar-group
7.标签 内 加 cu-tag
11.进度条 Progress
1.进度条必选 cu-progress
2.形状 默认方形 rauius 为圆角 round圆形 loading 初始是false,页面需要赋值为true
3.尺寸 默认 sm xs
4.颜色 bg-{{colorName}}
5.条纹 striped active 动态效果
6.比例 在cu-progress内 : style=“width:50%”
7.布局 包含内设置
12.边框阴影 Border&Shadow
direction 参数是 top -right -bottom -left
| class | 说明 |
|---|---|
| .solid | 四周-细边框 |
| .solid-{direction} | 具体某个方向-细边框 |
| .solids | 四周-粗边框 |
| .solids-{direction} | 具体某个方向-粗边框 |
| .shadow | 根据背景颜色而改变的阴影 |
| .shadow .shadow-lg | 长阴影 |
| .shadow-warp | 翘边阴影 |
| .shadow-blur | 根据背景图而改变的阴影 |
13.加载 Loading
1.加载必选 cu-load
2.状态 loading正在加载中,over加载完成,erro加载失败
3.背景 bg-{{colorName}}
4.弹框加载 load-modal
5.进度条加载 load-progress
6.进度条样式 load-progress-bar
7.旋转加载样式 load-progress-spinner
8.隐藏 hide
9.显示 show
13.组件 Componet
13.1操作条Tab
1.操作条必选 cu-bar
2.操作条必选 tabbar
3.固定在页面底部 foot
4.小程序tabbar的minButton
5.购物操作条必选值 shop
6.提交按钮 submin
7.带下边框样式的标题 border-title
8.css属性align-self:flex-end self-end
9.搜索框 search-form
10.输入框样式 input
基本用法cu-bar
<view class="cu-bar">   必须的
	<view>1</view>
	<view>2</view>
</view>
效果是 左右 靠边对齐 相当(flex align-center justify-between)
目标效果

如果里面有4个

结合icon和tab使用
![]()
<view class="cu-bar bg-white solid-bottom" :style="[{animation: 'show 0.5s 1'}]">
	<view class="action">
		<text class='cuIcon-title text-blue'></text>常用服务
	</view>
</view>
13.2导航栏 nav
1.导航栏 nav
2.导航栏子元素 cu-item
3.flex布局 flex
4.平分 flex-sub
5.居中 text-center
13.3列表List
1.列表必选值 cu-list
2.列表子元素 cu-item
3.无边框 no-border
4.菜单列表 menu
5.短边框 sm-border
6.卡片样式的菜单列表 card-menu
7.右箭头 arrow
8.消息列表(带头像) cu-avatar
9.内容 content
10.灰度 grayscale
11.cur
12.左移 move-cur
13.4卡片Card
1.卡片必选值 cu-card
2.案例类卡片 case
3.动态类卡片 dynamic
4.文章类卡片 article
5.评论 comment
6.配合cu-card,去除子元素cu-item的margin和border no-card
7.纵向的flex布局 desc
13.5表单Form
1.表单子元素 cu-form-group
2.标题 title
13.6时间轴TimeLine
1.cu-timeLine 包裹 cu-time和cu-item
2.cu-item 包裹 content 内容
13.7聊天 chat
1.聊天必选值 cu-chat
2.子元素 cu-item
3.右侧本人的聊天样式 self
4.聊天内容 main
5.消息内容 content
6.消息日期 date
7.提示词 cu-info
13.8轮播
1.全屏限高轮播 screen-swiper
2.方形指示点 square-dot
3.圆形指示点 round-dot
4.卡片式轮播 card-swiper
5.滑动切换区域 swiper-item
6.堆叠式轮播 tower-swiper
7.堆叠式轮播子元素 tower-item
13.9静态框 modal
1.基本
- 模态框必选 cu-modal
- 显示弹框 show
- 子元素 cu-dialog
2.样式
- 底部弹框 bottom-modal
- 侧边弹框 drawer-modal
3.Modal细节
- modal默认是全部居中,可在cu-diolog 后面加个内置样式 text-align:left
- 如:< view class=“cu-dialog” style=“text-align: left;”>
13.10 步骤条
1.步骤条必选 cu-steps
2.子元素 cu-item
3.数字步骤条未完成图标 num
4.错误图标 err
5.步骤条连接箭头 steps-arrow
6.配合多级步骤使用 steps-bottom





![【JavaWeb】重新认识 Servlet 的初始化 [ 回顾 Servlet ]](https://img-blog.csdnimg.cn/2176cbec76254db29d1ceefc8dcbdbab.png)

