文章目录
- 1. 前言
- 2. 提交内核补丁的步骤
- 2.1 从代码仓库下载内核源码
- 2.2 建立本地分支 linux-next_master
- 2.3 制作一个补丁
- 2.4 提交补丁
- 2.4.1 配置发送邮箱
- 2.4.2 配置 git send-email
- 2.4.3 发送补丁
1. 前言
限于作者能力水平,本文可能存在谬误,因此而给读者带来的损失,作者不做任何承诺。
2. 提交内核补丁的步骤
后续操作基于 GIT 工具完成,作者假定读者已经安装并配置好了 GIT 。如果没有,可以自行搜索相关资料安装 GIT 。
2.1 从代码仓库下载内核源码
首先,从Linux内核代码仓库下载主分支代码到本地:
git clone git://git.kernel.org/pub/scm/linux/kernel/git/torvalds/linux.git
主分支代码是相对稳定的代码,一般不够新,本文选择最新尚在开发中的 linux-next 分支来演示内核补丁的提交,所以还要更新代码到最新分支:
git remote add linux-next https://git.kernel.org/pub/scm/linux/kernel/git/next/linux-next.git
这些仓库的地址可以从 https://git.kernel.org/ 查找。接下来将 linux-next 的代码下载到本地:
git fetch --tags linux-next
2.2 建立本地分支 linux-next_master
注意,此时我们只是将 linux-next 分支的代码同步到了本地,但是本地还没有对应的可操作分支,为此,我们还要建立一个本地分支。先看一下当前分支情况:
$ git branch -a
* master
  remotes/linux-next/akpm
  remotes/linux-next/akpm-base
  remotes/linux-next/master
  remotes/linux-next/pending-fixes
  remotes/linux-next/stable
  remotes/origin/HEAD -> origin/master
  remotes/origin/master
所有名字前面有 remotes 是都是远程分支引用,我们看到已经有一个 master 本地分支,这是在 git clone 时自动创建的。但这个本地分支不是我们要的,我们要建立一个关联到 linux-next 的本地分支:
$ git checkout -b linux-next_master # 建立新的本地分支 linux-next_master
$ git branch -u linux-next/master # 关联 本地分支 linux-next_master 到远程分支 linux-next/master

$ git branch -vv
* linux-next_master 709c6adf19dc [linux-next/master] Add linux-next specific files for 20230307
  master            413c1061e467 [origin/master: ahead 2, behind 125519] Merge remote-tracking branch 'origin/master'

$ git branch -a
* linux-next_master
  master
  remotes/linux-next/akpm
  remotes/linux-next/akpm-base
  remotes/linux-next/master
  remotes/linux-next/pending-fixes
  remotes/linux-next/stable
  remotes/origin/HEAD -> origin/master
  remotes/origin/master
好,新的本地分支 linux-next_master 已经建立好了。
2.3 制作一个补丁
修改代码,然后运行系列指令:
git add /path/to/file
git commit -s -m 'message for patch.'
提交修改到本地分支 linux-next_master ,然后用工具制作可提交的补丁:
git format-patch -s -1 # 将自动按最近一次提交生成一个补丁文件 xxx.patch
./scripts/checkpatch.pl xxx.patch # 检查补丁的格式是否合法
./scripts/get_maintainer.pl xxx.patch # 补丁是以邮件形式发送,这里是找出要发送的邮箱
2.4 提交补丁
2.4.1 配置发送邮箱
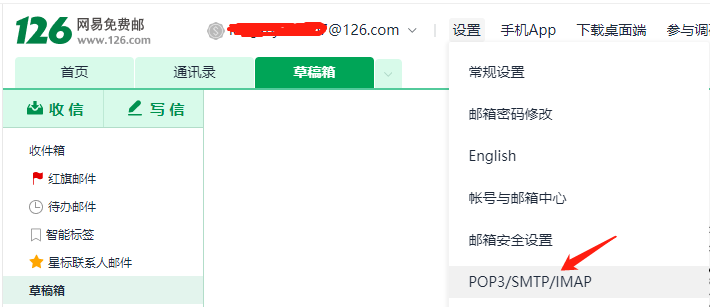
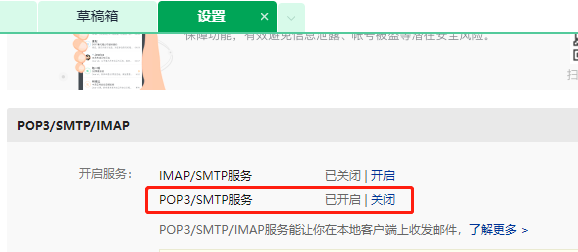
提交补丁就是将前面制作的 xxx.patch 发送到 get_maintainer.pl 提取的邮箱列表中。既然是发送邮件,那首先得准备一个邮箱,这里就有很多选择了,譬如 gmail ,但国内的用起来很麻烦,这里以 126 邮箱举例。首先配置下126邮箱:

2.4.2 配置 git send-email
GIT 默认不带 send-email ,运行下面的命令安装它:
sudo apt-get install git-email
编辑 ~/.gitconfig 进行邮件配置:
[user]
	name = Your name
	email = 你的126邮箱地址

[sendemail]
	smtpserver = smtp.126.com
	smtpuser = 你的126邮箱地址
	smtpserverport = 465
	smtpencryption = ssl
	smtppass = 2.4.1章节得到的授权码
2.4.3 发送补丁
运行下面的命令发送章节 2.3 制作的补丁 xxx.patch:
git send-email --smtp-debug \
    --to=david@redhat.com \
    --cc=linux-kernel@vger.kernel.org \
	xxx.patch
命令中的邮件列表根据 get_maintainer.pl 脚本得到的列表进行调整。可以先给自己发送,测试一下。我在实际过程中经常遇到下面的错误提示:
DEBUG: .../IO/Socket/SSL.pm:1177: global error: Undefined SSL object
但不影响邮件发送到社区,如果有哪位读者知道原因,请告知,不胜感激!邮件有没有发送到社区,可以到 https://lore.kernel.org/ 查询。在查询框输入自己在 .gitconfig 中配置的 name 或 email,如果你的邮件发送成功,就可以找到自己发送的邮件。





![[深入理解SSD系列 闪存实战2.1.5] NAND FLASH基本读操作及原理_NAND FLASH Read Operation源码实现](https://img-blog.csdnimg.cn/img_convert/72f13a2b5cb2911feebdafaf3c42842e.png)

