1 数据集介绍
1.1 Mnist
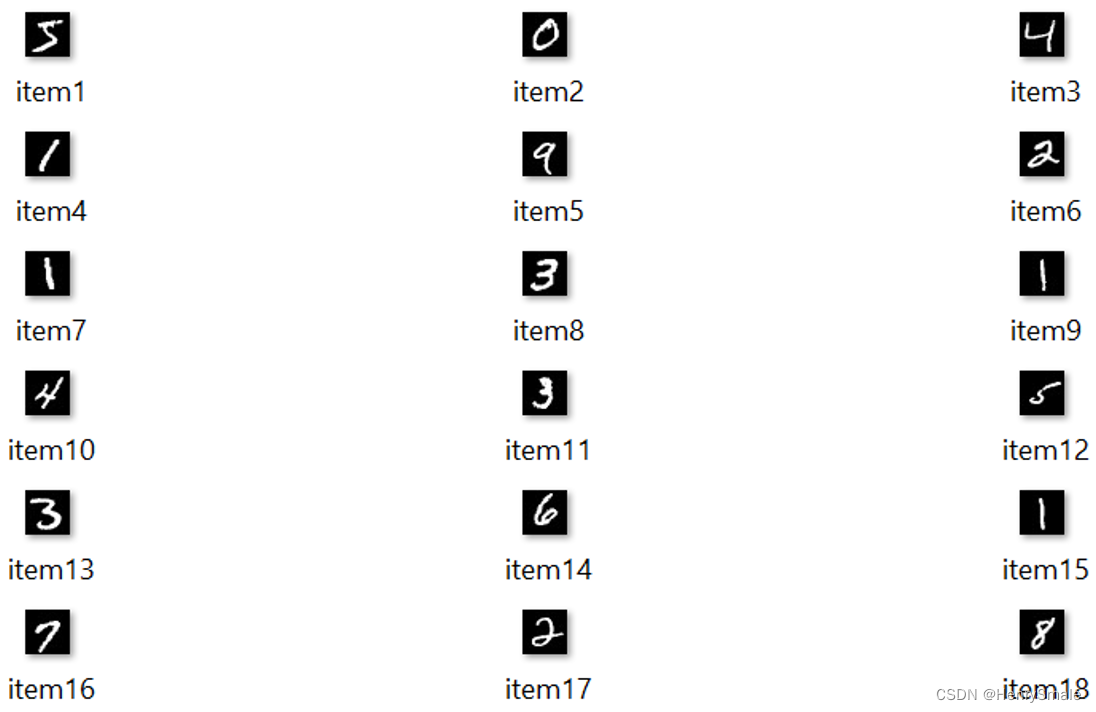
手写数字数据库 (LeCun 在1998年创造)
(1)手写数字 0-9共10类
(2)训练样本60000个,测试样本10000个。
(3)图像大小 28*28 二值图像。
(4)样例:
Labels:
trainingdata/item1.bmp 5
trainingdata/item2.bmp 0
trainingdata/item3.bmp 4
trainingdata/item4.bmp 1
trainingdata/item5.bmp 9
trainingdata/item6.bmp 2
trainingdata/item7.bmp 1
trainingdata/item8.bmp 3
trainingdata/item9.bmp 1
1.2 ImageNet
Fei-fei Li等 2007年创造。
(1)1000类,100多万张(2009年的规模);
(2)图片大小:正常图片大小,像素几百*几百;
(3)WORDNET结构,拥有多个Node(节点)。一个node(目前)含有至少500个对应物体的可供训练的图片/图像。

2 自编码器(Auto-encoder)
2.1 自编码器:解决 ( W , b ) (W,b) (W,b)参数初始化问题
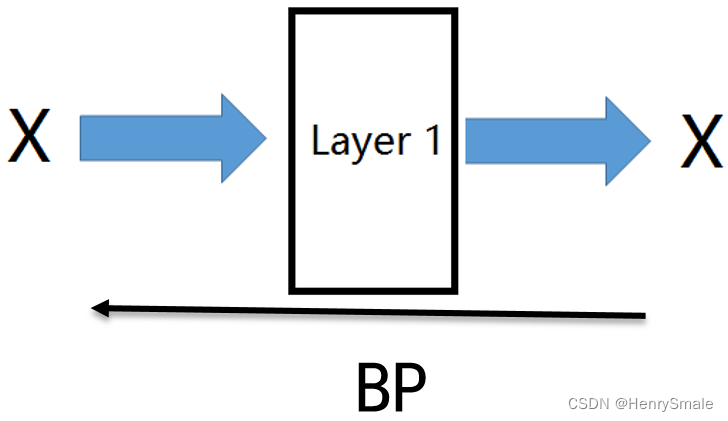
例如训练如下网络:

步骤1:先训练这个网络:
步骤2:训练好第1层后,接着训练第二层:
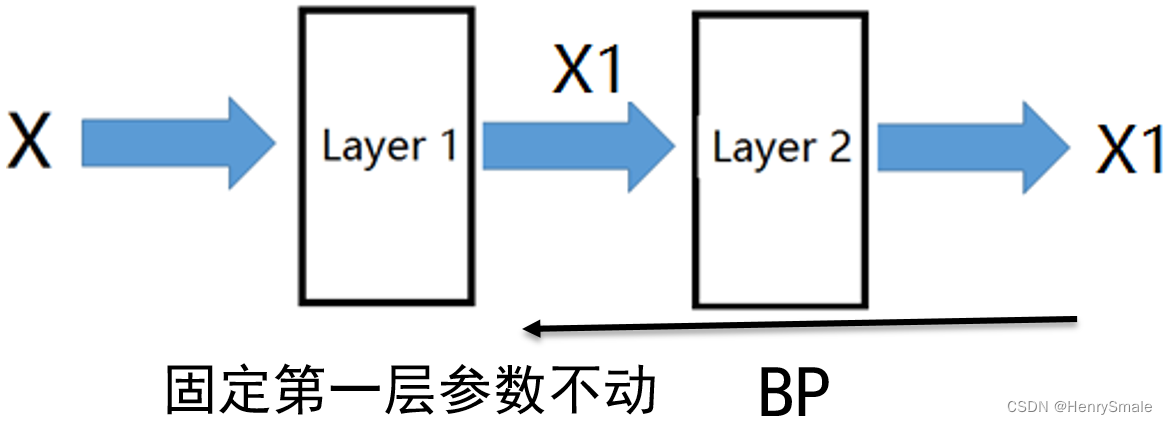
步骤M:以此类推,训练好第M-1层后,接着训练第M层。

最后用BP对网络进行微调。

2.2 压缩和还原实现对特征的重构
自动编码器是一种特殊类型的前馈神经网络,输入与输出相似。需要一种编码方法、损失函数和解码方法,最终目标是以最小的损失完美地复制输入。

3 代码分析
简单的自动编码器
# import all the dependencies
from keras.layers import Dense,Conv2D,MaxPooling2D,UpSampling2D
from keras import Input, Model
from keras.datasets import mnist
import numpy as np
import matplotlib.pyplot as plt

# 构建模型。提供决定输入将被压缩多少的维度数,维度越小,压缩越大。
encoding_dim = 15
input_img = Input(shape=(784,))
# encoded representation of input
encoded = Dense(encoding_dim, activation='relu')(input_img)
# decoded representation of code
decoded = Dense(784, activation='sigmoid')(encoded)
# Model which take input image and shows decoded images
autoencoder = Model(input_img, decoded)

# 分别构建编码器模型和解码器模型,以便区分输入和输出
# This model shows encoded images
encoder = Model(input_img, encoded)
# Creating a decoder model
encoded_input = Input(shape=(encoding_dim,))
# last layer of the autoencoder model
decoder_layer = autoencoder.layers[-1]
# decoder model
decoder = Model(encoded_input, decoder_layer(encoded_input))

# 用ADAM优化器和交叉熵损失函数拟合来编译模型
autoencoder.compile(optimizer='adam', loss='binary_crossentropy')

# 加载数据
(x_train, y_train), (x_test, y_test) = mnist.load_data()
x_train = x_train.astype('float32') / 255.
x_test = x_test.astype('float32') / 255.
x_train = x_train.reshape((len(x_train), np.prod(x_train.shape[1:])))
x_test = x_test.reshape((len(x_test), np.prod(x_test.shape[1:])))
print(x_train.shape)
print(x_test.shape)

# 查看数据的实际情况
plt.imshow(x_train[0].reshape(28,28))

# 训练模型
autoencoder.fit(x_train, x_train,
                epochs=15,
                batch_size=256,
                validation_data=(x_test, x_test))
# 测试
encoded_img = encoder.predict(x_test)
decoded_img = decoder.predict(encoded_img)
plt.figure(figsize=(20, 4))
for i in range(5):
    # Display original
    ax = plt.subplot(2, 5, i + 1)
    plt.imshow(x_test[i].reshape(28, 28))
    plt.gray()
    ax.get_xaxis().set_visible(False)
    ax.get_yaxis().set_visible(False)
    # Display reconstruction
    ax = plt.subplot(2, 5, i + 1 + 5)
    plt.imshow(decoded_img[i].reshape(28, 28))
    plt.gray()
    ax.get_xaxis().set_visible(False)
    ax.get_yaxis().set_visible(False)
plt.show()
运行结果如下:

![[深入理解SSD系列 闪存实战2.1.5] NAND FLASH基本读操作及原理_NAND FLASH Read Operation源码实现](https://img-blog.csdnimg.cn/img_convert/72f13a2b5cb2911feebdafaf3c42842e.png)








![[沧海月明珠有泪]两数求和](https://img-blog.csdnimg.cn/img_convert/11d8aa859eb07bf39d6ee7caf5f2df05.png)