一、webmagic的优点
它更偏向于java的语法,对于熟悉java的工程师来说学习成本较低
提供多种选择器,如css选择器、xpath、正则等
有一个模块pipeline:可通过简单地配置,可以将爬虫抽取到的信息,持久化到文件、数据库等。
二、webmagic的构成
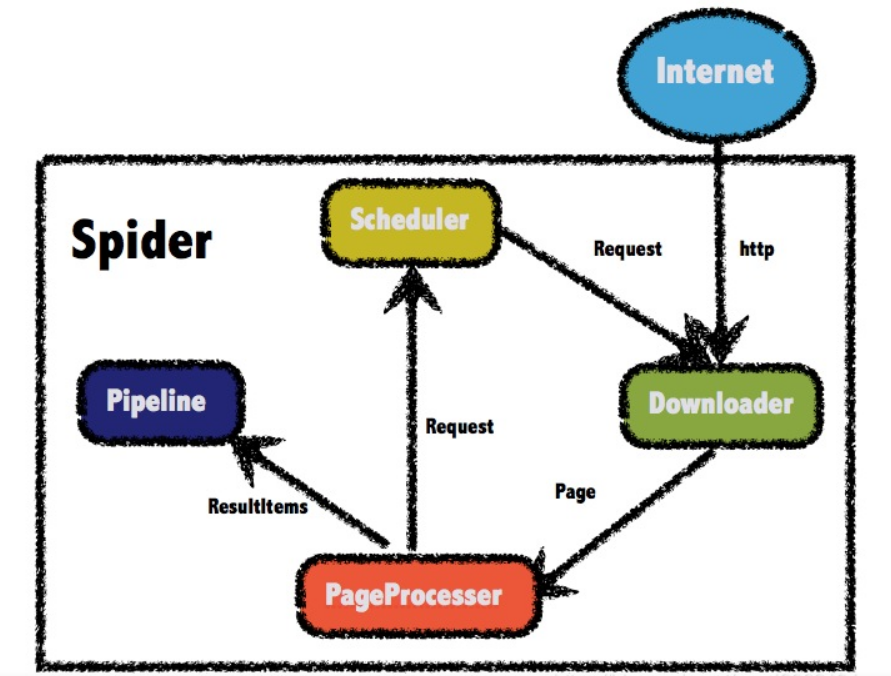
Downloader:负责请求url获取访问的数据(html页面、json等)。
PageProcessor:解析Downloader获取的数据。
Pipeline:PageProcessor解析出的数据由Pipeline来进行保存或者说叫持久化。
Scheduler:调度器通常负责url去重,或者保存url队列,PageProcessor解析出的url可以加入Scheduler队列,用于下一次的爬取。
三、webmagic的核心方法
addUrl:
    public Spider addurl(String... urls) {
        for (String url : urls) {
            addRequest(new Request(url));
        }
        signalNewUr1();
        return this;
    }
scheduler.push(request, this):把需要爬取的url加入到Scheduler队列。
    private void addRequest(Request request) {
        if (site.getDomain() == null && request != null && request.getUrl() != null) {
            site.setDomain(UrlUtils.getDomain(request.getUrl()));
        }
        Jscheduler.push(request, this);
}initComponent:初始化downloader、pipelines、threadPool线程池,webmagic默认down是HttpClientDownloader、默认pipeline是ConsolePipeline
protected void initComponent() {
    if(downloader == null){
        this.downloader = new HttpClientDownloader();
    }
    if (pipelines.isEmpty()) {
        pipelines.add(new ConsolePipeline());
    }
    downloader.setThread(threadNum);
    if(threadPool==null || threadPool.isShutdown()){
        if (executorService != null && !executorService.isShutdown()){
            threadPool = new CountableThreadPool(threadNum, executorService);
        } else {
        threadPool = new CountableThreadPool(threadNum);
        }
    }
    if (startRequests != null){
            for(Request request:startRequests){
                addRequest(request);
            }
            startRequests.clear();
        }
        startTime=new Date();
    }
四、webmagic的使用
导入依赖:
<dependency>
            <groupId>org.slf4j</groupId>
            <artifactId>slf4j-log4j12</artifactId>
            <version>1.7.25</version>
<!--            <scope>test</scope>-->
        </dependency>

        <!--webmagic-->
        <dependency>
            <groupId>us.codecraft</groupId>
            <artifactId>webmagic-core</artifactId>
            <version>0.7.4</version>
        </dependency>
        <dependency>
            <groupId>us.codecraft</groupId>
            <artifactId>webmagic-extension</artifactId>
            <version>0.7.4</version>
        </dependency>
实现PageProcessor
抽取元素Selectable
WebMagic里主要使用了三种抽取技术:XPath、正则表达式和CSS选择器。另外,对于JSON格式的内容,可使用JsonPath进行解析。.
1. XPath:语法教程
// Xpath解析
page.putField("div2",page.getHtml().xpath("//div[@id=shortcut-2014]/div/ul/li/a"));
2.使用CSS选择器(主要使用方式):
// 解析返回的数据page,并且把解析的结果放到ResultItems中
page.putField("div",page.getHtml().css("ul.fr li a.link-login").all());3.使用正则表达式(难度较大):
// 使用正则表达式
page.putField("div3",page.getHtml().css("div#shortcut-2014 a").regex(".*我的.*").all());
抽取部分API:
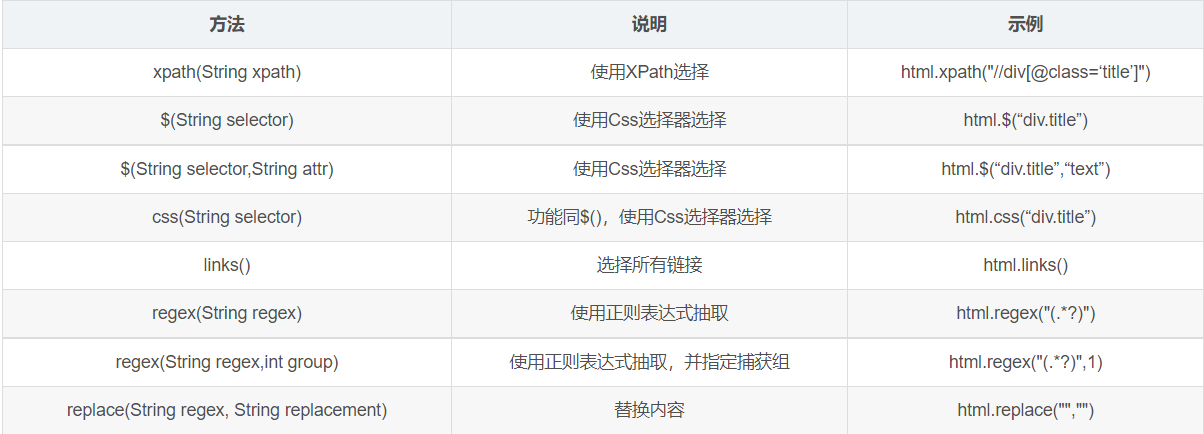
获得结果API:

测试:
// 处理结果的api
        page.putField("div3",page.getHtml().css("div#shortcut-2014 a").regex(".*我的.*").all());
        page.putField("div4",page.getHtml().css("div#shortcut-2014 a").regex(".*我的.*").get());
        page.putField("div5",page.getHtml().css("div#shortcut-2014 a").regex(".*我的.*").toString());
        page.putField("div6",page.getHtml().css("div#shortcut-2014 a").regex(".*我的.*").match());
使用Pipeline
1输出到控制台或文件
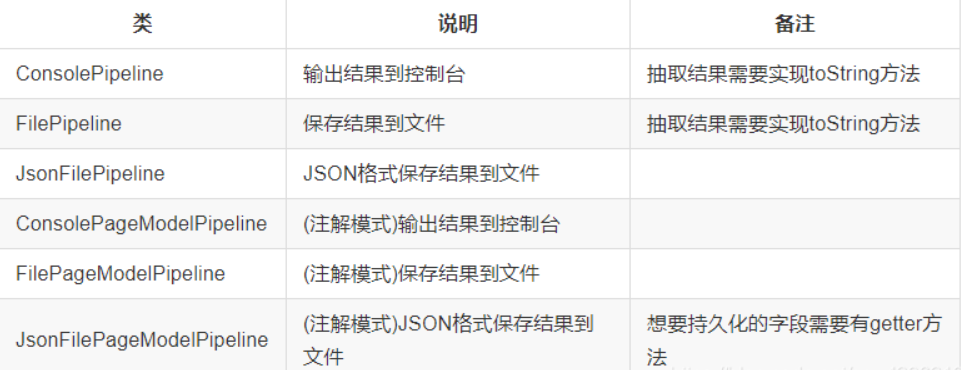
public static void main(String[] args) {
    Spider.create(new GithubRepoPageProcessor())
            //从"https://github.com/code4craft"开始抓
            .addUrl("https://github.com/code4craft")
            //输出到文件
            .addPipeline(new FilePipeline("D:\\webmagic\\"))
            //开启5个线程抓取
            .thread(5)
            //启动爬虫
            .run();
}
2.输出到数据库
2.1定义一个类,实现Pipeline接口
@Component
public class MybatisPipeline implements Pipeline {

    @Autowired
    private JobInfoService jobInfoService;


    @Override
    public void process(ResultItems resultItems, Task task) {
        // 获取封装好的招聘详情对象
        JobInfo jobInfo = resultItems.get("jobInfo");
        // 判断数据是否不为空
        if (jobInfo != null){
            // 如果不为空,则将其保存到数据库当中
            jobInfoService.save(jobInfo);
        }
    }
}
2.2在PageProcessor中 引入定制的 Pipeline,并且在Spider添加进去
//将自定义的 PipeLine注入到Process中
    @Autowired
    private MybatisPipeline mybatisPipeline;


    // 开启定时任务(initialDelay: 初始化的任务开启时间(项目启动多久后开启这个任务),fixedDelay:间隔多久再次开启)
    @Scheduled(initialDelay = 1000, fixedDelay = 100 * 1000) // 单位毫秒 1000毫秒 = 1秒
    public void process() {
        Spider.create(new JobProcessor())
                .addUrl(url)
                // 设置Scheduler和布隆过滤器
                .setScheduler(new QueueScheduler().setDuplicateRemover(new BloomFilterDuplicateRemover(100000)))
                .thread(10) //10个线程进行爬取
                // 添加Pipeline
                .addPipeline(mybatisPipeline)
                .run();
    }






![[css]通过网站实例学习以最简单的方式构造三元素布局](https://img-blog.csdnimg.cn/483513eab5b146258ce74d72cd07b65a.png)