参考资料:
《SpringMVC源码解析系列》
《SpringMVC源码分析》
《Spring MVC源码》
写在开头:本文为个人学习笔记,内容比较随意,夹杂个人理解,如有错误,欢迎指正。
前文:
《SpringMVC源码:DispatcherServlet初始化流程》
《SpringMVC源码:HandlerMapping加载1》
《SpringMVC源码:HandlerMapping加载2》
《SpringMVC源码:getHandler、getHandlerAdapter过程》
《SpringMVC源码:参数解析、方法调用与返回值处理》
前文我们已经介绍了,DispatcherServlet初始化时创建的handlermapping与HandlerAdapter组件,本文我们介绍另一个重要组件视图解析器ViewResolver。
目录
一、视图的基本介绍
1、initViewResolvers
2、View与ViewResolver
3、使用场景
二、视图解析器
1、BeanNameViewResolver
1.1、使用样例
1.2、resolveViewName
2、ContentNegotiatingViewResolver
2.1、resolveViewName
2.2、getMediaTypes
2.3、getCandidateViews
3、AbstractCachingViewResolver
3.1、resolveViewName
3.2、UrlBasedViewResolver#createView
3.3、buildView
一、视图的基本介绍
1、initViewResolvers
过程和HandlerMapping的初始化很类似,一样是解析容器中的ViewResolver类型的Bean。
	private void initViewResolvers(ApplicationContext context) {
		this.viewResolvers = null;
		if (this.detectAllViewResolvers) {
			Map<String, ViewResolver> matchingBeans =
					BeanFactoryUtils.beansOfTypeIncludingAncestors(context, ViewResolver.class, true, false);
			if (!matchingBeans.isEmpty()) {
				this.viewResolvers = new ArrayList<ViewResolver>(matchingBeans.values());
				AnnotationAwareOrderComparator.sort(this.viewResolvers);
			}
		}
		else {
			try {
				ViewResolver vr = context.getBean(VIEW_RESOLVER_BEAN_NAME, ViewResolver.class);
				this.viewResolvers = Collections.singletonList(vr);
			}
			catch (NoSuchBeanDefinitionException ex) {
			}
		}
		if (this.viewResolvers == null) {
			this.viewResolvers = getDefaultStrategies(context, ViewResolver.class);
			if (logger.isDebugEnabled()) {
				logger.debug("No ViewResolvers found in servlet '" + getServletName() + "': using default");
			}
		}
	}
2、View与ViewResolver
View接口定义了视图的基本行为,其中最重要的就是渲染方法render,我们的视图实现类可以通过重写该方法实现我们所要的渲染结果,这一点我们下文将会展示。
ViewResolver接口负责对处理器适配器获取到的对象进行解析获取对应的视图最终呈现给浏览器进行渲染。
public interface View {
	String RESPONSE_STATUS_ATTRIBUTE = View.class.getName() + ".responseStatus";
	String PATH_VARIABLES = View.class.getName() + ".pathVariables";
	String SELECTED_CONTENT_TYPE = View.class.getName() + ".selectedContentType";
	String getContentType();
	void render(Map<String, ?> model, HttpServletRequest request, HttpServletResponse response) throws Exception;

}

public interface ViewResolver {
	View resolveViewName(String viewName, Locale locale) throws Exception;
}
ViewResolver组件是根据String类型的视图名和对应的Locale(语言环境 国际化相关)解析出View对象,而View对象则是用来将数据填充进来,并解析成对应的html(也可能是其他类型)类型的文件渲染给前台。View对象是根据不同的类型使用某些模块来渲染的,比如针对jsp类型使用JstlView进行渲染。
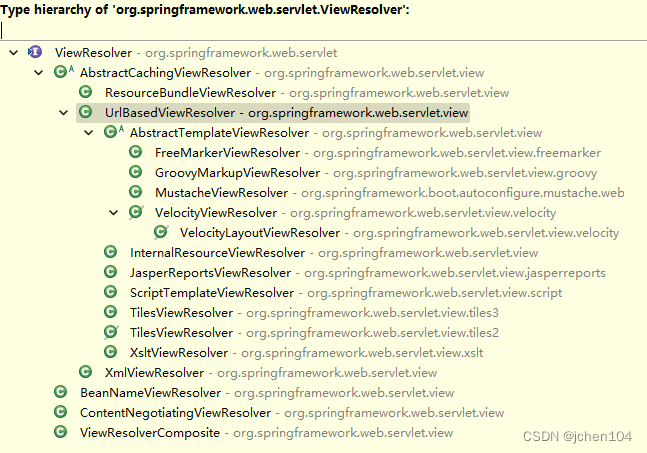
可以看出ViewResolver主要有四种实现类,包括:
- BeanNameViewResolver: 根据名字获取对应的视图对象
- ContentNegituatingViewResolver: 根据请求的MediaTypes(context-type)来获取最佳的View对象
- AbstractCachingViewResolver: 可以缓存解析过的视图对象的基类,亮点是视图解析后的缓存,实现了相关固定化的功能,提供变化的抽象功能交由子类实现,我们常使用的jsp相关的视图InternalResourceViewResolver,以及freeMarket模板语言的FreeMarkerViewResolver解析器。
- ViewResolverComposite: 是包含如上各个ViewResolver的组合类
3、使用场景
在render方法中,判断ModelAndView对象是否拥有已经处理好了的视图对象,如果未包含的话就调用resolveViewName方法,遍历所有的视图处理器,找出支持解析的那一个并完成解析返回视图对象。
	protected void render(ModelAndView mv, HttpServletRequest request, HttpServletResponse response) throws Exception {
		View view;
		if (mv.isReference()) {
            // We need to resolve the view name
			view = resolveViewName(mv.getViewName(), mv.getModelInternal(), locale, request);
		}
		else {
            // No need to lookup: the ModelAndView object contains the actual View object.
			view = mv.getView();
		}
        // 其余代码
	}

	protected View resolveViewName(String viewName, Map<String, Object> model, Locale locale,
			HttpServletRequest request) throws Exception {

		for (ViewResolver viewResolver : this.viewResolvers) {
			View view = viewResolver.resolveViewName(viewName, locale);
			if (view != null) {
				return view;
			}
		}
		return null;
	}
二、视图解析器
1、BeanNameViewResolver
1.1、使用样例
要使用BeanNameViewResolver则需要实现自定义的View接口实现类的render方法,比如下面我们顶一个一个handler与View。
// 自定义的View对象
public class HelloView implements View {
    // 设置该视图的media类型
    @Override
    public String getContentType() {
        return "text/html";
    }
     //设置渲染方法
    @Override
    public void render(Map<String, ?> model, HttpServletRequest request, HttpServletResponse response) throws Exception {
        response.getWriter().print("Welcome to hello View:"+new Date());
    }
}


@Controller
@RequestMapping(value = "/beanNameView")
public class BeanNameViewController {
    @RequestMapping(value = "hello", method = RequestMethod.GET)
    public String toHello(HttpServletRequest request){
        System.out.println("使用BeanNameViewResolver解析器 获取解析视图");
        //返回时String 类型的View 对象
        return "helloView";
    }
}
另外进行视图处理器注册
<!--视图解析 -->
<!BeanNameViewResolver视图解析器 根据controller类的方法返回的String
 类型的viewName  作为bean的name从spring中获取 View对象调用其的render()方法 -->
<bean class="org.springframework.web.servlet.view.BeanNameViewResolver">

</bean>
<!--配置view对象-->
 <bean id="helloView" class="com.text.HelloView"/>
1.2、resolveViewName
当调用beanNameView/hello时,将会返回视图对象helloView,随后视图解析器BeanNameViewResolver就会进行解析,我们来看下源码。
    //BeanNameViewResolver.java
	@Override
	public View resolveViewName(String viewName, Locale locale) throws BeansException {
        // 获取容器
		ApplicationContext context = getApplicationContext();
		// 检查当前容器内有无
        if (!context.containsBean(viewName)) {
			if (logger.isDebugEnabled()) {
				logger.debug("No matching bean found for view name '" + viewName + "'");
			}
			return null;
		}
        // 判断该bean是否是视图类型
		if (!context.isTypeMatch(viewName, View.class)) {
			if (logger.isDebugEnabled()) {
				logger.debug("Found matching bean for view name '" + viewName +
						"' - to be ignored since it does not implement View");
			}
			return null;
		}
        // 返回视图对象
		return context.getBean(viewName, View.class);
	}
可以非常明确的看出这里是根据返回的ViewName从spring环境中获取View对象返回。
2、ContentNegotiatingViewResolver
2.1、resolveViewName
我们直接从源码看起,ContentNegotiatingViewResolver首先获取请求的属性,并解析其中的MediaType,获取符合如上mediaType的所有视图view对象,最后根据条件获取到最佳匹配的View对象返回。
	@Override
	public View resolveViewName(String viewName, Locale locale) throws Exception {
        //从请求上下文中获取ServletRequestAttributes对象(封装过的ThreadLocal,其中保存了每次请求的HttpServletRequest对象)
        //只有是该HttpServletRequest 才能从其中获取到对应的mediaType类型
		RequestAttributes attrs = RequestContextHolder.getRequestAttributes();
		Assert.state(attrs instanceof ServletRequestAttributes, "No current ServletRequestAttributes");
        //根据HttpServletRequest解析其中的对应的media_type 和我们在xml中的配置有关
        // 比如配置favorParameter 为true则才可以使用xxxx?format=xml的形式 下面单独讲解
        //这一步获取到了请求的mediaType(可使用的)
		List<MediaType> requestedMediaTypes = getMediaTypes(((ServletRequestAttributes) attrs).getRequest());
		if (requestedMediaTypes != null) {
            //获取符合如上mediaType的所有视图view对象 获取视图对象可以从spring注册的ViewResolver 组件解析
            //也可以使用defaultViews配置的默认视图对象(先使用ViewResolver在使用defaultViews)
			List<View> candidateViews = getCandidateViews(viewName, locale, requestedMediaTypes);
            //根据条件获取到最佳匹配的View对象返回
			View bestView = getBestView(candidateViews, requestedMediaTypes, attrs);
			if (bestView != null) {
				return bestView;
			}
		}
		if (this.useNotAcceptableStatusCode) {
			if (logger.isDebugEnabled()) {
				logger.debug("No acceptable view found; returning 406 (Not Acceptable) status code");
			}
			return NOT_ACCEPTABLE_VIEW;
		}
		else {
			logger.debug("No acceptable view found; returning null");
			return null;
		}
	}
2.2、getMediaTypes
这里主要是两个操作,一个是根据请求解析出其可接受mediaType,另一个是获取请求本身带有的meidaType属性信息,两者兼容并按照优先级排序 。
主要起作用的是ContentNegotiationManager(这个类中的一些参数也是我们在xml配置的,我们用的不是该类本身而是其对应的FactoryBean对象)和ContentNegotiationStrategy类(按照url后缀、参数、请求头等策略)
	protected List<MediaType> getMediaTypes(HttpServletRequest request) {
		try {
			ServletWebRequest webRequest = new ServletWebRequest(request);
            //解析请求可以接受的mediaType
			List<MediaType> acceptableMediaTypes = this.contentNegotiationManager.resolveMediaTypes(webRequest);
			acceptableMediaTypes = (!acceptableMediaTypes.isEmpty() ? acceptableMediaTypes :
					Collections.singletonList(MediaType.ALL));
            //获取请求本身的mediaType
			List<MediaType> producibleMediaTypes = getProducibleMediaTypes(request);
            //对上述解析出来的mediaType 进行兼容处理
			Set<MediaType> compatibleMediaTypes = new LinkedHashSet<MediaType>();
			for (MediaType acceptable : acceptableMediaTypes) {
				for (MediaType producible : producibleMediaTypes) {
					if (acceptable.isCompatibleWith(producible)) {
						compatibleMediaTypes.add(getMostSpecificMediaType(acceptable, producible));
					}
				}
			}
            //获取到的最终mediaType按照优先级排序
			List<MediaType> selectedMediaTypes = new ArrayList<MediaType>(compatibleMediaTypes);
			MediaType.sortBySpecificityAndQuality(selectedMediaTypes);
			if (logger.isDebugEnabled()) {
				logger.debug("Requested media types are " + selectedMediaTypes + " based on Accept header types " +
						"and producible media types " + producibleMediaTypes + ")");
			}
			return selectedMediaTypes;
		}
		catch (HttpMediaTypeNotAcceptableException ex) {
			return null;
		}
	}
在该方法中ContentNegotiationStrategy代表不同的解析策略
	@Override
	public List<MediaType> resolveMediaTypes(NativeWebRequest request) throws HttpMediaTypeNotAcceptableException {
		for (ContentNegotiationStrategy strategy : this.strategies) {
			List<MediaType> mediaTypes = strategy.resolveMediaTypes(request);
			if (mediaTypes.isEmpty() || mediaTypes.equals(MEDIA_TYPE_ALL)) {
				continue;
			}
			return mediaTypes;
		}
		return Collections.emptyList();
	}
2.3、getCandidateViews
先交由注册在spring中的ViewResolver去解析对应的view,如果没有在从默认的views对象defauleViews集合中获取视图。
	private List<View> getCandidateViews(String viewName, Locale locale, List<MediaType> requestedMediaTypes)
			throws Exception {

		List<View> candidateViews = new ArrayList<View>();
		for (ViewResolver viewResolver : this.viewResolvers) {
			View view = viewResolver.resolveViewName(viewName, locale);
			if (view != null) {
				candidateViews.add(view);
			}
			for (MediaType requestedMediaType : requestedMediaTypes) {
				List<String> extensions = this.contentNegotiationManager.resolveFileExtensions(requestedMediaType);
				for (String extension : extensions) {
					String viewNameWithExtension = viewName + '.' + extension;
					view = viewResolver.resolveViewName(viewNameWithExtension, locale);
					if (view != null) {
						candidateViews.add(view);
					}
				}
			}
		}
		if (!CollectionUtils.isEmpty(this.defaultViews)) {
			candidateViews.addAll(this.defaultViews);
		}
		return candidateViews;
	}
3、AbstractCachingViewResolver
3.1、resolveViewName
该方法可以对解析过的视图对象进行缓存,下面我们看下其实现原理
	private static final View UNRESOLVED_VIEW = new View() {
		@Override
		public String getContentType() {
			return null;
		}
		@Override
		public void render(Map<String, ?> model, HttpServletRequest request, HttpServletResponse response) {
		}
	};

    // 默认1024
	private volatile int cacheLimit = DEFAULT_CACHE_LIMIT;

	public boolean isCache() {
		return (this.cacheLimit > 0);
	}

	@Override
	public View resolveViewName(String viewName, Locale locale) throws Exception {
        //判断是否对解析出来的View对象(视图对象) 进行缓存
        //判断逻辑是其cacheLimit(允许缓存的视图对象个数)默认是1024 默认是走缓存 可以更改为不走缓存
		if (!isCache()) {
            //创建View
			return createView(viewName, locale);
		}
		else {
            //先尝试从缓存中获取
			Object cacheKey = getCacheKey(viewName, locale);
			View view = this.viewAccessCache.get(cacheKey);
			if (view == null) {
				synchronized (this.viewCreationCache) {
					view = this.viewCreationCache.get(cacheKey);
					if (view == null) {
                        // 缓存没有则进行创建工作
						view = createView(viewName, locale);
						// view 为空则返回默认的视图
                        if (view == null && this.cacheUnresolved) {
							view = UNRESOLVED_VIEW;
						}
                        //创建出来的View对象放入缓存中 并返回View对象
                        //下次获取直接从缓存中获取
						if (view != null) {
							this.viewAccessCache.put(cacheKey, view);
							this.viewCreationCache.put(cacheKey, view);
							if (logger.isTraceEnabled()) {
								logger.trace("Cached view [" + cacheKey + "]");
							}
						}
					}
				}
			}
			return (view != UNRESOLVED_VIEW ? view : null);
		}
	}
该先判断是否走缓存,不走缓存直接创建View对象,否则走缓存,先从缓存中获取,缓存中没有则执行创建View对象并放入缓存操作,真正创建View对象的方法为 createView()。
该类使用了两个Map作为缓存,第一个map是支持并发获取的ConcurrentHashMap,第二个map是能提供对于缓存溢出时候的清楚工作(LinkedHashMap的removeEldestEntry方法)。
3.2、UrlBasedViewResolver#createView
在createView()方法中主要是针对转发、重定向、普通请求进行View的实例化和初始化
	protected boolean canHandle(String viewName, Locale locale) {
		String[] viewNames = getViewNames();
		return (viewNames == null || PatternMatchUtils.simpleMatch(viewNames, viewName));
	}

	@Override
	protected View createView(String viewName, Locale locale) throws Exception {
        //检查该视图解析器是否可以解析该viewName对应的视图
        //可以通过配置viewNames让其与viewName进行匹配判断是否能够解析
		if (!canHandle(viewName, locale)) {
			return null;
		}
        //对于重定向请求的处理
		if (viewName.startsWith(REDIRECT_URL_PREFIX)) {
			String redirectUrl = viewName.substring(REDIRECT_URL_PREFIX.length());
            //创建对应的View对象
			RedirectView view = new RedirectView(redirectUrl,
					isRedirectContextRelative(), isRedirectHttp10Compatible());
			view.setHosts(getRedirectHosts());
            //对实例化后的View进行属性初始化 调用BeanFactory的initializeBean()方法
			return applyLifecycleMethods(REDIRECT_URL_PREFIX, view);
		}
        //对于转发请求的处理
		if (viewName.startsWith(FORWARD_URL_PREFIX)) {
            //获取重定向的url
			String forwardUrl = viewName.substring(FORWARD_URL_PREFIX.length());
            //创建对应的View对象
			return new InternalResourceView(forwardUrl);
		}
        // 其他情况 普通请求 调用父类createView 最终调用子类的loadView()方法
		return super.createView(viewName, locale);
	}
3.3、UrlBasedViewResolver#buildView
上文中的createView方法会调用父类AbstractCachingViewResolver中的实现,但内部是调用了loadview方法,而子类UrlBasedViewResolver对其进行了重写。
    //AbstractCachingViewResolver.java
	protected View createView(String viewName, Locale locale) throws Exception {
		return loadView(viewName, locale);
	}

    //UrlBasedViewResolver.java
	@Override
	protected View loadView(String viewName, Locale locale) throws Exception {
        //调用buildView创建视图对象
		AbstractUrlBasedView view = buildView(viewName);
        //对实例化后的View进行属性初始化
		View result = applyLifecycleMethods(viewName, view);
		return (view.checkResource(locale) ? result : null);
	}
该方法获取viewClass通过反射形式进行实例化,并设置url、contextType、requestContextAttribute 等属性。
	protected AbstractUrlBasedView buildView(String viewName) throws Exception {
        //获取View对应的class (UrlBasedViewResolver子类中每一个类型都有只处理一个View对象)
        //比如FreeMarkerViewResolver 的viewClass 为FreeMarkerView
        //InternalResourceViewResolver的viewClass为JstlView
        //获取view class 并进行实例化
		AbstractUrlBasedView view = (AbstractUrlBasedView) BeanUtils.instantiateClass(getViewClass());
        //设置view的url
		view.setUrl(getPrefix() + viewName + getSuffix());
        //设置view的contentType
		String contentType = getContentType();
		if (contentType != null) {
			view.setContentType(contentType);
		}
        //设置view的requestContextAttribute 用于持有request对象的beanName
		view.setRequestContextAttribute(getRequestContextAttribute());
		view.setAttributesMap(getAttributesMap());
        //是否支持view使用PathVariables(url中的参数)
		Boolean exposePathVariables = getExposePathVariables();
		if (exposePathVariables != null) {
			view.setExposePathVariables(exposePathVariables);
		}
        //是否支持view可以使用spring容器中的bean实例
		Boolean exposeContextBeansAsAttributes = getExposeContextBeansAsAttributes();
		if (exposeContextBeansAsAttributes != null) {
			view.setExposeContextBeansAsAttributes(exposeContextBeansAsAttributes);
		}
        //是否配置view可以使用spring容器中的那些bean实例
		String[] exposedContextBeanNames = getExposedContextBeanNames();
		if (exposedContextBeanNames != null) {
			view.setExposedContextBeanNames(exposedContextBeanNames);
		}

		return view;
	}
到这里视图解析器基本介绍完了,下文我们会介绍DispatcherServlet是如何使用视图解析器工作的。