行人识别yolov5和v7对比
yolo车距
源码:yolov5双目检测车辆识别(2023年+单目+双目+python源码+毕业设计)上盒岛APP,开线上盲盒商店 http://www.hedaoapp.com/yunPC/goodsDetails?pid=4132
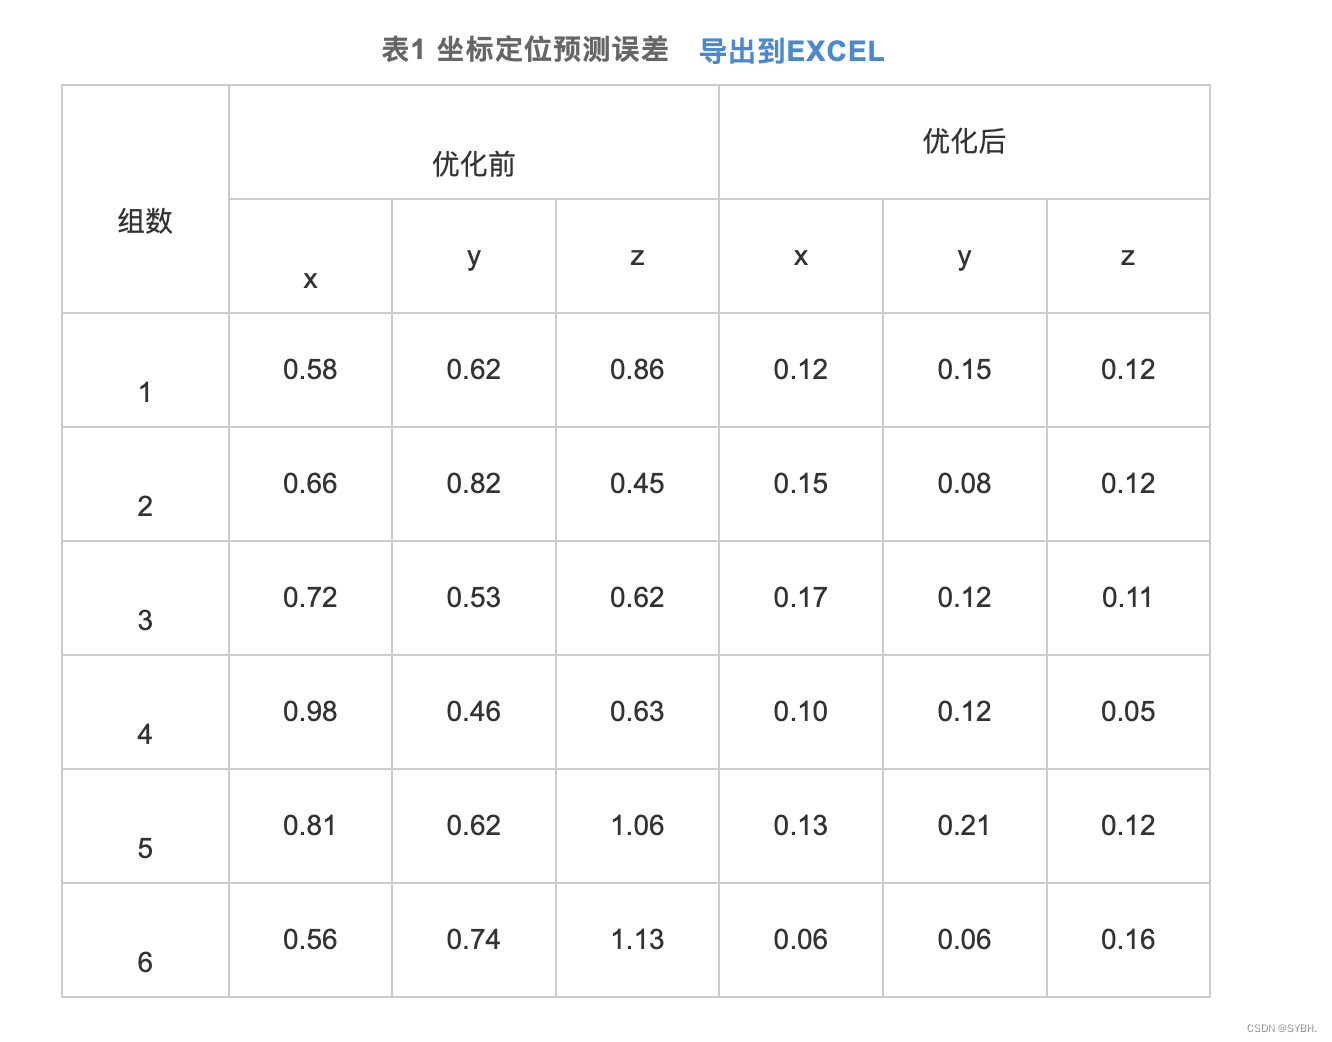
为了提高传统遗传算法(genetic algorithm, GA)IGA优化BP网络迭代时间过长以及精度偏低的缺陷,设计了一种通过改进遗传算法(improved genetic algorithm, GA)IGA优化BP网络,并进行完成双目视觉的定位计算。改进遗传算法来提升BP网络收敛能力并获得更强的全局寻优效果,显著改善BP网络处理效率与精度,最终促使相机获得更高定位精度以及运算速率。给出了IGA优化BP网络的双目视觉定位算法流程,并开展了双目视觉定位实验。研究结果表明,未优化坐标预测值误差均值为0.66 mm,优化坐标误差均值为0.08 mm。改进BP网络进行双目视觉定位精度达到0.12 mm,相对最初预测定位误差降低近0.01 mm。以BP网络来定位双目视觉精度均值是0.12 mm,以OpenCV定位的实际精度是0.10 mm。推断以神经网络双目视觉进行定位时满足双目视觉定位精度条件。
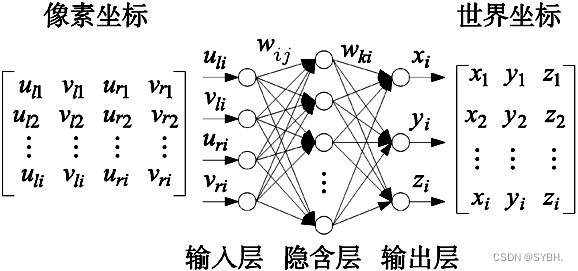
1.1 双目视觉定位BP网络结构
根据图1的方式通过BP网络进行双目视觉定位。共设定3层BP网络,依次包括输入、输出与隐含层。通过左右相机对棋盘格角点区域进行拍摄获得图像数据,再以横纵像素坐标构成输入神经元,之后利用角点实际坐标参数组成BP网络输出神经元。隐含层中共包含9个神经元,可以通过计算输入层神经元数量2倍再加1得到隐含层神经元数量。以wij、wki表示输入、输出层相对隐含层相对隐含层的权值。本研究总共包含1000个训练样本,设定目标精度为0.000 1,同时控制迭代上限10 000
。
1.2 双目视觉定位IGA优化BP结构
重点研究了采用遗传算法来实现双目视觉定位时所需要克服的问题,在此基础上设计得到更优的遗传算法来提升算法收敛能力并获得更强的全局寻优效果,显著改善BP网络处理效率与精度,最终促使相机获得更高定位精度以及运算速率。
1.2.1 改进GA选择算子
通过排序法来达到改进的目标,将第i个个体经过排序处理后被选择概率Pnew通过式(1)进行计算:
利用同名角点检测与匹配的方法,从中提取得到表2中的部分像素坐标与坐标参数。以(u,v)表示像素坐标,u、v依次对应水平与垂直方向。
3.1 精度测试
本次总共选择1000组通过相机拍摄得到的同名角点像素坐标及其对应的实际坐标数据组成训练集,之后训练BP网络以及通过IGA进行优化处理的BP网络,接着导入6组数据组成测试集再对相机实施定位。图4a是以未优化处理的BP网络计算得到的预测角点坐标与实际值,可以发现此时两条曲线形成了相近的走势规律,但也存在一定的差异性。图4b是通过IGA进行优化处理的BP网络角点坐标预测结果与实际值,经对比发现此时两条曲线形成了良好贴合的状态,可以确定精确的二维与坐标对应关系,能够确保双目视觉获得更低定位误差。
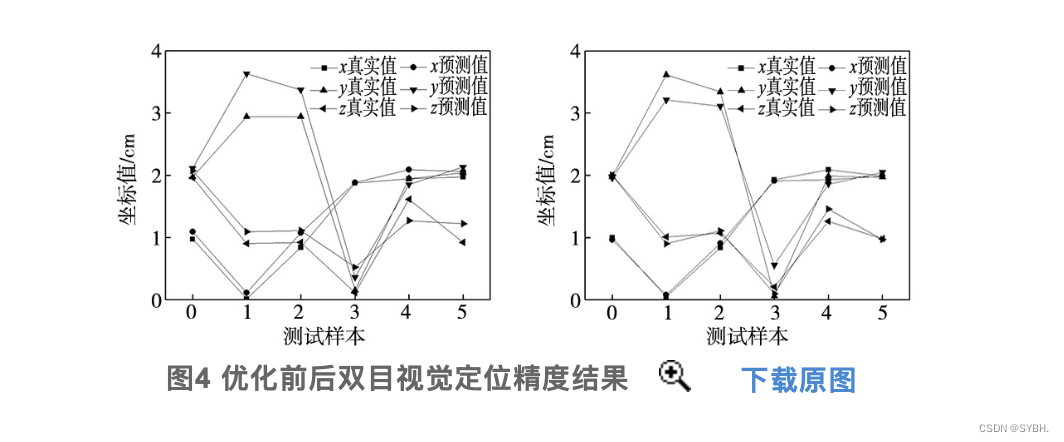
为评价经过改进的神经网络实际定位性能,通过改进BP网络构建二维与三维空间对应关系,对神经网络完成1000次训练后再把二维图像角点数据输入系统中进行测试。按照反向方式记录二维图像角点空间坐标输出结果,再跟定位块坐标开展差值比较,得到表2所示的结果,根据以上方式得到的差值作为最终定位精度。利用表2计算得到的改进BP网络进行双目视觉定位精度达到0.12 mm, 相对最初预测定位误差降低近0.01 mm。 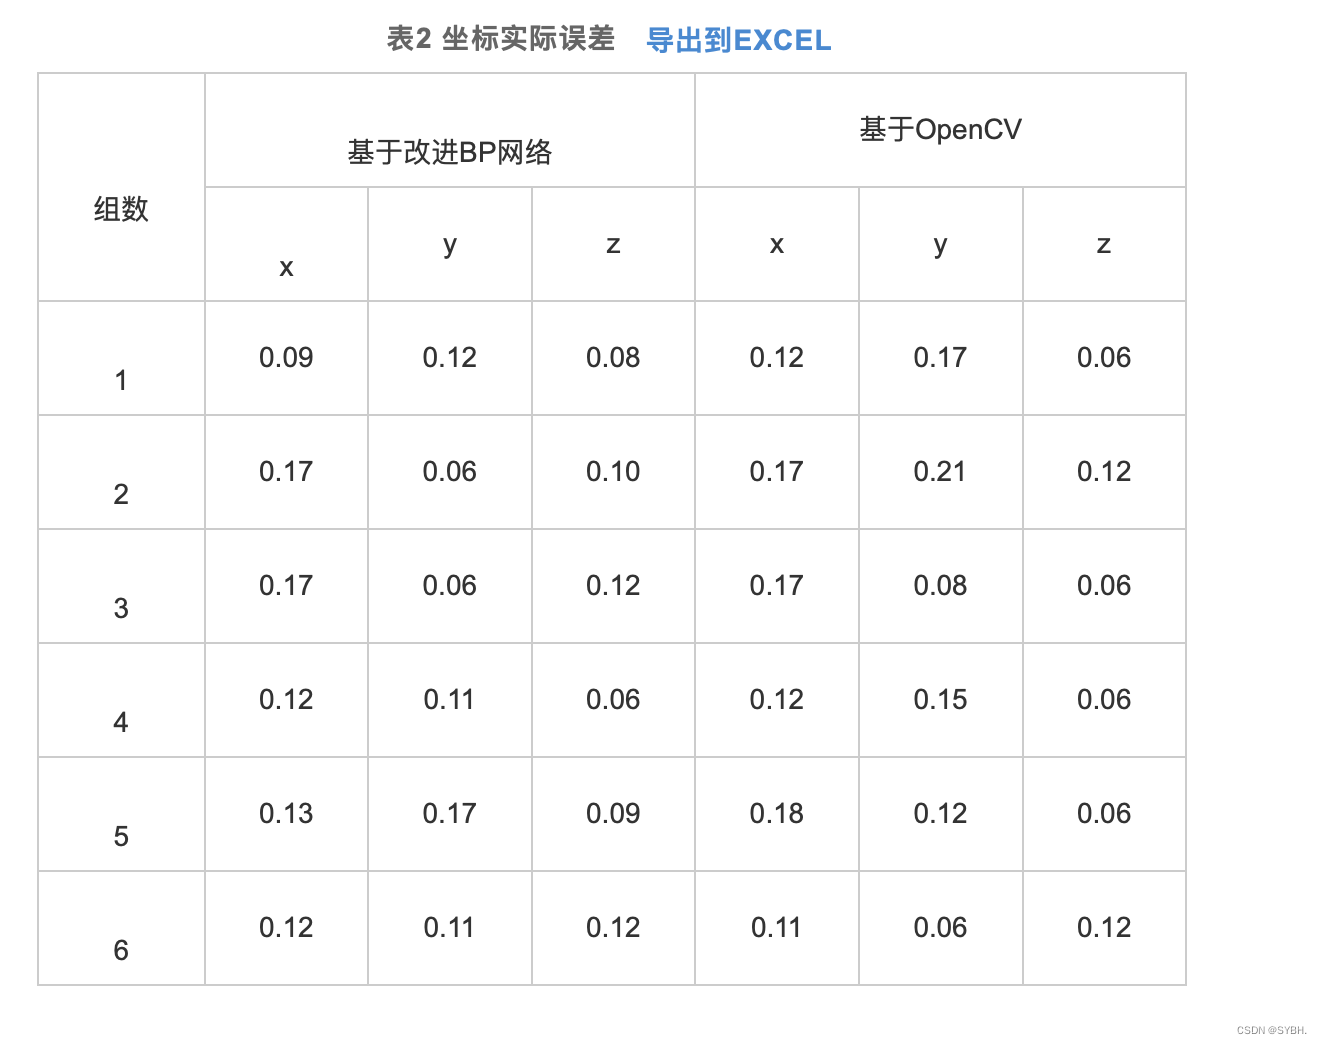
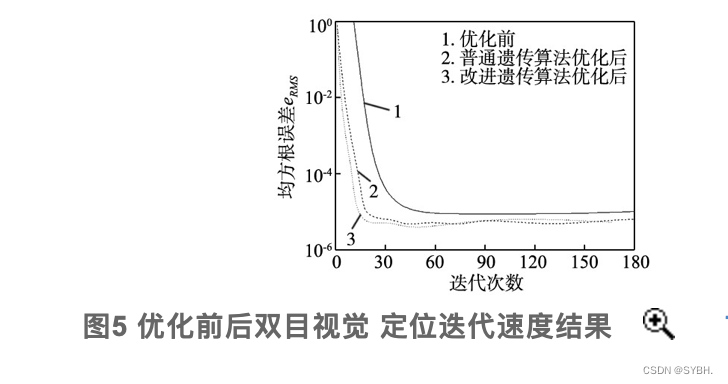
3.2 速度测试
为了对神经网络双目视觉定位结果可靠度进行验证,通过OpenCV完成双目视觉定位测试再跟定位结果进行比较。采用OpenCV传统双目视觉定位模式确定双目视觉参数,再利用定位后的参数进行反向计算得到二维图像平面内角点三维空间坐标数据。再对比上述三维空间计算角点坐标和真实三维空间角点坐标,由此确定定位精度。根据表2可知,以BP网络来定位双目视觉时获得的精度均值是0.12 mm, 以OpenCV定位的实际精度是0.10 mm。由此可以推断,以神经网络双目视觉进行定位时满足双目视觉定位精度条件。
 # -*- coding: utf-8 -*-
import argparse
import time
from pathlib import Path

import cv2
import torch
import torch.backends.cudnn as cudnn
from numpy import random

import numpy as np
from PIL import Image, ImageDraw, ImageFont

from models.experimental import attempt_load
from utils.datasets import LoadStreams, LoadImages
from utils.general import check_img_size, check_requirements, check_imshow, non_max_suppression, apply_classifier, \
     scale_coords, xyxy2xywh, strip_optimizer, set_logging, increment_path
from utils.plots import plot_one_box
from utils.torch_utils import select_device, load_classifier, time_synchronized

from stereo.dianyuntu_yolo import preprocess, undistortion, getRectifyTransform, draw_line, rectifyImage,\
     stereoMatchSGBM, hw3ToN3, DepthColor2Cloud, view_cloud

from stereo import stereoconfig_040_2

num = 210 #207 209 210 211
def detect(save_img=False):
    num = 210
    source, weights, view_img, save_txt, imgsz = opt.source, opt.weights, opt.view_img, opt.save_txt, opt.img_size
    webcam = source.isnumeric() or source.endswith('.txt') or source.lower().startswith(
        ('rtsp://', 'rtmp://', 'http://') )

    # Directories
    save_dir = Path( increment_path(Path(opt.project) / opt.name, exist_ok=opt.exist_ok) )  # increment run
    (save_dir / 'labels' if save_txt else save_dir).mkdir(parents=True, exist_ok=True)  # make dir

    # Initialize
    set_logging()
    device = select_device(opt.device)
    half = device.type != 'cpu'  # half precision only supported on CUDA

    # Load model
    model = attempt_load(weights, map_location=device)  # load FP32 model
    stride = int(model.stride.max())  # model stride
    imgsz = check_img_size(imgsz, s=stride)  # check img_size
    if half:
        model.half()  # to FP16

    # Second-stage classifier
    classify = False
    if classify:
        modelc = load_classifier(name='resnet101', n=2)  # initialize
        modelc.load_state_dict(torch.load('weights/resnet101.pt', map_location=device)['model']).to(device).eval()

    # Set Dataloader
    vid_path, vid_writer = None, None
    if webcam:
        view_img = check_imshow()
        cudnn.benchmark = True  # set True to speed up constant image size inference
        dataset = LoadStreams(source, img_size=imgsz, stride=stride)
    else:
        save_img = True
        dataset = LoadImages(source, img_size=imgsz, stride=stride)
        print("img_size:")
        print(imgsz)

    # Get names and colors
    names = model.module.names if hasattr(model, 'module') else model.names
    colors = [[random.randint(0, 255) for _ in range(3)] for _ in names]

    # Run inference
    if device.type != 'cpu':
        model(torch.zeros(1, 3, imgsz, imgsz).to(device).type_as(next(model.parameters())))  # run once
    t0 = time.time()
    for path, img, im0s, vid_cap in dataset:
        img = torch.from_numpy(img).to(device)
        img = img.half() if half else img.float()  # uint8 to fp16/32
        img /= 255.0  # 0 - 255 to 0.0 - 1.0
        if img.ndimension() == 3:
            img = img.unsqueeze(0)

        # Inference
        t1 = time_synchronized()
        pred = model(img, augment=opt.augment)[0]

        # Apply NMS
        pred = non_max_suppression(pred, opt.conf_thres, opt.iou_thres, classes=opt.classes, agnostic=opt.agnostic_nms)
        t2 = time_synchronized()

        # Apply Classifier
        if classify:
            pred = apply_classifier(pred, modelc, img, im0s)

        # Process detections
        for i, det in enumerate(pred):  # detections per image
            if webcam:  # batch_size >= 1
                p, s, im0, frame = path[i], '%g: ' % i, im0s[i].copy(), dataset.count
            else:
                p, s, im0, frame = path, '', im0s, getattr(dataset, 'frame', 0)

            p = Path(p)  # to Path
            save_path = str(save_dir / p.name)  # img.jpg
            txt_path = str(save_dir / 'labels' / p.stem) + ('' if dataset.mode == 'image' else f'_{frame}')  # img.txt
            s += '%gx%g ' % img.shape[2:]  # print string
            gn = torch.tensor(im0.shape)[[1, 0, 1, 0]]  # normalization gain whwh
            if len(det):
                # Rescale boxes from img_size to im0 size
                det[:, :4] = scale_coords(img.shape[2:], det[:, :4], im0.shape).round()

                # Print results
                for c in det[:, -1].unique():
                    n = (det[:, -1] == c).sum()  # detections per class
                    s += f"{n} {names[int(c)]} {'s' * (n > 1)} , "  # add to string

                # Write results
                for *xyxy, conf, cls in reversed(det):
                    if save_txt:  # Write to file
                        xywh = (xyxy2xywh(torch.tensor(xyxy).view(1, 4)) / gn).view(-1).tolist()  # normalized xywh

                        print("xywh  x : %d, y : %d"%(xywh[0],xywh[1]) )
                        line = (cls, *xywh, conf) if opt.save_conf else (cls, *xywh)  # label format
                        with open(txt_path + '.txt', 'a') as f:
                            f.write(('%g ' * len(line)).rstrip() % line + '\n')

                    if save_img or view_img:  # Add bbox to image
                        label = f'{names[int(cls)]} {conf:.2f} '
                        plot_one_box(xyxy, im0, label=label, color=colors[int(cls)], line_thickness=3)
                        ##print label x,y zuobiao

                        x = (xyxy[0] + xyxy[2]) / 2
                        y = (xyxy[1] + xyxy[3]) / 2
                        #print(" %s is  x: %d y: %d " %(label,x,y) )
                        height_0, width_0 = im0.shape[0:2]

                        if (x <= int(width_0/2) ):
                            t3 = time_synchronized()

                            ################################
                            #stereo code
                            p = num
                            string = ''
                            #print("P is %d" %p )
                            # 读取数据集的图片
                            #iml = cv2.imread('./stereo/yolo/zuo/%szuo%d.bmp' %(string,p) )  # 左图
                            #imr = cv2.imread('./stereo/yolo/you/%syou%d.bmp' %(string,p) )  # 右图

                            #iml = cv2.imread('./stereo/yolo/zuo/%szuo%d.bmp' %(string,p) )  # 左图
                            #imr = cv2.imread('./stereo/yolo/you/%syou%d.bmp' %(string,p) )  # 右图

                            #height_0, width_0 = im0.shape[0:2]

                            #print("width_0 =  %d "  % width_0)
                            #print("height_0 = %d "  % height_0)


                            iml = im0[0:int(height_0), 0:int(width_0/2)]
                            imr = im0[0:int(height_0), int(width_0/2):int(width_0) ]

                            height, width = iml.shape[0:2]

                            #cv2.imshow("iml",iml)
                            #cv2.imshow("imr",im0)
                            #cv2.waitKey(0)

                            #print("width =  %d "  % width)
                            #print("height = %d "  % height)

                            # 读取相机内参和外参
                            config = stereoconfig_040_2.stereoCamera()

                            # 立体校正
                            map1x, map1y, map2x, map2y, Q = getRectifyTransform(height, width, config)  # 获取用于畸变校正和立体校正的映射矩阵以及用于计算像素空间坐标的重投影矩阵
                            #print("Print Q!")
                            #print("Q[2,3]:%.3f"%Q[2,3])
                            iml_rectified, imr_rectified = rectifyImage(iml, imr, map1x, map1y, map2x, map2y)


                            # 绘制等间距平行线,检查立体校正的效果
                            line = draw_line(iml_rectified, imr_rectified)
                            #cv2.imwrite('./yolo/%s检验%d.png' %(string,p), line)

                            # 消除畸变
                            iml = undistortion(iml, config.cam_matrix_left, config.distortion_l)
                            imr = undistortion(imr, config.cam_matrix_right, config.distortion_r)

                            # 立体匹配
                            iml_, imr_ = preprocess(iml, imr)  # 预处理,一般可以削弱光照不均的影响,不做也可以

                            iml_rectified_l, imr_rectified_r = rectifyImage(iml_, imr_, map1x, map1y, map2x, map2y)

                            disp, _ = stereoMatchSGBM(iml_rectified_l, imr_rectified_r, True)
                            #cv2.imwrite('./yolo/%s视差%d.png' %(string,p), disp)


                            # 计算像素点的3D坐标(左相机坐标系下)
                            points_3d = cv2.reprojectImageTo3D(disp, Q)  # 可以使用上文的stereo_config.py给出的参数

                            #points_3d = points_3d

                            '''
                            #print("x is :%.3f" %points_3d[int(y), int(x), 0] )
                                print('点 (%d, %d) 的三维坐标 (x:%.3fcm, y:%.3fcm, z:%.3fcm)' % (int(x), int(y),
                                points_3d[int(y), int(x), 0]/10,
                                points_3d[int(y), int(x), 1]/10,
                                points_3d[int(y), int(x), 2]/10) )
                            '''
                            count = 0
                            #try:
                            while( (points_3d[int(y), int(x), 2] < 0) | (points_3d[int(y), int(x), 2] > 2500) ):

                                count += 1
                                x += count
                                if( 0 < points_3d[int(y), int(x), 2] < 2300 ):
                                    break
                                y += count
                                if( 0 < points_3d[int(y), int(x), 2] < 2300 ):
                                    break

                                count += 1
                                x -= count
                                if( 0 < points_3d[int(y), int(x), 2] < 2300 ):
                                    break
                                y -= count
                                if( 0 < points_3d[int(y), int(x), 2] < 2300 ):
                                    break

                                #if(count%2==1):
                                #    x += 1
                                #else:
                                #    y += 1


                            text_cxy = "*"
                            cv2.putText(im0, text_cxy, (x, y) ,  cv2.FONT_ITALIC, 1.2, (0,0,255), 3)

                            #print("count is %d" %count)
                            print('点 (%d, %d) 的三维坐标 (x:%.1fcm, y:%.1fcm, z:%.1fcm)' % (int(x), int(y),
                                points_3d[int(y), int(x), 0]/10,
                                points_3d[int(y), int(x), 1]/10,
                                points_3d[int(y), int(x), 2]/10) )


                            dis = ( (points_3d[int(y), int(x), 0] ** 2 + points_3d[int(y), int(x), 1] ** 2 + points_3d[int(y), int(x), 2] **2) ** 0.5 ) / 10
                            print('点 (%d, %d) 的 %s 距离左摄像头的相对距离为 %0.1f cm' %(x, y,label, dis) )


                            text_x = "x:%.1fcm" %(points_3d[int(y), int(x), 0]/10)
                            text_y = "y:%.1fcm" %(points_3d[int(y), int(x), 1]/10)
                            text_z = "z:%.1fcm" %(points_3d[int(y), int(x), 2]/10)
                            text_dis = "dis:%.1fcm" %dis

                            cv2.rectangle(im0,(xyxy[0]+(xyxy[2]-xyxy[0]),xyxy[1]),(xyxy[0]+(xyxy[2]-xyxy[0])+5+220,xyxy[1]+150),colors[int(cls)],-1);
                            cv2.putText(im0, text_x, (xyxy[0]+(xyxy[2]-xyxy[0])+5, xyxy[1]+30),  cv2.FONT_ITALIC, 1.2, (255,255,255), 3)
                            cv2.putText(im0, text_y, (xyxy[0]+(xyxy[2]-xyxy[0])+5, xyxy[1]+65),  cv2.FONT_ITALIC, 1.2, (255, 255, 255), 3)
                            cv2.putText(im0, text_z, (xyxy[0]+(xyxy[2]-xyxy[0])+5, xyxy[1]+100), cv2.FONT_ITALIC, 1.2, (255, 255, 255), 3)
                            cv2.putText(im0, text_dis, (xyxy[0]+(xyxy[2]-xyxy[0])+5, xyxy[1]+145), cv2.FONT_ITALIC, 1.2, (255, 255, 255), 3)


                            t4 = time_synchronized()
                            print(f'Done. ({t4 - t3:.3f}s)')


            # Print time (inference + NMS)
            print(f'{s}Done. ({t2 - t1:.3f}s)')

            # Stream results
            if view_img:
                cv2.imshow(str(p), im0)
                cv2.waitKey(1)  # 1 millisecond

            # Save results (image with detections)
            if save_img:
                if dataset.mode == 'image':
                    cv2.imwrite(save_path, im0)
                else:  # 'video'
                    if vid_path != save_path:  # new video
                        vid_path = save_path
                        if isinstance(vid_writer, cv2.VideoWriter):
                            vid_writer.release()  # release previous video writer

                        fourcc = 'mp4v'  # output video codec
                        fps = vid_cap.get(cv2.CAP_PROP_FPS)
                        w = int(vid_cap.get(cv2.CAP_PROP_FRAME_WIDTH))
                        h = int(vid_cap.get(cv2.CAP_PROP_FRAME_HEIGHT))
                        vid_writer = cv2.VideoWriter(save_path, cv2.VideoWriter_fourcc(*fourcc), fps, (w, h))
                    vid_writer.write(im0)

    if save_txt or save_img:
        s = f"\n{len(list(save_dir.glob('labels/*.txt')))} labels saved to {save_dir / 'labels'}" if save_txt else ''
        print(f"Results saved to {save_dir}{s}")

    print(f'Done. ({time.time() - t0:.3f}s)')


if __name__ == '__main__':
    parser = argparse.ArgumentParser()
    parser.add_argument('--weights', nargs='+', type=str, default='last_dead_fish_1000.pt', help='model.pt path(s)')
    parser.add_argument('--source', type=str, default='./shuangmu_dead_fish_011.mp4' , help='source')  # file/folder, 0 for webcam
    parser.add_argument('--img-size', type=int, default=640, help='inference size (pixels)')
    parser.add_argument('--conf-thres', type=float, default=0.25, help='object confidence threshold')
    parser.add_argument('--iou-thres', type=float, default=0.45, help='IOU threshold for NMS')
    parser.add_argument('--device', default='', help='cuda device, i.e. 0 or 0,1,2,3 or cpu')
    parser.add_argument('--view-img', action='store_true', help='display results')
    parser.add_argument('--save-txt', action='store_true', help='save results to *.txt')
    parser.add_argument('--save-conf', action='store_true', help='save confidences in --save-txt labels')
    parser.add_argument('--classes', nargs='+', type=int, help='filter by class: --class 0, or --class 0 2 3')
    parser.add_argument('--agnostic-nms', action='store_true', help='class-agnostic NMS')
    parser.add_argument('--augment', action='store_true', help='augmented inference')
    parser.add_argument('--update', action='store_true', help='update all models')
    parser.add_argument('--project', default='runs/detect', help='save results to project/name')
    parser.add_argument('--name', default='exp', help='save results to project/name')
    parser.add_argument('--exist-ok', action='store_true', help='existing project/name ok, do not increment')
    opt = parser.parse_args()
    print(opt)
    check_requirements()

    with torch.no_grad():
        if opt.update:  # update all models (to fix SourceChangeWarning)
            for opt.weights in ['yolov5s.pt', 'yolov5m.pt', 'yolov5l.pt', 'yolov5x.pt']:
                detect()
                strip_optimizer(opt.weights)
        else:
            detect()