本教程使用官网教程中指示的 Rollup 作为打包工具,并尽量遵循官网教程的指引进行实践;组件项目的初始化创建方式亦是使用官网提倡的 Vue CLI 工具简便生成。另外组件打包发布到 npm 还可以使用 webpack 作为打包工具,但不在本文讨论范围。
前期准备及版本信息
node: v18.14.2
@vue/cli: 5.0.8
使用 @vue/cli 初始化创建项目,项目生成后,其中依赖包版本信息为:
  "dependencies": {
    "core-js": "^3.8.3",
    "vue": "^2.6.14",
    "vue-router": "^3.5.1",
    "vuex": "^3.6.2"
  },
  "devDependencies": {
    "@babel/core": "^7.12.16",
    "@babel/eslint-parser": "^7.12.16",
    "@vue/cli-plugin-babel": "~5.0.0",
    "@vue/cli-plugin-eslint": "~5.0.0",
    "@vue/cli-plugin-router": "~5.0.0",
    "@vue/cli-plugin-vuex": "~5.0.0",
    "@vue/cli-service": "~5.0.0",
    "eslint": "^7.32.0",
    "eslint-plugin-vue": "^8.0.3",
    "sass": "^1.32.7",
    "sass-loader": "^12.0.0",
    "vue-template-compiler": "^2.6.14"
  }
安装 Rollup 相关开发时依赖
npm install rollup -D
npm install rollup-plugin-vue@5.1.9 -D
npm install @rollup/plugin-buble -D
npm install @rollup/plugin-commonjs -D
npm install @rollup/plugin-image -D
安装完成后的 devDependencies 如下
留意各依赖版本号。根据作者之前的经验,Vue 官网教程中使用的旧版 Rollup 与较新版 Vue 2 存在一些兼容性问题,导致无法编译。故建议读者可以使用当前最新的 Rollup 相关依赖库。但要特别注意的是:rollup-plugin-vue 必须安装 5.x.x 版本,当前最新的 6.x.x 据说只与 Vue 3 兼容,经作者测试,6.x.x 版本在编译项目时的确会报错。
如果仍然出现无法正常编译的问题,可使用和本教程一样的 Vue 和 Rollup 以及相关的各依赖库版本。
  "devDependencies": {
    "@babel/core": "^7.12.16",
    "@babel/eslint-parser": "^7.12.16",
    "@rollup/plugin-buble": "^1.0.2",
    "@rollup/plugin-commonjs": "^24.0.1",
    "@rollup/plugin-image": "^3.0.2",
    "@vue/cli-plugin-babel": "~5.0.0",
    "@vue/cli-plugin-eslint": "~5.0.0",
    "@vue/cli-plugin-router": "~5.0.0",
    "@vue/cli-plugin-vuex": "~5.0.0",
    "@vue/cli-service": "~5.0.0",
    "eslint": "^7.32.0",
    "eslint-plugin-vue": "^8.0.3",
    "rollup": "^3.18.0",
    "rollup-plugin-vue": "^5.1.9",
    "sass": "^1.32.7",
    "sass-loader": "^12.0.0",
    "vue-template-compiler": "^2.6.14"
  }
编写自己的将要发布的组件
在项目 src/components 下新建 my-component.vue

my-component.vue 内容如下
<template>
  <div class="my-component">
    <img :src="logoSrc" />
  </div>
</template>
<script>
import LOGO from "../assets/logo.png";
export default {
  data() {
    return {
      logoSrc: LOGO,
    };
  },
};
</script>
<style lang="scss" scoped>
.my-component {
  width: 100px;
  height: 100px;
  img {
    width: 100%;
    height: 100%;
  }
}
</style>
以上代码还展示了如何在组件中引入图片资源,得益于之前安装的 @rollup/plugin-image 依赖,可用 import 方式直接引入图片资源,图片在编译阶段会转换为 Base64 格式。需要特别主要的是需要用相对路径方式引入图片资源,Vue CLI 生成的项目所支持的 @ 路径引入方式实测无效
编写 wrapper.js
wrapper.js 负责组件导出(export)组件及将组件自动注册到 Vue
在项目 src 文件夹下新建 wrapper.js

wrapper.js 内容如下
// Import vue component
import component from './components/my-component.vue';

// Declare install function executed by Vue.use()
export function install(Vue) {
    if (install.installed) return;
    install.installed = true;
    Vue.component('MyComponent', component);
}

// Create module definition for Vue.use()
const plugin = {
    install,
};

// Auto-install when vue is found (eg. in browser via <script> tag)
let GlobalVue = null;
if (typeof window !== 'undefined') {
    GlobalVue = window.Vue;
} else if (typeof global !== 'undefined') {
    GlobalVue = global.Vue;
}
if (GlobalVue) {
    GlobalVue.use(plugin);
}

// To allow use as module (npm/webpack/etc.) export component
export default component;
编写 rollup.config.js
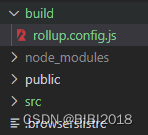
在项目根目录新建 build 文件夹,文件夹内新建 rollup.config.js
rollup.config.js 内容如下
import commonjs from '@rollup/plugin-commonjs'; // Convert CommonJS modules to ES6
import vue from 'rollup-plugin-vue'; // Handle .vue SFC files
import buble from '@rollup/plugin-buble'; // Transpile/polyfill with reasonable browser support
import image from '@rollup/plugin-image';

export default {
    input: 'src/wrapper.js', // Path relative to package.json
    output: {
        name: 'MyComponent',
        exports: 'named',
    },
    plugins: [
        commonjs(),
        image(),
        vue({
            css: true, // Dynamically inject css as a <style> tag
            compileTemplate: true, // Explicitly convert template to render function
        }),
        buble({
            objectAssign: true,
            transforms: {
                asyncAwait: false,
                forOf: false,
            }
        }), // Transpile to ES5
    ],
};
修改 package.json
内容如下
{
  "name": "my-component",
  "version": "0.1.0",
  "keywords": [
    "buble",
    "publish",
    "example",
    "vue"
  ],
  "author": "your name",
  "main": "dist/my-component.umd.js",
  "module": "dist/my-component.esm.js",
  "unpkg": "dist/my-component.min.js",
  "browser": {
    "./sfc": "src/components/my-component.vue"
  },
  "type": "module",
  "private": false,
  "files": [
    "dist/*"
  ],
  "scripts": {
    "serve": "vue-cli-service serve",
    "lint": "vue-cli-service lint",
    "build": "npm run build:umd & npm run build:es & npm run build:unpkg",
    "build:umd": "rollup --config build/rollup.config.js --format umd --file dist/my-component.umd.js",
    "build:es": "rollup --config build/rollup.config.js --format es --file dist/my-component.esm.js",
    "build:unpkg": "rollup --config build/rollup.config.js --format iife --file dist/my-component.min.js"
  },
  "dependencies": {
    ...
  },
  "devDependencies": {
    ...
  }
}
对其中一些字段的解释(详见 package.json 官方解释)
| 字段名 | 解释 |
| name | 发布npm的必须项。组件在npm上的名称,需要在npm中全局唯一。如果 name 在 npm 上已被其它组件占用,发布组件时将报错,但只会提示操作被禁止,不会提示名字被占用,因为 npm 认为你在向同名的那个组件提交新版本,但你本人的账号当然是无权向他人发布的组件提交新版的 |
| version | 发布 npm 的必须项。组件的版本号。每次再次发布新版组件,版本号需要递进 |
| keywords | 在 npm 上可以通过这些关键字搜索到本组件 |
| author | 组件的作者名称 |
| type | 可取值 commonjs 或 module,前者则无扩展名的文件和 .js 结尾文件将被视为 commonjs,后者则无扩展名的文件和 .js 结尾文件将被视为 ES 模块。由于上述组件项目中使用 import 语法加载模块文件,故要指明 type 为 module,否则编译时报错 |
| private | 是否私有项目。只有设为 false,才允许将本组件发布到 npm |
注册 npm 账号
略。读者请自行解决。
命令行登录 npm
使用 npm adduser 指令登录 npm,根据提示输入上一步得到的用户、密码、邮箱等信息。
编译组件
在指向组件项目根目录的命令行下,运行 npm run build 指令,组件会根据 package.json 中的配置进行编译,编译结果在项目根目录的 dist 文件夹中。
发布组件到 npm
运行 npm publish,组件将发布到 npm 上。此后,npm 上可以搜索到你的组件。

