文章目录
- 学习之前,跟你们说点事情,有助于你能快速看完文章
- 一、先应用再学习,代码示例
- 1. 第一个MyBatis程序
- 2. MyBatis整合Spring
- 3. SpringBoot整合MyBatis
- 二、MyBatis整体流程,各组件的作用域和生命周期
- 三、说说MyBatis-config.xml核心配置文件吧
- 四、讲讲xxxMapper.xml文件中的标签吧
- 五、MyBatis剩下的问题,在这里总结一下
参考文章:什么是MyBatis
学习之前,跟你们说点事情,有助于你能快速看完文章
先对MyBatis整套流程做个总结,看懂了就直接跳过这里的示例吧。
假设现在要全部都配置好了,我现在要测试UserMapper接口
- 完成了jar包导入后,需要配置数据源以及xml文件位置
- 创建数据库、实体类、实体接口
- 为每个接口配置xxxMapper.xml文件,规定每个方法做什么
- 测试:获取SqlSessionFactoryBuilder、sqlSessionFactory、sqlSession、xxxMapper
- 执行xxxMapper.方法时需要根据方法名,在核心配置文件找到对象的xxxMapper.xml,然后在xxxMapper.xml找到对应方法的CRUD操
很多同学对classpath这个东西不明白,在MyBatis中的classpath表示:main/java、main/resources 、第三方jar包的根目录
一、先应用再学习,代码示例
1. 第一个MyBatis程序
省流
配置篇:引入jar包、配置核心配置文件mybatis-config.xml、编写MyBatis工具类
数据库:创建数据表
编程篇:创建实体类、创建Mapper层、创建xxxMapper.xml文件
测试篇:MybatisUtils.getSqlseesion();sqlSession.getMapper(UserDao.class);
配置MyBatis
引入MyBatis的Jar包
<!--mysql驱动-->
    <dependency>
      <groupId>mysql</groupId>
      <artifactId>mysql-connector-java</artifactId>
      <version>8.0.21</version>
    </dependency>

  <!--mybatis-->
  <dependency>
      <groupId>org.mybatis</groupId>
      <artifactId>mybatis</artifactId>
      <version>3.5.6</version>
  </dependency>

  <!--junit-->
  <dependency>
    <groupId>junit</groupId>
    <artifactId>junit</artifactId>
    <version>4.13</version>
  </dependency>

	<!--配置全局-->
		<!--在build中配置resource,来防止我们资源到处失败的问题-->
    <build>
        <resources>
            <resource>
                <directory>src/main/resources</directory>
                <includes>
                    <include>**/*.properties</include>
                    <include>**/*.xml</include>
                </includes>
                <filtering>true</filtering>
            </resource>
            <resource>
                <directory>src/main/java</directory>
                <includes>
                    <include>**/*.properties</include>
                    <include>**/*.xml</include>
                </includes>
                <filtering>true</filtering>
            </resource>
        </resources>
    </build>
MyBatis配置类
<?xml version="1.0" encoding="UTF-8" ?>
<!DOCTYPE configuration
        PUBLIC "-//mybatis.org//DTD Config 3.0//EN"
        "http://mybatis.org/dtd/mybatis-3-config.dtd">
<configuration>

    <environments default="development">

        <environment id="development">
            <transactionManager type="JDBC"/>
            <dataSource type="POOLED">
                <property name="driver" value="com.mysql.cj.jdbc.Driver"/>
                <property name="url" value="com.mysql.cj.jdbc.Driver"/>
                <property name="username" value="root"/>
                <property name="password" value="123456"/>
            </dataSource>
        </environment>

    </environments>

    <mappers>
       <mapper resource="com/mybatis/dao/UserMapper.xml"/>
    </mappers>
</configuration>
编写MyBatis工具类
public class MybatisUtils {

    private static SqlSessionFactory sqlSessionFactory;

    static {
        try {
            //使用Mybatis第一步: 获取sqlSessionFactory对象
            String resource = "mybatis-config.xml";
            InputStream inputStream = Resources.getResourceAsStream(resource);
            sqlSessionFactory = new SqlSessionFactoryBuilder().build(inputStream);
        } catch (IOException e) {
            e.printStackTrace();
        }
    }


    //既然有了 SqlSessionFactory,顾名思义,我们可以从中获得 SqlSession 的实例。
    //sqlSession 完全包含了面向数据库执行SQL命令所需的所有方法
    public static SqlSession getSqlseesion() {
        // SqlSession sqlSession = sqlSessionFactory.openSession();
        return sqlSessionFactory.openSession();
    }
}
到这里,MyBatis就已经配置完成了。下面是根据业务需求,应用MyBatis。
数据库搭建
CREATE DATABASE `mybatis`;
USE `mybatis`;
DROP TABLE IF EXISTS `user`;
CREATE TABLE `user` (
`id` int(20) NOT NULL,
`name` varchar(20) DEFAULT NULL,
`pwd` varchar(40) DEFAULT NULL,
PRIMARY KEY (`id`)
) ENGINE=InnoDB DEFAULT CHARSET=utf8;
insert  into `user`(`id`,`name`,`pwd`) values (1,'小明','123456'),(2,'张三','abcdef'),(3,'李四','987654');
编程篇
@Data
@AllArgsConstructor
@NoArgsConstructor
public class User {
   private int id;  //id
   private String name;   //姓名
   private String pwd;   //密码
}
public interface UserMapper {
   //查询全部用户
   List<User> getUserList();
}
编写xxxMapper接口的配置文件xxxMapper.xml
<?xml version="1.0" encoding="UTF-8" ?>
<!DOCTYPE mapper
       PUBLIC "-//mybatis.org//DTD Mapper 3.0//EN"
       "http://mybatis.org/dtd/mybatis-3-mapper.dtd">

<mapper namespace="com.mybatis.dao.UserMapper">
  <select id="getUserList" resultType="com.mybatis.pojo.User">
        select * from mybatis.user
    </select>
</mapper>
测试接口
 @Test
    public void test(){

        SqlSession sqlSession = MybatisUtils.getSqlseesion();

        UserDao userdao = sqlSession.getMapper(UserDao.class);
        List<User> userList = userdao.getUserList();

        for(User user : userList){
            System.out.println(user);
        }

        sqlSession.close();

    }
2. MyBatis整合Spring
省流
配置篇:引入jar包、配置核心配置文件mybatis-config.xml、配置核心配置文件spring-dao.xml
数据库:创建数据表
编程篇:实体类、Mapper接口、xxxMapper.xml文件、UserMapperImpl、bean传入Spring容器
测试篇:ClassPathXmlApplicationContext("spring-dao.xml")context.getBean("userMapper", UserMapper.class);
配置MyBatis+Spring篇
<!--spring核心ioc-->
<dependency>
    <groupId>org.springframework</groupId>
    <artifactId>spring-context</artifactId>
    <version>5.2.5.RELEASE</version>
</dependency>
<!--做spring事务用到的-->
<dependency>
    <groupId>org.springframework</groupId>
    <artifactId>spring-tx</artifactId>
    <version>5.2.5.RELEASE</version>
</dependency>
<dependency>
    <groupId>org.springframework</groupId>
    <artifactId>spring-jdbc</artifactId>
    <version>5.2.5.RELEASE</version>
</dependency>
<!--mybatis依赖-->
<dependency>
    <groupId>org.mybatis</groupId>
    <artifactId>mybatis</artifactId>
    <version>3.5.1</version>
</dependency>
<!--mybatis和spring集成的依赖-->
<dependency>
    <groupId>org.mybatis</groupId>
    <artifactId>mybatis-spring</artifactId>
    <version>1.3.1</version>
</dependency>
<!--mysql驱动-->
<dependency>
    <groupId>mysql</groupId>
    <artifactId>mysql-connector-java</artifactId>
    <version>5.1.9</version>
</dependency>
<!--阿里公司的数据库连接池-->
<dependency>
    <groupId>com.alibaba</groupId>
    <artifactId>druid</artifactId>
    <version>1.1.12</version>
</dependency>


<build>
    <!--目的是把src/main/java目录中的xml文件包含到输出结果中。输出到classes目录中-->
    <resources>
        <resource>
            <directory>src/main/java</directory><!--所在的目录-->
            <includes><!--包括目录下的.properties,.xml 文件都会扫描到-->
                <include>**/*.properties</include>
                <include>**/*.xml</include>
            </includes>
            <filtering>false</filtering>
        </resource>
    </resources>
    <!--指定jdk的版本-->
    <plugins>
        <plugin>
            <artifactId>maven-compiler-plugin</artifactId>
            <version>3.1</version>
            <configuration>
                <source>1.8</source>
                <target>1.8</target>
            </configuration>
        </plugin>
    </plugins>
</build>
创建MyBatis核心配置文件
<?xml version="1.0" encoding="UTF-8" ?>
<!DOCTYPE configuration
        PUBLIC "-//mybatis.org//DTD Config 3.0//EN"
        "http://mybatis.org/dtd/mybatis-3-config.dtd">
<configuration>
    <!--settings:控制mybatis全局行为-->
    <settings>
        <!--设置mybatis输出日志-->
        <setting name="logImpl" value="STDOUT_LOGGING"/>
    </settings>

    <!--设置别名-->
    <typeAliases>
        <!--
            name:实体类所在的包名
            表示com.bjpowernode.domain包中的列名就是别名
            你可以使用Student表示com.bjpowenrode.domain.Student
            包下的所有类的类名则为别名
        -->
        <package name="com.SpringStudy.domain"/>
    </typeAliases>
    <!--
        一个mapper标签指定一个文件的位置。
        从类路径开始的路径信息
         target/classes(类路径)
     -->
    <mappers>
        <!--
         name:是包名, 这个包中的所有mapper.xml一次都能加载
       -->
       <package name="com.SpringStudy.dao"/>
    </mappers>
</configuration>
创建Spring配置文件spring-dao.xml
```xml
<?xml version="1.0" encoding="GBK"?>
<beans xmlns="http://www.springframework.org/schema/beans"
xmlns:xsi="http://www.w3.org/2001/XMLSchema-instance"
xsi:schemaLocation="http://www.springframework.org/schema/beans
https://www.springframework.org/schema/beans/spring-beans.xsd
<!--DataSource:使用Spring的数据源替换Mybatis的配置 c3p0 dbcp druid
我们这里使用Spring提供的JDBC:-->
<bean id="dataSource" class="org.springframework.jdbc.datasource.DriverManagerDataSource">
<property name="driverClassName" value="com.mysql.jdbc.Driver"/>
<property name="url" value="jdbc:mysql://localhost:3306/mybatis?useSSL=false&useUnicode=true&characterEncoding=UTF-8"/>
<property name="username" value="root"/>
<property name="password" value="123456"/>
</bean>
<!--sqlSessionFactory-->
<bean id="sqlSessionFactory" class="org.mybatis.spring.SqlSessionFactoryBean">
<property name="dataSource" ref="dataSource" />
<!--关联mybatis配置文件-->
<property name="configLocation" value="classpath:mybatis-config.xml"/>
<property name="mapperLocations" value="classpath:com/kuang/mapper/*.xml"/>
</bean>
<!--SqlSessionTemplate:就是我们使用的sqlSession-->
<bean id="sqlSession" class="org.mybatis.spring.SqlSessionTemplate">
<!--只能使用构造器注入sqlSessionFactory,因为它没有set方法-->
<constructor-arg index="0" ref="sqlSessionFactory" />
</bean>
</beans>
到这里,Spring与MyBatis整合配置已经完成
数据库篇
数据库搭建
CREATE DATABASE `mybatis`;
USE `mybatis`;
DROP TABLE IF EXISTS `user`;
CREATE TABLE `user` (
`id` int(20) NOT NULL,
`name` varchar(20) DEFAULT NULL,
`pwd` varchar(40) DEFAULT NULL,
PRIMARY KEY (`id`)
) ENGINE=InnoDB DEFAULT CHARSET=utf8;
insert  into `user`(`id`,`name`,`pwd`) values (1,'小明','123456'),(2,'张三','abcdef'),(3,'李四','987654');
编程篇
创建实体类User
@Data
@AllArgsConstructor
@NoArgsConstructor
public class User {
   private int id;  //id
   private String name;   //姓名
   private String pwd;   //密码
}
创建实体类接口Mapper
public interface UserMapper {
   //查询全部用户
   List<User> getUserList();
}
编写xxxMapper接口的配置文件xxxMapper.xml
<?xml version="1.0" encoding="UTF-8" ?>
<!DOCTYPE mapper
       PUBLIC "-//mybatis.org//DTD Mapper 3.0//EN"
       "http://mybatis.org/dtd/mybatis-3-mapper.dtd">

<mapper namespace="com.mybatis.dao.UserMapper">
  <select id="getUserList" resultType="com.mybatis.pojo.User">
        select * from mybatis.user
    </select>
</mapper>
需要UserMapper接口的UserMapperImpl 实现类,私有化sqlSessionTemplate
public class UserMapperImpl implements UserMapper {

    //我们的所有操作,都使用sqlSession来执行,在原来,现在都使用SqlsessionTemplate
    private SqlSessionTemplate sqlSession;

    public void setSqlSession(SqlSessionTemplate sqlSession) {
        this.sqlSession = sqlSession;
    }

    public List<User> selectUser() {
        UserMapper mapper = sqlSession.getMapper(UserMapper.class);
        return mapper.selectUser();
    }
}
将自己写的实现类,注入到Spring配置文件spring-dao.xml
    <bean id="userMapper" class="com.kuang.mapper.UserMapperImpl">
        <property name="sqlSession" ref="sqlSession"/>
    </bean>
测试篇
    @Test
    public void test () throws IOException {

        ApplicationContext context = new ClassPathXmlApplicationContext("spring-dao.xml");

        UserMapper userMapper = context.getBean("userMapper", UserMapper.class);
        for (User user : userMapper.selectUser()) {
            System.out.println(user);
        }
    }
3. SpringBoot整合MyBatis
省流
配置篇:引入jar包、配置核心配置文件application.yml
数据库:创建数据表
编程篇:实体类、Mapper接口、xxxMapper.xml文件、UserMapperImpl、bean传入Spring容器
测试篇:ClassPathXmlApplicationContext("spring-dao.xml")context.getBean("userMapper", UserMapper.class);
配置篇
SpringBoot+MyBatis配置文件
<!--Springboot需要的依赖-->
		<dependency>
			<groupId>org.springframework.boot</groupId>
			<artifactId>spring-boot-starter</artifactId>
		</dependency>

		<dependency>
			<groupId>org.springframework.boot</groupId>
			<artifactId>spring-boot-starter-test</artifactId>
			<scope>test</scope>
		</dependency>

		<dependency>
			<groupId>org.springframework.boot</groupId>
			<artifactId>spring-boot-starter-web</artifactId>
		</dependency>

<!--Mybatis项目需要的依赖-->
    <!--mysqlq驱动-->
    <dependency>
        <groupId>mysql</groupId>
        <artifactId>mysql-connector-java</artifactId>
        <version>8.0.12</version>
    </dependency>
    <!--mybatis-->
    <dependency>
        <groupId>org.mybatis</groupId>
        <artifactId>mybatis</artifactId>
        <version>3.5.4</version>
    </dependency>
    <!--junit-->
    <dependency>
        <groupId>junit</groupId>
        <artifactId>junit</artifactId>
        <version>4.12</version>
        <scope>test</scope>
    </dependency>

<!--Springboot-Mybatis整合需要的依赖-->
<dependency>
    <groupId>org.mybatis.spring.boot</groupId>
    <artifactId>mybatis-spring-boot-starter</artifactId>
    <version>2.1.1</version>
</dependency>


<build>
    <!--目的是把src/main/java目录中的xml文件包含到输出结果中。输出到classes目录中-->
    <resources>
        <resource>
            <directory>src/main/java</directory><!--所在的目录-->
            <includes><!--包括目录下的.properties,.xml 文件都会扫描到-->
                <include>**/*.properties</include>
                <include>**/*.xml</include>
            </includes>
            <filtering>false</filtering>
        </resource>
    </resources>
    <!--指定jdk的版本-->
    <plugins>
        <plugin>
            <artifactId>maven-compiler-plugin</artifactId>
            <version>3.1</version>
            <configuration>
                <source>1.8</source>
                <target>1.8</target>
            </configuration>
        </plugin>
    </plugins>
</build>
配置核心配置类application.yml:放在Resource文件夹下,SpringBoot会自己扫描到
spring:
datasource:
name: pro_man_sys_db
url: jdbc:mysql://localhost:3306/pro_man_sys_db?serverTimezone=UTC
username: root
password: root
driver-class-name: com.mysql.cj.jdbc.Driver
resources:
static-locations: classpath:/static,classpath:/resources,file:/root/uploadFiles
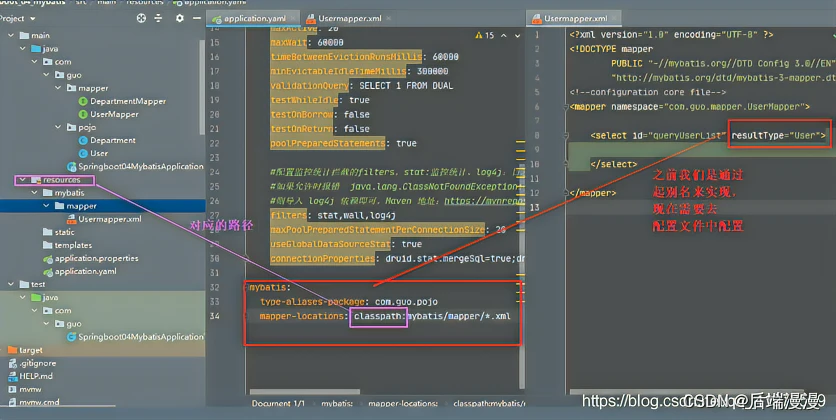
mybatis:
type-aliases-package: com.shiliuzi.model
mapper-locations: classpath:mapper/*.xml
数据库篇
CREATE DATABASE `mybatis`;
USE `mybatis`;
DROP TABLE IF EXISTS `user`;
CREATE TABLE `user` (
`id` int(20) NOT NULL,
`name` varchar(20) DEFAULT NULL,
`pwd` varchar(40) DEFAULT NULL,
PRIMARY KEY (`id`)
) ENGINE=InnoDB DEFAULT CHARSET=utf8;
insert  into `user`(`id`,`name`,`pwd`) values (1,'小明','123456'),(2,'张三','abcdef'),(3,'李四','987654');
编程篇
创建实体类User
@Data
@AllArgsConstructor
@NoArgsConstructor
public class User {
   private int id;  //id
   private String name;   //姓名
   private String pwd;   //密码
}
创建实体类接口Mapper
@Mapper
public interface UserMapper {
   //查询全部用户
   List<User> getUserList();
}
配置Mapper.xml文件
<?xml version="1.0" encoding="UTF-8" ?>
<!DOCTYPE mapper
        PUBLIC "-//mybatis.org//DTD Config 3.0//EN"
        "http://mybatis.org/dtd/mybatis-3-mapper.dtd">
<!--configuration core file-->
<mapper namespace="com.guo.mapper.UserMapper">

    <select id="queryUserList" resultType="User">
    </select>
</mapper>
二、MyBatis整体流程,各组件的作用域和生命周期
不同作用域和生命周期类别是至关重要的,因为错误的使用会导致非常严重的并发问题。
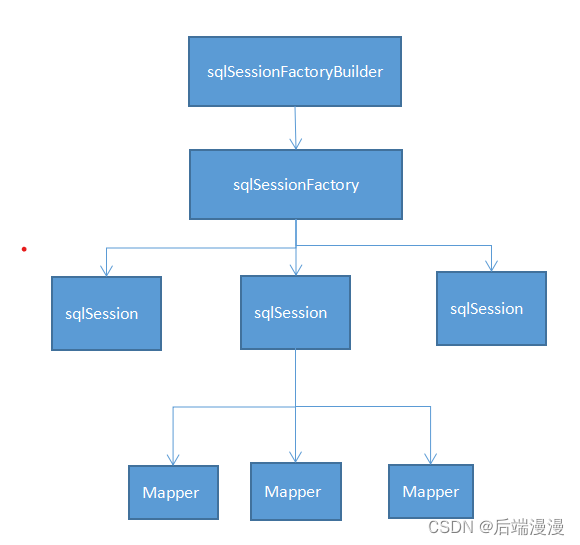
sqlSessionFactoryBuilder
利用xml解析资源来解析MyBatis-config.xml核心配置文件,创建了sqlSessionFactory就可以丢弃
sqlSessionFactory
SqlSessionFactory 一旦被创建就应该在应用的运行期间一直存在,没有任何理由丢弃它或重新创建另一个实例。 使用 SqlSessionFactory 的最佳实践是在应用运行期间不要重复创建多次,多次重建 SqlSessionFactory 被视为一种代码“坏习惯”。因此 SqlSessionFactory 的最佳作用域是应用作用域。 有很多方法可以做到,最简单的就是使用单例模式或者静态单例模式。
sqlSession
每个线程都应该有它自己的 SqlSession 实例。SqlSession 的实例不是线程安全的,因此是不能被共享的,所以它的最佳的作用域是请求或方法作用域。 绝对不能将 SqlSession 实例的引用放在一个类的静态域,甚至一个类的实例变量也不行。
三、说说MyBatis-config.xml核心配置文件吧
主要说说接口和对应xml映射文件的位置问题,可以通过mapper映射标签解决
Mybatis中接口和对应的mapper文件不一定要放在同一个包下,如果放在一起的目的是为了Mybatis进行自动扫描,并且要注意此时Java接口的名称和mapper文件的名称要相同,否则会报异常,由于此时Mybatis会自动解析对应的接口和相应的配置文件,所以就不需要配置mapper文件的位置了。
如果接口和mapper文件不在同一个包下,就不能进行自动扫描解析了,需要对接口和文件分别进行配置。
<!--方式一:使用相对于类路径的资源引用-->
<mappers>
  <mapper resource="org/mybatis/builder/AuthorMapper.xml"/>
</mappers>


<!--方式一:使用映射器接口实现类的完全限定类名 -->
<mappers>
  <mapper class="org.mybatis.builder.AuthorMapper"/>
</mappers>

<!--方式三:将包内的映射器接口实现全部注册为映射器 -->
<mappers>
  <package name="org.mybatis.builder"/>
</mappers>
四、讲讲xxxMapper.xml文件中的标签吧
如果童鞋们将上述的三个项目搭建认真看完并且总结了,我相信MyBatis在使用层面就没什么问题了,这里就再补充一下xxxMapper.xml文件的标签问题就好了。
1. CRUD标签
<!--对象中的属性,可以直接取出来-->
   <select id="getUserById" parameterType="int" resultType="com.kuang.pojo.User">
           select * from mybatis.user where id = #{id}
   </select>

    <insert id="addUser" parameterType="com.kuang.pojo.User">
        insert into mybatis.user (id, name, pwd) values (#{id},#{name},#{pwd});
    </insert>

    <update id="updateUser" parameterType="com.kuang.pojo.User">
        update mybatis.user set name=#{name},pwd=#{pwd}  where id = #{id} ;
    </update>

    <delete id="deleteUser" parameterType="int">
        delete from mybatis.user where id = #{id};
    </delete>
2. parameterType传入参数
parameterType = 实体类
如果 User 类型的参数对象传递到了语句中,会查找 id、username 和 password 属性,然后将它们的值传入预处理语句的参数中。对传递语句参数来说,这种方式真是干脆利落。
<insert id="insertUser" parameterType="User">
  insert into users (id, username, password) values (#{id}, #{username}, #{password})
</insert>
parameterType = map
    <!--对象中的属性,可以直接取出来    传递map的key-->
    <insert id="addUser" parameterType="map">
        insert into mybatis.user (id, pwd) values (#{userid},#{passWord});
    </insert>
    @Test
    public void addUser2(){
        SqlSession sqlSession = MybatisUtils.getSqlSession();

        UserMapper mapper = sqlSession.getMapper(UserMapper.class);


        Map<String, Object> map = new HashMap<String, Object>();

        map.put("userid",5);
        map.put("passWord","2222333");

        mapper.addUser2(map);

        sqlSession.close();
    }
五、MyBatis剩下的问题,在这里总结一下
- MyBatis的事务问题:CRUD需要提交事务!可以通过手动提交和自动提交完成:
- 手动提交:sqlSession.commit();
- 自动提交:sqlSessionFactory.openSession(true);
- 属性名和字段名不一致:通过ReslutMap
但是MyBatis-plus底层会去识别数据库字段,然后遇到下划线就会转化为下一个字母的大写,也就是驼峰命名转化。
   <resultMap id="WaterSupplyProduction" type="com.ruoyi.domain.monitor.WaterSupplyProduction">
        <!-- 定义主键 ,非常重要。如果是多个字段,则定义多个id -->
        <!-- property:主键在pojo中的属性名 -->
        <!-- column:主键在数据库中的列名 -->
        <id property="id" column="id"/>

        <!-- 定义普通属性 -->
        <result property="areaName" column="area_name"/>
        <result property="factoryId" column="factory_id"/>
        <result property="monitorRecordId" column="monitor_record_id"/>
        <result property="riverLevel" column="river_level"/>
        <result property="riverTurbidity" column="river_turbidity"/>
        <result property="riverFlowRate" column="river_flow_rate"/>
        <result property="handledTurbidity" column="handled_turbidity"/>
        <result property="poolLevel" column="pool_level"/>
        <result property="factoryWaterTurbidity" column="factory_water_turbidity"/>
        <result property="factoryWaterPH" column="factory_water_pH"/>
        <result property="factoryWaterChlorine" column="factory_water_chlorine"/>
        <result property="factoryWaterRate" column="factory_water_rate"/>
        <result property="createTime" column="create_time"/>
    </resultMap>

    <select id="selectAll" resultMap="WaterSupplyProduction">
        select * from water_supply_production
    </select>
- 使用注解开发项目:实际上就是将xxxMapper.xml与xxxMapper整合在一起
如果把xxxMapper.xml与xxxMapper整合在一起,那就应该把Mapper映射器位置改成xxxMapper接口位置
    <mappers>
        <mapper class="com.itheima.dao.UserMapper"></mapper>
    </mappers>
public interface UserMapper {
    @Select("select * from user")
    List<User> getUsers();
    //方法存在多个参数,所有的参数前面必须加上@param("id")

    @Select("select * from user where id = #{id}")
    User getUserById(@Param("id") int id);

    @Insert("insert into user(id,name,pwd) values(#{id},#{name},#{paswword})")
    int addUser(User user);

    @Update("update user set name=#{name},pwd=#{password} where id=#{id}")
    int updateUser(User user);

    @Delete("delete from user where id=#{id}")
    int deleteUser(@Param("id") int id);
}
- MyBatis的二级缓存
在MyBatis-config.xml核心配置文件开启二级缓存支持
<!-- 配置二级缓存 -->
<settings>
	<!-- 开启二级缓存的支持 -->
 	<setting name="cacheEnabled" value="true"/>
</settings>
在持久层接口中使用注解配置二级缓存
@CacheNamespace(blocking = true)
public interface UserMapper{

}