一、回顾XML注解 bean 配置
-
创建 bean
public class Student { } -
配置 xml bean
<?xml version="1.0" encoding="UTF-8"?> <beans xmlns="http://www.springframework.org/schema/beans" xmlns:xsi="http://www.w3.org/2001/XMLSchema-instance" xsi:schemaLocation="http://www.springframework.org/schema/beans http://www.springframework.org/schema/beans/spring-beans.xsd"> <bean id="student" class="cn.sycoder.xmlbean.Student"></bean> </beans> -
获取 bean
@Test
public void testXmlBean(){
    ApplicationContext context = new ClassPathXmlApplicationContext("xmlbeans.xml");
    final Student student = (Student)context.getBean("student");
    System.out.println(student);
}
1.存在问题
- 需要写xml 配置,比较麻烦,而已获取也很麻烦
-
注入属性也比较麻烦:构造器,setter
2.解决办法
- 通过注解配置bean 以及注解操作 di 注入
- 注解配置的优点:更简洁,更短,更方便
二、IOC 注解开发
- 版本了解
- 2.0版本时开始支持注解开发(2.0之前就是昨天学习的纯 xml 操作)
- 2.5版本才完善
- 3.0版本支持纯注解开发
1.注解&xml配置Bean
1.1配置用户mapper
- 配置 mapper
public interface UserMapper {
    void save();
}- 配置 mapper 实现类(还没有交给 spring 管理)
public class UserMapperImpl implements UserMapper {
    public void save() {
        System.out.println("保存用户成功");
    }
}
1.2将mapper交给spring管理
使用 @Component 注解,配置 mapper 实现类
@Component
public class UserMapperImpl implements UserMapper {
    public void save() {
        System.out.println("保存用户成功");
    }
}
配置 xml 包扫描路径
<?xml version="1.0" encoding="UTF-8"?>
<beans xmlns="http://www.springframework.org/schema/beans"
       xmlns:xsi="http://www.w3.org/2001/XMLSchema-instance"
       xmlns:context="http://www.springframework.org/schema/context"
       xsi:schemaLocation="http://www.springframework.org/schema/beans http://www.springframework.org/schema/beans/spring-beans.xsd http://www.springframework.org/schema/context https://www.springframework.org/schema/context/spring-context.xsd">
    <context:component-scan base-package="cn.wjcoder.xmlAnnotationBean.mapper"/>
</beans>
1.3通过容器获取bean
获取 applicationContext
@Test
public void testComponent(){
    ApplicationContext context = new ClassPathXmlApplicationContext("xmlAndAnnotation.xml");
    final UserMapper bean = context.getBean(UserMapper.class);
    bean.save();
}
1.4Component详解
- 默认不传参,bean 的名称是首字母小写其余不变
正规命名的时候:UserMapperImpl --- userMapperImpl
不正规命名时候:UUserMapperImpl--- UUserMapperImpl- 给bean 指定名称
@Component("u") 参数就是你bean的名称- 使用位置:具体类的上方,不要使用到接口上
- 作用:将bean 交给spring管理
- 延伸的注解,注意,和Component一模一样的,只不过是用于给程序员区分业务组件的
Controller(控制层)
@Controllerpublic class UserController { //写接口}Service(业务层)
@Service
public class UserServiceImpl implements IUserService {
    public void save() {
    }
}
Repository(持久层)
@Repository
public class UserMapperImpl implements UserMapper {
    public void save() {
        System.out.println("保存用户成功");
    }
}
2.纯注解配置Bean
2.1配置学生Mapper
mapper 接口
  public interface StudentMapper {
      void save();
  }
mapper 接口实现类
 @Repository
  public class StudentMapperImpl implements StudentMapper {
      public void save() {
          System.out.println("保存学生成功");
      }
  }
2.2添加配置类
- @Configuration详解
- 使用 @Configuration
 @Configuration
  public class SpringConfig {
  }
将 SpringConfig 类变成spring 的配置类,替换 xml 配置文件
作用:标识该类是spring的配置类
配置名称,默认首字母小写
使用在类上
- @ComponentScan详解
配置包扫描 @ComponentScan
  @Configuration
  @ComponentScan("cn.sycoder.annotationBean.mapper")
  public class SpringConfig {
  }
作用:配置包扫描路径,当前包及其子包都会扫描
value:指定包的路径,用于扫描并且注册bean
2.3获取bean
获取 applicationContext
ApplicationContext context = new AnnotationConfigApplicationContext(SpringConfig.class);获取 bean
@Test
    public void testAnnotation(){
      ApplicationContext context = new AnnotationConfigApplicationContext(SpringConfig.class);
      System.out.println(context);

      final StudentMapper bean = context.getBean(StudentMapper.class);
      System.out.println(bean);
  }
3.注解开发与xml 的梳理
3.1使用@Component 替代 xml 的过程梳理

3.2使用 @Configuration @ComponentScan 与 xml 配置过程的梳理

4.bean scops
配置类
@Configuration
@ComponentScan({"cn.wjcoder.xmlAnnotationBean"})
public class ScopesConfig {
}
配置 bean
@Component
public class ScopeBean {
}
获取 bean 执行发现bean 单例的
@Test
    public void testScope(){
        ApplicationContext context = new AnnotationConfigApplicationContext(ScopesConfig.class);
        final ScopeBean bean = context.getBean(ScopeBean.class);
        final ScopeBean bean1 = context.getBean(ScopeBean.class);
        System.out.println(bean);
        System.out.println(bean1);
    }
4.1通过注解修改 scope(@Scope)
@Component
@Scope("prototype")
public class ScopeBean {
}
4.2@Scope 详解
- 位置:定义到类上方
- 作用:修改对象创建的作用域
- 属性:默认是singleton(单例的),可以修改成 prototype(原型)
5.bean 生命周期常用注解
@Component
public class LifeBean {

    public LifeBean(){
        System.out.println("构造器执行了");
    }
    @PostConstruct
    public void init(){
        System.out.println("初始化bean");
    }
    @PreDestroy
    public void destroy(){
        System.out.println("销毁bean");
    }
}
5.1@PostConstruct详解
位置:方法上
作用:设置该方法为初始化方法
5.2@PreDestroy
位置:方法上
作用:设置该方法为销毁方法
5.3注解与 xml 的梳理
三、DI 注解开发
1.目前面临问题
-
建立 mapper
public interface EmployeeMapper { void save(); } -
建立 mapper 实现类
@Repository public class EmployeeMapperImpl implements EmployeeMapper { public void save(){ System.out.println("保存员工信息"); } } -
建立 service
public interface IEmployeeService { void save(); } -
建立 service 实现类
@Service public class EmployeeServiceImpl implements IEmployeeService { private EmployeeMapper employeeMapper; public void setEmployeeMapper(EmployeeMapper employeeMapper){ this.employeeMapper = employeeMapper; } public void save() { employeeMapper.save(); } } -
设置配置类
@Configuration @ComponentScan("cn.sycoder.di.di01") public class DiConfig { } -
出现空指针异常

2.使用类型注入
-
@Autowired按照类型注入
-
通过构造器注入
@Autowired public EmployeeServiceImpl(EmployeeMapper employeeMapper) { this.employeeMapper = employeeMapper; } -
通过setter 方法注入
@Autowired public void setEmployeeMapper(EmployeeMapper employeeMapper) { this.employeeMapper = employeeMapper; } -
直接在属性上使用(是以后用得最多的)
@Service public class EmployeeServiceImpl implements IEmployeeService { @Autowired private EmployeeMapper employeeMapper; public void save() { employeeMapper.save(); } }
-
注意:不提供setter 方法以及构造器是使用反射创建对象的
@Test
    public void autowired() throws Exception {
        final Class<?> aClass = Class.forName("cn.wjcoder.di.di01.service.EmployeeServiceImpl");
        final Object o = aClass.newInstance();
        final Field[] fields = aClass.getDeclaredFields();
        AnnotationConfigApplicationContext context = new AnnotationConfigApplicationContext(DiConfig.class);
        final EmployeeMapper bean = context.getBean(EmployeeMapper.class);
        for (Field field : fields) {
            field.setAccessible(true);
            field.set(o,bean);
        }
        final EmployeeServiceImpl service = (EmployeeServiceImpl) o;
        service.save();
}-
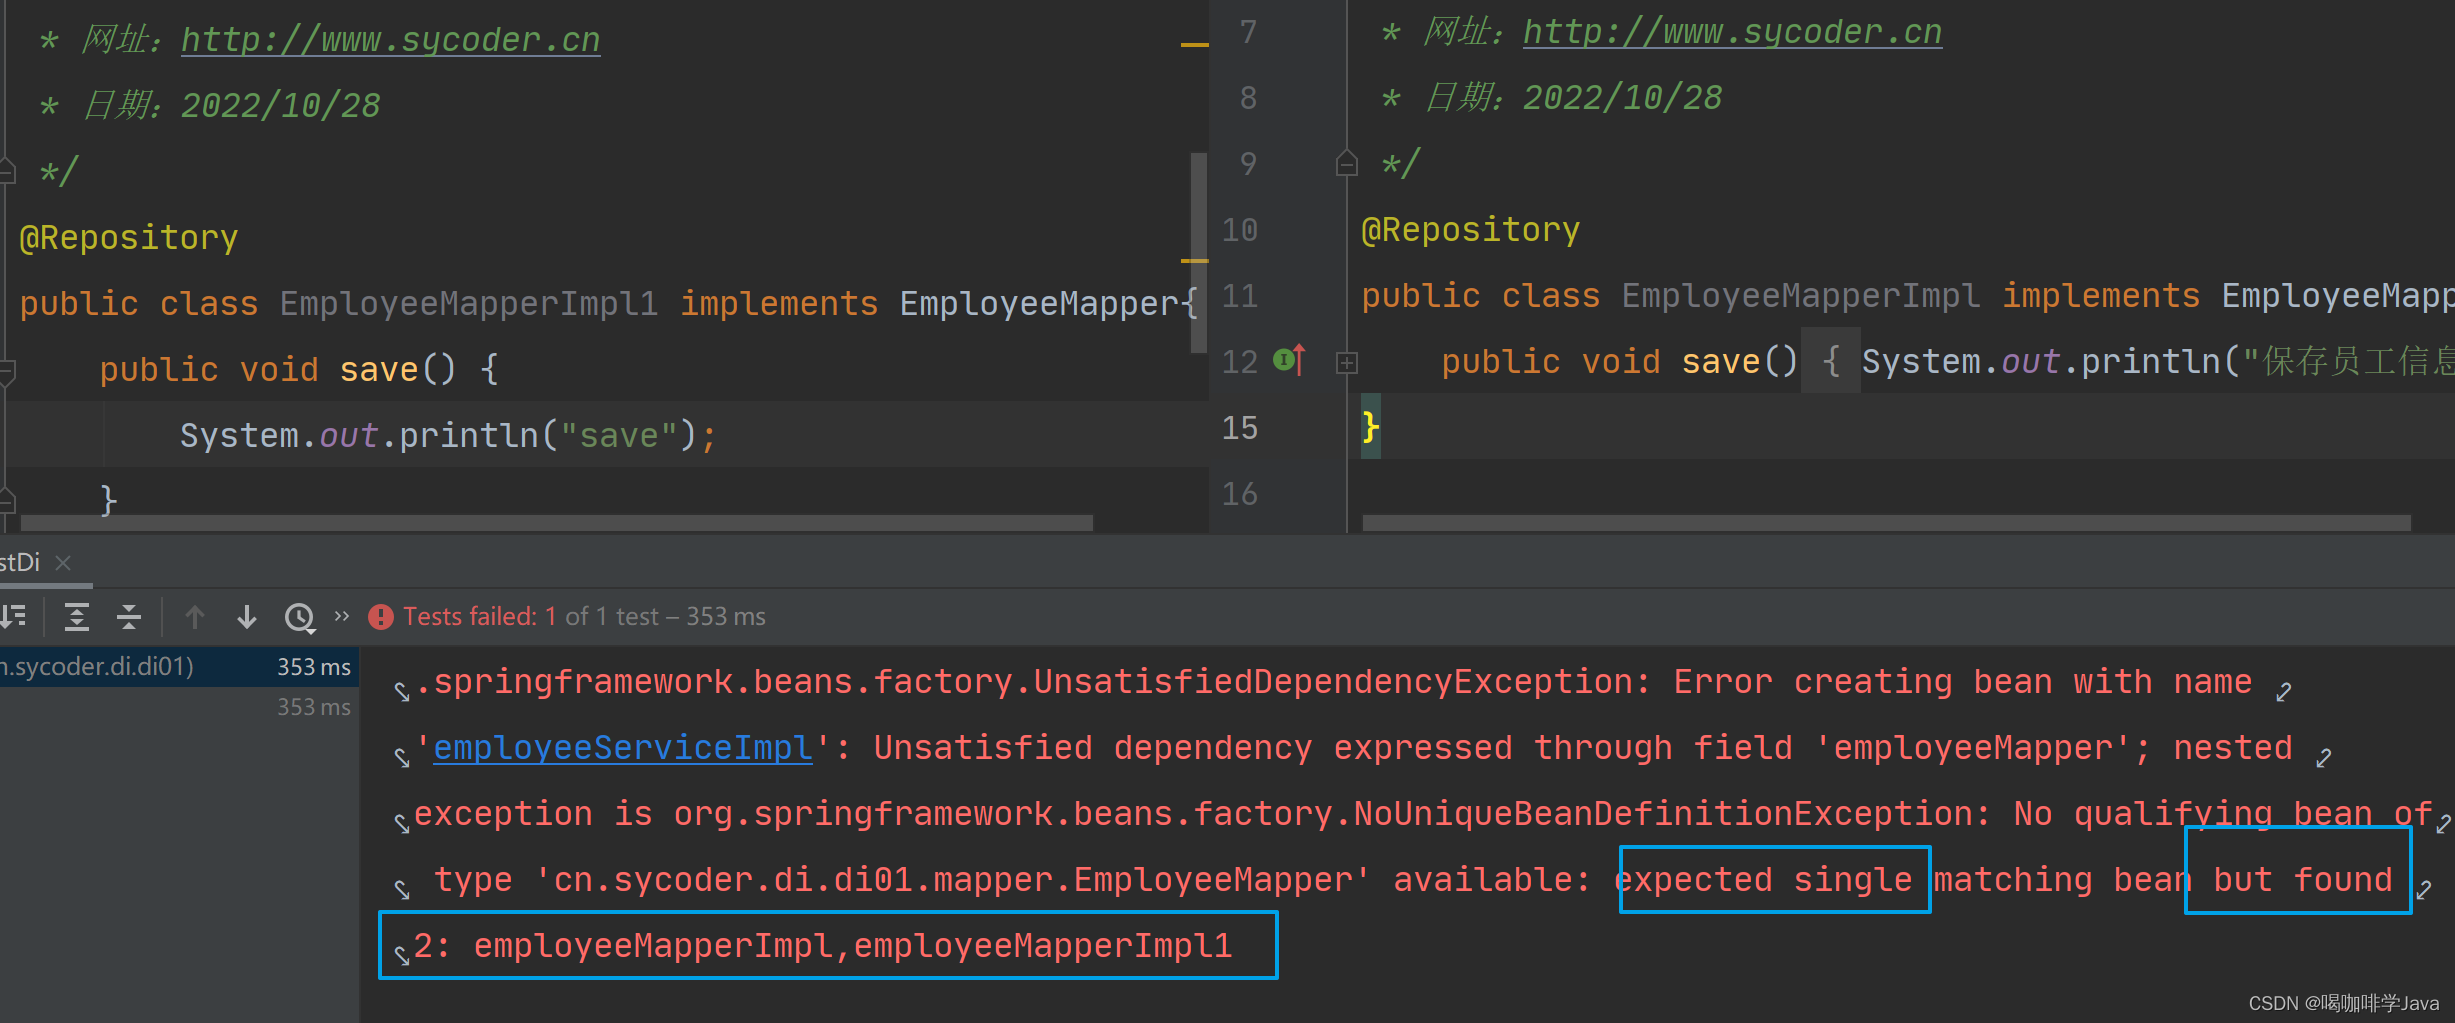
根据类型注入必须只有一个实现类,否则会报错,添加名称也不行
-
属性required=false,如果找不到不会报错
3.使用名称注入
-
@Autowired & @Qualifier
-
@Autowired & @Qualifier必须同时使用,缺一不可
-
解决刚才出现两个实现类没法注入的问题
-
配置mapper 并且指定实现类的名称
public interface EmployeeMapper {
    void save();
}
@Repository("empMapper1")
public class EmployeeMapperImpl implements EmployeeMapper{
    @Override
    public void save() {
        System.out.println("保存员工信息");
    }
}
@Repository("empMapper2")
public class EmployeeMapperImpl1 implements EmployeeMapper {
private EmployeeMapper employeeMapper;
public void save() {
employeeMapper.save();
}
}- 按照名称注入
@Service
public class EmployeeServiceImpl implements IEmployeeService {

    @Autowired(required = false)
    @Qualifier("empMapper1")
    private EmployeeMapper employeeMapper;

    public void save() {
        employeeMapper.save();
    }

}
4.简单数据类型注入
-
@Value
-
修改配置类
@Configuration @ComponentScan("cn.wjcoder.di.di01") @PropertySource("db.properties") public class DiConfig { } -
修改获取方式使用 ${} 的方式
@Component public class DbProperties { @Value("${username}") private String username; @Value("${password}") private String password; public void test(){ System.out.println(username + ":" + password); } }
5.1@PropertySource
-
@PropertySource 加载配置文件
-
位置:配置类上
-
作用导入配置文件
-
对于多个配置文件
@Configuration
@ComponentScan("cn.wjcoder.di.di01")
@PropertySource({"db.properties","xx.properties"})
public class DiConfig {
}
6.注解配置第三方bean
6.1配置 druid
-
添加依赖
<dependency> <groupId>com.alibaba</groupId> <artifactId>druid</artifactId> <version>1.2.8</version> </dependency> -
先添加配置类 SpringConfig
@Configuration public class SpringConfig { public DataSource dataSource(){ final DruidDataSource source = new DruidDataSource(); source.setUsername("root"); source.setPassword("123456"); source.setDriverClassName("com.mysql.cj.jdbc.Driver"); source.setUrl("jdbc:mysql://localhost:3306/mybatis"); return source; } } -
传统做法存在硬编码,DataSource 并且没有交给 spring 管理,每次都需要重新新建 DataSource ,并不存在单例一说
@Test
    public void testDruid(){
        AnnotationConfigApplicationContext context = new AnnotationConfigApplicationContext(SpringConfig.class);
        final SpringConfig bean = context.getBean(SpringConfig.class);
        System.out.println(bean.dataSource());
    }
6.2@Bean 配置 druid
-
使用@Bean 交给 spring 管理
@Configuration public class SpringConfig { @Bean public DataSource dataSource(){ final DruidDataSource source = new DruidDataSource(); source.setUsername("root"); source.setPassword("123456"); source.setDriverClassName("com.mysql.cj.jdbc.Driver"); source.setUrl("jdbc:mysql://localhost:3306/mybatis"); return source; } } -
修改配置的硬编码改成软编码
@Configuration @PropertySource("druidDb.properties") public class SpringConfig { @Value("${jdbc.username}") private String username; @Value("${jdbc.password}") private String password; @Value("${jdbc.url}") private String url; @Value("${jdbc.driverClassName}") private String driver; @Bean public DataSource dataSource(){ final DruidDataSource source = new DruidDataSource(); source.setUsername(username); source.setPassword(password); source.setDriverClassName(driver); source.setUrl(url); return source; } }jdbc.username=root jdbc.password=123456 jdbc.driverClassName=com.mysql.cj.jdbc.Driver jdbc.url=jdbc:mysql://localhost:3306/mybatis -
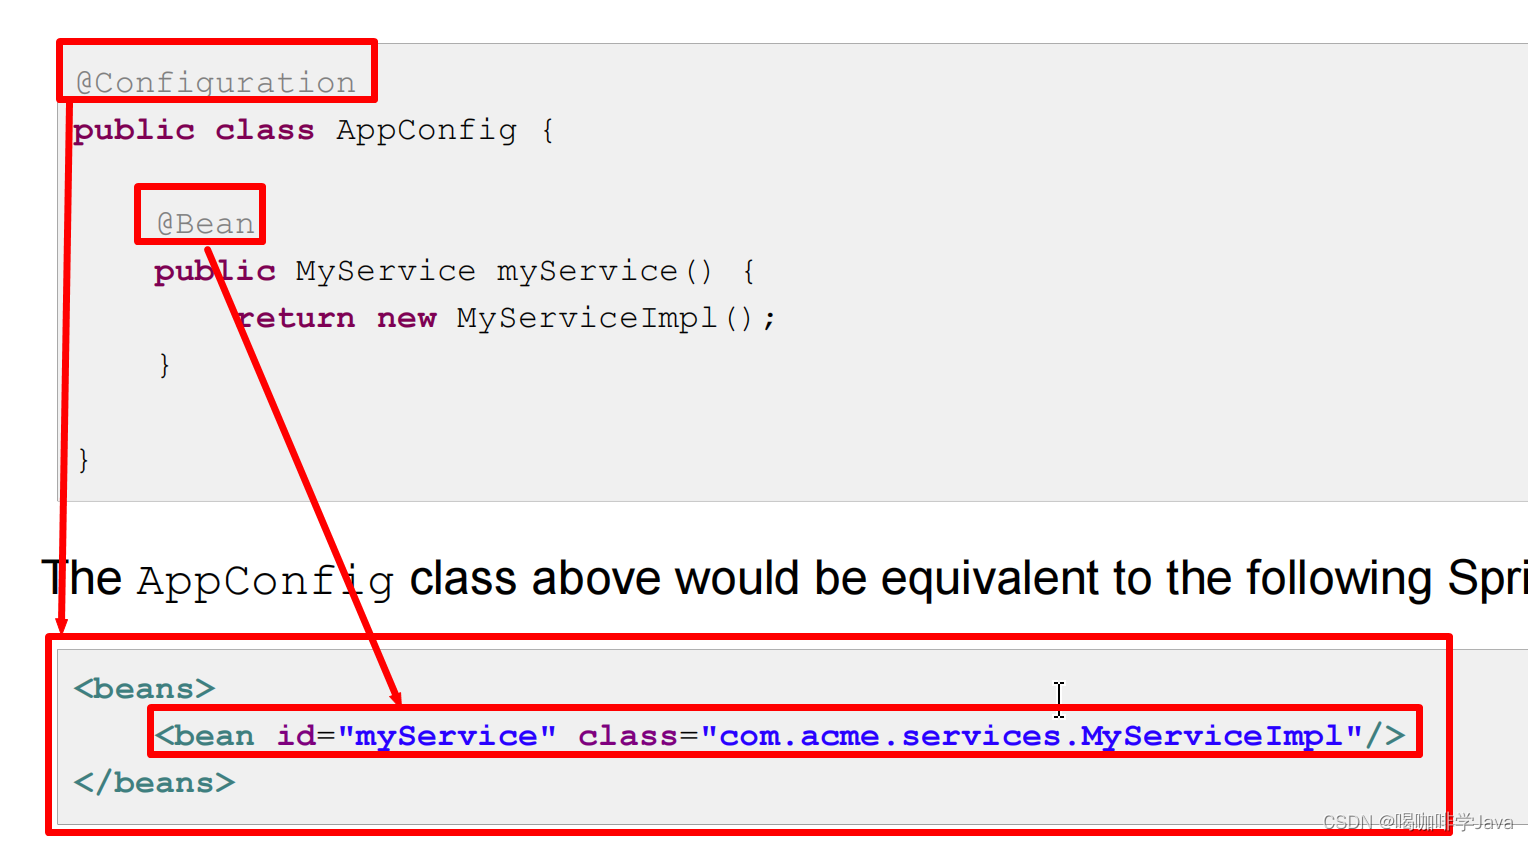
@Bean 与 xml 对应
7.使用@Import 实现配置导入
-
目前存在:任何类都配置到配置类里面,不方便管理,也不方便维护
7.1配置 Component 解决
-
@Component
@Component public class DruidConfig { @Value("{jdbc.username}") private String username; @Value("{jdbc.password}") private String password; @Value("{jdbc.url}") private String url; @Value("{jdbc.driverClassName}") private String driver; @Bean public DataSource dataSource(){ final DruidDataSource source = new DruidDataSource(); source.setUsername(username); source.setPassword(password); source.setDriverClassName(driver); source.setUrl(url); return source; } }
7.2使用@import
-
修改druidConfig
@Configuration public class DruidConfig { @Value("{jdbc.username}") private String username; @Value("{jdbc.password}") private String password; @Value("{jdbc.url}") private String url; @Value("{jdbc.driverClassName}") private String driver; @Bean public DataSource dataSource(){ final DruidDataSource source = new DruidDataSource(); source.setUsername(username); source.setPassword(password); source.setDriverClassName(driver); source.setUrl(url); return source; } } -
修改spring配置类
@Configuration @PropertySource("druidDb.properties") @Import({DruidConfig.class}) public class SpringConfig { } -
如果需要传参,只需要将参数交给spring管理就行了
@Configuration
public class RepositoryConfig {
     @Bean
     public AccountRepository accountRepository(DataSource dataSource) {
        return new JdbcAccountRepository(dataSource);
     }
}
8.注解开发总结
| 注解配置 | xml 配置 | 功能说明 |
|---|---|---|
| @Component @Controller @Service @Repository | bean 标签(id,class) | 定义bean |
| @ComponentScan | <context:component-scan base-package="cn.sycoder.ioc.xmlAnnotationBean"/> | 扫描包加载bean |
| @Autowired @Qualifier @Value | setter 注入 构造器注入 自动装配 | 依赖注入 |
| @Bean | bean 标签, 静态工厂模式, 实例工厂模式, FactoryBean | 配置第三方bean |
| @Scope | bean 标签中的 scope 属性 | 设置作用域 |
| @PostConstructor @PreDestroy | bean 标签中的 init-method / destroy-method | 生命周期相关 |
| @Import | 导入其它的配置类 | |
| @PropertySource({"db.properties","xx.properties"}) | <context:property-placeholder system-properties-mode="NEVER" location="*.properties"/> | 导入配置文件 |






![[1.1_1]计算机系统概述——操作系统的概念、功能和目标](https://img-blog.csdnimg.cn/img_convert/c06e19f2aa66fdabcc8e9e32293a3bdc.png)
![[架构之路-126]-《软考-系统架构设计师》-操作系统-5-虚拟化技术、Docker与虚拟机比较](https://img-blog.csdnimg.cn/img_convert/6682a532785ae32d6f4d992ea27d2458.png)
