关于tf.gather函数batch_dims参数用法的理解
- 0 前言
- 1. 不考虑batch_dims
- 2. 批处理(考虑batch_dims)
- 2.1 batch_dims=1
- 2.2 batch_dims=0
- 2.3 batch_dims>=2
- 2.4 batch_dims再降为1
- 2.5 再将axis降为1
- 2.6 batch_dims<0
- 2.7 batch_dims总结
- 3. 补充
- 4. 参数和返回值
- 5. 其他相关论述
- 6. 附件
截至发稿(2023年3月2日)之前,全网对这个问题的解释都不是很清楚(包括官网和英文互联网),尤其是对batch_dims本质物理含义的解释,以下内容根据tf.gather官网进行翻译,并补充。
0 前言
根据索引indices从参数 axis 轴收集切片。 (弃用的参数,应该指下文的validate_indices)
tf.gather(
    params, indices, validate_indices=None, axis=None, batch_dims=0, name=None
)
已弃用:一些参数已弃用:(validate_indices)。 它们将在未来的版本中被删除。 更新说明: validate_indices参数无效。 索引(indices)总是在 CPU 上验证,从不在 GPU 上验证。
1. 不考虑batch_dims
根据索引indices从轴参数axis收集切片。indices必须是任意维度(通常是1-D)的整数张量。
Tensor.getitem适用于标量、tf.newaxis 和 python切片
tf.gather 扩展索引功能以处理索引(indices)张量。
在最简单的情况下,它与标量索引功能相同:
>>> params = tf.constant(['p0', 'p1', 'p2', 'p3', 'p4', 'p5'])
>>> params[3].numpy()
b'p3'
>>> tf.gather(params, 3).numpy()
b'p3'
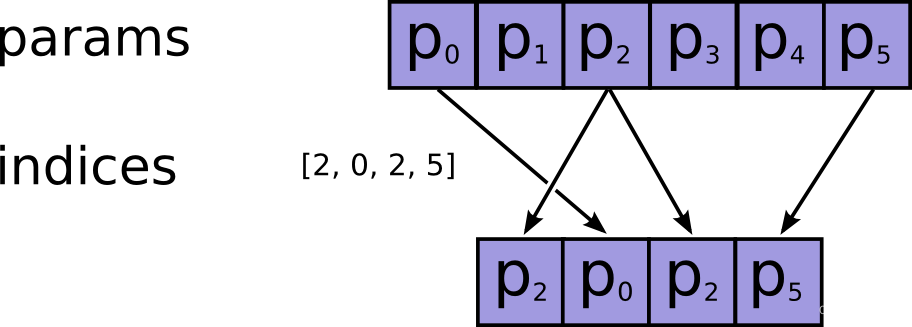
最常见的情况是传递索引的单轴张量(这不能表示为python切片,因为索引不是连续的):
>>> indices = [2, 0, 2, 5]
>>> tf.gather(params, indices).numpy()
array([b'p2', b'p0', b'p2', b'p5'], dtype=object)
过程如下图所示:
索引可以有任何形状(shape)。 当参数params有 1 个轴(axis)时,输出形状等于输入形状:
>>> tf.gather(params, [[2, 0], [2, 5]]).numpy()
array([[b'p2', b'p0'],
[b'p2', b'p5']], dtype=object)
参数params也可以有任何形状。 gather 可以根据参数axis(默认为 0)在任何轴(axis)上选择切片。 它下面例程用于收集(gather)矩阵中的第一行,然后是列:
>>> params = tf.constant([[0, 1.0, 2.0],
...                       [10.0, 11.0, 12.0],
...                       [20.0, 21.0, 22.0],
...                       [30.0, 31.0, 32.0]])
>>> tf.gather(params, indices=[3,1]).numpy()
array([[30., 31., 32.],
              [10., 11., 12.]], dtype=float32)
>>> tf.gather(params, indices=[2,1], axis=1).numpy()
array([[ 2., 1.],
              [12., 11.],
              [22., 21.],
              [32., 31.]], dtype=float32)
更一般地说:输出形状与输入形状相同,索引轴(indexed-axis)由索引(indices)的形状代替。
>>> def result_shape(p_shape, i_shape, axis=0):
...   return p_shape[:axis] + i_shape + p_shape[axis+1:]
>>>
>>> result_shape([1, 2, 3], [], axis=1)
[1, 3]
>>> result_shape([1, 2, 3], [7], axis=1)
[1, 7, 3]
>>> result_shape([1, 2, 3], [7, 5], axis=1)
[1, 7, 5, 3]
例如下面的例程:
>>> params.shape.as_list()
[4, 3]
>>> indices = tf.constant([[0, 2]])
>>> tf.gather(params, indices=indices, axis=0).shape.as_list()
[1, 2, 3]
>>> tf.gather(params, indices=indices, axis=1).shape.as_list()
[4, 1, 2]
>>> params = tf.random.normal(shape=(5, 6, 7, 8))
>>> indices = tf.random.uniform(shape=(10, 11), maxval=7, dtype=tf.int32)
>>> result = tf.gather(params, indices, axis=2)
>>> result.shape.as_list()
[5, 6, 10, 11, 8]
这是因为每个索引都从params中获取一个切片,并将其放置在输出中的相应位置。 对于上面的例子
>>> # For any location in indices
>>> a, b = 0, 1
>>> tf.reduce_all(
...     # the corresponding slice of the result
...     result[:, :, a, b, :] ==
...     # is equal to the slice of `params` along `axis` at the index.
...     params[:, :, indices[a, b], :]
...  ).numpy()
True
除此之外,我们再给indices增加一个元素,当进行gather的时候是沿着params的axis=1的上一个维度的元素进行循环的。即params的axis=0的元素分别为[0, 1.0, 2.0]、[10.0, 11.0, 12.0]、[20.0, 21.0, 22.0]、[30.0, 31.0, 32.0],然后逐次对这四个元素里面的params的axis=1的元素进行取indices对应的元素,四次循环完成整个gather
>>> tf.gather(params, indices=[[2,1], [1,0]], axis=1).numpy()
array([[[ 2.,  1.],
        [ 1.,  0.]],
       [[12., 11.],
        [11., 10.]],
       [[22., 21.],
        [21., 20.]],
       [[32., 31.],
        [31., 30.]]], dtype=float32)
2. 批处理(考虑batch_dims)
batch_dims参数可以让您从批次的每个元素中收集不同的项目。
ps:
可以先直接跳到到2.7 batch_dims总结,前后对照阅读。
2.1 batch_dims=1
使用batch_dims=1相当于在params和indices的第一个轴(是指axis=0轴)上有一个外循环(在axis=0轴上的元素上进行循环):
>>> params = tf.constant([
...     [0, 0, 1, 0, 2],
...     [3, 0, 0, 0, 4],
...     [0, 5, 0, 6, 0]])
>>> indices = tf.constant([
...     [2, 4],
...     [0, 4],
...     [1, 3]])
>>> tf.gather(params, indices, axis=1, batch_dims=1).numpy()
array([[1, 2],
[3, 4],
[5, 6]], dtype=int32)
等价于:
>>> def manually_batched_gather(params, indices, axis):
...            batch_dims=1
...            result = []
...            for p,i in zip(params, indices):  # 这就是上文所说的外循环
...                   r = tf.gather(p, i, axis=axis-batch_dims)
...                   result.append(r)
...            return tf.stack(result)
>>> manually_batched_gather(params, indices, axis=1).numpy()
array([[1, 2],
             [3, 4],
             [5, 6]], dtype=int32)
接下来将循环里zip的结果打印如下,说明外循环将params和indices在第一个轴上先zip成三个元组
pprint(list(zip(params.numpy().tolist(), indices.numpy().tolist())))
# [([0, 0, 1, 0, 2], [2, 4]),
# ([3, 0, 0, 0, 4], [0, 4]),
# ([0, 5, 0, 6, 0], [1, 3])]
然后分别对[0, 0, 1, 0, 2]与[2, 4]、[3, 0, 0, 0, 4]与 [0, 4]、[0, 5, 0, 6, 0]与[1, 3],沿着重组之后的axis = 0(即重组之前的axis = 1,这就是为什么后面所说的必须axis>=batch_dims)进行gather。
2.2 batch_dims=0
所以可以总结:batch_dims是指最终对哪一个维度的张量进行对照gather,所以当batch_dims=0时,实际上就是将两个整个张量组包,也就是上面第一阶段的省略batch_dims的状态。
此时,相当于将两个张量在外面添加一个维度之后再zip,相当于没zip直接gather。所以,以下两条指令等价,因为batch_dims默认值为0。
params = tf.constant([[  # 相对于上文该张量增加了一个维度
    [0, 0, 1, 0, 2],
    [3, 0, 0, 0, 4],
    [0, 5, 0, 6, 0]]])
indices = tf.constant([[  # 相对于上文该张量增加了一个维度
    [2, 4],
    [0, 4],
    [1, 3]]])
pprint(list(zip(params.numpy().tolist(), indices.numpy().tolist())))
# [([[0, 0, 1, 0, 2], [3, 0, 0, 0, 4], [0, 5, 0, 6, 0]],
#   [[2, 4], [0, 4], [1, 3]])]

tf.gather(params, indices, axis=1, batch_dims=0).numpy()
# 等价于
tf.gather(params, indices, axis=1).numpy()
# 输出结果为
# array([[[1, 2],
#         [0, 2],
#         [0, 0]],
#
#        [[0, 4],
#         [3, 4],
#         [0, 0]],
#
#        [[0, 0],
#         [0, 0],
#         [5, 6]]], dtype=int32)
2.3 batch_dims>=2
较高的batch_dims值相当于在params和indices的外轴上进行多个嵌套循环。 所以整体形状函数是
>>> def batched_result_shape(p_shape, i_shape, axis=0, batch_dims=0):
...             return p_shape[:axis] + i_shape[batch_dims:] + p_shape[axis+1:]

>>> batched_result_shape(
...              p_shape=params.shape.as_list(),
...              i_shape=indices.shape.as_list(),
...              axis=1,
...              batch_dims=1)
[3, 2]
>>> tf.gather(params, indices, axis=1, batch_dims=1).shape.as_list()
[3, 2]
举例来说,params和indices升高一个维度,即batch_dims=2,这时按照约束条件只能axis=2
params = tf.constant([  # 升高一个维度
    [[0, 0, 1, 0, 2],
     [3, 0, 0, 0, 4],
     [0, 5, 0, 6, 0]],

    [[1, 8, 4, 2, 2],
     [9, 6, 2, 3, 0],
     [7, 2, 8, 6, 3]]])
indices = tf.constant([  # 升高一个维度
    [[2, 4],
     [0, 4],
     [1, 3]],

    [[1, 3],
     [2, 1],
     [4, 2]]])
# 进行batch_dims高值gather计算
tf.gather(params, indices, axis=2, batch_dims=2).numpy()
# 则上面的运算等价于
def manually_batched_gather_3d(params, indices, axis):
  batch_dims=2
  result = []
  for p,i in zip(params, indices):  # 这里面进行了batch_dims层(也就是2层)嵌套for循环
      result_2 = []
      for p_2, i_2 in zip(p,i):
          r = tf.gather(p_2, i_2, axis=axis-batch_dims)  # 这里告诉我们为什么axis必须>=batch_dims
          result_2.append(r)
      result.append(result_2)
  return tf.stack(result)
manually_batched_gather_3d(params, indices, axis=2).numpy()
# array([[[1, 2],
#         [3, 4],
#         [5, 6]],
#
#        [[8, 2],
#         [2, 6],
#         [3, 8]]], dtype=int32)
下面来解释一下上面程序的运行过程,在上面的manually_batched_gather_3d运行过程中第一层zip的作用如下
pprint(list(zip(params.numpy().tolist(), indices.numpy().tolist())))
# 打印得到如下list,该list有两个元组组成,都是将两个参数的axis=0轴上的两个二维张量,分别进行了组包
# [([[0, 0, 1, 0, 2],
#    [3, 0, 0, 0, 4],
#    [0, 5, 0, 6, 0]],  # 到这儿为params的axis=0轴上的[0]二维张量
#   [[2, 4],
#    [0, 4],
#    [1, 3]]),  # 到这儿为indices的axis=0轴上的[0]二维张量
#
#  ([[1, 8, 4, 2, 2],
#    [9, 6, 2, 3, 0],
#    [7, 2, 8, 6, 3]],  # 到这儿为params的axis=0轴上的[1]二维张量
#   [[1, 3],
#    [2, 1],
#    [4, 2]])]  # 到这儿为indices的axis=0轴上的[1]二维张量
然后进入第一层for循环的第一次循环,将zip之后的两个元组中的第一个元组,拿过来分别赋给p、i:
p=tf.Tensor(
[[0 0 1 0 2]
 [3 0 0 0 4]
 [0 5 0 6 0]], shape=(3, 5), dtype=int32)
i=tf.Tensor(
[[2 4]
 [0 4]
 [1 3]], shape=(3, 2), dtype=int32)
在第二层for之前插入,得到第二层的zip结果
print(list(zip(p.numpy().tolist(), i.numpy().tolist())))
# [([0, 0, 1, 0, 2], [2, 4]),
#  ([3, 0, 0, 0, 4], [0, 4]),
#  ([0, 5, 0, 6, 0], [1, 3])]
则开始第二层for的第一次循环,则
# p_2 = tf.Tensor([0 0 1 0 2], shape=(5,), dtype=int32)
# i_2 = tf.Tensor([2 4], shape=(2,), dtype=int32)
# r = tf.Tensor([1 2], shape=(2,), dtype=int32)
这之后第二层for循环再进行2次循环,退回到第一层大循环,第一层大循环再进行一次上述循环即完成了整个循环。
2.4 batch_dims再降为1
你会发现,下面两条指令等价,即batch_dims=1只有一层循环,只zip一次
tf.gather(params, indices, axis=2, batch_dims=1).numpy()
# 等价于
manually_batched_gather(params, indices, axis=2).numpy()
# [[[[1 2]
#    [0 2]
#    [0 0]]
#
#   [[0 4]
#    [3 4]
#    [0 0]]
#
#   [[0 0]
#    [0 0]
#    [5 6]]]
#
#
#  [[[8 2]
#    [4 8]
#    [2 4]]
#
#   [[6 3]
#    [2 6]
#    [0 2]]
#
#   [[2 6]
#    [8 2]
#    [3 8]]]]
2.5 再将axis降为1
还需修改一下indices,因为下文有对indices的约束——必须在 [0, params.shape[axis]] 范围内,此时params.shape为(2, 3, 5),则params.shape[1]=3,所以indices只能等于0或1或2,如果>=3索引的时候就会溢出。此时还是batch_dims=1只有一层循环,只zip一次,只是改变了索引轴。
indices = tf.constant([
    [[1, 0],
     [2, 1],
     [2, 0]],

    [[2, 0],
     [0, 1],
     [1, 2]]])
tf.gather(params, indices, axis=1, batch_dims=1).numpy()
# 等价于
manually_batched_gather(params, indices, axis=1).numpy()
# array([[[[3, 0, 0, 0, 4],
#          [0, 0, 1, 0, 2]],
#
#         [[0, 5, 0, 6, 0],
#          [3, 0, 0, 0, 4]],
#
#         [[0, 5, 0, 6, 0],
#          [0, 0, 1, 0, 2]]],
#
#
#        [[[7, 2, 8, 6, 3],
#          [1, 8, 4, 2, 2]],
#
#         [[1, 8, 4, 2, 2],
#          [9, 6, 2, 3, 0]],
#
#         [[9, 6, 2, 3, 0],
#          [7, 2, 8, 6, 3]]]], dtype=int32)>>
2.6 batch_dims<0
因为params和indices一共由3各维度——0、1、2,其对应的负维度就是-3、-2、-1,所以下面两条指令等价
a = tf.gather(params, indices, axis=2, batch_dims=1).numpy()
pprint(a)
# 等价于
a = tf.gather(params, indices, axis=2, batch_dims=-2).numpy()
pprint(a)
2.7 batch_dims总结
故个人认为,batch_dims是由batch和dimensions两个单词缩写而成,因为dimensions为复数所以可以翻译为“批量维度数”(自己翻译没有查到文献),可以指批处理batch_dims个维度,如果是正数可以理解成嵌套几层循环或者进行几次zip,如果是负数需要转化为对应的正维度再进行上述理解;也可以是指组包到哪一个维度上,如果是负数也同样适用于这种解释。
batch_dims极大的扩展了gather的功能,使你可以将params和indices在对应的某个维度上分别进行gather然后再stack。
ps:关于batch_dims的这个解释同样也适用于tf.gather_nd。
3. 补充
如果您需要使用诸如 tf.argsort 或 tf.math.top_k 之类的操作的索引,其中索引的最后一个维度在相应位置索引到输入的最后一个维度,这自然会出现。 在这种情况下,您可以使用 tf.gather(values, indices, batch_dims=-1)。
4. 参数和返回值
| 参数 | |
|---|---|
params | 从中收集值的Tensor(张量)。其秩(rank)必须至少为axis + 1。 |
indices | 索引张量。 必须是以下类型之一:int32、int64。 这些值必须在 [0, params.shape[axis]] 范围内。 |
validate_indices | 已弃用,没有任何作用。 索引总是在 CPU 上验证,从不在 GPU 上验证。 注意:在 CPU 上,如果发现越界索引,则会引发错误。 在 GPU 上,如果发现越界索引,则将 0 存储在相应的输出值中。 |
axis | 一个Tensor((张量))。 必须是以下类型之一:int32、int64。 从参数params中的axis轴收集索引。 必须大于或等于batch_dims。 默认为第一个** |
batch_dims | 一个integer(整数)。 批量维度(batch dimensions)的数量。 必须小于或等于 rank(indices)。 |
name | 操作的名称(可选)。 |
| 返回值 |
|---|
一个Tensor(张量), 与params具有相同的类型。 |
5. 其他相关论述
下面几篇博客,相对于官网手册都有新的信息增量,可以作为参考
- 知网《tf.gather()函数》,使用索引推演的方式在维度和操作两个方面进行理解,但是其关于
batch_dims的描述不够充分且有些片面; - 知乎《tf.gather()函数总结》,举了一个新的例子,但是
batch_dims还是只到了1,没有很好的归纳其真正的物理意义; - CSDN《tf.gather函数》,跟上一篇的情况差不多。
6. 附件
上文用到的调试程序,可以忽略
import tensorflow as tf
from pprint import pprint

params = tf.constant([[0, 1.0, 2.0],
                      [10.0, 11.0, 12.0],
                      [20.0, 21.0, 22.0],
                      [30.0, 31.0, 32.0]])
a = tf.gather(params, indices=[[2,1], [1,0]], axis=1).numpy()
pprint(a)

params = tf.constant([
    [0, 0, 1, 0, 2],
    [3, 0, 0, 0, 4],
    [0, 5, 0, 6, 0]])
indices = tf.constant([
    [2, 4],
    [0, 4],
    [1, 3]])

a = tf.gather(params, indices, axis=1, batch_dims=1).numpy()
pprint(a)
a = tf.gather(params, indices, axis=1, batch_dims=-1).numpy()
pprint(a)

def manually_batched_gather(params, indices, axis):
  batch_dims=1
  result = []
  for p,i in zip(params, indices):
    r = tf.gather(p, i, axis=axis-batch_dims)
    result.append(r)
  return tf.stack(result)
manually_batched_gather(params, indices, axis=1).numpy()

pprint(list(zip(params.numpy().tolist(), indices.numpy().tolist())))

tf.gather(params, indices, axis=1, batch_dims=0).numpy()
tf.gather(params, indices, axis=1).numpy()
# tf.gather(params, indices, axis=0, batch_dims=0).numpy()

params = tf.constant([[
    [0, 0, 1, 0, 2],
    [3, 0, 0, 0, 4],
    [0, 5, 0, 6, 0]]])
indices = tf.constant([[
    [2, 4],
    [0, 4],
    [1, 3]]])
pprint(list(zip(params.numpy().tolist(), indices.numpy().tolist())))

# [([[0, 0, 1, 0, 2], [3, 0, 0, 0, 4], [0, 5, 0, 6, 0]],
#   [[2, 4], [0, 4], [1, 3]])]

params_1 = [[0, 0, 1, 0, 2],
   [3, 0, 0, 0, 4],
   [0, 5, 0, 6, 0]],
indices_1 = [[2, 4],
   [0, 4],
   [1, 3]]

# a = tf.gather(params_1, indices_1, axis=0).numpy()

params = tf.constant([
    [[0, 0, 1, 0, 2],
     [3, 0, 0, 0, 4],
     [0, 5, 0, 6, 0]],

    [[1, 8, 4, 2, 2],
     [9, 6, 2, 3, 0],
     [7, 2, 8, 6, 3]]])
indices = tf.constant([
    [[2, 4],
     [0, 4],
     [1, 3]],

    [[1, 3],
     [2, 1],
     [4, 2]]])

a = tf.gather(params, indices, axis=2, batch_dims=2).numpy()
pprint(a)
a = tf.gather(params, indices, axis=2, batch_dims=-1).numpy()
pprint(a)

print(list(zip(params.numpy().tolist(), indices.numpy().tolist())))


# [([[0, 0, 1, 0, 2],
#    [3, 0, 0, 0, 4],
#    [0, 5, 0, 6, 0]],
#   [[2, 4],
#    [0, 4],
#    [1, 3]]),
#
#  ([[1, 8, 4, 2, 2],
#    [9, 6, 2, 3, 0],
#    [7, 2, 8, 6, 3]],
#   [[1, 3],
#    [2, 1],
#    [4, 2]])]

def manually_batched_gather_3(params, indices, axis):
  batch_dims=2
  result = []
  for p,i in zip(params, indices):
      result_2 = []
      print(list(zip(p.numpy().tolist(), i.numpy().tolist())))
      for p_2, i_2 in zip(p,i):
          r = tf.gather(p_2, i_2, axis=axis-batch_dims)
          result_2.append(r)
      result.append(result_2)
  return tf.stack(result)
manually_batched_gather_3(params, indices, axis=2).numpy()

# <tf.Tensor: shape=(2, 3, 2), dtype=int32, numpy=
# array([[[1, 2],
#         [3, 4],
#         [5, 6]],
#
#        [[8, 2],
#         [2, 6],
#         [3, 8]]], dtype=int32)>>

# [([0, 0, 1, 0, 2], [2, 4]),
#  ([3, 0, 0, 0, 4], [0, 4]),
#  ([0, 5, 0, 6, 0], [1, 3])]

a = tf.gather(params, indices, axis=2, batch_dims=1).numpy()
pprint(a)
a = tf.gather(params, indices, axis=2, batch_dims=-2).numpy()
pprint(a)
manually_batched_gather(params, indices, axis=2).numpy()
# [[[[1 2]
#    [0 2]
#    [0 0]]
#
#   [[0 4]
#    [3 4]
#    [0 0]]
#
#   [[0 0]
#    [0 0]
#    [5 6]]]
#
#
#  [[[8 2]
#    [4 8]
#    [2 4]]
#
#   [[6 3]
#    [2 6]
#    [0 2]]
#
#   [[2 6]
#    [8 2]
#    [3 8]]]]

indices = tf.constant([
    [[1, 0],
     [2, 1],
     [2, 0]],

    [[2, 0],
     [0, 1],
     [1, 2]]])

a = tf.gather(params, indices, axis=1, batch_dims=1).numpy()
pprint(a)
a = tf.gather(params, indices, axis=1, batch_dims=-2).numpy()
pprint(a)
manually_batched_gather(params, indices, axis=1).numpy()
# array([[[[3, 0, 0, 0, 4],
#          [0, 0, 1, 0, 2]],
#
#         [[0, 5, 0, 6, 0],
#          [3, 0, 0, 0, 4]],
#
#         [[0, 5, 0, 6, 0],
#          [0, 0, 1, 0, 2]]],
#
#
#        [[[7, 2, 8, 6, 3],
#          [1, 8, 4, 2, 2]],
#
#         [[1, 8, 4, 2, 2],
#          [9, 6, 2, 3, 0]],
#
#         [[9, 6, 2, 3, 0],
#          [7, 2, 8, 6, 3]]]], dtype=int32)>>

![[数据结构]:09-二分查找(顺序表指针实现形式)(C语言实现)](https://img-blog.csdnimg.cn/4da1fbe0a8354b3592515519f873c81d.png)