编辑:OAK中国
首发:oakchina.cn
喜欢的话,请多多👍⭐️✍
内容可能会不定期更新,官网内容都是最新的,请查看首发地址链接。
▌前言
Hello,大家好,这里是OAK中国,我是助手君。
最近咱社群里有几个朋友在将yolox转换成blob的过程有点不清楚,所以我就写了这篇博客。(请夸我贴心!咱的原则:合理要求,有求必应!)
1.其他Yolo转换及使用教程请参考
2.检测类的yolo模型建议使用在线转换(地址),如果在线转换不成功,你再根据本教程来做本地转换。
▌.pt 转换为 .onnx
使用下列脚本(将脚本放到 YOLOv8 根目录中)将 pytorch 模型转换为 onnx 模型,若已安装 openvino_dev,则可进一步转换为 OpenVINO 模型:
示例用法:
python export_onnx.py -w <path_to_model>.pt -imgsz 640
export_onnx.py :
#!/usr/bin/env python3
# -*- coding:utf-8 -*-
import argparse
import json
import math
import subprocess
import sys
import time
import warnings
from pathlib import Path

import onnx
import torch
import torch.nn as nn

warnings.filterwarnings("ignore")

ROOT = Path.cwd()
if str(ROOT) not in sys.path:
    sys.path.append(str(ROOT))

from ultralytics.nn.modules import Detect
from ultralytics.nn.tasks import attempt_load_weights
from ultralytics.yolo.utils import LOGGER


class DetectV8(nn.Module):
    """YOLOv8 Detect head for detection models"""

    dynamic = False  # force grid reconstruction
    export = False  # export mode
    shape = None
    anchors = torch.empty(0)  # init
    strides = torch.empty(0)  # init

    def __init__(self, old_detect):
        super().__init__()
        self.nc = old_detect.nc  # number of classes
        self.nl = old_detect.nl  # number of detection layers
        self.reg_max = (
            old_detect.reg_max
        )  # DFL channels (ch[0] // 16 to scale 4/8/12/16/20 for n/s/m/l/x)
        self.no = old_detect.no  # number of outputs per anchor
        self.stride = old_detect.stride  # strides computed during build

        self.cv2 = old_detect.cv2
        self.cv3 = old_detect.cv3
        self.dfl = old_detect.dfl
        self.f = old_detect.f
        self.i = old_detect.i

    def forward(self, x):
        shape = x[0].shape  # BCHW

        for i in range(self.nl):
            x[i] = torch.cat((self.cv2[i](x[i]), self.cv3[i](x[i])), 1)

        box, cls = torch.cat([xi.view(shape[0], self.no, -1) for xi in x], 2).split(
            (self.reg_max * 4, self.nc), 1
        )
        box = self.dfl(box)
        cls_output = cls.sigmoid()
        # Get the max
        conf, _ = cls_output.max(1, keepdim=True)
        # Concat
        y = torch.cat([box, conf, cls_output], axis=1)
        # Split to 3 channels
        outputs = []
        start, end = 0, 0
        for i, xi in enumerate(x):
            end += xi.shape[-2] * xi.shape[-1]
            outputs.append(
                y[:, :, start:end].view(xi.shape[0], -1, xi.shape[-2], xi.shape[-1])
            )
            start += xi.shape[-2] * xi.shape[-1]

        return outputs

    def bias_init(self):
        # Initialize Detect() biases, WARNING: requires stride availability
        m = self  # self.model[-1]  # Detect() module

        for a, b, s in zip(m.cv2, m.cv3, m.stride):  # from
            a[-1].bias.data[:] = 1.0  # box
            b[-1].bias.data[: m.nc] = math.log(
                5 / m.nc / (640 / s) ** 2
            )  # cls (.01 objects, 80 classes, 640 img)


if __name__ == "__main__":
    parser = argparse.ArgumentParser(
        formatter_class=argparse.ArgumentDefaultsHelpFormatter
    )
    parser.add_argument(
        "-w", "--weights", type=Path, default="./yolov8s.pt", help="weights path"
    )
    parser.add_argument(
        "-imgsz",
        "--img-size",
        nargs="+",
        type=int,
        default=[640, 640],
        help="image size",
    )  # height, width
    parser.add_argument("--opset", type=int, default=12, help="opset version")
    args = parser.parse_args()
    args.img_size *= 2 if len(args.img_size) == 1 else 1  # expand
    LOGGER.info(args)
    t = time.time()

    # Check device
    device = torch.device("cpu")
    # Load PyTorch model
    model = attempt_load_weights(
        str(args.weights), device=device, inplace=True, fuse=True
    )  # load FP32 model

    labels = (
        model.module.names if hasattr(model, "module") else model.names
    )  # get class names

    labels = labels if isinstance(labels, list) else list(labels.values())

    # check num classes and labels
    assert model.nc == len(
        labels
    ), f"Model class count {model.nc} != len(names) {len(labels)}"

    # Replace with the custom Detection Head
    if isinstance(model.model[-1], (Detect)):
        model.model[-1] = DetectV8(model.model[-1])

    num_branches = model.model[-1].nl

    # Input
    img = torch.zeros(1, 3, *args.img_size).to(
        device
    )  # image size(1,3,320,192) iDetection

    # Update model
    model.eval()

    # ONNX export
    try:
        LOGGER.info("\nStarting to export ONNX...")
        output_list = [f"output{i+1}_yolov6r2" for i in range(num_branches)]
        export_file = args.weights.with_suffix(".onnx")  # filename
        torch.onnx.export(
            model,
            img,
            export_file,
            verbose=False,
            opset_version=args.opset,
            training=torch.onnx.TrainingMode.EVAL,
            do_constant_folding=True,
            input_names=["images"],
            output_names=output_list,
            dynamic_axes=None,
        )

        # Checks
        onnx_model = onnx.load(export_file)  # load onnx model
        onnx.checker.check_model(onnx_model)  # check onnx model
        try:
            import onnxsim

            LOGGER.info("\nStarting to simplify ONNX...")
            onnx_model, check = onnxsim.simplify(onnx_model)
            assert check, "assert check failed"
        except Exception as e:
            LOGGER.warning(f"Simplifier failure: {e}")
        LOGGER.info(f"ONNX export success, saved as {export_file}")
    except Exception as e:
        LOGGER.error(f"ONNX export failure: {e}")

    export_json = export_file.with_suffix(".json")
    export_json.with_suffix(".json").write_text(
        json.dumps(
            {
                "anchors": [],
                "anchor_masks": {},
                "coordinates": 4,
                "labels": labels,
                "num_classes": model.nc,
            },
            indent=4,
        )
    )
    LOGGER.info("Labels data export success, saved as %s" % export_json)

    # OpenVINO export
    print("\nStarting to export OpenVINO...")
    export_dir = Path(str(export_file).replace(".onnx", "_openvino"))
    OpenVINO_cmd = (
        "mo --input_model %s --output_dir %s --data_type FP16 --scale 255 --reverse_input_channel --output '%s' "
        % (export_file, export_dir, ",".join(output_list))
    )
    try:
        subprocess.check_output(OpenVINO_cmd, shell=True)
        LOGGER.info(f"OpenVINO export success, saved as {export_dir}")
    except Exception as e:
        LOGGER.warning(f"OpenVINO export failure: {e}")
        LOGGER.info("\nBy the way, you can try to export OpenVINO use:")
        LOGGER.info("\n%s" % OpenVINO_cmd)

    # OAK Blob export
    LOGGER.info("\nThen you can try to export blob use:")
    export_xml = export_dir / export_file.with_suffix(".xml")
    export_blob = export_dir / export_file.with_suffix(".blob")
    blob_cmd = (
        "compile_tool -m %s -ip U8 -d MYRIAD -VPU_NUMBER_OF_SHAVES 6 -VPU_NUMBER_OF_CMX_SLICES 6 -o %s"
        % (export_xml, export_blob)
    )
    LOGGER.info("\n%s" % blob_cmd)

    # Finish
    LOGGER.info("\nExport complete (%.2fs)" % (time.time() - t))
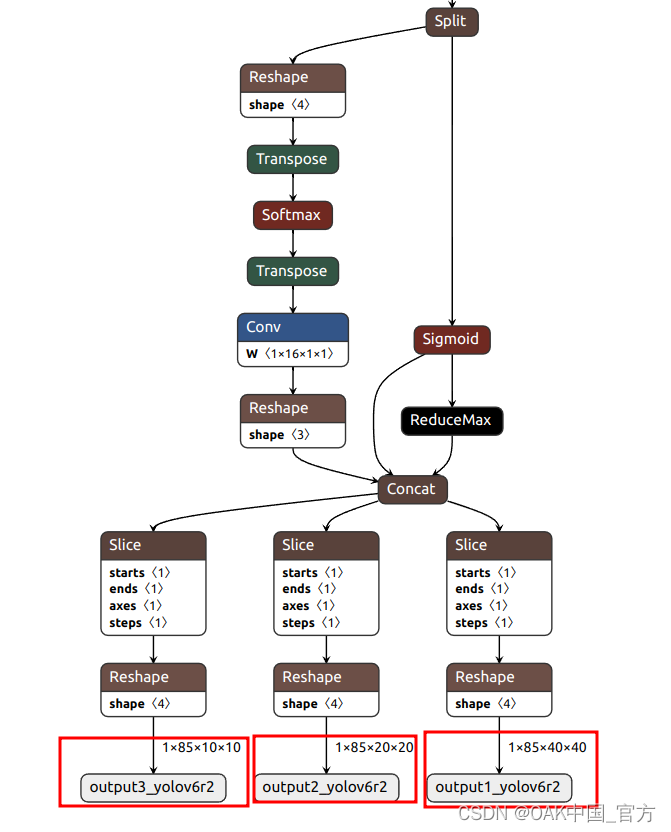
可以使用 Netron 查看模型结构:
▌转换
openvino 本地转换
onnx -> openvino
mo 是 openvino_dev 2022.1 中脚本,
安装命令为
pip install openvino-dev
mo --input_model yolov8n.onnx --scale 255 --reverse_input_channel
openvino -> blob
<path>/compile_tool -m yolov8n.xml \
-ip U8 -d MYRIAD \
-VPU_NUMBER_OF_SHAVES 6 \
-VPU_NUMBER_OF_CMX_SLICES 6
在线转换
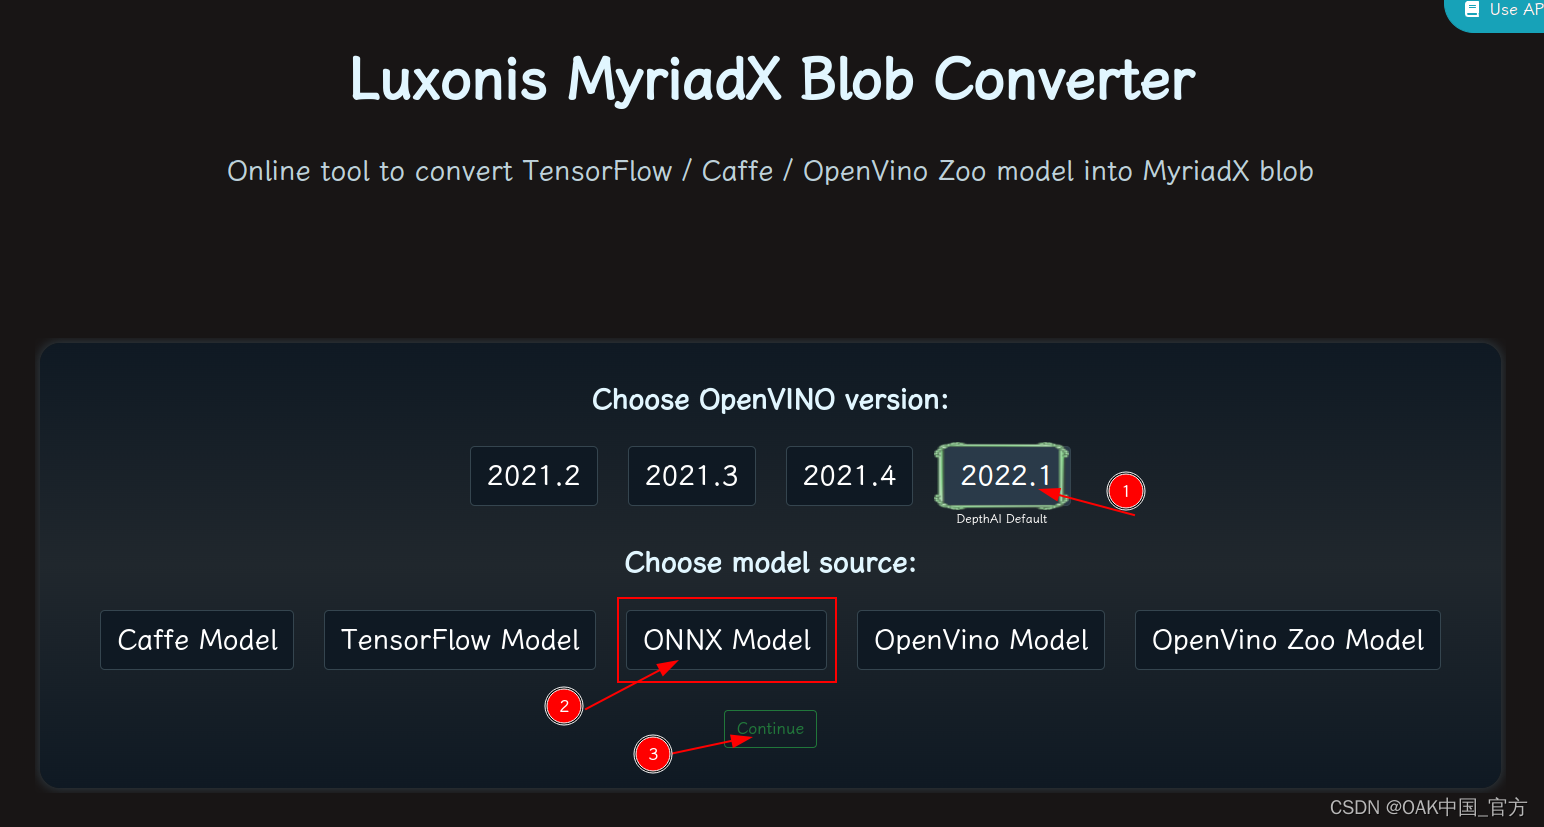
blobconvert 网页 http://blobconverter.luxonis.com/
- 进入网页,按下图指示操作:
- 修改参数,转换模型:
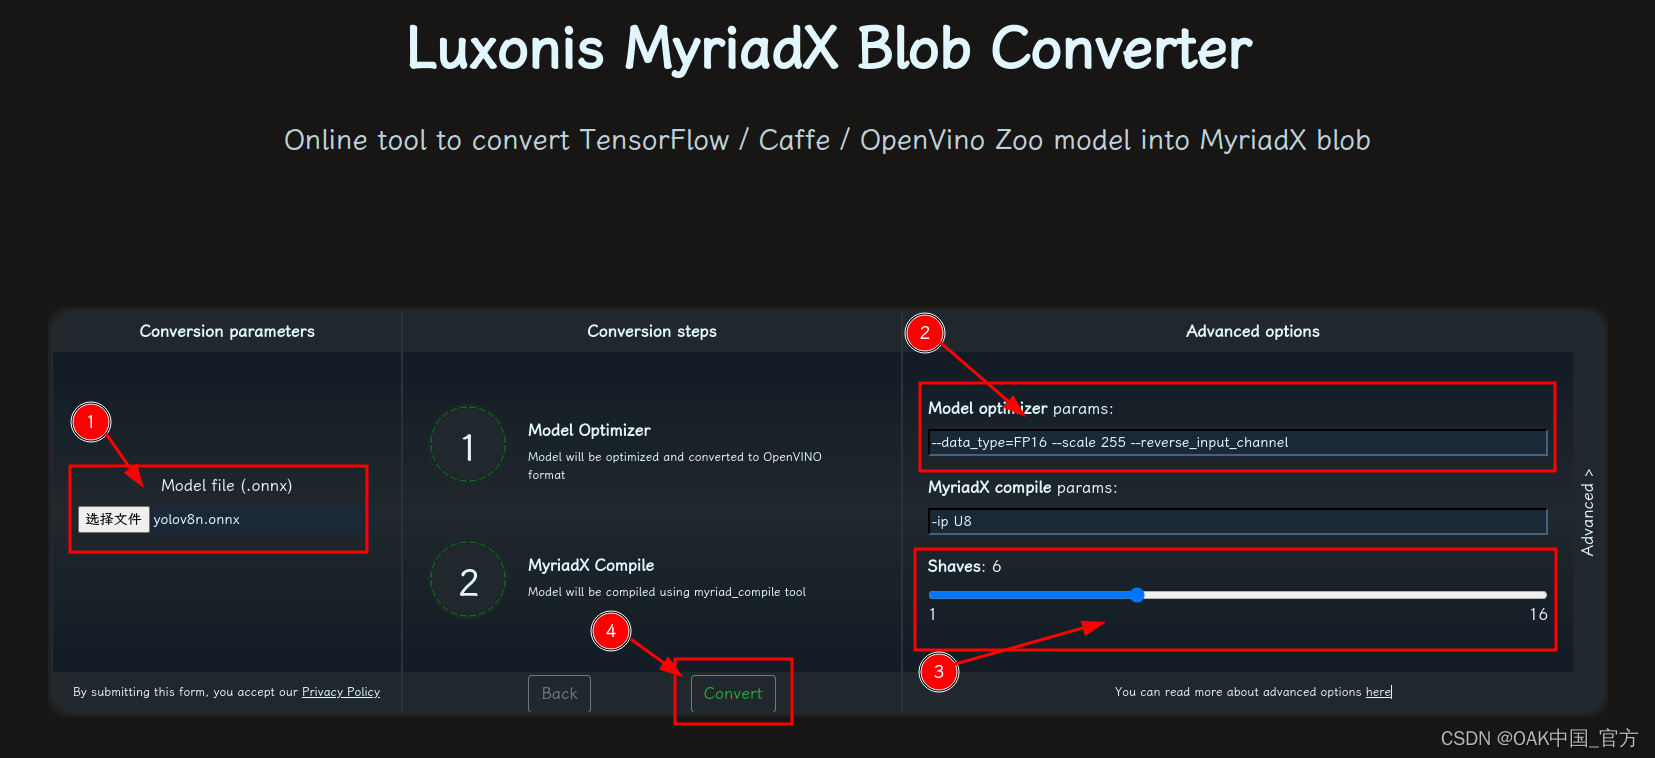
- 选择 onnx 模型
- 修改
optimizer_params为--data_type=FP16 --scale 255 --reverse_input_channel - 修改
shaves为6 - 转换
blobconverter python 代码
blobconverter.from_onnx(
            "yolov8n.onnx",
            optimizer_params=[
                "--scale 255",
                "--reverse_input_channel",
            ],
            shaves=6,
        )
blobconvert cli
blobconverter --onnx yolov8n.onnx -sh 6 -o . --optimizer-params "scale=255 --reverse_input_channel"
▌DepthAI 示例
正确解码需要可配置的网络相关参数:
- setNumClasses - YOLO 检测类别的数量
- setIouThreshold - iou 阈值
- setConfidenceThreshold - 置信度阈值,低于该阈值的对象将被过滤掉
import cv2
import depthai as dai
import numpy as np

model = dai.OpenVINO.Blob("yolov8n.blob")
dim = model.networkInputs.get("images").dims
W, H = dim[:2]
labelMap = [
    # "class_1","class_2","..."
    "class_%s"%i for i in range(80)
]

# Create pipeline
pipeline = dai.Pipeline()

# Define sources and outputs
camRgb = pipeline.create(dai.node.ColorCamera)
detectionNetwork = pipeline.create(dai.node.YoloDetectionNetwork)
xoutRgb = pipeline.create(dai.node.XLinkOut)
nnOut = pipeline.create(dai.node.XLinkOut)

xoutRgb.setStreamName("rgb")
nnOut.setStreamName("nn")

# Properties
camRgb.setPreviewSize(W, H)
camRgb.setResolution(dai.ColorCameraProperties.SensorResolution.THE_1080_P)
camRgb.setInterleaved(False)
camRgb.setColorOrder(dai.ColorCameraProperties.ColorOrder.BGR)
camRgb.setFps(40)

# Network specific settings
detectionNetwork.setBlob(model)
detectionNetwork.setConfidenceThreshold(0.5)
detectionNetwork.setNumClasses(80)
detectionNetwork.setCoordinateSize(4)
detectionNetwork.setAnchors([])
detectionNetwork.setAnchorMasks({})
detectionNetwork.setIouThreshold(0.5)

# Linking
camRgb.preview.link(detectionNetwork.input)
camRgb.preview.link(xoutRgb.input)
detectionNetwork.out.link(nnOut.input)

# Connect to device and start pipeline
with dai.Device(pipeline) as device:
    # Output queues will be used to get the rgb frames and nn data from the outputs defined above
    qRgb = device.getOutputQueue(name="rgb", maxSize=4, blocking=False)
    qDet = device.getOutputQueue(name="nn", maxSize=4, blocking=False)

    frame = None
    detections = []
    color2 = (255, 255, 255)

    # nn data, being the bounding box locations, are in <0..1> range - they need to be normalized with frame width/height
    def frameNorm(frame, bbox):
        normVals = np.full(len(bbox), frame.shape[0])
        normVals[::2] = frame.shape[1]
        return (np.clip(np.array(bbox), 0, 1) * normVals).astype(int)

    def displayFrame(name, frame):
        color = (255, 0, 0)
        for detection in detections:
            bbox = frameNorm(frame, (detection.xmin, detection.ymin, detection.xmax, detection.ymax))
            cv2.putText(frame, labelMap[detection.label], (bbox[0] + 10, bbox[1] + 20), cv2.FONT_HERSHEY_TRIPLEX, 0.5, 255)
            cv2.putText(frame, f"{int(detection.confidence * 100)}%", (bbox[0] + 10, bbox[1] + 40), cv2.FONT_HERSHEY_TRIPLEX, 0.5, 255)
            cv2.rectangle(frame, (bbox[0], bbox[1]), (bbox[2], bbox[3]), color, 2)
        # Show the frame
        cv2.imshow(name, frame)

    while True:
        inRgb = qRgb.tryGet()
        inDet = qDet.tryGet()

        if inRgb is not None:
            frame = inRgb.getCvFrame()

        if inDet is not None:
            detections = inDet.detections


        if frame is not None:
            displayFrame("rgb", frame)

        if cv2.waitKey(1) == ord('q'):
            break
▌参考资料
https://www.oakchina.cn/2023/02/24/yolov8-blob/
https://docs.oakchina.cn/en/latest/
https://www.oakchina.cn/selection-guide/
OAK中国
| OpenCV AI Kit在中国区的官方代理商和技术服务商
| 追踪AI技术和产品新动态
戳「+关注」获取最新资讯↗↗
