导入模块
import hashlib
import os
import tarfile
import zipfile
import requests
import numpy as np
import pandas as pd
import mindspore
import mindspore.dataset as ds
from mindspore import nn
import mindspore.ops as ops
import mindspore.numpy as mnp
from mindspore import Tensor
from IPython import display
from matplotlib import pyplot as plt
数据预处理
数据下载:https://www.kaggle.com/datasets/ahsan81/hotel-reservations-classification-dataset
train_data = pd.read_csv("Hotel Reservations_train.csv")
test_data = pd.read_csv("Hotel Reservations_test.csv")

print(train_data.shape)
print(test_data.shape)
(30000, 20)
(6275, 20)
# 可去掉第0列与第1列的信息
print(train_data.iloc[0:4, [0, 1, 2, -3, -2, -1]])
   Unnamed: 0 Booking_ID  no_of_adults  avg_price_per_room  \
0           0   INN00001             2               65.00
1           1   INN00002             2              106.68
2           2   INN00003             1               60.00
3           3   INN00004             2              100.00

   no_of_special_requests booking_status
0                       0   Not_Canceled
1                       1   Not_Canceled
2                       0       Canceled
3                       0       Canceled
# 将train_data和test_data合并,后面做数据预处理方便
all_features = pd.concat((train_data.iloc[:, 2:-1], test_data.iloc[:, 2:-1]))

all_features
| no_of_adults | no_of_children | no_of_weekend_nights | no_of_week_nights | type_of_meal_plan | required_car_parking_space | room_type_reserved | lead_time | arrival_year | arrival_month | arrival_date | market_segment_type | repeated_guest | no_of_previous_cancellations | no_of_previous_bookings_not_canceled | avg_price_per_room | no_of_special_requests | |
|---|---|---|---|---|---|---|---|---|---|---|---|---|---|---|---|---|---|
| 0 | 2 | 0 | 1 | 2 | Meal Plan 1 | 0 | Room_Type 1 | 224 | 2017 | 10 | 2 | Offline | 0 | 0 | 0 | 65.00 | 0 |
| 1 | 2 | 0 | 2 | 3 | Not Selected | 0 | Room_Type 1 | 5 | 2018 | 11 | 6 | Online | 0 | 0 | 0 | 106.68 | 1 |
| 2 | 1 | 0 | 2 | 1 | Meal Plan 1 | 0 | Room_Type 1 | 1 | 2018 | 2 | 28 | Online | 0 | 0 | 0 | 60.00 | 0 |
| 3 | 2 | 0 | 0 | 2 | Meal Plan 1 | 0 | Room_Type 1 | 211 | 2018 | 5 | 20 | Online | 0 | 0 | 0 | 100.00 | 0 |
| 4 | 2 | 0 | 1 | 1 | Not Selected | 0 | Room_Type 1 | 48 | 2018 | 4 | 11 | Online | 0 | 0 | 0 | 94.50 | 0 |
| ... | ... | ... | ... | ... | ... | ... | ... | ... | ... | ... | ... | ... | ... | ... | ... | ... | ... |
| 6270 | 3 | 0 | 2 | 6 | Meal Plan 1 | 0 | Room_Type 4 | 85 | 2018 | 8 | 3 | Online | 0 | 0 | 0 | 167.80 | 1 |
| 6271 | 2 | 0 | 1 | 3 | Meal Plan 1 | 0 | Room_Type 1 | 228 | 2018 | 10 | 17 | Online | 0 | 0 | 0 | 90.95 | 2 |
| 6272 | 2 | 0 | 2 | 6 | Meal Plan 1 | 0 | Room_Type 1 | 148 | 2018 | 7 | 1 | Online | 0 | 0 | 0 | 98.39 | 2 |
| 6273 | 2 | 0 | 0 | 3 | Not Selected | 0 | Room_Type 1 | 63 | 2018 | 4 | 21 | Online | 0 | 0 | 0 | 94.50 | 0 |
| 6274 | 2 | 0 | 1 | 2 | Meal Plan 1 | 0 | Room_Type 1 | 207 | 2018 | 12 | 30 | Offline | 0 | 0 | 0 | 161.67 | 0 |
36275 rows × 17 columns
# 将所有缺失的值替换为相应特征的平均值。 通过将特征重新缩放到零均值和单位方差来标准化数据

# 先将为数字类型的列取出来,dtypes[all_features.dtypes != 'object'].index 返回类型是数字的列的索引
numeric_features = all_features.dtypes[all_features.dtypes != 'object'].index
# 之后对其应用apply方法 apply中对每列进行了标准化(Z-score标准化方法)
all_features[numeric_features] = all_features[numeric_features].apply(
    lambda x: (x - x.mean()) / (x.std()))
# 在标准化数据之后,所有均值消失,因此我们可以将缺失值设置为0
all_features[numeric_features] = all_features[numeric_features].fillna(0)
# 处理离散值。我们用独热编码替换它们
# 独热编码:例如,“MSZoning”包含值“RL”和“Rm”。 我们将创建两个新的指示器特征“MSZoning_RL”和“MSZoning_RM”,其值为0或1。

print(all_features.shape)

# “Dummy_na=True”将“na”(缺失值)视为有效的特征值,并为其创建指示符特征
all_features = pd.get_dummies(all_features, dummy_na=True)

print(all_features.shape)
(36275, 17)
(36275, 33)
all_labels = pd.concat((train_data.iloc[:,-1], test_data.iloc[:, -1]))

change = {'Not_Canceled':1,'Canceled':0}
all_labels = all_labels.map(change)
all_labels
0       1
1       1
2       0
3       0
4       0
       ..
6270    1
6271    0
6272    1
6273    0
6274    1
Name: booking_status, Length: 36275, dtype: int64
n_train = train_data.shape[0]         # 提取训练样本数
train_features = all_features[:n_train].values.astype(np.float32)      # 注意要统一数据的类型:np.float32
test_features = all_features[n_train:].values.astype(np.float32)
train_labels = all_labels.iloc[:n_train].values.astype(np.int64)
test_labels = all_labels.iloc[n_train:].values.astype(np.int64)
class SyntheticData():
    def __init__(self,features,labels):
        self.features, self.labels = features , labels

    def __getitem__(self, index):   # __getitem__(self, index) 一般用来迭代序列(常见序列如:列表、元组、字符串)
        return self.features[index], self.labels[index]

    def __len__(self):
        return len(self.labels)
# 数据集
train_dataset= ds.GeneratorDataset(source=SyntheticData(train_features, train_labels), column_names=['features', 'label'],
                                    python_multiprocessing=False)

test_dataset= ds.GeneratorDataset(source=SyntheticData(test_features, test_labels ), column_names=['features', 'label'],
                                   python_multiprocessing=False)
构建模型
class Accumulator:
    """累加器"""
    def __init__(self, n):
        self.data = [0.0] * n

    def add(self, *args):
        self.data = [a + float(b) for a, b in zip(self.data, args)]

    def reset(self):
        self.data = [0.0] * len(self.data)

    def __getitem__(self, idx):
        return self.data[idx]
def accuracy(y_hat, y):
    """计算预测正确的数量"""
    if len(y_hat.shape) > 1 and y_hat.shape[1] > 1:   # 判断y_hat是不是矩阵
        y_hat = y_hat.argmax(axis=1)                  # 得到每样本预测概率最大所属分类的下标
    cmp = y_hat.asnumpy() == y.asnumpy()              # y_hat.asnumpy() == y.asnumpy()返回的是一个布尔数组
    return float(cmp.sum())


def evaluate_accuracy(net, data_iter):
    """计算在指定数据集上模型的精度"""
    metric = Accumulator(2)         # 累加器,metric[0]记录正确预测数,metric[1]记录预测总数
    for X, y in data_iter:
        metric.add(accuracy(net(X), y), y.size)
    return metric[0] / metric[1]    # 正确预测数 / 预测总数
def train_epoch( train_iter, learning_rate, weight_decay, batch_size):
    """训练模型一个迭代周期"""
    net = nn.SequentialCell([nn.Dense(all_features.shape[1], 32),
                             nn.ReLU(),
                             nn.Dense(32, 16),
                             nn.ReLU(),
                             nn.Dense(16, 2)])

    loss = nn.SoftmaxCrossEntropyWithLogits(sparse=True, reduction='mean')

    #optim = nn.SGD(net.trainable_params(), learning_rate = learning_rate, weight_decay = weight_decay)
    optim = nn.Adam(net.trainable_params(), learning_rate = learning_rate, weight_decay = weight_decay)

    net_with_loss = nn.WithLossCell(net, loss)
    net_train = nn.TrainOneStepCell(net_with_loss, optim)
    metric = Accumulator(3)
    for X, y in train_iter:
        l = net_train(X, y)
        y_hat = net(X)
        metric.add(float(l.sum().asnumpy()), accuracy(y_hat, y), y.size)
    return metric[0] / metric[2], metric[1] / metric[2] ,net      # 误差 / 预测总数 ,正确预测数 / 预测总数
def trainer( train_iter, test_iter, num_epochs, learning_rate, weight_decay, batch_size, train_acc_plot, test_acc_plot):
    """训练模型"""
    train_iter = train_iter.batch(batch_size = batch_size, num_parallel_workers=1)
    test_iter = test_iter.batch(batch_size = batch_size, num_parallel_workers=1)

    for epoch in range(num_epochs):
        train_metrics = train_epoch(train_iter, learning_rate, weight_decay, batch_size)
        train_loss, train_acc, net = train_metrics
        test_acc = evaluate_accuracy(net, test_iter)

        train_acc_plot.append(float(train_acc))
        test_acc_plot.append(float(test_acc))

    print('最终训练集精度:', train_acc, '最终测试集精度:',test_acc )

    # 检测
    assert train_loss < 0.6, train_loss
    assert train_acc <= 1 and train_acc > 0.7, train_acc
    assert test_acc <= 1 and test_acc > 0.7, test_acc
训练
num_epochs,  weight_decay, batch_size  =20, 0, 64

# 动态学习率
learning_rate = 0.1
end_learning_rate = 0.05
decay_steps = 6
power = 0.5
learning_rate  = nn.PolynomialDecayLR(learning_rate, end_learning_rate, decay_steps, power)

train_acc_plot=[]
test_acc_plot=[]
trainer( train_dataset, test_dataset, num_epochs, learning_rate, weight_decay, batch_size, train_acc_plot, test_acc_plot)
最终训练集精度: 0.8078666666666666 最终测试集精度: 0.8124302788844622
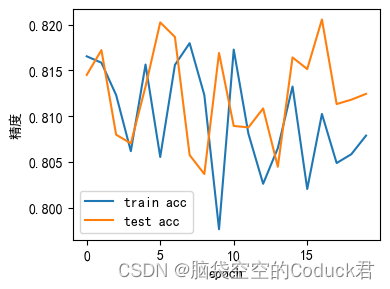
# 构建loss-step曲线可了解loss随epoch的变化情况

plt.rcParams['font.sans-serif']=['SimHei']
plt.rcParams['axes.unicode_minus']=False

x=np.linspace(0, num_epochs-1,num_epochs)

plt.figure(figsize=(4,3))
plt.xlabel(u"epoch")
plt.ylabel(u"精度")
plt.plot(x, train_acc_plot, label='train acc')
plt.plot(x, test_acc_plot, label='test acc')
plt.legend(loc="best")
plt.tight_layout(rect = [0,0,1,1])


![[数据结构]:06-队列(链表)(C语言实现)](https://img-blog.csdnimg.cn/b3ecae3eb7c2422ba896c6694ec376bb.png)