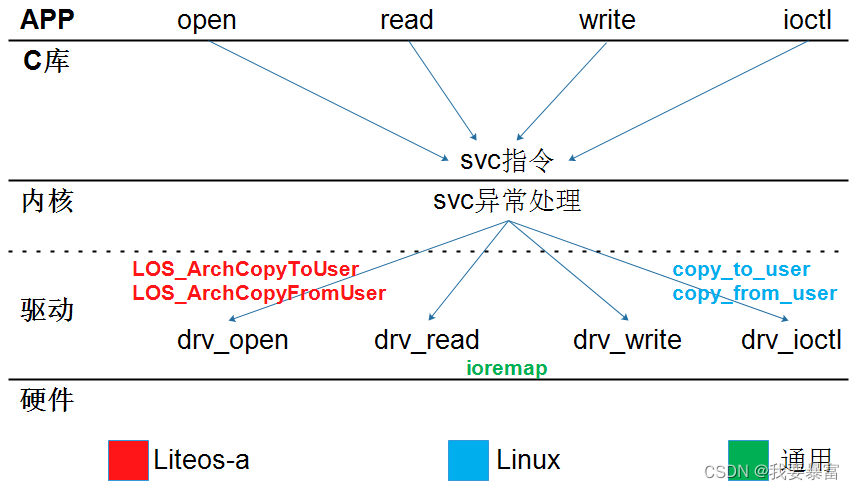
简介
先来了解什么是输入设备?
常见的输入设备有键盘、 鼠标、 遥控杆、 书写板、 触摸屏等等,用户通过这些输入设备与 Linux 系统进行数据交换。
什么是输入系统?
输入设备种类繁多, 能否统一它们的接口? 既在驱动层面统一, 也在应用程序层面统一? 可以的。
Linux 系统为了统一管理这些输入设备, 实现了一套能兼容所有输入设备的框架: 输入系统。 驱动开发人员基于这套框架开发出程序, 应用开发人员就可以使用统一的 API 去使用设备。
输入子系统的框架如下图:
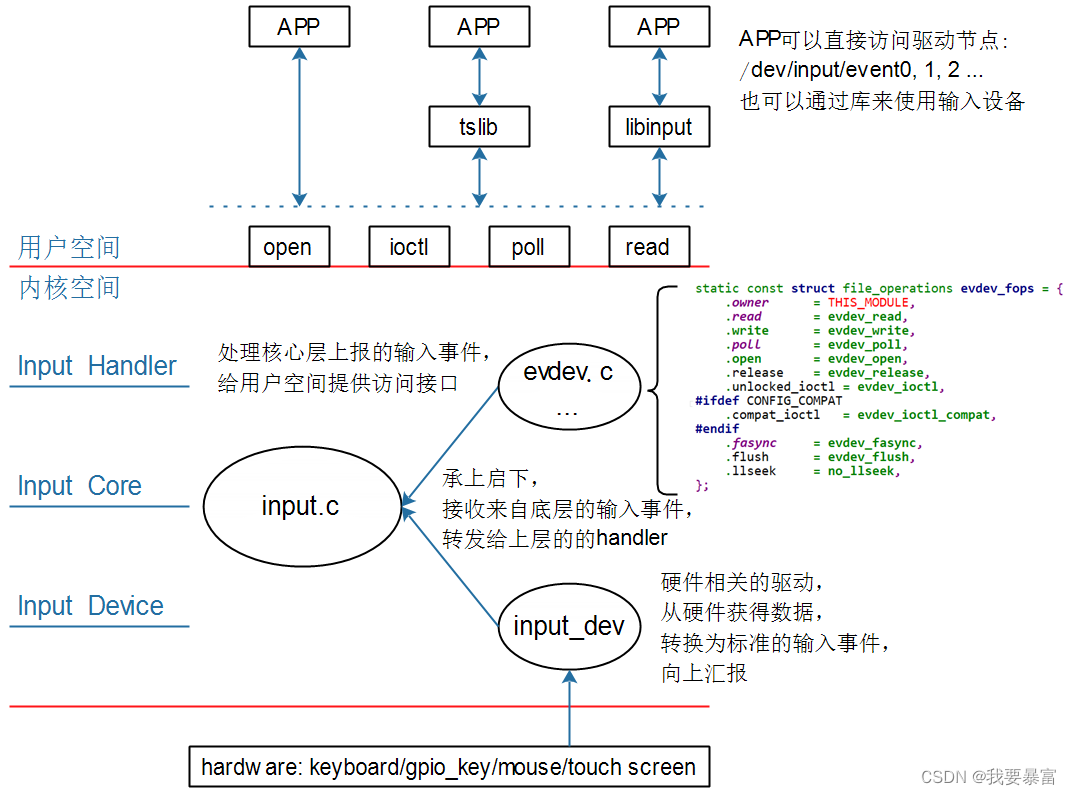
应用层可以通过读取 /dev/input/event0 节点或调用其它库(tslib、libinput)来获取输入事件。
应用层读取输入事件时的流程如下:
① APP 发起读操作, 若无数据则休眠;
② 用户操作设备, 硬件上产生中断;
③ 输入系统驱动层对应的驱动程序处理中断:
读取到数据, 转换为标准的输入事件, 向核心层汇报。
所谓输入事件就是一个“ struct input_event” 结构体。
④ 核心层可以决定把输入事件转发给上面哪个 handler 来处理:
从 handler 的名字来看, 它就是用来处理输入操作的。 有多种 handler, 比如: evdev_handler、 kbd_handler、joydev_handler 等等。
最常用的是 evdev_handler: 它只是把 input_event 结构体保存在内核 buffer, APP 来读取时就原原本本地返回。 它支持多个 APP 同时访问输入设备, 每个 APP 都可以获得同一份输入事件。
当 APP 正在等待数据时, evdev_handler 会把它唤醒, 这样 APP 就可以返回数据。
⑤ APP 对输入事件的处理:
APP 获得数据的方法有 2 种: 直接访问设备节点(比如/dev/input/event0,1,2,…), 或者通过 tslib、libinput 这类库来间接访问设备节点。 这些库简化了对数据的处理。
应用层查看输入设备
见识到了输入设备在内核中的描述,我们来看一下应用层怎么查看输入设备吧
输入设备的文件节点都在 “/dev/input” 目录下,event0 就是一个输入设备。

只有一个event0,我们并不知道它的详细信息,那么怎么查看event0 的具体信息呢?
用 cat /proc/bus/input/devices
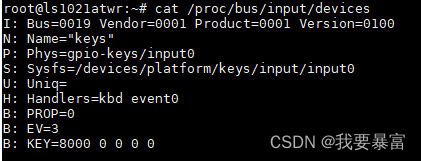
① I:id of the device(设备 ID)
该参数由结构体 struct input_id 来进行描述, 驱动程序中会定义这样的结构体:
struct input_id {
	__u16 bustype;
	__u16 vendor;
	__u16 product;
	__u16 version;
};
② N:name of the device
设备名称
③ P:physical path to the device in the system hierarchy
系统层次结构中设备的物理路径。
④ S:sysfs path
位于 sys 文件系统的路径
⑤ U:unique identification code for the device(if device has it)
设备的唯一标识码
⑥ H:list of input handles associated with the device.
与设备关联的输入句柄列表。
⑦ B:bitmaps(位图)
PROP:device properties and quirks(设备属性)
EV:types of events supported by the device(设备支持的事件类型)
KEY:keys/buttons this device has(此设备具有的键/按钮)
MSC:miscellaneous events supported by the device(设备支持的其他事件)
LED:leds present on the device(设备上的指示灯)
从上面的信息中看出,event0 是一个按键。
使用命令读取数据
调试输入系统时, 直接执行类似下面的命令, 然后操作对应的输入设备即可读出数据:
hexdump /dev/input/event0
hexdump 读取文件和read 读时是一样的,默认没数据会阻塞。
当按键按下时就会返回数据。
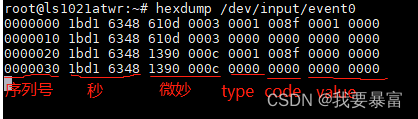
如图一行代表一个事件,上图一共有4个事件。
第一部分是序列号,接着是时间、类型、code 和value。
与input_event 中描述的一样,type 和code 都是16 位,value 32位。
其中两个事件类型为0x1,说明他们的事件类型是按键;code = 0x8f 代表键值是0x8f,根据定义它的意思是系统唤醒。

在按键事件后,有一个type、code、value 皆为0 的事件,这就是一个同步事件,代表事件上报完毕。
扩展:
应用层在打开文件读取事件时,根据不同的需求,可以使用不同的方式了。比如查询、休眠-唤醒、poll/select 和异步通知。
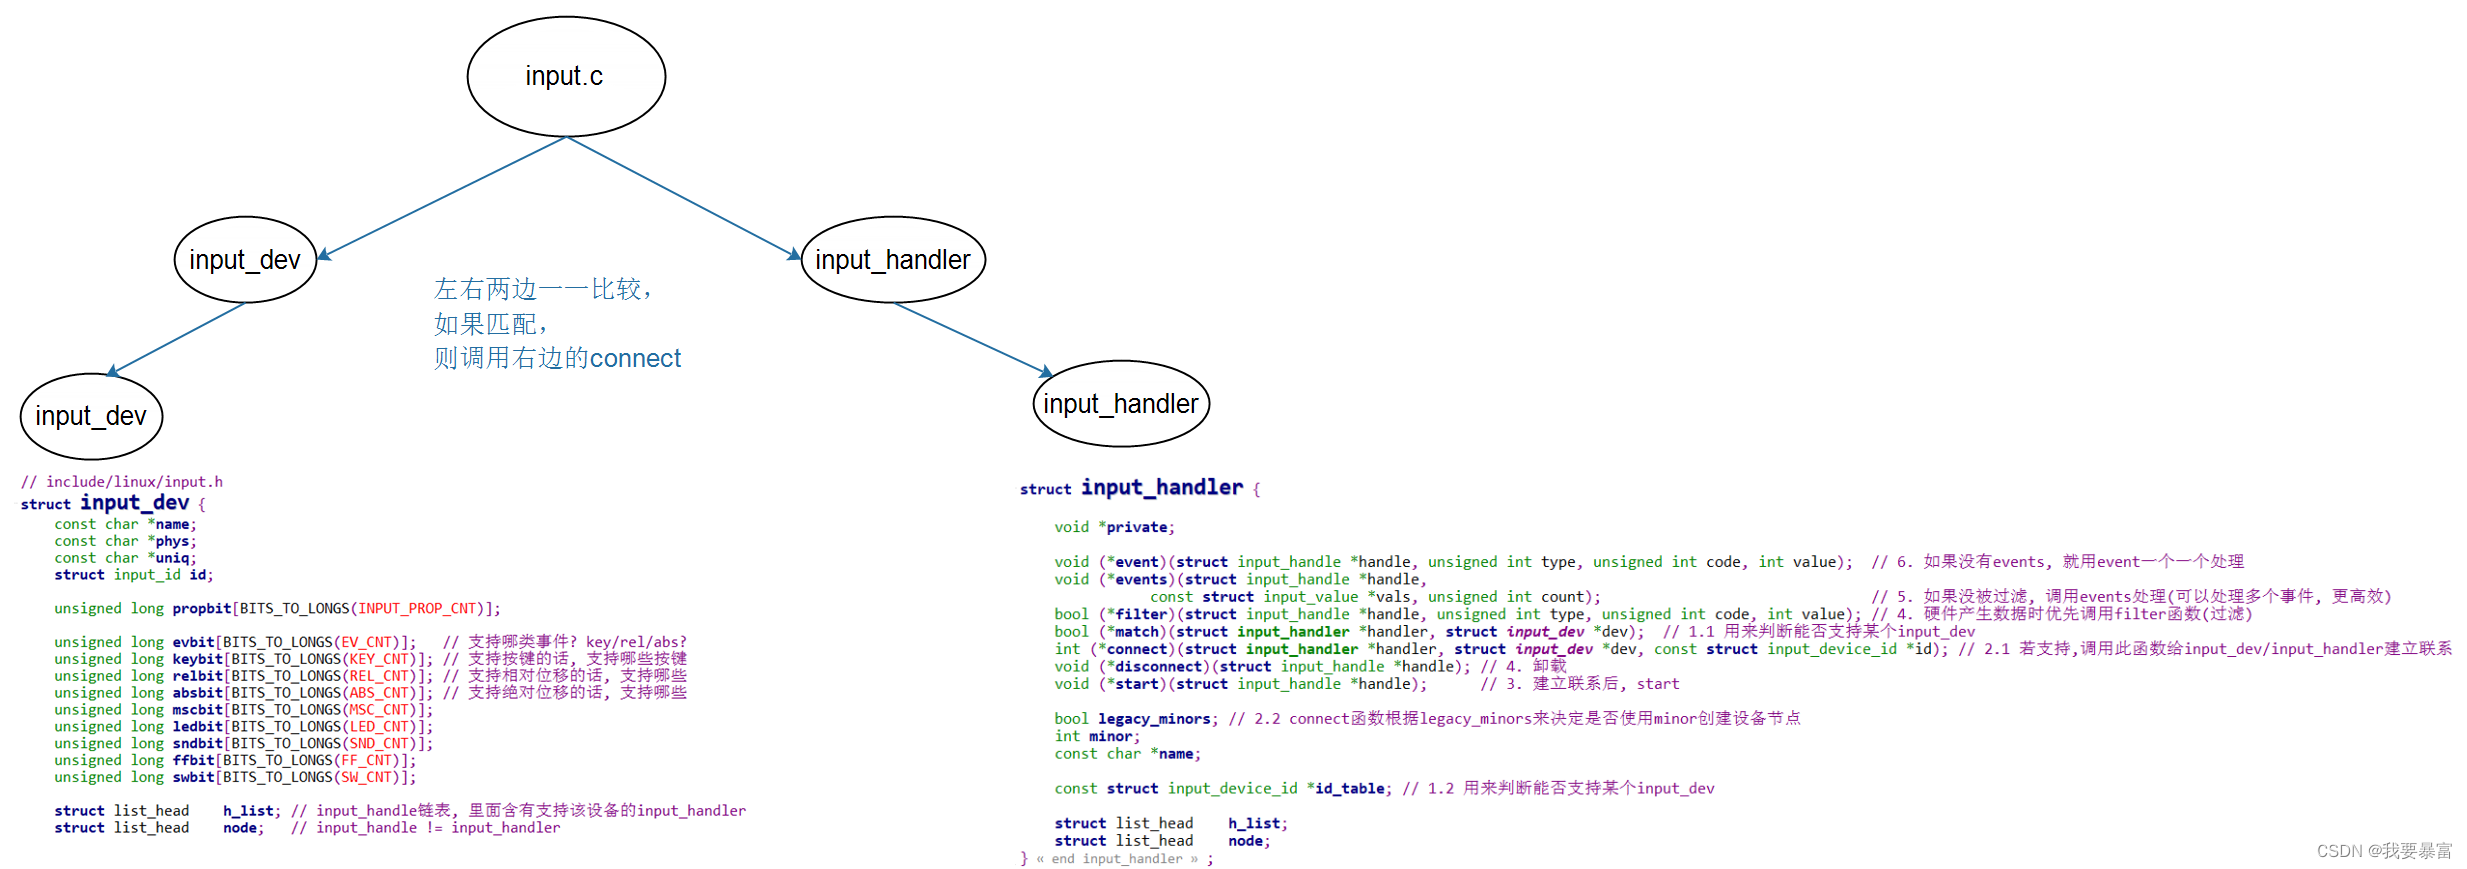
输入子系统中的重要数据结构
关于input 子系统的数据结构与函数定义在:include/linux/input.h
input_dev
驱动中这么描述一个输入设备,用struct input_dev :
//include/linux/input.h
struct input_dev {
	const char *name;
	const char *phys;
	const char *uniq;
	struct input_id id;

	unsigned long propbit[BITS_TO_LONGS(INPUT_PROP_CNT)];

	unsigned long evbit[BITS_TO_LONGS(EV_CNT)];			//支持什么类型的输入设备:key、rel、abs 等等,在include\uapi\linux\input-event-codes.h 中有定义。
	unsigned long keybit[BITS_TO_LONGS(KEY_CNT)];		//支持什么按键事件:比如键盘上有1、2、3、4等许多按键,每一个按键都是一个单独的按键事件
	unsigned long relbit[BITS_TO_LONGS(REL_CNT)];		//支持什么相对位移事件,鼠标是相对位移。
	unsigned long absbit[BITS_TO_LONGS(ABS_CNT)];		//支持什么绝对位移事件,触摸屏即绝对位移设备:包含的事件有x轴方位、y轴方位、z轴压力大小等等。
	//其它事件类型所支持的事件
	unsigned long mscbit[BITS_TO_LONGS(MSC_CNT)];
	unsigned long ledbit[BITS_TO_LONGS(LED_CNT)];
	unsigned long sndbit[BITS_TO_LONGS(SND_CNT)];
	unsigned long ffbit[BITS_TO_LONGS(FF_CNT)];
	unsigned long swbit[BITS_TO_LONGS(SW_CNT)];

	unsigned int hint_events_per_packet;

	unsigned int keycodemax;
	unsigned int keycodesize;
	void *keycode;

	int (*setkeycode)(struct input_dev *dev,
			  const struct input_keymap_entry *ke,
			  unsigned int *old_keycode);
	int (*getkeycode)(struct input_dev *dev,
			  struct input_keymap_entry *ke);

	struct ff_device *ff;

	struct input_dev_poller *poller;

	unsigned int repeat_key;
	struct timer_list timer;

	int rep[REP_CNT];

	struct input_mt *mt;

	struct input_absinfo *absinfo;

	unsigned long key[BITS_TO_LONGS(KEY_CNT)];
	unsigned long led[BITS_TO_LONGS(LED_CNT)];
	unsigned long snd[BITS_TO_LONGS(SND_CNT)];
	unsigned long sw[BITS_TO_LONGS(SW_CNT)];

	int (*open)(struct input_dev *dev);
	void (*close)(struct input_dev *dev);
	int (*flush)(struct input_dev *dev, struct file *file);
	int (*event)(struct input_dev *dev, unsigned int type, unsigned int code, int value);

	struct input_handle __rcu *grab;

	spinlock_t event_lock;
	struct mutex mutex;

	unsigned int users;
	bool going_away;

	struct device dev;

	/*
	指向一个input_handle 链表,通过链表可以找到已经匹配完成的input_handler
	这表示一个input_dev 可以有多个input_handler 支持。
	*/
	struct list_head	h_list;

	//注册时会将此list_head 添加到input_dev_list 链表,也就是所谓的input_dev 链表
	struct list_head	node;

	unsigned int num_vals;
	unsigned int max_vals;
	struct input_value *vals;

	bool devres_managed;

	ktime_t timestamp[INPUT_CLK_MAX];
};
input_event
知道了驱动中是如何描述一个输入设备的,我们再来看一下,Linux 是如何描述一个输入事件的?用input_event 结构体:
struct input_event {
	struct timeval time;	//发生事件时的时间: 自系统启动以来过了多少时间
	__u16 type;				//事件类型
	__u16 code;				//什么事件
	__s32 value;			//事件值
};
在input_dev 和 input_event 中我们看到都描述了事件和事件类型,我们来看一下输入系统中具体支持的事件类型吧:
有如下许多宏定义,表示事件类型
//include\uapi\linux\input-event-codes.h
/*
 * Event types
 */
#define EV_SYN			0x00
/*
同步事件类型:当一个驱动读取到一个硬件数据时可能会上报多个事件。
比如触摸屏,我们需要知道触摸点的位置就需要知道x轴的值、y轴的值,那么对于触摸屏来说,
一次触摸 内核就会向应用层上报多个事件,
那么应用怎么知道一次动作的所有事件都读取完了呢?
实际上每次事件上报完之后,随后就会上报一个同步事件,同步事件的type、code、value 都是0.
应用读取到同步事件,就知道一次动作的事件读取完了。
*/
#define EV_KEY			0x01		//按键事件类型
#define EV_REL			0x02		//相对位移事件类型
#define EV_ABS			0x03		//绝对位移事件类型
#define EV_MSC			0x04
#define EV_SW			0x05
#define EV_LED			0x11
#define EV_SND			0x12
#define EV_REP			0x14
#define EV_FF			0x15
#define EV_PWR			0x16
#define EV_FF_STATUS	0x17
#define EV_MAX			0x1f
#define EV_CNT			(EV_MAX+1)		//事件类型的数量 + 1
按键类型的事件:
#define KEY_RESERVED		0
#define KEY_ESC			1
#define KEY_1			2
#define KEY_2			3
#define KEY_3			4
#define KEY_4			5
#define KEY_5			6
#define KEY_6			7
#define KEY_7			8
#define KEY_8			9
#define KEY_9			10
#define KEY_0			11
#define KEY_MINUS		12
#define KEY_EQUAL		13
#define KEY_BACKSPACE		14
#define KEY_TAB			15
#define KEY_Q			16
#define KEY_W			17
#define KEY_E			18
#define KEY_R			19
#define KEY_T			20
#define KEY_Y			21
#define KEY_U			22
#define KEY_I			23
#define KEY_O			24
#define KEY_P			25
#define KEY_LEFTBRACE		26
#define KEY_RIGHTBRACE		27
......			//按键类型的事件太多了,截取一小部分
#define KEY_MAX			0x2ff
#define KEY_CNT			(KEY_MAX+1)
相对位移事件
/*
 * Relative axes
 */
#define REL_X			0x00
#define REL_Y			0x01
#define REL_Z			0x02
#define REL_RX			0x03
#define REL_RY			0x04
#define REL_RZ			0x05
#define REL_HWHEEL		0x06
#define REL_DIAL		0x07
#define REL_WHEEL		0x08
#define REL_MISC		0x09
/*
 * 0x0a is reserved and should not be used in input drivers.
 * It was used by HID as REL_MISC+1 and userspace needs to detect if
 * the next REL_* event is correct or is just REL_MISC + n.
 * We define here REL_RESERVED so userspace can rely on it and detect
 * the situation described above.
 */
#define REL_RESERVED		0x0a
#define REL_WHEEL_HI_RES	0x0b
#define REL_HWHEEL_HI_RES	0x0c
#define REL_MAX			0x0f
#define REL_CNT			(REL_MAX+1)
绝对位移事件
/*
 * Absolute axes
 */

#define ABS_X			0x00
#define ABS_Y			0x01
#define ABS_Z			0x02
#define ABS_RX			0x03
#define ABS_RY			0x04
#define ABS_RZ			0x05
#define ABS_THROTTLE		0x06
#define ABS_RUDDER		0x07
#define ABS_WHEEL		0x08
#define ABS_GAS			0x09
#define ABS_BRAKE		0x0a
#define ABS_HAT0X		0x10
#define ABS_HAT0Y		0x11
#define ABS_HAT1X		0x12
#define ABS_HAT1Y		0x13
#define ABS_HAT2X		0x14
#define ABS_HAT2Y		0x15
#define ABS_HAT3X		0x16
#define ABS_HAT3Y		0x17
#define ABS_PRESSURE		0x18
#define ABS_DISTANCE		0x19
#define ABS_TILT_X		0x1a
#define ABS_TILT_Y		0x1b
#define ABS_TOOL_WIDTH		0x1c
......
#define ABS_MAX			0x3f
#define ABS_CNT			(ABS_MAX+1)
input_handler
在input 子系统框架图中可以看到input 输入子系统分为三层,分别是驱动层 (input_dev) 负责读取硬件数据,并向上层传递;事件层 (input_handler) 负责处理驱动层传递来的数据,并上报给应用层;核心层负责管理input_dev 和input_handler,负责它们的互相匹配。
事件层怎么处理一个输入层上报的事件? 用 struct input_handler。
注意:在内核中已经注册有很多个input_handler 实例,内核已经替我们做好了,evdev_handler 就是最常用的,它可以匹配所有输入设备,通常我们编写输入设备驱动只需要构造input_dev,注册到内核就可以,如果你非要自己注册一个input_handler 也可以。
struct input_handler {

	void *private;
	/*
		当在输入设备驱动中调用input_event() 上报事件时,
		会通过input_dev->input_handle->input_handler 找到handler,优先调用filter 对事件数据过滤和处理;
		如果filter 没有实现的话就调用 events 来接收数据,events 可以一次性处理多个事件;
		如果events 还是没有那就调用event 来一个一个处理事件。
	*/
	void (*event)(struct input_handle *handle, unsigned int type, unsigned int code, int value);
	void (*events)(struct input_handle *handle,
		       const struct input_value *vals, unsigned int count);
	bool (*filter)(struct input_handle *handle, unsigned int type, unsigned int code, int value);

	//当判断id_table 匹配成功后,会调用match 函数来进一步做更复杂的匹配,此函数可以不填充
	bool (*match)(struct input_handler *handler, struct input_dev *dev);
	/*
	input_dev 与input_handler 互相匹配成功后就会调用connect 来建立两者的联系,即将它们的地址都保存在input_handle 结构体中。
	除此之外connect 还会注册字符设备(struct cdev,其中包含struct file_operations)和创建设备节点(/dev/input/event0、event1 ...),
	我们在应用层调用read 读取/dev/input/event0 的时候就会调用到connect 注册的cdev->file_operations->read.
	*/
	int (*connect)(struct input_handler *handler, struct input_dev *dev, const struct input_device_id *id);
	void (*disconnect)(struct input_handle *handle);
	void (*start)(struct input_handle *handle);

	bool legacy_minors;
	int minor;
	const char *name;
	//凭借id_table 来判断input_dev 和input_handler 是否匹配;在构建一个input_handler 实例时这个成员必须填充
	const struct input_device_id *id_table;
	/*
	指向一个input_handle 链表,通过该链表就可以找到已经匹配完成的输入设备;
	这表示一个input_handler 可以有支持input_dev,通过链表可以找到它们
	*/
	struct list_head	h_list;

	//注册时会将此list_head 添加到input_handler_list 链表,也就是input_handler 链表
	struct list_head	node;
}
input_device_id
在input_dev 和input_handler 匹配时,input_handler 是依靠id_table 来判断是否支持一个设备。那么来看一下id_table 的定义,它的原型是input_device_id :
struct input_device_id {

	kernel_ulong_t flags;

	__u16 bustype;			//总线类型、厂商等值(可以不填写,在input_dev 中,只要事件和事件类型兼容就可以完成匹配)
	__u16 vendor;
	__u16 product;
	__u16 version;
							//所支持的事件类型和具体的事件
	kernel_ulong_t evbit[INPUT_DEVICE_ID_EV_MAX / BITS_PER_LONG + 1];
	kernel_ulong_t keybit[INPUT_DEVICE_ID_KEY_MAX / BITS_PER_LONG + 1];
	kernel_ulong_t relbit[INPUT_DEVICE_ID_REL_MAX / BITS_PER_LONG + 1];
	kernel_ulong_t absbit[INPUT_DEVICE_ID_ABS_MAX / BITS_PER_LONG + 1];
	kernel_ulong_t mscbit[INPUT_DEVICE_ID_MSC_MAX / BITS_PER_LONG + 1];
	kernel_ulong_t ledbit[INPUT_DEVICE_ID_LED_MAX / BITS_PER_LONG + 1];
	kernel_ulong_t sndbit[INPUT_DEVICE_ID_SND_MAX / BITS_PER_LONG + 1];
	kernel_ulong_t ffbit[INPUT_DEVICE_ID_FF_MAX / BITS_PER_LONG + 1];
	kernel_ulong_t swbit[INPUT_DEVICE_ID_SW_MAX / BITS_PER_LONG + 1];

	kernel_ulong_t driver_info;
};
input_handle
handler 是处理者,handle 的意思则是句柄。
在核心层中要管理输入设备和事件处理函数。
在硬件上的每一个输入设备都会有一个input_dev 来描述,这其中会保存着这个输入设备支持哪些类型事件,和事件类型中的具体事件。
内核中有input_handler 可以来处理input_dev 上报的事件,内核里面已经注册好了多个input_handler,input_handler 也有支持的事件类型和 具体事件。
那么input_dev 要怎么找到支持它这个事件的input_handler,这个工作就由核心层来完成。在注册input_dev 和input_handler 的过程中都会把它们添加到对应的链表,并把新注册的节点与对方的链表中的节点匹配,这个过程和设备-总线-驱动 的机制是类似的。
在完成匹配之后就需要用input_handle 来保存两者之间的联系,input_handle->dev 指向input_dev ,input_handle->handler 指向input_handler ,另外在input_dev、input_handler 结构体中都有指向 input_handle 链表的指针成员,所以只要知道其一就可以找到另外两个啦。
struct input_handle {

	void *private;

	int open;
	const char *name;

	struct input_dev *dev;						//指向一个 input_dev
	struct input_handler *handler;				//指向一个 input_handler

	struct list_head	d_node;
	struct list_head	h_node;
};
输入子系统框架
输入设备是一个字符设备,那么它就逃不出字符设备驱动框架,应用通过open、read、write 来访问设备,驱动中就需要注册字符设备(struct cdev)、注册file_operations。不过输入子系统稍稍有些不同,它是在事件层的input_handler->connect 函数中来完成字符设备的注册,那么下面我们来看一下它是怎么实现的。
注册输入设备初始化工作input_dev 与 input_handler 的匹配
a. input_dev注册流程演示
在上面的介绍中我们知道了可以用input_dev (驱动层)来描述一个输入设备,用input_handler (事件层)来处理input_dev 上报的事件,并且能处理事件的前提是它们要互相匹配,能互相找到对方(通过 input_handle)。
先来看看它们是如何匹配的,按照前面设备-总线-驱动框架的匹配经验,我们知道input_dev 或input_handler 在注册完成后会被挂入一个链表(list_head),input_dev 挂入input_dev 的链表,input_handler 挂入input_handler 链表。匹配的操作也是在双方注册的时候来完成,假如现在注册input_dev,就会拿到input_handler 的链表头,进行一个个节点遍历,比较id_table 的值来判断二者是否匹配,匹配的话就调用input_handler->connect 来绑定关系。同样的注册input_handler 的时候也会获取到input_dev 的链表,进行一个个的比较。
前面我们说了匹配的原理,现在来看一下代码,input_handler 就参考evdev.c 中的evdev_handler。
input_dev 使用 input_register_device 来注册:
省略其它内容只看我们想要的这一段。
//drivers\input\input.c
static LIST_HEAD(input_dev_list);
static LIST_HEAD(input_handler_list);

int input_register_device(struct input_dev *dev)
{
	......
	list_add_tail(&dev->node, &input_dev_list);					//将input_dev 添加到链表

	list_for_each_entry(handler, &input_handler_list, node)		//遍历input_handler 链表
		input_attach_handler(dev, handler);						//进行input_dev 和input_handler 对比 ,attach(附加)
	......
}
static int input_attach_handler(struct input_dev *dev, struct input_handler *handler)
{
	const struct input_device_id *id;
	int error;

	id = input_match_device(handler, dev);				//调用input_match_device 进行匹配
	if (!id)
		return -ENODEV;

	error = handler->connect(handler, dev, id);			//如果匹配成功的话,就调用connect
	if (error && error != -ENODEV)
		pr_err("failed to attach handler %s to device %s, error: %d\n",
		       handler->name, kobject_name(&dev->dev.kobj), error);

	return error;
}
input_match_device 中证明两者就是通过比较input_handler->id_table 和input_dev->id,以及evbit、keybit、relbit 等等来判断是否匹配的。
static const struct input_device_id *input_match_device(struct input_handler *handler,
							struct input_dev *dev)
{
	const struct input_device_id *id;

	for (id = handler->id_table; id->flags || id->driver_info; id++) {

	//前面4步就是比较 总线类型、厂商id、产品id、版本,前面有提到过(在编写驱动填充input_dev 时,也可以不填充,只要支持的事件类型和事件兼容即可)
	/*
		struct input_id {
			__u16 bustype;
			__u16 vendor;
			__u16 product;
			__u16 version;
		};
	*/
		if (id->flags & INPUT_DEVICE_ID_MATCH_BUS)
			if (id->bustype != dev->id.bustype)
				continue;

		if (id->flags & INPUT_DEVICE_ID_MATCH_VENDOR)
			if (id->vendor != dev->id.vendor)
				continue;

		if (id->flags & INPUT_DEVICE_ID_MATCH_PRODUCT)
			if (id->product != dev->id.product)
				continue;

		if (id->flags & INPUT_DEVICE_ID_MATCH_VERSION)
			if (id->version != dev->id.version)
				continue;
		//比较所支持的事件类型和具体的事件是否兼容,这些所有都判断完毕后,就认为它们是匹配的。
		if (!bitmap_subset(id->evbit, dev->evbit, EV_MAX))
			continue;

		if (!bitmap_subset(id->keybit, dev->keybit, KEY_MAX))
			continue;

		if (!bitmap_subset(id->relbit, dev->relbit, REL_MAX))
			continue;

		if (!bitmap_subset(id->absbit, dev->absbit, ABS_MAX))
			continue;

		if (!bitmap_subset(id->mscbit, dev->mscbit, MSC_MAX))
			continue;

		if (!bitmap_subset(id->ledbit, dev->ledbit, LED_MAX))
			continue;

		if (!bitmap_subset(id->sndbit, dev->sndbit, SND_MAX))
			continue;

		if (!bitmap_subset(id->ffbit, dev->ffbit, FF_MAX))
			continue;

		if (!bitmap_subset(id->swbit, dev->swbit, SW_MAX))
			continue;

		if (!handler->match || handler->match(handler, dev))
			return id;
	}

	return NULL;
}
b. input_handler注册流程演示
input_handler 是调用input_register_handler 来完成注册,在evdev.c 中有如下代码:
//drivers\input\evdev.c
static const struct input_device_id evdev_ids[] = {
	{ .driver_info = 1 },	/* Matches all devices */		//driver_info = 1,表示这个handler 兼容所有的输入设备
	{ },			/* Terminating zero entry */
};

MODULE_DEVICE_TABLE(input, evdev_ids);
//初始化了一个input_handler
static struct input_handler evdev_handler = {
	.event		= evdev_event,
	.events		= evdev_events,
	.connect	= evdev_connect,
	.disconnect	= evdev_disconnect,
	.legacy_minors	= true,
	.minor		= EVDEV_MINOR_BASE,
	.name		= "evdev",
	.id_table	= evdev_ids,
};

static int __init evdev_init(void)
{
	return input_register_handler(&evdev_handler);		//注册input_handler
}
//drivers\input\input.c
static LIST_HEAD(input_dev_list);
static LIST_HEAD(input_handler_list);

int input_register_handler(struct input_handler *handler)
{
	struct input_dev *dev;
	int error;

	error = mutex_lock_interruptible(&input_mutex);
	if (error)
		return error;

	INIT_LIST_HEAD(&handler->h_list);		//初始化了一个list_head 链表,用来存放input_handle 链表

	list_add_tail(&handler->node, &input_handler_list);		//将handler 添加到input_handler_list链表中

	list_for_each_entry(dev, &input_dev_list, node)			//遍历 input_dev 链表
		input_attach_handler(dev, handler);					//进行dev 和handler的匹配

	input_wakeup_procfs_readers();

	mutex_unlock(&input_mutex);
	return 0;
}
input_register_device 和input_register_handler 都是调用input_attach_handler 来完成匹配的,接下来再看看evdev_handler->connect 具体做了什么操作。
在驱动层中用struct input_dev 来描述一个输入设备。如果在事件层中也有一个数据结构体来描述一个input 设备那就方便了,所以evdev.c 中用struct evdev 来描述一个输入设备(这就像是我们在编写驱动的时候自己定义的一个结构体来管理一些重要的信息)。
struct evdev {
	int open;
	struct input_handle handle;				//handle: 用来保存input_handler 和input_dev 的联系
	wait_queue_head_t wait;					//等待队列,read时若没有数据,会进入休眠
	struct evdev_client __rcu *grab;

	//client 队列:一个输入设备支持多个应用同时访问,每个应用open 设备节点时,都会创建一个client ,并挂入client_list。
	struct list_head client_list;
	spinlock_t client_lock; /* protects client_list */
	struct mutex mutex;
	struct device dev;
	struct cdev cdev;						//字符设备
	bool exist;
};
evdev_connect 中主要做了两件事:
- 填充input_handle->dev 和input_handle->handler,保存了二者的关系。
- 注册字符设备(event0、event1 等等,它们的主设备号相同,此设备号不同)
static int evdev_connect(struct input_handler *handler, struct input_dev *dev,
			 const struct input_device_id *id)
{
	struct evdev *evdev;
	int minor;
	int dev_no;
	int error;

	minor = input_get_new_minor(EVDEV_MINOR_BASE, EVDEV_MINORS, true);		//获取一个新的次设备号
	if (minor < 0) {
		error = minor;
		pr_err("failed to reserve new minor: %d\n", error);
		return error;
	}

	evdev = kzalloc(sizeof(struct evdev), GFP_KERNEL);			//申请了一个struct evdev 内存
	if (!evdev) {
		error = -ENOMEM;
		goto err_free_minor;
	}

	INIT_LIST_HEAD(&evdev->client_list);			//初始化client_list 链表
	spin_lock_init(&evdev->client_lock);			//初始化client 锁
	mutex_init(&evdev->mutex);						//初始化互斥量
	init_waitqueue_head(&evdev->wait);				//初始化等待队列,应用read 一个输入设备时,有休眠机制
	evdev->exist = true;							//表示这个evdev 存在

	dev_no = minor;
	/* Normalize device number if it falls into legacy range */
	if (dev_no < EVDEV_MINOR_BASE + EVDEV_MINORS)
		dev_no -= EVDEV_MINOR_BASE;

	dev_set_name(&evdev->dev, "event%d", dev_no);			//设置设备名

	//注意:这里就在input_handle 中绑定input_handler 和input_dev 的关系了
	evdev->handle.dev = input_get_device(dev);			//填充input_dev
	evdev->handle.name = dev_name(&evdev->dev);
	evdev->handle.handler = handler;					//填充input_handler
	evdev->handle.private = evdev;						//填充handle 的私有数据为evdev

	evdev->dev.devt = MKDEV(INPUT_MAJOR, minor);		//创建一个设备号,INPUT_MAJOR 主设备号为13
	evdev->dev.class = &input_class;					//设置类
	evdev->dev.parent = &dev->dev;						//设置evdev->dev 的父亲是input_dev->dev
	evdev->dev.release = evdev_free;					//evdev_free:用于释放evdev
	device_initialize(&evdev->dev);						//初始化struct device

	error = input_register_handle(&evdev->handle);		//注册一个input_handle,注意是input_handle,不是input_handler
	if (error)
		goto err_free_evdev;

	cdev_init(&evdev->cdev, &evdev_fops);					//将evdev_fops初始化到cdev, evdev_fops是实现的file_operations

	error = cdev_device_add(&evdev->cdev, &evdev->dev);		//注册cdev,将cdev 添加到cdev 链表。
	if (error)
		goto err_cleanup_evdev;

	return 0;
}
读取数据流程演示
搞清楚了输入设备的注册和匹配的流程,接着来看读取输入设备的流程。
在evdev.c 中实现了如下file_operations,在应用调用open、read、write 就会调用到evdev_fops 中的open、read、write。
//drivers\input\evdev.c
static const struct file_operations evdev_fops = {
	.owner		= THIS_MODULE,
	.read		= evdev_read,
	.write		= evdev_write,
	.poll		= evdev_poll,
	.open		= evdev_open,
	.release	= evdev_release,
	.unlocked_ioctl	= evdev_ioctl,
#ifdef CONFIG_COMPAT
	.compat_ioctl	= evdev_ioctl_compat,
#endif
	.fasync		= evdev_fasync,
	.llseek		= no_llseek,
};
evdev_open
来看看应用读取一个输入设备"/dev/input/event0" 时会发生什么。
首先open 打开/dev/input/event0,会调用到evdev_fops->open:
输入设备是支持多个应用同时读取事件的,每次应用调用open(“/dev/event0”,RDWR),时就会调用evdev_open,evdev_open 会为每一个打开evnet0 的进程创建一个client(里面有事件数据的缓冲区等等,驱动调用input_evnet() 会把数据拷贝到这个缓冲区,最后由file_operations->read 将数据从缓冲区拷贝到用户缓冲区),并把它挂入evdev->client_list 中。
struct evdev_client {
	unsigned int head;
	unsigned int tail;
	unsigned int packet_head; /* [future] position of the first element of next packet */
	spinlock_t buffer_lock; /* protects access to buffer, head and tail */
	struct fasync_struct *fasync;
	struct evdev *evdev;					//指向evdev
	struct list_head node;					//在open时会被添加到evdev->client_list 链表中
	enum input_clock_type clk_type;
	bool revoked;
	unsigned long *evmasks[EV_CNT];
	unsigned int bufsize;
	struct input_event buffer[];			//存放事件的缓冲区,read 时假如有数据可读,那么会从此缓冲区将事件数据(struct input_event) 拷贝到应用的缓冲区中,应用就可以得到数据
};
static int evdev_open(struct inode *inode, struct file *file)
{
	struct evdev *evdev = container_of(inode->i_cdev, struct evdev, cdev);
	unsigned int bufsize = evdev_compute_buffer_size(evdev->handle.dev);
	struct evdev_client *client;
	int error;

	//申请了一个client,一个输入设备支持多应用访问,每个应用调用open 打开输入设备时,都会建立一个新的client
	client = kvzalloc(struct_size(client, buffer, bufsize), GFP_KERNEL);
	if (!client)
		return -ENOMEM;

	client->bufsize = bufsize;				//bufsize 表示缓冲区能存放struct input_evnet 的个数
	spin_lock_init(&client->buffer_lock);
	client->evdev = evdev;
	evdev_attach_client(evdev, client);		//将client 添加到evdev->client_list 链表

	error = evdev_open_device(evdev);
	if (error)
		goto err_free_client;

	file->private_data = client;			//设置file 的私有数据是client。在Linux 系统中每打开一次文件,都会在vfs 都建立一个struct file 数据结构,来记录文件的动态信息,另外struct inode 用来记录文件的静态信息。
	stream_open(inode, file);

	return 0;

err_free_client:
	evdev_detach_client(evdev, client);
	kvfree(client);
	return error;
}
static void evdev_attach_client(struct evdev *evdev,
				struct evdev_client *client)
{
	spin_lock(&evdev->client_lock);
	list_add_tail_rcu(&client->node, &evdev->client_list);			//将client 添加到evdev->client_list 链表
	spin_unlock(&evdev->client_lock);
}
evdev_read
在evdev_read 中如果有数据的情况下,会把驱动上报的事件数据(存放在client->buffer),拷贝到用户缓冲区,并返回。
没有数据可读时,如果应用设置了非阻塞O_NONBLOCK 那么会直接返回、如果没设置则会调用 wait_event_interruptible() 将应用线程进入休眠。
static ssize_t evdev_read(struct file *file, char __user *buffer,
			  size_t count, loff_t *ppos)
{
	struct evdev_client *client = file->private_data;			//从file->private_data 获取应用对应的client
	struct evdev *evdev = client->evdev;
	struct input_event event;									//描述一个事件
	size_t read = 0;
	int error;

	/*
	input_event_size 表示一个struct input_event 的长度
	count:应用传入要读的字节数。如果count 小于一个input_event,那么此次读取无效。
	*/
	if (count != 0 && count < input_event_size())
		return -EINVAL;

	for (;;) {
		if (!evdev->exist || client->revoked)
			return -ENODEV;

		/*
			client->packet_head == client->tail 表示没有数据可读,如果应用设置了非阻塞模式的话,就会立即返回
		*/
		if (client->packet_head == client->tail &&
		    (file->f_flags & O_NONBLOCK))
			return -EAGAIN;

		//read:已读的字节数,input_event_size 本次读取的一个事件长度,count: 应用要读数据的长度(已读取的长度超过count,就可以返回了)
		while (read + input_event_size() <= count &&
			       evdev_fetch_next_event(client, &event)) {
			       //如果有event数据,就将client->buffer[] 装载着事件数据的项赋值给event;如果没有数据,直接跳过 不会进入while

				if (input_event_to_user(buffer + read, &event))		//将input_event 数据和时间拷贝到用户缓冲区
					return -EFAULT;

				read += input_event_size();			//增加本次读取的事件长度
		}

		if (!(file->f_flags & O_NONBLOCK)) {		//如果未标识非阻塞的话,就调用wait_event_interruptible
			error = wait_event_interruptible(evdev->wait,
					client->packet_head != client->tail || !evdev->exist || client->revoked);	//当条件不满足,就进入休眠态。
															//client->packet_head != client->tail 表示有数据可读,如果有数据就不会阻塞
			if (error)
				return error;
		}
	}

	return read;
}
static int evdev_fetch_next_event(struct evdev_client *client,
				  struct input_event *event)
{
	int have_event;

	spin_lock_irq(&client->buffer_lock);

	have_event = client->packet_head != client->tail;		//判断是否有数据可读,have_event为真时则有。
	if (have_event) {
		*event = client->buffer[client->tail++];			//有数据的话就把它赋值给event,同时tail++
		client->tail &= client->buffer[client->tail++];
		client->tail &= client->bufsize - 1;
	}

	spin_unlock_irq(&client->buffer_lock);

	return have_event;
}
int input_event_to_user(char __user *buffer,
			const struct input_event *event)
{
	if (in_compat_syscall() && !COMPAT_USE_64BIT_TIME) {
		struct input_event_compat compat_event;

		compat_event.sec = event->input_event_sec;
		compat_event.usec = event->input_event_usec;
		compat_event.type = event->type;
		compat_event.code = event->code;
		compat_event.value = event->value;

		if (copy_to_user(buffer, &compat_event,
				 sizeof(struct input_event_compat)))
			return -EFAULT;

	} else {
		if (copy_to_user(buffer, event, sizeof(struct input_event)))
			return -EFAULT;
	}

	return 0;
}
在 evdev_read 中如果没有数据的话就会被 wait_event_interruptible 挂入等待队列进入休眠态,那么当数据到来时它是怎么唤醒的呢?
有数据时才能唤醒应用线程,让它继续读数据。
硬件上发生数据来了,第一个知道的肯定是对应的输入设备驱动,那我们去看一下驱动。
硬件产生信号,驱动程序中要及时读取数据一般是采用两种方式:中断或轮询。在这两种方式中,中断比较常用,所以一般会把上报事件input_event() 函数放在中断中调用。
以按键驱动为例 在gpio_keys_probe 中有注册中断,中断处理函数为gpio_keys_gpio_isr:
在gpio_keys_gpio_isr 中调用了延时工作队列mod_delayed_work,延时工作队列的意思就是多少时间后会去执行实现设置好的任务(有点类似内核中的定时器),延时工作队列&bdata->work->func 才是我们真正想干的事。
那么为什么要调用延时工作队列,这是为了消除按键抖动,通常我们人为的按下一次按键,就会产生多次抖动,那么就会产生多次中断,这样我们只是按下了一次按键,却上报了多个事件。
设置一个延时工作队列,第一次抖动产生中断时修改延时事件(要大于抖动间隔时间),第二次抖动中断来了又修改了计时时间——重新开始计时,就这样反复一直到最后一次抖动中断,延时时间到上报事件。
static irqreturn_t gpio_keys_gpio_isr(int irq, void *dev_id)
{
	struct gpio_button_data *bdata = dev_id;

	BUG_ON(irq != bdata->irq);

	......
	mod_delayed_work(system_wq,
				&bdata->work,
			 msecs_to_jiffies(bdata->software_debounce));

	return IRQ_HANDLED;
}
延时工作队列函数
static void gpio_keys_gpio_work_func(struct work_struct *work)
{
	struct gpio_button_data *bdata =
		container_of(work, struct gpio_button_data, work.work);

	gpio_keys_gpio_report_event(bdata);			//上报事件数据

	if (bdata->button->wakeup)
		pm_relax(bdata->input->dev.parent);
}
调用input_evnet 上报事件,input_sync 上报同步事件。
static void gpio_keys_gpio_report_event(struct gpio_button_data *bdata)
{
	const struct gpio_keys_button *button = bdata->button;
	struct input_dev *input = bdata->input;
	unsigned int type = button->type ?: EV_KEY;
	int state = (gpio_get_value_cansleep(button->gpio) ? 1 : 0) ^ button->active_low;

	if (type == EV_ABS) {
		if (state)
			input_event(input, type, button->code, button->value);
	} else {
		input_event(input, type, button->code, !!state);
	}
	input_sync(input);
}
在中断中调用了input_event() 向上层传递事件,input_event 是如何上报的;并且应用线程还在休眠中,并没有看到唤醒应用线程的函数,接着看input_event() 。
前面的框架中有讲到驱动层会将事件上报给事件层来处理,也就是需要交给input_handler 处理,input_event 的过程就是找到handler 并调用handler中的函数。
input_dev->h_list 中保存着input_handle,有了input_handle 就可以找到input_handler,假如input_handler->filter 存在则调用filter 处理,没有则调用input_handler->events,还是没有则调用input_handler->event。
void input_event(struct input_dev *dev,
		 unsigned int type, unsigned int code, int value)
{
	unsigned long flags;

	if (is_event_supported(type, dev->evbit, EV_MAX)) {

		spin_lock_irqsave(&dev->event_lock, flags);
		input_handle_event(dev, type, code, value);
		spin_unlock_irqrestore(&dev->event_lock, flags);
	}
}
在 input_handle_event 函数中 要发给handler的事件,会先把事件保存到input_dev->vals[], 那什么时候上报?
disposition 中INPUT_FLUSH 被设置的时候,disposition 是通过input_get_disposition 来获取,当上报一个sync 事件的时候,返回的disposition 中flush 位便会被设置,就会把前面积累的事件和同步事件一起上报(这刚好是一次动作的所有事件),调用函数一次性上报多个事件input_pass_values。
input_sync() 函数也是调用的input_evnet,最后还是调用到input_handle_event,所以也会调用 input_get_disposition() 获取disposition 。
#define INPUT_IGNORE_EVENT	0
#define INPUT_PASS_TO_HANDLERS	1			//pass:传递
#define INPUT_PASS_TO_DEVICE	2
#define INPUT_SLOT		4
#define INPUT_FLUSH		8
#define INPUT_PASS_TO_ALL	(INPUT_PASS_TO_HANDLERS | INPUT_PASS_TO_DEVICE)

static inline void input_sync(struct input_dev *dev)
{
	input_event(dev, EV_SYN, SYN_REPORT, 0);
}


static int input_get_disposition(struct input_dev *dev,
			  unsigned int type, unsigned int code, int *pval)
{
	int disposition = INPUT_IGNORE_EVENT;
	int value = *pval;

	switch (type) {

	case EV_SYN:			//同步事件类型
		switch (code) {
		case SYN_REPORT:	//同步上报事件
			disposition = INPUT_PASS_TO_HANDLERS | INPUT_FLUSH;
			break;
		}
		break;
	case EV_KEY:
		if (is_event_supported(code, dev->keybit, KEY_MAX)) {
			/* auto-repeat bypasses state updates */
			if (value == 2) {
				disposition = INPUT_PASS_TO_HANDLERS;
				break;
			}
			if (!!test_bit(code, dev->key) != !!value) {
				__change_bit(code, dev->key);
				disposition = INPUT_PASS_TO_HANDLERS;
			}
		}
		break;
		......
	}

	*pval = value;
	return disposition;
}


static void input_handle_event(struct input_dev *dev,
			       unsigned int type, unsigned int code, int value)
{
	/* disposition:数据的流向 */
	int disposition;
	disposition = input_get_disposition(dev, type, code, &value);

	if ((disposition & INPUT_PASS_TO_DEVICE) && dev->event)			//发给设备的,则交由input_dev->event 来处理
		dev->event(dev, type, code, value);

	if (!dev->vals)
		return;

	/*

	*/
	if (disposition & INPUT_PASS_TO_HANDLERS) {	 	//要传递给handler的事件会被存在input_dev->vals[]
		struct input_value *v;


		if (disposition & INPUT_SLOT) {
			v = &dev->vals[dev->num_vals++];
			v->type = EV_ABS;
			v->code = ABS_MT_SLOT;
			v->value = dev->mt->slot;
		}

		v = &dev->vals[dev->num_vals++];
		v->type = type;
		v->code = code;
		v->value = value;
	}

	//当上报一个同步事件时,就会把input_dev->vals[] 中保存的事件冲洗掉
	if (disposition & INPUT_FLUSH) {		//flush:冲洗
		if (dev->num_vals >= 2)
			input_pass_values(dev, dev->vals, dev->num_vals);			//input_pass_values: 将事件递交给更上层,也就是handler
			dev->num_vals = 0;
		} else if (dev->num_vals >= dev->max_vals - 2) {
			dev->vals[dev->num_vals++] = input_value_sync;
			input_pass_values(dev, dev->vals, dev->num_vals);
			dev->num_vals = 0;
		}
}
static void input_pass_values(struct input_dev *dev,
			      struct input_value *vals, unsigned int count)
{
	struct input_handle *handle;
	struct input_value *v;

	if (!count)
		return;

	rcu_read_lock();

	handle = rcu_dereference(dev->grab);
	if (handle) {
		count = input_to_handler(handle, vals, count);
	} else {
		list_for_each_entry_rcu(handle, &dev->h_list, d_node)			//从链表中取出input_handle
			if (handle->open) {
				count = input_to_handler(handle, vals, count);			//将数据交给input_handler 来处理
				if (!count)
					break;
			}
	}

	rcu_read_unlock();

	/* trigger auto repeat for key events */
	if (test_bit(EV_REP, dev->evbit) && test_bit(EV_KEY, dev->evbit)) {
		for (v = vals; v != vals + count; v++) {
			if (v->type == EV_KEY && v->value != 2) {
				if (v->value)
					/*
					repeat (重复)
					利用定时器来做重复性的操作,上报多个事件,定时器处理函数中也是调用input_pass_values()
					重复性动作:比如一直按着键盘a 键时,就会一直输入a
					*/
					input_start_autorepeat(dev, v->code);
				else
					input_stop_autorepeat(dev);
			}
		}
	}
}
static unsigned int input_to_handler(struct input_handle *handle,
			struct input_value *vals, unsigned int count)
{
	struct input_handler *handler = handle->handler;
	struct input_value *end = vals;
	struct input_value *v;

	if (handler->filter) {									//如果handler 中支持了filter 函数,则优先使用它来处理
		for (v = vals; v != vals + count; v++) {
			if (handler->filter(handle, v->type, v->code, v->value))
				continue;
			if (end != v)
				*end = *v;
			end++;
		}
		count = end - vals;
	}

	if (!count)
		return 0;

	if (handler->events)							//如果没有filter,可以调用events 来一次性处理多个事件
		handler->events(handle, vals, count);
	else if (handler->event)
		for (v = vals; v != vals + count; v++)		//还是没有events,则调用event 来一个个处理
			handler->event(handle, v->type, v->code, v->value);

	return count;
}
evdev_handler 中没有实现filter,先看一下 evdev_handler->events (evdev_events)
这个函数的功能就是将input_dev 上报的事件传递给所有连接的客户端,并唤醒在read中休眠的应用线程,应用线程就会返回想要的数据。
/*
 * Pass incoming events to all connected clients.
 */
static void evdev_events(struct input_handle *handle,
			 const struct input_value *vals, unsigned int count)
{
	struct evdev *evdev = handle->private;
	struct evdev_client *client;
	ktime_t *ev_time = input_get_timestamp(handle->dev);

	rcu_read_lock();

	client = rcu_dereference(evdev->grab);

	if (client)
		evdev_pass_values(client, vals, count, ev_time);
	else
		list_for_each_entry_rcu(client, &evdev->client_list, node)		//遍历 client 链表
			evdev_pass_values(client, vals, count, ev_time);			//将struct input_event数据拷贝给client->buffer

	rcu_read_unlock();
}
static void evdev_pass_values(struct evdev_client *client,
			const struct input_value *vals, unsigned int count,
			ktime_t *ev_time)
{
	struct evdev *evdev = client->evdev;
	const struct input_value *v;
	struct input_event event;
	bool wakeup = false;

	if (client->revoked)
		return;

	event.time = ktime_to_timeval(ev_time[client->clk_type]);

	/* Interrupts are disabled, just acquire the lock. */
	spin_lock(&client->buffer_lock);

	for (v = vals; v != vals + count; v++) {
		event.type = v->type;				//将数据赋值到event
		event.code = v->code;
		event.value = v->value;
		__pass_event(client, &event);		//event 数据拷贝到client->buffer

		//如果是SYN_REPORT 事件,代表一次的事件上报完了,就把wakeup设为真,唤醒应用线程读取数据
		if (v->type == EV_SYN && v->code == SYN_REPORT)
			wakeup = true;
	}

	spin_unlock(&client->buffer_lock);

	if (wakeup)
		wake_up_interruptible(&evdev->wait);		//唤醒应用线程
}
static void __pass_event(struct evdev_client *client,
			 const struct input_event *event)
{
	client->buffer[client->head++] = *event;		//拷贝input_evnet 数据到client 的buffer
	client->head &= client->bufsize - 1;

	......

	//当前处理的事件是一个同步事件的话,就调用异步通知发信号给应用,告诉它有数据可读
	if (event->type == EV_SYN && event->code == SYN_REPORT) {
		client->packet_head = client->head;
		kill_fasync(&client->fasync, SIGIO, POLL_IN);
	}
}
按键驱动
按键驱动(compatible = “gpio-keys”)来看看:
//drivers/input/keyboard/gpio_keys.c
static int gpio_keys_probe(struct platform_device *pdev)
{
	......			//其它代码先略过,只看与input 子系统有关的内容

	input = devm_input_allocate_device(dev);			//申请了一个input_dev 内存
	if (!input) {
		dev_err(dev, "failed to allocate input device\n");
		return -ENOMEM;
	}
				//填充input_dev 内容
	input->name = pdata->name ? : pdev->name;
	input->phys = "gpio-keys/input0";
	input->dev.parent = dev;					//父设备,即pdev->dev
	input->open = gpio_keys_open;				//设置input_dev->open 函数
	input->close = gpio_keys_close;

	input->id.bustype = BUS_HOST;				//设置id 值,在做input_dev 和input_handler 匹配时就是通过id值来判断是否匹配
	input->id.vendor = 0x0001;					//应用层中也可以通过cat /proc/bus/input/devices 查看此信息
	input->id.product = 0x0001;
	input->id.version = 0x0100;

	input->keycode = ddata->keymap;				//设置键值
	input->keycodesize = sizeof(ddata->keymap[0]);
	input->keycodemax = pdata->nbuttons;

	for (i = 0; i < pdata->nbuttons; i++) {
		const struct gpio_keys_button *button = &pdata->buttons[i];	//gpio_keys_button:描述一个按键

		error = gpio_keys_setup_key(pdev, input, ddata,				//
					    button, i, child);
	}

	error = input_register_device(input);		//注册input_dev
	if (error) {
		dev_err(dev, "Unable to register input device, error: %d\n",
			error);
		return error;
	}
	......
}
我们看完了按键驱动的probe 函数,是不是发现缺少点什么,没有设置input_dev 支持的事件类型、和支持什么事件,其实它在gpio_keys_setup_key 函数中设置了。
static int gpio_keys_setup_key(struct platform_device *pdev,
				struct input_dev *input,
				struct gpio_keys_drvdata *ddata,
				const struct gpio_keys_button *button,
				int idx,
				struct fwnode_handle *child)
{
	......
	bdata->code = &ddata->keymap[idx];
	*bdata->code = button->code;			//code 中保存着具体支持的事件
	input_set_capability(input, button->type ?: EV_KEY, *bdata->code);		//设置input_dev支持的事件类型和具体的事件

	......
}
这里就是根据传入的参数设置具体的位了,标识支持的事件类型和事件。
void input_set_capability(struct input_dev *dev, unsigned int type, unsigned int code)
{
	switch (type) {
	case EV_KEY:
		__set_bit(code, dev->keybit);
		break;

	case EV_REL:
		__set_bit(code, dev->relbit);
		break;

	case EV_ABS:
		input_alloc_absinfo(dev);
		if (!dev->absinfo)
			return;

		__set_bit(code, dev->absbit);
		break;

	......
	default:
		pr_err("%s: unknown type %u (code %u)\n", __func__, type, code);
		dump_stack();
		return;
	}

	__set_bit(type, dev->evbit);
}
按键注册中断处理函数
gpio_keys_probe
	-> gpio_keys_setup_key

static int gpio_keys_setup_key(struct platform_device *pdev,
				struct input_dev *input,
				struct gpio_keys_drvdata *ddata,
				const struct gpio_keys_button *button,
				int idx,
				struct fwnode_handle *child)
{
	if (button->irq) {								//获取中断号
		bdata->irq = button->irq;
	} else {
		irq = gpiod_to_irq(bdata->gpiod);
		bdata->irq = irq;
	}

	isr = gpio_keys_gpio_isr;					//中断处理函数
	irqflags = IRQF_TRIGGER_RISING | IRQF_TRIGGER_FALLING;		//中断触发类型,边沿触发

	error = devm_request_any_context_irq(dev, bdata->irq, isr, irqflags,	//注册中断
					     desc, bdata);
	if (error < 0) {
		dev_err(dev, "Unable to claim irq %d; error %d\n",
			bdata->irq, error);
		return error;
	}
	return 0;
}

devm_request_any_context_irq
	-> request_any_context_irq

int request_any_context_irq(unsigned int irq, irq_handler_t handler,
			    unsigned long flags, const char *name, void *dev_id)
{
	struct irq_desc *desc;
	int ret;

	if (irq == IRQ_NOTCONNECTED)
		return -ENOTCONN;

	desc = irq_to_desc(irq);
	if (!desc)
		return -EINVAL;

	if (irq_settings_is_nested_thread(desc)) {				//注册带线程的中断,成功后直接返回
		ret = request_threaded_irq(irq, NULL, handler,
					   flags, name, dev_id);
		return !ret ? IRQC_IS_NESTED : ret;
	}

	ret = request_irq(irq, handler, flags, name, dev_id);	//注册中断
	return !ret ? IRQC_IS_HARDIRQ : ret;
}
input 设备驱动编写
编写时可以参考头文件:include/linux/input.h
申请一个struct input_dev 内存:
struct input_dev __must_check *devm_input_allocate_device(struct device *);
设置input_dev 支持的事件类型、事件的位时可以用__set_bit 如:
__set_bit(EV_KEY,input->evbit);
__set_bit(KEY_1 | KEY_2 | KEY_3,input->keybit);
向内核注册一个input_dev:
int __must_check input_register_device(struct input_dev *);
注销一个 input_dev:
void input_unregister_device(struct input_dev *);
上报一个输入事件:
void input_event(struct input_dev *dev, unsigned int type, unsigned int code, int value);
上报一个同步事件:
static inline void input_sync(struct input_dev *dev);