前端数据可视化方案:
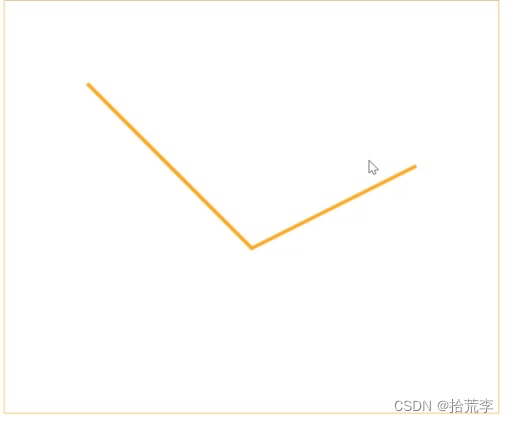
一、canvas绘制直线
<!DOCTYPE html>
<html lang="en">

<head>
  <meta charset="UTF-8">
  <meta http-equiv="X-UA-Compatible" content="IE=edge">
  <meta name="viewport" content="width=device-width, initial-scale=1.0">
  <title>canvas绘制线条</title>
  <style>
    canvas {
      display: block;
      margin: 10px auto 0;
      border: 1px solid orange;
    }
  </style>
</head>

<body>
  <canvas id="canvas" width="600" height="500">您的浏览器当前不支持 canvas</canvas>
</body>
<script>
  const canvas = document.getElementById('canvas')
  const ctx = canvas.getContext('2d')

  ctx.beginPath()
  ctx.lineWidth = 4
  ctx.strokeStyle = 'orange'
  // 起点  终点  中间点
  ctx.moveTo(100, 100)
  ctx.lineTo(300, 300)
  ctx.lineTo(500, 200)
  ctx.stroke()
  ctx.closePath()

</script>

</html>
二、canvas高清绘制
解决模糊问题
<!DOCTYPE html>
<html lang="en">

<head>
  <meta charset="UTF-8">
  <meta http-equiv="X-UA-Compatible" content="IE=edge">
  <meta name="viewport" content="width=device-width, initial-scale=1.0">
  <title>canvas 高清绘制</title>
  <style>
    canvas {
      display: block;
      margin: 10px auto 0;
      border: 1px solid orange;
    }
  </style>
</head>

<body>
  <canvas id="canvas" width="600" height="500">您的浏览器当前不支持 canvas</canvas>
</body>
<script>
  const canvas = document.getElementById('canvas')
  const ctx = canvas.getContext('2d')

  const getPixelRatio = (context) => {
    return window.devicePixelRatio || 1
  }

  /*
    01 放大 canvas
    02 再在 css 里将宽高设置为原来的大小
    03 考虑到内容的缩放,因此也需将 ctx 缩放
  */

  const ratio = getPixelRatio()
  const oldWidth = canvas.width
  const oldHeight = canvas.height

  canvas.width = canvas.width * ratio
  canvas.height = canvas.height * ratio

  canvas.style.width = oldWidth + 'px'
  canvas.style.height = oldHeight + 'px'

  ctx.scale(ratio, ratio)


  ctx.beginPath()
  ctx.lineWidth = 10
  ctx.strokeStyle = 'orange'
  ctx.moveTo(100, 100)
  ctx.lineTo(300, 300)
  ctx.lineTo(500, 200)
  ctx.stroke()
  ctx.closePath()

</script>

</html>
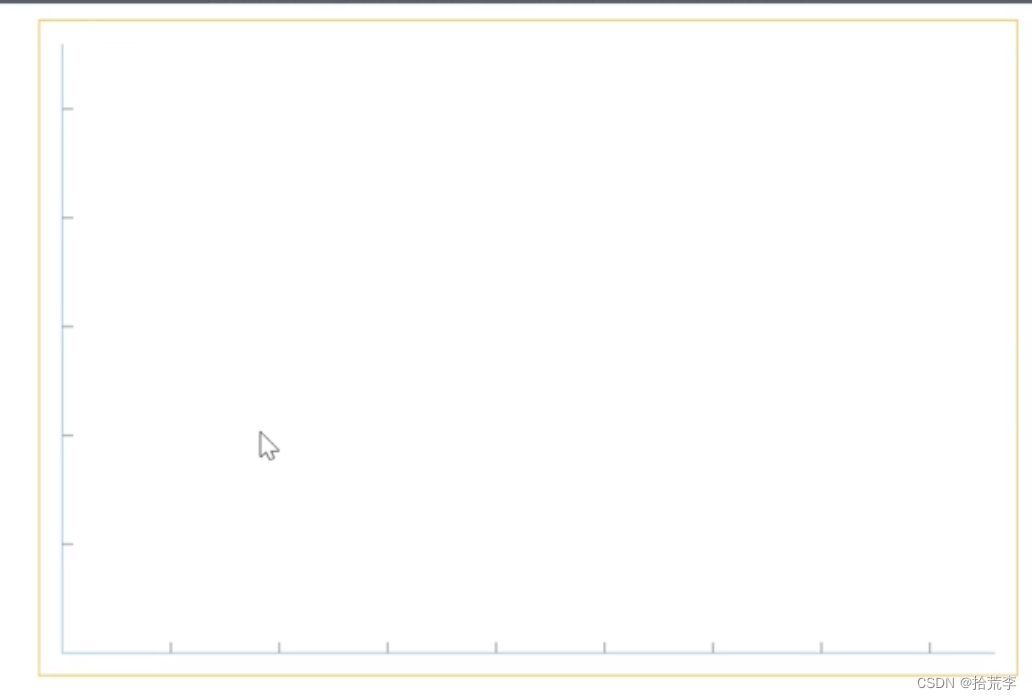
三、canvas绘制直角坐标系
<!DOCTYPE html>
<html lang="en">

<head>
  <meta charset="UTF-8">
  <meta http-equiv="X-UA-Compatible" content="IE=edge">
  <meta name="viewport" content="width=device-width, initial-scale=1.0">
  <title>绘制直角坐标系</title>
  <style>
    canvas {
      display: block;
      margin: 10px auto 0;
      border: 1px solid orange;
    }
  </style>
</head>

<body>
  <canvas id="canvas" width="600" height="400">您的浏览器不支持 canvas</canvas>
</body>
<script>
  const canvas = document.getElementById('canvas')
  const ctx = canvas.getContext('2d')

  canvas.style.width = canvas.width + 'px'
  canvas.style.height = canvas.height + 'px'
  canvas.width = canvas.width * 1.5
  canvas.height = canvas.height * 1.5

  // 提前设置相关属性
  const ht = canvas.clientHeight
  const wd = canvas.clientWidth
  const pad = 20
  const bottomPad = 20
  const step = 100

  const drawAxis = (options) => {
    const { ht, wd, pad, bottomPad, step, ctx } = options
    // 绘制坐标轴
    ctx.beginPath()
    ctx.lineWidth = 2
    ctx.strokeStyle = 'lightblue'
    ctx.moveTo(pad, pad)
    ctx.lineTo(pad, ht * 1.5 - bottomPad)
    ctx.lineTo(wd * 1.5 - pad, ht * 1.5 - bottomPad)
    ctx.stroke()
    ctx.closePath()

    // 绘制 X 轴方向刻度
    ctx.beginPath()
    ctx.lineWidth = 1
    ctx.strokeStyle = '#666'
    for (let i = 1; i < Math.floor(wd * 1.5 / step); i++) {
      ctx.moveTo(pad + i * step, ht * 1.5 - bottomPad)
      ctx.lineTo(pad + i * step, ht * 1.5 - bottomPad - 10)
    }
    ctx.stroke()
    ctx.closePath()


    // 绘制 Y 轴方向刻度
    ctx.beginPath()
    ctx.lineWidth = 1
    ctx.strokeStyle = '#666'
    for (let i = 1; i < Math.floor(ht * 1.5 / step); i++) {
      ctx.moveTo(pad, (ht * 1.5 - bottomPad) - (i * step))
      ctx.lineTo(pad + 10, (ht * 1.5 - bottomPad) - (i * step))
    }
    ctx.stroke()
    ctx.closePath()
  }

  drawAxis({
    ht: ht,
    wd: wd,
    pad: pad,
    bottomPad: bottomPad,
    step: step,
    ctx: ctx
  })

</script>

</html>
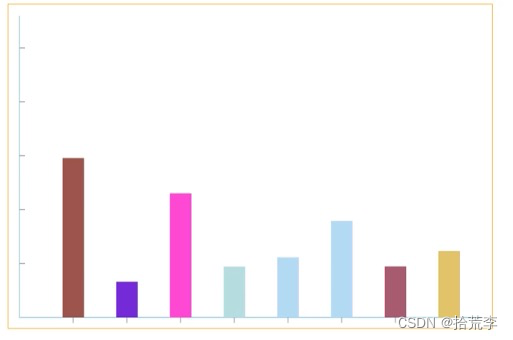
四、canvas绘制柱状图
<!DOCTYPE html>
<html lang="en">

<head>
  <meta charset="UTF-8">
  <meta http-equiv="X-UA-Compatible" content="IE=edge">
  <meta name="viewport" content="width=device-width, initial-scale=1.0">
  <title>绘制矩形</title>
  <style>
    canvas {
      display: block;
      margin: 10px auto 0;
      border: 1px solid orange;
    }
  </style>
</head>

<body>
  <canvas id="canvas" width="600" height="400">您的浏览器不支持 canvas</canvas>
</body>
<script>
  const canvas = document.getElementById('canvas')
  const ctx = canvas.getContext('2d')

  canvas.style.width = canvas.width + 'px'
  canvas.style.height = canvas.height + 'px'
  canvas.width = canvas.width * 1.5
  canvas.height = canvas.height * 1.5

  // 提前设置相关属性
  const ht = canvas.clientHeight
  const wd = canvas.clientWidth
  const pad = 20
  const bottomPad = 20
  const step = 100

  const drawAxis = (options) => {
    const { ht, wd, pad, bottomPad, step, ctx } = options
    // 绘制坐标轴
    ctx.beginPath()
    ctx.lineWidth = 2
    ctx.strokeStyle = 'lightblue'
    ctx.moveTo(pad, pad)
    ctx.lineTo(pad, ht * 1.5 - bottomPad)
    ctx.lineTo(wd * 1.5 - pad, ht * 1.5 - bottomPad)
    ctx.stroke()
    ctx.closePath()

    // 绘制 X 轴方向刻度
    ctx.beginPath()
    ctx.lineWidth = 1
    ctx.strokeStyle = '#666'
    for (let i = 1; i < Math.floor(wd * 1.5 / step); i++) {
      ctx.moveTo(pad + i * step, ht * 1.5 - bottomPad)
      ctx.lineTo(pad + i * step, ht * 1.5 - bottomPad + 10)
    }
    ctx.stroke()
    ctx.closePath()


    // 绘制 Y 轴方向刻度
    ctx.beginPath()
    ctx.lineWidth = 1
    ctx.strokeStyle = '#666'
    for (let i = 1; i < Math.floor(ht * 1.5 / step); i++) {
      ctx.moveTo(pad, (ht * 1.5 - bottomPad) - (i * step))
      ctx.lineTo(pad + 10, (ht * 1.5 - bottomPad) - (i * step))
    }
    ctx.stroke()
    ctx.closePath()
  }

  drawAxis({
    ht: ht,
    wd: wd,
    pad: pad,
    bottomPad: bottomPad,
    step: step,
    ctx: ctx
  })

  // 绘制矩形:描述+填充   描边  填充
  // ctx.beginPath()
  // ctx.lineWidth = 5
  // ctx.strokeStyle = 'orange'
  // ctx.fillStyle = 'hotpink'
  // ctx.rect(100, 100, 300, 200)
  // ctx.fill()
  // ctx.stroke()
  // ctx.closePath()

  // ctx.beginPath()
  // ctx.lineWidth = 4
  // ctx.strokeStyle = 'seagreen'
  // ctx.strokeRect(100, 310, 300, 200)
  // ctx.closePath()

  // ctx.beginPath()
  // ctx.fillStyle = 'skyblue'
  // ctx.fillRect(410, 310, 300, 200)
  // ctx.closePath()

  // 绘制直方图
  ctx.beginPath()
  for (var i = 1; i < Math.floor(wd * 1.5 / step); i++) {
    const height = Math.random() * 300 + 50
    ctx.fillStyle = '#' + parseInt(Math.random() * 0xFFFFFF).toString(16)
    ctx.fillRect((i * step), ht * 1.5 - bottomPad - height, 40, height)
  }
  ctx.closePath()

</script>

</html>
五、canvas绘制圆形
<!DOCTYPE html>
<html lang="en">

<head>
  <meta charset="UTF-8">
  <meta http-equiv="X-UA-Compatible" content="IE=edge">
  <meta name="viewport" content="width=device-width, initial-scale=1.0">
  <title>绘制矩形</title>
  <style>
    canvas {
      display: block;
      margin: 10px auto 0;
      border: 1px solid orange;
    }
  </style>
</head>

<body>
  <canvas id="canvas" width="600" height="400">您的浏览器不支持 canvas</canvas>
</body>
<script>
  const canvas = document.getElementById('canvas')
  const ctx = canvas.getContext('2d')

  canvas.style.width = canvas.width + 'px'
  canvas.style.height = canvas.height + 'px'
  canvas.width = canvas.width * 1.5
  canvas.height = canvas.height * 1.5

  // 提前设置相关属性
  const ht = canvas.clientHeight
  const wd = canvas.clientWidth
  const pad = 20
  const bottomPad = 20
  const step = 100

  const drawAxis = (options) => {
    const { ht, wd, pad, bottomPad, step, ctx } = options
    // 绘制坐标轴
    ctx.beginPath()
    ctx.lineWidth = 2
    ctx.strokeStyle = 'lightblue'
    ctx.moveTo(pad, pad)
    ctx.lineTo(pad, ht * 1.5 - bottomPad)
    ctx.lineTo(wd * 1.5 - pad, ht * 1.5 - bottomPad)
    ctx.stroke()
    ctx.closePath()

    // 绘制 X 轴方向刻度
    ctx.beginPath()
    ctx.lineWidth = 1
    ctx.strokeStyle = '#666'
    for (let i = 1; i < Math.floor(wd * 1.5 / step); i++) {
      ctx.moveTo(pad + i * step, ht * 1.5 - bottomPad)
      ctx.lineTo(pad + i * step, ht * 1.5 - bottomPad + 10)
    }
    ctx.stroke()
    ctx.closePath()


    // 绘制 Y 轴方向刻度
    ctx.beginPath()
    ctx.lineWidth = 1
    ctx.strokeStyle = '#666'
    for (let i = 1; i < Math.floor(ht * 1.5 / step); i++) {
      ctx.moveTo(pad, (ht * 1.5 - bottomPad) - (i * step))
      ctx.lineTo(pad + 10, (ht * 1.5 - bottomPad) - (i * step))
    }
    ctx.stroke()
    ctx.closePath()
  }

  drawAxis({
    ht: ht,
    wd: wd,
    pad: pad,
    bottomPad: bottomPad,
    step: step,
    ctx: ctx
  })

  // 绘制圆环
  ctx.beginPath()
  ctx.lineWidth = 2
  ctx.strokeStyle = 'orange'
  ctx.arc(400, 300, 200, 0, Math.PI / 4, true)
  ctx.stroke()
  ctx.closePath()

  // 绘制圆形
  ctx.beginPath()
  ctx.fillStyle = 'skyblue'
  ctx.moveTo(400, 300)
  ctx.arc(400, 300, 100, 0, -Math.PI / 2, true)
  ctx.fill()
  ctx.closePath()

</script>

</html>
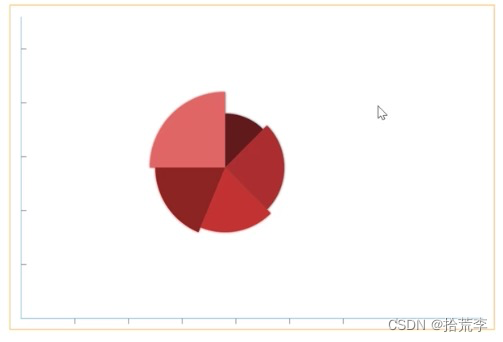
六、canvas绘制饼状图
<!DOCTYPE html>
<html lang="en">

<head>
  <meta charset="UTF-8">
  <meta http-equiv="X-UA-Compatible" content="IE=edge">
  <meta name="viewport" content="width=device-width, initial-scale=1.0">
  <title>绘制矩形</title>
  <style>
    canvas {
      display: block;
      margin: 10px auto 0;
      border: 1px solid orange;
    }
  </style>
</head>

<body>
  <canvas id="canvas" width="600" height="400">您的浏览器不支持 canvas</canvas>
</body>
<script>
  const canvas = document.getElementById('canvas')
  const ctx = canvas.getContext('2d')

  canvas.style.width = canvas.width + 'px'
  canvas.style.height = canvas.height + 'px'
  canvas.width = canvas.width * 1.5
  canvas.height = canvas.height * 1.5

  // 提前设置相关属性
  const ht = canvas.clientHeight
  const wd = canvas.clientWidth
  const pad = 20
  const bottomPad = 20
  const step = 100

  const drawAxis = (options) => {
    const { ht, wd, pad, bottomPad, step, ctx } = options
    // 绘制坐标轴
    ctx.beginPath()
    ctx.lineWidth = 2
    ctx.strokeStyle = 'lightblue'
    ctx.moveTo(pad, pad)
    ctx.lineTo(pad, ht * 1.5 - bottomPad)
    ctx.lineTo(wd * 1.5 - pad, ht * 1.5 - bottomPad)
    ctx.stroke()
    ctx.closePath()

    // 绘制 X 轴方向刻度
    ctx.beginPath()
    ctx.lineWidth = 1
    ctx.strokeStyle = '#666'
    for (let i = 1; i < Math.floor(wd * 1.5 / step); i++) {
      ctx.moveTo(pad + i * step, ht * 1.5 - bottomPad)
      ctx.lineTo(pad + i * step, ht * 1.5 - bottomPad + 10)
    }
    ctx.stroke()
    ctx.closePath()


    // 绘制 Y 轴方向刻度
    ctx.beginPath()
    ctx.lineWidth = 1
    ctx.strokeStyle = '#666'
    for (let i = 1; i < Math.floor(ht * 1.5 / step); i++) {
      ctx.moveTo(pad, (ht * 1.5 - bottomPad) - (i * step))
      ctx.lineTo(pad + 10, (ht * 1.5 - bottomPad) - (i * step))
    }
    ctx.stroke()
    ctx.closePath()
  }

  drawAxis({
    ht: ht,
    wd: wd,
    pad: pad,
    bottomPad: bottomPad,
    step: step,
    ctx: ctx
  })

  ctx.beginPath()
  ctx.shadowOffsetX = 0
  ctx.shadowOffsetY = 0
  ctx.shadowBlur = 4
  ctx.shadowColor = '#333'
  ctx.fillStyle = '#5C1918'
  ctx.moveTo(400, 300)
  ctx.arc(400, 300, 100, -Math.PI / 2, -Math.PI / 4)
  ctx.fill()
  ctx.closePath()

  ctx.beginPath()
  ctx.shadowOffsetX = 0
  ctx.shadowOffsetY = 0
  ctx.shadowBlur = 4
  ctx.shadowColor = '#5C1918'
  ctx.fillStyle = '#A32D29'
  ctx.moveTo(400, 300)
  ctx.arc(400, 300, 110, -Math.PI / 4, Math.PI / 4)
  ctx.fill()
  ctx.closePath()

  ctx.beginPath()
  ctx.shadowOffsetX = 0
  ctx.shadowOffsetY = 0
  ctx.shadowBlur = 4
  ctx.shadowColor = '#A32D29'
  ctx.fillStyle = '#B9332E'
  ctx.moveTo(400, 300)
  ctx.arc(400, 300, 120, Math.PI / 4, Math.PI * 5 / 8)
  ctx.fill()
  ctx.closePath()

  ctx.beginPath()
  ctx.shadowOffsetX = 0
  ctx.shadowOffsetY = 0
  ctx.shadowBlur = 4
  ctx.shadowColor = '#B9332E'
  ctx.fillStyle = '#842320'
  ctx.moveTo(400, 300)
  ctx.arc(400, 300, 130, Math.PI * 5 / 8, Math.PI)
  ctx.fill()
  ctx.closePath()

  ctx.beginPath()
  ctx.shadowOffsetX = 0
  ctx.shadowOffsetY = 0
  ctx.shadowBlur = 4
  ctx.shadowColor = '#842320'
  ctx.fillStyle = '#D76662'
  ctx.moveTo(400, 300)
  ctx.arc(400, 300, 140, Math.PI, Math.PI * 3 / 2)
  ctx.fill()
  ctx.closePath()

</script>

</html>
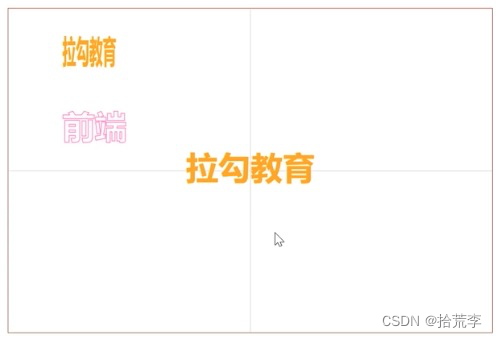
七、canvas绘制文字
<!DOCTYPE html>
<html lang="en">

<head>
  <meta charset="UTF-8">
  <meta http-equiv="X-UA-Compatible" content="IE=edge">
  <meta name="viewport" content="width=device-width, initial-scale=1.0">
  <title>绘制文字</title>
  <style>
    canvas {
      display: block;
      margin: 40px auto 0;
      border: 1px solid sienna;
    }
  </style>
</head>

<body>
  <canvas id="canvas" width="600" height="400">您的浏览器不支持 canvas</canvas>
</body>
<script>
  const canvas = document.getElementById('canvas')
  const ctx = canvas.getContext('2d')

  canvas.style.width = canvas.width + 'px'
  canvas.style.height = canvas.height + 'px'
  canvas.width = canvas.width * 1.5
  canvas.height = canvas.height * 1.5

  // 绘制居中线条
  ctx.beginPath()
  ctx.lineWidth = 1
  ctx.strokeStyle = '#ccc'
  ctx.moveTo(450, 0)
  ctx.lineTo(450, 600)
  ctx.stroke()
  ctx.closePath()

  ctx.beginPath()
  ctx.lineWidth = 1
  ctx.strokeStyle = '#ccc'
  ctx.moveTo(0, 300)
  ctx.lineTo(900, 300)
  ctx.stroke()
  ctx.closePath()

  // 实心文字 描边文字
  ctx.fillStyle = 'orange'
  ctx.strokeStyle = "hotpink"
  ctx.font = 'bold 60px 微软雅黑'
  ctx.fillText('拉勾教育', 100, 100, 100)
  ctx.strokeText('前端', 100, 240)

  // 对齐属性设置
  ctx.textAlign = 'center' // left right start end center
  ctx.textBaseline = "middle"  // top bottom middle
  ctx.fillText('拉勾教育', 450, 300)

</script>

</html>