文章目录
- 背景
- 介绍
- 一般刷新 notifyDataSetChanged()
- 局部刷新
- 实现
- 调用代码
- 准备工作
- 创建 MyDiffUtilCallback 类继承 DiffUtil.Callback 抽象类
- MyAdpter 类代码实现
- 步骤总结
- 通过 log 证实 diffutil 的局部刷新
- diffutil 优化
- 后台线程参考
- 主线程参考
- diff 更新优化后写法
- 相关参考
背景
- 学习记录
- 针对
recyclerview实现的多数据列表展示,进一步优化数据频繁更新时的性能
介绍
Android在Support:v7-24.2.0中,recyclerview支持库开始支持了DiffUtil工具类的使用DiffUtil内部使用Eugene W. Myers’s difference算法:进行两个数据集的对比,找出新数据与旧数据之间最小的变化部分,和RecyclerView一起使用可以实现列表的局部更新
一般刷新 notifyDataSetChanged()
public class MyAdapter extends RecyclerView.Adapter<MyAdapter.ViewHolder> {
	...

	// 一般刷新方式
    public void notifyUpdate(List<CoderBean> mCoderList){
        this.mCoderList = mCoderList;
        if (mCoderList == null || mCoderList.size() == 0){
            this.mCoderList = new ArrayList<>();
        }
        notifyDataSetChanged();
    }
}
主要缺点:
- 粗暴的刷新整个列表的可见区域,这时候就会触发每个
item的视图重绘,当onBindViewHolder(@NonNull ViewHolder holder, int position)中的处理逻辑比较复杂,容易出现卡顿
局部刷新
为了进一步优化上面的缺点,recyclerview 提供了局部刷新的方式,如下:
# notifyItemChanged(int)
# notifyItemInserted(int)
# notifyItemRemoved(int)
# notifyItemRangeChanged(int, int)
# notifyItemRangeInserted(int, int)
# notifyItemRangeRemoved(int, int)
上面的几个 recyclerview 提供的局部刷新方法,都只会刷新指定 position 位置的 item,就不会存在一般刷新方式出现的缺点。
但是如果数据量多,且需要更新的 item 也较多,那么这将会需要我们提供较为复杂的局部刷新调用处理逻辑,这无疑是一场灾难。
所以后面 Google 也注意到了这点,后续推出了工具类: DiffUtil ,用来专门计算哪些位置的数据需要进行更新。
实现
调用代码
这里先给出调用的代码,我们来看下相关 api :
public class MyAdapter extends RecyclerView.Adapter<MyAdapter.ViewHolder> {
	...

	// diff 更新方式
    public void diffUpdate(final List<CoderBean> newCoderList){
        final MyDiffUtilCallback diffUtilCallback = new MyDiffUtilCallback(this.mCoderList, newCoderList);
        // 获取差异结果(注意这里是耗时操作,如果数据量大的时候需要放到后台线程处理差异,否则会阻塞主线程)
        final DiffUtil.DiffResult diffResult = DiffUtil.calculateDiff(diffUtilCallback);
        cloneData(newCoderList);
        // DiffResult 再把差异分发给 Adapter,adapter 最后根据接收到的差异数据做更新
        diffResult.dispatchUpdatesTo(MyAdapter.this);

    }

	// 拷贝一份数据给到当前数据集 mCoderList
	private void cloneData(List<CoderBean> newCoderList) {
        this.mCoderList.clear();
        this.mCoderList.addAll(newCoderList);
    }
}
- 首先
MyAdapter就是简单的展示数据逻辑:构建itemView、获取数据,绑定数据展示 mCoderList是上一次的数据集,newCoderList是通过参数新传进来的新的数据集- 需要一个
DiffUtil.Callback对象。MyDiffUtilCallback继承了DiffUtil.Callback抽象类
准备工作
- 创建实体类
CoderBean
package com.example.diffutildemo.bean;

import android.os.Parcel;
import android.os.Parcelable;

/**
 * 搬砖工 实体
 */
public class CoderBean implements Parcelable {

    private int id;
    private String name;

    public int getId() {
        return id;
    }

    public void setId(int id) {
        this.id = id;
    }

    public String getName() {
        return name;
    }

    public void setName(String name) {
        this.name = name;
    }


    @Override
    public int describeContents() {
        return 0;
    }

    @Override
    public void writeToParcel(Parcel dest, int flags) {
        dest.writeInt(this.id);
        dest.writeString(this.name);
    }

    public CoderBean() {
    }

    protected CoderBean(Parcel in) {
        this.id = in.readInt();
        this.name = in.readString();
    }

    public static final Parcelable.Creator<CoderBean> CREATOR = new Parcelable.Creator<CoderBean>() {
        @Override
        public CoderBean createFromParcel(Parcel source) {
            return new CoderBean(source);
        }

        @Override
        public CoderBean[] newArray(int size) {
            return new CoderBean[size];
        }
    };
}
创建 MyDiffUtilCallback 类继承 DiffUtil.Callback 抽象类
代码如下:
package com.example.diffutildemo.callback;

import android.text.TextUtils;

import androidx.annotation.Nullable;
import androidx.recyclerview.widget.DiffUtil;

import com.example.diffutildemo.bean.CoderBean;

import java.util.ArrayList;
import java.util.List;

public class MyDiffUtilCallback extends DiffUtil.Callback {

    private List<CoderBean> oldCoderList = new ArrayList<>();
    private List<CoderBean> newCoderList = new ArrayList<>();

    // 通过构造传入新旧数据集
    public MyDiffUtilCallback(List<CoderBean> oldCoderList, List<CoderBean> newCoderList) {
        this.oldCoderList = oldCoderList;
        this.newCoderList = newCoderList;
    }

    @Override
    public int getOldListSize() {
        return oldCoderList == null ? 0 : oldCoderList.size();
    }

    @Override
    public int getNewListSize() {
        return newCoderList == null ? 0 : newCoderList.size();
    }

    @Override
    public boolean areItemsTheSame(int oldItemPosition, int newItemPosition) {
        CoderBean oldCoderBean = oldCoderList.get(oldItemPosition);
        CoderBean newCoderBean = oldCoderList.get(newItemPosition);
        if (oldCoderBean != null && newCoderBean != null){
            int oldId = oldCoderList.get(oldItemPosition).getId();
            int newId = newCoderList.get(newItemPosition).getId();
            if (oldId == newId){
                return true;
            }
        }
        return false;
    }

    @Override
    public boolean areContentsTheSame(int oldItemPosition, int newItemPosition) {
        String oldName = oldCoderList.get(oldItemPosition).getName();
        String newName = newCoderList.get(newItemPosition).getName();
        if (TextUtils.isEmpty(oldName) || TextUtils.isEmpty(newName)){
            return false;
        }
        if (oldName.equals(newName)){
            return true;
        }
        return false;
    }

    @Nullable
    @Override
    public Object getChangePayload(int oldItemPosition, int newItemPosition) {
        System.out.println(":> getChangePayload +++ old: " + oldItemPosition
        + ", +++ new: " + newItemPosition);
        return super.getChangePayload(oldItemPosition, newItemPosition);
    }
}
- public int getOldListSize() :
返回旧列表数据集的数量。
- public int getNewListSize():
返回新列表数据集的数量。
- public boolean areItemsTheSame(int oldItemPosition, int newItemPosition):
两个位置的对象是否是同一个 item。一般通过实体类中定义的 id 属性值是否相同来进行判断:返回 true 表示是同一个,反之则不是。
- public boolean areContentsTheSame(int oldItemPosition, int newItemPosition):
用来判断新旧 item 的各内容属性值是否相同(自己实现,也相对简单)。
只有当 areItemsTheSame() 返回 true 时才会触发调用:返回 true
表示是相同的各属性内容,反之则存在属性内容的变化。
- public Object getChangePayload(int oldItemPosition, int newItemPosition):
当 areItemsTheSame() 返回 true ,并且 areContentsTheSame() 返回 false 时触发调用。
这里可以自己实现返回差异数据,会从 DiffResult 分发给 notifyItemRangeChanged(position,
count, payload) 方法,最终交给 Adapter 的 onBindViewHolder(… List< Object >
payloads) 处理。
MyAdpter 类代码实现
package com.example.diffutildemo.adatper;

import android.content.Context;
import android.view.LayoutInflater;
import android.view.View;
import android.view.ViewGroup;
import android.widget.TextView;

import androidx.annotation.NonNull;
import androidx.recyclerview.widget.DiffUtil;
import androidx.recyclerview.widget.RecyclerView;

import com.example.diffutildemo.R;
import com.example.diffutildemo.bean.CoderBean;
import com.example.diffutildemo.callback.MyDiffUtilCallback;
import com.example.diffutildemo.executor.DiffMainThreadExecutor;

import java.util.ArrayList;
import java.util.List;
import java.util.concurrent.Executor;
import java.util.concurrent.Executors;

public class MyAdapter extends RecyclerView.Adapter<MyAdapter.ViewHolder> {

    private List<CoderBean> mCoderList = new ArrayList<>();
    private LayoutInflater inflater;
    private ViewHolder holder;
    private Context context;

    public MyAdapter(Context context, List<CoderBean> mCoderList) {
        this.mCoderList = mCoderList;
        this.context = context;
        this.inflater = LayoutInflater.from(context);
    }

    @NonNull
    @Override
    public ViewHolder onCreateViewHolder(@NonNull ViewGroup parent, int viewType) {
        System.out.println(":> onCreateViewHolder +++ ");
        View itemView = inflater.inflate(R.layout.recyclerview_itemview_coder, parent, false);
        holder = new ViewHolder(itemView);
        return holder;
    }

    @Override
    public void onBindViewHolder(@NonNull ViewHolder holder, int position) {
        System.out.println(":> onBindViewHolder +++ " + position);
        String name = mCoderList.get(position).getName();
        holder.tv_coder.setText(name);
    }

    @Override
    public void onBindViewHolder(@NonNull ViewHolder holder, int position, @NonNull List<Object> payloads) {
//        System.out.println(":> onBindViewHolder +++ payloads");
        super.onBindViewHolder(holder, position, payloads);
    }

    @Override
    public int getItemCount() {
        return (mCoderList == null) ? 0 : mCoderList.size();
    }

    public class ViewHolder extends RecyclerView.ViewHolder {
        TextView tv_coder;
        public ViewHolder(@NonNull View itemView) {
            super(itemView);
            tv_coder = itemView.findViewById(R.id.tv_coder);
        }
    }

    @Override
    public int getItemViewType(int position) {
        return super.getItemViewType(position);
    }

    // 一般刷新方式
    public void notifyUpdate(List<CoderBean> mCoderList){
        this.mCoderList = mCoderList;
        if (mCoderList == null || mCoderList.size() == 0){
            this.mCoderList = new ArrayList<>();
        }
        notifyDataSetChanged();
    }

    // diff 更新方式
    public void diffUpdate(final List<CoderBean> newCoderList){
        final MyDiffUtilCallback diffUtilCallback = new MyDiffUtilCallback(this.mCoderList, newCoderList);
        // 获取差异结果(注意这里是耗时操作,如果数据量大的时候需要放到后台线程处理差异,否则会阻塞主线程)
        final DiffUtil.DiffResult diffResult = DiffUtil.calculateDiff(diffUtilCallback);
        cloneData(newCoderList);
        // DiffResult 再把差异分发给 Adapter,adapter 最后根据接收到的差异数据做更新
        diffResult.dispatchUpdatesTo(MyAdapter.this);


    }

    private void cloneData(List<CoderBean> newCoderList) {
        this.mCoderList.clear();
        this.mCoderList.addAll(newCoderList);
    }

}
- 代码简单,不过多说明。
步骤总结
所以使用 DiffUtil 工具类进行局部刷新可以简单分为下面几步:
- 自实现
DiffUtil.callback - 计算得到
DiffResult
final DiffUtil.DiffResult diffResult = DiffUtil.calculateDiff(diffUtilCallback);
- 将
DiffResult分发给Adapter进行局部更新
cloneData(newCoderList);
// DiffResult 再把差异分发给 Adapter,adapter 最后根据接收到的差异数据做更新
diffResult.dispatchUpdatesTo(MyAdapter.this);
计算出 DiffResult 后,咱们必须要将新数据设置给 Adapter,然后才能调用DiffResult.dispatchUpdatesTo(Adapter) 刷新ui
private void cloneData(List<CoderBean> newCoderList) {
        this.mCoderList.clear();
        this.mCoderList.addAll(newCoderList);
}
通过 log 证实 diffutil 的局部刷新
原始数据初始化代码:
private void initData() {
        coderList.clear();
        for (int i = 0;i < 10;i++){
            CoderBean bean = new CoderBean();
            bean.setId(i);
            bean.setName("原始数据 coder +00" + i);
            coderList.add(bean);
        }
    }
一般更新模拟设置数据代码:
// 一般更新数据模拟,前两个数据保持不变
    private List<CoderBean> getNewData(){
        List<CoderBean> list = new ArrayList<>();
        for (int i = 0;i < 10;i++){
            CoderBean bean = new CoderBean();
            bean.setId(i);
            bean.setName("一般更新 coder +00" + i);
            if (i < 2){
                bean.setName("原始数据 coder +00" + i);
            }
            list.add(bean);
        }
        return list;
    }
diff 更新模拟设置数据代码:
// diff 更新模拟设置数据 前两个数据保持不变
    private List<CoderBean> getNewDiffData(){
        List<CoderBean> list = new ArrayList<>();
        for (int i = 0;i < 10;i++){
            CoderBean bean = new CoderBean();
            bean.setId(i);
            bean.setName("Diff更新 coder +00" + i);
            if (i < 2){
                bean.setName("原始数据 coder +00" + i);
            }
            list.add(bean);
        }
        return list;
    }
一般更新调用测试:
		// 一般更新
        btn_update.setOnClickListener(new View.OnClickListener() {
            @Override
            public void onClick(View v) {
                if (adapter != null){
                    adapter.notifyUpdate(getNewData());
                }
            }
        });
日志打印如下:
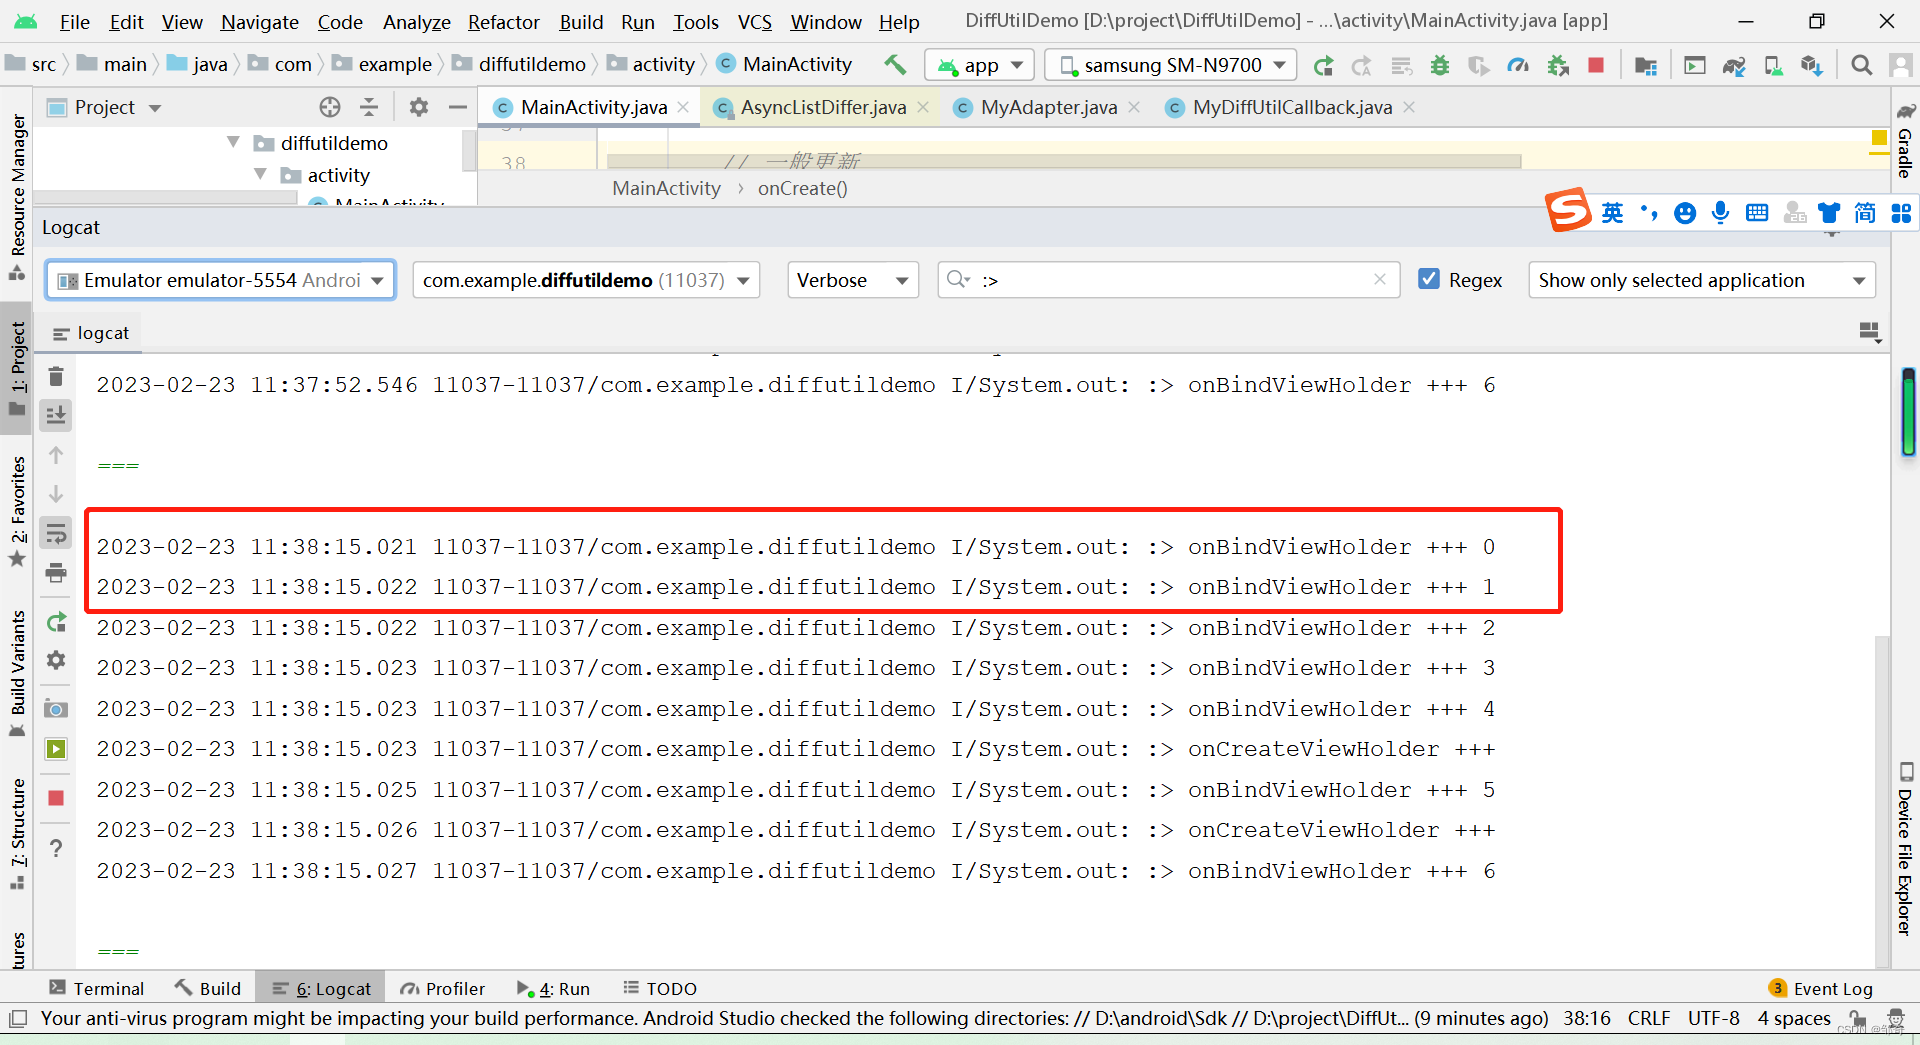
上图可知:即使前两个 item 的数据一样,一般更新也会重新绘制前两个 itemview 的视图。
diff 更新调用测试:
		// diff 更新
        btn_update_diff.setOnClickListener(new View.OnClickListener() {
            @Override
            public void onClick(View v) {
                if (adapter != null){
                    adapter.diffUpdate(getNewDiffData());
                }
            }
        });
日志打印如下:
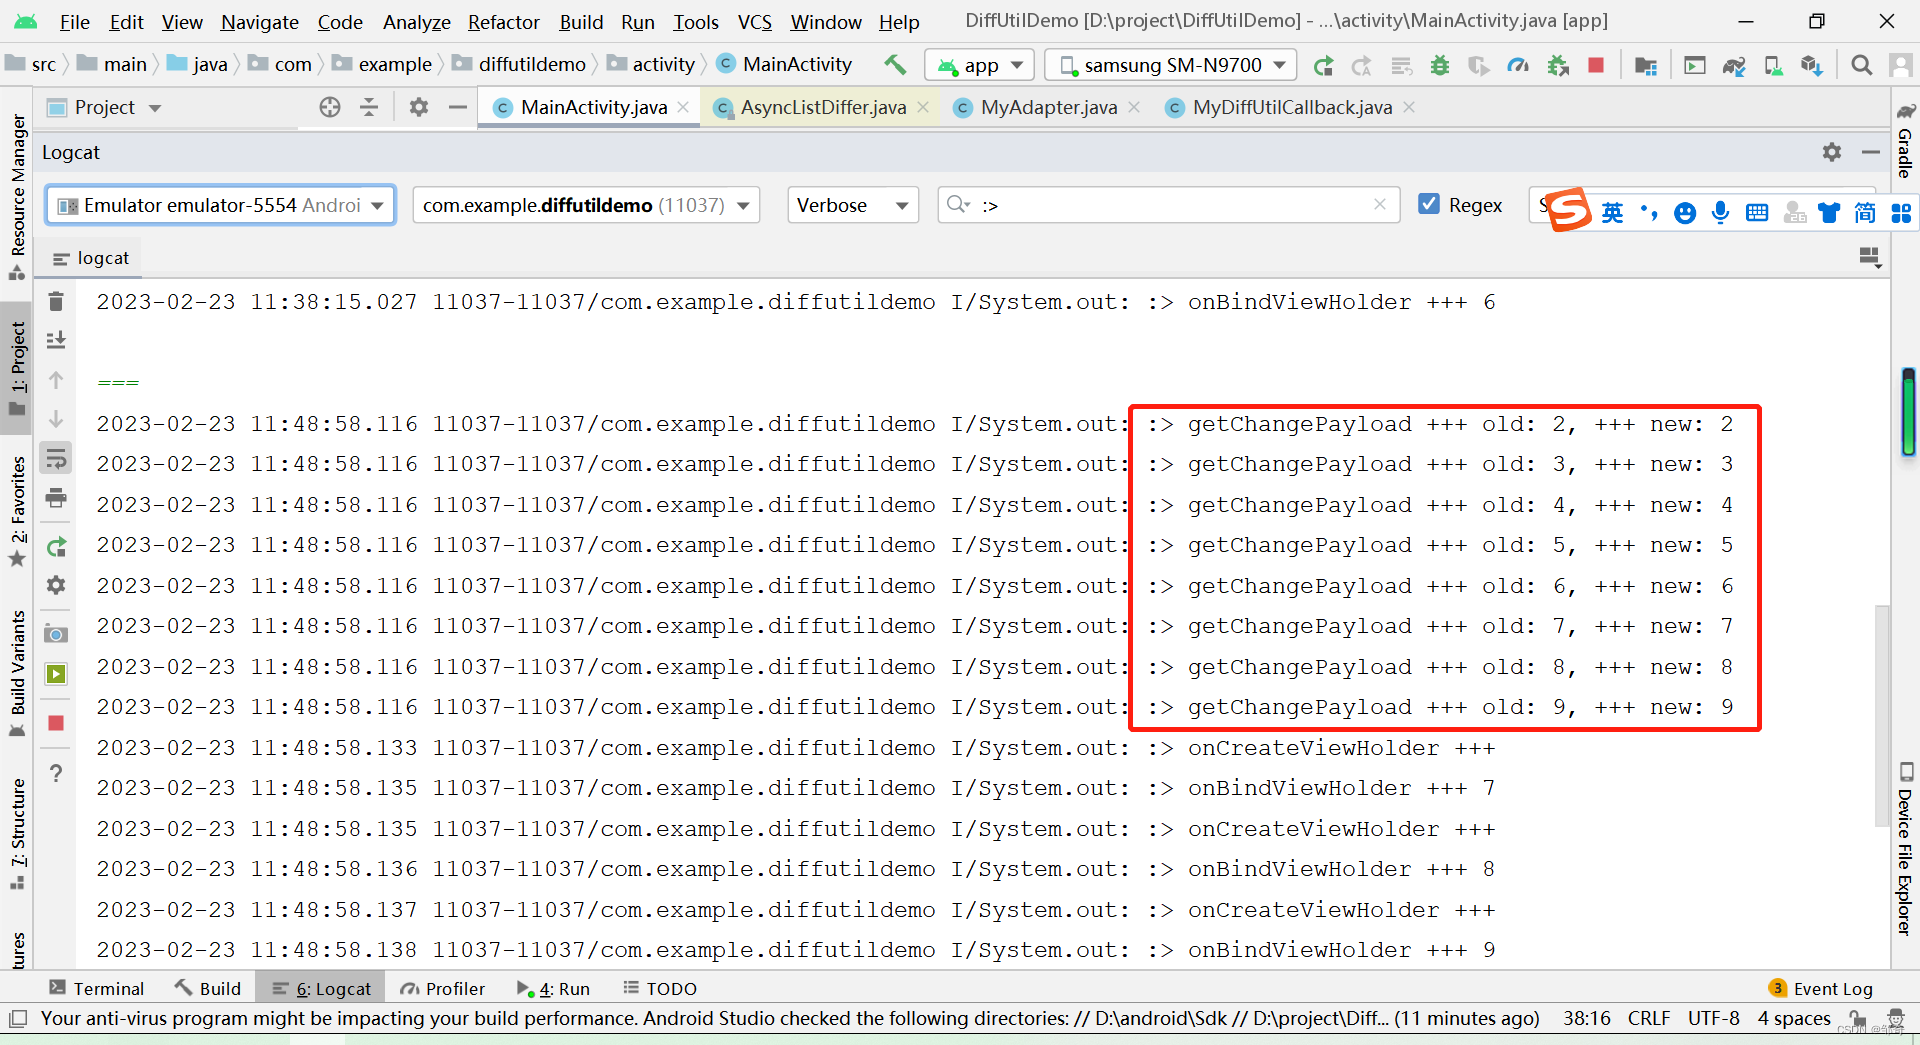
完整打印如下:
2023-02-23 11:48:58.116 11037-11037/com.example.diffutildemo I/System.out: :> getChangePayload +++ old: 2, +++ new: 2
2023-02-23 11:48:58.116 11037-11037/com.example.diffutildemo I/System.out: :> getChangePayload +++ old: 3, +++ new: 3
2023-02-23 11:48:58.116 11037-11037/com.example.diffutildemo I/System.out: :> getChangePayload +++ old: 4, +++ new: 4
2023-02-23 11:48:58.116 11037-11037/com.example.diffutildemo I/System.out: :> getChangePayload +++ old: 5, +++ new: 5
2023-02-23 11:48:58.116 11037-11037/com.example.diffutildemo I/System.out: :> getChangePayload +++ old: 6, +++ new: 6
2023-02-23 11:48:58.116 11037-11037/com.example.diffutildemo I/System.out: :> getChangePayload +++ old: 7, +++ new: 7
2023-02-23 11:48:58.116 11037-11037/com.example.diffutildemo I/System.out: :> getChangePayload +++ old: 8, +++ new: 8
2023-02-23 11:48:58.116 11037-11037/com.example.diffutildemo I/System.out: :> getChangePayload +++ old: 9, +++ new: 9
2023-02-23 11:48:58.133 11037-11037/com.example.diffutildemo I/System.out: :> onCreateViewHolder +++
2023-02-23 11:48:58.135 11037-11037/com.example.diffutildemo I/System.out: :> onBindViewHolder +++ 7
2023-02-23 11:48:58.135 11037-11037/com.example.diffutildemo I/System.out: :> onCreateViewHolder +++
2023-02-23 11:48:58.136 11037-11037/com.example.diffutildemo I/System.out: :> onBindViewHolder +++ 8
2023-02-23 11:48:58.137 11037-11037/com.example.diffutildemo I/System.out: :> onCreateViewHolder +++
2023-02-23 11:48:58.138 11037-11037/com.example.diffutildemo I/System.out: :> onBindViewHolder +++ 9
2023-02-23 11:48:58.138 11037-11037/com.example.diffutildemo I/System.out: :> onCreateViewHolder +++
2023-02-23 11:48:58.140 11037-11037/com.example.diffutildemo I/System.out: :> onBindViewHolder +++ 2
2023-02-23 11:48:58.140 11037-11037/com.example.diffutildemo I/System.out: :> onCreateViewHolder +++
2023-02-23 11:48:58.142 11037-11037/com.example.diffutildemo I/System.out: :> onBindViewHolder +++ 3
2023-02-23 11:48:58.142 11037-11037/com.example.diffutildemo I/System.out: :> onCreateViewHolder +++
2023-02-23 11:48:58.142 11037-11037/com.example.diffutildemo I/System.out: :> onBindViewHolder +++ 4
2023-02-23 11:48:58.143 11037-11037/com.example.diffutildemo I/System.out: :> onCreateViewHolder +++
2023-02-23 11:48:58.144 11037-11037/com.example.diffutildemo I/System.out: :> onBindViewHolder +++ 5
2023-02-23 11:48:58.144 11037-11037/com.example.diffutildemo I/System.out: :> onCreateViewHolder +++
2023-02-23 11:48:58.145 11037-11037/com.example.diffutildemo I/System.out: :> onBindViewHolder +++ 6
由上面日志打印可知,前两个位置的 item 的视图没有重新绘制,也就是说明做到了局部刷新。
相比 notifyDataSetChanged(),性能大有提高。
如果在 Adapter 的 onBindViewHolder(… List< Object > payloads)
中进一步判断,可以做到进一步优化,只改变控件的内容,不用进行重绘,这里就不展开细讲了。
diffutil 优化
- 如果列表很大,
DiffUtil的计算操作会花费很多时间。所以官方建议在后台线程计算差异,在主线程应用计算结果DiffResult。
Google 当然也考虑到了这个问题,后面推出了 AsyncListDiffer工具类。所以我们来看下这个工具类的源码实现,然后自己参考进行优化即可。
后台线程参考
AsyncListDiffer.java 这个工具类的源码,大家根据自己依赖的库找就行。
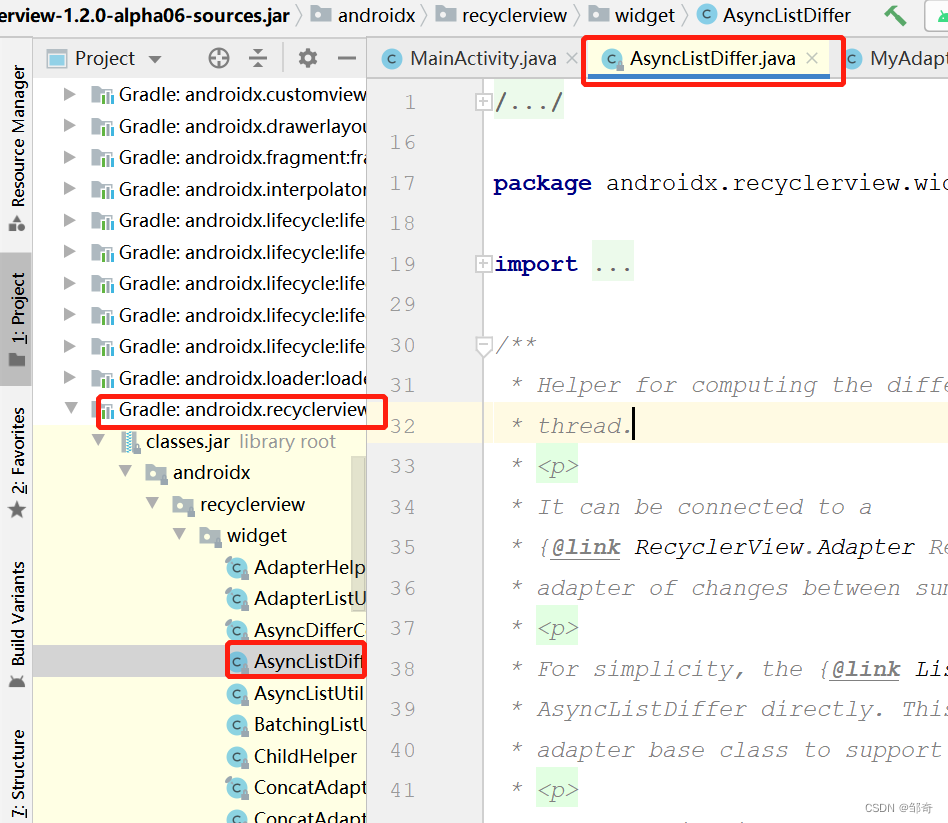
找到 public void submitList(@Nullable final List<T> newList, @Nullable final Runnable commitCallback) 这个方法的实现,如下:
/**
     * Pass a new List to the AdapterHelper. Adapter updates will be computed on a background
     * thread.
     * <p>
     * If a List is already present, a diff will be computed asynchronously on a background thread.
     * When the diff is computed, it will be applied (dispatched to the {@link ListUpdateCallback}),
     * and the new List will be swapped in.
     * <p>
     * The commit callback can be used to know when the List is committed, but note that it
     * may not be executed. If List B is submitted immediately after List A, and is
     * committed directly, the callback associated with List A will not be run.
     *
     * @param newList The new List.
     * @param commitCallback Optional runnable that is executed when the List is committed, if
     *                       it is committed.
     */
    @SuppressWarnings("WeakerAccess")
    public void submitList(@Nullable final List<T> newList,
            @Nullable final Runnable commitCallback) {
        // incrementing generation means any currently-running diffs are discarded when they finish
        final int runGeneration = ++mMaxScheduledGeneration;

        if (newList == mList) {
            // nothing to do (Note - still had to inc generation, since may have ongoing work)
            if (commitCallback != null) {
                commitCallback.run();
            }
            return;
        }

        final List<T> previousList = mReadOnlyList;

        // fast simple remove all
        if (newList == null) {
            //noinspection ConstantConditions
            int countRemoved = mList.size();
            mList = null;
            mReadOnlyList = Collections.emptyList();
            // notify last, after list is updated
            mUpdateCallback.onRemoved(0, countRemoved);
            onCurrentListChanged(previousList, commitCallback);
            return;
        }

        // fast simple first insert
        if (mList == null) {
            mList = newList;
            mReadOnlyList = Collections.unmodifiableList(newList);
            // notify last, after list is updated
            mUpdateCallback.onInserted(0, newList.size());
            onCurrentListChanged(previousList, commitCallback);
            return;
        }

        final List<T> oldList = mList;
        mConfig.getBackgroundThreadExecutor().execute(new Runnable() {
            @Override
            public void run() {
                final DiffUtil.DiffResult result = DiffUtil.calculateDiff(new DiffUtil.Callback() {
                    @Override
                    public int getOldListSize() {
                        return oldList.size();
                    }

                    @Override
                    public int getNewListSize() {
                        return newList.size();
                    }

                    @Override
                    public boolean areItemsTheSame(int oldItemPosition, int newItemPosition) {
                        T oldItem = oldList.get(oldItemPosition);
                        T newItem = newList.get(newItemPosition);
                        if (oldItem != null && newItem != null) {
                            return mConfig.getDiffCallback().areItemsTheSame(oldItem, newItem);
                        }
                        // If both items are null we consider them the same.
                        return oldItem == null && newItem == null;
                    }

                    @Override
                    public boolean areContentsTheSame(int oldItemPosition, int newItemPosition) {
                        T oldItem = oldList.get(oldItemPosition);
                        T newItem = newList.get(newItemPosition);
                        if (oldItem != null && newItem != null) {
                            return mConfig.getDiffCallback().areContentsTheSame(oldItem, newItem);
                        }
                        if (oldItem == null && newItem == null) {
                            return true;
                        }
                        // There is an implementation bug if we reach this point. Per the docs, this
                        // method should only be invoked when areItemsTheSame returns true. That
                        // only occurs when both items are non-null or both are null and both of
                        // those cases are handled above.
                        throw new AssertionError();
                    }

                    @Nullable
                    @Override
                    public Object getChangePayload(int oldItemPosition, int newItemPosition) {
                        T oldItem = oldList.get(oldItemPosition);
                        T newItem = newList.get(newItemPosition);
                        if (oldItem != null && newItem != null) {
                            return mConfig.getDiffCallback().getChangePayload(oldItem, newItem);
                        }
                        // There is an implementation bug if we reach this point. Per the docs, this
                        // method should only be invoked when areItemsTheSame returns true AND
                        // areContentsTheSame returns false. That only occurs when both items are
                        // non-null which is the only case handled above.
                        throw new AssertionError();
                    }
                });

                mMainThreadExecutor.execute(new Runnable() {
                    @Override
                    public void run() {
                        if (mMaxScheduledGeneration == runGeneration) {
                            latchList(newList, result, commitCallback);
                        }
                    }
                });
            }
        });
    }
定位到 mConfig.getBackgroundThreadExecutor() 这个地方:
public final class AsyncDifferConfig<T> {
	...
	@NonNull
    private final Executor mBackgroundThreadExecutor;

	@SuppressWarnings("WeakerAccess")
    @NonNull
    public Executor getBackgroundThreadExecutor() {
        return mBackgroundThreadExecutor;
    }
}
然后我们再继续在 AsyncDifferConfig.java 中找 mBackgroundThreadExecutor 是怎么创建的。
最后定位到 public AsyncDifferConfig<T> build() 这个方法,如下:
public final class AsyncDifferConfig<T> {
	...
	@NonNull
    private final Executor mBackgroundThreadExecutor;

	/**
         * Creates a {@link AsyncListDiffer} with the given parameters.
         *
         * @return A new AsyncDifferConfig.
         */
        @NonNull
        public AsyncDifferConfig<T> build() {
            if (mBackgroundThreadExecutor == null) {
                synchronized (sExecutorLock) {
                    if (sDiffExecutor == null) {
                        sDiffExecutor = Executors.newFixedThreadPool(2);
                    }
                }
                mBackgroundThreadExecutor = sDiffExecutor;
            }
            return new AsyncDifferConfig<>(
                    mMainThreadExecutor,
                    mBackgroundThreadExecutor,
                    mDiffCallback);
        }
}
到这里就找到后台线程的创建方式了,如下:
sDiffExecutor = Executors.newFixedThreadPool(2);
mBackgroundThreadExecutor = sDiffExecutor;
使用如下:
Executor background = Executors.newFixedThreadPool(2);
        background.execute(new Runnable() {
            @Override
            public void run() {
                // 计算差异的耗时操作放到这里执行
            }
        });
后面我们就可以将计算差异的耗时操作放到后台线程中进行。
主线程参考
主线程 mMainThreadExecutor 的创建位于 AsyncListDiffer.java 中,如下:
public class AsyncListDiffer<T> {
	...
	Executor mMainThreadExecutor;

	private static class MainThreadExecutor implements Executor {
        final Handler mHandler = new Handler(Looper.getMainLooper());
        MainThreadExecutor() {}
        @Override
        public void execute(@NonNull Runnable command) {
            mHandler.post(command);
        }
    }

	// TODO: use MainThreadExecutor from supportlib once one exists
    private static final Executor sMainThreadExecutor = new MainThreadExecutor();

	/**
     * Create a AsyncListDiffer with the provided config, and ListUpdateCallback to dispatch
     * updates to.
     *
     * @param listUpdateCallback Callback to dispatch updates to.
     * @param config Config to define background work Executor, and DiffUtil.ItemCallback for
     *               computing List diffs.
     *
     * @see DiffUtil.DiffResult#dispatchUpdatesTo(RecyclerView.Adapter)
     */
    @SuppressWarnings("WeakerAccess")
    public AsyncListDiffer(@NonNull ListUpdateCallback listUpdateCallback,
            @NonNull AsyncDifferConfig<T> config) {
        mUpdateCallback = listUpdateCallback;
        mConfig = config;
        if (config.getMainThreadExecutor() != null) {
            mMainThreadExecutor = config.getMainThreadExecutor();
        } else {
            mMainThreadExecutor = sMainThreadExecutor;
        }
    }

	public void submitList(@Nullable final List<T> newList,@Nullable final Runnable commitCallback) {
			...
			mConfig.getBackgroundThreadExecutor().execute(new Runnable() {
            @Override
            public void run() {
                ...
                mMainThreadExecutor.execute(new Runnable() {
                    @Override
                    public void run() {
                        if (mMaxScheduledGeneration == runGeneration) {
                            latchList(newList, result, commitCallback);
                        }
                    }
                });
            }
        });
		}

}
可以看到如果 config 获取不到主线程对象时,会用默认的 sMainThreadExecutor,如下:
if (config.getMainThreadExecutor() != null) {
            mMainThreadExecutor = config.getMainThreadExecutor();
        } else {
            mMainThreadExecutor = sMainThreadExecutor;
        }
这里就找到了源码中主线程的创建方式,我们可以用来参考。如下:
private static class MainThreadExecutor implements Executor {
        final Handler mHandler = new Handler(Looper.getMainLooper());
        MainThreadExecutor() {}
        @Override
        public void execute(@NonNull Runnable command) {
            mHandler.post(command);
        }
    }
使用如下:
new MainThreadExecutor().execute(new Runnable() {
                    @Override
                    public void run() {
                        // 这里执行主线程刷新操作
                    }
                });
diff 更新优化后写法
public class MyAdapter extends RecyclerView.Adapter<MyAdapter.ViewHolder> {

	...

	// diff 更新方式 优化
    public void diffUpdate(final List<CoderBean> newCoderList){
        final MyDiffUtilCallback diffUtilCallback = new MyDiffUtilCallback(this.mCoderList, newCoderList);
        // 获取差异结果(注意这里是耗时操作,如果数据量大的时候需要放到后台线程处理差异,否则会阻塞主线程)
        Executor background = Executors.newFixedThreadPool(2);
        background.execute(new Runnable() {
            @Override
            public void run() {
                final DiffUtil.DiffResult diffResult = DiffUtil.calculateDiff(diffUtilCallback);

                new DiffMainThreadExecutor().execute(new Runnable() {
                    @Override
                    public void run() {
                        cloneData(newCoderList);
                        // DiffResult 再把差异分发给 Adapter,adapter 最后根据接收到的差异数据做更新
                        diffResult.dispatchUpdatesTo(MyAdapter.this);
                    }
                });
            }
        });


    }

}
DiffMainThreadExecutor.java 如下:
package com.example.diffutildemo.executor;

import android.os.Handler;
import android.os.Looper;

import java.util.concurrent.Executor;

public class DiffMainThreadExecutor implements Executor {

    private final Handler handler = new Handler(Looper.getMainLooper());

    public DiffMainThreadExecutor(){}

    @Override
    public void execute(Runnable command) {
        try {
            handler.post(command);
        }catch (Exception e){
            e.printStackTrace();
        }
    }
}
到这里就完成了对 DiffUtil 的一个使用与说明,更多还是需要同学们自己在实际中多实践应用,最后希望 DiffUtil 带给同学们一个更流畅的数据展示效果。
相关参考
Android高性能列表:RecyclerView + DiffUtil
AsyncListDiffer-RecyclerView最好的伙伴
技术永不眠!下期见!

![[AI助力] 2022.2.23 考研英语学习 2010 英语二翻译](https://img-blog.csdnimg.cn/d4984061e48a44a4bbb13eb38e258085.png)