目录
1、什么是MVC?
2、什么是 Spring MVC
3、如何学好 Spring MVC?
3.1、如何创建 Spring MVC 项目
3.1.1、使用Spring Initializr创建(推荐)
3.2、将 Spring 程序与用户(浏览器)联通
3.3、基础注解
3.3.1、@RequestMapping
3.3.2、GET/POST方法、
3.4、获取参数注解
3.4.1、传递单个/多个参数
3.4.2、传递对象
3.4.3、参数重命名
3.4.4、接收 JSON 对象
3.4.5、获取URL中参数@PathVariable
3.4.6、上传文件
3.5.7、获取Cookie数据
更简单的读取Cookie数据如下方式:
3.4.8、存储Session数据
3.4.9、读取Session数据
更简单的读取Session数据如下方式:
3.5、返回其他格式的数据
3.5.1、返回静态页面
3.5.2、返回JSON对象
1、什么是MVC?
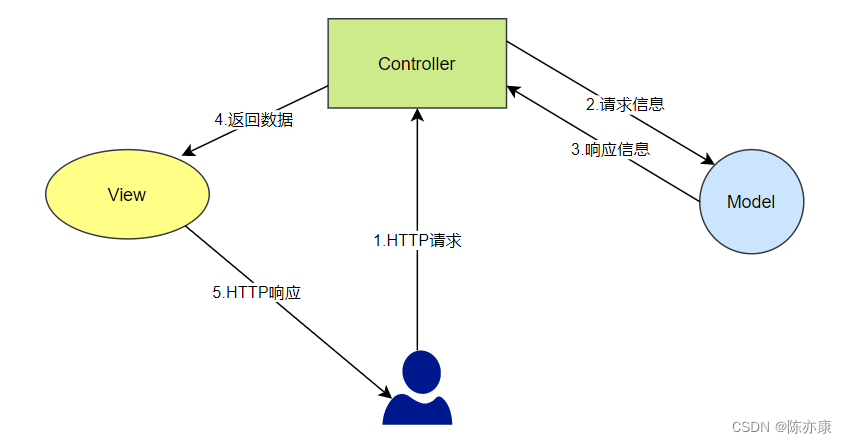
MVC是 Model View Controller 的缩写,是一种软件设计模式,将软件分为模型、视图和控制器三部分,大体工作流程:客户端向服务器发起请 HTTP 请求,被 Controller 接收,从 Model 中请求信息(通常模型对象负责在数据库中存取数据),并将响应信息返回给 Controller,接着交由给 View 显示数据,最后将 HTTP 响应传递给用户。
2、什么是 Spring MVC
简单来说,是一个构建在 Servlet(API)之上,来自于 Spring Web 模块的的 Web框架(HTTP);
通常我们所说的 SSM 就等于 Spring + Spring MVC + MyBatis,后来又有了一种更新的说法:SSM = Spring Boot + Spring Web(Spring MVC) + MyBatis。
3、如何学好 Spring MVC?
想要学好 Spring MVC 需要掌握以下3个功能:
1.连接功能:将用户(浏览器)和 Java 程序连接起来,也就是访问一个能够调用 Spring 程序的地址;
2.获取参数功能:用户访问时会带一些参数(例如 query string),在程序中想办法获取参数。
3.输出数据功能:根据请求计算响应,将响应结果返回给用户。
3.1、如何创建 Spring MVC 项目
3.1.1、使用Spring Initializr创建(推荐)
a)如果你是使用的IDEA社区版,需要安装以下插件(不是社区版可以跳过此步骤)
所需插件:Spring Boot Helper(如下图)

注意:此插件在IDEA社区版2022.1.x之前都免费,IDEA社区版2022.2.x之后开始收费,所以IDEA社区版版本的选择,大家自行选择。
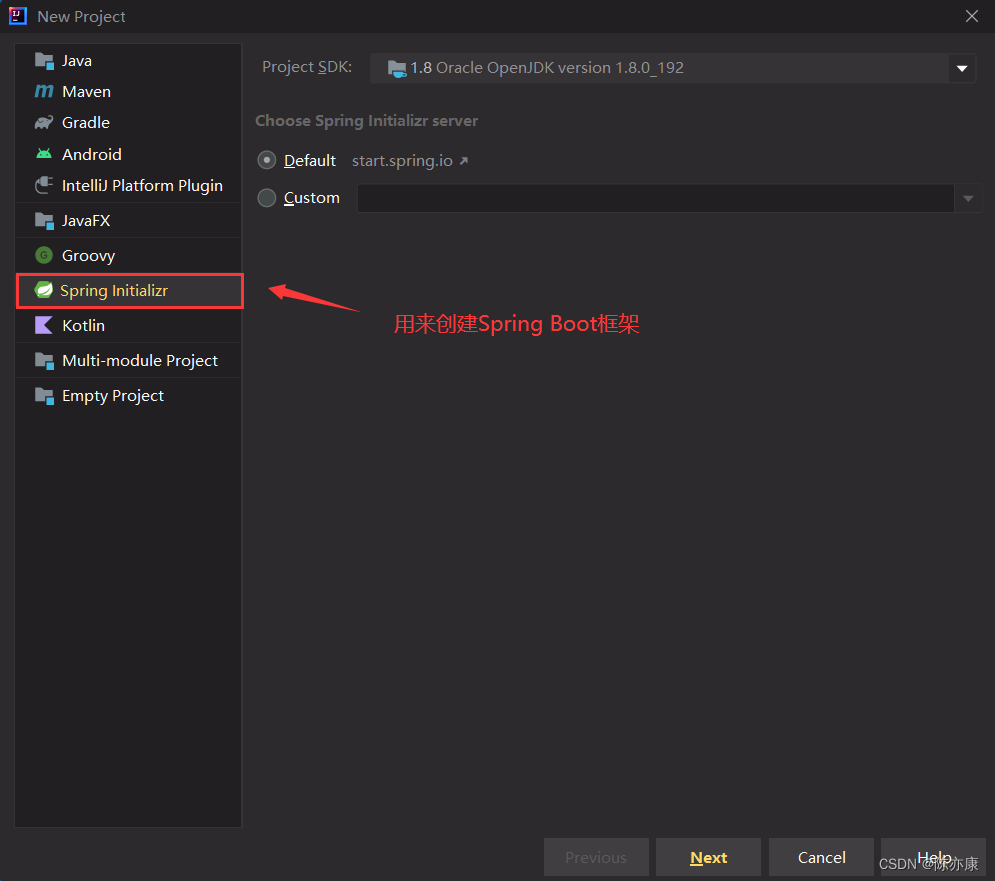
这个插件就是用来构建 Spring Boot 框架的,之后,你在创建一个项目的时候可以看到这样一个选项(就是通过来创建Spring Boot框架),如下图:
b)接下来就是创建Spring-MVC项目的步骤:
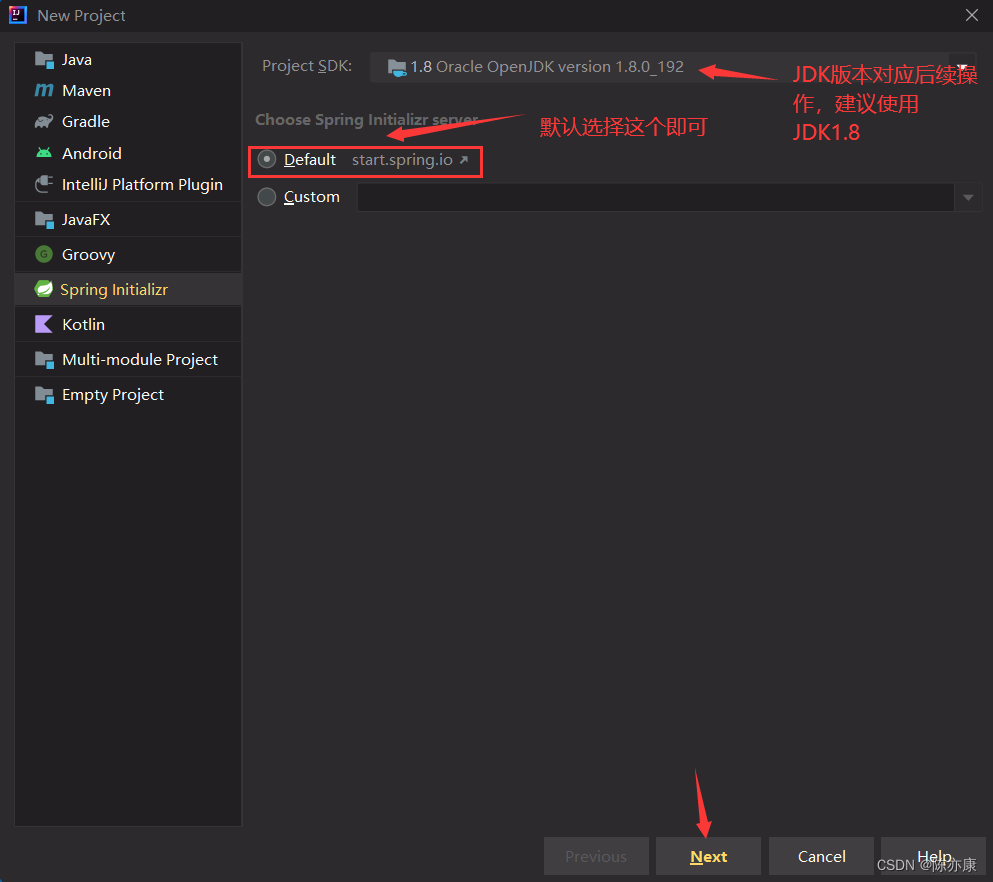
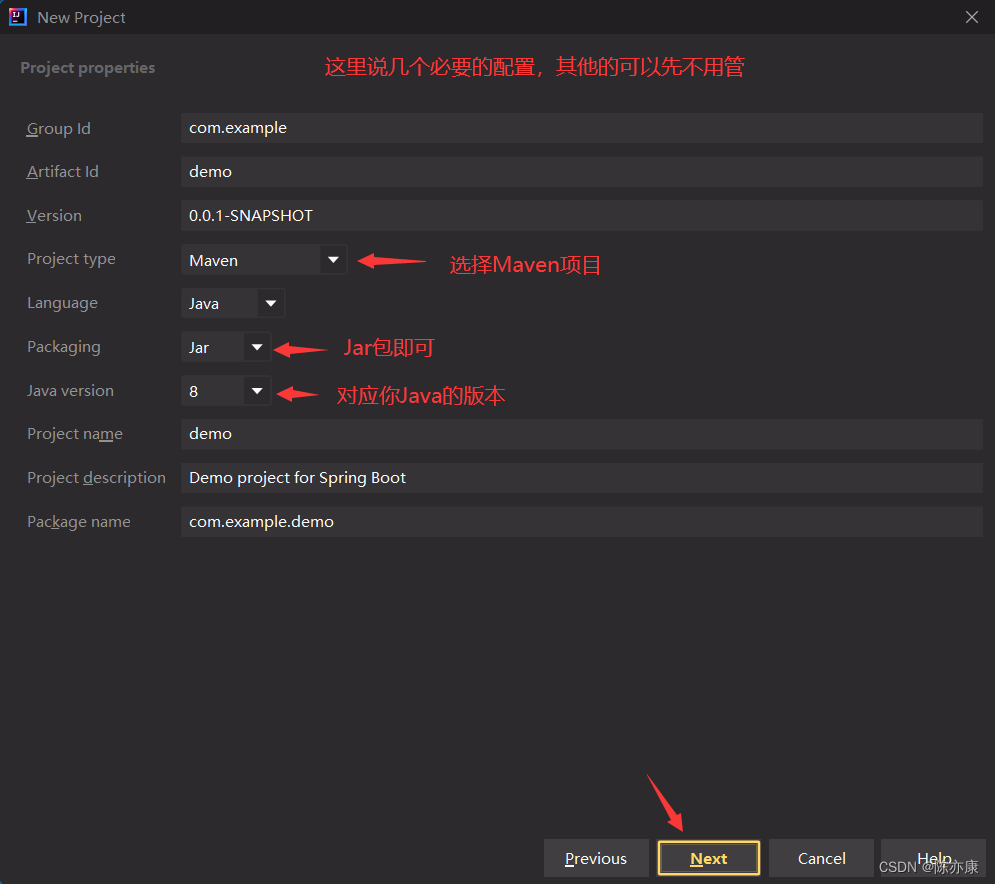
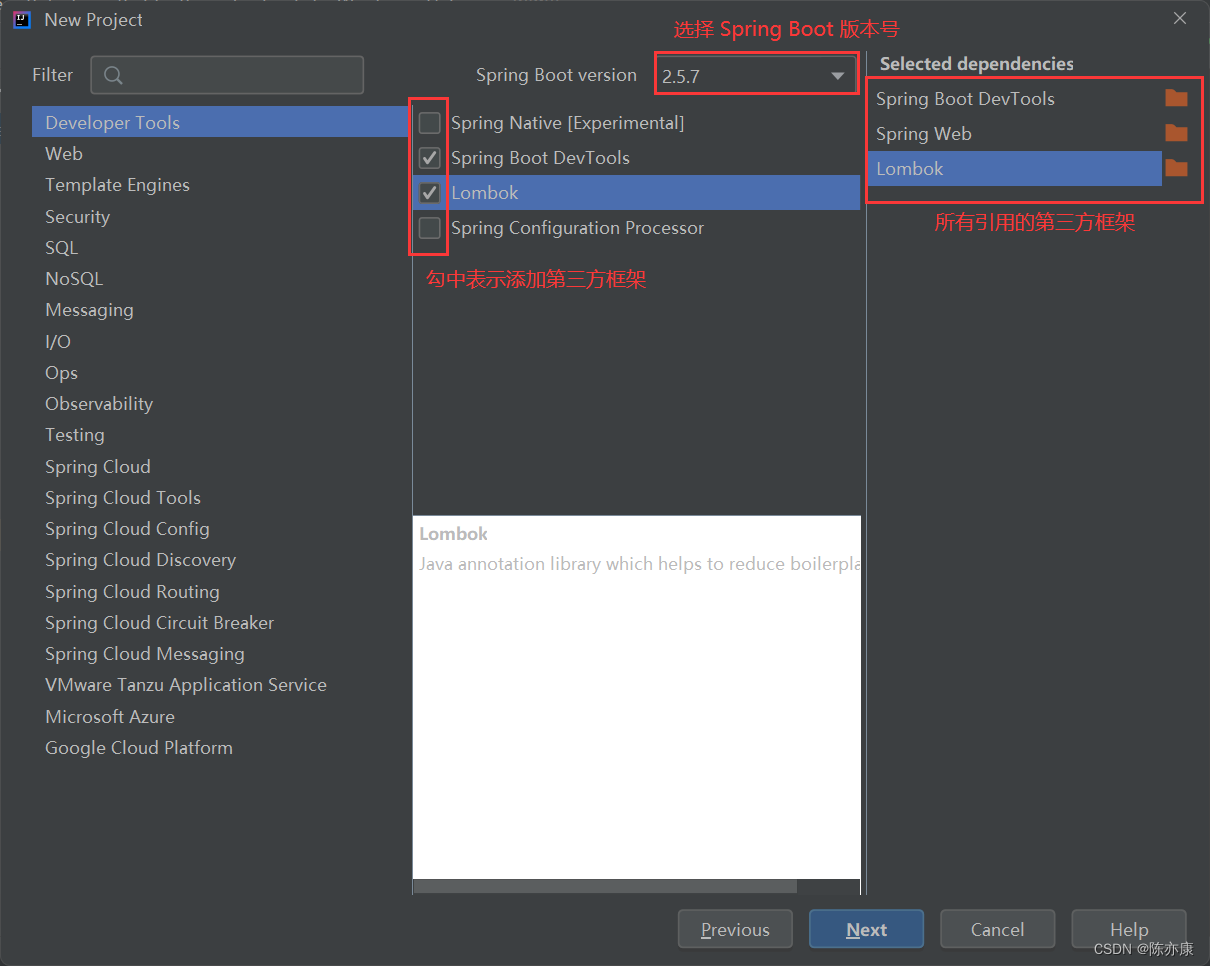
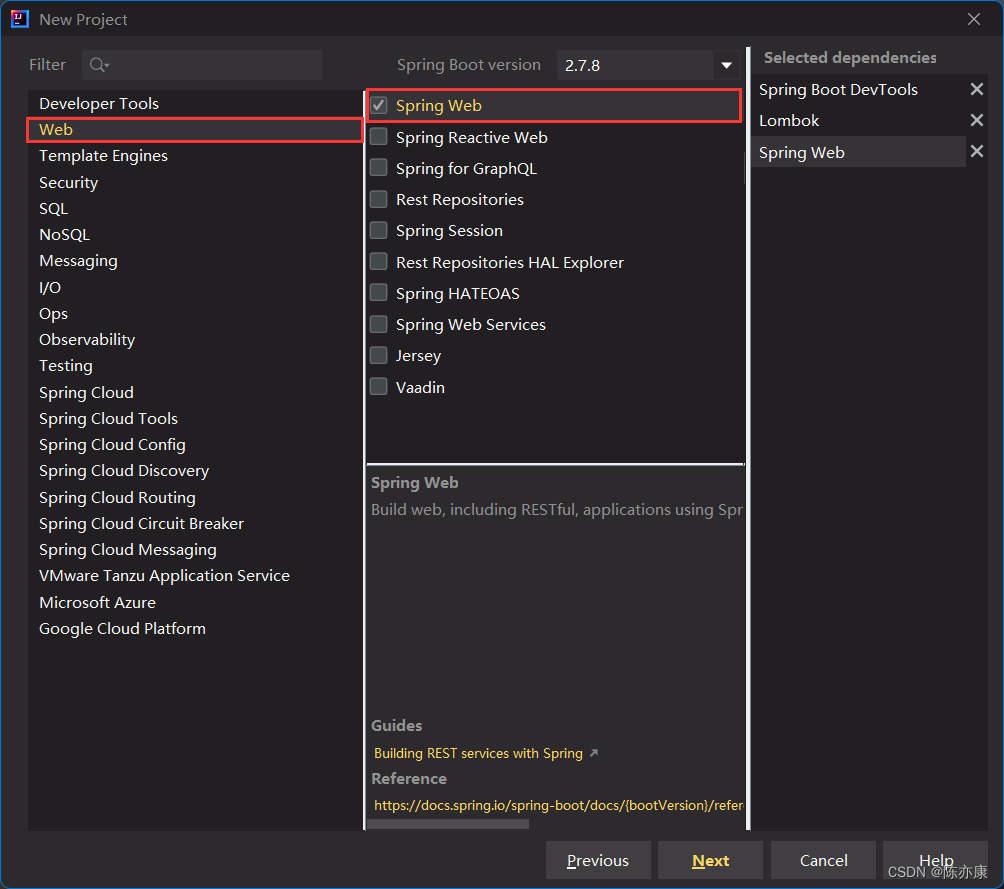
关键是要选择Spring Web选项,这里就包含了MVC,如下:
最后一路Next即可,最终目录结构如下:
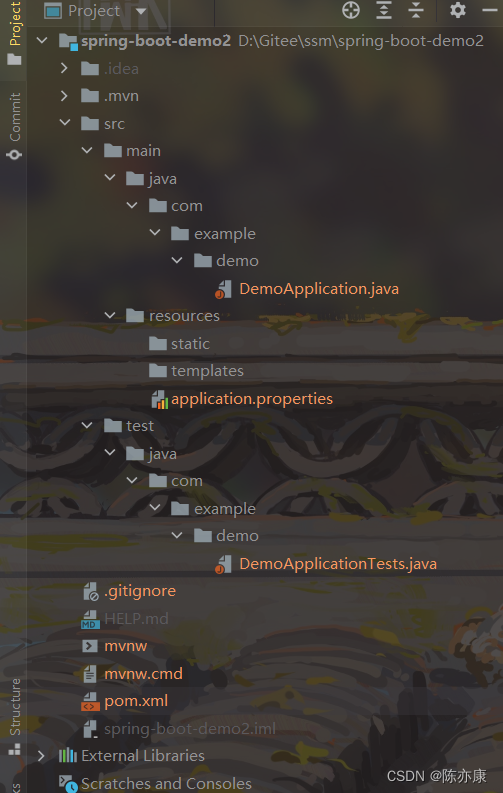
如果你得到了上图这个目录结构,说明你的项目已经创建好了,但是还没有初始化,因此还需要以下步骤:
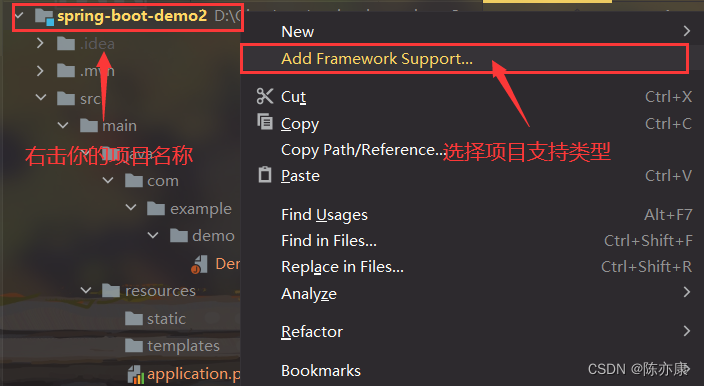
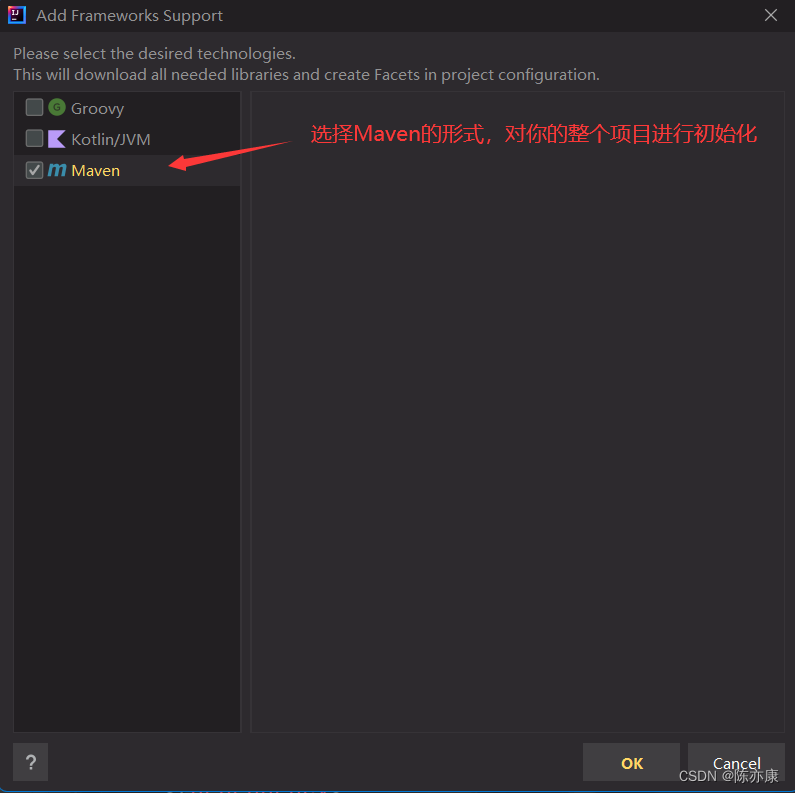
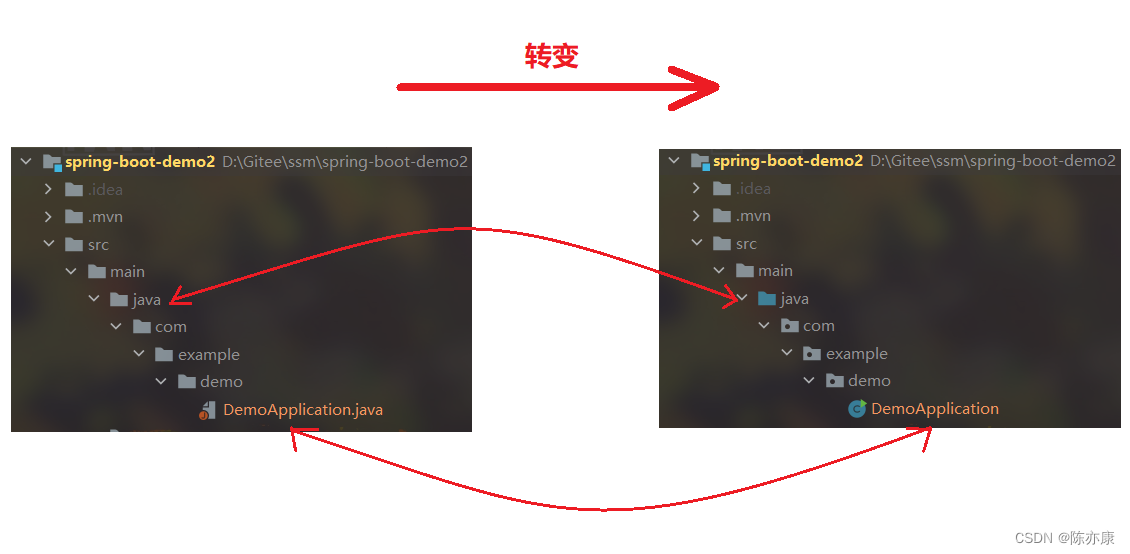
然后点击OK,接着就是一个,漫长的等待过程,当你的项目出现了下图变化,才说明你的Spring-Boot项目已经创建并初始化完成:
3.2、将 Spring 程序与用户(浏览器)联通
具体代码如下:
import org.springframework.stereotype.Controller;
import org.springframework.web.bind.annotation.RequestMapping;
import org.springframework.web.bind.annotation.ResponseBody;

@Controller //让 Spring 项目启动时,将这个注解下的类加载到容器中
@ResponseBody //使其返回的响应是数据,而非页面
@RequestMapping("/user") //注册路由
public class UserController {

    @RequestMapping("/hi") //路由注册
    public String sayHi() {
        return "hi! Spring MVC!";
    }

}
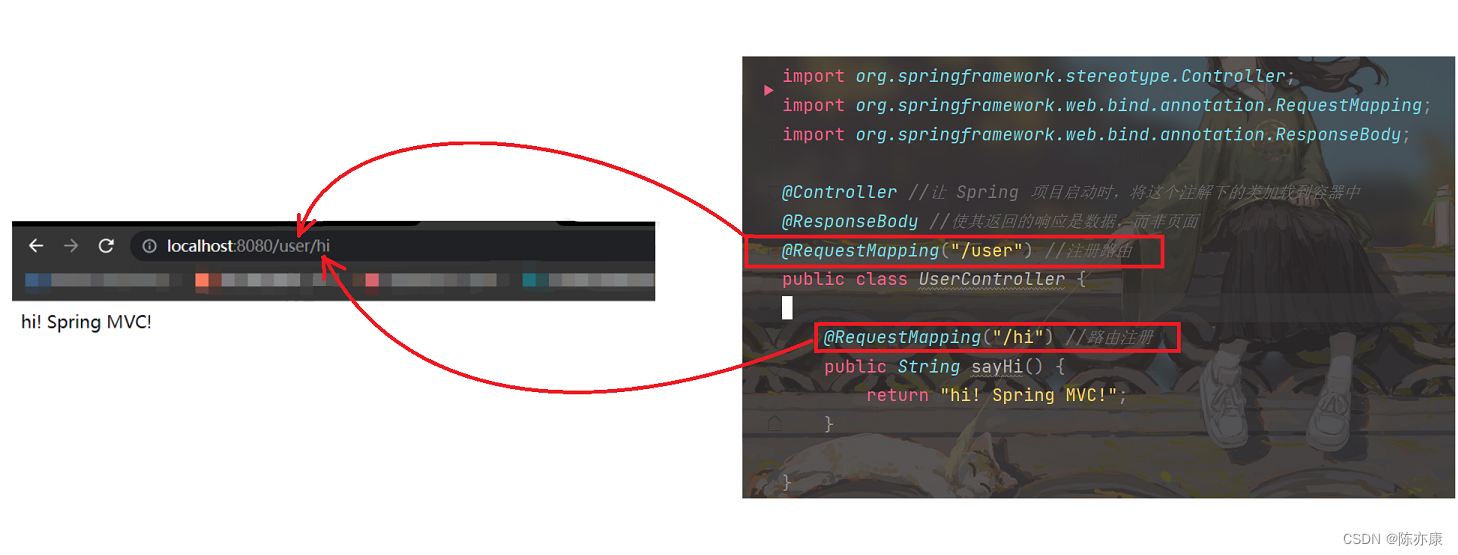
输入URl即可访问到sayHi方法,如下结果:

3.3、基础注解
3.3.1、@RequestMapping
@RequestMapping 是⽤来注册接⼝的路由映射的,当用户输入一个url,就可以通过url访问程序某个类的某个方法(@RequestMapping 即可修饰类,也可以修饰⽅法,当修饰类和⽅法时,访问的地址是类 + 方法。),如下图:
3.3.2、GET/POST方法、
可以通过 @RequestMapping 或 @GetMapping/@PostMapping 获取请求的数据。
get请求的写法有如下三种:
// 写法1
@RequestMapping("/index")

// 写法2
@RequestMapping(value = "/index",method = RequestMethod.GET)

// 写法3
@GetMapping("/index")
post请求的写法有如下两种:
// 写法1
@RequestMapping(value = "/index",method = RequestMethod.POST)

// 写法2
@PostMapping("/index")
3.4、获取参数注解
Spring MVC中可以直接通过方法中的参数来传参,要注意的有以下几点:
Ps:
1、当有多个参数进行参数匹配时,是按照参数的名称进行匹配的,因此参数的位置不影响参数的获取;
2、Spring MVC 中通过前端传参时,方法的参数一定要是包装类类型,而非基础类型(因为如果方法的参数是基础类型,但又忘记传递时,程序就会报500错误,而保证类型为包装类类型忘记传参时,只会值为null);
3.4.1、传递单个/多个参数
由于传递单个和多个参数的写法方式一样,所以这里就以多参数为例~
代码如下:
import org.springframework.stereotype.Controller;
import org.springframework.web.bind.annotation.RequestMapping;
import org.springframework.web.bind.annotation.ResponseBody;

@Controller //让 Spring 项目启动时,将这个注解下的类加载到容器中
@ResponseBody //使其返回的响应是数据,而非页面
@RequestMapping("/user") //注册路由
public class UserController {

    @RequestMapping("/message")
    public void getUserMessage(String name, String age) {
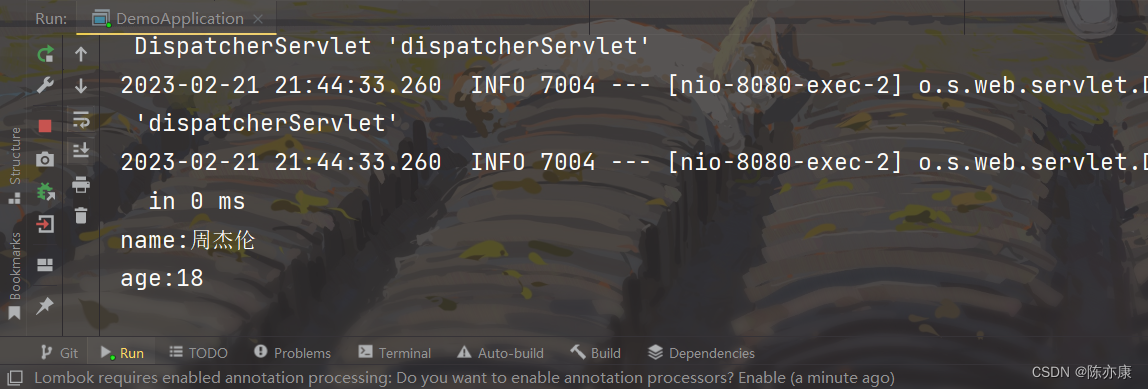
        System.out.println("name:" + name);
        System.out.println("age:" + age);
    }
方法参数对应 url 中 query string 的 key 值,如下使用 Postman 访问方法:
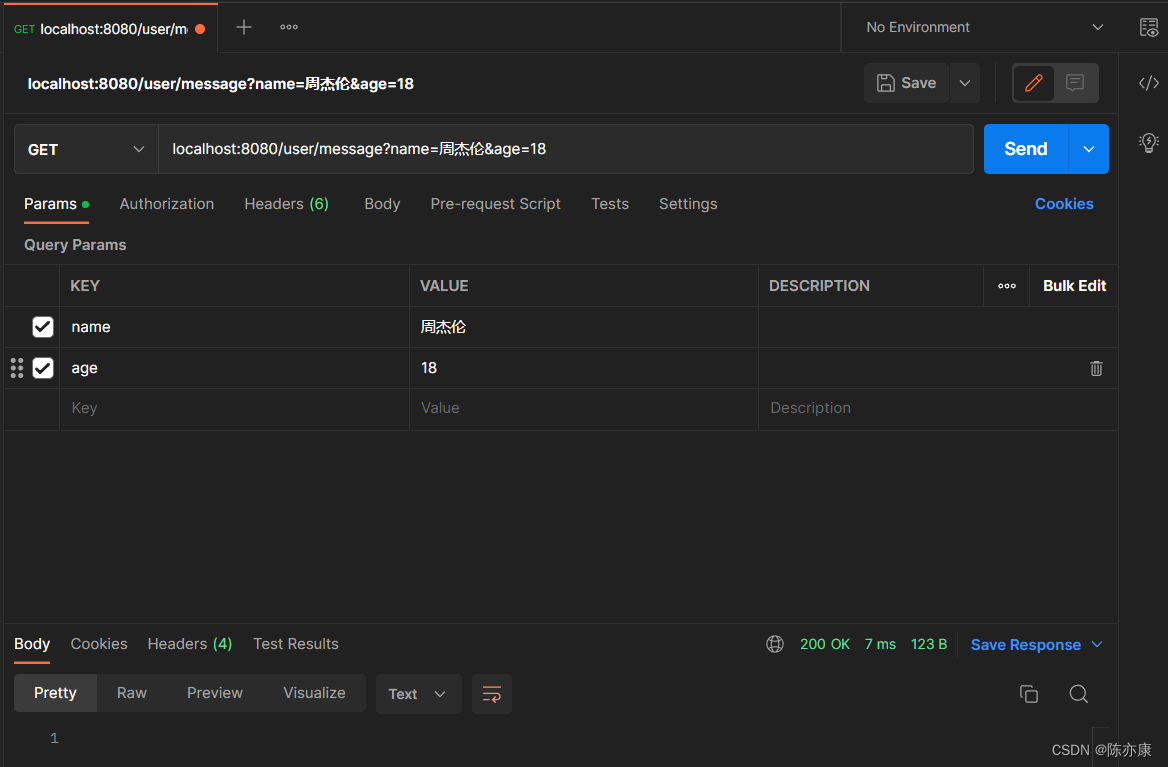
执行结果如下:
3.4.2、传递对象
在 Spring MVC 中可以创建一个实体类对象(含getter和setter方法),最后通过方法的参数对象的getter方法获取属性。
如下实体类对象:
@Controller //让 Spring 项目启动时,将这个注解下的类加载到容器中
@ResponseBody //使其返回的响应是数据,而非页面
@RequestMapping("/user") //注册路由
public class UserController {

    @RequestMapping("/message")
    public void getMessage(User user) {

        System.out.println("id:" + user.getId());
        System.out.println("name:" + user.getName());
        System.out.println("age:" + user.getAge());

    }

}
前端访问:
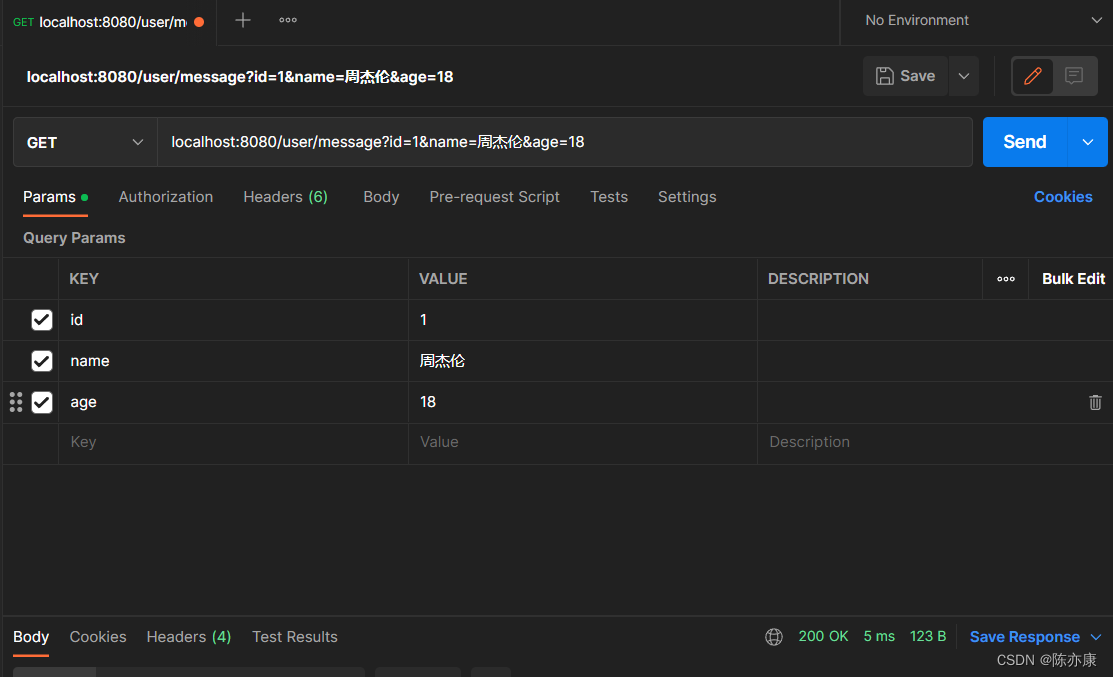
执行结果:

3.4.3、参数重命名
情况一:必传参数设置
有些情况下,前端传递的参数 key 的字段和后端接收的 key 的字段可以不一致,例如前端传输一个 time ,后端就可以使用 @RequestParam 来重命名后端的参数为 startTime 字段来接收。
例如前端两个参数key字段分别为t1,t2,后端使用 startTime 和 endTime 字段来接收如下代码:
import org.springframework.stereotype.Controller;
import org.springframework.web.bind.annotation.RequestMapping;
import org.springframework.web.bind.annotation.RequestParam;
import org.springframework.web.bind.annotation.ResponseBody;

@Controller //让 Spring 项目启动时,将这个注解下的类加载到容器中
@ResponseBody //使其返回的响应是数据,而非页面
@RequestMapping("/user") //注册路由
public class UserController {

    @RequestMapping("/time")
    public void getTime(@RequestParam("t1") String startTime,
                        @RequestParam("t2") String endTime) {
        System.out.println("起始时间:" + startTime);
        System.out.println("结束时间" + endTime);
    }

}
前端访问地址如下:
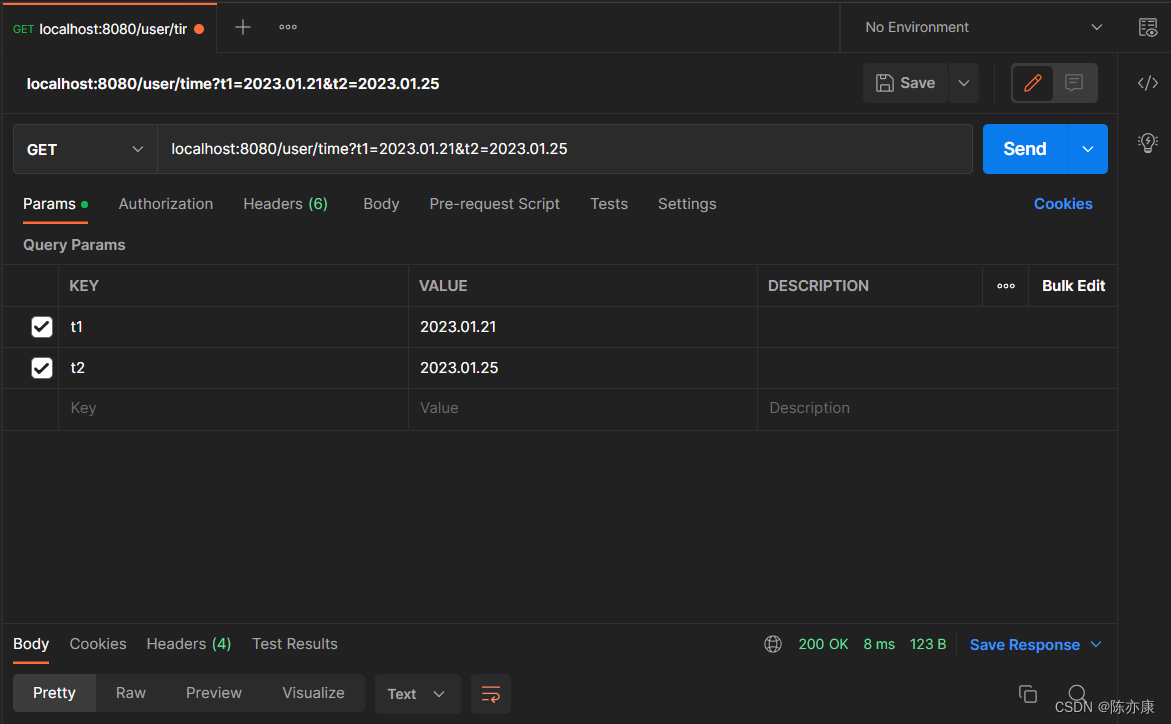
执行结果:

情况二:非必传参数设置
情况一中,若前端传递了一个非time的参数,程序就会出现报错的情况,我们可以通过设置 @RequestParam 中的 required=false 来避免不传递时报错,具体实现如下:
    @RequestMapping("/time")
    public void getTime(@RequestParam(value = "t1", required = false) String startTime,
                        @RequestParam(value = "t2", required = false) String endTime) {
        System.out.println("起始时间:" + startTime);
        System.out.println("结束时间" + endTime);
    }
3.4.4、接收 JSON 对象
代码如下:
import com.example.demo.model.User;
import org.springframework.stereotype.Controller;
import org.springframework.web.bind.annotation.RequestBody;
import org.springframework.web.bind.annotation.RequestMapping;
import org.springframework.web.bind.annotation.RequestParam;
import org.springframework.web.bind.annotation.ResponseBody;

@Controller //让 Spring 项目启动时,将这个注解下的类加载到容器中
@ResponseBody //使其返回的响应是数据,而非页面
@RequestMapping("/user") //注册路由
public class UserController {

    @PostMapping("/message")
    public String getMessage(@RequestBody User user) {
        return user.toString();
    }

}
前端发送请求,结果如下:
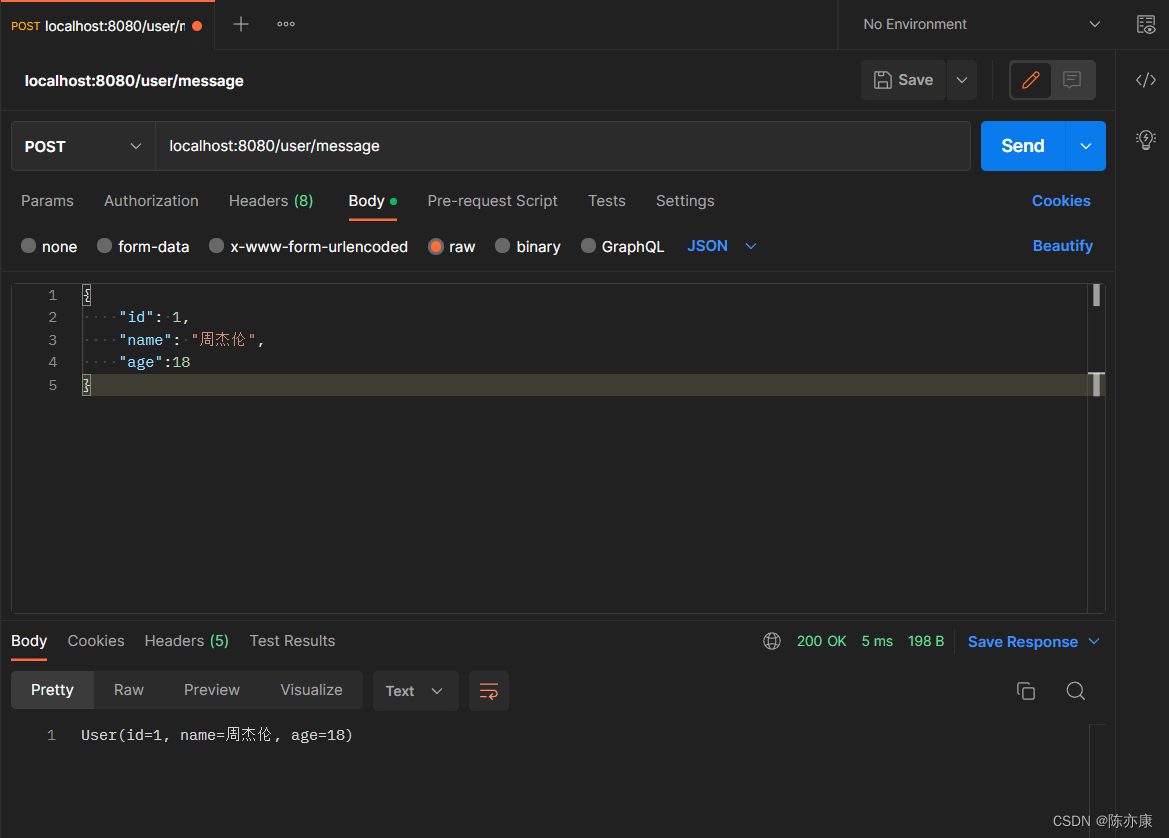
Ps:注意这里传递的是JSON对象,向后端提交数据,需要搭配着POST请求。
3.4.5、获取URL中参数@PathVariable
前端地址:

后端接收:
    @PostMapping("/urlValue/{name}/{age}")
    public String getUrlValue(@PathVariable("name") String name,
                              @PathVariable("age") String age) {
        return "name:" + name + ", age:" + age;
    }
执行结果:

注意:以上写法@PostMapping("/urlValue/{name}/{age}")中{name}和{age}是必须要传的参数,若只传age,不传name,则可以使用如下写法:
    @PostMapping("/urlValue/{name}/{age}")
    public String getUrlValue(@PathVariable(value = "name", required = false) String name,
                              @PathVariable("age") String age) {
        return "name:" + name + ", age:" + age;
    }
Ps:
1.需要获取的参数要在 @PostMapping 注解中用大括号{}括起来。
2.这种写法的URl对比之前的 query string 在SEO上效果更好(浏览器搜索以后会排在更前面)!
3.4.6、上传文件
前端通过from表单请求的请求文件数据:
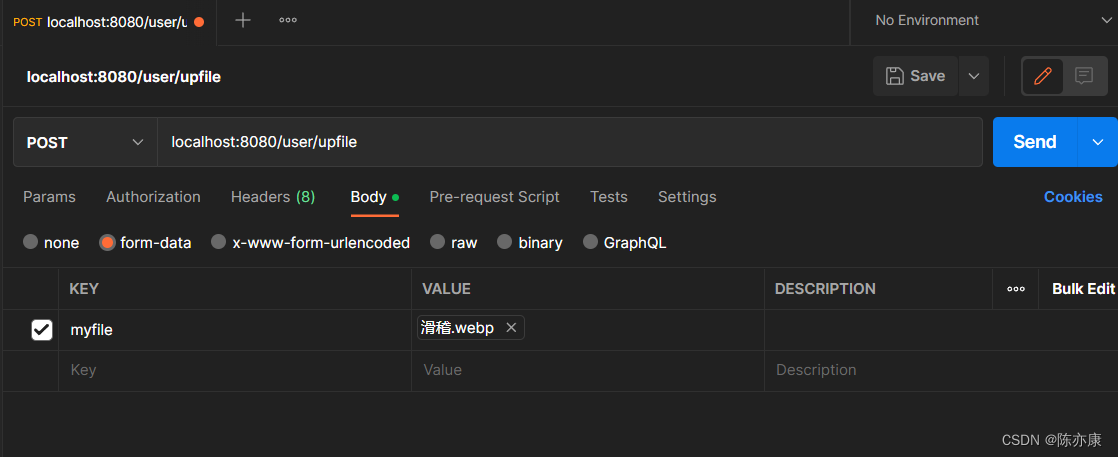
后端接收:
    @PostMapping("/upfile")
    public String upfile(@RequestPart("myfile") MultipartFile file) throws IOException {
        String path = "D:\\其他\\滑稽2.webp";
        file.transferTo(new File(path));
        return path;
    }
3.5.7、获取Cookie数据
由于 Spring MVC(Spring Web)是基于 Servlet 实现的,所以获取 Cooike 数据也是通过 HttpServletResponse 的 getCookie 方法获取到的,如下后端代码(这里为了方便观察结果,使用 @Slf4j 来打印日志信息):
    @GetMapping("/getCookie")
    public String getCookie(HttpServletRequest request) {
        Cookie[] cookies = request.getCookies();
        for(Cookie ans : cookies) {
            log.error("key:" + ans.getName() + ",value:" + ans.getValue());
        }
        return "get Cookie Success!";
    }
前端可以通过F12检测里的Application中的Cookie自定义数据,如下:

前端请求如下:

访问结果:

更简单的读取Cookie数据如下方式:
@RequestMapping("/cookie")
@ResponseBody

public String cookie(@CookieValue("zhangsan") String name) {
     return "cookie:" + name;
}
Ps:如果 zhangsan 这个参数是一个非必要的参数,那么也可以再在@CookieValue注解后面加上一个false参数;
3.4.8、存储Session数据
由于 Spring MVC(Spring Web)是基于 Servlet 实现的,所以获取 Session 数据也是通过 HttpServletResponse 的 getSesion 方法获取到的,如下后端代码:
    @RequestMapping("setSession")
    public String setSession(HttpServletRequest request) {
        HttpSession session = request.getSession(true);
        session.setAttribute("jay chou", "nb");
        return "set Session Success!";
    }
前端请求:

3.4.9、读取Session数据
由于 Spring MVC(Spring Web)是基于 Servlet 实现的,所以获取 Session 数据也是通过 HttpServletResponse 的 getSesion 方法获取到的,如下后端代码:
    @RequestMapping("getSession")
    public String getSession(HttpServletRequest request) {
        HttpSession session = request.getSession(false);
        if(session == null || session.getAttribute("jay chou") == null) {
            return "当前会话参数错误";
        }
        return "get Session Success!";
    }
前端先通过2.5.7中的后端代码存储Session数据,就可以观察到生成如下SessionId:

再进行前端访问就可以得到如下结果:

更简单的读取Session数据如下方式:
    @RequestMapping("getSessionEasy")
    public String getSession(@SessionAttribute(value = "jay chou", required = false) String name) {
        return name;
    }
Ps:这里表示 jay chou 这个字符串是一个非必要参数,去掉false参数他就是一个必要参数。
3.5、返回其他格式的数据
3.5.1、返回静态页面
Spring MVC 和 Spring Boot 默认情况下都是返回View视图(xxx.html),通过@ResponseBody注解就可以让后端返回的是数据,而非页面。那么如果现在需要返回一个页面,我们应该怎么做?
a)创建一个前端页面 index.html
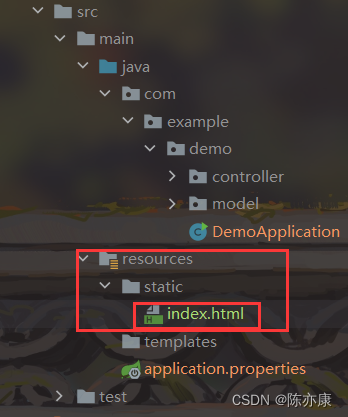
前端代码如下:
<!doctype html>

<html lang="en">
<head>
    <meta charset="UTF-8">
    <meta name="viewport"

          content="width=device-width, user-scalable=no, initial-scale=1.
0, maximum-scale=1.0, minimum-scale=1.0">
    <meta http-equiv="X-UA-Compatible" content="ie=edge">
    <title>hello,spring mvc</title>
    <script src="index.js"></script>
</head>
<body>
    <h1>Hello,Spring MVC.</h1>
</body>
</html>
后端代码如下:
@Controller
@RequestMapping("/html")
public class IndexController {

    @RequestMapping("/index")
    public String retIndex() {
        //执行业务逻辑...
        return "/index.html";
    }

}
客户发送请求后的结果:

3.5.2、返回JSON对象
在 Spring MVC 中返回 HashMap 对象,实际上就是在返回JSON对象,如下后端代码:
    @RequestMapping("getJson")
    public HashMap<String, Integer> resJson() {
        HashMap<String, Integer> map = new HashMap<>();
        map.put("zhangsan", 1);
        map.put("lisi", 2);
        map.put("wangwu", 3);
        return map;
    }
客户端输入url得到如下结果:


