JavaScript-XHR-深入理解
- 1. XHR(Asynchronous JavaScript And XML)初始
- 1.1. xhr request demo
- 1.2. status of XHRHttpRequest
- 1.3. send synchronous request by xhr
- 1.4. onload监听数据加载完成
- 1.5. http status code
- 1.6. get/post request with josn/form/urlcoded
- 1.7. encapsulate an ajax function to send requests
- 1.8. encapsulate an ajax function to send requests with Promise
- 2. Fetch
- 2.1. fetch demo
1. XHR(Asynchronous JavaScript And XML)初始
1.1. xhr request demo
- 第一步:创建网络请求的AJAX 对象(使用 XMLHttpRequest
- 第二步:监听XMLHttpRequest 对象状态的变化,或者监听 onload 事件(请求完成时触发);
- 第三步:配置网络请求(通过open 方法);
- 第四步:发送send 网络请求;
<!DOCTYPE html>
<html lang="en">
<head>
  <meta charset="UTF-8">
  <meta http-equiv="X-UA-Compatible" content="IE=edge">
  <meta name="viewport" content="width=device-width, initial-scale=1.0">
  <title>JS-learn</title>
</head>
<body>
    <button class="dataClick">get data</button>
    <p></p>
    <textarea class="dataArea"></textarea>

  <script>

    const buttonData = document.querySelector(".dataClick");
    const dataInput = document.querySelector(".dataArea")
    // debugger
    buttonData.onclick = function getData(){
        // 1. create XMLHttpRequest object
        const xhr = new XMLHttpRequest()

        // 2. monitor the change of status (macrotask)
        xhr.onreadystatechange = () => {
            if (xhr.readyState !== XMLHttpRequest.DONE) return

            // get the response data
            const resJSON = JSON.parse(xhr.response)
            console.log('response: ', resJSON)
            // data = resJSON
            dataInput.value = JSON.stringify(resJSON)
        }

        // 2. configure request open
        xhr.open('get', 'http://123.xxx:8000/home/multidata')

        // 4. send request
        xhr.send()
    }

  </script>
</body>
</html>
1.2. status of XHRHttpRequest


1.3. send synchronous request by xhr
<!DOCTYPE html>
<html lang="en">
<head>
  <meta charset="UTF-8">
  <meta http-equiv="X-UA-Compatible" content="IE=edge">
  <meta name="viewport" content="width=device-width, initial-scale=1.0">
  <title>JS-learn</title>
</head>
<body>
    <button class="dataClick">get data</button>
    <button class="clearClick">clear</button>
    <p></p>
    <textarea class="dataArea"></textarea>

  <script>

    const buttonData = document.querySelector(".dataClick");
    const dataInput = document.querySelector(".dataArea")
    const clearData =  document.querySelector(".clearClick")
    // debugger
    buttonData.onclick = function getData(){
        // 1. create XMLHttpRequest object
        const xhr = new XMLHttpRequest()

        // 2. monitor the change of status (macrotask)
        xhr.onreadystatechange = () => {
            if (xhr.readyState !== XMLHttpRequest.DONE) {
              console.log(xhr.readyState)
              return
            }

            // get the response data
            const resJSON = JSON.parse(xhr.response)
            console.log('response: ', resJSON)
            console.log('status: ', xhr.status)
            console.log('xhr: ', xhr)
            // data = resJSON
            dataInput.value = JSON.stringify(resJSON)
        }

        // 2. configure request open
        xhr.open('get', 'http://xxxx.32:8000/home/multidata', true)

        // 4. send request
        xhr.send()

        console.log('here is the log after sending')
    }
    clearData.onclick = () => {
        dataInput.value = ""
    }

  </script>

</body>
</html>

        // 2. configure request open
        xhr.open('get', 'http://123.207.32.32:8000/home/multidata', false)

1.4. onload监听数据加载完成
<!DOCTYPE html>
<html lang="en">
<head>
  <meta charset="UTF-8">
  <meta http-equiv="X-UA-Compatible" content="IE=edge">
  <meta name="viewport" content="width=device-width, initial-scale=1.0">
  <title>JS-learn</title>
</head>
<body>
    <button class="dataClick">get data</button>
    <button class="clearClick">clear</button>
    <p></p>
    <textarea class="dataArea"></textarea>

  <script>

    const buttonData = document.querySelector(".dataClick");
    const dataInput = document.querySelector(".dataArea")
    const clearData =  document.querySelector(".clearClick")
    // debugger
    buttonData.onclick = function getData(){
        // 1. create XMLHttpRequest object
        const xhr = new XMLHttpRequest()

        // 2. monitor onload event
        xhr.onload = () => {
            console.log('onload')
            dataInput.value = xhr.response
        }

        // 2. configure request open
        xhr.open('get', 'http://xxx.32:8000/home/multidata', false)

        // 4. send request
        xhr.send()
    }
    clearData.onclick = () => {
        dataInput.value = ""
    }

  </script>

</body>
</html>
1.5. http status code
<!DOCTYPE html>
<html lang="en">
<head>
<meta charset="UTF-8">
<meta http-equiv="X-UA-Compatible" content="IE=edge">
<meta name="viewport" content="width=device-width, initial-scale=1.0">
<title>JS-learn</title>
</head>
<body>
<button class="dataClick">get data</button>
<button class="clearClick">clear</button>
<p></p>
<textarea class="dataArea"></textarea>
<script>
const buttonData = document.querySelector(".dataClick");
const dataInput = document.querySelector(".dataArea")
const clearData = document.querySelector(".clearClick")
// debugger
buttonData.onclick = function getData(){
// 1. create XMLHttpRequest object
const xhr = new XMLHttpRequest()
// 2. monitor onload event
xhr.onload = () => {
console.log(xhr.status, xhr.statusText)
// make a judgement based on http status code
if (xhr.status >= 200 && xhr.status < 300) {
console.log('get response success: ', xhr.response)
} else {
console.log(xhr.status, xhr.statusText)
}
dataInput.value = xhr.response
}
xhr.onerror = () => {
console.log('send request error: ', xhr.status, xhr.statusText)
}
// 2. configure request open
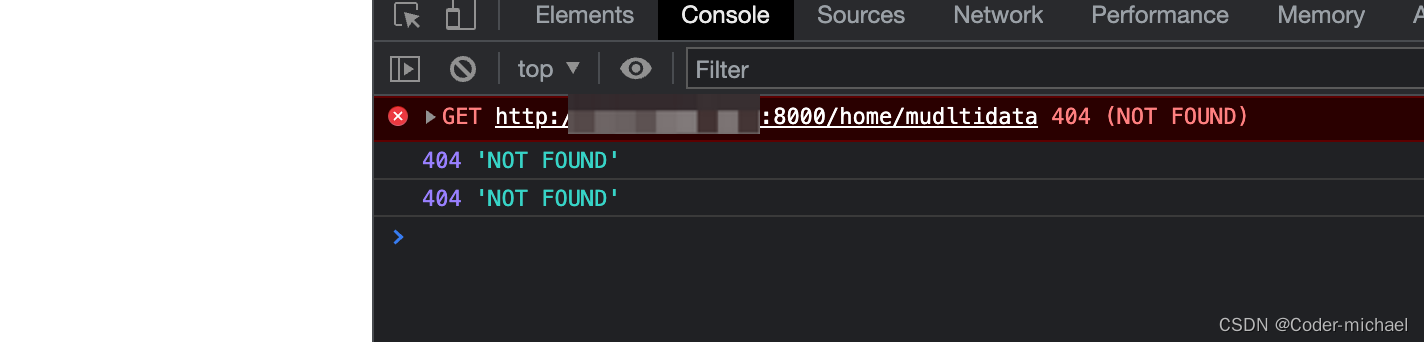
xhr.open('get', 'http://xxx.32:8000/home/mudltidata', false)
// 4. send request
xhr.send()
}
clearData.onclick = () => {
dataInput.value = ""
}
</script>
</body>
</html>
1.6. get/post request with josn/form/urlcoded
<!DOCTYPE html>
<html lang="en">
<head>
  <meta charset="UTF-8">
  <meta http-equiv="X-UA-Compatible" content="IE=edge">
  <meta name="viewport" content="width=device-width, initial-scale=1.0">
  <title>JS-learn</title>
</head>
<body>
    <button class="dataClick">get data</button>
    <button class="clearClick">clear</button>
    <p></p>
    <textarea class="dataArea"></textarea>
    <form class="info">
      <input type="text" name="username">
      <input type="password" name="password">
    </form>
    <p></p>
    <button class="send">send request</button>

  <script>

    const buttonData = document.querySelector(".dataClick");
    const dataInput = document.querySelector(".dataArea")
    const clearData =  document.querySelector(".clearClick")


    const formEl = document.querySelector(".info")
    const sendBtn = document.querySelector(".send")
    // debugger
    sendBtn.onclick = function getData(){
        // 1. create XMLHttpRequest object
        const xhr = new XMLHttpRequest()

        // 2. monitor onload event
        xhr.onload = () => {
            console.log(xhr.status, xhr.statusText)
            // make a judgement based on http status code
            if (xhr.status >= 200 && xhr.status < 300) {
                console.log('get response success: ', xhr.response)
            } else {
              console.log(xhr.status, xhr.statusText)
            }
            dataInput.value = xhr.response
        }

        xhr.onerror = () => {
          console.log('send request error: ', xhr.status, xhr.statusText)
        }

        // 2. configure request open
        // 2.1. http get
        // xhr.open('get', 'http://xxx.32:1888/02_param/get?name=michael&age=18&address=广州市')
        // xhr.send()

        // 2.2. post: urlencoded
        // xhr.open('post', 'http://xxx.32:1888/02_param/posturl')
        // xhr.setRequestHeader('Content-type', 'application/x-www-form-urlencoded')
        // xhr.send('name=michael&age=18&address=广州市')

        // 2.3. post: formdata
        // xhr.open('post', 'http://xxx.32:1888/02_param/postform')
        // const formData = new FormData(formEl)
        // xhr.send(formData)

        // 2.4. post: json
        xhr.open('post', 'http://xxx.32:1888/02_param/postjson')
        xhr.setRequestHeader('Content-type', 'application/json')
        xhr.send(JSON.stringify({name: "michael", age:18, height: 1.8}))

        // 4. send request
        // xhr.send()
    }
    clearData.onclick = () => {
        dataInput.value = ""
    }

  </script>

</body>
</html>
1.7. encapsulate an ajax function to send requests
<!DOCTYPE html>
<html lang="en">
<head>
  <meta charset="UTF-8">
  <meta http-equiv="X-UA-Compatible" content="IE=edge">
  <meta name="viewport" content="width=device-width, initial-scale=1.0">
  <title>JS-learn</title>
</head>
<body>
    <button class="send">send request</button>

  <script>

    // my ajax request class
    function myAjax({
      url,
      method = 'get',
      data = {},
      headers = {},
      success,  // callback function after sending requeset successfully
      failure   // callback function where there is any error
    } = {}){
      // 1. create a XMLHttpRequeset
      const xhr = new XMLHttpRequest()

      //  2. monitor the data
      xhr.onload = function() {
        if (xhr.status >= 200 && xhr.status < 300) {
          success && success()
        } else {
          failure && failure({status: xhr.status, message: xhr.statusText})
        }
      }

      // 3. set the response type
      xhr.responseType = 'json'

      // 4. configure open
      if (method.toUpperCase() === 'GET') {
        const queryStr = []
        for (const key in data) {
          queryStr.push(`${key}=${data[key]}`)
        }

        url = url + '?' + queryStr.join('&')
        xhr.open(method, url)
        xhr.send()
      }else {
        xhr.open(method, url)
        xhr.setRequestHeader('Content-type', 'application/json')
        xhr.send(JSON.stringify(data))
      }

      return xhr

    }

    const sendBtn = document.querySelector(".send")

    // sendBtn.onclick = function getData(){
    //   myAjax({
    //     url: "http://xxx.32:1888/02_param/gest",
    //     method: "GET",
    //     data: {
    //       name: "michael",
    //       age: 18
    //     },
    //     success: function(res) {
    //       console.log("res:", res)
    //     },
    //     failure: function(err) {
    //       alert(err.message)

    //     }
    //   })
    // }
    sendBtn.onclick = function getData(){
      myAjax({
        url: "http://xxx.32:1888/02_param/postjson",
        method: "post",
        data: {
          name: "michael",
          age: 18
        },
        success: function(res) {
          console.log("res:", res)
        },
        failure: function(err) {
          alert(err.message)

        }
      })
    }
  </script>

</body>
</html>
1.8. encapsulate an ajax function to send requests with Promise
function myAjax({
    url,
    method = "get",
    data = {},
    timeout = 10000,
    headers = {}, // token
} = {}) {
    // 1. create a XMLHttpRequest object
    const xhr = new XMLHttpRequest()

    // 2. create a promise object
    const promise = new Promise((resolve, reject) => {

        // 3. monitor data
        xhr.onload = function() {
            if (xhr.status >= 200 && xhr.status < 300) {
                resolve(xhr.response)
            } else {
                reject({ status: xhr.status, message: xhr.statusText })
            }
        }

        // 4. set response type and timeout
        xhr.responseType = 'json'
        xhr.timeout = timeout

        // 5. configure open
        if (method.toUpperCase() === 'GET') {
            const queryStr = []
            for (const key in data) {
                queryStr.push(`${key}&${data[key]}`)
            }
            url = url + '?' + queryStr.join('&')
            xhr.open(method, url)
            xhr.send()
        } else {
            xhr.open(method, url)
            xhr.setRequestHeader('Content-type', 'application/json')
            xhr.send(JSON.stringify(data))
        }
    })

    promise.xhr = xhr

    return promise
}
2. Fetch
2.1. fetch demo
<!DOCTYPE html>
<html lang="en">
<head>
  <meta charset="UTF-8">
  <meta http-equiv="X-UA-Compatible" content="IE=edge">
  <meta name="viewport" content="width=device-width, initial-scale=1.0">
  <title>Fetch</title>
</head>
<body>
    <button class="send">send request</button>
    <script>

        const sendBtn = document.querySelector('.send')
        // 1. fetch send http request
        // sendBtn.onclick = () => {
        //     fetch('http://xxx.32:8000/home/multidata').then(result => {
        //         console.log(result)
        //     }).catch(reason => {
        //         console.log(reason)
        //     })
        // }

        // 2. optimize code when using fetch
        // 2.1. first solution
        // sendBtn.onclick =  () => {
        //     fetch('http://xxx.32:8000/home/multidata').then(result => {
        //         return result.json()
        //     }).then(result => {
        //         console.log('result: ', result)
        //     }).catch(reason => {
        //         console.log('error: ', reason)
        //     })
        // }

        // 2.2. second solution
        // async function getData(){
        //     const response = await fetch('http://xxx.32:8000/home/multidata')
        //     const result = await response.json()
        //     console.log('result: ', result)
        // }

        // sendBtn.onclick = getData

        // 3. send post request with params
        // 3.1. send json
        // async function getData() {
        //     const response = await fetch('http://xxx.32:1888/02_param/postjson', {
        //         method: 'post',
        //         headers: { 'Content-type': 'application/json' },
        //         body: JSON.stringify({
        //             name: 'michael',
        //             age: 18
        //         })
        //     })

        //     console.log(response.ok, response.status, response.statusText)
        //     const result = await response.json()
        //     console.log('result: ', result)

        // }

        // sendBtn.onclick = getData

        // 3.2. send form
        async function getDate() {
            const formData = new FormData()
            formData.append('name', 'michael')
            formData.append('age', 18)
            const response = await fetch('http://xxxx.32:1888/02_param/postform', {
                method: 'post',
                body: formData
            })

            console.log(response.ok, response.status, response.statusText)

            const result = await response.json()
            console.log('result: ', result)
        }
        sendBtn.onclick = getDate

    </script>
</body>


![[python入门㊿] - python如何打断点](https://img-blog.csdnimg.cn/480466a9a71a40bca002d88a47dd6cd8.png)
