文章目录
- pvs中pv显示[unknown]解决方法
- 报错产生情况
- 报错说明
- 解决方法
- 解决方法【无法修复情况,重要!!!】
- 解决方法【正常情况下】
- 正常的剔除一个vg流程【不影响vg已有lv】
- 环境准备
- 强制剔除
- 正常剔除
- vgs容量和硬盘容量显示不一致解决方法
- 情况说明
- 解决方法
pvs中pv显示[unknown]解决方法
报错产生情况
- 我记得我操作的时候,需要删除一个vg容量嘛【比如vda3的容量,我将这个vda3的容量从vg中删除,然后没有删除pv,我直接又通过vda3来新创建了一个vg容量,所以就造成了pvs中之前删除的时候没有剔除pv,所以造成了之前vda3的pv名为
unknow device。 可能说的有点乱,但大概就是这么个意思。】 - 我记得我操作的时候是违规操作了,怎么个违规操作呢: 比如我有一个vda硬盘扩容了200G空间,我全部在fdisk中新增到vda3里并加入到一个vg中了,最后业务方说需要留32G空间出来做swap,所以vda3我得删除重做。 然后我直接删除vda3空间,并没有剔除vda3生成的pv。
其实这种情况不仅是pvs名称有问题,vgs的容量也有问题。 我下面重新复刻一下环境。
可以看到,现在只有一个rootvg,容量为298G,vda3有280G,这容量是我给硬盘扩容后通过fdisk创建出来的
[root@rhel ~]# fdisk -l /dev/vda
Disk /dev/vda: 300 GiB, 322122547200 bytes, 629145600 sectors
Units: sectors of 1 * 512 = 512 bytes
Sector size (logical/physical): 512 bytes / 512 bytes
I/O size (minimum/optimal): 512 bytes / 512 bytes
Disklabel type: dos
Disk identifier: 0xe2ce4614

Device     Boot    Start       End   Sectors  Size Id Type
/dev/vda1  *        2048   2099199   2097152    1G 83 Linux
/dev/vda2        2099200  41943039  39843840   19G 8e Linux LVM
/dev/vda3       41943040 629145599 587202560  280G 8e Linux LVM
[root@rhel ~]#
[root@rhel ~]# pvs
  PV         VG     Fmt  Attr PSize    PFree
  /dev/vda2  rootvg lvm2 a--   <19.00g    0
  /dev/vda3  rootvg lvm2 a--  <280.00g    0
[root@rhel ~]# vgs
  VG     #PV #LV #SN Attr   VSize   VFree
  rootvg   2   2   0 wz--n- 298.99g    0
[root@rhel ~]#
- 上面我已经将vda3添加到rootvg里了,现在我将vda3通过fdisk直接删除并新建一个32G的的vda3空间和一个248G的vda4空间,此时之前vda3的280G已经不存在了
Device     Boot     Start       End   Sectors  Size Id Type
/dev/vda1  *         2048   2099199   2097152    1G 83 Linux
/dev/vda2         2099200  41943039  39843840   19G 8e Linux LVM
/dev/vda3        41943040 109051903  67108864   32G 82 Linux swap / Solaris
/dev/vda4       109051904 629145599 520093696  248G 8e Linux LVM

Filesystem/RAID signature on partition 3 will be wiped.

Command (m for help): w
The partition table has been altered.
Syncing disks.


# 可以看到现在显示还是处于异常状态,vda3已经不存在了。
[root@rhel ~]#
[root@rhel ~]# lsblk
NAME            MAJ:MIN RM  SIZE RO TYPE MOUNTPOINT
sr0              11:0    1  478K  0 rom
vda             252:0    0  300G  0 disk
|-vda1          252:1    0    1G  0 part /boot
|-vda2          252:2    0   19G  0 part
| |-rootvg-root 253:0    0  297G  0 lvm  /
| `-rootvg-swap 253:1    0    2G  0 lvm  [SWAP]
|-vda3          252:3    0   32G  0 part
| `-rootvg-root 253:0    0  297G  0 lvm  /
- 现在我将vda4添加到vg里面,可以看到之前的vda3就变成
[unknown]了,而且一直有报错。。。。
最重要的是vgs可以看到总空间是叠加的,现在变成500多G了【我全部空间也才300】,所以这就是异常状态
[root@rhel ~]# pvs
  WARNING: Couldn't find device with uuid BJDsFk-8faO-XonP-jvUI-wEmt-JXj0-YuJQfw.
  WARNING: VG rootvg is missing PV BJDsFk-8faO-XonP-jvUI-wEmt-JXj0-YuJQfw (last written to /dev/vda3).
  WARNING: Couldn't find all devices for LV rootvg/root while checking used and assumed devices.
  PV         VG     Fmt  Attr PSize    PFree
  /dev/vda2  rootvg lvm2 a--   <19.00g    0
  [unknown]  rootvg lvm2 a-m  <280.00g    0
[root@rhel ~]# vgs
  WARNING: Couldn't find device with uuid BJDsFk-8faO-XonP-jvUI-wEmt-JXj0-YuJQfw.
  WARNING: VG rootvg is missing PV BJDsFk-8faO-XonP-jvUI-wEmt-JXj0-YuJQfw (last written to /dev/vda3).
  WARNING: Couldn't find all devices for LV rootvg/root while checking used and assumed devices.
  VG     #PV #LV #SN Attr   VSize   VFree
  rootvg   2   2   0 wz-pn- 298.99g    0
[root@rhel ~]#
[root@rhel ~]# vgextend rootvg /dev/vda4
  WARNING: Couldn't find device with uuid BJDsFk-8faO-XonP-jvUI-wEmt-JXj0-YuJQfw.
  WARNING: VG rootvg is missing PV BJDsFk-8faO-XonP-jvUI-wEmt-JXj0-YuJQfw (last written to /dev/vda3).
  WARNING: Couldn't find all devices for LV rootvg/root while checking used and assumed devices.
  Physical volume "/dev/vda4" successfully created.
  WARNING: Couldn't find device with uuid BJDsFk-8faO-XonP-jvUI-wEmt-JXj0-YuJQfw.
  WARNING: VG rootvg is missing PV BJDsFk-8faO-XonP-jvUI-wEmt-JXj0-YuJQfw (last written to /dev/vda3).
  WARNING: Couldn't find all devices for LV rootvg/root while checking used and assumed devices.
  WARNING: Couldn't find device with uuid BJDsFk-8faO-XonP-jvUI-wEmt-JXj0-YuJQfw.
  WARNING: Couldn't find device with uuid BJDsFk-8faO-XonP-jvUI-wEmt-JXj0-YuJQfw.
  Volume group "rootvg" successfully extended
[root@rhel ~]# vgs
  WARNING: Couldn't find device with uuid BJDsFk-8faO-XonP-jvUI-wEmt-JXj0-YuJQfw.
  WARNING: VG rootvg is missing PV BJDsFk-8faO-XonP-jvUI-wEmt-JXj0-YuJQfw (last written to [unknown]).
  WARNING: Couldn't find all devices for LV rootvg/root while checking used and assumed devices.
  VG     #PV #LV #SN Attr   VSize    VFree
  rootvg   3   2   0 wz-pn- <546.99g <248.00g
[root@rhel ~]# pvs
  WARNING: Couldn't find device with uuid BJDsFk-8faO-XonP-jvUI-wEmt-JXj0-YuJQfw.
  WARNING: VG rootvg is missing PV BJDsFk-8faO-XonP-jvUI-wEmt-JXj0-YuJQfw (last written to [unknown]).
  WARNING: Couldn't find all devices for LV rootvg/root while checking used and assumed devices.
  PV         VG     Fmt  Attr PSize    PFree
  /dev/vda2  rootvg lvm2 a--   <19.00g       0
  /dev/vda4  rootvg lvm2 a--  <248.00g <248.00g
  [unknown]  rootvg lvm2 a-m  <280.00g       0
[root@rhel ~]#
报错说明
pvs命令的pv名称为[unknown],并且一直有一堆报错信息。
[root@rhel ~]# pvs
  WARNING: Couldn't find device with uuid BJDsFk-8faO-XonP-jvUI-wEmt-JXj0-YuJQfw.
  WARNING: VG rootvg is missing PV BJDsFk-8faO-XonP-jvUI-wEmt-JXj0-YuJQfw (last written to [unknown]).
  WARNING: Couldn't find all devices for LV rootvg/root while checking used and assumed devices.
  PV         VG     Fmt  Attr PSize    PFree
  /dev/vda2  rootvg lvm2 a--   <19.00g       0
  /dev/vda4  rootvg lvm2 a--  <248.00g <248.00g
  [unknown]  rootvg lvm2 a-m  <280.00g       0
[root@rhel ~]#
[root@rhel ~]#
[root@rhel ~]# vgs
  WARNING: Couldn't find device with uuid BJDsFk-8faO-XonP-jvUI-wEmt-JXj0-YuJQfw.
  WARNING: VG rootvg is missing PV BJDsFk-8faO-XonP-jvUI-wEmt-JXj0-YuJQfw (last written to [unknown]).
  WARNING: Couldn't find all devices for LV rootvg/root while checking used and assumed devices.
  VG     #PV #LV #SN Attr   VSize    VFree
  rootvg   3   2
解决方法
- 遇事可以多翻翻官网文档,这内容就是官网文档,官网说明如下:
4.3.7. 从卷从 组中删除物理卷
要从卷组中删除未使用的物理卷, 请使用 vgreduce 命令。 vgreduce 命令通 过删除一个或多个空物理 卷来 缩小卷组的容量。 这样就可以使不同的卷组自由使用那些物理卷,或者将其从系统中删除。
在从卷组中删除物理卷前,您可以使用 pvdisplay 命令确定物理卷没有被任何 逻辑逻卷使用。
如果物理卷仍在使用,您必须使用使 pvmove 命令将数据迁移到 另一个物理卷。
然后使用 一 vgreduce 命 令删除物理卷。
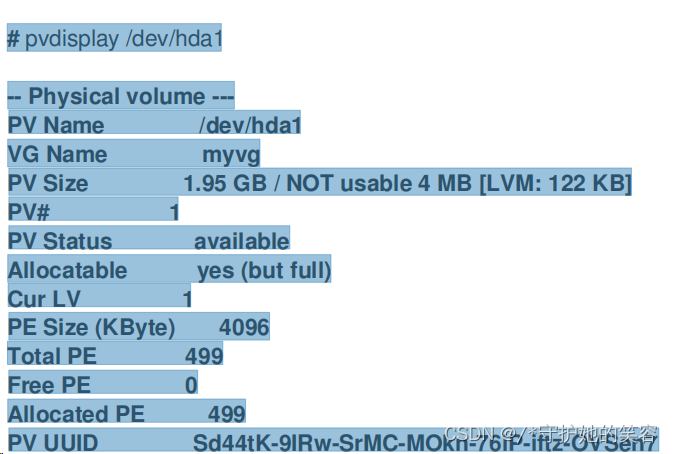
以下命令将物理卷 以 /dev/hda1 从卷组 my_volume_group 中删除。 # vgreduce my_volume_group /dev/hda1
如果逻辑 卷包含失 败的物理卷,您就无法使用 该逻辑 卷。要从卷 组中删除缺少的物理卷,您可以使用 vgreduce 命令的 --remove mising 参数,如果缺少物理卷上没有分配 逻辑 卷。
如果物理卷包含 镜像片段 类型的 逻辑逻 卷的 镜像,您可以使用 像 vgreduce --removemissing – mirrorsonly --force 命令从 镜像中 删除该镜 像。 这样 只删除从物理卷中 镜像镜像的逻辑 卷。
解决方法【无法修复情况,重要!!!】
- 注意看,我下面vda3虽然现在成32G了,但之前分配是297G信息依然还在,并且处于挂载到根目录下【根目录处于使用中,所以这个vda3就会一直提示占用。。。。】!
[root@rhel ~]# lsblk
NAME            MAJ:MIN RM  SIZE RO TYPE MOUNTPOINT
sr0              11:0    1  478K  0 rom
vda             252:0    0  300G  0 disk
|-vda1          252:1    0    1G  0 part /boot
|-vda2          252:2    0   19G  0 part
| |-rootvg-root 253:0    0  297G  0 lvm  /
| `-rootvg-swap 253:1    0    2G  0 lvm  [SWAP]
|-vda3          252:3    0   32G  0 part
| `-rootvg-root 253:0    0  297G  0 lvm  /
`-vda4          252:4    0  248G  0 part
[root@rhel ~]#

# 看下面我接触占用的时候,提示有卷在使用中,可以使用--mirrorsonly --force参数强制删除
[root@rhel ~]# vgreduce --removemissing /dev/rootvg
  WARNING: Couldn't find device with uuid BJDsFk-8faO-XonP-jvUI-wEmt-JXj0-YuJQfw.
  WARNING: VG rootvg is missing PV BJDsFk-8faO-XonP-jvUI-wEmt-JXj0-YuJQfw (last written to [unknown]).
  WARNING: Couldn't find all devices for LV rootvg/root while checking used and assumed devices.
  WARNING: Couldn't find device with uuid BJDsFk-8faO-XonP-jvUI-wEmt-JXj0-YuJQfw.
  WARNING: Partial LV root needs to be repaired or removed.
  There are still partial LVs in VG rootvg.
  To remove them unconditionally use: vgreduce --removemissing --force.
  To remove them unconditionally from mirror LVs use: vgreduce --removemissing --mirrorsonly --force.
  WARNING: Proceeding to remove empty missing PVs.
  WARNING: Couldn't find device with uuid BJDsFk-8faO-XonP-jvUI-wEmt-JXj0-YuJQfw.
 [root@rhel ~]#

# 强制修复,不行。
 [root@rhel ~]# vgreduce --removemissing --force  rootvg
  WARNING: Couldn't find device with uuid BJDsFk-8faO-XonP-jvUI-wEmt-JXj0-YuJQfw.
  WARNING: VG rootvg is missing PV BJDsFk-8faO-XonP-jvUI-wEmt-JXj0-YuJQfw (last written to [unknown]).
  WARNING: Couldn't find all devices for LV rootvg/root while checking used and assumed devices.
  WARNING: Couldn't find device with uuid BJDsFk-8faO-XonP-jvUI-wEmt-JXj0-YuJQfw.
  WARNING: Removing partial LV rootvg/root.
  Logical volume rootvg/root contains a filesystem in use.
[root@rhel ~]#
[root@rhel ~]#
[root@rhel ~]# vgs
  WARNING: Couldn't find device with uuid BJDsFk-8faO-XonP-jvUI-wEmt-JXj0-YuJQfw.
  WARNING: VG rootvg is missing PV BJDsFk-8faO-XonP-jvUI-wEmt-JXj0-YuJQfw (last written to [unknown]).
  WARNING: Couldn't find all devices for LV rootvg/root while checking used and assumed devices.
  VG     #PV #LV #SN Attr   VSize    VFree
  rootvg   3   2   0 wz-pn- <546.99g <248.00g
[root@rhel ~]#

# 另一种强制修复删除,依然不行。
[root@rhel ~]# vgreduce --removemissing --force  /dev/rootvg
  WARNING: Couldn't find device with uuid BJDsFk-8faO-XonP-jvUI-wEmt-JXj0-YuJQfw.
  WARNING: VG rootvg is missing PV BJDsFk-8faO-XonP-jvUI-wEmt-JXj0-YuJQfw (last written to [unknown]).
  WARNING: Couldn't find all devices for LV rootvg/root while checking used and assumed devices.
  WARNING: Couldn't find device with uuid BJDsFk-8faO-XonP-jvUI-wEmt-JXj0-YuJQfw.
  WARNING: Removing partial LV rootvg/root.
  Logical volume rootvg/root contains a filesystem in use.
[root@rhel ~]# vgs
  WARNING: Couldn't find device with uuid BJDsFk-8faO-XonP-jvUI-wEmt-JXj0-YuJQfw.
  WARNING: VG rootvg is missing PV BJDsFk-8faO-XonP-jvUI-wEmt-JXj0-YuJQfw (last written to [unknown]).
  WARNING: Couldn't find all devices for LV rootvg/root while checking used and assumed devices.
  VG     #PV #LV #SN Attr   VSize    VFree
  rootvg   3   2   0 wz-pn- <546.99g <248.00g
[root@rhel ~]#
[root@rhel ~]# pvs
  WARNING: Couldn't find device with uuid BJDsFk-8faO-XonP-jvUI-wEmt-JXj0-YuJQfw.
  WARNING: VG rootvg is missing PV BJDsFk-8faO-XonP-jvUI-wEmt-JXj0-YuJQfw (last written to [unknown]).
  WARNING: Couldn't find all devices for LV rootvg/root while checking used and assumed devices.
  PV         VG     Fmt  Attr PSize    PFree
  /dev/vda2  rootvg lvm2 a--   <19.00g       0
  /dev/vda4  rootvg lvm2 a--  <248.00g <248.00g
  [unknown]  rootvg lvm2 a-m  <280.00g       0
[root@rhel ~]#
- 总结: 所以如果硬盘分区是扩容到根目录下的,一定不能直接fdisk删除硬盘分区并重新分,因为根目录会一直占用,错误信息清理不掉! 一定要正规流程清除lv-vg-pv后再fdisk清除分区重新划分。
解决方法【正常情况下】
- 上面是新分区扩容到根目录下的情况,我现在重新弄一个环境,新建一个vg,让扩容的硬盘扩容到非根的vg下。因为这个盘是新扩的,lv里面没有数据,并且后面要修复vg,该lv的数据肯定要丢。 如果你扩容前vg中有其他使用中的lv,你删除刚新增的vg,是不会影响之前数据的,前提是你新扩容的空间没有划分到已有的lv中,而是新增的一个lv。【为了保险,如果之前有lv且已有数据,建议先备份数据再操作。误操作会直接导致数据丢失的,直接看下面强制剔除中最后说明,数据会丢失!!!!】
Hex code (type L to list all codes): 8e

Changed type of partition 'Linux' to 'Linux LVM'.

Command (m for help): w
The partition table has been altered.
Syncing disks.
pa
[root@test-11 ~]# partprobe
Warning: Unable to open /dev/sr0 read-write (Read-only file system).  /dev/sr0 has been opened read-only.
[root@test-11 ~]#
[root@test-11 ~]# lsblk
NAME            MAJ:MIN RM  SIZE RO TYPE MOUNTPOINT
sr0              11:0    1  478K  0 rom
vda             252:0    0  100G  0 disk
|-vda1          252:1    0    1G  0 part /boot
|-vda2          252:2    0   19G  0 part
| |-rootvg-root 253:0    0   17G  0 lvm  /
| `-rootvg-swap 253:1    0    2G  0 lvm  [SWAP]
`-vda3          252:3    0   80G  0 part
[root@test-11 ~]#
[root@test-11 ~]# vgcreate vgtest /dev/vda3
  Physical volume "/dev/vda3" successfully created.
  Volume group "vgtest" successfully created
[root@test-11 ~]# vgs
  VG     #PV #LV #SN Attr   VSize   VFree
  rootvg   1   2   0 wz--n- <19.00g      0
  vgtest   1   0   0 wz--n- <80.00g <80.00g
[root@test-11 ~]# lvcreate -l 100%free -n lvtest vgtest
  Logical volume "lvtest" created.
[root@test-11 ~]# lvs
  LV     VG     Attr       LSize   Pool Origin Data%  Meta%  Move Log Cpy%Sync Convert
  root   rootvg -wi-ao---- <17.00g
  swap   rootvg -wi-ao----   2.00g
  lvtest vgtest -wi-a----- <80.00g
[root@test-11 ~]#
- 现在我直接fdisk删除vda3分区并新建vda3和vda4分区出来,然后添加到vgtest里面,按理说这时候vda3的pv会显示为unknown才对,但这并没有显示unknown,但报错信息有的,不知道为啥。。。
Device     Boot    Start       End   Sectors Size Id Type
/dev/vda1  *        2048   2099199   2097152   1G 83 Linux
/dev/vda2        2099200  41943039  39843840  19G 8e Linux LVM
/dev/vda3       41943040  75497471  33554432  16G 83 Linux
/dev/vda4       75497472 209715199 134217728  64G 8e Linux LVM

Command (m for help): w
The partition table has been altered.
Syncing disks.

[root@test-11 ~]# lsblk
NAME              MAJ:MIN RM  SIZE RO TYPE MOUNTPOINT
sr0                11:0    1  478K  0 rom
vda               252:0    0  100G  0 disk
|-vda1            252:1    0    1G  0 part /boot
|-vda2            252:2    0   19G  0 part
| |-rootvg-root   253:0    0   17G  0 lvm  /
| `-rootvg-swap   253:1    0    2G  0 lvm  [SWAP]
|-vda3            252:3    0   16G  0 part
| `-vgtest-lvtest 253:2    0   80G  0 lvm
`-vda4            252:4    0   64G  0 part
[root@test-11 ~]# partprobe
Warning: Unable to open /dev/sr0 read-write (Read-only file system).  /dev/sr0 has been opened read-only.
[root@test-11 ~]#
[root@test-11 ~]# pvs
  WARNING: Device /dev/vda3 has size of 33554432 sectors which is smaller than corresponding PV size of 167772160 sectors. Was device resized?
  WARNING: One or more devices used as PVs in VG vgtest have changed sizes.
  PV         VG     Fmt  Attr PSize   PFree
  /dev/vda2  rootvg lvm2 a--  <19.00g    0
  /dev/vda3  vgtest lvm2 a--  <80.00g    0
[root@test-11 ~]#
[root@test-11 ~]#
[root@test-11 ~]# vgextend vgtest /dev/vda4
  WARNING: Device /dev/vda3 has size of 33554432 sectors which is smaller than corresponding PV size of 167772160 sectors. Was device resized?
  WARNING: One or more devices used as PVs in VG vgtest have changed sizes.
  Physical volume "/dev/vda4" successfully created.
  WARNING: Device /dev/vda3 has size of 33554432 sectors which is smaller than corresponding PV size of 167772160 sectors. Was device resized?
  WARNING: One or more devices used as PVs in VG vgtest have changed sizes.
  WARNING: Device /dev/vda3 has size of 33554432 sectors which is smaller than corresponding PV size of 167772160 sectors. Was device resized?
  Volume group "vgtest" successfully extended
[root@test-11 ~]#
[root@test-11 ~]# pvs
  WARNING: Device /dev/vda3 has size of 33554432 sectors which is smaller than corresponding PV size of 167772160 sectors. Was device resized?
  WARNING: One or more devices used as PVs in VG vgtest have changed sizes.
  PV         VG     Fmt  Attr PSize   PFree
  /dev/vda2  rootvg lvm2 a--  <19.00g      0
  /dev/vda3  vgtest lvm2 a--  <80.00g      0
  /dev/vda4  vgtest lvm2 a--  <64.00g <64.00g
[root@test-11 ~]# vgs
  WARNING: Device /dev/vda3 has size of 33554432 sectors which is smaller than corresponding PV size of 167772160 sectors. Was device resized?
  WARNING: One or more devices used as PVs in VG vgtest have changed sizes.
  VG     #PV #LV #SN Attr   VSize   VFree
  rootvg   1   2   0 wz--n- <19.00g      0
  vgtest   2   1   0 wz--n- 143.99g <64.00g
[root@test-11 ~]#
- 现在vgtest的实际用量是不对的,我执行删除的时候提示vgtest数据一致,真特么该死啊。 vda3的pv竟然不变成unknown。 vda3下的挂载信息都没了,但pvs中就是保留vda3的信息。。。
[root@test-11 ~]# vgreduce --removemissing vgtest
  WARNING: Device /dev/vda3 has size of 33554432 sectors which is smaller than corresponding PV size of 167772160 sectors. Was device resized?
  WARNING: One or more devices used as PVs in VG vgtest have changed sizes.
  Volume group "vgtest" is already consistent.
[root@test-11 ~]#
[root@test-11 ~]# lsblk
NAME            MAJ:MIN RM  SIZE RO TYPE MOUNTPOINT
sr0              11:0    1  478K  0 rom
vda             252:0    0  100G  0 disk
|-vda1          252:1    0    1G  0 part /boot
|-vda2          252:2    0   19G  0 part
| |-rootvg-root 253:0    0   17G  0 lvm  /
| `-rootvg-swap 253:1    0    2G  0 lvm  [SWAP]
|-vda3          252:3    0   16G  0 part
`-vda4          252:4    0   64G  0 part
[root@test-11 ~]# pvs
  WARNING: Device /dev/vda3 has size of 33554432 sectors which is smaller than corresponding PV size of 167772160 sectors. Was device resized?
  WARNING: One or more devices used as PVs in VG vgtest have changed sizes.
  PV         VG     Fmt  Attr PSize   PFree
  /dev/vda2  rootvg lvm2 a--  <19.00g      0
  /dev/vda3  vgtest lvm2 a--  <80.00g      0
  /dev/vda4  vgtest lvm2 a--  <64.00g <64.00g
[root@test-11 ~]#
- 我去fdisk将vda3删除了,pvs变成unknown了
[root@test-11 ~]# lsblk
NAME            MAJ:MIN RM  SIZE RO TYPE MOUNTPOINT
sr0              11:0    1  478K  0 rom
vda             252:0    0  100G  0 disk
|-vda1          252:1    0    1G  0 part /boot
|-vda2          252:2    0   19G  0 part
| |-rootvg-root 253:0    0   17G  0 lvm  /
| `-rootvg-swap 253:1    0    2G  0 lvm  [SWAP]
|-vda3          252:3    0   16G  0 part
`-vda4          252:4    0   64G  0 part
[root@test-11 ~]# pvs
  WARNING: Device /dev/vda3 has size of 33554432 sectors which is smaller than corresponding PV size of 167772160 sectors. Was device resized?
  WARNING: One or more devices used as PVs in VG vgtest have changed sizes.
  PV         VG     Fmt  Attr PSize   PFree
  /dev/vda2  rootvg lvm2 a--  <19.00g      0
  /dev/vda3  vgtest lvm2 a--  <80.00g      0
  /dev/vda4  vgtest lvm2 a--  <64.00g <64.00g
[root@test-11 ~]#
- 既然变成unknown了,那么就执行删除恢复吧
恢复命令:vgreduce --removemissing vg_name【如果失败,根据提示加个--force即可】【不能有占用,有占用先umount再操作】
# 恢复报错了,提示强制报错,心里一紧,心想不会凉了吧。
[root@test-11 ~]# vgreduce --removemissing vgtest
  WARNING: Couldn't find device with uuid XvEHOY-p3Tp-6wbL-EPkc-cDIE-MUKv-r97PCA.
  WARNING: VG vgtest is missing PV XvEHOY-p3Tp-6wbL-EPkc-cDIE-MUKv-r97PCA (last written to /dev/vda3).
  WARNING: Couldn't find device with uuid XvEHOY-p3Tp-6wbL-EPkc-cDIE-MUKv-r97PCA.
  WARNING: Partial LV lvtest needs to be repaired or removed.
  There are still partial LVs in VG vgtest.
  To remove them unconditionally use: vgreduce --removemissing --force.
  To remove them unconditionally from mirror LVs use: vgreduce --removemissing --mirrorsonly --force.
  WARNING: Proceeding to remove empty missing PVs.
  WARNING: Couldn't find device with uuid XvEHOY-p3Tp-6wbL-EPkc-cDIE-MUKv-r97PCA.
[root@test-11 ~]#
[root@test-11 ~]# pvs
  WARNING: Couldn't find device with uuid XvEHOY-p3Tp-6wbL-EPkc-cDIE-MUKv-r97PCA.
  WARNING: VG vgtest is missing PV XvEHOY-p3Tp-6wbL-EPkc-cDIE-MUKv-r97PCA (last written to [unknown]).
  PV         VG     Fmt  Attr PSize   PFree
  /dev/vda2  rootvg lvm2 a--  <19.00g      0
  /dev/vda4  vgtest lvm2 a--  <64.00g <64.00g
  [unknown]  vgtest lvm2 a-m  <80.00g      0
[root@test-11 ~]#
[root@test-11 ~]#

# 加个强制 诶 成功了,问题解决。 注:这个vg下的lv也自动被删除了。
[root@test-11 ~]# vgreduce --removemissing --force vgtest
  WARNING: Couldn't find device with uuid XvEHOY-p3Tp-6wbL-EPkc-cDIE-MUKv-r97PCA.
  WARNING: VG vgtest is missing PV XvEHOY-p3Tp-6wbL-EPkc-cDIE-MUKv-r97PCA (last written to [unknown]).
  WARNING: Couldn't find device with uuid XvEHOY-p3Tp-6wbL-EPkc-cDIE-MUKv-r97PCA.
  WARNING: Removing partial LV vgtest/lvtest.
  WARNING: Couldn't find device with uuid XvEHOY-p3Tp-6wbL-EPkc-cDIE-MUKv-r97PCA.
  Logical volume "lvtest" successfully removed
  Wrote out consistent volume group vgtest.
[root@test-11 ~]# pvs
  PV         VG     Fmt  Attr PSize   PFree
  /dev/vda2  rootvg lvm2 a--  <19.00g      0
  /dev/vda4  vgtest lvm2 a--  <64.00g <64.00g
[root@test-11 ~]#
正常的剔除一个vg流程【不影响vg已有lv】
环境准备
[root@test-11 ~]# lvcreate -l 100%free -n lvtest_1 vgtest
WARNING: xfs signature detected on /dev/vgtest/lvtest_1 at offset 0. Wipe it? [y/n]: y
  Wiping xfs signature on /dev/vgtest/lvtest_1.
  Logical volume "lvtest_1" created.
[root@test-11 ~]# lvs
  LV       VG     Attr       LSize   Pool Origin Data%  Meta%  Move Log Cpy%Sync Convert
  root     rootvg -wi-ao---- <17.00g
  swap     rootvg -wi-ao----   2.00g
  lvtest_1 vgtest -wi-a----- <64.00g
[root@test-11 ~]# vgs
  VG     #PV #LV #SN Attr   VSize   VFree
  rootvg   1   2   0 wz--n- <19.00g    0
  vgtest   1   1   0 wz--n- <64.00g    0
[root@test-11 ~]#
[root@test-11 ~]# mkfs.xfs /dev/vgtest/lvtest
meta-data=/dev/vgtest/lvtest     isize=512    agcount=4, agsize=4194048 blks
         =                       sectsz=512   attr=2, projid32bit=1
         =                       crc=1        finobt=1, sparse=1, rmapbt=0
         =                       reflink=1
data     =                       bsize=4096   blocks=16776192, imaxpct=25
         =                       sunit=0      swidth=0 blks
naming   =version 2              bsize=4096   ascii-ci=0, ftype=1
log      =internal log           bsize=4096   blocks=8191, version=2
         =                       sectsz=512   sunit=0 blks, lazy-count=1
realtime =none                   extsz=4096   blocks=0, rtextents=0
[root@test-11 ~]# mkdir lvtest
[root@test-11 ~]# mount /dev/vgtest/lvtest /lvtest
mount: /lvtest: mount point does not exist.
[root@test-11 ~]#
[root@test-11 ~]# mount /dev/vgtest/lvtest lvtest
[root@test-11 ~]#
[root@test-11 ~]# cd lvtest
[root@test-11 lvtest]# touch test{1..50}
[root@test-11 lvtest]# ls
test1   test11  test13  test15  test17  test19  test20  test22  test24  test26  test28  test3   test31  test33  test35  test37  test39  test40  test42  test44  test46  test48  test5   test6  test8
test10  test12  test14  test16  test18  test2   test21  test23  test25  test27  test29  test30  test32  test34  test36  test38  test4   test41  test43  test45  test47  test49  test50  test7  test9
[root@test-11 lvtest]# cd
[root@test-11 ~]#
[root@test-11 ~]# lsblk
NAME              MAJ:MIN RM  SIZE RO TYPE MOUNTPOINT
sr0                11:0    1  478K  0 rom
vda               252:0    0  100G  0 disk
|-vda1            252:1    0    1G  0 part /boot
|-vda2            252:2    0   19G  0 part
| |-rootvg-root   253:0    0   17G  0 lvm  /
| `-rootvg-swap   253:1    0    2G  0 lvm  [SWAP]
|-vda3            252:3    0   16G  0 part
`-vda4            252:4    0   64G  0 part
  `-vgtest-lvtest 253:2    0   64G  0 lvm  /root/lvtest
[root@test-11 ~]#
[root@test-11 ~]# vgs
  VG     #PV #LV #SN Attr   VSize   VFree
  rootvg   1   2   0 wz--n- <19.00g    0
  vgtest   1   1   0 wz--n- <64.00g    0
[root@test-11 ~]# pvs
  PV         VG     Fmt  Attr PSize   PFree
  /dev/vda2  rootvg lvm2 a--  <19.00g    0
  /dev/vda4  vgtest lvm2 a--  <64.00g    0
[root@test-11 ~]# lvs
  LV     VG     Attr       LSize   Pool Origin Data%  Meta%  Move Log Cpy%Sync Convert
  root   rootvg -wi-ao---- <17.00g
  swap   rootvg -wi-ao----   2.00g
  lvtest vgtest -wi-ao---- <64.00g
[root@test-11 ~]#
- 上面可以看到vda4已经添加到vgtest中并且我格式化了,有数据。
我新增一个vda3【因为我后面将vda3删除了】,现在我模拟将vda3添加到vgs以后,并且将该空间添加到已有的lv中。如合强制剔除。
[root@test-11 ~]# vgextend vgtest /dev/vda3
  Physical volume "/dev/vda3" successfully created.
  Volume group "vgtest" successfully extended
[root@test-11 ~]# vgs
  VG     #PV #LV #SN Attr   VSize   VFree
  rootvg   1   2   0 wz--n- <19.00g      0
  vgtest   2   1   0 wz--n-  79.99g <16.00g
[root@test-11 ~]#
[root@test-11 ~]# lvextend -l 100%free /dev/vgtest/lvtest
  New size given (4095 extents) not larger than existing size (16383 extents)
[root@test-11 ~]# lsblk
NAME              MAJ:MIN RM  SIZE RO TYPE MOUNTPOINT
sr0                11:0    1  478K  0 rom
vda               252:0    0  100G  0 disk
|-vda1            252:1    0    1G  0 part /boot
|-vda2            252:2    0   19G  0 part
| |-rootvg-root   253:0    0   17G  0 lvm  /
| `-rootvg-swap   253:1    0    2G  0 lvm  [SWAP]
|-vda3            252:3    0   16G  0 part
`-vda4            252:4    0   64G  0 part
  `-vgtest-lvtest 253:2    0   64G  0 lvm  /root/lvtest
[root@test-11 ~]# lvextend -L +15G /dev/vgtest/lvtest
  Size of logical volume vgtest/lvtest changed from <64.00 GiB (16383 extents) to <79.00 GiB (20223 extents).
  Logical volume vgtest/lvtest successfully resized.
[root@test-11 ~]# lvs
  LV     VG     Attr       LSize   Pool Origin Data%  Meta%  Move Log Cpy%Sync Convert
  root   rootvg -wi-ao---- <17.00g
  swap   rootvg -wi-ao----   2.00g
  lvtest vgtest -wi-ao---- <79.00g
[root@test-11 ~]# pvs
  PV         VG     Fmt  Attr PSize   PFree
  /dev/vda2  rootvg lvm2 a--  <19.00g       0
  /dev/vda3  vgtest lvm2 a--  <16.00g 1020.00m
  /dev/vda4  vgtest lvm2 a--  <64.00g       0
[root@test-11 ~]#
[root@test-11 ~]# lsblk
NAME              MAJ:MIN RM  SIZE RO TYPE MOUNTPOINT
sr0                11:0    1  478K  0 rom
vda               252:0    0  100G  0 disk
|-vda1            252:1    0    1G  0 part /boot
|-vda2            252:2    0   19G  0 part
| |-rootvg-root   253:0    0   17G  0 lvm  /
| `-rootvg-swap   253:1    0    2G  0 lvm  [SWAP]
|-vda3            252:3    0   16G  0 part
| `-vgtest-lvtest 253:2    0   79G  0 lvm  /root/lvtest
`-vda4            252:4    0   64G  0 part
  `-vgtest-lvtest 253:2    0   79G  0 lvm  /root/lvtest
[root@test-11 ~]#
强制剔除
- 开始剔除【正常情况下,我们删除vda分区使用的lv信息,然后删除vg或者剔除vg【如果vg还有其他lv,就剔除,反正删除即可】,最后删除pv即可】
现在vda3我添加到lv里面了,但lv有vda4的数据,我肯定不能删,也导致我不能剔除,vg也有vda4的数据,也不能删,所以这个时候我们删除pv也不能删除,所以这种情况要强制删除,只能用上面说过的方法
[root@test-11 ~]# vgreduce  vgtest /dev/vda3
  Physical volume "/dev/vda3" still in use
[root@test-11 ~]#
[root@test-11 ~]# pvremove /dev/vda3
  PV /dev/vda3 is used by VG vgtest so please use vgreduce first.
  (If you are certain you need pvremove, then confirm by using --force twice.)
  /dev/vda3: physical volume label not removed.
[root@test-11 ~]# pvremove /dev/vda3 --force
  PV /dev/vda3 is used by VG vgtest so please use vgreduce first.
  (If you are certain you need pvremove, then confirm by using --force twice.)
  /dev/vda3: physical volume label not removed.
[root@test-11 ~]# pvs
  PV         VG     Fmt  Attr PSize   PFree
  /dev/vda2  rootvg lvm2 a--  <19.00g       0
  /dev/vda3  vgtest lvm2 a--  <16.00g 1020.00m
  /dev/vda4  vgtest lvm2 a--  <64.00g       0
[root@test-11 ~]# pvremove --force /dev/vda3
  PV /dev/vda3 is used by VG vgtest so please use vgreduce first.
  (If you are certain you need pvremove, then confirm by using --force twice.)
  /dev/vda3: physical volume label not removed.
[root@test-11 ~]#
- 我fdisk删除vda3以后,刷新提示我再使用中,让我重启,ok,直接重启。
Command (m for help): p
Disk /dev/vda: 100 GiB, 107374182400 bytes, 209715200 sectors
Units: sectors of 1 * 512 = 512 bytes
Sector size (logical/physical): 512 bytes / 512 bytes
I/O size (minimum/optimal): 512 bytes / 512 bytes
Disklabel type: dos
Disk identifier: 0xe2ce4614

Device     Boot    Start       End   Sectors Size Id Type
/dev/vda1  *        2048   2099199   2097152   1G 83 Linux
/dev/vda2        2099200  41943039  39843840  19G 8e Linux LVM
/dev/vda4       75497472 209715199 134217728  64G 8e Linux LVM

Command (m for help): w
The partition table has been altered.
Syncing disks.

[root@test-11 ~]#
[root@test-11 ~]#
[root@test-11 ~]# partprobe /dev/vda
Error: Partition(s) 3 on /dev/vda have been written, but we have been unable to inform the kernel of the change, probably because it/they are in use.  As a result, the old partition(s) will remain in use.  You should reboot now before making further changes.
[root@test-11 ~]#
[root@test-11 ~]# pvs
  PV         VG     Fmt  Attr PSize   PFree
  /dev/vda2  rootvg lvm2 a--  <19.00g       0
  /dev/vda3  vgtest lvm2 a--  <16.00g 1020.00m
  /dev/vda4  vgtest lvm2 a--  <64.00g       0
[root@test-11 ~]# vgs
  VG     #PV #LV #SN Attr   VSize   VFree
  rootvg   1   2   0 wz--n- <19.00g       0
  vgtest   2   1   0 wz--n-  79.99g 1020.00m
[root@test-11 ~]#
[root@test-11 ~]# reboot
- 重启以后,pv就变成unknown了
[root@test-11 ~]# pvs
  WARNING: Couldn't find device with uuid FA5IJi-Hc5y-9rrS-lTwK-YeI1-MvBU-7K04gp.
  WARNING: VG vgtest is missing PV FA5IJi-Hc5y-9rrS-lTwK-YeI1-MvBU-7K04gp (last written to /dev/vda3).
  PV         VG     Fmt  Attr PSize   PFree
  /dev/vda2  rootvg lvm2 a--  <19.00g       0
  /dev/vda4  vgtest lvm2 a--  <64.00g       0
  [unknown]  vgtest lvm2 a-m  <16.00g 1020.00m
[root@test-11 ~]# lsblk
NAME            MAJ:MIN RM  SIZE RO TYPE MOUNTPOINT
sr0              11:0    1  478K  0 rom
vda             252:0    0  100G  0 disk
|-vda1          252:1    0    1G  0 part /boot
|-vda2          252:2    0   35G  0 part
| |-rootvg-root 253:0    0   17G  0 lvm  /
| `-rootvg-swap 253:1    0    2G  0 lvm  [SWAP]
`-vda4          252:4    0   64G  0 part
[root@test-11 ~]#
[root@test-11 ~]# pvs
  WARNING: Couldn't find device with uuid FA5IJi-Hc5y-9rrS-lTwK-YeI1-MvBU-7K04gp.
  WARNING: VG vgtest is missing PV FA5IJi-Hc5y-9rrS-lTwK-YeI1-MvBU-7K04gp (last written to /dev/vda3).
  PV         VG     Fmt  Attr PSize   PFree
  /dev/vda2  rootvg lvm2 a--  <19.00g       0
  /dev/vda4  vgtest lvm2 a--  <64.00g       0
  [unknown]  vgtest lvm2 a-m  <16.00g 1020.00m
[root@test-11 ~]#
[root@test-11 ~]# vgs
  WARNING: Couldn't find device with uuid FA5IJi-Hc5y-9rrS-lTwK-YeI1-MvBU-7K04gp.
  WARNING: VG vgtest is missing PV FA5IJi-Hc5y-9rrS-lTwK-YeI1-MvBU-7K04gp (last written to /dev/vda3).
  VG     #PV #LV #SN Attr   VSize   VFree
  rootvg   1   2   0 wz--n- <19.00g       0
  vgtest   2   1   0 wz-pn-  79.99g 1020.00m
[root@test-11 ~]# lvs
  WARNING: Couldn't find device with uuid FA5IJi-Hc5y-9rrS-lTwK-YeI1-MvBU-7K04gp.
  WARNING: VG vgtest is missing PV FA5IJi-Hc5y-9rrS-lTwK-YeI1-MvBU-7K04gp (last written to /dev/vda3).
  LV     VG     Attr       LSize   Pool Origin Data%  Meta%  Move Log Cpy%Sync Convert
  root   rootvg -wi-ao---- <17.00g
  swap   rootvg -wi-ao----   2.00g
  lvtest vgtest -wi-----p- <79.00g
[root@test-11 ~]#
- ok 开始恢复,可以看到,修复成功,但lv也没了。
所以强制fdisk删除后再修复数据会丢失!
[root@test-11 ~]#  vgreduce --removemissing vgtest
  WARNING: Couldn't find device with uuid FA5IJi-Hc5y-9rrS-lTwK-YeI1-MvBU-7K04gp.
  WARNING: VG vgtest is missing PV FA5IJi-Hc5y-9rrS-lTwK-YeI1-MvBU-7K04gp (last written to /dev/vda3).
  WARNING: Couldn't find device with uuid FA5IJi-Hc5y-9rrS-lTwK-YeI1-MvBU-7K04gp.
  WARNING: Partial LV lvtest needs to be repaired or removed.
  There are still partial LVs in VG vgtest.
  To remove them unconditionally use: vgreduce --removemissing --force.
  To remove them unconditionally from mirror LVs use: vgreduce --removemissing --mirrorsonly --force.
  WARNING: Proceeding to remove empty missing PVs.
  WARNING: Couldn't find device with uuid FA5IJi-Hc5y-9rrS-lTwK-YeI1-MvBU-7K04gp.
[root@test-11 ~]#  vgreduce --removemissing vgtest --force
  WARNING: Couldn't find device with uuid FA5IJi-Hc5y-9rrS-lTwK-YeI1-MvBU-7K04gp.
  WARNING: VG vgtest is missing PV FA5IJi-Hc5y-9rrS-lTwK-YeI1-MvBU-7K04gp (last written to [unknown]).
  WARNING: Couldn't find device with uuid FA5IJi-Hc5y-9rrS-lTwK-YeI1-MvBU-7K04gp.
  WARNING: Removing partial LV vgtest/lvtest.
  WARNING: Couldn't find device with uuid FA5IJi-Hc5y-9rrS-lTwK-YeI1-MvBU-7K04gp.
  Logical volume "lvtest" successfully removed
  Wrote out consistent volume group vgtest.
[root@test-11 ~]# vgs
  VG     #PV #LV #SN Attr   VSize   VFree
  rootvg   1   2   0 wz--n- <19.00g      0
  vgtest   1   0   0 wz--n- <64.00g <64.00g
[root@test-11 ~]# pvs
  PV         VG     Fmt  Attr PSize   PFree
  /dev/vda2  rootvg lvm2 a--  <19.00g      0
  /dev/vda4  vgtest lvm2 a--  <64.00g <64.00g
[root@test-11 ~]# lvs
  LV   VG     Attr       LSize   Pool Origin Data%  Meta%  Move Log Cpy%Sync Convert
  root rootvg -wi-ao---- <17.00g
  swap rootvg -wi-ao----   2.00g
[root@test-11 ~]#
[root@test-11 ~]#
正常剔除
- 复刻一次上面的环境准备操作。
[root@test-11 ~]# lvcreate -l 100%free -n lvtest_1 vgtest
  Logical volume "lvtest_1" created.
[root@test-11 ~]# lvs
  LV       VG     Attr       LSize   Pool Origin Data%  Meta%  Move Log Cpy%Sync Convert
  root     rootvg -wi-ao---- <17.00g
  swap     rootvg -wi-ao----   2.00g
  lvtest_1 vgtest -wi-a----- <48.00g
[root@test-11 ~]# mkfs.xfs /dev/vgtest/lvtest_1
meta-data=/dev/vgtest/lvtest_1   isize=512    agcount=4, agsize=3145472 blks
         =                       sectsz=512   attr=2, projid32bit=1
         =                       crc=1        finobt=1, sparse=1, rmapbt=0
         =                       reflink=1
data     =                       bsize=4096   blocks=12581888, imaxpct=25
         =                       sunit=0      swidth=0 blks
naming   =version 2              bsize=4096   ascii-ci=0, ftype=1
log      =internal log           bsize=4096   blocks=6143, version=2
         =                       sectsz=512   sunit=0 blks, lazy-count=1
realtime =none                   extsz=4096   blocks=0, rtextents=0
[root@test-11 ~]#  mount /dev/vgtest/lvtest_1 lvtest
[root@test-11 ~]# touch lvtest/test{1..50}
[root@test-11 ~]# ls lvtest/
test1   test11  test13  test15  test17  test19  test20  test22  test24  test26  test28  test3   test31  test33  test35  test37  test39  test40  test42  test44  test46  test48  test5   test6  test8
test10  test12  test14  test16  test18  test2   test21  test23  test25  test27  test29  test30  test32  test34  test36  test38  test4   test41  test43  test45  test47  test49  test50  test7  test9
[root@test-11 ~]# lsblk
NAME                MAJ:MIN RM  SIZE RO TYPE MOUNTPOINT
sr0                  11:0    1  478K  0 rom
vda                 252:0    0  100G  0 disk
|-vda1              252:1    0    1G  0 part /boot
|-vda2              252:2    0   35G  0 part
| |-rootvg-root     253:0    0   17G  0 lvm  /
| `-rootvg-swap     253:1    0    2G  0 lvm  [SWAP]
|-vda3              252:3    0   16G  0 part
`-vda4              252:4    0   48G  0 part
  `-vgtest-lvtest_1 253:2    0   48G  0 lvm  /root/lvtest
[root@test-11 ~]#
- 上面可以看到vda4已经添加到vgtest中并且我格式化了,有数据。
我新增一个vda3【因为我后面将vda3删除了】,现在我模拟将vda3添加到vgs以后,并且将该空间添加到一个新的lv中。如合正常剔除
[root@test-11 ~]# vgextend vgtest /dev/vda3
  Physical volume "/dev/vda3" successfully created.
  Volume group "vgtest" successfully extended
[root@test-11 ~]# vgs
  VG     #PV #LV #SN Attr   VSize   VFree
  rootvg   1   2   0 wz--n- <19.00g      0
  vgtest   2   1   0 wz--n-  63.99g <16.00g
[root@test-11 ~]# lvcreate -l 100%free -n lvtest_2 vgtest
WARNING: xfs signature detected on /dev/vgtest/lvtest_2 at offset 0. Wipe it? [y/n]: y
  Wiping xfs signature on /dev/vgtest/lvtest_2.
  Logical volume "lvtest_2" created.
[root@test-11 ~]# lvs
  LV       VG     Attr       LSize   Pool Origin Data%  Meta%  Move Log Cpy%Sync Convert
  root     rootvg -wi-ao---- <17.00g
  swap     rootvg -wi-ao----   2.00g
  lvtest_1 vgtest -wi-ao---- <48.00g
  lvtest_2 vgtest -wi-a----- <16.00g
[root@test-11 ~]#
[root@test-11 ~]# lsblk
NAME                MAJ:MIN RM  SIZE RO TYPE MOUNTPOINT
sr0                  11:0    1  478K  0 rom
vda                 252:0    0  100G  0 disk
|-vda1              252:1    0    1G  0 part /boot
|-vda2              252:2    0   35G  0 part
| |-rootvg-root     253:0    0   17G  0 lvm  /
| `-rootvg-swap     253:1    0    2G  0 lvm  [SWAP]
|-vda3              252:3    0   16G  0 part
| `-vgtest-lvtest_2 253:3    0   16G  0 lvm
`-vda4              252:4    0   48G  0 part
  `-vgtest-lvtest_1 253:2    0   48G  0 lvm  /root/lvtest
[root@test-11 ~]#
- 上面可以知道,lvtest_1是有数据的,lvtest_2没有数据,现在我将lvtest_2和其vg删除,并释放对应的vda3空间。 正确流程为:删除lv-剔除vg-删除pv,命令过程如下
[root@test-11 ~]# lsblk
NAME                MAJ:MIN RM  SIZE RO TYPE MOUNTPOINT
sr0                  11:0    1  478K  0 rom
vda                 252:0    0  100G  0 disk
|-vda1              252:1    0    1G  0 part /boot
|-vda2              252:2    0   35G  0 part
| |-rootvg-root     253:0    0   17G  0 lvm  /
| `-rootvg-swap     253:1    0    2G  0 lvm  [SWAP]
|-vda3              252:3    0   16G  0 part
| `-vgtest-lvtest_2 253:3    0   16G  0 lvm
`-vda4              252:4    0   48G  0 part
  `-vgtest-lvtest_1 253:2    0   48G  0 lvm  /root/lvtest
[root@test-11 ~]#
[root@test-11 ~]# lvremove /dev/vgtest/lvtest_2
Do you really want to remove active logical volume vgtest/lvtest_2? [y/n]: y
  Logical volume "lvtest_2" successfully removed
[root@test-11 ~]# lvs
  LV       VG     Attr       LSize   Pool Origin Data%  Meta%  Move Log Cpy%Sync Convert
  root     rootvg -wi-ao---- <17.00g
  swap     rootvg -wi-ao----   2.00g
  lvtest_1 vgtest -wi-ao---- <48.00g
[root@test-11 ~]#
[root@test-11 ~]# vgreduce vgtest /dev/vda3
  Removed "/dev/vda3" from volume group "vgtest"
[root@test-11 ~]#
[root@test-11 ~]# vgs
  VG     #PV #LV #SN Attr   VSize   VFree
  rootvg   1   2   0 wz--n- <19.00g    0
  vgtest   1   1   0 wz--n- <48.00g    0
[root@test-11 ~]#
[root@test-11 ~]# pvs
  PV         VG     Fmt  Attr PSize   PFree
  /dev/vda2  rootvg lvm2 a--  <19.00g     0
  /dev/vda3         lvm2 ---   16.00g 16.00g
  /dev/vda4  vgtest lvm2 a--  <48.00g     0
[root@test-11 ~]#
[root@test-11 ~]# pvremove /dev/vda3
  Labels on physical volume "/dev/vda3" successfully wiped.
[root@test-11 ~]# pvs
  PV         VG     Fmt  Attr PSize   PFree
  /dev/vda2  rootvg lvm2 a--  <19.00g    0
  /dev/vda4  vgtest lvm2 a--  <48.00g    0
[root@test-11 ~]#
[root@test-11 ~]# lsblk
NAME                MAJ:MIN RM  SIZE RO TYPE MOUNTPOINT
sr0                  11:0    1  478K  0 rom
vda                 252:0    0  100G  0 disk
|-vda1              252:1    0    1G  0 part /boot
|-vda2              252:2    0   35G  0 part
| |-rootvg-root     253:0    0   17G  0 lvm  /
| `-rootvg-swap     253:1    0    2G  0 lvm  [SWAP]
|-vda3              252:3    0   16G  0 part
`-vda4              252:4    0   48G  0 part
  `-vgtest-lvtest_1 253:2    0   48G  0 lvm  /root/lvtest
[root@test-11 ~]#
- 验证lvtest_1的数据,一切正常。
[root@test-11 ~]# df -Th
Filesystem                  Type      Size  Used Avail Use% Mounted on
devtmpfs                    devtmpfs  893M     0  893M   0% /dev
tmpfs                       tmpfs     910M     0  910M   0% /dev/shm
tmpfs                       tmpfs     910M  8.5M  901M   1% /run
tmpfs                       tmpfs     910M     0  910M   0% /sys/fs/cgroup
/dev/mapper/rootvg-root     xfs        17G  1.8G   16G  11% /
/dev/vda1                   xfs      1014M  229M  786M  23% /boot
tmpfs                       tmpfs     182M     0  182M   0% /run/user/0
/dev/mapper/vgtest-lvtest_1 xfs        48G  375M   48G   1% /root/lvtest
[root@test-11 ~]#
[root@test-11 ~]# cd lvtest/
[root@test-11 lvtest]# ls
test1   test11  test13  test15  test17  test19  test20  test22  test24  test26  test28  test3   test31  test33  test35  test37  test39  test40  test42  test44  test46  test48  test5   test6  test8
test10  test12  test14  test16  test18  test2   test21  test23  test25  test27  test29  test30  test32  test34  test36  test38  test4   test41  test43  test45  test47  test49  test50  test7  test9
[root@test-11 lvtest]#
- 重启试试
[root@test-11 lvtest]# reboot


[root@test-11 ~]# lvs
  LV       VG     Attr       LSize   Pool Origin Data%  Meta%  Move Log Cpy%Sync Convert
  root     rootvg -wi-ao---- <17.00g
  swap     rootvg -wi-ao----   2.00g
  lvtest_1 vgtest -wi-a----- <48.00g
[root@test-11 ~]# mount /dev/vgtest/lvtest_1 lvtest/
[root@test-11 ~]# cd lvtest/
[root@test-11 lvtest]# ls
test1   test11  test13  test15  test17  test19  test20  test22  test24  test26  test28  test3   test31  test33  test35  test37  test39  test40  test42  test44  test46  test48  test5   test6  test8
test10  test12  test14  test16  test18  test2   test21  test23  test25  test27  test29  test30  test32  test34  test36  test38  test4   test41  test43  test45  test47  test49  test50  test7  test9
[root@test-11 lvtest]#
vgs容量和硬盘容量显示不一致解决方法
情况说明
-
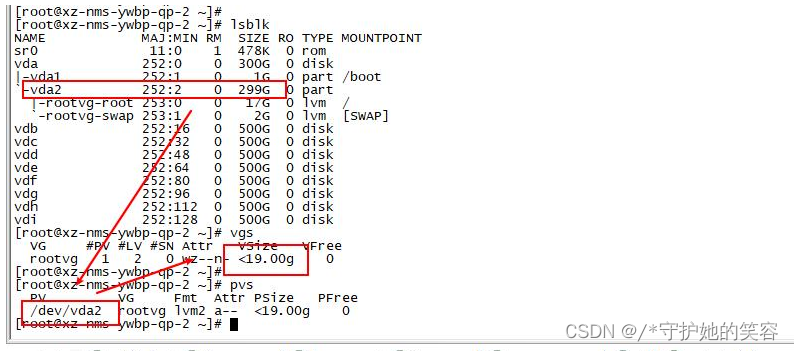
奇葩问题 一个盘空间有299G,vg添加后只能识别到19G【也不能重复添加】
-
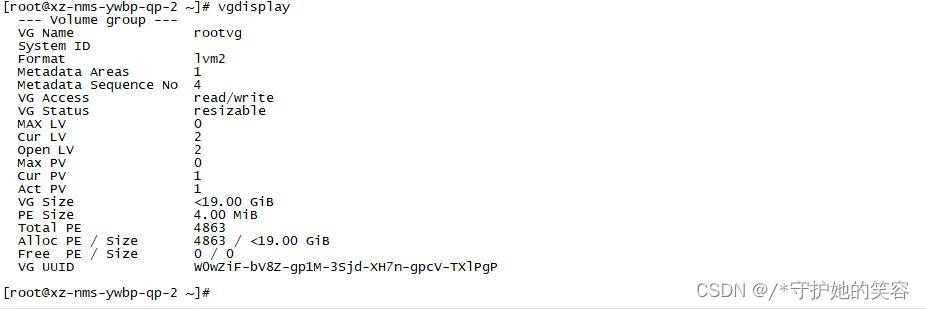
fdisk看到的也是299G

解决方法
- 百度了很多方法都试过了,无果,最后翻官方手册,发现解决方法其实很简单,官方手册说明如下
4.2.4. 重新定 义物理卷大小
如果您需要出于某种原因更改基 础块设备 的大小, 请使用使 pvresize 命令更新新大小的 VM。您可以在 LVM 正在使用物理卷 时执行这个命令。
- 使用方法:
pvresize /dev/vda2【因为我vda2显示异常了】
crt工具登录的虚拟机超时退出了,再登的时候之前的窗口被覆盖了,我所有的执行命令都没了,真该死,不能放命令过程了。
反正就是这么解决的问题。照着做即可。






![[软件工程导论(第六版)]第4章 形式化说明技术(复习笔记)](https://img-blog.csdnimg.cn/286b5369cb3e437fb0720205c53cae97.png)
