一、初始配置
1、导入maven坐标
<!--rabbitmq-->
    <dependency>
        <groupId>org.springframework.boot</groupId>
        <artifactId>spring-boot-starter-amqp</artifactId>
    </dependency>
2、yml配置
spring:
    rabbitmq:
        host: 你的rabbitmq的ip
        port: 5672
        username: guest
        password: guest
二、基本消息队列
1、创建队列
访问接口:http://localhost:15672,账号密码都为guest
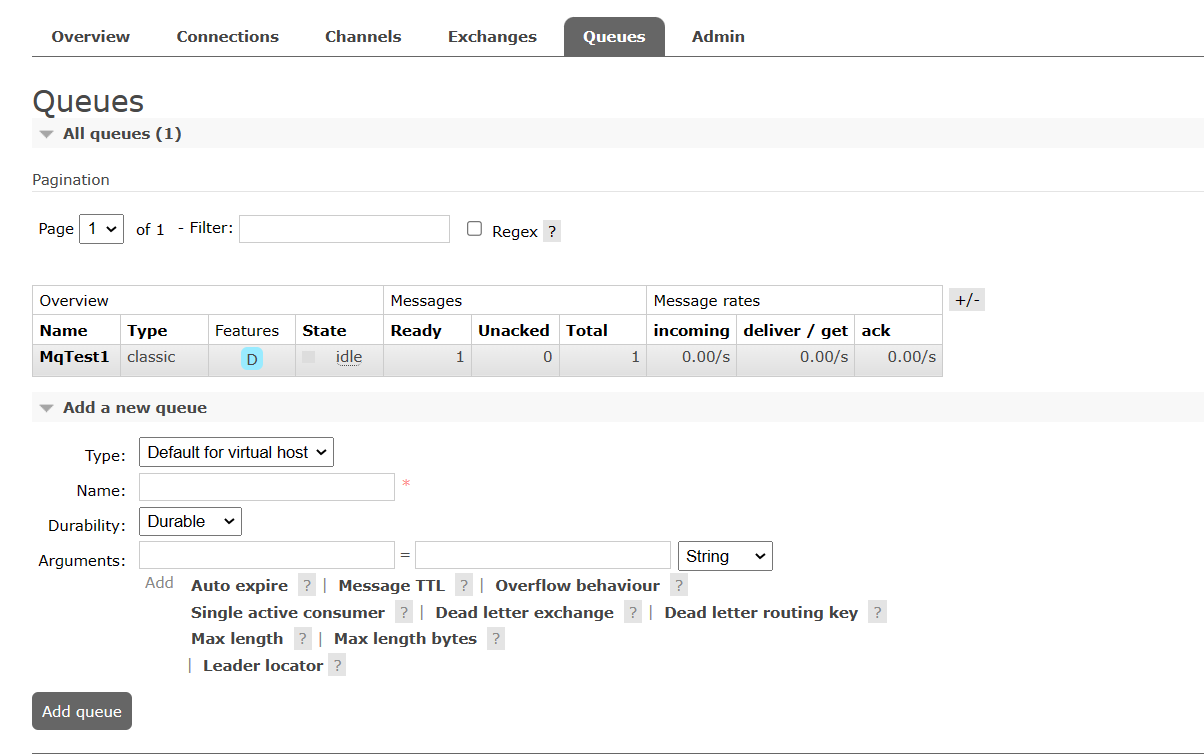
进入后左下角有Add queue添加队列,我已添加队列为MqTest1
2、发布消息
@SpringBootTest
class RabbitMQDemoPublishApplicationTests {
    @Autowired
    private RabbitTemplate rabbitTemplate;

    @Test
    void contextLoads() {
        String queue="MqTest1";
        String message="message1";
        rabbitTemplate.convertAndSend(queue,message);
    }

}
此时可以看到队列有一个消息
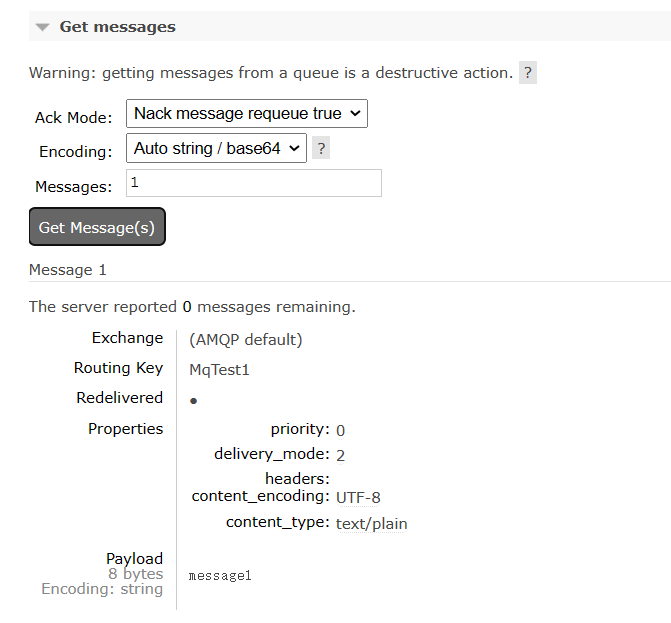
3、接受消息
package com.rabbitmqdemoconsumer.rabbitmq;

import org.springframework.amqp.rabbit.annotation.RabbitListener;
import org.springframework.stereotype.Component;

@Component
public class SpringRabbitLeistener {

    @RabbitListener(queues = "MqTest1")
    public void listenSimpleQueueMessage(String msg){
        System.out.println("接收到的消息:"+msg);
    }
}
此时控制台输出接收到的消息

三、工作消息队列(Work Queue)
可以提高消息处理速度,避免队列消息堆积
1、发布消息
@SpringBootTest
class RabbitMQDemoPublishApplicationTests {
    @Autowired
    private RabbitTemplate rabbitTemplate;

    @Test
    void contextLoads() {
        String queue="MqTest1";
        String message="message1";
        for (int i=0;i<10;i++){
            rabbitTemplate.convertAndSend(queue,message);
        }
    }

}
此时队列有10条消息
2、接受消息
package com.rabbitmqdemoconsumer.rabbitmq;

import org.springframework.amqp.rabbit.annotation.RabbitListener;
import org.springframework.stereotype.Component;

@Component
public class SpringRabbitLeistener {

    @RabbitListener(queues = "MqTest1")
    public void listenSimpleQueueMessage1(String msg){
        System.out.println("consume1接收到的消息:"+msg);
    }
    @RabbitListener(queues = "MqTest1")
    public void listenSimpleQueueMessage2(String msg){
        System.out.println("consume2接收到的消息:"+msg);
    }
}
控制台输出结果
consume1接收到的消息:message1
consume2接收到的消息:message1
consume1接收到的消息:message1
consume2接收到的消息:message1
consume1接收到的消息:message1
consume2接收到的消息:message1
consume1接收到的消息:message1
consume2接收到的消息:message1
consume1接收到的消息:message1
consume2接收到的消息:message1
4、消息预取问题
但是此时有一个问题就是消息预取,比如队列有10条消息,两个消费者各自直接先预取5个消息,如果一个消费者接受消息的速度慢,一个快,就会导致一个消费者已经完成工作,另一个还在慢慢处理,会造成消息堆积消费者身上,要解决这个问题需要在yml文件配置相关配置
  rabbitmq:
    host: 43.140.244.236
    port: 5672
    username: guest
    password: guest
    virtual-host: /
    listener:
      simple:
        prefetch: 1 #每次只能取一个,处理完才能取下一个消息
这样可以避免消息预取导致堆积
四、发布订阅模式
exchange是交换机,负责消息路由,但不存储消息,路由失败则消息丢失
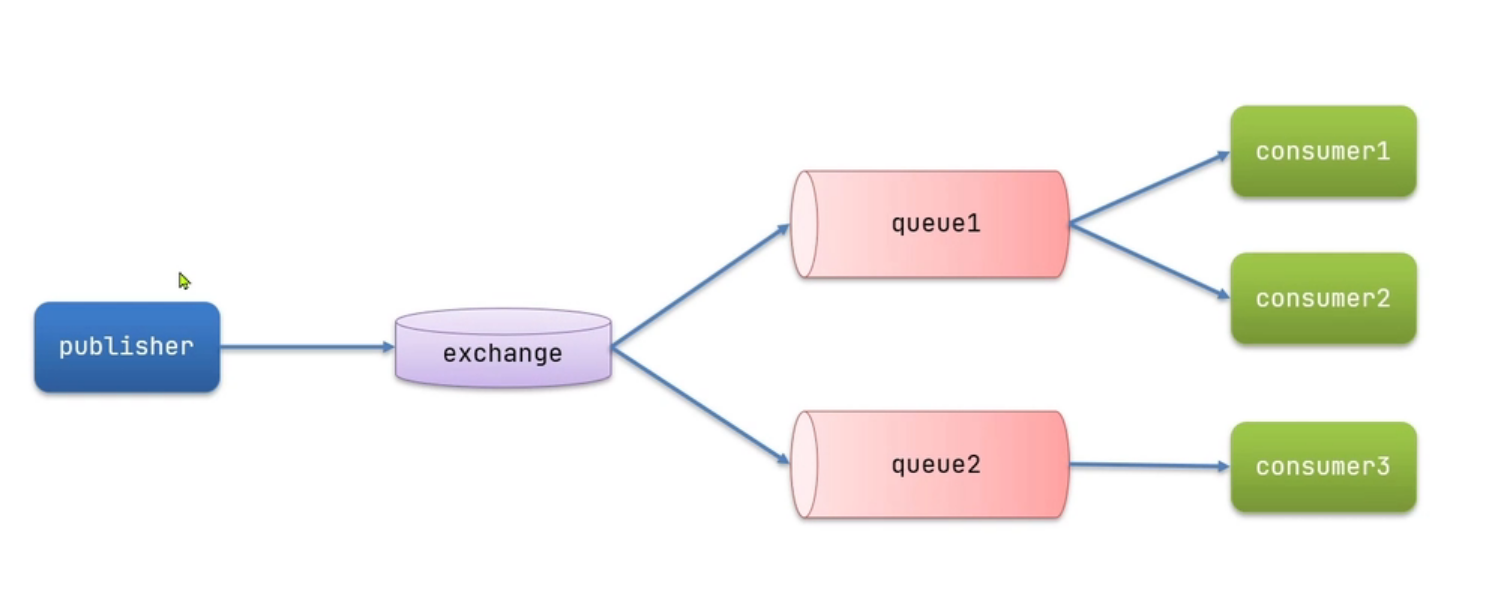
五、发布订阅模式之广播模式(Fanout)

1、Fanout配置类(@Bean声明)
package com.rabbitmqdemoconsumer.config;

import org.springframework.amqp.core.Binding;
import org.springframework.amqp.core.BindingBuilder;
import org.springframework.amqp.core.FanoutExchange;
import org.springframework.amqp.core.Queue;
import org.springframework.context.annotation.Bean;
import org.springframework.context.annotation.Configuration;

@Configuration
public class FanountConfig {
    //交换机声明
    @Bean
    public FanoutExchange fanoutExchange(){
        return new FanoutExchange("FanountExchange");
    }
    //声明队列1
    @Bean
    public Queue Fanount_Qeueue1(){
        return new Queue("Fanount_Qeueue1");
    }
    //声明队列2
    @Bean
    public Queue Fanount_Qeueue2(){
        return new Queue("Fanount_Qeueue2");
    }
    //绑定交换机和队列
    @Bean
    public Binding bindingFanount_Qeueue1(Queue Fanount_Qeueue1,FanoutExchange fanoutExchange){
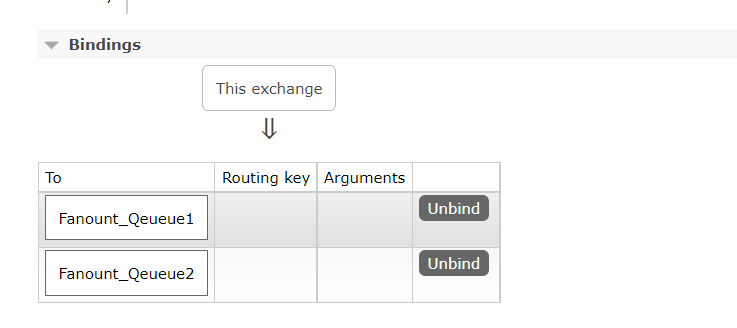
        return BindingBuilder.bind(Fanount_Qeueue1).to(fanoutExchange);
    }
    @Bean
    public Binding bindingFanount_Qeueue2(Queue Fanount_Qeueue2,FanoutExchange fanoutExchange){
        return BindingBuilder.bind(Fanount_Qeueue2).to(fanoutExchange);
    }
}
可以看到声明的队列
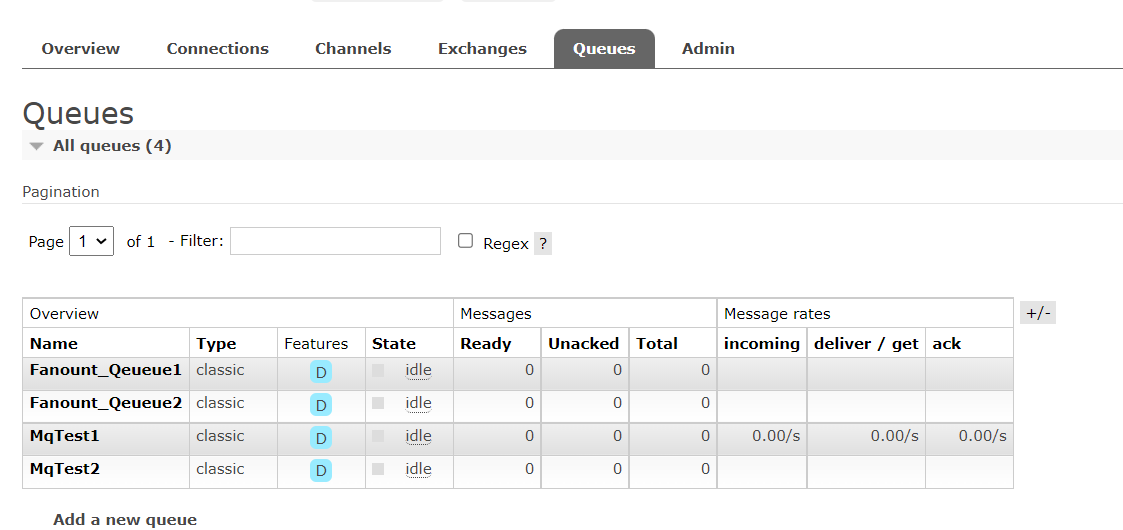
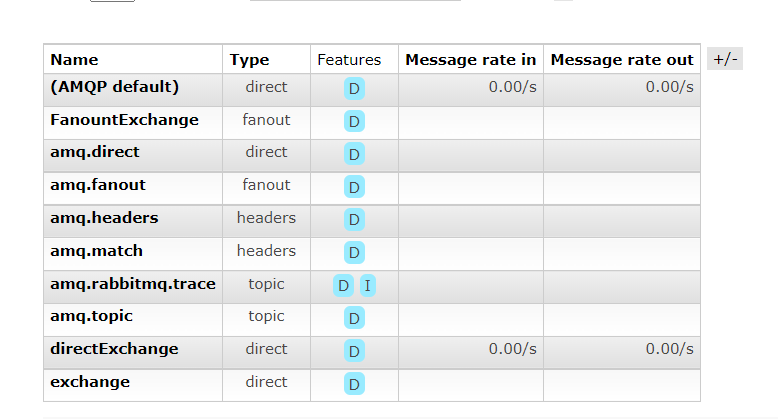
已经声明的交换机(第一个)
绑定关系
2、发送消息
首先发送10条消息,经过交换机转发到队列
@SpringBootTest
class RabbitMQDemoPublishApplicationTests {
    @Autowired
    private RabbitTemplate rabbitTemplate;

    @Test
    void contextLoads2() {
        String exchange="FanountExchange";
        String message="message";
        for (int i=0;i<10;i++){
            rabbitTemplate.convertAndSend(exchange,"",message);
        }
    }

}
此时可以看到两个队列各自有十条消息

3、接受消息
 //监听交换机Fanount_Qeueue1
    @RabbitListener(queues = "Fanount_Qeueue1")
    public void listenFanountQeueue1(String msg){
        System.out.println("Fanount_Qeueue1接收到的消息:"+msg);
    }
    //监听交换机Fanount_Qeueue2
    @RabbitListener(queues = "Fanount_Qeueue2")
    public void listenFanountQeueue2(String msg){
        System.out.println("Fanount_Qeueue2接收到的消息:"+msg);
    }
控制台结果如下(共发送20条,每个队列10条)
Fanount_Qeueue1接收到的消息:message
Fanount_Qeueue1接收到的消息:message
Fanount_Qeueue1接收到的消息:message
Fanount_Qeueue1接收到的消息:message
Fanount_Qeueue2接收到的消息:message
Fanount_Qeueue1接收到的消息:message
Fanount_Qeueue2接收到的消息:message
Fanount_Qeueue1接收到的消息:message
Fanount_Qeueue2接收到的消息:message
Fanount_Qeueue1接收到的消息:message
Fanount_Qeueue2接收到的消息:message
Fanount_Qeueue1接收到的消息:message
Fanount_Qeueue2接收到的消息:message
Fanount_Qeueue1接收到的消息:message
Fanount_Qeueue2接收到的消息:message
Fanount_Qeueue2接收到的消息:message
Fanount_Qeueue2接收到的消息:message
Fanount_Qeueue2接收到的消息:message
六、发布订阅模式之路由模式(Direct)
会将消息根据规则路由到指定的队列
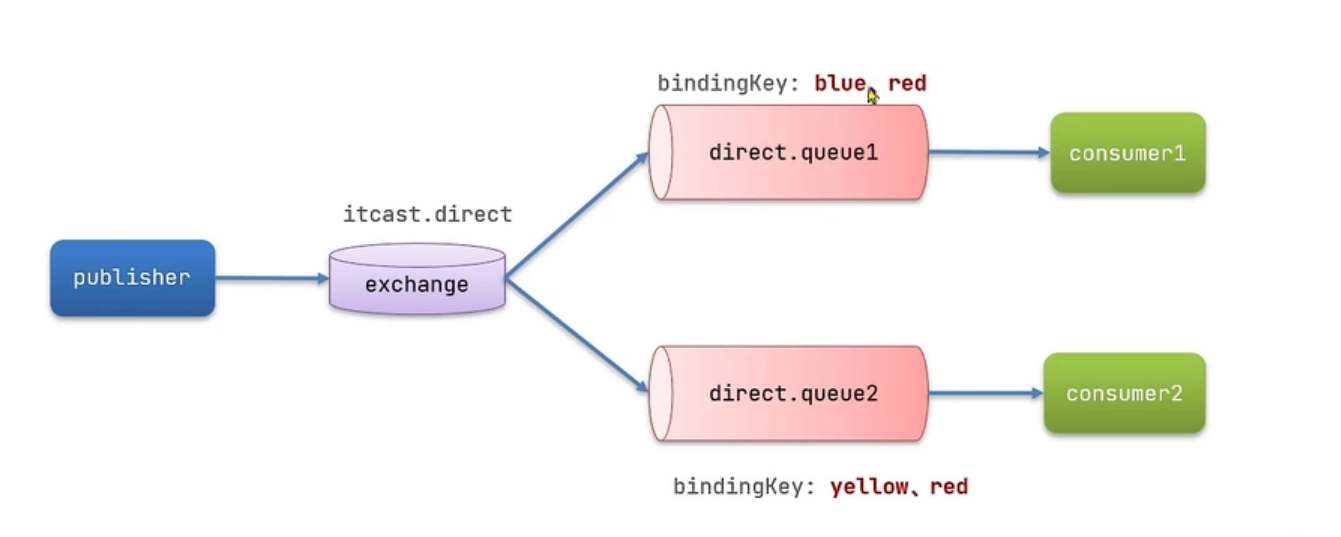
1、声明(基于@RabbitListener声明)
package com.rabbitmqdemoconsumer.rabbitmq;

import org.springframework.amqp.core.ExchangeTypes;
import org.springframework.amqp.rabbit.annotation.Exchange;
import org.springframework.amqp.rabbit.annotation.Queue;
import org.springframework.amqp.rabbit.annotation.QueueBinding;
import org.springframework.amqp.rabbit.annotation.RabbitListener;
import org.springframework.stereotype.Component;

@Component
public class SpringRabbitLeistener {

    /**
     * 绑定交换机和队列,并为key赋值
     * @param msg
     */
    @RabbitListener(bindings = @QueueBinding(
        value = @Queue(name = "DirectQueue1"),
        exchange = @Exchange(name = "DirectExchange",type = ExchangeTypes.DIRECT),
        key = {"red","blue"}
    ))
    public void listenDirectQueue1(String msg){
        System.out.println("listenDirectQueue1接收到的消息:"+msg);
    }


    @RabbitListener(bindings = @QueueBinding(
        value = @Queue(name = "DirectQueue2"),
        exchange = @Exchange(name = "DirectExchange",type = ExchangeTypes.DIRECT),
        key = {"red","yellow"}
    ))
    public void listenDirectQueue2(String msg){
        System.out.println("listenDirectQueue2接收到的消息:"+msg);
    }
}
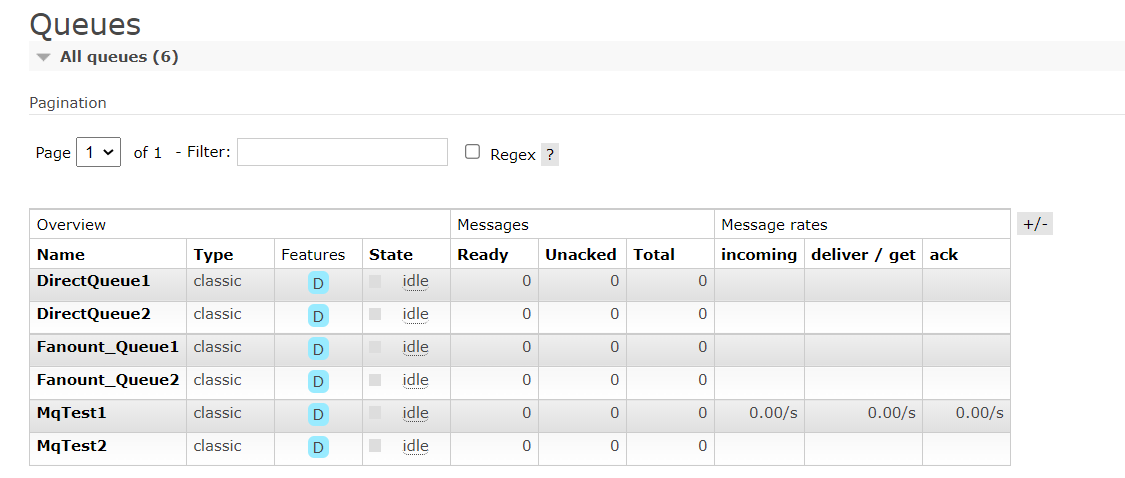
此时可以看到声明的队列
声明的交换机(第一个)
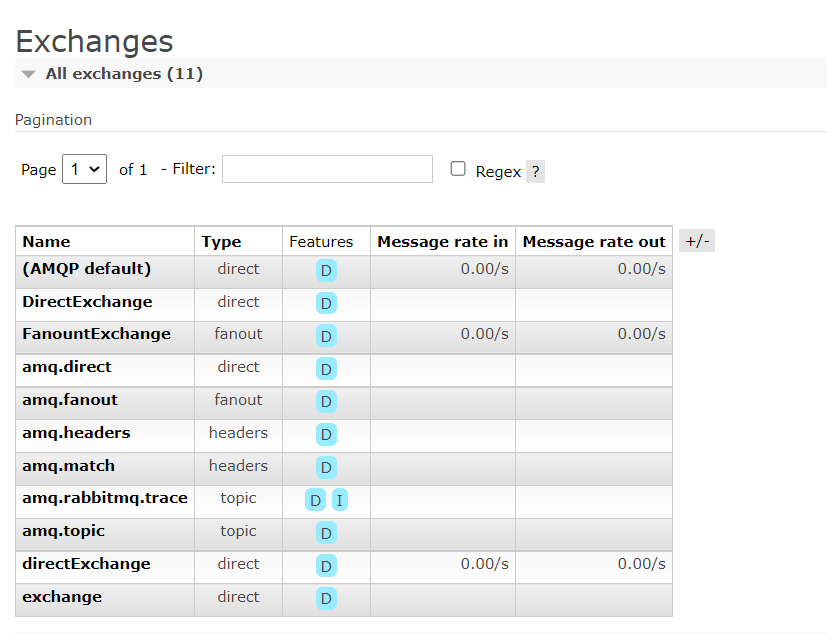
绑定关系
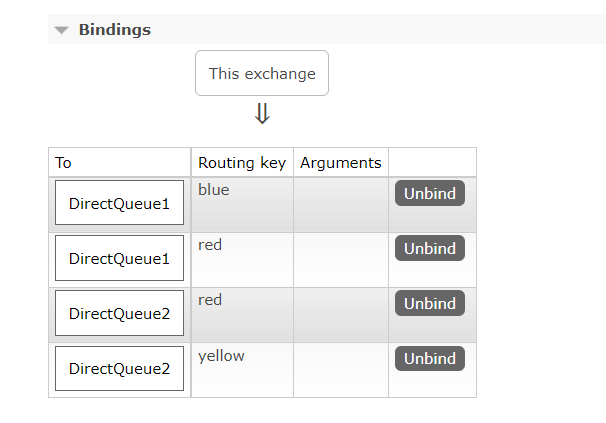
2、发送给blue
发送消息
@SpringBootTest
class RabbitMQDemoPublishApplicationTests {
    @Autowired
    private RabbitTemplate rabbitTemplate;

    @Test
    void contextLoads2() {
        String exchange="DirectExchange";
        String message="HelloWorld";
        for (int i=0;i<10;i++){
            rabbitTemplate.convertAndSend(exchange,"blue",message);
        }
    }

}
接收消息
listenDirectQueue1(red,blue)接收到的消息:HelloWorld
listenDirectQueue1(red,blue)接收到的消息:HelloWorld
listenDirectQueue1(red,blue)接收到的消息:HelloWorld
listenDirectQueue1(red,blue)接收到的消息:HelloWorld
listenDirectQueue1(red,blue)接收到的消息:HelloWorld
listenDirectQueue1(red,blue)接收到的消息:HelloWorld
listenDirectQueue1(red,blue)接收到的消息:HelloWorld
listenDirectQueue1(red,blue)接收到的消息:HelloWorld
listenDirectQueue1(red,blue)接收到的消息:HelloWorld
listenDirectQueue1(red,blue)接收到的消息:HelloWorld
3、发送给red
发送消息
@SpringBootTest
class RabbitMQDemoPublishApplicationTests {
    @Autowired
    private RabbitTemplate rabbitTemplate;

    @Test
    void contextLoads2() {
        String exchange="DirectExchange";
        String message="HelloWorld";
        for (int i=0;i<10;i++){
            rabbitTemplate.convertAndSend(exchange,"blue",message);
        }
    }

}
接收消息
listenDirectQueue1(red,blue)接收到的消息:HelloWorld
listenDirectQueue2(red,yellow)接收到的消息:HelloWorld
listenDirectQueue2(red,yellow)接收到的消息:HelloWorld
listenDirectQueue1(red,blue)接收到的消息:HelloWorld
listenDirectQueue1(red,blue)接收到的消息:HelloWorld
listenDirectQueue2(red,yellow)接收到的消息:HelloWorld
listenDirectQueue1(red,blue)接收到的消息:HelloWorld
listenDirectQueue2(red,yellow)接收到的消息:HelloWorld
listenDirectQueue2(red,yellow)接收到的消息:HelloWorld
listenDirectQueue1(red,blue)接收到的消息:HelloWorld
listenDirectQueue2(red,yellow)接收到的消息:HelloWorld
listenDirectQueue1(red,blue)接收到的消息:HelloWorld
listenDirectQueue2(red,yellow)接收到的消息:HelloWorld
listenDirectQueue1(red,blue)接收到的消息:HelloWorld
listenDirectQueue1(red,blue)接收到的消息:HelloWorld
listenDirectQueue2(red,yellow)接收到的消息:HelloWorld
listenDirectQueue2(red,yellow)接收到的消息:HelloWorld
listenDirectQueue1(red,blue)接收到的消息:HelloWorld
listenDirectQueue2(red,yellow)接收到的消息:HelloWorld
listenDirectQueue1(red,blue)接收到的消息:HelloWorld
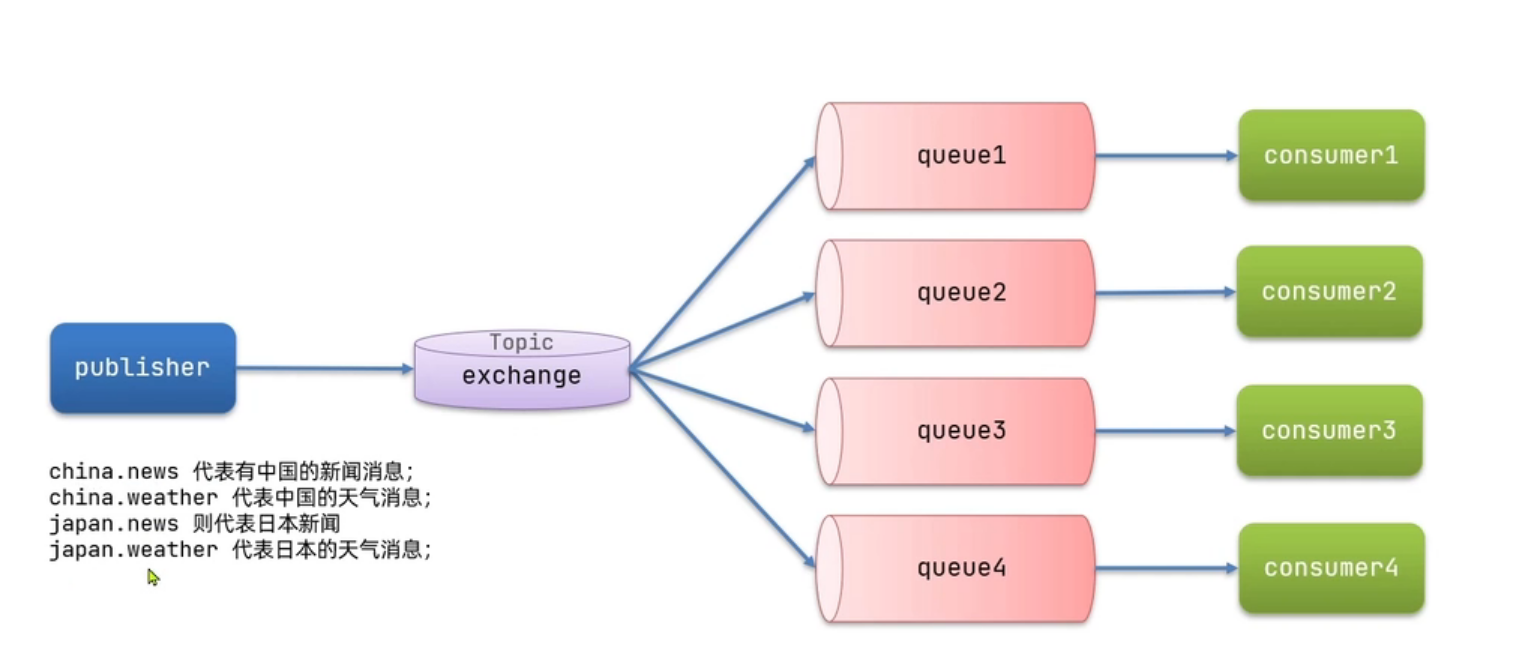
七、发布订阅模式之广播模式(Topic)
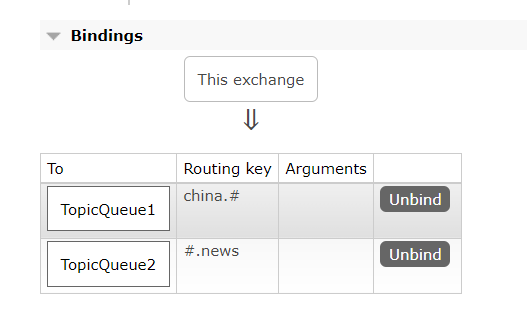
Queue与Exchange指定BindingKey可以使用通配符:
#:代指0个或多个单词
*:代指一个单词
比如:
bindingkey: china.# ->中国的所有消息
bindingkey: #.weather ->所以国家的天气
1、声明
@RabbitListener(bindings = @QueueBinding(
        value = @Queue(name = "TopicQueue1"),
        exchange = @Exchange(name = "TopicExchange",type = ExchangeTypes.TOPIC),
        key = {"china.#"}
    ))
public void listenTopicQueue1(String msg){
    System.out.println("listenTopicQueue1接收到的消息:"+msg);
}

@RabbitListener(bindings = @QueueBinding(
    value = @Queue(name = "TopicQueue2"),
    exchange = @Exchange(name = "TopicExchange",type = ExchangeTypes.TOPIC),
    key = {"#.news"}
))
public void listenTopicQueue2(String msg){
    System.out.println("listenTopicQueue2接收到的消息:"+msg);
}
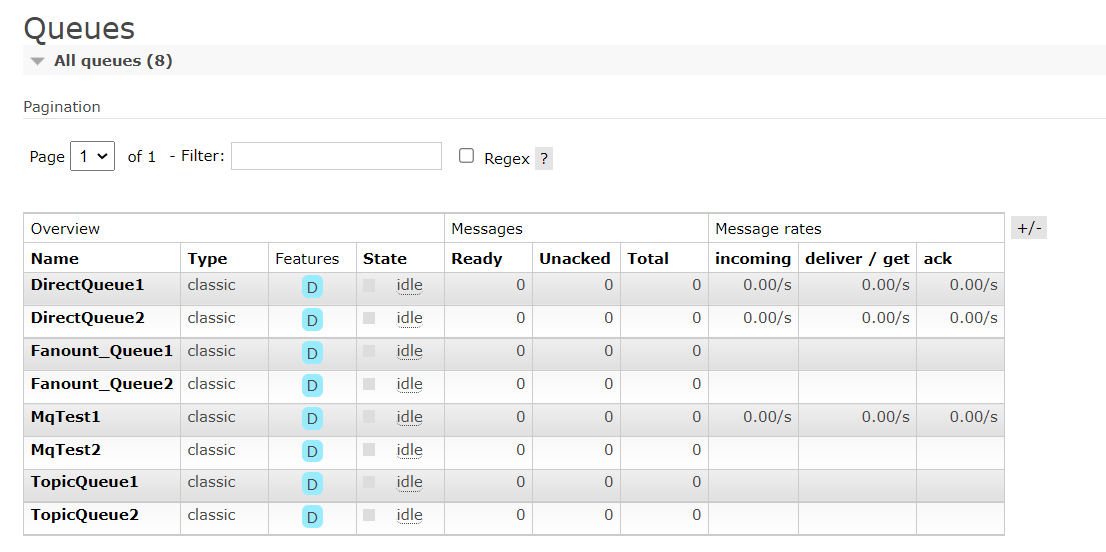
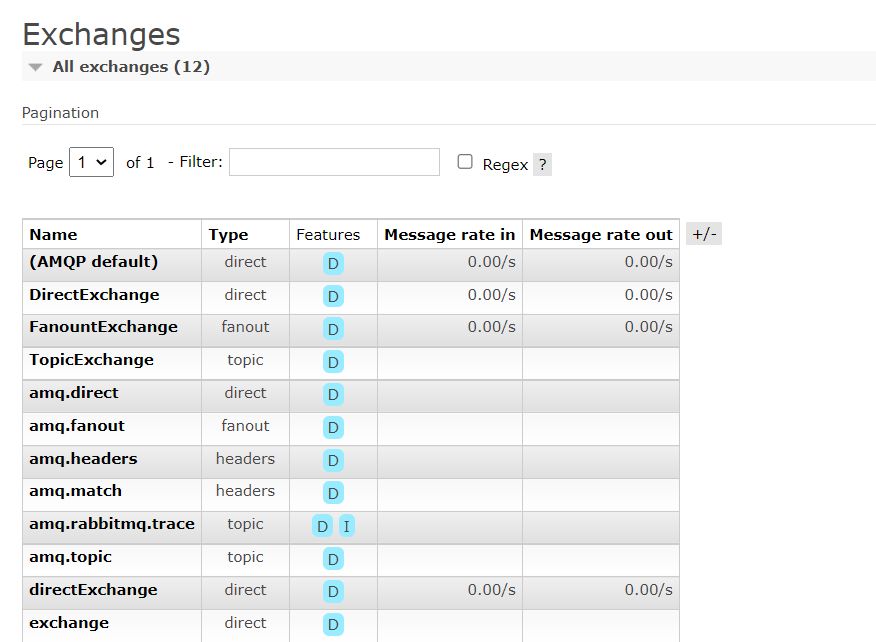
队列
交换机(第四个)
绑定关系
2、发送消息(测试1)
package com.rabbitmqdemo;

import org.junit.jupiter.api.Test;
import org.springframework.amqp.rabbit.core.RabbitTemplate;
import org.springframework.beans.factory.annotation.Autowired;
import org.springframework.boot.test.context.SpringBootTest;

@SpringBootTest
class RabbitMQDemoPublishApplicationTests {
    @Autowired
    private RabbitTemplate rabbitTemplate;

    @Test
    void contextLoads2() {
        String exchange="TopicExchange";
        String message="HelloWorld";
        for (int i=0;i<10;i++){
            rabbitTemplate.convertAndSend(exchange,"china.news",message);
        }
    }

}
接收消息
TopicQueue2接收到的消息:HelloWorld
TopicQueue1接收到的消息:HelloWorld
TopicQueue2接收到的消息:HelloWorld
TopicQueue1接收到的消息:HelloWorld
TopicQueue2接收到的消息:HelloWorld
TopicQueue1接收到的消息:HelloWorld
TopicQueue2接收到的消息:HelloWorld
TopicQueue1接收到的消息:HelloWorld
TopicQueue2接收到的消息:HelloWorld
TopicQueue1接收到的消息:HelloWorld
TopicQueue2接收到的消息:HelloWorld
TopicQueue1接收到的消息:HelloWorld
TopicQueue2接收到的消息:HelloWorld
TopicQueue1接收到的消息:HelloWorld
TopicQueue2接收到的消息:HelloWorld
TopicQueue1接收到的消息:HelloWorld
TopicQueue2接收到的消息:HelloWorld
TopicQueue1接收到的消息:HelloWorld
TopicQueue1接收到的消息:HelloWorld
TopicQueue2接收到的消息:HelloWorld
3、发送消息(测试2)
发送消息
package com.rabbitmqdemo;

import org.junit.jupiter.api.Test;
import org.springframework.amqp.rabbit.core.RabbitTemplate;
import org.springframework.beans.factory.annotation.Autowired;
import org.springframework.boot.test.context.SpringBootTest;

@SpringBootTest
class RabbitMQDemoPublishApplicationTests {
    @Autowired
    private RabbitTemplate rabbitTemplate;

    @Test
    void contextLoads2() {
        String exchange="TopicExchange";
        String message="HelloWorld";
        for (int i=0;i<10;i++){
            rabbitTemplate.convertAndSend(exchange,"china.weather",message);
        }
    }

}
接收消息
TopicQueue1接收到的消息:HelloWorld
TopicQueue1接收到的消息:HelloWorld
TopicQueue1接收到的消息:HelloWorld
TopicQueue1接收到的消息:HelloWorld
TopicQueue1接收到的消息:HelloWorld
TopicQueue1接收到的消息:HelloWorld
TopicQueue1接收到的消息:HelloWorld
TopicQueue1接收到的消息:HelloWorld
TopicQueue1接收到的消息:HelloWorld
TopicQueue1接收到的消息:HelloWorld

![[软件工程导论(第六版)]第3章 需求分析(课后习题详解)](https://img-blog.csdnimg.cn/4c778e1d5cb54e648742e2fea5fe8afc.png)


