Spring 系列文章目录
文章目录
- Spring 系列文章目录
- 前言
- 一、介绍
- 二、项目搭建
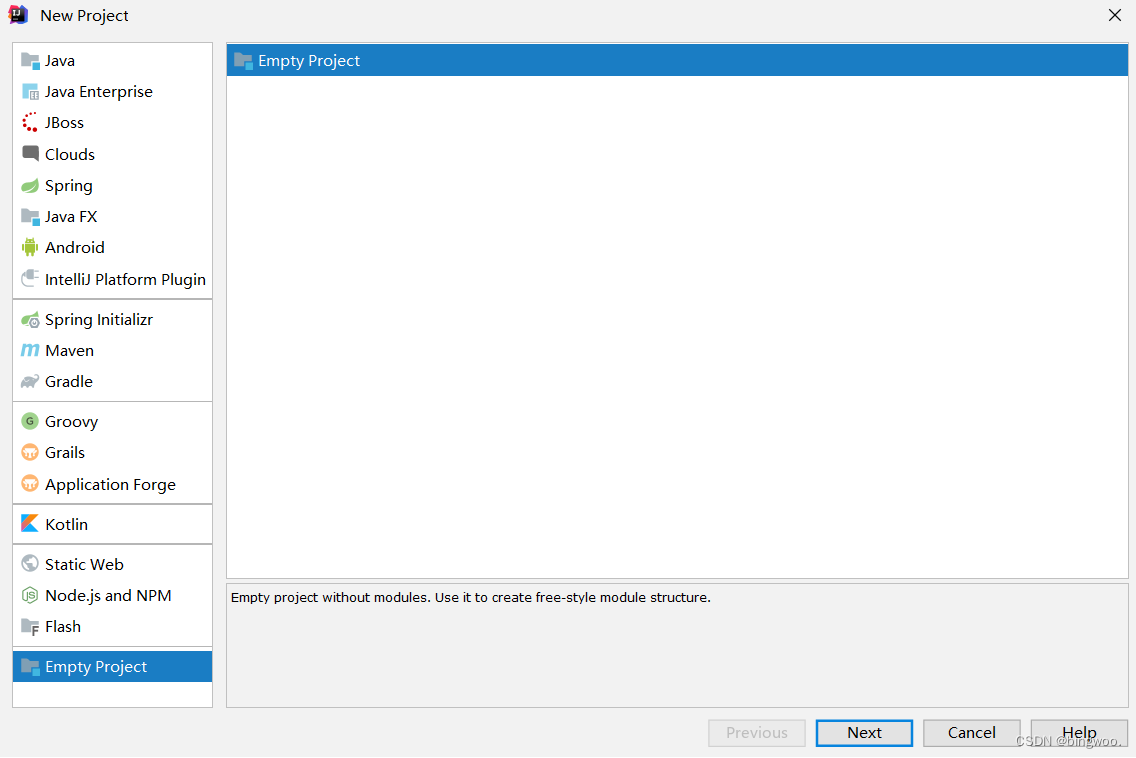
- 1.创建空项目
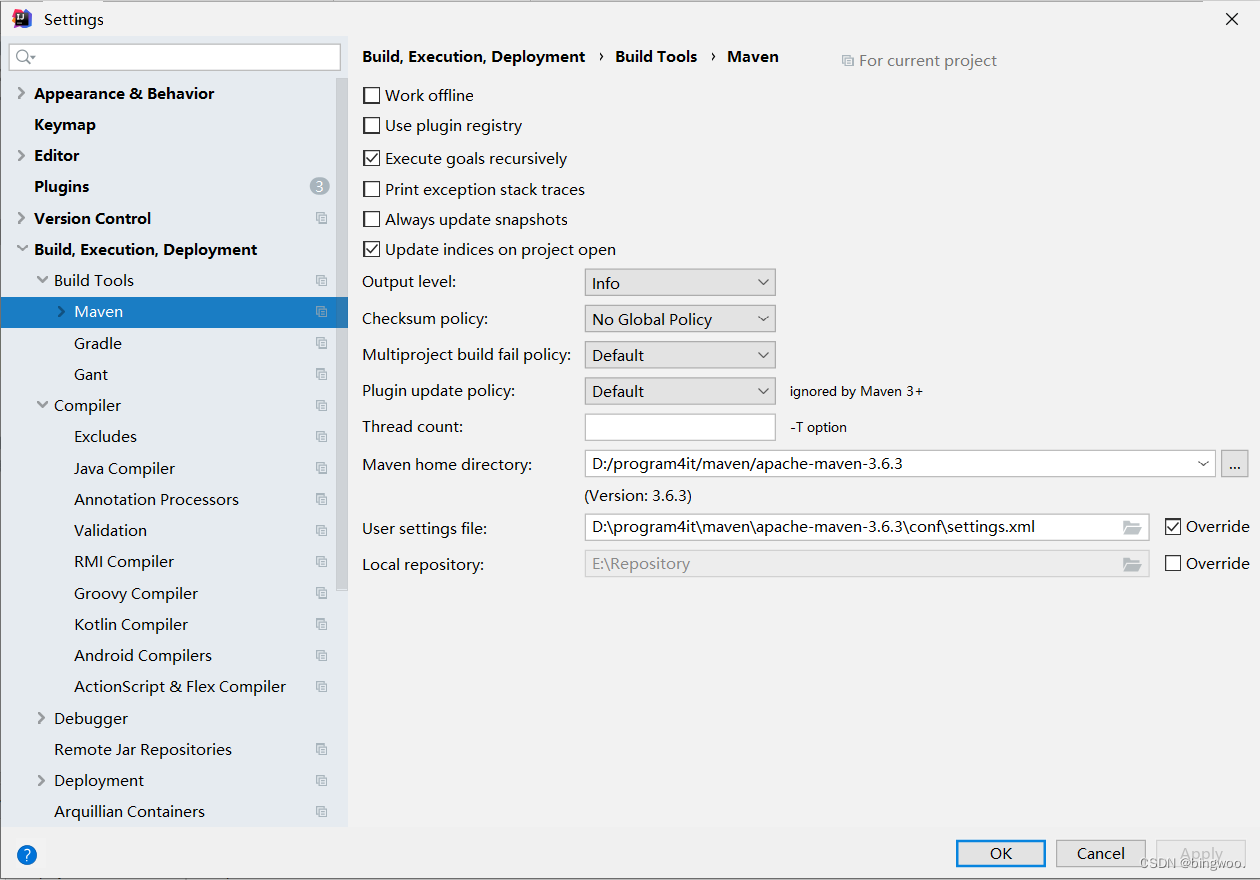
- 2.设置maven和lombok
- 3.创建maven web module
- 4. 配置Tomcat启动运行项目(选择local本地)
- 5. 导入jar依赖包
- 6.在web.xml中配置DispatcherServlet
- 7. 加入SpringMVC的配置文件
- 1. 在resources下添加 springmvc.xml
- 2. 添加log4j2.xml
- 8. 编写controller层处理器
- 9.编写视图层
- 三、MVC执行流程
- 1. 程序执行流程图
- 2. 网络请求执行流程图
- 四、常见注解
- 1. @RequestMapping
- 2.@RequestParam
- 3. @PathVariable
- 4. @RequestHeader(了解)
- 5. @CookieValue(了解)
- 五、相应体
- 1. 单元方法返回值为void
- 2. 转发和重定向ServletAPI 实现
- 3. 使用forward关键字完成响应
- 4. 使用redirect关键字完成响应
- 5. 使用View视图转发和重定向
- 6. 使用ModelAndView转发重定向
- 7. ResponseBody 响应 json 数据
- 8. @RestController
- 六、作用域
- 1. PageContext对象
- 2. request对象
- 3. session对象
- 4. application(ServletContext)对象
- 七、上传下载
- 1. 上传
- 2. 下载
- 八、拦截器
- 1. 拦截器使用
- 2. 拦截器和过滤器的区别
- 3. 定义一个拦截器
- 4. 拦截器内容详解
- 1. preHandle方法
- 2. postHandle方法
- 3. afterCompletion方法
- 4. 多个拦截器执行顺序
- 九、异常处理
- 1. 异常简介
- 2. 异常处理具体实现
- 1. 使用@ExceptionHandler注解处理异常
- 2. 使用:@ControllerAdvice+@ExceptionHandler
- 3. 使用:SimpleMappingExceptionResolver
- 4. 自定义的HandlerExceptionResolver
- 十、其他注解
- 1.@PostMapping
- 2. @GetMapping
- 3. @RestController
- 4. @JsonFormat
- 5. @RequestBody
- 6. @CrossOrigin
- 总结
前言
Spring MVC属于SpringFrameWork的后续产品,已经融合在Spring Web Flow里面。Spring 框架提供了构建 Web 应用程序的全功能 MVC 模块。使用 Spring 可插入的 MVC 架构,从而在使用Spring进行WEB开发时,可以选择使用Spring的Spring MVC框架或集成其他MVC开发框架,如Struts1(现在一般不用),Struts 2(一般老项目使用)等等。
一、介绍
- SpringMVC是spring为展现层提供的基于MVC设计理念的优秀WEB框架,是目前最主流的MVC框架之一
- SpringMVC通过一套注解,可以让普通的JAVA类成为contrllor控制器,无需继承Servlet,实现了控制层和Servlet之间的解耦
- SpringMVC支持Rest风格的URL写法
- SpringMVC采用了松耦合,可热插的主键结构,比其他的框架更具扩展性和灵活性
M   model      模型层   DAO封装        >>> Mybatis
V   view       视图层   html css js jsp
C   controller 控制层   Servlet封装    >>> springMVC
二、项目搭建
1.创建空项目
2.设置maven和lombok
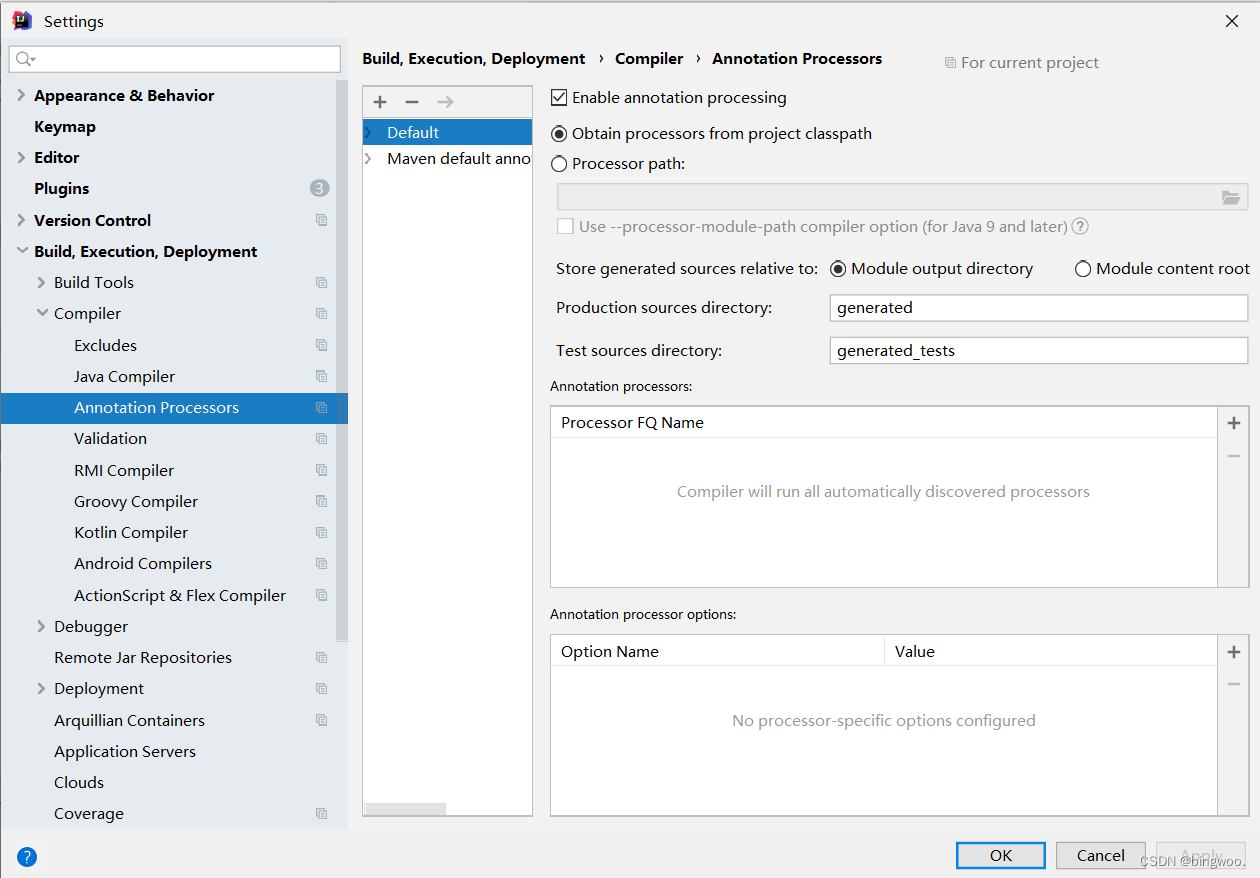
3.创建maven web module
- 注意选择骨架为maven-archetype-webapp

4. 配置Tomcat启动运行项目(选择local本地)

5. 导入jar依赖包
<dependencies>
 <!--spring核心容器包-->
  <dependency>
    <groupId>org.springframework</groupId>
    <artifactId>spring-context</artifactId>
    <version>5.3.5</version>
  </dependency>
  <!--spring切面包-->
  <dependency>
    <groupId>org.springframework</groupId>
    <artifactId>spring-aspects</artifactId>
    <version>5.3.5</version>
  </dependency>
  <!--aop联盟包-->
  <dependency>
    <groupId>aopalliance</groupId>
    <artifactId>aopalliance</artifactId>
    <version>1.0</version>
  </dependency>
  <!--德鲁伊连接池-->
  <dependency>
    <groupId>com.alibaba</groupId>
    <artifactId>druid</artifactId>
    <version>1.1.10</version>
  </dependency>
  <!--mysql驱动-->
  <dependency>
    <groupId>mysql</groupId>
    <artifactId>mysql-connector-java</artifactId>
    <version>8.0.22</version>
  </dependency>
  <!--springJDBC包-->
  <dependency>
    <groupId>org.springframework</groupId>
    <artifactId>spring-jdbc</artifactId>
    <version>5.3.5</version>
  </dependency>
  <!--spring事务控制包-->
  <dependency>
    <groupId>org.springframework</groupId>
    <artifactId>spring-tx</artifactId>
    <version>5.3.5</version>
  </dependency>
  <!--spring orm 映射依赖-->
  <dependency>
    <groupId>org.springframework</groupId>
    <artifactId>spring-orm</artifactId>
    <version>5.3.5</version>
  </dependency>
  <!--Apache Commons日志包-->
  <dependency>
    <groupId>commons-logging</groupId>
    <artifactId>commons-logging</artifactId>
    <version>1.2</version>
  </dependency>
  <!--log4j2 日志-->
  <dependency>
    <groupId>org.apache.logging.log4j</groupId>
    <artifactId>log4j-slf4j-impl</artifactId>
    <version>2.14.0</version>
    <scope>test</scope>
  </dependency>
  <!--lombok -->
  <dependency>
    <groupId>org.projectlombok</groupId>
    <artifactId>lombok</artifactId>
    <version>1.18.12</version>
    <scope>provided</scope>
  </dependency>
  <!--spring test测试支持包-->
  <dependency>
    <groupId>org.springframework</groupId>
    <artifactId>spring-test</artifactId>
    <version>5.3.5</version>
    <scope>test</scope>
  </dependency>
  <!--junit5单元测试-->
  <dependency>
    <groupId>org.junit.jupiter</groupId>
    <artifactId>junit-jupiter-api</artifactId>
    <version>5.7.0</version>
    <scope>test</scope>
  </dependency>
  <!--springMVC支持包-->
  <dependency>
    <groupId>org.springframework</groupId>
    <artifactId>spring-web</artifactId>
    <version>5.3.5</version>
  </dependency>
  <dependency>
    <groupId>org.springframework</groupId>
    <artifactId>spring-webmvc</artifactId>
    <version>5.3.5</version>
  </dependency>
  <!--jsp 和Servlet  可选-->
  <dependency>
    <groupId>javax.servlet</groupId>
    <artifactId>javax.servlet-api</artifactId>
    <version>4.0.1</version>
    <scope>provided</scope>
  </dependency>
  <dependency>
    <groupId>javax.servlet.jsp</groupId>
    <artifactId>javax.servlet.jsp-api</artifactId>
    <version>2.3.3</version>
    <scope>provided</scope>
  </dependency>
</dependencies>
6.在web.xml中配置DispatcherServlet
<?xml version="1.0" encoding="UTF-8"?>
<web-app xmlns="http://xmlns.jcp.org/xml/ns/javaee"
         xmlns:xsi="http://www.w3.org/2001/XMLSchema-instance"
         xsi:schemaLocation="http://xmlns.jcp.org/xml/ns/javaee http://xmlns.jcp.org/xml/ns/javaee/web-app_4_0.xsd"
         version="4.0">
    <!--配置DispatcherServlet -->
    <servlet>
        <servlet-name>dispatcherServlet</servlet-name>
        <servlet-class>org.springframework.web.servlet.DispatcherServlet</servlet-class>
        <!--配置初始化参数,读取springMVC的核心配置文件的位置和名称-->
        <!--
        当然,不使用initparam,springMVC会到一个默认路径下读取默认名称的.xml配置文件
        默认路径为/WEB-INF/
        默认配置文件名为:<servlet-name>-servlet.xml
        我们暂时不推荐这种方式
        -->
       <!-- <init-param>
            <param-name>contextConfigLocation</param-name>
            <param-value>classpath:dispatcherServlet-servlet.xml</param-value>
        </init-param>-->
        <load-on-startup>1</load-on-startup>
    </servlet>
    <!--配置dispatcherServlet的映射路径为 / 包含全部的servlet,  JSP除外-->
    <servlet-mapping>
        <servlet-name>dispatcherServlet</servlet-name>
        <url-pattern>/</url-pattern>
    </servlet-mapping>
</web-app>
7. 加入SpringMVC的配置文件
1. 在resources下添加 springmvc.xml
<?xml version="1.0" encoding="UTF-8"?>
<beans xmlns="http://www.springframework.org/schema/beans"
       xmlns:xsi="http://www.w3.org/2001/XMLSchema-instance"
       xmlns:p="http://www.springframework.org/schema/p"
       xmlns:c="http://www.springframework.org/schema/c"
       xmlns:util="http://www.springframework.org/schema/util"
       xmlns:context="http://www.springframework.org/schema/context"
       xmlns:aop="http://www.springframework.org/schema/aop"
       xmlns:tx="http://www.springframework.org/schema/tx"
       xsi:schemaLocation="
       http://www.springframework.org/schema/beans
       http://www.springframework.org/schema/beans/spring-beans.xsd
       http://www.springframework.org/schema/util
       http://www.springframework.org/schema/util/spring-util.xsd
       http://www.springframework.org/schema/context
       http://www.springframework.org/schema/context/spring-context.xsd
       http://www.springframework.org/schema/aop
       http://www.springframework.org/schema/aop/spring-aop.xsd
       http://www.springframework.org/schema/tx
       http://www.springframework.org/schema/tx/spring-tx.xsd
">
    <!--配置spring包扫描-->
    <context:component-scan base-package="com.msb"></context:component-scan>
    <!--配置视图解析器
    <bean class="org.springframework.web.servlet.view.InternalResourceViewResolver">
        <property name="prefix" value="/WEB-INF/view/"  ></property>
        <property name="suffix" value=".jsp"  ></property>
    </bean>-->
</beans>
2. 添加log4j2.xml
<?xml version="1.0" encoding="UTF-8"?>
<Configuration status="DEBUG">
    <Appenders>
        <Console name="Console" target="SYSTEM_OUT">
            <PatternLayout pattern="%d{YYYY-MM-dd HH:mm:ss} [%t] %-5p %c{1}:%L - %msg%n" />
        </Console>
    </Appenders>
    <Loggers>
        <Root level="debug">
            <AppenderRef ref="Console" />
        </Root>
    </Loggers>
</Configuration>
8. 编写controller层处理器
package com.msb.controller;
import org.springframework.stereotype.Controller;
import org.springframework.web.bind.annotation.RequestMapping;
import org.springframework.web.bind.annotation.ResponseBody;
/**
 * @Author: bingwoo
 */
@Controller
@RequestMapping("/msb")
public class FirstController  {
    @RequestMapping("/firstController.do")
    public String firstController(){
        System.out.println("this is firstController");
        return "/first.jsp";
    }
}
9.编写视图层
<%--
  Created by IntelliJ IDEA.
  User: Mark70
  Date: 2021/4/12
  Time: 12:28
  To change this template use File | Settings | File Templates.
--%>
<%@ page contentType="text/html;charset=UTF-8" language="java" %>
<html>
<head>
    <title>Title</title>
</head>
<body>
  this is first Jsp
</body>
</html>
三、MVC执行流程
1. 程序执行流程图
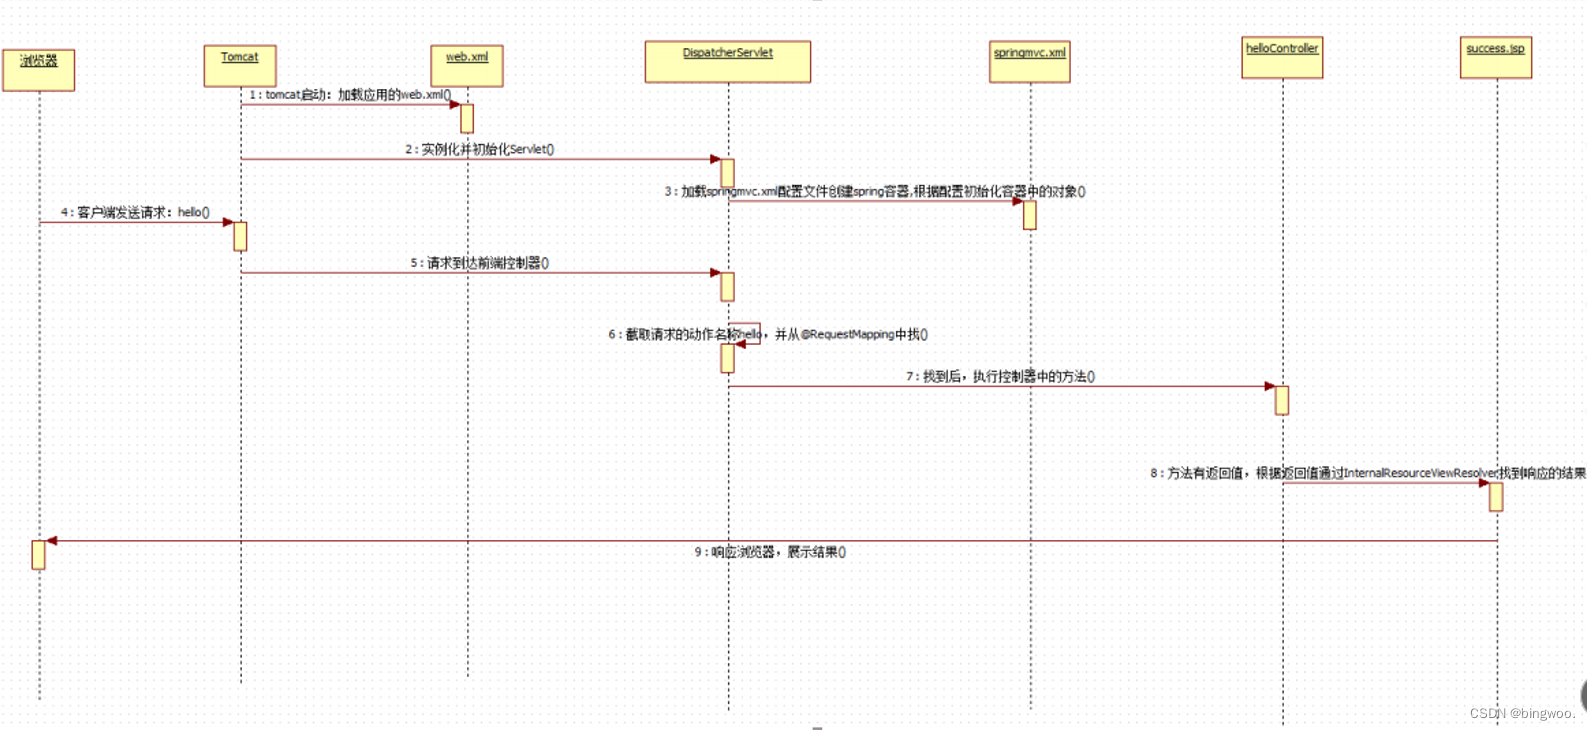
2. 网络请求执行流程图
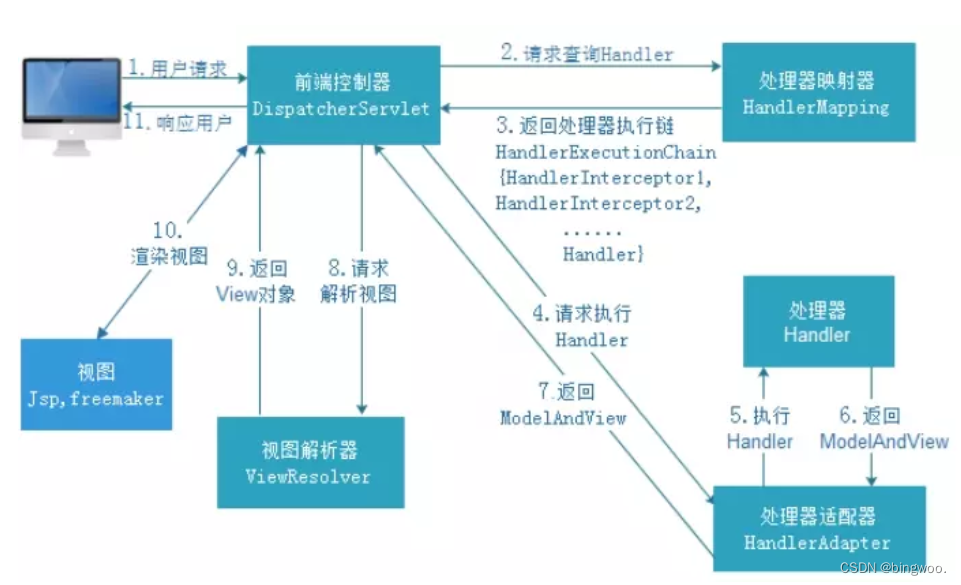
-
DispatcherServlet:前端控制器
用户请求到达前端控制器,它就相当于 mvc 模式中的 c,dispatcherServlet 是整个流程控制的中心,由 它调用其它组件处理用户的请求,dispatcherServlet 的存在降低了组件之间的耦合性。 -
HandlerMapping:处理器映射器
HandlerMapping 负责根据用户请求找到 Handler 即处理器,SpringMVC 提供了不同的映射器实现不同的 映射方式,例如:配置文件方式,实现接口方式,注解方式等。 -
Handler:处理器 (自己定义的Controller处理单元)
它就是我们开发中要编写的具体业务控制器。由 DispatcherServlet 把用户请求转发到 Handler。由 Handler 对具体的用户请求进行处理。 -
HandlAdapter:处理器适配器
通过 HandlerAdapter 对处理器进行执行,这是适配器模式的应用,通过扩展适配器可以对更多类型的处理器进行执行 -
View Resolver:视图解析器
View Resolver 负责将处理结果生成 View 视图,View Resolver 首先根据逻辑视图名解析成物理视图名 即具体的页面地址,再生成 View 视图对象,最后对 View 进行渲染将处理结果通过页面展示给用户。 -
View:视图
SpringMVC 框架提供了很多的 View 视图类型的支持,包括:jstlView、freemarkerView、pdfView等。我们最常用的视图就是 jsp。 一般情况下需要通过页面标签或页面模版技术将模型数据通过页面展示给用户,需要由程序员根据业务需求开 发具体的页面。 -
mvc:annotation-driven说明
在 SpringMVC 的各个组件中,处理器映射器、处理器适配器、视图解析器称为 SpringMVC 的三大组件。
使 用 mvc:annotation-driven 自动加载 RequestMappingHandlerMapping (处理映射器) 和 RequestMappingHandlerAdapter ( 处 理 适 配 器 ) , 可 用 在 SpringMVC.xml 配 置 文 件 中 使 用 mvc:annotation-driven替代注解处理器和适配器的配置。protected void doDispatch(HttpServletRequest request, HttpServletResponse response) throws Exception { HttpServletRequest processedRequest = request; HandlerExecutionChain mappedHandler = null; boolean multipartRequestParsed = false; WebAsyncManager asyncManager = WebAsyncUtils.getAsyncManager(request); try { try { ModelAndView mv = null; Object dispatchException = null; try { processedRequest = this.checkMultipart(request); multipartRequestParsed = processedRequest != request; mappedHandler = this.getHandler(processedRequest); if (mappedHandler == null) { this.noHandlerFound(processedRequest, response); return; } HandlerAdapter ha = this.getHandlerAdapter(mappedHandler.getHandler()); String method = request.getMethod(); boolean isGet = "GET".equals(method); if (isGet || "HEAD".equals(method)) { long lastModified = ha.getLastModified(request, mappedHandler.getHandler()); if ((new ServletWebRequest(request, response)).checkNotModified(lastModified) && isGet) { return; } } if (!mappedHandler.applyPreHandle(processedRequest, response)) { return; } mv = ha.handle(processedRequest, response, mappedHandler.getHandler()); if (asyncManager.isConcurrentHandlingStarted()) { return; } this.applyDefaultViewName(processedRequest, mv); mappedHandler.applyPostHandle(processedRequest, response, mv); } catch (Exception var20) { dispatchException = var20; } catch (Throwable var21) { dispatchException = new NestedServletException("Handler dispatch failed", var21); } this.processDispatchResult(processedRequest, response, mappedHandler, mv, (Exception)dispatchException); } catch (Exception var22) { this.triggerAfterCompletion(processedRequest, response, mappedHandler, var22); } catch (Throwable var23) { this.triggerAfterCompletion(processedRequest, response, mappedHandler, new NestedServletException("Handler processing failed", var23)); } } finally { if (asyncManager.isConcurrentHandlingStarted()) { if (mappedHandler != null) { mappedHandler.applyAfterConcurrentHandlingStarted(processedRequest, response); } } else if (multipartRequestParsed) { this.cleanupMultipart(processedRequest); } } } private void applyDefaultViewName(HttpServletRequest request, @Nullable ModelAndView mv) throws Exception { if (mv != null && !mv.hasView()) { String defaultViewName = this.getDefaultViewName(request); if (defaultViewName != null) { mv.setViewName(defaultViewName); } } } -
HandlerMapping的实现类的作用
实现类RequestMappingHandlerMapping,它会处理@RequestMapping 注解,并将其注册到请求映射表中。 -
HandlerAdapter的实现类的作用
实现类RequestMappingHandlerAdapter,则是处理请求的适配器,确定调用哪个类的哪个方法,并且构造方法参数,返回值。 -
当配置了mvc:annotation-driven/后,Spring就知道了我们启用注解驱动。然后Spring通过context:component-scan/标签的配置,会自动为我们将扫描到的@Component,@Controller,@Service,@Repository等注解标记的组件注册到工厂中,来处理我们的请求,这个时候接收返回json数据、参数验证、统一异常等功能。
<?xml version="1.0" encoding="UTF-8"?>
<beans xmlns="http://www.springframework.org/schema/beans"
       xmlns:xsi="http://www.w3.org/2001/XMLSchema-instance"
       xmlns:p="http://www.springframework.org/schema/p"
       xmlns:c="http://www.springframework.org/schema/c"
       xmlns:util="http://www.springframework.org/schema/util"
       xmlns:context="http://www.springframework.org/schema/context"
       xmlns:aop="http://www.springframework.org/schema/aop"
       xmlns:tx="http://www.springframework.org/schema/tx"
       xmlns:mvc="http://www.springframework.org/schema/mvc"
       xsi:schemaLocation="
       http://www.springframework.org/schema/beans
       http://www.springframework.org/schema/beans/spring-beans.xsd
       http://www.springframework.org/schema/util
       http://www.springframework.org/schema/util/spring-util.xsd
       http://www.springframework.org/schema/context
       http://www.springframework.org/schema/context/spring-context.xsd
       http://www.springframework.org/schema/aop
       http://www.springframework.org/schema/aop/spring-aop.xsd
       http://www.springframework.org/schema/tx
       http://www.springframework.org/schema/tx/spring-tx.xsd
       http://www.springframework.org/schema/mvc
       http://www.springframework.org/schema/mvc/spring-mvc.xsd
">
    <!--配置spring包扫描-->
    <context:component-scan base-package="com.msb"></context:component-scan>

    <!--配置处理器映射器-->
    <!-- <bean class="org.springframework.web.servlet.mvc.method.annotation.RequestMappingHandlerMapping"></bean>-->
    <!--配置处理器适配器-->
    <!-- <bean class="org.springframework.web.servlet.mvc.method.annotation.RequestMappingHandlerAdapter"></bean>-->
    <!--一个注解替换上面的两个配置-->
    <!--<mvc:annotation-driven>会自动注册RequestMappingHandlerMapping与RequestMappingHandlerAdapter两个Bean-->
    <mvc:annotation-driven/>
    <!--配置视图解析器-->
    <bean class="org.springframework.web.servlet.view.InternalResourceViewResolver">
        <property name="prefix" value="/WEB-INF/view/"  ></property>
        <property name="suffix" value=".jsp"  ></property>
    </bean>
    <!--静态资源放行-->
    <!--<mvc:resources mapping="/js/**" location="/js/"></mvc:resources>
    <mvc:resources mapping="/img/**" location="/img/"></mvc:resources>
    <mvc:resources mapping="/css/**" location="/css/"></mvc:resources>-->
    <mvc:resources mapping="/static/**" location="/static/"></mvc:resources>
</beans>
四、常见注解
1. @RequestMapping
- 作用:用于建立请求 URL 和处理请求方法之间的对应关系
- 出现位置:类上: 请求 URL 的第一级访问目录。此处不写的话,就相当于应用的根目录。写的话需要以/开头方法上: 请求 URL 的第二级访问目录
- 属性:value:用于指定请求的 URL。它和 path 属性的作用是一样的。method:用于指定请求的方式。
- params(了解):用于指定限制请求参数的条件。它支持简单的表达式。要求请求参数的 key 和 value 必须和 配置的一模一样。
- headers(了解):用于指定限制请求消息头的条件。
2.@RequestParam
-
作用:把请求中指定名称的参数给控制器中的形参赋值。
-
属性:value:请求参数中的名称。required:请求参数中是否必须提供此参数。默认值:true。表示必须提供,如果不提供将报错。
@RequestMapping("/getRequestParam")
public String getRequestParam(@RequestParam("name")String uname, @RequestParam(value="age",required=false)Integer age){
    System.out.println(username+","+age);
    return "success";
}
3. @PathVariable
-
Restful的简介 :REST(英文:Representational State Transfer,简称 REST)restful是一种软件架构风格、设计风格,而不是标准,只是提供了一组设计原则和约束条件。它主要用于客户端和服务器交互类的软件。基于这个风格设计的软件可以更简洁,更有层次,更易于实现缓存等机制。
-
restful 的优点:它结构清晰、符合标准、易于理解、扩展方便,所以正得到越来越多网站的采用。
-
作用:用于绑定 url 中的占位符。例如:请求 url 中 /delete/{id},这个{id}就是 url 占位符。 url 支持占位符是 spring3.0 之后加入的。是 springmvc 支持 rest 风格 URL 的一个重要标志。
-
属性:value:用于指定 url 中占位符名称。required:是否必须提供占位符。
@Controller
public class PathController {
    @RequestMapping("/testPathVariable/{id}/{username}")
    public String testPathVariable(@PathVariable("id") Integer id, @PathVariable("username") String username){
        System.out.println("id:"+id);
        System.out.println("username:"+username);
        System.out.println("testPathVariable1");
        return "success";
    }
}
4. @RequestHeader(了解)
- 作用:用于获取请求消息头。
- 属性:value:提供消息头名称,required:是否必须有此消息头。
@RequestMapping("/getRequestHeader")
public String getRequestHeader(@RequestHeader(value="Accept", required=false)String requestHeader){
    System.out.println(requestHeader);
    return "success";
}
5. @CookieValue(了解)
-
作用:用于把指定 cookie 名称的值传入控制器方法参数。
-
属性:value:指定 cookie 的名称。required:是否必须有此 cookie
@RequestMapping("/getCookie")
public String getCookie(@CookieValue(value="JSESSIONID",required=false) String cookieValue){
    System.out.println(cookieValue);
    return "success";
}
五、相应体
- 在学习了SpringMVC的配置流程以及单元方法请求数据的获取后,我们可以使用SpringMVC搭建一个项目,在单元方法中使用SpringMVC提供的方式来获取请求信息,然后根据功能需求,声明请求处理的逻辑代码,进行请求的处理。当请求处理完成后,我们需要将此次请求的处理结果响应给浏览器,以前我们是自己在Servlet中使用response对象来完成响应的,那么在SpringMVC中如何响应请求的处理结果呢?
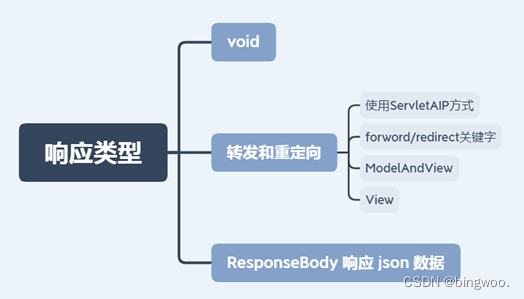
1. 单元方法返回值为void
-
在SpringMVC中如果对于当前的控制单元,没有写对应的返回值,这个时候SpringMVC就会找和自己控制单元名称一致的页面展示,如果没有配置视图解析器的前缀和后缀是没有产生404,需要注意控制单元仍然可以进。
@RequestMapping("/testReturnVoid")
public void testReturnVoid() throws Exception {
    System.out.println("AccountController 的 testForward 方法执行了。。。。");
}
2. 转发和重定向ServletAPI 实现
- 单元方法的返回值类型设置void。因为使用response对象在单元方法中直接对此次请求进行了响应,不再通过DispatcherServlet了,既然已经响应了,就不需要再给DispatcherServlet返回值了。在单元方法上声明HttpServletResponse形参,来接收此次请求的response对象。
@RequestMapping("demo1")
public void testDemo1(HttpServletRequest request, HttpServletResponse response) throws Exception {
    // 请求转发
    request.getRequestDispatcher("/forward.jsp").forward(request,response);
    // 响应重定向
    response.sendRedirect(request.getContextPath()+"/redirect.jsp");
}
3. 使用forward关键字完成响应
- 使用通过单元方法的返回值来告诉DispatcherServlet请求转发指定的资源,如果是请求转发,forward关键字可以省略不写的
/*
* 返回字符串告诉DispatcherServlet跳转的路径
* 在路径之前放上一个forward: 关键字,就是请求转发
* 如果路径前的关键字是forward,那么可以省略不写
* */
@RequestMapping("demo2")
public String testDemo2() throws Exception {
    //return "forward:/forwardPage.jsp";
    return "/forwardPage.jsp";
}
4. 使用redirect关键字完成响应
-
使用通过单元方法的返回值来告诉DispatcherServlet重定向指定的资源,注意这个redirect关键字不可以省去
/*
* 返回字符串告诉DispatcherServlet跳转的路径
* 在路径之前放上一个redirect: 关键字,就是重定向
* 如果路径前的关键字是redirect,那么不可以省略
* /表示当前项目下.这里不需要项目的上下文路径
* */
@RequestMapping("demo3")
public String testDemo3() throws Exception {
   return "redirect:/redirectPage.jsp";
}
5. 使用View视图转发和重定向
-
RedirectView中所做的操作,最终的实现是在renderMergedOutputModel中完成实现的,简单来说RedirectView实现了链接的重定向,并且将数据保存到FlashMap中,这样在跳转后的链接中可以获取一些数据.
@RequestMapping("demo4")
public View testDemo4(HttpServletRequest req)   {
    View  view =null;
    // 请求转发
    //view =new InternalResourceView("/forwardPage.jsp");
    // 重定向
    view=new RedirectView(req.getContextPath()+"/redirectPage.jsp");
    return view;
}
6. 使用ModelAndView转发重定向
-
ModelAndView中的Model代表模型,View代表视图,这个名字就很好地解释了该类的作用。业务处理器调用模型层处理完用户请求后,把结果数据存储在该类的model属性中,把要返回的视图信息存储在该类的view属性中,然后让该ModelAndView返回该Spring MVC框架。
@RequestMapping("demo5")
public ModelAndView testDemo5(HttpServletRequest req)   {
    ModelAndView mv=new ModelAndView();
    // 请求转发
    //mv.setViewName("forward:/forwardPage.jsp");
    //mv.setView(new InternalResourceView("/forwardPage.jsp"));
    // 重定向
    //mv.setViewName("redirect:/redirectPage.jsp");
    mv.setView(new RedirectView(req.getContextPath()+"/redirectPage.jsp"));
    return mv;
}
7. ResponseBody 响应 json 数据
- 当浏览器发起一个ajax请求给服务器,服务器调用对应的单元方法处理ajax请求。而ajax的请求在被处理完成后,其处理结果需要直接响应。而目前我们在单元方 法中响应ajax请求,使用的是response对象,需要我们自己将要响应的数据转换 为json字符串响应,比较麻烦,而我们一直希望在单元方法中无论是否是ajax请求,都使用return语句来完成资源的响应,怎么办?
- 既然我们希望使用单元方法的返回值来响应ajax请求的处理结果,而目前DispatcherServlet的底层会将单元方法的返回值按照请求转发或者重定向来处理,所以就需要我们告诉DispatcherServlet,单元方法的返回值不要按照请求转发或者重定向处理,而是按照直接响应处理,将单元方法的返回值直接响应给浏览器。
-
第一步 导入jackson的jar
<dependency> <groupId>com.fasterxml.jackson.core</groupId> <artifactId>jackson-databind</artifactId> <version>2.12.1</version> </dependency> -
第二步 声明单元方法处理ajax请求,并在单元方法上新增注解@ResponseBody
/*
 * @ResponseBody
 * 1方法的返回值不在作为界面跳转依据,而已直接作为返回的数据
 * 2将方法的返回的数据自动使用ObjectMapper转换为JSON
 */
@ResponseBody
@RequestMapping("testAjax")
public Pet testAjax(Person p) throws JsonProcessingException {
    System.out.println(p);
    Pet pet =new Pet("Tom","cat");
    return pet;
}
- 注意:把我们要响应的数据直接return即可,返回值类型为要return的数据类型。
- 第三步: 在ajax的回调函数中,无需再次使用eval函数将响应数据转换为json对象直接使用即可。
<head>
    <meta charset="UTF-8">
    <title>Title</title>
    <script src="js/jquery.min.js"></script>
    <script>
        $(function(){
            $("#btn").click(function(){
                $.get("testAjax",{pname:"晓明",page:"10"},function(data){
                    console.log(data.petName)
                    console.log(data.petType)
                })
            })
        })
    </script>
</head>
<body>
<input id="btn" type="button" value="testJSON">
</body>
</html>
8. @RestController
-
相当于@Controller+@ResponseBody两个注解的结合,返回json数据不需要在方法前面加@ResponseBody注解了,但使用@RestController这个注解,就不能返回jsp,html页面,视图解析器无法解析jsp,html页面
@RestController
public class AjaxController {
    /*
     * @ResponseBody
     * 1方法的返回值不在作为界面跳转依据,而已直接作为返回的数据
     * 2将方法的返回的数据自动使用ObjectMapper转换为JSON
     */
    @RequestMapping("testAjax")
    public Pet testAjax(Person p) throws JsonProcessingException {
        System.out.println(p);
        Pet pet =new Pet("Tom","cat");
        return pet;
    }
}
六、作用域
1. PageContext对象
- 作用域范围:当前jsp页面内有效
2. request对象
- 作用域范围:一次请求内。
- 作用: 解决了一次请求内的资源的数据共享问题
3. session对象
- 作用域范围:一次会话内有效。
- 说明:浏览器不关闭,并且后台的session不失效,在任意请求中都可以获取到同一个session对象。
- 作用:解决了一个用户不同请求的数据共享问题。
4. application(ServletContext)对象
- 作用域范围:整个项目内有效。
- 特点:一个项目只有一个,在服务器启动的时候即完成初始化创建无论如何获取都是同一个项目。
- 作用:解决了不同用户的数据共享问题。
七、上传下载
1. 上传
- 随着我们互联网的发展,我们的用户从直接访问网站获取信息。变为希望将自己本地的资源发送给服务器,让服务器提供给其他人使用或者查看。还有部分的用户希望可以将本地的资源上传服务器存储起来,然后再其他的电脑中可以通过访问网站来获取上传的资源,这样用户就可以打破空间的局限性,再任何时候只要有网有电脑就可以对自己的资源进行操作,比如:云存储,云编辑
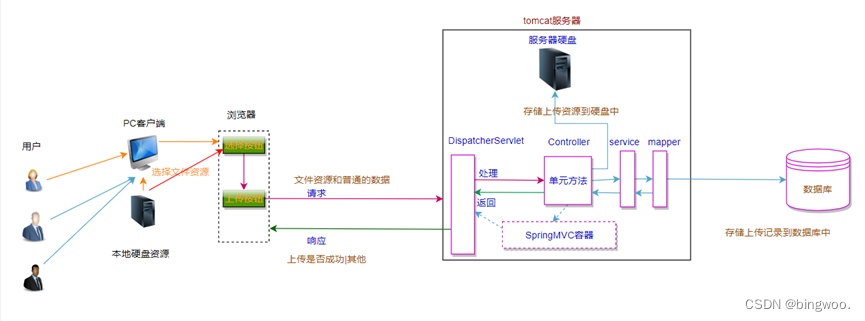
-
如何在页面中显示一个按钮:用户可以点击该按钮后选择本地要上传的文件在页面中使用input标签,type值设置为”file”即可
-
确定上传请求的发送方式:上传成功后的响应结果在当前页面显示,使用ajax请求来完成资源的发送
-
上传请求的请求数据及其数据格式:
- 请求数据: 上传的文件本身普通数据:用户名,Id,密码等,建议上传功能中不携带除上传资源以外的数据。
- 数据格式:传统的请求中,请求数据是以键值对的格式来发送给后台服务器的,但是在上传请求中,没有任何一个键可以描述上次的数据,因为数据本身是非常大的键就相当于一个变量,我们使用一个变量存储一个10g的电影显然是不可能的。在上传请求中,将请求数据以二进制流的方式发送给服务器。
-
在ajax中如何发送二进制流数据给服务器
① 创建FormData的对象,将请求数据存储到该对象中发送
② 将processData属性的值设置为false,告诉浏览器发送对象请求数据
③ 将contentType属性的值设置为false,设置请求数据的类型为二进制类型。
④ 正常发送ajax即可 -
上传成功后后台服务器应该响应什么结果给浏览器
并且浏览器如何处理后台服务器处理完成后,响应一个json对象给浏览器,示例格式如下:{ state:true,msg:“服务器繁忙”,url:”上传成功的资源的请求地址”} -
文件上传依赖的jar
<!--文件上传依赖--> <dependency> <groupId>commons-fileupload</groupId> <artifactId>commons-fileupload</artifactId> <version>1.4</version> </dependency> <dependency> <groupId>commons-io</groupId> <artifactId>commons-io</artifactId> <version>2.8.0</version> </dependency> -
配置文件上传组件
<!--文件上传解析组件 id必须为multipartResolver springmvc默认使用该id找该组件 --> <bean id="multipartResolver" class="org.springframework.web.multipart.commons.CommonsMultipartResolver"></bean> -
部分代码
- 控制器Controller
package com.msb.controller; import com.sun.jersey.api.client.Client; import com.sun.jersey.api.client.WebResource; import org.springframework.stereotype.Controller; import org.springframework.web.bind.annotation.RequestMapping; import org.springframework.web.bind.annotation.ResponseBody; import org.springframework.web.multipart.MultipartFile; import javax.servlet.http.HttpServletRequest; import java.io.File; import java.io.IOException; import java.util.HashMap; import java.util.Map; import java.util.UUID; /** * @Author: bingwoo */ @Controller public class FileUploadController { // 文件存储位置 private final static String FILESERVER="http://192.168.8.109:8090/upload/"; @ResponseBody @RequestMapping("fileUpload.do") public Map<String,String> fileUpload(MultipartFile headPhoto, HttpServletRequest req) throws IOException { Map<String,String> map=new HashMap<>(); // 获取文件名 String originalFilename = headPhoto.getOriginalFilename(); // 避免文件名冲突,使用UUID替换文件名 String uuid = UUID.randomUUID().toString(); // 获取拓展名 String extendsName = originalFilename.substring(originalFilename.lastIndexOf(".")); // 新的文件名 String newFileName=uuid.concat(extendsName); // 创建 sun公司提供的jersey包中的client对象 Client client=Client.create(); WebResource resource = client.resource(FILESERVER + newFileName); // 文件保存到另一个服务器上去了 resource.put(String.class, headPhoto.getBytes()); // 上传成功之后,把文件的名字和文件的类型返回给浏览器 map.put("message", "上传成功"); map.put("newFileName",newFileName); map.put("filetype", headPhoto.getContentType()); return map; } }- 页面代码view
<%@ page contentType="text/html;charset=UTF-8" language="java" %>
<html>
<head>
    <title>Title</title>
    <style>
        .progress {
            width: 200px;
            height: 10px;
            border: 1px solid #ccc;
            border-radius: 10px;
            margin: 10px 0px;
            overflow: hidden;
        }
        /* 初始状态设置进度条宽度为0px */
        .progress > div {
            width: 0px;
            height: 100%;
            background-color: yellowgreen;
            transition: all .3s ease;
        }
    </style>
    <script type="text/javascript" src="js/jquery.min.js"></script>
    <script type="text/javascript">
        $(function(){
            $("#uploadFile").click(function(){
                // 获取要上传的文件
                var photoFile =$("#photo")[0].files[0]
                if(photoFile==undefined){
                    alert("您还未选中文件")
                    return;
                }
                // 将文件装入FormData对象
                var formData =new FormData();
                formData.append("headPhoto",photoFile)
                // ajax向后台发送文件
                $.ajax({
                    type:"post",
                    data:formData,
                    url:"fileUpload.do",
                    processData:false,
                    contentType:false,
                    success:function(result){
                        // 接收后台响应的信息
                        alert(result.message)
                        // 图片回显
                        $("#headImg").attr("src","http://192.168.8.109:8090/upload/"+result.newFileName);
                        // 将文件类型和文件名放入form表单
                        $("#photoInput").val(result.newFileName)
                        $("#filetypeInput").val(result.filetype)
                    },
                    xhr: function() {
                        var xhr = new XMLHttpRequest();
                        //使用XMLHttpRequest.upload监听上传过程,注册progress事件,打印回调函数中的event事件
                        xhr.upload.addEventListener('progress', function (e) {
                            //loaded代表上传了多少
                            //total代表总数为多少
                            var progressRate = (e.loaded / e.total) * 100 + '%';
                            //通过设置进度条的宽度达到效果
                            $('.progress > div').css('width', progressRate);
                        })
                        return xhr;
                    }
                })
            })
        })
    </script>
</head>
<body>
    <form action="addPlayer" method="get">
        <p>账号<input type="text" name="name"></p>
        <p>密码<input type="text" name="password"></p>
        <p>昵称<input type="text" name="nickname"></p>
        <p>头像:
            <br/>
            <input id="photo" type="file">
            <%--图片回显--%>
            <br/>
            <img id="headImg" style="width: 200px;height: 200px" alt="你还未上传图片">
            <br/>
           <%--进度条--%>
            <div class="progress">
                <div></div>
            </div>
            <a id="uploadFile" href="javascript:void(0)">立即上传</a>
            <%--使用隐藏的输入框存储文件名称和文件类型--%>
            <input id="photoInput"  type="hidden" name="photo" >
            <input id="filetypeInput"  type="hidden" name="filetype">
        </p>
        <p><input type="submit" value="注册"></p>
    </form>
</body>
</html>
- 控制器Controller
2. 下载
- 下载的基本流程
文件的上传是将用户本地的资源发送到服务器,让服务器存储到其硬盘中的过程。而下载和上传正好是相反的过程。下载是用户发起请求,请求要下载的资源。服务器根据请求,将其硬盘中的文件资源发送给浏览器的过程。 - 下载的请求数据
用户通过浏览器发起下载请求,服务器在接收到请求后,根据当前请求的用户信息,去数据库中获取当前用户要下载的资源的文件路径,然后服务器再去其硬盘中读取对应的文件,将文件响应给浏览器,基于此过程,下载请求的请求数据为:简单的下载:文件的路径直接作为一个字段存储在用户信息表中用户的ID。
[1] 下载的后台实现- 创建单元方法处理下载请求
- 根据请求获取要下载的资源的流对象
- 读取文件并将资源响应给浏览器
- 下载的示例代码
-
页面 html
<%@ page contentType="text/html;charset=UTF-8" language="java" %> <html> <head> <title>Title</title> <style> #playerTable{ width: 50%; border: 3px solid cadetblue; margin: 0px auto; text-align: center; } #playerTable th,td{ border: 1px solid gray; } #playerTable img{ width: 100px; height: 100px; } </style> <script type="text/javascript" src="js/jquery.min.js"></script> <script> $(function(){ $.ajax({ type:"get", url:"getAllPlayer", success:function(players){ $.each(players,function(i,e){ $("#playerTable").append('<tr>\n' + ' <td>'+e.id+'</td>\n' + ' <td>'+e.name+'</td>\n' + ' <td>'+e.password+'</td>\n' + ' <td>'+e.nickname+'</td>\n' + ' <td>\n' + ' <img src="http://192.168.8.109:8090/upload/'+e.photo+'" alt="" src>\n' + ' </td>\n' + ' <td>\n' + ' <a href="fileDownload.do?photo='+e.photo+'&filetype='+e.filetype+'">下载</a>\n' + ' </td>\n' + ' </tr>') }) } }) }) </script> </head> <body> <table id="playerTable" cellspacing="0xp" cellpadding="0px"> <tr> <th>编号</th> <th>用户名</th> <th>密码</th> <th>昵称</th> <th>头像</th> <th>操作</th> </tr> </table> </body> </html> -
控制器controller
@RequestMapping("fileDownload.do")
public void fileDownLoad(String photo, String filetype, HttpServletResponse response) throws IOException {
    // 设置响应头
    // 告诉浏览器要将数据保存到磁盘上,不在浏览器上直接解析
    response.setHeader("Content-Disposition", "attachment;filename="+photo);
    // 告诉浏览下载的文件类型
    response.setContentType(filetype);
    // 获取一个文件的输入流
    InputStream inputStream = new URL(FILESERVER + photo).openStream();
    // 获取一个指向浏览器的输出流
    ServletOutputStream outputStream = response.getOutputStream();
    // 向浏览器响应文件即可
    IOUtils.copy(inputStream, outputStream);
}
八、拦截器
- 在之前学习JAVAWEB 的时候,我们学习了过滤器的知识。过滤器的作用是保护请求的服务器资源,在请求资源被执行之前,如果请求地址符合拦截范围,则会先执行过滤器。过滤器的执行时机,是在Servlet之前执行的。但是在使用了SpringMVC后,Servlet只有一个了,也就是DisptcherServlet。那么,如果我们仍然使用过滤器来完成请求的拦截,因为过滤器是在Servlet之前执行的,就会造成,过滤器会拦截DispatcherServlet所有的请求。那么,如果我们有部分请求不想被拦截,怎么办?
1. 拦截器使用
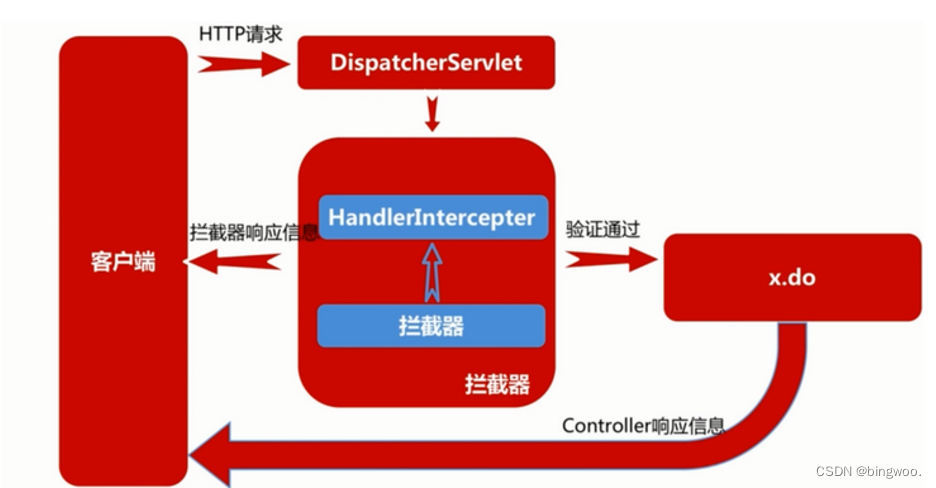
- Spring MVC中的拦截器(Interceptor)类似于Servlet中的过滤器(Filter),它主要用于拦截用户请求并作相应的处理。例如通过拦截器可以进行权限验证、记录请求信息的日志、判断用户是否登录等。
- 要使用Spring MVC中的拦截器,就需要对拦截器类进行定义和配置。通常拦截器类可以通过两种方式来定义。
- 通过实现HandlerInterceptor接口,或继承HandlerInterceptor接口的实现类(如HandlerInterceptorAdapter)来定义。
- 通过实现WebRequestInterceptor接口,或继承WebRequestInterceptor接口的实现类来定义。
2. 拦截器和过滤器的区别
- 拦截器SpringMVC的,而过滤器是servlet的。
- 拦截器不依赖与servlet容器,由spring容器初始化,过滤器依赖与servlet容器,由servlet容器初始化。
- 拦截器只能对action请求起作用,而过滤器则可以对几乎所有的请求起作用。
- 拦截器可以访问action上下文、值栈里的对象,而过滤器不能访问。
- 在action的生命周期中,拦截器可以多次被调用,而过滤器只能在容器初始化时被调用一次。
- 拦截器可以获取IOC容器中的各个bean,而过滤器就不太方便,这点很重要,在拦截器里注入一个service,可以调用业务逻辑。
3. 定义一个拦截器
-
示例代码
import org.springframework.web.servlet.HandlerInterceptor; import org.springframework.web.servlet.ModelAndView; import javax.servlet.http.HttpServletRequest; import javax.servlet.http.HttpServletResponse; /** * @Author: bingwoo */ public class MyInterceptor implements HandlerInterceptor { @Override public boolean preHandle(HttpServletRequest request, HttpServletResponse response, Object handler) throws Exception { /*在请求到达我们定义的handler之前工作的*/ System.out.println("MyInterceptor preHandle"); /*返回的是true,代表放行,可以继续到达handler*/ return true; } @Override public void postHandle(HttpServletRequest request, HttpServletResponse response, Object handler, ModelAndView modelAndView) throws Exception { System.out.println("MyInterceptor postHandle"); /*handler 处理单元返回ModelAndView 时候进行 拦截*/ } @Override public void afterCompletion(HttpServletRequest request, HttpServletResponse response, Object handler, Exception ex) throws Exception { /* 页面渲染完毕,但是还没有给浏览器响应数据的时候 */ System.out.println("MyInterceptor afterCompletion"); } } -
springmvc.xml中注册拦截器
<!--注册拦截器-->
<mvc:interceptors>
    <mvc:interceptor>
        <mvc:mapping path="/login.action"/>
        <bean id="myInterceptor" class="com.msb.interceptor.MyInterceptor"></bean>
    </mvc:interceptor>
</mvc:interceptors>
4. 拦截器内容详解
1. preHandle方法
- 执行时机:再进入控制单元方法之前执行
- 如何调用:按拦截器定义顺序调用
- 具体作用:如果程序员决定该拦截器对请求进行拦截处理后还要调用其他的拦截器,或者是业务处理器去 进行处理,则返回 true。 如果程序员决定不需要再调用其他的组件去处理请求,则返回 false。
- 参数详解:HttpServletRequest arg0,拦截的请求的request对象,HttpServletResponse arg1, 拦截的请求的response对象,Object arg2 封存了单元方法对象的HandleMethod对象。
/**
 *
 * @param request  请求对象
 * @param response 响应对象
 * @param handler  目标要调用的Handler
 * @return 返回true放行,返回false拦截
 * @throws Exception
 */
public boolean preHandle(HttpServletRequest request, HttpServletResponse response, Object handler) throws Exception {
    /*在请求到达我们定义的handler之前工作的*/
    System.out.println("MyInterceptor preHandle");
    /*设置请求和响应的乱码 */
    /* request.setCharacterEncoding("UTF-8");
    response.setCharacterEncoding("UTF-8");*/
    // 判断是否登录
    /*User user =(User) request.getSession().getAttribute("user");
    if(null == user)
        response.sendRedirect("index.jsp");
    return false;*/
    // 用户权限控制
    return true;
}
2. postHandle方法
- 执行时机:在进行数据处理和做出响应之间进行这个方法的调用
- 如何调用:在拦截器链内所有拦截器返成功调用
- 具体作用:在业务处理器处理完请求后,但是 DispatcherServlet 向客户端返回响应前被调用,在该方法中对用户请求 request域数据进行处理。
- 参数详解:
- HttpServletRequest arg0, 拦截的请求的request对象
- HttpServletResponse arg1, 拦截的请求的response对象
- Object arg2, 封存了单元方法对象的HandleMethod对象
- ModelAndView arg3 封存了单元方法的返回值资源路径和请求转到的Map数据
/**
 *
 * @param request
 * @param response
 * @param handler
 * @param modelAndView  controller响应的结果,视图和数据
 * @throws Exception
 */
public void postHandle(HttpServletRequest request, HttpServletResponse response, Object handler, ModelAndView modelAndView) throws Exception {
    System.out.println("MyInterceptor postHandle");
    /*控制数据*/
    /*Map<String, Object> map = modelAndView.getModel();
    String msg = (String)map.get("msg");
    String newMsg = msg.replaceAll("脏话", "**");
    map.put("msg", newMsg);*/
    /*控制视图*/
    /*modelAndView.setViewName("/testDemo1.jsp");*/
}
3. afterCompletion方法
-
执行时机:在进行页面渲染的时候执行
-
如何调用:按拦截器定义逆序调用
-
具体作用:在DispatcherServlet 完全处理完请求后被调用,可以在该方法中进行一些资源清理的操作。
-
参数详解:
- HttpServletRequest arg0, 拦截的请求的request对象
- HttpServletResponsearg1, 拦截的请求的response对象
- Object arg2, 封存了单元方法对象的HandleMethod对象
- Exception arg3 存储了责任链的异常信息
/**
 * 无论controller是否出现异常,都会执行的方法
 *  一般来说都做一些资源释放工作
 * @param request
 * @param response
 * @param handler
 * @param ex
 * @throws Exception
 */
public void afterCompletion(HttpServletRequest request, HttpServletResponse response, Object handler, Exception ex) throws Exception {
    /*页面渲染完毕,但是还没有给浏览器响应数据的时候*/
    System.out.println("MyInterceptor afterCompletion");
    System.out.println(ex);
}
4. 多个拦截器执行顺序
-
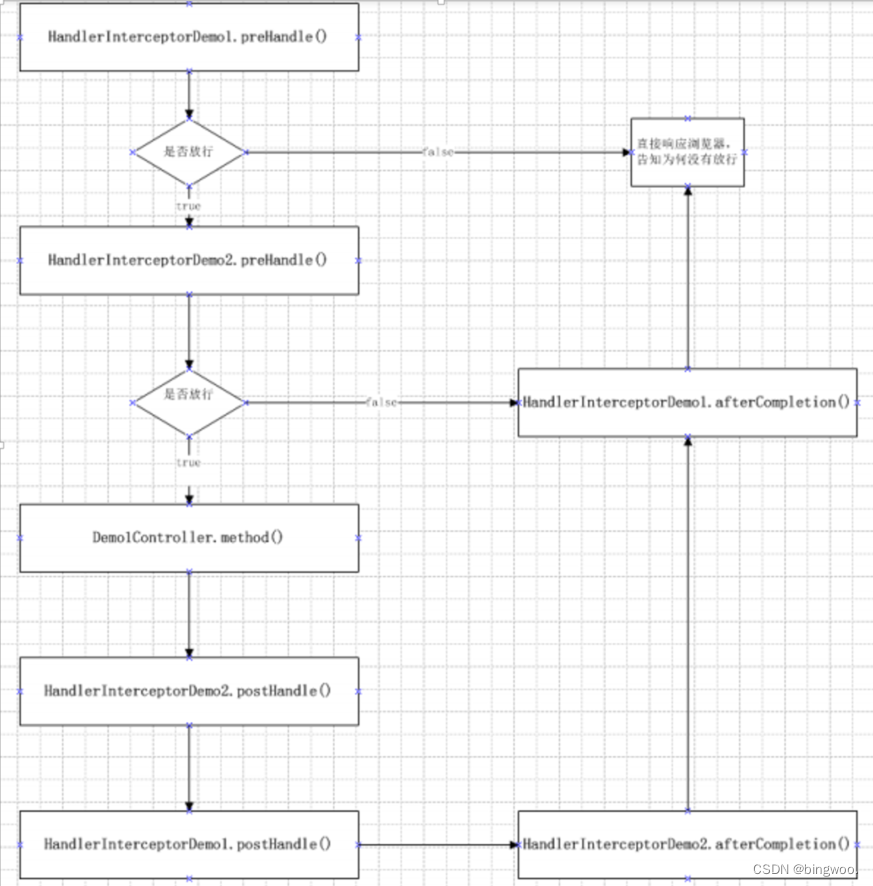
多个拦截器同时存在时,执行的顺序由配置顺序决定. 先配置谁, 谁就先执行.多个拦截器可以理解为拦截器栈, 先进后出(后进先出), 如图所示:
<!--注册拦截器-->
<mvc:interceptors>
    <mvc:interceptor>
        <mvc:mapping path="/login.action"/>
        <bean id="myInterceptor1" class="com.msb.interceptor.MyInterceptor"></bean>
    </mvc:interceptor>
    <mvc:interceptor>
        <mvc:mapping path="/login.action"/>
        <bean id="myInterceptor2" class="com.msb.interceptor.MyInterceptor2"></bean>
    </mvc:interceptor>
</mvc:interceptors>
MyInterceptor preHandle MyInterceptor2 preHandle login.action MyInterceptor2 postHandle MyInterceptor postHandle success.jsp MyInterceptor2 afterCompletion MyInterceptor afterCompletion
九、异常处理
1. 异常简介
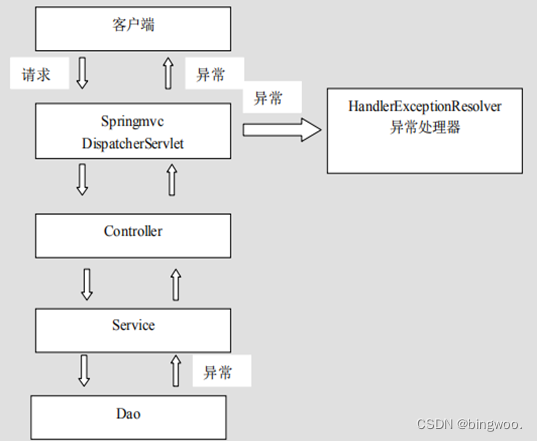
- 系统中异常包括两类:预期异常(检查型异常)和运行时异常 RuntimeException,前者通过捕获异常从而获取异常信息, 后者主要通过规范代码开发、测试通过手段减少运行时异常的发生。
- 系统的 dao、service、controller 出现都通过 throws Exception 向上抛出,最后由 springmvc 前端控制器交由异常处理器进行异常处理,如下图
2. 异常处理具体实现
1. 使用@ExceptionHandler注解处理异常
-
缺点:只能处理当前Controller中的异常。
@Controller
public class ControllerDemo1 {
    @RequestMapping("test1.action")
    public String test1(){
        int i = 1/0;
        return "success.jsp";
    }
    @RequestMapping("test2.action")
    public String test2(){
        String s =null;
        System.out.println(s.length());
        return "success.jsp";
    }
    @ExceptionHandler(value ={ArithmeticException.class,NullPointerException.class} )
    public ModelAndView handelException(){
        ModelAndView mv =new ModelAndView();
        mv.setViewName("error1.jsp");
        return mv;
    }
}
2. 使用:@ControllerAdvice+@ExceptionHandler
-
此处优先级低于局部异常处理器
package com.msb.exceptionhandler; import org.springframework.web.bind.annotation.ControllerAdvice; import org.springframework.web.bind.annotation.ExceptionHandler; import org.springframework.web.servlet.ModelAndView; /** * @Author: bingwoo */ @ControllerAdvice public class GloableExceptionHandler1 { @ExceptionHandler(value ={ArithmeticException.class,NullPointerException.class} ) public ModelAndView handelException(){ ModelAndView mv =new ModelAndView(); mv.setViewName("error1.jsp"); return mv; } } -
配置包扫描
<context:component-scan base-package="com.msb.service,com.msb.exceptionhandler"/>
3. 使用:SimpleMappingExceptionResolver
-
xml配置
<!--自定义异常解析器--> <bean id="exceptionResolver" class="org.springframework.web.servlet.handler.SimpleMappingExceptionResolver"> <property name="exceptionMappings"> <props> <prop key="java.lang.ArithmeticException">redirect:/error.jsp</prop> <prop key="java.lang.NullPointerException">redirect:/error2.jsp</prop> </props> </property> </bean> -
配置类配置
/**
 * 全局异常
 */
  @Configuration
  public class GloableException2 {
    @Bean
    public SimpleMappingExceptionResolver getSimpleMappingExceptionResolver(){
        SimpleMappingExceptionResolver resolver = new SimpleMappingExceptionResolver();
        Properties prop = new Properties();
        prop.put("java.lang.NullPointerException","error1.jsp");
        prop.put("java.lang.ArithmeticException","error2.jsp");
        resolver.setExceptionMappings(prop);
        return resolver;
    }
}
4. 自定义的HandlerExceptionResolver
- 代码示例:
/**
 * 全局异常
 * HandlerExceptionResolve
 */
 @Configuration
 public class GloableException3 implements HandlerExceptionResolver {
   @Override
   public ModelAndView resolveException(HttpServletRequest httpServletRequest, HttpServletResponse httpServletResponse, Object o, Exception e) {
       ModelAndView mv = new ModelAndView();
       if(e instanceof NullPointerException){
               mv.setViewName("error1");
       }
       if(e instanceof ArithmeticException){
               mv.setViewName("error2");
       }
       mv.addObject("msg",e);
       return mv;
   }
 }
十、其他注解
1.@PostMapping
- 作用:指定当前发送请求的方式只可以是post请求
- 属性:和@RequestMapping中属性一致
- 代码实现:
@PostMapping("/userControllerA")
public   String   userControllerA(){
   return "forward:/success.jsp";
}
2. @GetMapping
- 作用:指定当前发送请求的方式只可以是get请求
- 属性:和@RequestMapping中属性一致
- 代码实现:
@GetMapping("/userControllerA")
public   String   userControllerA(){
   return "forward:/success.jsp";
}
3. @RestController
- 作用: 书写到类上,代表该类中所有控制单元方法均是ajax响应 相当于@ResponseBody+@Controller
- 属性: 其中的属性和@Controller中一样
- 代码实现:
@RestController
public class UserController {
}
4. @JsonFormat
- 作用:处理响应json 数据的处理。
- 属性:pattern :指定响应时间日期的格式。Timezone:指定响应的时区,否则会有8个小时的时间差。
- 代码实现:
@DateTimeFormat(pattern = "yyyy-MM-dd")
@JsonFormat(pattern = "yyyy-MM-dd" ,timezone="GMT+8")
private Date   birth;
5. @RequestBody
- 作用:用于获取请求体json格式的字符串内容。直接使用得到是 key=value&key=value…结构的数据,get 请求方式不适用。
- 属性:required:是否必须有请求体。默认值是:true。当取值为 true 时,get 请求方式会报错。如果取值 为 false,get 请求得到是null。
- 代码实现:
$(function () { var jsonObj ={name:"zs",pwd:"123"}; var str =JSON.stringify(jsonObj); $.ajax({ type:"post", url:"testController", /*data:'{"name":"zs","password":"123"}',*/ data:str, contentType:"application/json", }) })@RequestMapping("/useRequestBody") public String useRequestBody(@RequestBody(required=false) User user){ System.out.println(body); return "msb"; }
6. @CrossOrigin
- 什么是跨域:出于浏览器的同源策略限制。同源策略(SameOriginPolicy)是一种约定,它是浏览器最核心也最基本的安全功能,如果缺少了同源策略,则浏览器的正常功能可能都会受到影响。可以说Web是构建在同源策略基础之上的,浏览器只是针对同源策略的一种实现。同源策略会阻止一个域的javascript脚本和另外一个域的内容进行交互。所谓同源(即指在同一个域)就是两个页面具有相同的协议(protocol),主机(host)和端口号(port)
- http://127.0.0.1:8080/msb/index.jsp基础
- https://127.0.0.1:8080/msb/index.jsp 协议不一样
- http://192.168.24.11:8080/msb/index.jsp IP不一致
- http://127.0.0.1:8888/msb/index.jsp 端口不一致
- http://localhost:8080/msb/index.jsp IP不一致
- 作用:解决ajax请求之间的跨域问题
- 属性:origins : 允许可访问的域列表IP。maxAge:准备响应前的缓存持续的最大时间(以秒为单位)。
- 代码实现:
@CrossOrigin(origins = "http://domain2.com", maxAge = 3600)
@RestController
@RequestMapping("/account")
public class AccountController {
    @GetMapping("/{id}")
    public Account receive(@PathVariable Long id) { }
}
总结
以上是整理的Spring mvc 相关的注解及具体介绍,欢迎大家留言讨论。
