文章目录
- 一、设计集群图
- 二、准备五台虚拟机
- 2.1、下载安装文件
- 2.2、创建虚拟机
- 2.3、配置网络
- 2.4、修改主机名称
- 2.5、关闭防火墙
- 2.6、同步时间
- 2.7、设置/etc/hosts文件
- 2.8、设置免密登录
- 2.9、为后面可以主备替换安装psmisc
- 三、安装JDK
- 3.1、安装jdk
- 3.2、测试jdk是否安装成功
- 3.3、将配置文件和安装目录传输给其他主机
- 四、搭建zookeeper集群
- 3.1、安装zookeeper
- 3.2、将配置文件和安装目录传输给其他主机
- 3.3、修改其他主机的id
- 3.4、集群使用脚本
- 3.5、测试zookeeper是否安装成功
- 四、搭建hadoop集群
- 4.1、安装hadoop
- 4.2、core-site.xml
- 4.3、hadoop-env.sh
- 4.4、hdfs-site.xml
- 4.5、mapred-site.xml
- 4.6、yarn-site.xml
- 4.7、workers
- 4.8、/etc/profile
- 4.9、将配置文件和安装目录传输给其他主机
- 五、集群首次启动
- 六、测试集群是否成功
- 6.1、上传文件测试
- 6.2使用jar包运行测试
一、设计集群图

关于JournalNode:
一探究竟:Namenode、SecondaryNamenode、NamenodeHA关系
DFSZKFailoverController:
高可用时它负责监控NN的状态,并及时的把状态信息写入ZK。它通过一个独立线程周期性的调用NN上的一个特定接口来获取NN的健康状态。FC也有选择谁作为Active NN的权利,因为最多只有两个节点,目前选择策略还比较简单(先到先得,轮换)。
二、准备五台虚拟机
2.1、下载安装文件
链接:https://pan.baidu.com/s/19s19t-yDcxRuj0AnnDOSkQ
提取码:n7km
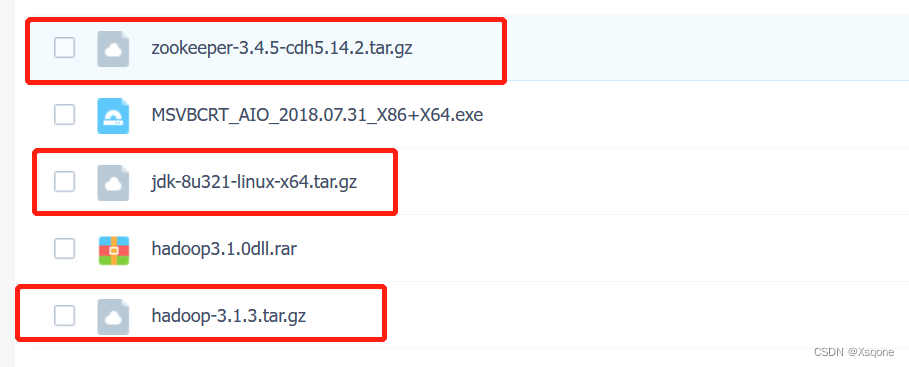
需要下方红框的三个文件
2.2、创建虚拟机
创建centos虚拟机
2.3、配置网络
配置网络
2.4、修改主机名称
例如我主机设置ip为192.168.136.31-35,将虚拟机名称修改为xsqone31-35
192.168.136.41:hostnamectl set-hostname xsqone31
192.168.136.42:hostnamectl set-hostname xsqone32
192.168.136.43:hostnamectl set-hostname xsqone33
192.168.136.44:hostnamectl set-hostname xsqone34
192.168.136.45:hostnamectl set-hostname xsqone35
使用bash命令可以即可生效。
2.5、关闭防火墙
5台机器都需要执行命令
[root@xsqone31 ~]# systemctl stop firewalld
[root@xsqone31 ~]# systemctl disable firewalld
2.6、同步时间
5台机器都需要执行命令
# 同步时间
	[root@xsqone31 ~]# yum install -y ntpdate
	[root@xsqone31 ~]# ntpdate time.windows.com
	[root@xsqone31 ~]# date
# 定时同步时间
	[root@xsqone31 ~]# crontab -e
	# 每5小时更新时间
	* */5 * * * /usr/sbin/ntpdate -u time.windows.com
	# 重新加载
	[root@xsqone31 ~]# service crond reload
	# 启动定时任务
	[root@xsqone31 ~]# service crond start
2.7、设置/etc/hosts文件
添加映射
192.168.136.31 xsqone31
192.168.136.32 xsqone32
192.168.136.33 xsqone33
192.168.136.34 xsqone34
192.168.136.35 xsqone35
2.8、设置免密登录
# 配置免密登录
ssh-keygen -t rsa -P ""
# 将本地公钥拷贝到要免密登录的目标机器
ssh-copy-id -i /root/.ssh/id_rsa.pub -p22 root@xsqone31
ssh-copy-id -i /root/.ssh/id_rsa.pub -p22 root@xsqone32
ssh-copy-id -i /root/.ssh/id_rsa.pub -p22 root@xsqone33
ssh-copy-id -i /root/.ssh/id_rsa.pub -p22 root@xsqone34
ssh-copy-id -i /root/.ssh/id_rsa.pub -p22 root@xsqone35
# 测试
ssh -p22 xsqone31
ssh -p22 xsqone32
ssh -p22 xsqone33
ssh -p22 xsqone34
ssh -p22 xsqone35
2.9、为后面可以主备替换安装psmisc
yum install psmisc -y
三、安装JDK
3.1、安装jdk
将压缩包放入/opt/install目录下
创建/opt/soft目录使用以下脚本即可安装JDK
注意:使用脚本需要赋可执行权限:chmod 777 文件名
#! /bin/bash
echo 'auto install JDK beginging ...'

#global var
jdk=true

if [ "$jdk" = true ];then
  echo 'jdk install set true'
  echo 'setup jdk 8'
  tar -zxf /opt/install/jdk-8u321-linux-x64.tar.gz -C /opt/soft
  mv /opt/soft/jdk1.8.0_321 /opt/soft/jdk180
#  echo '#jdk' >> /etc/profile
#  echo 'export JAVA_HOME=/opt/soft/jdk180' >> /etc/profile
#  echo 'export CLASS_PATH=.:$JAVA_HOME/lib/dt.jar:$JAVA_HOME/lib/tools.jar' >> /etc/profile
#  echo 'export PATH=$PATH:$JAVA_HOME/bin' >> /etc/profile
  sed -i '54a\export JAVA_HOME=/opt/soft/jdk180' /etc/profile
  sed -i '54a\export CLASS_PATH=.:$JAVA_HOME/lib/dt.jar:$JAVA_HOME/lib/tools.jar' /etc/profile
  sed -i '54a\export PATH=$PATH:$JAVA_HOME/bin' /etc/profile
  sed -i '54a\#jdk' /etc/profile
  source /etc/profile
  echo 'setup jdk 8 successful!!!'
fi
3.2、测试jdk是否安装成功
如下:若出现java版本即成功
[root@xsqone31 fileshell]# source /etc/profile
[root@xsqone31 fileshell]# java -version
java version "1.8.0_321"
Java(TM) SE Runtime Environment (build 1.8.0_321-b07)
Java HotSpot(TM) 64-Bit Server VM (build 25.321-b07, mixed mode)
[root@xsqone31 fileshell]#
3.3、将配置文件和安装目录传输给其他主机
# 将安装目录传输给其他主机
scp -r /opt/soft/jdk180 root@xsqone32:/opt/soft/
scp -r /opt/soft/jdk180 root@xsqone33:/opt/soft/
scp -r /opt/soft/jdk180 root@xsqone34:/opt/soft/
scp -r /opt/soft/jdk180 root@xsqone35:/opt/soft/
# 将配置文件传输给其他主机
scp -r /etc/profile root@xsqone32:/etc/
scp -r /etc/profile root@xsqone33:/etc/
scp -r /etc/profile root@xsqone34:/etc/
scp -r /etc/profile root@xsqone35:/etc/
四、搭建zookeeper集群
3.1、安装zookeeper
与java相似,先安装一台,再将安装目录与配置文件传输给其他主机
#! /bin/bash
echo 'auto install JDK beginging ...'

#global var
zk=true
hostname=`hostname`

if [ "$zk" = true ];then
  echo 'zookeeper install set true'
  echo 'setup zookeeper 345'
  tar -zxf /opt/install/zookeeper-3.4.5-cdh5.14.2.tar.gz -C /opt/soft
  mv /opt/soft/zookeeper-3.4.5-cdh5.14.2 /opt/soft/zk345
  cp /opt/soft/zk345/conf/zoo_sample.cfg /opt/soft/zk345/conf/zoo.cfg
  mkdir -p /opt/soft/zk345/datas
  sed -i '12c dataDir=/opt/soft/zk345/datas' /opt/soft/zk345/conf/zoo.cfg
  echo '0' >> /opt/soft/zk345/datas/myid
  sed -i '54a\export ZOOKEEPER_HOME=/opt/soft/zk345' /etc/profile
  sed -i '54a\export PATH=$PATH:$ZOOKEEPER_HOME/bin' /etc/profile
  sed -i '54a\#zookeeper' /etc/profile
fi
使用以上脚本后在/opt/soft/zk345/datas目录下修改zoo.cfg文件
vim /opt/soft/zk345/datas/zoo.cfg
# zookeeper集群的配置
	server.0=xsqone31:2287:3387
	server.1=xsqone32:2287:3387
	server.2=xsqone33:2287:3387
	server.3=xsqone34:2287:3387
	server.4=xsqone35:2287:3387
3.2、将配置文件和安装目录传输给其他主机
# 将安装目录传输给其他主机
scp -r /opt/soft/zk345 root@xsqone32:/opt/soft/
scp -r /opt/soft/zk345 root@xsqone33:/opt/soft/
scp -r /opt/soft/zk345 root@xsqone34:/opt/soft/
scp -r /opt/soft/zk345 root@xsqone35:/opt/soft/
# 将配置文件传输给其他主机
scp -r /etc/profile root@xsqone32:/etc/
scp -r /etc/profile root@xsqone33:/etc/
scp -r /etc/profile root@xsqone34:/etc/
scp -r /etc/profile root@xsqone35:/etc/
3.3、修改其他主机的id
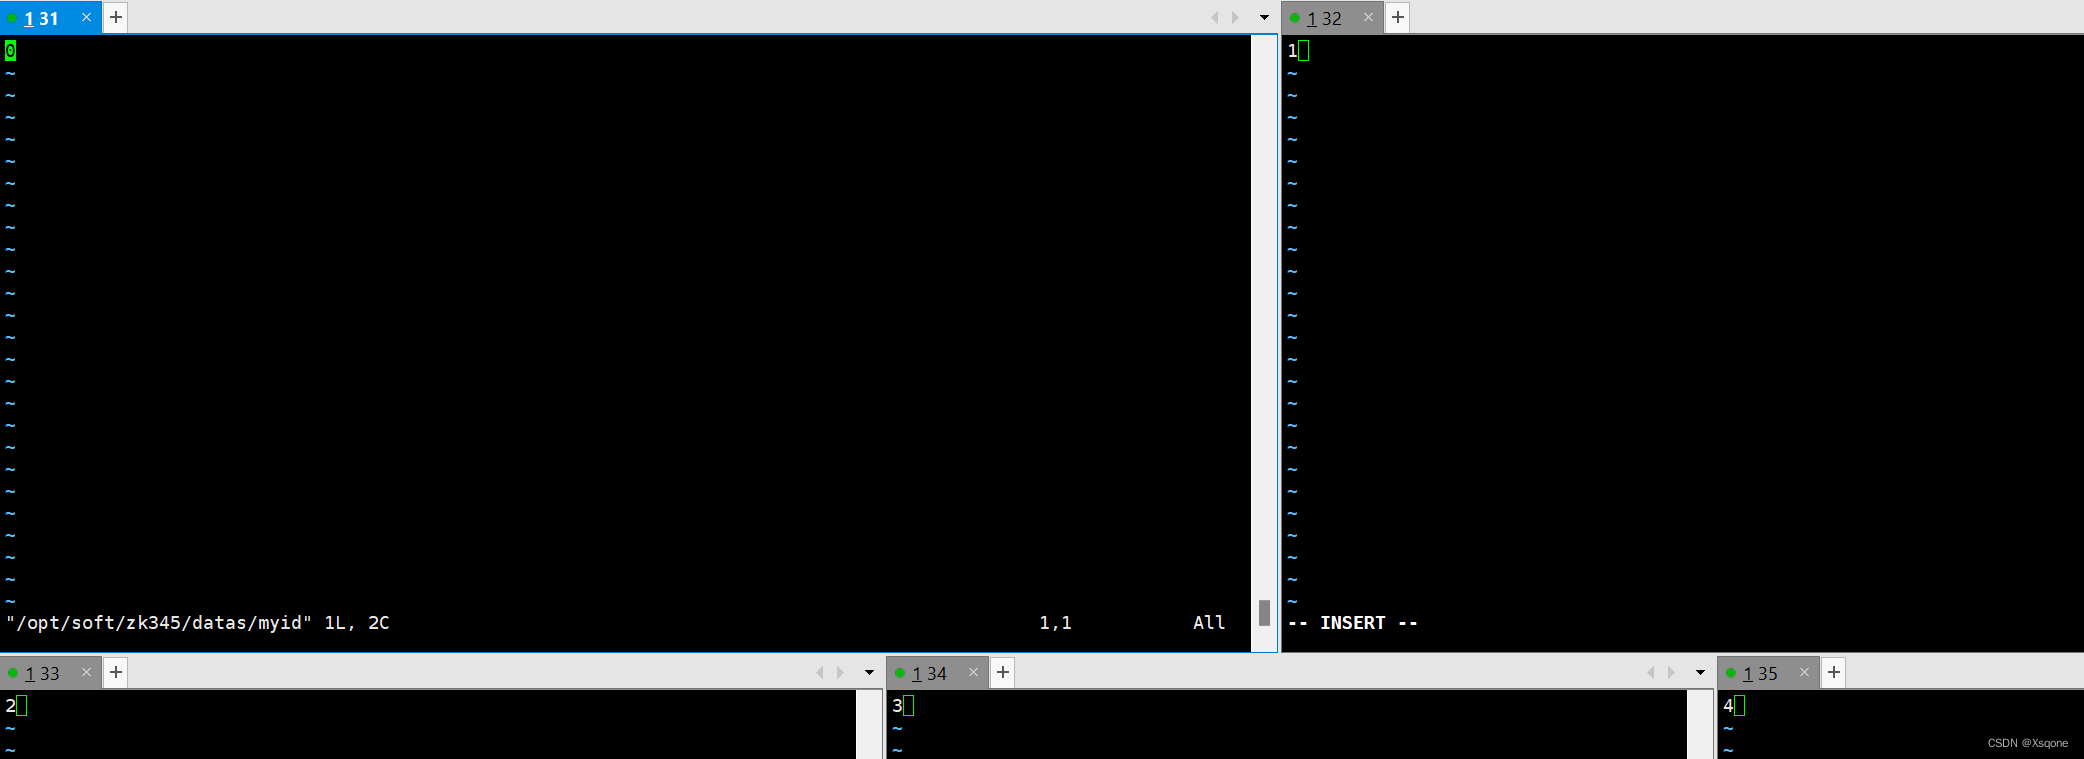
根据zookeeper配置文件中的配置修改/opt/soft/zk345/datas/myid
3.4、集群使用脚本
以下脚本可以在一个主机启动集群中的全部zookeeper
启动:./文件名 start
状态:./文件名 status
关停:./文件名 stop
#! /bin/bash

case $1 in

"start"){
  for i in xsqone31 xsqone32 xsqone33 xsqone34 xsqone35
    do
      ssh $i "source /etc/profile; /opt/soft/zk345/bin/zkServer.sh start "
    done
};;
"stop"){
  for i in xsqone31 xsqone32 xsqone33 xsqone34 xsqone35
    do
      ssh $i "source /etc/profile; /opt/soft/zk345/bin/zkServer.sh stop "
    done
};;
"status"){
  for i in xsqone31 xsqone32 xsqone33 xsqone34 xsqone35
    do
      ssh $i "source /etc/profile; /opt/soft/zk345/bin/zkServer.sh status "
    done
};;
esac
3.5、测试zookeeper是否安装成功
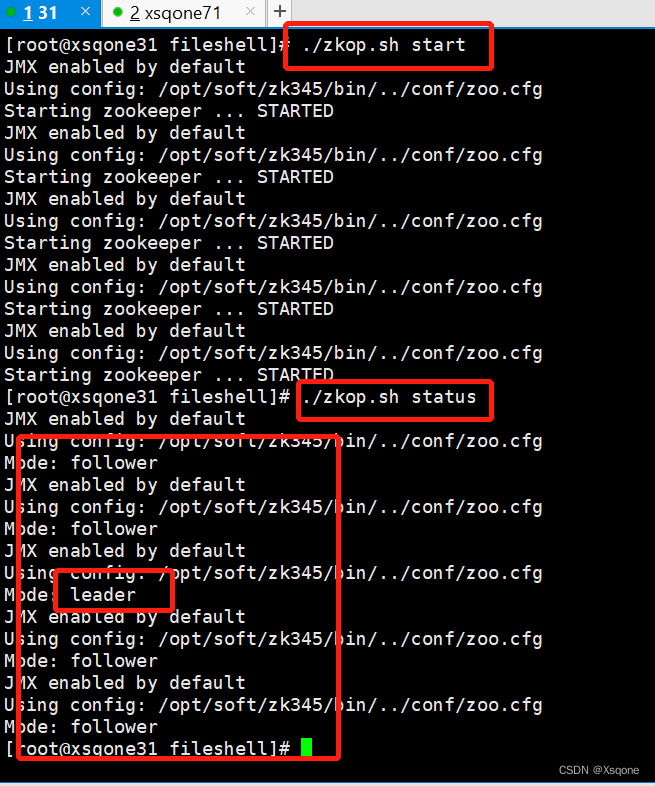
使用3.4中启动和查看状态命令
如下图:若有多台follower和一台leader即为成功。
四、搭建hadoop集群
4.1、安装hadoop
tar -zxvf /opt/install/hadoop-3.1.3.tar.gz -C ../soft/
mv /opt/soft/hadoop-3.1.3/ hadoop313
chown -R root:root /opt/soft/hadoop313/
4.2-4.7文件目录为:/opt/soft/hadoop313/etc/hadoop/
4.2、core-site.xml
<?xml version="1.0" encoding="UTF-8"?>
<?xml-stylesheet type="text/xsl" href="configuration.xsl"?>
<!--
  Licensed under the Apache License, Version 2.0 (the "License");
  you may not use this file except in compliance with the License.
  You may obtain a copy of the License at

    http://www.apache.org/licenses/LICENSE-2.0

  Unless required by applicable law or agreed to in writing, software
  distributed under the License is distributed on an "AS IS" BASIS,
  WITHOUT WARRANTIES OR CONDITIONS OF ANY KIND, either express or implied.
  See the License for the specific language governing permissions and
  limitations under the License. See accompanying LICENSE file.
-->

<!-- Put site-specific property overrides in this file. -->

<configuration>
	<property>
		<name>fs.defaultFS</name>
		<value>hdfs://gky</value>
		<description>逻辑名称,必须与hdfs-site.xml的dfs.nameservices保持一致</description>
	</property>
	<property>
		<name>hadoop.tmp.dir</name>
		<value>/opt/soft/hadoop313/tmpdata</value>
		<description>namenode上本地的临时文件夹</description>
	</property>
	<property>
		<name>hadoop.http.staticuser.user</name>
		<value>root</value>
		<description>默认用户</description>
	</property>
	<property>
		<name>hadoop.proxyuser.root.hosts</name>
		<value>*</value>
		<description></description>
	</property>
	<property>
		<name>hadoop.proxyuser.root.groups</name>
		<value>*</value>
		<description></description>
	</property>
	<property>
		<name>io.file.buffer.size</name>
		<value>131072</value>
		<description>读写序列缓存为:128KB</description>
	</property>
	<property>
		<name>ha.zookeeper.quorum</name>
		<value>xsqone31:2181,xsqone32:2181,xsqone33:2181,xsqone34:2181,xsqone35:2181</value>
		<description>ZKFailoverController在自动故障转移中使用的ZooKeeper服务器地址列表,以逗号分隔。</description>
	</property>
	<property>
		<name>ha.zookeeper.session-timeout.ms</name>
		<value>10000</value>
		<description>hadoop链接zookeeper的超时时长为10s</description>
	</property>
</configuration>
4.3、hadoop-env.sh
export JAVA_HOME=/opt/soft/jdk180
export HDFS_NAMENODE_USER=root
export HDFS_DATANODE_USER=root
export HDFS_SECONDARYNAMENODE_USER=root
export HDFS_JOURNALNODE_USER=root
export HDFS_ZKFC_USER=root
export YARN_RESOURCEMANAGER_USER=root
export YARN_NODEMANAGER_USER=root
4.4、hdfs-site.xml
<?xml version="1.0" encoding="UTF-8"?>
<?xml-stylesheet type="text/xsl" href="configuration.xsl"?>
<!--
  Licensed under the Apache License, Version 2.0 (the "License");
  you may not use this file except in compliance with the License.
  You may obtain a copy of the License at

    http://www.apache.org/licenses/LICENSE-2.0

  Unless required by applicable law or agreed to in writing, software
  distributed under the License is distributed on an "AS IS" BASIS,
  WITHOUT WARRANTIES OR CONDITIONS OF ANY KIND, either express or implied.
  See the License for the specific language governing permissions and
  limitations under the License. See accompanying LICENSE file.
-->

<!-- Put site-specific property overrides in this file. -->

<configuration>
	<property>
		<name>dfs.replication</name>
		<value>3</value>
		<description>hadoop中每一个block的备份数</description>
	</property>
	<property>
		<name>dfs.namenode.name.dir</name>
		<value>/opt/soft/hadoop313/data/dfs/name</value>
		<description>namenode上存储hdfs名字的空间元数据路径</description>
	</property>
	<property>
		<name>dfs.datanode.data.dir</name>
		<value>/opt/soft/hadoop313/data/dfs/data</value>
		<description>datanode上数据块的物理存储路径</description>
	</property>
	<property>
		<name>dfs.namenode.secondary.http-address</name>
		<value>xsqone31:9869</value>
		<description></description>
	</property>
	<property>
		<name>dfs.nameservices</name>
		<value>gky</value>
		<description>指定hdfs的nameservice,需要和core-site.xml中保持一致</description>
	</property>
	<property>
		<name>dfs.ha.namenodes.gky</name>
		<value>nn1,nn2,nn3</value>
		<description>gky为集群的逻辑名称,映射两个namenode逻辑名</description>
	</property>
	<property>
		<name>dfs.namenode.rpc-address.gky.nn1</name>
		<value>xsqone31:9000</value>
		<description>nn1的rpc通信地址</description>
	</property>
	<property>
		<name>dfs.namenode.http-address.gky.nn1</name>
		<value>xsqone31:9870</value>
		<description>nn1的http通信地址</description>
	</property>
	<property>
		<name>dfs.namenode.rpc-address.gky.nn2</name>
		<value>xsqone32:9000</value>
		<description>nn2的rpc通信地址</description>
	</property>
	<property>
		<name>dfs.namenode.http-address.gky.nn2</name>
		<value>xsqone32:9870</value>
		<description>nn2的http通信地址</description>
	</property>
	<property>
		<name>dfs.namenode.rpc-address.gky.nn3</name>
		<value>xsqone33:9000</value>
		<description>nn3的rpc通信地址</description>
	</property>
	<property>
		<name>dfs.namenode.http-address.gky.nn3</name>
		<value>xsqone33:9870</value>
		<description>nn3的http通信地址</description>
	</property>
	<property>
		<name>dfs.namenode.shared.edits.dir</name>
		<value>qjournal://xsqone31:8485;xsqone32:8485;xsqone33:8485/gky</value>
		<description>指定NameNode的edits元数据的共享存储位置(journal列表)</description>
	</property>
	<property>
		<name>dfs.journalnode.edits.dir</name>
		<value>/opt/soft/hadoop313/data/journaldata</value>
		<description>指定JournalNode在本地磁盘存放数据的位置</description>
	</property>
	<!-- 容错-->
	<property>
		<name>dfs.ha.automatic-failover.enabled</name>
		<value>true</value>
		<description>开启NameNode故障自动切换</description>
	</property>
	<property>
		<name>dfs.client.failover.proxy.provider.gky</name>
		<value>org.apache.hadoop.hdfs.server.namenode.ha.ConfiguredFailoverProxyProvider</value>
		<description>失败后自动切换的实现方式</description>
	</property>
	<property>
		<name>dfs.ha.fencing.methods</name>
		<value>sshfence</value>
		<description>防止脑裂的处理</description>
	</property>
	<property>
		<name>dfs.ha.fencing.ssh.private-key-files</name>
		<value>/root/.ssh/id_rsa</value>
		<description>使用sshfence隔离机制时,需要使用到免密登录</description>
	</property>
	<property>
		<name>dfs.permissions.enabled</name>
		<value>false</value>
		<description>关闭HDFS权限验证</description>
	</property>
	<property>
		<name>dfs.image.transfer.bandwidthPerSec</name>
		<value>1048576</value>
		<description></description>
	</property>
	<property>
		<name>dfs.block.scanner.volume.bytes.per.second</name>
		<value>1048576</value>
		<description></description>
	</property>
</configuration>
4.5、mapred-site.xml
<?xml version="1.0"?>
<?xml-stylesheet type="text/xsl" href="configuration.xsl"?>
<!--
  Licensed under the Apache License, Version 2.0 (the "License");
  you may not use this file except in compliance with the License.
  You may obtain a copy of the License at

    http://www.apache.org/licenses/LICENSE-2.0

  Unless required by applicable law or agreed to in writing, software
  distributed under the License is distributed on an "AS IS" BASIS,
  WITHOUT WARRANTIES OR CONDITIONS OF ANY KIND, either express or implied.
  See the License for the specific language governing permissions and
  limitations under the License. See accompanying LICENSE file.
-->

<!-- Put site-specific property overrides in this file. -->

<configuration>
	<property>
		<name>mapreduce.framework.name</name>
		<value>yarn</value>
		<description>job执行框架:local,classic or yarn</description>
		<final>true</final>
	</property>
	<property>
		<name>mapreduce.application.classpath</name>
		<value>/opt/soft/hadoop313/etc/hadoop:/opt/soft/hadoop313/share/hadoop/common/lib/*:/opt/soft/hadoop313/share/hadoop/common/*:/opt/soft/hadoop313/share/hadoop/hdfs/*:/opt/soft/hadoop313/share/hadoop/hdfs/lib/*:/opt/soft/hadoop313/share/hadoop/mapreduce/*:/opt/soft/hadoop313/share/hadoop/mapreduce/lib/*:/opt/soft/hadoop313/share/hadoop/yarn/*:/opt/soft/hadoop313/share/hadoop/yarn/lib/*</value>
		<description>job执行框架:local,classic or yarn</description>
	</property>
	<property>
		<name>mapreduce.jobhistory.address</name>
		<value>xsqone31:10020</value>
	</property>
	<property>
		<name>mapreduce.jobhistory.webapp.address</name>
		<value>xsqone31:19888</value>
	</property>
	<property>
		<name>mapreduce.map.memory.mb</name>
		<value>1024</value>
		<description>map阶段的task工作内存</description>
	</property>
	<property>
		<name>mapreduce.reduce.memory.mb</name>
		<value>2048</value>
		<description>reduce阶段的task工作内存</description>
	</property>
</configuration>
4.6、yarn-site.xml
<?xml version="1.0"?>
<!--
  Licensed under the Apache License, Version 2.0 (the "License");
  you may not use this file except in compliance with the License.
  You may obtain a copy of the License at

    http://www.apache.org/licenses/LICENSE-2.0

  Unless required by applicable law or agreed to in writing, software
  distributed under the License is distributed on an "AS IS" BASIS,
  WITHOUT WARRANTIES OR CONDITIONS OF ANY KIND, either express or implied.
  See the License for the specific language governing permissions and
  limitations under the License. See accompanying LICENSE file.
-->
<configuration>
	<property>
		<name>yarn.resourcemanager.ha.enabled</name>
		<value>true</value>
		<description>开启resourcemanager高可用</description>
	</property>
	<property>
		<name>yarn.resourcemanager.cluster-id</name>
		<value>yrcabc</value>
		<description>指定yarn集群中的id</description>
	</property>
	<property>
		<name>yarn.resourcemanager.ha.rm-ids</name>
		<value>rm1,rm2,rm3</value>
		<description>指定resourcemanager的名字</description>
	</property>
	<property>
		<name>yarn.resourcemanager.hostname.rm1</name>
		<value>xsqone33</value>
		<description>设置rm1的名字</description>
	</property>
	<property>
		<name>yarn.resourcemanager.hostname.rm2</name>
		<value>xsqone34</value>
		<description>设置rm2的名字</description>
	</property>
		<property>
		<name>yarn.resourcemanager.hostname.rm3</name>
		<value>xsqone35</value>
		<description>设置rm3的名字</description>
	</property>
	<property>
		<name>yarn.resourcemanager.webapp.address.rm1</name>
		<value>xsqone33:8088</value>
		<description></description>
	</property>
	<property>
		<name>yarn.resourcemanager.webapp.address.rm2</name>
		<value>xsqone34:8088</value>
		<description></description>
	</property>
		<property>
		<name>yarn.resourcemanager.webapp.address.rm3</name>
		<value>xsqone35:8088</value>
		<description></description>
	</property>
	<property>
		<name>yarn.resourcemanager.zk-address</name>
		<value>xsqone31:2181,xsqone32:2181,xsqone33:2181,xsqone34:2181,xsqone35:2181</value>
		<description>指定zk集群地址</description>
	</property>
	<property>
		<name>yarn.nodemanager.aux-services</name>
		<value>mapreduce_shuffle</value>
		<description>运行mapreduce程序的时候必须配置的附属服务</description>
	</property>
	<property>
		<name>yarn.nodemanager.local-dirs</name>
		<value>/opt/soft/hadoop313/tmpdata/yarn/local</value>
		<description>nodemanager本地存储目录</description>
	</property>
	<property>
		<name>yarn.nodemanager.log-dirs</name>
		<value>/opt/soft/hadoop313/tmpdata/yarn/log</value>
		<description>nodemanager本地日志目录</description>
	</property>

	<property>
		<name>yarn.nodemanager.resource.memory-mb</name>
		<value>2048</value>
		<description>resource进程的工作内存</description>
	</property>
	<property>
		<name>yarn.nodemanager.resource.cpu-vcores</name>
		<value>2</value>
		<description>resource工作中所能使用机器的内核数</description>
	</property>
	<property>
		<name>yarn.scheduler.minimum-allocation-mb</name>
		<value>256</value>
		<description>每个容器请求的最小分配</description>
	</property>
	<property>
		<name>yarn.log-aggregation-enable</name>
		<value>true</value>
		<description>开启日志聚合</description>
	</property>
	<property>
		<name>yarn.log-aggregation.retain-seconds</name>
		<value>86400</value>
		<description>日志保留多少秒</description>
	</property>
	<property>
		<name>yarn.nodemanager.vmem-check-enabled</name>
		<value>false</value>
		<description></description>
	</property>
	<property>
		<name>yarn.application.classpath</name>
		<value>/opt/soft/hadoop313/etc/hadoop:/opt/soft/hadoop313/share/hadoop/common/lib/*:/opt/soft/hadoop313/share/hadoop/common/*:/opt/soft/hadoop313/share/hadoop/hdfs/*:/opt/soft/hadoop313/share/hadoop/hdfs/lib/*:/opt/soft/hadoop313/share/hadoop/mapreduce/*:/opt/soft/hadoop313/share/hadoop/mapreduce/lib/*:/opt/soft/hadoop313/share/hadoop/yarn/*:/opt/soft/hadoop313/share/hadoop/yarn/lib/*</value>
		<description></description>
	</property>
	<property>
		<name>yarn.nodemanager.env-whitelist</name>
		<value>JAVA_HOME,HADOOP_COMMON_HOME,HADOOP_HDFS_HOME,HADOOP_CONF_DIR,CLASSPATH_PREPEND_DISTCACHE,HADOOP_YARN_HOME,HADOOP_MAPRED_HOME</value>
		<description></description>
	</property>

</configuration>
4.7、workers
xsqone31
xsqone32
xsqone33
xsqone34
xsqone35
4.8、/etc/profile
#hadoop
export JAVA_LIBRARY_PATH=/opt/soft/hadoop313/lib/native
export HADOOP_HOME=/opt/soft/hadoop313
export PATH=$PATH:$HADOOP_HOME/bin:$HADOOP_HOME/sbin:$HADOOP_HOME/lib
4.9、将配置文件和安装目录传输给其他主机
# 将安装目录传输给其他主机
scp -r /opt/soft/hadoop313 root@xsqone32:/opt/soft/
scp -r /opt/soft/hadoop313 root@xsqone33:/opt/soft/
scp -r /opt/soft/hadoop313 root@xsqone34:/opt/soft/
scp -r /opt/soft/hadoop313 root@xsqone35:/opt/soft/
# 将配置文件传输给其他主机
scp -r /etc/profile root@xsqone32:/etc/
scp -r /etc/profile root@xsqone33:/etc/
scp -r /etc/profile root@xsqone34:/etc/
scp -r /etc/profile root@xsqone35:/etc/
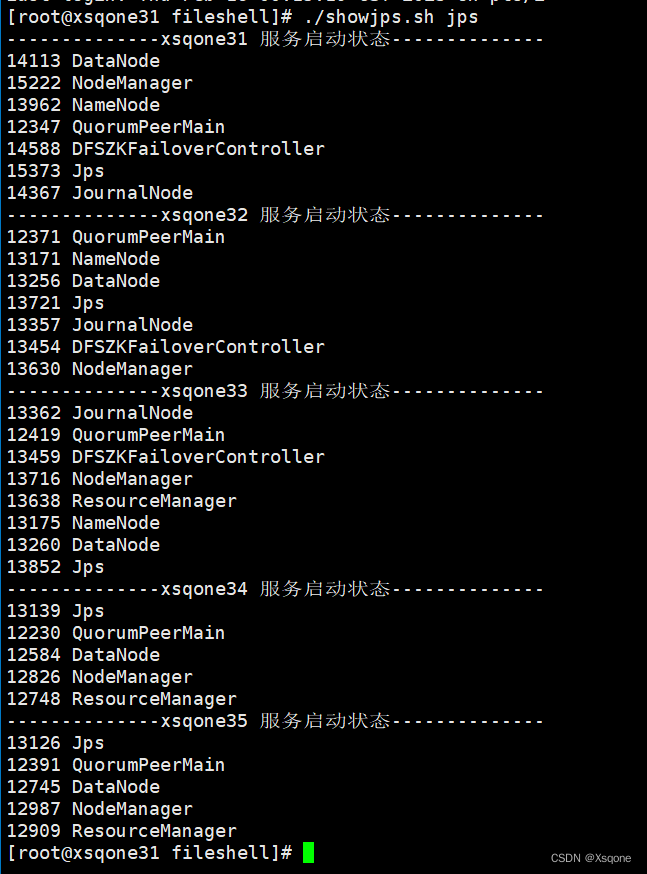
五、集群首次启动
集群首次启动
1、启动zookeeper集群
2、在xsqone31-33   启动journalnode:hdfs --daemon start journalnode
3、在xsqone31格式化hdfs: hdfs namenode -format
4、在xsqone31启动namenode:hdfs --daemon start namenode
5、在32-33机器上同步namenode信息:hdfs namenode -bootstrapStandby
6、在32-33机器上启动namenode:hdfs --daemon start namenode
	查看namenode节点状态:hdfs haadmin -getServiceState nn1|nn2|nn3
7、关闭所有dfs的服务:stop-dfs.sh
8、格式化ZK:hdfs zkfc -formatZK
9、启动hdfs:start-dfs.sh


10、启动yarn:start-yarn.sh
	查看resourcemanager节点状态:yarn rmadmin -getServiceState rm1|rm2|rm3
六、测试集群是否成功
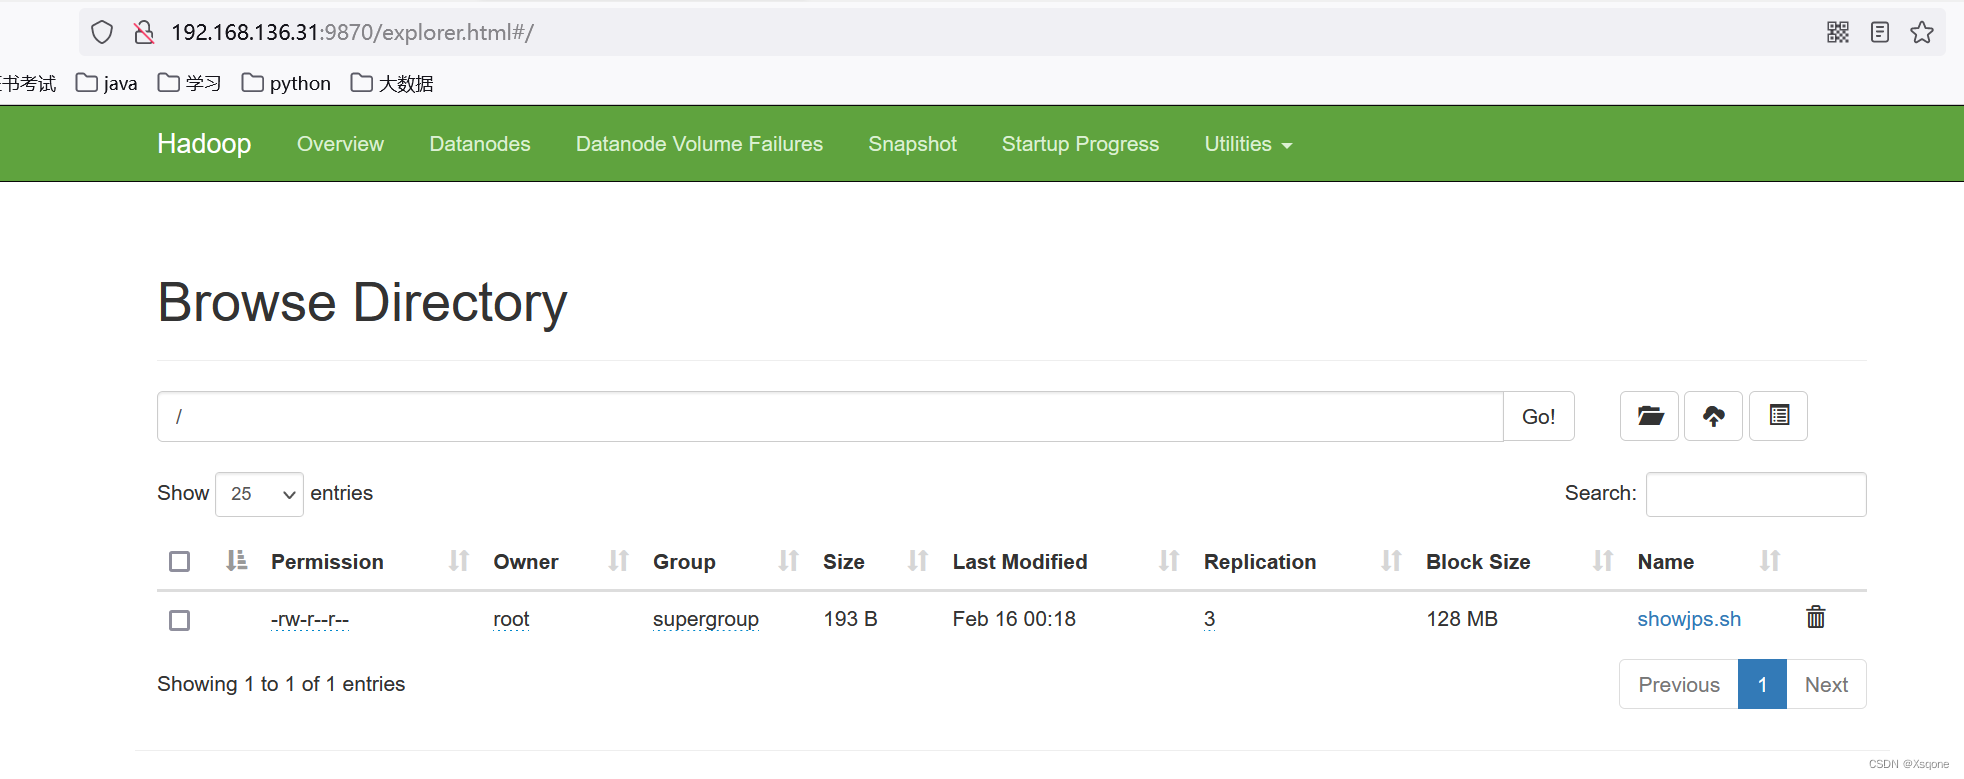
6.1、上传文件测试
此处有上传命令

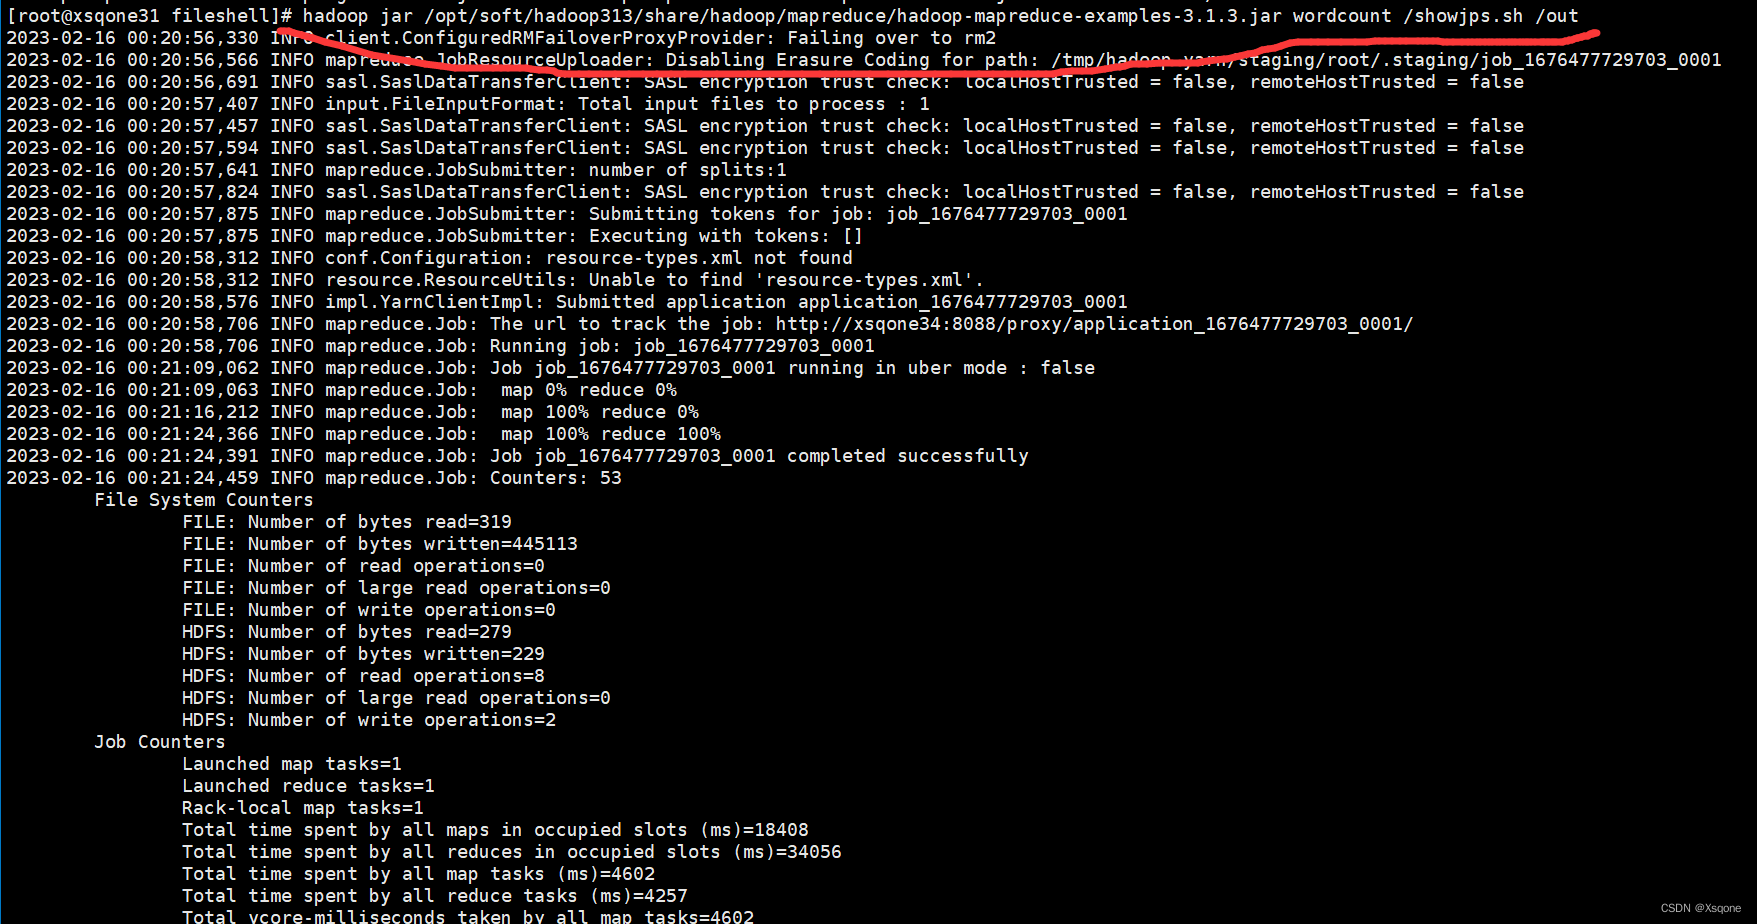
6.2使用jar包运行测试
jar包目录为: /opt/soft/hadoop313/share/hadoop/mapreduce
