C++实现线程池
- 一、前言
- 二、线程池的接口设计
- 2.1、类封装
- 2.2、线程池的初始化
- 2.3、线程池的启动
- 2.4、线程池的停止
- 2.5、线程的执行函数run()
- 2.6、任务的运行函数
- 2.7、等待所有线程结束
- 三、测试线程池
- 四、源码地址
- 总结
一、前言
C++实现的线程池,可能涉及以下知识点:
- decltype。
- packaged_task。
- make_shared。
- mutex。
- unique_lock。
- notify_one。
- future。
- queue。
- bind。
- thread。
等等。
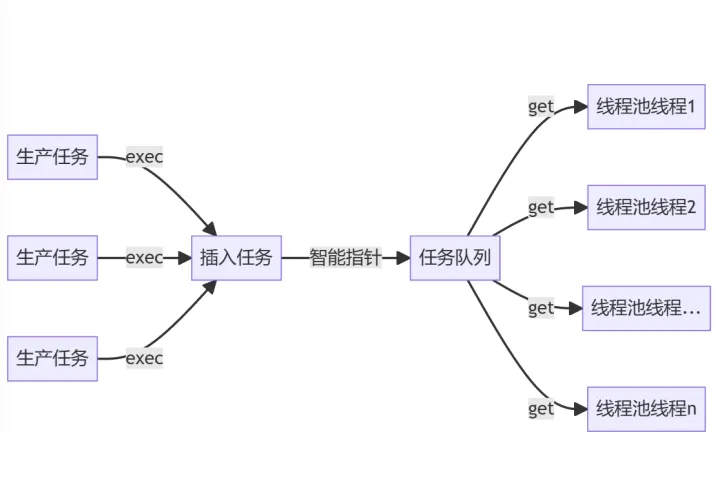
二、线程池的接口设计
(1)封装一个线程池的类。
(2)线程池的初始化:设置线程的数量。
(3)启动线程池:创建线程等工作。
(4)执行任务的函数。
(5)停止线程池。
(6)等所有任务执行完成,退出执行函数。
2.1、类封装
线程池类,采用c++11来实现。
#ifndef _CPP_THREAD_POOL_H_
#define _CPP_THREAD_POOL_H_

#include <iostream>
#include <functional>
#include <memory>
#include <queue>
#include <mutex>
#include <vector>
#include <thread>
#include <future>

#ifdef WIN32
#include <windows.h>
#else
#include <sys/time.h>
#endif

using namespace std;

void getNow(timeval *tv);
int64_t getNowMs();

#define TNOW    getNow()
#define TNOWMS  getNowMs()

class CPP_ThreadPool{
protected:
    struct TaskFunc{
        TaskFunc(uint64_t expireTime):_expireTime(expireTime){}
        int64_t _expireTime=0;//超时的绝对时间
        function<void()> _func;
    };
    typedef shared_ptr<TaskFunc> TaskFuncPtr;

    /*
     * @brief 获取任务 **
     *@return TaskFuncPtr
     */
    bool get(TaskFuncPtr& task);

    /*
    * @brief 线程池是否退出
    */
    bool isTerminate()
    {
        return _bTerminate;
    }

    /*
    * @brief 线程运行态
    */
   void run();

public:
    /*
     * @brief 构造函数
     */
    CPP_ThreadPool();

    /*
    * @brief 析构, 会停止所有线程
    */
    virtual ~CPP_ThreadPool();

    /*
     * * @brief 初始化.
     * * @param num 工作线程个数
     */
    bool init(size_t num);

    /*
    * @brief 停止所有线程, 会等待所有线程结束
    */
   void stop();

   /*
   * @brief 启动所有线程
   */
    bool start();

    /*
     * @brief 等待当前任务队列中, 所有工作全部结束(队列无任务).
     * @param millsecond 等待的时间(ms), -1:永远等待
     * @return true, 所有工作都处理完毕
     * false,超时退出
     */
    bool waitForAllDone(int millsecond=-1);

   /*
    * @brief 获取线程个数.
    * @return size_t 线程个数
    */
   size_t getThreadNum()
   {
        unique_lock<mutex> lock(_mutex);
        return _threads.size();
   }

   /*
    *  @brief 获取当前线程池的任务数
    * @return size_t 线程池的任务数
    */
   size_t getJobNum()
   {
        unique_lock<mutex> lock(_mutex);
        return _tasks.size();
   }

   /*
   * @brief 用线程池启用任务(F是function, Args是参数) **
   * @param ParentFunctor
   * @param tf
   * @return 返回任务的future对象, 可以通过这个对象来获取返回值
   */
    template <class F,class... Args>
    auto exec(F&& f, Args&&... args)->future<decltype(f(args...))>
    {
        return exec(0,f,args...);
    }

    /*
    * unused.
    *
    * @brief 用线程池启用任务(F是function, Args是参数)
    * @param 超时时间 ,单位ms (为0时不做超时控制) ;若任务超时,此任务将被丢弃
    * @param bind function
    * @return 返回任务的future对象, 可以通过这个对象来获取返回值
    *
    * template <class F, class... Args>
    * 它是c++里新增的最强大的特性之一,它对参数进行了高度泛化,它能表示0到任意个数、任意类型的参数
    * auto exec(F &&f, Args &&... args) -> std::future<decltype(f(args...))>
    * std::future<decltype(f(args...))>:返回future,调用者可以通过future获取返回值
    * 返回值后置
    */
    template<class F,class... Args>
    auto exec(int64_t timeoutMs,F&& f,Args&&... args) -> future<decltype(f(args...))>
    {
        //获取现在时间
        int64_t expireTime=(timeoutMs==0)?0:TNOWMS+timeoutMs;
        // 定义返回值类型
        using retType=decltype(f(args...));
        // 封装任务
        auto task=make_shared<packaged_task<retType()>>(bind(forward<F>(f),forward<Args>(args)...));
        // 封装任务指针,设置过期时间
        TaskFuncPtr fPtr=make_shared<TaskFunc>(expireTime);
        fPtr->_func=[task](){
            (*task)();
        };

        unique_lock<mutex> lock(_mutex);
        // 插入任务
        _tasks.push(fPtr);
        // 唤醒阻塞的线程,可以考虑只有任务队列为空的情 况再去notify
        _condition.notify_one();

        return task->get_future();
    }

protected:
    size_t  _threadNum;//线程数量
    bool    _bTerminate;//判定是否终止线程池
    mutex   _mutex;     //唯一锁
    vector<thread*> _threads;   //工作线程数组
    queue<TaskFuncPtr> _tasks;  //任务队列
    condition_variable _condition;//条件变量
    atomic<int>         _atomic{0};//原子变量
};


#endif
使用示例:
CPP_ThreadPool tpool;
tpool.init(5); //初始化线程池线程数
//启动线程方式
tpool.start();
//将任务丢到线程池中*
tpool.exec(testFunction, 10); //参数和start相同
//等待线程池结束
tpool.waitForAllDone(1000); //参数<0时, 表示无限等待(注意有人调用stop也会推出)
//此时: 外部需要结束线程池是调用
tpool.stop();
注意:ZERO_ThreadPool::exec执行任务返回的是个future, 因此可以通过future异步获取结果, 比如:
int testInt(int i)
{
    return i;
}
auto f = tpool.exec(testInt, 5);
cout << f.get() << endl; //当testInt在线程池中执行后, f.get()会返回数值5

class Test
{
public:
    int test(int i);
};
Test t;
auto f = tpool.exec(std::bind(&Test::test, &t, std::placeholders::_1), 10);
//返回的future对象, 可以检查是否执行
cout << f.get() << endl;
2.2、线程池的初始化
主要是设置线程池中线程的数量,如果线程池已经存在则直接返回,防止重复初始化。
bool CPP_ThreadPool::init(size_t num)
{
    unique_lock<mutex> lock(_mutex);
    if(!_threads.empty())
        return false;
    _threadNum=num;
    return true;
}
2.3、线程池的启动
根据设置的线程数量,创建线程并保存在一个数组中。如果线程池已经存在则直接返回,防止重复启动。
bool CPP_ThreadPool::start()
{
    unique_lock<mutex> lock(_mutex);
    if(!_threads.empty())
        return false;

    for(size_t i=0;i<_threadNum;i++)
    {
        _threads.push_back(new thread(&CPP_ThreadPool::run,this));
    }
    return true;
}
2.4、线程池的停止
设置线程退出条件,并通知所有线程。停止时,要等待所有线程都执行完任务,再销毁线程。
需要注意锁的粒度。
void CPP_ThreadPool::stop()
{
    // 注意要有这个{},不然会死锁。
    {
        unique_lock<mutex> lock(_mutex);
        _bTerminate=true;
        _condition.notify_all();
    }
    size_t thdCount=_threads.size();
    for(size_t i=0;i<thdCount;i++)
    {
        if(_threads[i]->joinable())
        {
            _threads[i]->join();
        }
        delete _threads[i];
        _threads[i]=NULL;
    }
    unique_lock<mutex> lock(_mutex);
    _threads.clear();
}
2.5、线程的执行函数run()
读取任务:判断任务是否存在,如果任务队列为空,则进入等待状态直到任务队列不为空或退出线程池(这里需要两次判断,因为可能存在虚假唤醒)。
执行任务:调用匿名函数。
检测所有任务都是否执行完毕:这里使用了原子变量来检测任务是否都执行完,原因在于任务队列为空不代表任务已经执行完(任务可能还在运行中、也可能是任务刚弹出还没运行),使用原子变量来计数就更严谨。
bool CPP_ThreadPool::get(TaskFuncPtr& task)
{
    unique_lock<mutex> lock(_mutex);
    if(_tasks.empty())//判断任务是否存在
    {
        _condition.wait(lock,[this]{
            return _bTerminate || !_tasks.empty();//唤醒条件
        });
    }

    if(_bTerminate)
        return false;

    if(!_tasks.empty())//判断任务是否存在
    {
        task=move(_tasks.front());// 使用移动语义
        _tasks.pop();//弹出一个任务
        return true;
    }
    return false;
}

// 执行任务的线程
void CPP_ThreadPool::run()
{
    while(!isTerminate())
    {
        TaskFuncPtr task;
        // 读取任务
        bool ok=get(task);
        if(ok)
        {
            ++_atomic;
            try
            {
                if(task->_expireTime!=0 && task->_expireTime < TNOWMS)
                {
                    // 处理超时任务
                }
                else
                    task->_func();//执行任务
            }
            catch(...)
            {}
            --_atomic;
            // 任务执行完毕,这里只是为了通知waitForAllDone
            unique_lock<mutex> lock(_mutex);
            if(_atomic==0 && _tasks.empty())
                _condition.notify_all();
        }
    }
}
2.6、任务的运行函数
这里使用了可变模块参数、智能指针、bind、function、捕获列表的相关技术知识。
返回任务的future对象, 可以通过这个对象来获取返回值。
超时时间 ,单位ms (为0时不做超时控制) ;若任务超时,此任务将被丢弃。
可变模块参数对参数进行了高度泛化,它能表示0到任意个数、任意类型的参数。
  /*
   * @brief 用线程池启用任务(F是function, Args是参数) **
   * @param ParentFunctor
   * @param tf
   * @return 返回任务的future对象, 可以通过这个对象来获取返回值
   */
    template <class F,class... Args>
    auto exec(F&& f, Args&&... args)->future<decltype(f(args...))>
    {
        return exec(0,f,args...);
    }

    /*
    * unused.
    *
    * @brief 用线程池启用任务(F是function, Args是参数)
    * @param 超时时间 ,单位ms (为0时不做超时控制) ;若任务超时,此任务将被丢弃
    * @param bind function
    * @return 返回任务的future对象, 可以通过这个对象来获取返回值
    *
    * template <class F, class... Args>
    * 它是c++里新增的最强大的特性之一,它对参数进行了高度泛化,它能表示0到任意个数、任意类型的参数
    * auto exec(F &&f, Args &&... args) -> std::future<decltype(f(args...))>
    * std::future<decltype(f(args...))>:返回future,调用者可以通过future获取返回值
    * 返回值后置
    */
    template<class F,class... Args>
    auto exec(int64_t timeoutMs,F&& f,Args&&... args) -> future<decltype(f(args...))>
    {
        //获取现在时间
        int64_t expireTime=(timeoutMs==0)?0:TNOWMS+timeoutMs;
        // 定义返回值类型
        using retType=decltype(f(args...));
        // 封装任务
        auto task=make_shared<packaged_task<retType()>>(bind(forward<F>(f),forward<Args>(args)...));
        // 封装任务指针,设置过期时间
        TaskFuncPtr fPtr=make_shared<TaskFunc>(expireTime);
        fPtr->_func=[task](){
            (*task)();
        };

        unique_lock<mutex> lock(_mutex);
        // 插入任务
        _tasks.push(fPtr);
        // 唤醒阻塞的线程,可以考虑只有任务队列为空的情 况再去notify
        _condition.notify_one();

        return task->get_future();
    }
2.7、等待所有线程结束
bool CPP_ThreadPool::waitForAllDone(int millsecond)
{
    unique_lock<mutex> lock(_mutex);
    if(_tasks.empty())
        return true;
    if(millsecond<0)
    {
        _condition.wait(lock,[this]{ return _tasks.empty();});
        return true;
    }
    else
    {
        return _condition.wait_for(lock,chrono::milliseconds(millsecond),[this]{ return _tasks.empty();});
    }
}
三、测试线程池
#include <iostream>
#include "cppThreadPool.h"

using namespace std;

void func1(int a)
{
    cout << "func1() a=" << a << endl;
}
void func2(int a, string b)
{
    cout << "func2() a=" << a << ", b=" << b<< endl;
}

void func3()
{
    cout<<"func3"<<endl;
}

void test01()
{
    cout<<"test 01"<<endl;
    CPP_ThreadPool threadpool;
    threadpool.init(2);
    threadpool.start();//启动线程池
    // 执行任务
    threadpool.exec(func1,10);
    threadpool.exec(func2,20,"FLY.");
    threadpool.exec(1000,func3);


    threadpool.waitForAllDone();
    threadpool.stop();
}

int func1_future(int a)
{
    cout << "func1() a=" << a << endl;
    return a;
}

string func2_future(int a, string b)
{
    cout << "func2() a=" << a << ", b=" << b<< endl;
    return b;
}

void test02()
{
    cout<<"test 02"<<endl;
    CPP_ThreadPool threadpool;
    threadpool.init(2);
    threadpool.start();//启动线程池

    future<decltype(func1_future(0))> ret01=threadpool.exec(func1_future,10);
    future<string> ret02=threadpool.exec(func2_future,20,"FLY.");

    threadpool.waitForAllDone();

    cout<<"ret01 = "<<ret01.get()<<endl;
    cout<<"ret02 = "<<ret02.get()<<endl;


    threadpool.stop();

}

class Test{
public:
    int test(int a)
    {
        cout<<_name<<": a = "<<a<<endl;
        return a+1;
    }
    void setname(string name)
    {
        _name=name;
    }
    string _name;

};

void test03()
{
    cout<<"test 03"<<endl;
    CPP_ThreadPool threadpool;
    threadpool.init(2);
    threadpool.start();//启动线程池
    Test t1;
    Test t2;
    t1.setname("Test 1");
    t2.setname("Test 2");
    auto f1=threadpool.exec(bind(&Test::test,&t1,placeholders::_1),10);
    auto f2=threadpool.exec(bind(&Test::test,&t2,placeholders::_1),20);

    threadpool.waitForAllDone();
    cout<<"f1 = "<<f1.get()<<endl;
    cout<<"f2 = "<<f2.get()<<endl;
    threadpool.stop();

}

int main(int argc,char **argv)
{
    // 简单测试线程池
    test01();
    // 测试任务函数返回值
    test02();
    // 测试类对象函数的绑定
    test03();

    return 0;
}
执行结果:
test 01
func1() a=10
func2() a=20, b=FLY.
func3
test 02
func1() a=10
func2() a=20, b=FLY.
ret01 = 10
ret02 = FLY.
test 03
Test 1: a = 10
Test 2: a = 20
f1 = 11
f2 = 21
四、源码地址
源码已经上传github。
总结
线程池的核心:初始化、线程启动、执行函数、线程停止。

