文章目录
- 前言
- 1、那么Springboot是怎么实现自动配置的
- 1.1 启动类
- 1.2 @SpringBootApplication
- 1.3 @Configuration
- 1.4 @ComponentScan
- 1.5 @EnableAutoConfiguration
- 1.6 两个重要注解
- 1.7 AutoConfigurationPackage注解
- 1.8 Import(AutoConfigurationImportSelector.class)注解
- 1.9自动配置幕后英雄:SpringFactoriesLoader详解
- 1.10 深入探索SpringApplication执行流程
- 总结
前言
学习了一段时间springboot,一般都可以在项目中使用springboot开发了。因为springboot的东西并不多,或者说,springboot根本就没有新东西。
好了,现在问一句,我们为什么要用springboot?
我听过的回答:
A:Spring Boot 最主要是不用 XML 配置,可以用 Java 来配置 bean,省去了许多配置文件。
我又问:Spring 本身就可以用 Java 配置代替 XML 配置,和 Spring Boot 有什么关系呢?
A:。。。
B:Spring Boot 我们用来做 Spring Cloud 微服务。
我又问:微服务和 Spring Boot 有什么关系?不用 Spring Boot 行不行?
B:。。。
C:Spring Boot 可以打 jar 包部署,内部集成了Tomcat。
这个确实是 Spring Boot 的特色,但是我还是觉得没有答到关键点上。
然后我继续问,如果不考虑打 jar 包部署呢?
C:。。。
显然,这些答案都没有回答到点子上。以我的理解,springboot是什么?它只是对spring Framework做了二次封装。以便简化开发,让程序员将更多的精力和时间放到业务上去。规避了繁琐的配置操作。而且还减少了遭遇bug的数量。说直白一点:自动配置。
1、那么Springboot是怎么实现自动配置的
1.1 启动类
@SpringBootApplication
public class Application {
    public static void main(String[] args) {
        SpringApplication.run(Application.class, args);
    }
}
还是要从springboot的启动类说起。就这个类而言,最神秘的还是Annotation定义(@SpringBootApplication)和类定义(SpringApplication.run)。
1.2 @SpringBootApplication
这个注解之前没见过,可以说它是springboot自己的新注解,我们点进去看下。
@Target(ElementType.TYPE)
@Retention(RetentionPolicy.RUNTIME)
@Documented
@Inherited
@SpringBootConfiguration
@EnableAutoConfiguration
@ComponentScan(excludeFilters = {
        @Filter(type = FilterType.CUSTOM, classes = TypeExcludeFilter.class),
        @Filter(type = FilterType.CUSTOM, classes = AutoConfigurationExcludeFilter.class) })
public @interface SpringBootApplication {
     ...
}
可以看到,这是一个组合注解
虽然定义使用了多个Annotation进行了原信息标注,但实际上重要的只有三个Annotation
- @Configuration(@SpringBootConfiguration点开查看发现里面还是应用了@Configuration)
- @EnableAutoConfiguration
- @ComponentScan
1.3 @Configuration
这里的@Configuration对我们来说不陌生,它就是JavaConfig形式的Spring Ioc容器的配置类使用的那个@Configuration,SpringBoot社区推荐使用基于JavaConfig的配置形式,所以,这里的启动类标注了@Configuration之后,本身其实也是一个IoC容器的配置类。
1.4 @ComponentScan
@ComponentScan这个注解在Spring中很重要,它对应XML配置中的元素,@ComponentScan的功能其实就是自动扫描并加载符合条件的组件(比如@Component和@Repository等)或者bean定义,最终将这些bean定义加载到IoC容器中。
我们可以通过basePackages等属性来细粒度的定制@ComponentScan自动扫描的范围,如果不指定,则默认Spring框架实现会从声明@ComponentScan所在类的package进行扫描。
注:所以SpringBoot的启动类最好是放在root package下,因为默认不指定basePackages。
1.5 @EnableAutoConfiguration
这厮才是springboot的核心!
大家是否还熟悉Spring框架提供的各种名字为@Enable开头的Annotation定义?比如@EnableScheduling、@EnableCaching、@EnableMBeanExport等,@EnableAutoConfiguration的理念和做事方式其实一脉相承,简单概括一下就是,借助@Import的支持,收集和注册特定场景相关的bean定义。
而@EnableAutoConfiguration也是借助@Import的帮助,将所有符合自动配置条件的bean定义加载到IoC容器,仅此而已!
@EnableAutoConfiguration作为一个复合Annotation,点进去,信息如下:
@Target(ElementType.TYPE)
@Retention(RetentionPolicy.RUNTIME)
@Documented
@Inherited
@AutoConfigurationPackage
@Import(AutoConfigurationImportSelector.class)
public @interface EnableAutoConfiguration {
    ...
}
这是springboot2.0的配置,如果你用的版本是1.5或以下的,是这样:
@Target(ElementType.TYPE)
@Retention(RetentionPolicy.RUNTIME)
@Documented
@Inherited
@AutoConfigurationPackage
@Import(EnableAutoConfigurationImportSelector.class)
public @interface EnableAutoConfiguration {
    ...
}
当然,EnableAutoConfigurationImportSelector这个类也是继承了AutoConfigurationImportSelector类的,这个没关系,无所谓啦!
1.6 两个重要注解
- @AutoConfigurationPackage:自动配置包
- @Import: 导入自动配置的组件
1.7 AutoConfigurationPackage注解
你一步一步点进去,一直点到Registrar类中:
/**
     * {@link ImportBeanDefinitionRegistrar} to store the base package from the importing
     * configuration.
     */
    static class Registrar implements ImportBeanDefinitionRegistrar, DeterminableImports {

        @Override
        public void registerBeanDefinitions(AnnotationMetadata metadata,
                BeanDefinitionRegistry registry) {
            register(registry, new PackageImport(metadata).getPackageName());
        }

        @Override
        public Set<Object> determineImports(AnnotationMetadata metadata) {
            return Collections.singleton(new PackageImport(metadata));
        }
它其实是注册了一个Bean的定义。
new PackageImport(metadata).getPackageName(),它其实返回了当前主程序类的 同级以及子级 的包组件。
1.8 Import(AutoConfigurationImportSelector.class)注解
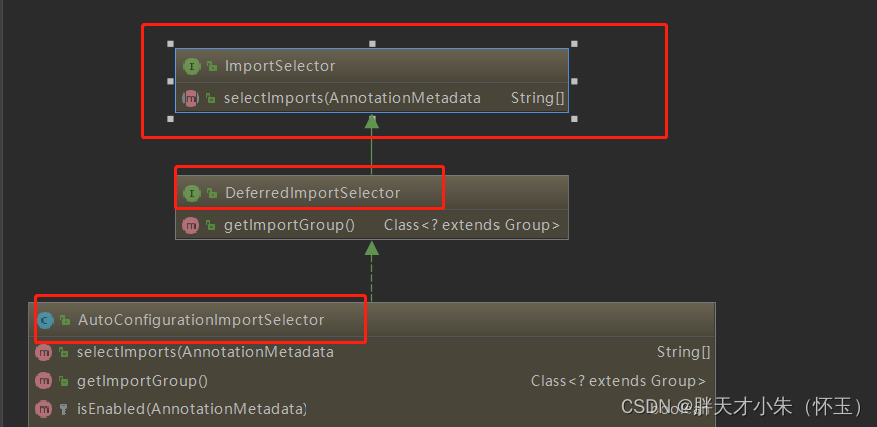
可以从图中看出 AutoConfigurationImportSelector 继承了 DeferredImportSelector 继承了 ImportSelector
ImportSelector有一个方法为:selectImports。
@Override
    public String[] selectImports(AnnotationMetadata annotationMetadata) {
        if (!isEnabled(annotationMetadata)) {
            return NO_IMPORTS;
        }
        AutoConfigurationMetadata autoConfigurationMetadata = AutoConfigurationMetadataLoader
                .loadMetadata(this.beanClassLoader);
        AnnotationAttributes attributes = getAttributes(annotationMetadata);
        List<String> configurations = getCandidateConfigurations(annotationMetadata,
                attributes);
        configurations = removeDuplicates(configurations);
        Set<String> exclusions = getExclusions(annotationMetadata, attributes);
        checkExcludedClasses(configurations, exclusions);
        configurations.removeAll(exclusions);
        configurations = filter(configurations, autoConfigurationMetadata);
        fireAutoConfigurationImportEvents(configurations, exclusions);
        return StringUtils.toStringArray(configurations);
    }
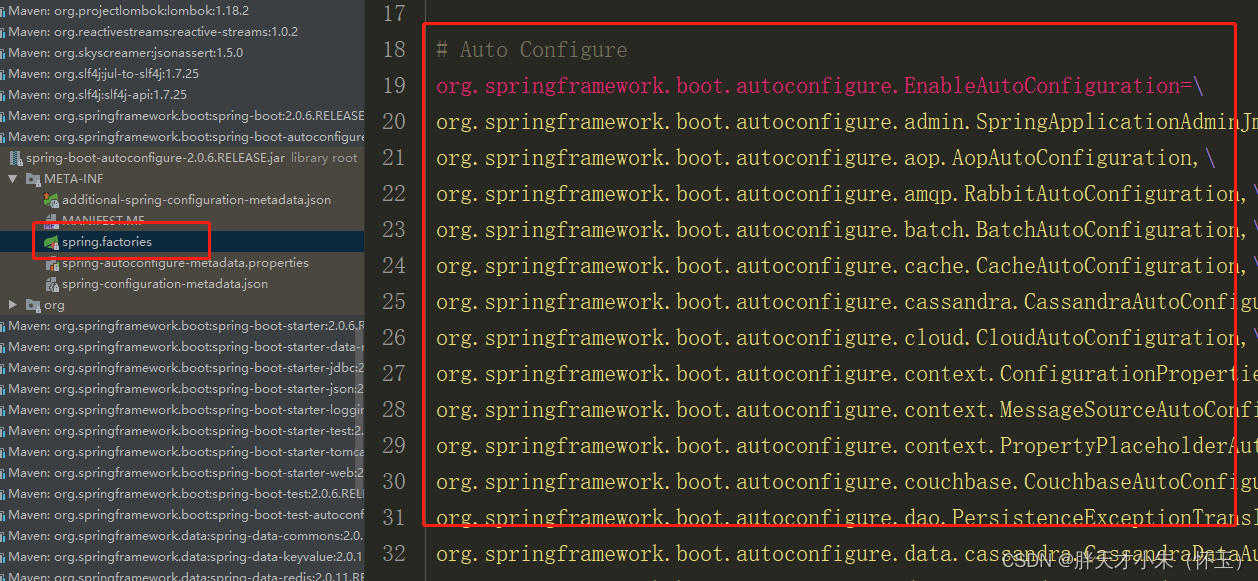
它其实是去加载 public static final String FACTORIES_RESOURCE_LOCATION = "META-INF/spring.factories";外部文件。这个外部文件,有很多自动配置的类。如下:
其中,最关键的要属@Import(EnableAutoConfigurationImportSelector.class),借助EnableAutoConfigurationImportSelector,@EnableAutoConfiguration可以帮助SpringBoot应用将所有符合条件的@Configuration配置都加载到当前SpringBoot创建并使用的IoC容器。
1.9自动配置幕后英雄:SpringFactoriesLoader详解
public abstract class SpringFactoriesLoader {
    //...
    public static <T> List<T> loadFactories(Class<T> factoryClass, ClassLoader classLoader) {
        ...
    }


    public static List<String> loadFactoryNames(Class<?> factoryClass, ClassLoader classLoader) {
        ....
    }
}
配合@EnableAutoConfiguration使用的话,它更多是提供一种配置查找的功能支持,即根据@EnableAutoConfiguration的完整类名org.springframework.boot.autoconfigure.EnableAutoConfiguration作为查找的Key,获取对应的一组@Configuration类

上图就是从SpringBoot的autoconfigure依赖包中的META-INF/spring.factories配置文件中摘录的一段内容,可以很好地说明问题。
所以,@EnableAutoConfiguration自动配置的魔法骑士就变成了:从classpath中搜寻所有的META-INF/spring.factories配置文件,并将其中org.springframework.boot.autoconfigure.EnableutoConfiguration对应的配置项通过反射(Java Refletion)实例化为对应的标注了@Configuration的JavaConfig形式的IoC容器配置类,然后汇总为一个并加载到IoC容器。
1.10 深入探索SpringApplication执行流程
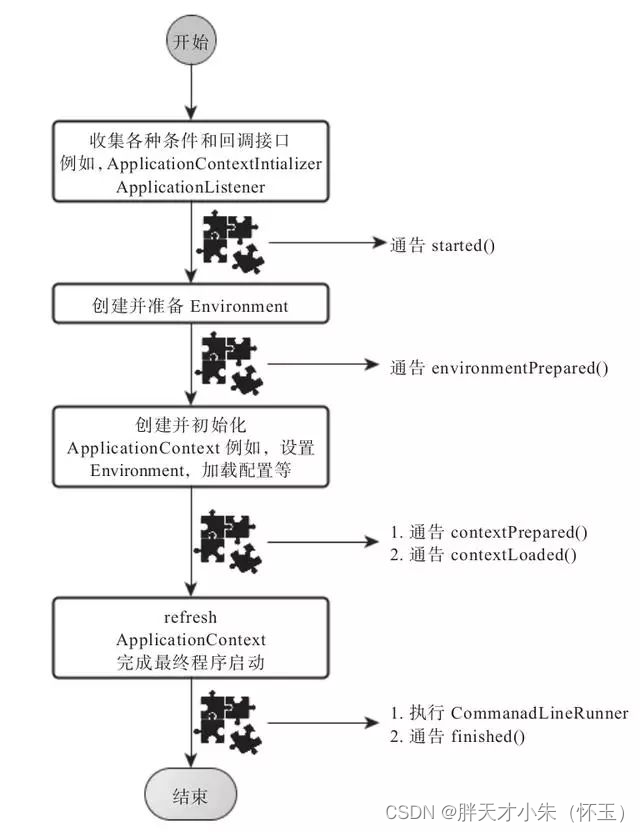
SpringApplication的run方法的实现是我们本次旅程的主要线路,该方法的主要流程大体可以归纳如下:
1) 如果我们使用的是SpringApplication的静态run方法,那么,这个方法里面首先要创建一个SpringApplication对象实例,然后调用这个创建好的SpringApplication的实例方法。在SpringApplication实例初始化的时候,它会提前做几件事情:
public static ConfigurableApplicationContext run(Object[] sources, String[] args) {
        return new SpringApplication(sources).run(args);
    }
- 根据classpath里面是否存在某个特征(org.springframework.web.context.ConfigurableWebApplicationContext)来决定是否应该创建一个为Web应用使用的ApplicationContext类型。
- 使用SpringFactoriesLoader在应用的classpath中查找并加载所有可用的ApplicationContextInitializer。
- 使用SpringFactoriesLoader在应用的classpath中查找并加载所有可用的ApplicationListener。
- 推断并设置main方法的定义类
@SuppressWarnings({ "unchecked", "rawtypes" })
    private void initialize(Object[] sources) {
        if (sources != null && sources.length > 0) {
            this.sources.addAll(Arrays.asList(sources));
        }
        this.webEnvironment = deduceWebEnvironment();
        setInitializers((Collection) getSpringFactoriesInstances(
                ApplicationContextInitializer.class));
        setListeners((Collection) getSpringFactoriesInstances(ApplicationListener.class));
        this.mainApplicationClass = deduceMainApplicationClass();
    }
2) SpringApplication实例初始化完成并且完成设置后,就开始执行run方法的逻辑了,方法执行伊始,首先遍历执行所有通过SpringFactoriesLoader可以查找到并加载的SpringApplicationRunListener。调用它们的started()方法,告诉这些SpringApplicationRunListener,“嘿,SpringBoot应用要开始执行咯!”。
public ConfigurableApplicationContext run(String... args) {
        StopWatch stopWatch = new StopWatch();
        stopWatch.start();
        ConfigurableApplicationContext context = null;
        FailureAnalyzers analyzers = null;
        configureHeadlessProperty();
        SpringApplicationRunListeners listeners = getRunListeners(args);
        listeners.starting();
        try {
            ApplicationArguments applicationArguments = new DefaultApplicationArguments(
                    args);
            ConfigurableEnvironment environment = prepareEnvironment(listeners,
                    applicationArguments);
            Banner printedBanner = printBanner(environment);
            context = createApplicationContext();
            analyzers = new FailureAnalyzers(context);
            prepareContext(context, environment, listeners, applicationArguments,
                    printedBanner);
       // 核心点:会打印springboot的启动标志,直到server.port端口启动
            refreshContext(context);
            afterRefresh(context, applicationArguments);
            listeners.finished(context, null);
            stopWatch.stop();
            if (this.logStartupInfo) {
                new StartupInfoLogger(this.mainApplicationClass)
                        .logStarted(getApplicationLog(), stopWatch);
            }
            return context;
        }
        catch (Throwable ex) {
            handleRunFailure(context, listeners, analyzers, ex);
            throw new IllegalStateException(ex);
        }
    }
3) 创建并配置当前Spring Boot应用将要使用的Environment(包括配置要使用的PropertySource以及Profile)。
private ConfigurableEnvironment prepareEnvironment(
            SpringApplicationRunListeners listeners,
            ApplicationArguments applicationArguments) {
        // Create and configure the environment
        ConfigurableEnvironment environment = getOrCreateEnvironment();
        configureEnvironment(environment, applicationArguments.getSourceArgs());
        listeners.environmentPrepared(environment);
        if (!this.webEnvironment) {
            environment = new EnvironmentConverter(getClassLoader())
                    .convertToStandardEnvironmentIfNecessary(environment);
        }
        return environment;
    }
4) 遍历调用所有SpringApplicationRunListener的environmentPrepared()的方法,告诉他们:“当前SpringBoot应用使用的Environment准备好了咯!”。
public void environmentPrepared(ConfigurableEnvironment environment) {
        for (SpringApplicationRunListener listener : this.listeners) {
            listener.environmentPrepared(environment);
        }
    }
5) 如果SpringApplication的showBanner属性被设置为true,则打印banner。
private Banner printBanner(ConfigurableEnvironment environment) {
        if (this.bannerMode == Banner.Mode.OFF) {
            return null;
        }
        ResourceLoader resourceLoader = this.resourceLoader != null ? this.resourceLoader
                : new DefaultResourceLoader(getClassLoader());
        SpringApplicationBannerPrinter bannerPrinter = new SpringApplicationBannerPrinter(
                resourceLoader, this.banner);
        if (this.bannerMode == Mode.LOG) {
            return bannerPrinter.print(environment, this.mainApplicationClass, logger);
        }
        return bannerPrinter.print(environment, this.mainApplicationClass, System.out);
    }
6) 根据用户是否明确设置了applicationContextClass类型以及初始化阶段的推断结果,决定该为当前SpringBoot应用创建什么类型的ApplicationContext并创建完成,然后根据条件决定是否添加ShutdownHook,决定是否使用自定义的BeanNameGenerator,决定是否使用自定义的ResourceLoader,当然,最重要的,将之前准备好的Environment设置给创建好的ApplicationContext使用。
7) ApplicationContext创建好之后,SpringApplication会再次借助Spring-FactoriesLoader,查找并加载classpath中所有可用的ApplicationContext-Initializer,然后遍历调用这些ApplicationContextInitializer的initialize(applicationContext)方法来对已经创建好的ApplicationContext进行进一步的处理。
@SuppressWarnings({ "rawtypes", "unchecked" })
    protected void applyInitializers(ConfigurableApplicationContext context) {
        for (ApplicationContextInitializer initializer : getInitializers()) {
            Class<?> requiredType = GenericTypeResolver.resolveTypeArgument(
                    initializer.getClass(), ApplicationContextInitializer.class);
            Assert.isInstanceOf(requiredType, context, "Unable to call initializer.");
            initializer.initialize(context);
        }
    }
8) 遍历调用所有SpringApplicationRunListener的contextPrepared()方法。
private void prepareContext(ConfigurableApplicationContext context,
            ConfigurableEnvironment environment, SpringApplicationRunListeners listeners,
            ApplicationArguments applicationArguments, Banner printedBanner) {
        context.setEnvironment(environment);
        postProcessApplicationContext(context);
        applyInitializers(context);
        listeners.contextPrepared(context);
        if (this.logStartupInfo) {
            logStartupInfo(context.getParent() == null);
            logStartupProfileInfo(context);
        }

        // Add boot specific singleton beans
        context.getBeanFactory().registerSingleton("springApplicationArguments",
                applicationArguments);
        if (printedBanner != null) {
            context.getBeanFactory().registerSingleton("springBootBanner", printedBanner);
        }

        // Load the sources
        Set<Object> sources = getSources();
        Assert.notEmpty(sources, "Sources must not be empty");
        load(context, sources.toArray(new Object[sources.size()]));
        listeners.contextLoaded(context);
    }
9) 最核心的一步,将之前通过@EnableAutoConfiguration获取的所有配置以及其他形式的IoC容器配置加载到已经准备完毕的ApplicationContext。
private void prepareAnalyzer(ConfigurableApplicationContext context,
FailureAnalyzer analyzer) {
if (analyzer instanceof BeanFactoryAware) {
((BeanFactoryAware) analyzer).setBeanFactory(context.getBeanFactory());
}
}
10) 遍历调用所有SpringApplicationRunListener的contextLoaded()方法。
public void contextLoaded(ConfigurableApplicationContext context) {
        for (SpringApplicationRunListener listener : this.listeners) {
            listener.contextLoaded(context);
        }
    }
11) 调用ApplicationContext的refresh()方法,完成IoC容器可用的最后一道工序。
private void refreshContext(ConfigurableApplicationContext context) {
        refresh(context);
        if (this.registerShutdownHook) {
            try {
                context.registerShutdownHook();
            }
            catch (AccessControlException ex) {
                // Not allowed in some environments.
            }
        }
    }
12) 查找当前ApplicationContext中是否注册有CommandLineRunner,如果有,则遍历执行它们。
private void callRunners(ApplicationContext context, ApplicationArguments args) {
        List<Object> runners = new ArrayList<Object>();
        runners.addAll(context.getBeansOfType(ApplicationRunner.class).values());
        runners.addAll(context.getBeansOfType(CommandLineRunner.class).values());
        AnnotationAwareOrderComparator.sort(runners);
        for (Object runner : new LinkedHashSet<Object>(runners)) {
            if (runner instanceof ApplicationRunner) {
                callRunner((ApplicationRunner) runner, args);
            }
            if (runner instanceof CommandLineRunner) {
                callRunner((CommandLineRunner) runner, args);
            }
        }
    }
13) 正常情况下,遍历执行SpringApplicationRunListener的finished()方法、(如果整个过程出现异常,则依然调用所有SpringApplicationRunListener的finished()方法,只不过这种情况下会将异常信息一并传入处理)
去除事件通知点后,整个流程如下:
public void finished(ConfigurableApplicationContext context, Throwable exception) {
        for (SpringApplicationRunListener listener : this.listeners) {
            callFinishedListener(listener, context, exception);
        }
    }
总结
到此,SpringBoot的核心组件完成了基本的解析,综合来看,大部分都是Spring框架背后的一些概念和实践方式,SpringBoot只是在这些概念和实践上对特定的场景事先进行了固化和升华,而也恰恰是这些固化让我们开发基于Sping框架的应用更加方便高效。

