前言:
接上一篇文章:https://zskjohn.blog.csdn.net/article/details/128931042
我们可以从官方获取到现成的镜像,例如,从Ubuntu 18.04 LTS (Bionic Beaver) Daily Build [20230210]官方下载的bionic-server-cloudimg-amd64.img 这样的文件(注意,注意,注意,openstack的架构是哪个,镜像也需要一致,本例中openstack安装的是x86_64,获取镜像的时候,只能下载amd64的,否则镜像不能实例化,arm和ppc这些的镜像是不能够使用的)。
- "bionic" 表示使用的操作系统版本,在这种情况下是 Ubuntu 18.04 LTS 版本;
- "server" 表示这个镜像是一个服务器版本的镜像;
- "cloudimg" 表示这个镜像是针对云计算的;
- "amd64" 表示这个镜像适用于 x86_64 架构的计算机。
1,
基本概念:
cloud-init是专为云计算环境中虚拟机实例/裸金属实例的初始化而开发的一个开源工具,它安装在虚拟机镜像/裸金属镜像中,创建实例时,通过nova组件的config drive把预注入的数据打包成镜像,并挂载在实例的cdrom中,实例启动时,通过读取cdrom中的相关数据,对虚拟机进行初始化配置。
2,
cloud-init的适用范围
cloudinit安装在openstack虚拟机、裸金属的镜像中,只适用于linux操作系统镜像。
Windows镜像对应需要安装cloudbase-init。
OpenStack中如果要使用Config Drive实现元数据的注入,在制作image时一定要安装cloud-init软件,否则无法实现元数据注入(官方镜像基本都已经安装过了,如果是自制的镜像,需要安装cloud-init)。
3,
Metadata和Userdata(元数据的两种类别)
Metadata只能注入主机的基本信息。
Userdata使用场景比较广,只要有配置云服务器的需求,尤其是在批量化模版化的情况下,使用userdata定制云主机是最好的选择。
4,
虚拟机实例获取metadata的方式
在OpenStack中,虚拟机中的cloud-init获取metadata信息的方式有两种 Config drive 和 metadata RESTful服务:
- Config drive方式获取metadata
Config drive 机制是指OpenStack将metadata信息写入虚拟机的一个特殊的配置设备中,然后在虚拟机启动时,自动挂载并读取 metadata信息,从而达到获取metadata的目的。
在客户端操作系统中,存储 metadata 的设备需要是ISO9660或者VFAT文件系统。
config-drive 其实就是 Metadata-Source 的 “本地” 版本,它不依赖虚拟机网络信息,客户机操作系统可以直接通过一个设备读取 Metadata 信息。
- Metadata RESTful 服务方式获取metadata
OpenStack提供了RESTful 接口,虚拟机可以通过 REST API 来获取 metadata 信息。提供该服务的组件为:nova-api-metadata。当然,要完成从虚拟机至网络节点的请求发送和相应,只有 nova-api-metadata 服务是不够的,此外共同完成这项任务的服务还有:Neutron-metadata-agent 和 Neutron-ns-metadata-proxy。
由于metadata service结构太复杂,建议使用config drive的方式获取metadata。
5,
Userdata的注入方式
userdata注入方式有多种,常用的格式有:userdata-scripts和cloud-config。
- userdata-scripts:适用于需要通过执行shell脚本初始化实例的用户,以“#!/bin/sh”开头,从用户数据来看目前大部分用户都是直接通过这种格式输入userdata的, 也适用于较复杂的部署场景。
- cloud-config: 是cloud-init支持的特有格式,它把常用的个性化配置包装成YAML文件格式提供出来,通过这种形式可以更方便的完成常用配置,以“#cloud-config”为首行区分,紧随其后的是一个关联数组,提供的键包括ssh_authorized_keys、hostname、write_files、manage_etc_hosts等。
本文示例使用的是cloud-config
metadata 在openstack中会放置在meta服务器上或者虚拟机内部,分光驱方式和修改镜像方式,后面讲到,需要虚拟机用户主动去获取,而userdata则是由cloudinit软件执行,在虚拟机实例launch时运行
从镜像名字可以看出这些官方镜像文件是预制带有cloud-init服务的(有cloud或者clouding字段的镜像文件都是已经安装过cloud-init的),如果你根据此镜像已经启动成功了一个实例,那么,现在登陆这个实例时会看到有cloud-init 这个服务的
登陆控制台,进入虚拟机实例:

OK,现在可以这么说,每一个名字里带有cloud或者clouding字样的官方镜像都内置了cloud-init这个服务。那,这个服务到底是干什么的,如何使用它?
在回答以上问题前,需要了解一下官方镜像的特点(本文只讲Linux的镜像,Windows的后面在说):
只有普通用户 ,例如下载的如果是centos的镜像的话,那么普通用户就是centos,此用户无密码,只有使用秘钥ssh的方式才可以登陆实例,root密码是不提供的,实例只有最基础的环境,比如常用的vim,wget等等软件是没有的(通常是最小化安装的操作系统),实例的主机名也无法定制,都是固定的镜像名称。
针对以上定制化需求,我们可以使用很多方法,比如,libguestfs工具集定制镜像,其中的常用工具:guestfish,guestmount,virt-sysprep(修改或者设定系统用户密码等等一系列准备工作的工具)等等,非常的多,但,如果只是一些个别的镜像需要定制修改,可能使用libguestfs工具集是一个简单的办法,那么,如果是若干个镜像需要定制化修改,工作量就非常大了(毕竟,libguestfs是一个一个镜像的定制化修改,效率值得商榷)
而由于cloud-init 基本上是一个事实上的行业标准了,基本所有的官方镜像都内置了此服务,我们使用的时候仅仅只需要一个配置文件,镜像内的cloud-init 服务将会在根据收到的配置文件,对镜像做初始化动作,例如,CentOS-7-x86_64-GenericCloud-1508.qcow2.xz这个镜像的密码设定,预安装wget这些常用软件,设定主机名都可以通过一个配置文件就搞定了,并且,其它的centos镜像也可以使用这个配置文件,仅仅在实例化镜像的时候指定这个配置文件即可。
正文:
一,
直接使用官方镜像
######注:openstack的neutron,以及秘钥,安全组等等必须条件已完成,这里不解释了
1,
上传官方镜像到glance
openstack image create "ubuntu" --file bionic-server-cloudimg-amd64.img --disk-format qcow2 --container-format bare --public2,
由于是VMware虚拟机搭建的openstack,修改镜像的磁盘格式为ide:
openstack image set --property hw_disk_bus=ide ubuntu3,
直接启动
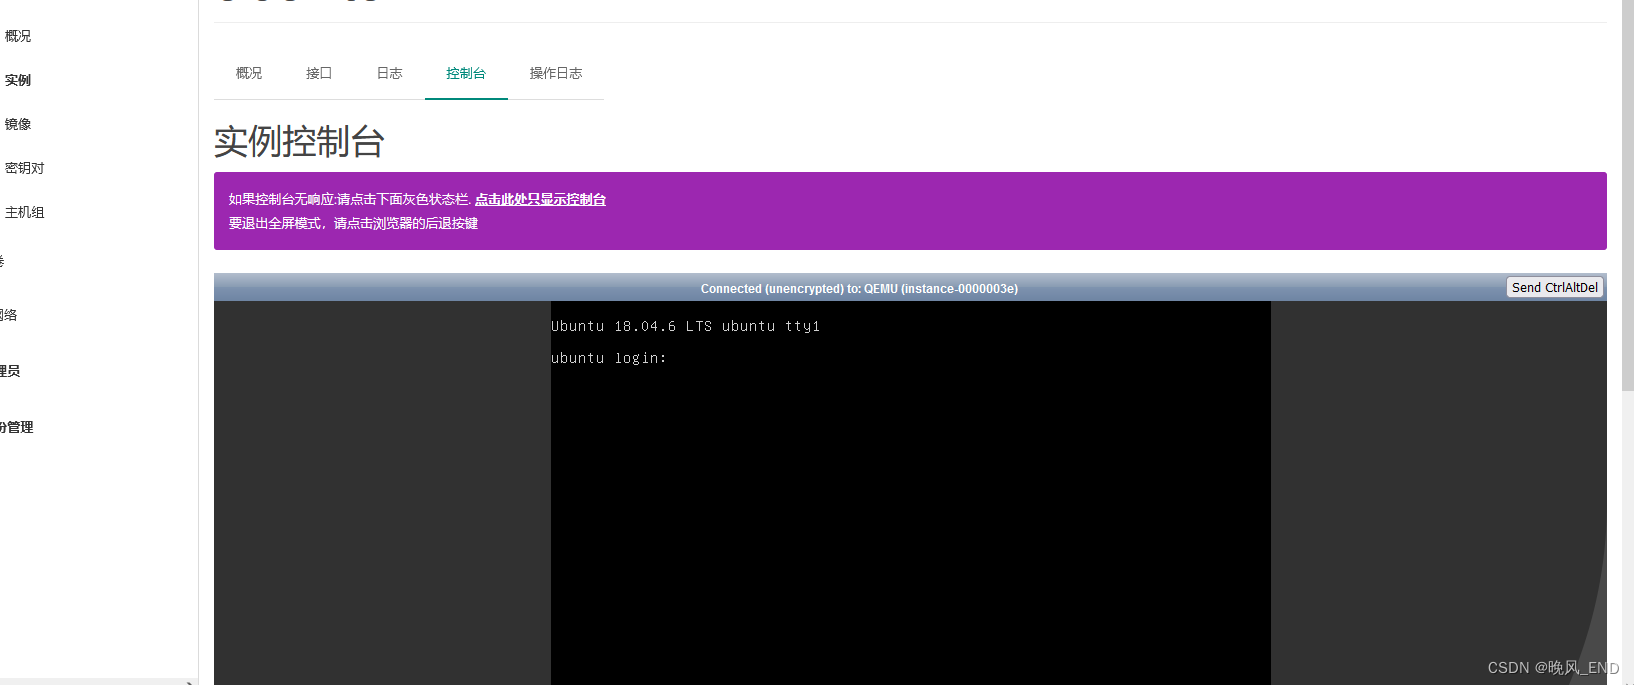
openstack server create --flavor m1.tiny --image ubuntu --key-name mykey --security-group admin --network selfservice ubuntu实例启动后,进入novnc控制台,毫无办法,只能看看,因为没有root密码或者普通用户密码
4,
绑定浮动ip 在控制节点ssh登陆以上建立的实例,使用秘钥以普通用户Ubuntu登陆实例,
[root@openstack1 opt]# openstack floating ip create provider
+---------------------+--------------------------------------+
| Field               | Value                                |
+---------------------+--------------------------------------+
| created_at          | 2023-02-12T15:25:56Z                 |
| description         |                                      |
| dns_domain          | None                                 |
| dns_name            | None                                 |
| fixed_ip_address    | None                                 |
| floating_ip_address | 192.168.123.168                      |
| floating_network_id | 688a0356-4f2b-4029-b49e-a11bbdbedf0b |
| id                  | 091444ba-b93f-45e8-8363-292bd4c875e1 |
| name                | 192.168.123.168                      |
| port_details        | None                                 |
| port_id             | None                                 |
| project_id          | 205ce8addd9444c893bd62244bcdae78     |
| qos_policy_id       | None                                 |
| revision_number     | 0                                    |
| router_id           | None                                 |
| status              | DOWN                                 |
| subnet_id           | None                                 |
| tags                | []                                   |
| updated_at          | 2023-02-12T15:25:56Z                 |
+---------------------+--------------------------------------+
[root@openstack1 opt]# openstack server add floating ip ubuntu 192.168.123.168
[root@openstack1 opt]# ssh ubuntu@192.168.123.168
The authenticity of host '192.168.123.168 (192.168.123.168)' can't be established.
ECDSA key fingerprint is SHA256:U9W/IXHQ0+WtchdaehCI2o1sE2yUw+M1kgnth2byd+Q.
ECDSA key fingerprint is MD5:a6:6a:7c:74:e7:28:3c:74:fc:68:b1:9b:f4:10:e8:58.
Are you sure you want to continue connecting (yes/no)? yes
Warning: Permanently added '192.168.123.168' (ECDSA) to the list of known hosts.
Welcome to Ubuntu 18.04.6 LTS (GNU/Linux 4.15.0-204-generic x86_64)

 * Documentation:  https://help.ubuntu.com
 * Management:     https://landscape.canonical.com
 * Support:        https://ubuntu.com/advantage

  System information as of Sun Feb 12 15:27:10 UTC 2023

  System load:  0.0               Processes:           81
  Usage of /:   2.3% of 48.27GB   Users logged in:     0
  Memory usage: 12%               IP address for ens3: 172.16.1.10
  Swap usage:   0%

Expanded Security Maintenance for Applications is not enabled.

0 updates can be applied immediately.

Enable ESM Apps to receive additional future security updates.
See https://ubuntu.com/esm or run: sudo pro status


The programs included with the Ubuntu system are free software;
the exact distribution terms for each program are described in the
individual files in /usr/share/doc/*/copyright.

Ubuntu comes with ABSOLUTELY NO WARRANTY, to the extent permitted by
applicable law.

To run a command as administrator (user "root"), use "sudo <command>".
See "man sudo_root" for details.

ubuntu@ubuntu:~$
5,
在虚拟机内部查看日志,可以看到cloud-init初始化使用秘钥的日志:
Feb 12 15:12:05 ubuntu systemd[1]: Started Update UTMP about System Runlevel Changes.
Feb 12 15:12:06 ubuntu cloud-init: #############################################################
Feb 12 15:12:06 ubuntu cloud-init: -----BEGIN SSH HOST KEY FINGERPRINTS-----
Feb 12 15:12:06 ubuntu cloud-init: 1024 SHA256:ssYh7n67IsNn0QYUmLoC7tL6JTLPAnr8a2x47tp4X4o root@ubuntu (DSA)
Feb 12 15:12:06 ubuntu cloud-init: 256 SHA256:U9W/IXHQ0+WtchdaehCI2o1sE2yUw+M1kgnth2byd+Q root@ubuntu (ECDSA)
Feb 12 15:12:06 ubuntu cloud-init: 256 SHA256:GbiqHwMBtH5lqPV2feHmioYLebVDmzs1cR9o+aD13Gs root@ubuntu (ED25519)
Feb 12 15:12:06 ubuntu cloud-init: 2048 SHA256:iXk1lobwN2tAhEIakffr3nzjokapoZ+Mt0dFgfsP4Os root@ubuntu (RSA)
Feb 12 15:12:06 ubuntu cloud-init: -----END SSH HOST KEY FINGERPRINTS-----
Feb 12 15:12:06 ubuntu cloud-init: #############################################################
Feb 12 15:12:06 ubuntu systemd-timesyncd[555]: Synchronized to time server 185.125.190.56:123 (ntp.ubuntu.com).
Feb 12 15:12:07 ubuntu cloud-init[1133]: Cloud-init v. 22.4.2-0ubuntu0~18.04.1 running 'modules:final' at Sun, 12 Feb 2023 15:12:06 +0000. Up 64.11 seconds.
Feb 12 15:12:07 ubuntu cloud-init[1133]: Cloud-init v. 22.4.2-0ubuntu0~18.04.1 finished at Sun, 12 Feb 2023 15:12:07 +0000. Datasource DataSourceOpenStackLocal [net
OK,这样的虚拟机实例使用上是非常不方便的,并且时区,apt源什么的都还是使用的国外的网址,那么,如果使用cloud-init 配置文件,将会是非常简单的一个事情。
二,
使用cloud-init 配置文件定制化启动虚拟机实例
1,
在控制节点,新建文件,名称为ubuntu.config ,内容如下:
cat >ubuntu.config <<EEE
#cloud-config
chpasswd:
    list: |
        root:123456
        ubuntu:ubuntu
    expire: false
ssh_pwauth: yes


hostname: ubuntutest

apt:
    primary:
        - arches: [default]
          uri: "http://mirrors.aliyun.com/ubuntu/"
          search:
            - "http://mirrors.aliyun.com/ubuntu/"


resolv_conf:
    nameservers: ['223.6.6.6', '8.8.8.8']
    searchdomains:
        - localdomain
    domain: localdomain
    options:
        rotate: true
        timeout: 1
manage_resolv_conf: true

packages:
 - apache2

timezone: 'Asia/Shanghai'

runcmd:
    - [ mkdir, /dropme ]
    - [ sed, -i, "$a nameserver 223.6.6.6", /etc/resolv.conf ]
EEE
2,
启动虚拟机实例的时候指定这个文件:
openstack server create --flavor m1.tiny --image ubuntu --key-name mykey --security-group admin --network selfservice --user-data ./ubuntu.config --config-drive true ubuntu3,实例启动后,进入控制台,查看cloud-init是否生效:
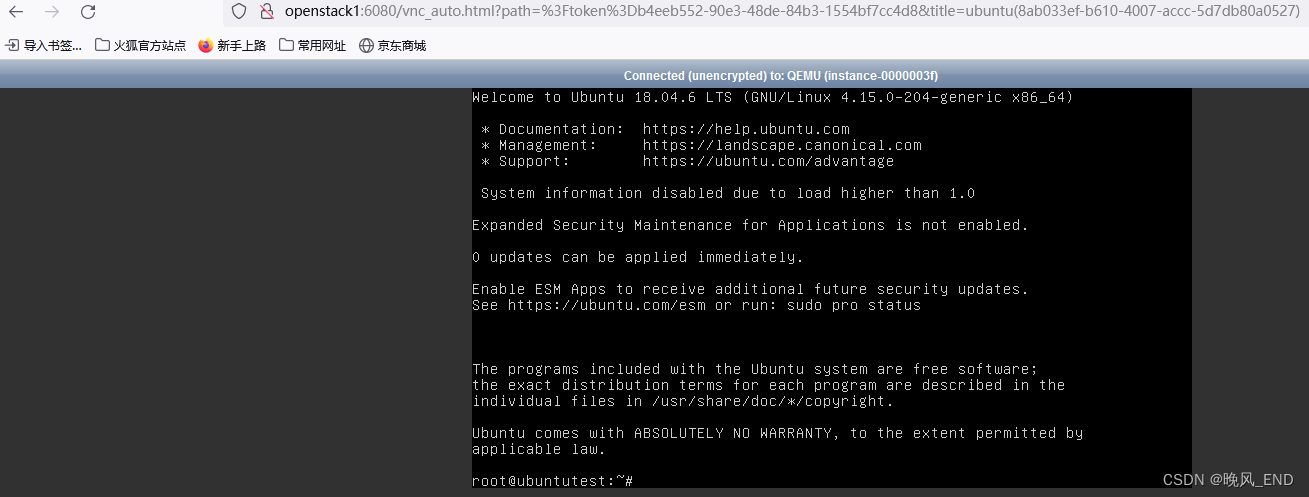
主机名确实是ubuntutest,并且使用密码123456可以进入系统,apt源也更新为了阿里云的
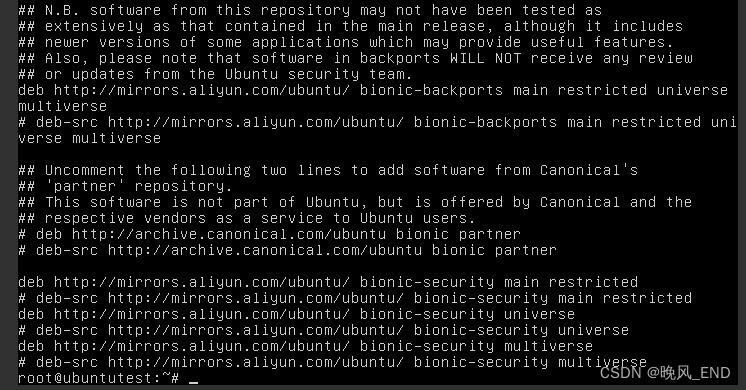
此时,重新绑定一个浮动IP就可以在其他地方ssh连接了,注意,是重新绑定浮动IP,否则会出现以下报错:
[root@openstack1 opt]# ssh 192.168.123.168
@@@@@@@@@@@@@@@@@@@@@@@@@@@@@@@@@@@@@@@@@@@@@@@@@@@@@@@@@@@
@    WARNING: REMOTE HOST IDENTIFICATION HAS CHANGED!     @
@@@@@@@@@@@@@@@@@@@@@@@@@@@@@@@@@@@@@@@@@@@@@@@@@@@@@@@@@@@
IT IS POSSIBLE THAT SOMEONE IS DOING SOMETHING NASTY!
Someone could be eavesdropping on you right now (man-in-the-middle attack)!
It is also possible that a host key has just been changed.
The fingerprint for the ECDSA key sent by the remote host is
SHA256:etQl3iZ7QCNN866MdwiS8iL0p8uEU0FwTq5xBC139+k.
Please contact your system administrator.
Add correct host key in /root/.ssh/known_hosts to get rid of this message.
Offending ECDSA key in /root/.ssh/known_hosts:14
ECDSA host key for 192.168.123.168 has changed and you have requested strict checking.
ssh登陆虚拟机实例后,查看该实例的系统日志,可以看到cloud-init的相关日志,截取部分内容,如下:
#¥#¥¥¥¥¥¥¥注:最后一行是cloud-init(也可以称之为ci)修改密码了
Feb 12 15:51:39 ubuntutest cloud-init[940]: Cloud-init v. 22.4.2-0ubuntu0~18.04.1 running 'init' at Sun, 12 Feb 2023 15:51:32 +0000. Up 29.18 seconds.
Feb 12 15:51:39 ubuntutest cloud-init[940]: ci-info: +++++++++++++++++++++++++++++++++++++++Net device info+++++++++++++++++++++++++++++++++++++++
Feb 12 15:51:39 ubuntutest cloud-init[940]: ci-info: +--------+------+------------------------------+---------------+--------+-------------------+
Feb 12 15:51:39 ubuntutest cloud-init[940]: ci-info: | Device |  Up  |           Address            |      Mask     | Scope  |     Hw-Address    |
Feb 12 15:51:39 ubuntutest cloud-init[940]: ci-info: +--------+------+------------------------------+---------------+--------+-------------------+
Feb 12 15:51:39 ubuntutest cloud-init[940]: ci-info: |  ens3  | True |         172.16.1.15          | 255.255.255.0 | global | fa:16:3e:0f:ae:1e |
Feb 12 15:51:39 ubuntutest cloud-init[940]: ci-info: |  ens3  | True | fe80::f816:3eff:fe0f:ae1e/64 |       .       |  link  | fa:16:3e:0f:ae:1e |
Feb 12 15:51:39 ubuntutest cloud-init[940]: ci-info: |   lo   | True |          127.0.0.1           |   255.0.0.0   |  host  |         .         |
Feb 12 15:51:39 ubuntutest cloud-init[940]: ci-info: |   lo   | True |           ::1/128            |       .       |  host  |         .         |
Feb 12 15:51:39 ubuntutest cloud-init[940]: ci-info: +--------+------+------------------------------+---------------+--------+-------------------+
Feb 12 15:51:39 ubuntutest cloud-init[940]: ci-info: +++++++++++++++++++++++++++++++Route IPv4 info++++++++++++++++++++++++++++++++
Feb 12 15:51:39 ubuntutest cloud-init[940]: ci-info: +-------+-----------------+------------+-----------------+-----------+-------+
Feb 12 15:51:39 ubuntutest cloud-init[940]: ci-info: | Route |   Destination   |  Gateway   |     Genmask     | Interface | Flags |
Feb 12 15:51:39 ubuntutest cloud-init[940]: ci-info: +-------+-----------------+------------+-----------------+-----------+-------+
Feb 12 15:51:39 ubuntutest cloud-init[940]: ci-info: |   0   |     0.0.0.0     | 172.16.1.1 |     0.0.0.0     |    ens3   |   UG  |
Feb 12 15:51:39 ubuntutest cloud-init[940]: ci-info: |   1   | 169.254.169.254 | 172.16.1.1 | 255.255.255.255 |    ens3   |  UGH  |
Feb 12 15:51:39 ubuntutest cloud-init[940]: ci-info: |   2   |    172.16.1.0   |  0.0.0.0   |  255.255.255.0  |    ens3   |   U   |
Feb 12 15:51:39 ubuntutest cloud-init[940]: ci-info: +-------+-----------------+------------+-----------------+-----------+-------+
Feb 12 15:51:39 ubuntutest cloud-init[940]: ci-info: +++++++++++++++++++Route IPv6 info+++++++++++++++++++
Feb 12 15:51:39 ubuntutest cloud-init[940]: ci-info: +-------+-------------+---------+-----------+-------+
Feb 12 15:51:39 ubuntutest cloud-init[940]: ci-info: | Route | Destination | Gateway | Interface | Flags |
Feb 12 15:51:39 ubuntutest cloud-init[940]: ci-info: +-------+-------------+---------+-----------+-------+
Feb 12 15:51:39 ubuntutest cloud-init[940]: ci-info: |   1   |  fe80::/64  |    ::   |    ens3   |   U   |
Feb 12 15:51:39 ubuntutest cloud-init[940]: ci-info: |   3   |    local    |    ::   |    ens3   |   U   |
Feb 12 15:51:39 ubuntutest cloud-init[940]: ci-info: |   4   |   ff00::/8  |    ::   |    ens3   |   U   |
Feb 12 15:51:39 ubuntutest cloud-init[940]: ci-info: +-------+-------------+---------+-----------+-------+
Feb 12 15:51:39 ubuntutest cloud-init[940]: 2023-02-12 15:51:32,379 - schema.py[WARNING]: Deprecated cloud-config provided:
Feb 12 15:51:39 ubuntutest cloud-init[940]: chpasswd.list: DEPRECATED: List of ``username:password`` pairs. Each user will have the corresponding password set. A password can be randomly generated by specifying ``RANDOM`` or ``R`` as a user's password. A hashed password, created by a tool like ``mkpasswd``, can be specified. A regex (``r'\$(1|2a|2y|5|6)(\$.+){2}'``) is used to determine if a password value should be treated as a hash.
在虚拟机内也可以看到apache是启动的:
ubuntu@ubuntutest:~$ systemctl status apache2
● apache2.service - The Apache HTTP Server
   Loaded: loaded (/lib/systemd/system/apache2.service; enabled; vendor preset: enabled)
  Drop-In: /lib/systemd/system/apache2.service.d
           └─apache2-systemd.conf
   Active: active (running) since Sun 2023-02-12 23:52:36 CST; 21min ago
 Main PID: 2536 (apache2)
    Tasks: 55 (limit: 1151)
   CGroup: /system.slice/apache2.service
           ├─2536 /usr/sbin/apache2 -k start
           ├─2563 /usr/sbin/apache2 -k start
           └─2564 /usr/sbin/apache2 -k start

Feb 12 23:52:36 ubuntutest systemd[1]: Starting The Apache HTTP Server...
Feb 12 23:52:36 ubuntutest apachectl[2515]: AH00558: apache2: Could not reliably determine the server's fully qualified domain name, using 172.16.1.15. Set the 'Serv
Feb 12 23:52:36 ubuntutest systemd[1]: Started The Apache HTTP Server.
可以看到虚拟机内部有一个虚拟光驱,挂载光驱,看看里面有什么?
root@ubuntutest:/mnt/openstack/latest# lsblk
NAME    MAJ:MIN RM  SIZE RO TYPE MOUNTPOINT
loop0     7:0    0  492K  1 loop /mnt
sda       8:0    0   50G  0 disk
├─sda1    8:1    0 49.9G  0 part /
├─sda14   8:14   0    4M  0 part
└─sda15   8:15   0  106M  0 part /boot/efi
sr0      11:0    1  492K  0 rom
root@ubuntutest:/mnt/openstack/latest# blkid
/dev/sda1: LABEL="cloudimg-rootfs" UUID="389aa1a9-4466-4e69-8f3f-9bfc5cfc4bbd" TYPE="ext4" PARTUUID="4d7b5a03-f968-4e9e-af71-dcc3028f8d76"
/dev/sda15: LABEL="UEFI" UUID="8374-EB2F" TYPE="vfat" PARTUUID="f29c5fa0-6fb6-4f4f-b04f-2ccae321cd4d"
/dev/sr0: UUID="2023-02-12-23-50-11-00" LABEL="config-2" TYPE="iso9660"
/dev/loop0: UUID="2023-02-12-23-50-11-00" LABEL="config-2" TYPE="iso9660"
/dev/sda14: PARTUUID="63375218-4ce6-4cc2-b0f6-22d1421c41fe"
###挂载虚拟光驱
root@ubuntutest:/mnt/openstack/latest# mount -o loop -t iso9660 /dev/sr0 /mnt
挂载之后,可以看到latest目录下有一个user_data 文本文件,此文件就是前面注入的ubuntu.config 这个文件,内容是和它一样的
root@ubuntutest:/mnt/openstack/latest# pwd
/mnt/openstack/latest
root@ubuntutest:/mnt/openstack/latest# ls
meta_data.json  network_data.json  user_data  vendor_data.json  vendor_data2.json
#########小结:这样的方式修改定制官方镜像非常的方便,并且是可以大批量的修改定制,可以理解为一个模板文件解决了基本所有的困扰。
centos7的ci配置文件如下:
[root@openstack1 opt]# cat /tmp/centos.config
#cloud-config
chpasswd:
    list: |
        root:123456
        centos:centos
    expire: false
ssh_pwauth: yes

hostname: centostest

yum_repos:
    epel-163:
        baseurl: http://mirrors.163.com/centos/$releasever/os/$basearch/
        name: Centos-7
        enabled: true

resolv_conf:
    nameservers: ['223.6.6.6', '8.8.8.8']
    searchdomains:
        - localdomain
    domain: localdomain
    options:
        rotate: true
        timeout: 1
manage_resolv_conf: true


packages:
    - vim
    - wget
    - httpd

timezone: 'Asia/Shanghai'

runcmd:
    - [ sed, -i, "s/^ *SELINUX=enforcing/SELINUX=disabled/g", /etc/selinux/config ]
    - [ mkdir, /fuck ]
    - [ touch, /root/123456 ]
    - [ sed, -i, "s/^ *nameserver.*/nameserver 223.6.6.6/g", /etc/resolv.conf ]
    - [ rpm, --import, /etc/pki/rpm-gpg/RPM-GPG-KEY-CentOS-7 ]

power_state:
    delay: now
    mode: reboot
    message: reboot now
    timeout: 30
    condition: true
三,
openstack中nova服务关于config_drive的设置
在上面的演示中,看到了一个虚拟光驱在虚拟机实例中,那么,这个虚拟光驱哪来的?
在nova的配置文件/etc/nova/nova.conf文件内:
config_drive_format有两个值,ISO9660和vfat,对应于虚拟光驱和虚拟磁盘
默认是 iso9660,但这会导致 instance 无法在线迁移,必须设置成config_drive_format=vfat 才能在线迁移。
# * A compute node running Hyper-V hypervisor can be configured to attach
#   configuration drive as a CD drive. To attach the configuration drive as a CD
#   drive, set the ``[hyperv] config_drive_cdrom`` option to true.
#  (string value)
# Possible values:
# iso9660 - <No description provided>
# vfat - <No description provided>
#config_drive_format=iso9660
还有一个配置,如果此值是true,那么,镜像实例化的时候可以不加--config-drive true,默认是不启用config注入:
#force_config_drive=false