概述
本文续上一篇博文,上一篇文章中验证了C# .NET Framework (Web Service) + STK + Cesium前端显示的相关技术,本篇通过STK安装附带的Pro Tutorial实例以及Export CZML插件演示如何创建STK场景,创建对象,计算Access,并通过插件输出CZML文件,以及在客户端加载显示场景。
CZML是一种JSON格式的用于描述时间动态图形场景的规范。CZML主要用在Cesium客户端浏览器中显示,其能够描述线、点、广告牌、模型和其他图形基元,并指定它们如何随时间变化。通过CZML扩展资源,可以实现更丰富的场景效果,例如显示STK场景中传感器(Sensor)的探测动态等。
任务目标
本实例在服务端参照STKPro Stutorial给出的实例代码生成STK场景,通过STK的Export CZML插件输出czml格式文件(存储在服务器本地),客户端浏览器通过加载czml文件实现场景的复现。
环境及版本
STK 11.6
VS2017(C#, .NETFramework 4.8)
Cesium-1.99
相关资源
参见本系列上一篇博文:https://blog.csdn.net/wangyulj/article/details/128914391
实现过程
服务端场景生成
代码如下(在STK示例代码基础上增加了注释):
[WebMethod(Description = "以STK Tutorial场景为例输出czml文件")]
public void CzmlExport()
{
string description = ""; // 计算过程、结果或异常等的描述
this.m_STKApp = null;
this.m_STKRoot = null;
//--------------------------------------------------------
// 参照STK Pro Tutorial创建场景,并输出czml文件
//--------------------------------------------------------
if (!InvokeSTK(out description))
{
StkCalCommon.packAndResponse(this.Context, -1, description, "");
return;
}
// 设置场景各计算单位(有可能之前的场景设置不同,最好是重置一遍)
SetUnits();
// 设置仿真时间:startTime, stopTime, epoch
string startTime = "1 Jul 2002 00:00:00.00";
string stopTime = "1 Jul 2002 04:00:00.00";
string epoch = "1 Jul 2002 00:00:00.00";
SetSimuTimes(startTime, stopTime, epoch);
//currently there is no way to set the 2d graphics properties for the scenario listed in the tutorial
// 创建地面设施
// AgESTKObjectType Enumeration
// IAgScenario 接口实现了 IAgStkObject 接口以及 IAgLifetimeInformation 接口
// 此处用的是 m_STKRoot.CurrentScenario 的 IAgStkObject 接口的 Children 属性的 New() 方法
// m_STKRoot.CurrentScenario.Children : IAgStkObjectCollection Interface,表示一组STK对象的集合
IAgFacility baikonur = (IAgFacility)this.m_STKRoot.CurrentScenario.Children.New(AgESTKObjectType.eFacility, "Baikonur");
// IAgFacility.UseTerrain:选择是否使用地形数据自动设置(facility)高度
baikonur.UseTerrain = false;
// -- AgEPositionType:属于STK Util库,定了7种位置类型:
// eCartesian - 笛卡尔坐标:根据对象位置向量的 X、Y 和 Z 分量指定的位置,其中 Z 轴指向北极,X 轴穿过 0 度纬度/0 度经度。
// eCylindrical - 圆柱:根据半径(极坐标)、经度(以度数从 -360.0 度到 +360.0 度测量)和对象位置矢量的 Z 分量指定的位置。
// eGeocentric - 地心:以纬度(地球表面上子点的球纬度)、经度和高度指定的位置。
// eGeodeti - 大地测量:根据纬度(参考椭球法线与赤道平面之间的角度)、经度和高度指定的位置。
// eSpherical - 球面:根据纬度(地球表面子点的球面纬度)、经度和半径(物体距地球中心的距离)指定的位置。
// ePlanetocentric - 行星中心:根据纬度(地球表面子点的球面纬度)、经度和高度指定的位置。
// ePlanettodetic - 行星大地测量:根据纬度(参考椭球法线与赤道平面之间的角度)、经度和高度指定的位置。
// -- 此处用的是 ePlanetodetic,根据维度(参考椭球法线与赤道平面之间的角度)、维度和高度指定位置
IAgPlanetodetic planetodetic = (IAgPlanetodetic)baikonur.Position.ConvertTo(AgEPositionType.ePlanetodetic);
planetodetic.Lat = 48.0;
planetodetic.Lon = 55.0;
planetodetic.Alt = 0.0;
baikonur.Position.Assign(planetodetic);
// 注意在运算中在特定的STK对象(例如IAgFacility)与通用的STK对象(IAgStkObject)之间的转换
((IAgStkObject)baikonur).ShortDescription = "Launch Site";
((IAgStkObject)baikonur).LongDescription = "Launch site in Kazakhstan. Also known as Tyuratam.";
// 继续创建两个地面站(设施)
IAgFacility perth = (IAgFacility)m_STKRoot.CurrentScenario.Children.New(AgESTKObjectType.eFacility, "Perth");
IAgFacility wallops = (IAgFacility)m_STKRoot.CurrentScenario.Children.New(AgESTKObjectType.eFacility, "Wallops");
perth.UseTerrain = false;
planetodetic = (IAgPlanetodetic)perth.Position.ConvertTo(AgEPositionType.ePlanetodetic);
planetodetic.Lat = -31.0;
planetodetic.Lon = 116.0;
planetodetic.Alt = 0;
perth.Position.Assign(planetodetic);
((IAgStkObject)perth).ShortDescription = "Australian Tracking Station";
wallops.UseTerrain = false;
planetodetic = (IAgPlanetodetic)wallops.Position.ConvertTo(AgEPositionType.ePlanetodetic);
planetodetic.Lat = 37.8602;
planetodetic.Lon = -75.5095;
planetodetic.Alt = -0.0127878;
wallops.Position.Assign(planetodetic);
((IAgStkObject)wallops).ShortDescription = "NASA Launch Site/Tracking Station";
// 从现有数据库添加地面设施(示例代码)
// 执行connct命令示例
AGI.STKUtil.AgExecCmdResult facDbResult = (AgExecCmdResult)m_STKRoot.ExecuteCommand("GetDirectory / Database Facility");
string facDataDir = facDbResult[0]; // 取返回结果的第一个元素
// @符号:可使字符串不必使用转义序列
string filelocation = facDataDir + @"\stkFacility.fd";
string command = "ImportFromDB * Facility \"" + filelocation + "\"Class Facility SiteName \"Santiago Station AGO 3 STDN AGO3\" Network \"NASA NEN\" Rename Santiago";
m_STKRoot.ExecuteCommand(command);
command = "ImportFromDB * Facility \"" + filelocation + "\"Class Facility SiteName \"White Sands\" Network \"Other\" Rename WhiteSands";
m_STKRoot.ExecuteCommand(command);
// 获取刚刚创建的两个 Facility 对象
IAgFacility santiago = (IAgFacility)m_STKRoot.CurrentScenario.Children["Santiago"];
IAgFacility whitesands = (IAgFacility)m_STKRoot.CurrentScenario.Children["WhiteSands"];
// ***.Graphics : IAgFaGraphics,修改地面设置的(显示)颜色
// 为啥不用 FromArgb 方法之外的其他形式,直接一个 int 参数实在是不直观
// 可以注释掉下面4行,实际效果比价差,颜色暗,还不如默认的颜色,也可以根据实际效果调整
//baikonur.Graphics.Color = Color.Lime;
//perth.Graphics.Color = Color.FromArgb(16777215);
//wallops.Graphics.Color = Color.FromArgb(13421772);
//santiago.Graphics.Color = Color.FromArgb(88888);
//whitesands.Graphics.Color = Color.FromArgb(1234567);
// 创建 Target 对象,与创建 Facility 对象基本一致
IAgTarget iceberg = (IAgTarget)m_STKRoot.CurrentScenario.Children.New(AgESTKObjectType.eTarget, "Iceberg");
iceberg.UseTerrain = false;
planetodetic = (IAgPlanetodetic)iceberg.Position.ConvertTo(AgEPositionType.ePlanetodetic);
planetodetic.Lat = 74.91;
planetodetic.Lon = -74.5;
planetodetic.Alt = 0.0;
iceberg.Position.Assign(planetodetic);
((IAgStkObject)iceberg).ShortDescription = "Only the tip.";
// 创建 Ship 对象
// AgShip类实现了如下接口:IAgGreatArcVehicle, IAgLifetimeInformation, IAgProvideSpatialInfo, IAgShip, IAgStkObject
IAgShip cruise = (IAgShip)m_STKRoot.CurrentScenario.Children.New(AgESTKObjectType.eShip, "Cruise");
// 设置路径预报器,SetRouteType()是IAgGreatArcVehicle接口方法
// 包括AgGroundVehicle, AgAircraft, AgShip等三个COM类(CoClass)实现了 IAgGreatArcVehicle 接口
// AgEVePropagatorType,因为涵盖了卫星的轨道预报器,有点多,定义了18种,其中大弧预报器用于飞机、船只、地面车辆。
cruise.SetRouteType(AgEVePropagatorType.ePropagatorGreatArc);
IAgVePropagatorGreatArc greatArc = (IAgVePropagatorGreatArc)cruise.Route;
IAgCrdnEventIntervalSmartInterval smartInterval = greatArc.EphemerisInterval;
// 下面方法的第二个参数没有用 stopTime,而是STK计算模块根据Ship对象的路径及速度(速度应该是一个系统默认值)
// 计算,根据czml文件的输出结果判断,Ship沿路径点需要5天才能到达目的地,而其他对象的计算时间均约定为4小时,
// 所以在czml文件的仿真时间中,是取场景中各对象的仿真时间的最大值为
smartInterval.SetExplicitInterval(startTime, smartInterval.FindStopTime());
greatArc.Method = AgEVeWayPtCompMethod.eDetermineTimeAccFromVel;
// 设置 Ship 的路径点
AddWaypoint(greatArc.Waypoints, 44.1, -8.5, 0.0, .015, 0.0);
AddWaypoint(greatArc.Waypoints, 51.0, -26.6, 0.0, .015, 0.0);
AddWaypoint(greatArc.Waypoints, 52.1, -40.1, 0.0, .015, 0.0);
AddWaypoint(greatArc.Waypoints, 60.2, -55.0, 0.0, .015, 0.0);
AddWaypoint(greatArc.Waypoints, 68.2, -65.0, 0.0, .015, 0.0);
AddWaypoint(greatArc.Waypoints, 72.5, -70.1, 0.0, .015, 0.0);
AddWaypoint(greatArc.Waypoints, 74.9, -74.5, 0.0, .015, 0.0);
// AgEVeAttitude(姿态类型)定义了两个值:eAttitudeRealtime, eAttitudeStandard
// 设置大弧预报器的各参数,然后进行路径计算
cruise.SetAttitudeType(AgEVeAttitude.eAttitudeStandard);
IAgVeRouteAttitudeStandard attitude = (IAgVeRouteAttitudeStandard)cruise.Attitude;
attitude.Basic.SetProfileType(AgEVeProfile.eProfileECFVelocityAlignmentWithRadialConstraint);
cruise.Graphics.WaypointMarker.IsWaypointMarkersVisible = true;
cruise.Graphics.WaypointMarker.IsTurnMarkersVisible = true;
greatArc.Propagate(); // 轨道预报(计算)
//===========================================================================
// 创建卫星,TDRS: Tracking & Data Relay Satellite
// IAgSatellite 其实只有两个接口方法:SetAttitudeType, SetPropagatorType,分别指定姿态和预报器类型
// 相比 IAgShip,IAgSatellite 仅实现了三个接口IAgStkObject,IAgLifetimeInformation,IAgProvideSpatialInfo
IAgSatellite tdrs = (IAgSatellite)m_STKRoot.CurrentScenario.Children.New(AgESTKObjectType.eSatellite, "TDRS");
// 设置轨道预报器(类型),二体(运动)预报器的应用实例代码
tdrs.SetPropagatorType(AgEVePropagatorType.ePropagatorTwoBody);
// 二体问题,或者开普勒运动,预报器只考虑来自地球的引力,将其建模为一个质点
IAgVePropagatorTwoBody twobody = (IAgVePropagatorTwoBody)tdrs.Propagator;
// IAgOrbitState:系统定义了7种 Orbit State(轨道状态的坐标类型):
// Cartesian, Classical, Delaunay, Equinoctial, Geodetic, MixedSpherical, Spherical
IAgOrbitStateClassical classical = (IAgOrbitStateClassical)twobody.InitialState.Representation.ConvertTo(AgEOrbitStateType.eOrbitStateClassical);
classical.CoordinateSystemType = AgECoordinateSystem.eCoordinateSystemJ2000;
smartInterval = twobody.EphemerisInterval;
smartInterval.SetExplicitInterval(startTime, stopTime);
twobody.Step = 60; // 秒(s)
// AgEClassicalLocation预定义值包括:
// eLocationArgumentOfLatitude - 使用纬度参数指定航天器位置。
// eLocationExcentricAnomaly - 使用 Eccentric Anomaly 指定航天器位置。
// eLocationMeanAnomaly - 使用平均异常来指定航天器位置。
// eLocationTimePastAN - 使用经过升交点的时间指定航天器位置。
// eLocationTimePastPerigee - 使用 Time Past Perigee 指定航天器位置。
// eLocationTrueAnomaly - 使用 True Anomaly 指定航天器位置。
classical.LocationType = AgEClassicalLocation.eLocationTrueAnomaly;
IAgClassicalLocationTrueAnomaly trueAnomaly = (IAgClassicalLocationTrueAnomaly)classical.Location;
// ture anomaly: 真近点角
trueAnomaly.Value = 178.845262;
// 利用轨道周期和偏心率确定轨道形状
classical.SizeShapeType = AgEClassicalSizeShape.eSizeShapePeriod;
// IAgClassicalSizeShapePeriod:使用周期和偏心率指定(卫星的)轨道大小和形状
IAgClassicalSizeShapePeriod period = (IAgClassicalSizeShapePeriod)classical.SizeShape;
// Eccentricity: 偏心率,离心率
period.Eccentricity = 0.0;
// 轨道周期,基于假定的二体运动的轨道周期
period.Period = 86164.090540;
// classical.Orientation: IAgClassicalOrientation Interface
// 近地点角:从升交点到在卫星运动方向和轨道平面中测量的偏心矢量(轨道最低点)的角度
classical.Orientation.ArgOfPerigee = 0.0;
// 轨道倾角
classical.Orientation.Inclination = 0.0;
// 升交点类型包括:LAN(Longitude of Ascending Node,升交点经度), RAAN(升交点赤经)
// 升交点经度:卫星从南向北穿过惯性赤道的地球固定经度(the Earth-fixed longitude where the satellite crosses the inertial equator form south to north)
// LAN : the Earth-fixed longitude where the satellite crosses the inertial equator form south to north
// RAAN: the angle from the inertial X axis to the ascending node measured in a right-handed sense about the inertial Z axis in the equatorial plane
classical.Orientation.AscNodeType = AgEOrientationAscNode.eAscNodeLAN;
IAgOrientationAscNodeLAN lan = (IAgOrientationAscNodeLAN)classical.Orientation.AscNode;
// 升交点经度
lan.Value = 259.999982;
twobody.InitialState.Representation.Assign(classical);
// 执行轨道计算(预报)
twobody.Propagate();
// 从数据库(文件)创建卫星
AGI.STKUtil.AgExecCmdResult satDbResult = (AgExecCmdResult)m_STKRoot.ExecuteCommand("GetDirectory / Database Satellite");
string satDataDir = satDbResult[0];
filelocation = satDataDir + @"\stkSatDB.sd";
// STK示例代码此处有一个bug,Rename的参数“TDRS 3”与后续代码实际使用的名称不一致,少了一个下划线
// 在CustomApplications项目中的代码是正确的(Automation中的代码有bug)
//command = "ImportFromDB * Satellite \"" + filelocation + "\" Rename \"TDRS 3\" Propagate On CommonName \"TDRS 3\"";
command = "ImportFromDB * Satellite \"" + filelocation + "\" Rename TDRS_3 Propagate On CommonName \"TDRS 3\"";
m_STKRoot.ExecuteCommand(command);
// 获取刚刚从数据库文件创建的卫星对象
IAgSatellite tdrsC = (IAgSatellite)m_STKRoot.CurrentScenario.Children["TDRS_3"];
// 需要重新计算(预报)报道,用的是SGP4轨道预报器(简化的通用摄动预报器,与TLE一起使用)
IAgVePropagatorSGP4 sgp4 = (IAgVePropagatorSGP4)tdrsC.Propagator;
smartInterval = sgp4.EphemerisInterval;
smartInterval.SetExplicitInterval(startTime, stopTime);
// 创建ERS(Earth Resources Satellite)卫星
IAgSatellite ers1 = (IAgSatellite)m_STKRoot.CurrentScenario.Children.New(AgESTKObjectType.eSatellite, "ERS1");
// j4: J4摄动(二阶)预报器,考虑了由于地球扁率引起的轨道要素的长期变化
ers1.SetPropagatorType(AgEVePropagatorType.ePropagatorJ4Perturbation);
IAgVePropagatorJ4Perturbation j4 = (IAgVePropagatorJ4Perturbation)ers1.Propagator;
smartInterval = j4.EphemerisInterval;
smartInterval.SetExplicitInterval(startTime, stopTime);
j4.Step = 60.00;
// J4预报器的参数设置还蛮多的
IAgOrbitState j4Orb = j4.InitialState.Representation as IAgOrbitState;
j4Orb.Epoch = startTime;
classical = (IAgOrbitStateClassical)j4.InitialState.Representation.ConvertTo(AgEOrbitStateType.eOrbitStateClassical);
classical.CoordinateSystemType = AgECoordinateSystem.eCoordinateSystemJ2000;
// ture anomaly: 真近点角
classical.LocationType = AgEClassicalLocation.eLocationTrueAnomaly;
trueAnomaly = (IAgClassicalLocationTrueAnomaly)classical.Location;
trueAnomaly.Value = 0.0;
// 通过指定半长轴(Semimajor Axis)和偏心率以确定轨道形状
classical.SizeShapeType = AgEClassicalSizeShape.eSizeShapeSemimajorAxis;
IAgClassicalSizeShapeSemimajorAxis semi = (IAgClassicalSizeShapeSemimajorAxis)classical.SizeShape;
semi.SemiMajorAxis = 7163.14; // 半长轴
semi.Eccentricity = 0.0; // 偏心率/离心率
classical.Orientation.ArgOfPerigee = 0.0; // 近地点角
classical.Orientation.AscNodeType = AgEOrientationAscNode.eAscNodeLAN;
lan = (IAgOrientationAscNodeLAN)classical.Orientation.AscNode;
lan.Value = 99.38; // 升交点经度
classical.Orientation.Inclination = 98.50; // 轨道倾角
j4.InitialState.Representation.Assign(classical);
j4.Propagate();
// IAgSaGraphics Interface : ers1.Graphics,卫星的2D图形属性
// IAgVeGfxPasses Interface : ers1.Graphics.Passes,用于设置卫星轨迹显示的接口
// 看示例代码中的语句,应该是设置了Both,就没有必要再设置Descending,前一句代码多余(冗余)
// 如果只是需要生成数据报告,则可以简化或忽略对2D或3D属性的设置
ers1.Graphics.Passes.VisibleSides = AgEVeGfxVisibleSides.eVisibleSidesDescending;
ers1.Graphics.Passes.VisibleSides = AgEVeGfxVisibleSides.eVisibleSidesBoth;
// 新建一个空间站(Shuttle),使用J4预报器计算轨道
// 参考上一卫星创建的注释及说明
IAgSatellite shuttle = (IAgSatellite)m_STKRoot.CurrentScenario.Children.New(AgESTKObjectType.eSatellite, "Shuttle");
shuttle.SetPropagatorType(AgEVePropagatorType.ePropagatorJ4Perturbation);
j4 = (IAgVePropagatorJ4Perturbation)shuttle.Propagator;
smartInterval = j4.EphemerisInterval;
// 此处与原代码有不同,原代码的 stopTime 仅计算到 3 点
smartInterval.SetExplicitInterval(startTime, stopTime);
j4.Step = 60.00;
j4Orb = j4.InitialState.Representation as IAgOrbitState;
j4Orb.Epoch = startTime;
classical = (IAgOrbitStateClassical)j4.InitialState.Representation.ConvertTo(AgEOrbitStateType.eOrbitStateClassical);
classical.CoordinateSystemType = AgECoordinateSystem.eCoordinateSystemJ2000;
classical.LocationType = AgEClassicalLocation.eLocationTrueAnomaly;
trueAnomaly = (IAgClassicalLocationTrueAnomaly)classical.Location;
trueAnomaly.Value = 0.0; // 真近点角
// Size Shape Type与前一创建实例不一样
// eSizeShapeAltitude - Apogee and Perigee Altitude(远地点和近地点高度).
// eSizeShapeMeanMotion - Mean Motion and Eccentricity(平均运动和离心率.
// eSizeShapePeriod - Period and Eccentricity(周期和偏心率).
// eSizeShapeRadius - Apogee and Perigee Radius(远地点和近地点半径).
// eSizeShapeSemimajorAxis - Semimajor Axis and Eccentricity(半长轴和偏心率).
// 通过指定远地点和近地点高度确定轨道形状
classical.SizeShapeType = AgEClassicalSizeShape.eSizeShapeAltitude;
IAgClassicalSizeShapeAltitude altitude = (IAgClassicalSizeShapeAltitude)classical.SizeShape;
altitude.ApogeeAltitude = 370.4; // 远地点高度
altitude.PerigeeAltitude = 370.4; // 近地点高度
classical.Orientation.ArgOfPerigee = 0.0; // 近地点角
classical.Orientation.AscNodeType = AgEOrientationAscNode.eAscNodeLAN;
lan = (IAgOrientationAscNodeLAN)classical.Orientation.AscNode;
lan.Value = -151.0; // 升交点经度
classical.Orientation.Inclination = 28.5; // 轨道倾角
j4.InitialState.Representation.Assign(classical);
j4.Propagate();
// Modify Shuttle Contours(轮廓/等高线),这个属性估计czml不会输出
shuttle.Graphics.SetAttributesType(AgEVeGfxAttributes.eAttributesBasic);
// IAgVeGfxAttributesOrbit : 设置卫星2D属性的接口,本接口又借助接口IAgVeGfxAttributesBasic(的实现)提供相关功能
IAgVeGfxAttributesOrbit orbitgfx = (IAgVeGfxAttributesOrbit)shuttle.Graphics.Attributes;
orbitgfx.Line.Style = AgELineStyle.eDashed;
// 下面这个关键字‘Plus’没有预定义枚举类型,就怕这种参数,最好是别用到
orbitgfx.MarkerStyle = "Plus";
// contours : 轮廓线/等高线,这个等高线的设置后的效果在图中没有看出来
// 轮廓线的设置在czml文件也未输出
IAgVeGfxElevContours contours = (IAgVeGfxElevContours)shuttle.Graphics.ElevContours;
IAgVeGfxElevationsCollection elevations = contours.Elevations;
elevations.RemoveAll();
elevations.AddLevelRange(0, 50, 10);
for (int i = 0; i < elevations.Count; i++)
{
IAgVeGfxElevationsElement elem = elevations[i];
elem.DistanceVisible = false;
elem.LineStyle = AgELineStyle.eDotDashed;
elem.LineWidth = AgELineWidth.e3;
}
// 下面几条语句不起作用,在本例中忽略
//contours.IsVisible = true;
//contours.Fill = true; 此版本没有Fill属性(可设置)
//contours.FillTranslucency = 80.0;
//=========================================================================
//Again we don't have the capability in OM to handle a second graphics window and modify it's properties
// 创建面目标(AreaTarget)
IAgAreaTarget searchArea = (IAgAreaTarget)m_STKRoot.CurrentScenario.Children.New(AgESTKObjectType.eAreaTarget, "SearchArea");
// 设置AreaTarget的2D属性
IAgATGraphics atGfx = searchArea.Graphics;
atGfx.MarkerStyle = "None";
atGfx.Inherit = false;
atGfx.LabelVisible = false;
atGfx.CentroidVisible = false;
searchArea.UseTerrainData = false;
searchArea.AutoCentroid = false;
// 有另种方式指定AreaTarget的边界:
// eEllipse - 椭圆
// ePattern - 类似于多边形,以一组点坐标(经纬度)定义边界
searchArea.AreaType = AgEAreaType.ePattern;
IAgAreaTypePatternCollection patterns = (IAgAreaTypePatternCollection)searchArea.AreaTypeData;
patterns.Add(78.4399, -77.6125);
patterns.Add(77.7879, -71.1578);
patterns.Add(74.5279, -69.0714);
patterns.Add(71.6591, -69.1316);
patterns.Add(70.0291, -70.8318);
patterns.Add(71.9851, -76.3086);
// Spherical : 球面坐标定义:维度、经度、球半径(此处为地球半径)
// 此处指定的是AreaTarget的中心?难道不应该自动计算吗?
// 经往回看,此处的坐标是前面目标对象(Target对象)Iceberg的坐标
IAgSpherical sphere = (IAgSpherical)searchArea.Position.ConvertTo(AgEPositionType.eSpherical);
sphere.Lat = 74.9533;
sphere.Lon = -74.5482;
sphere.Radius = 6358.186790;
searchArea.Position.Assign(sphere);
// 访问计算,从ers1 到 searchArea
IAgStkAccess access = ((IAgStkObject)ers1).GetAccessToObject((IAgStkObject)searchArea);
access.ComputeAccess();
// 最怕的就是这种指定的字符串,而不是预定义的字符串,其他的如何知道?
IAgDataPrvInterval interval = (IAgDataPrvInterval)access.DataProviders["Access Data"];
// IAgDrResult : Provides methods to access the results returned by the data provider
IAgDrResult result = (IAgDrResult)interval.Exec(startTime, stopTime);
//with the result returned, the user can use the data any way they prefer.
// 此处示例代码省略了关于如何使用数据
// 清除当前的Access数据
//access.RemoveAccess();
// 给卫星(ERS1)添加一个传感器
IAgSensor horizon = (IAgSensor)m_STKRoot.CurrentScenario.Children["ERS1"].Children.New(AgESTKObjectType.eSensor, "Horizon");
// eSnSimpleConic : 简单圆锥:由指定的圆锥角定义
// AgESnPattern中定义了 7 种类型的传感器(天线)模式
horizon.SetPatternType(AgESnPattern.eSnSimpleConic);
IAgSnSimpleConicPattern simpleConic = (IAgSnSimpleConicPattern)horizon.Pattern;
simpleConic.ConeAngle = 90; // 圆锥角
// AgESnPointing中定义了 9 种类型的(传感器天线)跟踪模式
horizon.SetPointingType(AgESnPointing.eSnPtFixed);
IAgSnPtFixed fixedPt = (IAgSnPtFixed)horizon.Pointing;
// azEl : 方位角/仰角(az:Azimuth, El:Elevation)
IAgOrientationAzEl azEl = (IAgOrientationAzEl)fixedPt.Orientation.ConvertTo(AgEOrientationType.eAzEl);
azEl.Elevation = 90;
azEl.AboutBoresight = AgEAzElAboutBoresight.eAzElAboutBoresightRotate;
fixedPt.Orientation.Assign(azEl);
//removing the ers1 elevcontours from the 2d window
// 移除 ERS1 有关轮廓线的设置(设置为不可见)
// 此代码对于 czml 输出没有影响
contours.IsVisible = false;
// 继续给卫星(ERS1)添加另一个传感器
IAgSensor downlink = (IAgSensor)m_STKRoot.CurrentScenario.Children["ERS1"].Children.New(AgESTKObjectType.eSensor, "Downlink");
// eSnHalfPower : 半功率(Half Power),模拟抛物面天线
downlink.SetPatternType(AgESnPattern.eSnHalfPower);
IAgSnHalfPowerPattern halfpower = (IAgSnHalfPowerPattern)downlink.Pattern;
halfpower.Frequency = .85; // 频率
halfpower.AntennaDiameter = 1.0; // 天线口径(m)
// 设置传感器的目标对象,可与前面的 eSnPtFixed 比较
downlink.SetPointingType(AgESnPointing.eSnPtTargeted);
IAgSnPtTargeted targeted = (IAgSnPtTargeted)downlink.Pointing;
// Boresight : 视轴类型
targeted.Boresight = AgESnPtTrgtBsightType.eSnPtTrgtBsightTracking;
// 可一次指定多个 targets
IAgSnTargetCollection targets = targeted.Targets;
targets.Add("Facility/Baikonur");
targets.Add("Facility/WhiteSands");
targets.Add("Facility/Perth");
targets.AddObject((IAgStkObject)santiago);
targets.Add(((IAgStkObject)wallops).Path);
// 为地面设施(地面站Wallops)创建一个传感器
IAgSensor fiveDegElev = (IAgSensor)m_STKRoot.CurrentScenario.Children["Wallops"].Children.New(AgESTKObjectType.eSensor, "FiveDegElev");
// eSnComplexConic : 复杂圆锥,二次曲线,由指定的内半角和外半角以及最小和最大时钟角定义
fiveDegElev.SetPatternType(AgESnPattern.eSnComplexConic);
IAgSnComplexConicPattern complexConic = (IAgSnComplexConicPattern)fiveDegElev.Pattern;
complexConic.InnerConeHalfAngle = 0; // 内半角
complexConic.OuterConeHalfAngle = 85; // 外半角
complexConic.MinimumClockAngle = 0; // 最小时钟角
complexConic.MaximumClockAngle = 360; // 最大时钟角
// eSnPtFixed : 设置步骤与前述同
fiveDegElev.SetPointingType(AgESnPointing.eSnPtFixed);
fixedPt = (IAgSnPtFixed)fiveDegElev.Pointing;
azEl = (IAgOrientationAzEl)fixedPt.Orientation.ConvertTo(AgEOrientationType.eAzEl);
azEl.Elevation = 90;
azEl.AboutBoresight = AgEAzElAboutBoresight.eAzElAboutBoresightRotate;
fixedPt.Orientation.Assign(azEl);
// Graphics相关的设置与2D显示有关
fiveDegElev.Graphics.Projection.DistanceType = AgESnProjectionDistanceType.eConstantAlt;
IAgSnProjDisplayDistance dispDistance = (IAgSnProjDisplayDistance)fiveDegElev.Graphics.Projection.DistanceData;
dispDistance.Max = 785.248;
dispDistance.Min = 0;
dispDistance.NumberOfSteps = 1;
// 重新进行轨道计算?是的,重新计算了卫星 ERS1 的轨道
j4 = (IAgVePropagatorJ4Perturbation)ers1.Propagator;
smartInterval = j4.EphemerisInterval;
// 参数与前述不同,前面直接用的 startTime,此处为 FindStartTime()
// 第二个参数为啥是前面的 startTime ?哦,不是,是第二天,计算了 24h
smartInterval.SetExplicitInterval(smartInterval.FindStartTime(), "2 Jul 2002 00:00:00.000");
j4.Propagate();
// 定制了计算时间段及其显示(属性)
ers1.Graphics.SetAttributesType(AgEVeGfxAttributes.eAttributesCustom);
IAgVeGfxAttributesCustom customAtt = (IAgVeGfxAttributesCustom)ers1.Graphics.Attributes;
IAgVeGfxInterval gfxInterval = customAtt.Intervals.Add("1 Jul 2002 11:30:00.000", "1 Jul 2002 12:00:00.000");
gfxInterval.GfxAttributes.Color = Color.FromArgb(15649024); //EEC900
gfxInterval.GfxAttributes.IsVisible = true;
gfxInterval.GfxAttributes.Inherit = true;
gfxInterval = customAtt.Intervals.Add("1 Jul 2002 23:30:00.000", "1 Jul 2002 24:00:00.000");
gfxInterval.GfxAttributes.Color = Color.FromArgb(11680494); //B23AEE
gfxInterval.GfxAttributes.IsVisible = true;
gfxInterval.GfxAttributes.Inherit = true;
// 设置(卫星 ERS1 的追踪目标),此处设置的似乎是 Graphics 属性,与真正的Access计算无关
// IAgSaGraphics : ers1.Graphics
// AgEVeGfxAttributes.eAttributesAccess : Display based on access periods.
ers1.Graphics.SetAttributesType(AgEVeGfxAttributes.eAttributesAccess);
IAgVeGfxAttributesAccess gfxAccess = (IAgVeGfxAttributesAccess)ers1.Graphics.Attributes;
gfxAccess.AccessObjects.Add("Facility/Wallops");
gfxAccess.AccessObjects.Add("Facility/Santiago");
gfxAccess.AccessObjects.Add("Facility/Baikonur");
gfxAccess.AccessObjects.Add("Facility/Perth");
gfxAccess.AccessObjects.Add(((IAgStkObject)whitesands).Path);
IAgVeGfxAttributesOrbit orbitGfx = (IAgVeGfxAttributesOrbit)gfxAccess.NoAccess;
orbitGfx.IsVisible = true;
orbitGfx.Inherit = false;
orbitGfx.IsGroundMarkerVisible = false;
orbitGfx.IsOrbitMarkerVisible = false;
// horizon是卫星 ERS1 的传感器
IAgDisplayTm horizonDispTm = (IAgDisplayTm)horizon;
horizonDispTm.SetDisplayStatusType(AgEDisplayTimesType.eDuringAccess);
IAgDuringAccess duringAccess = (IAgDuringAccess)horizonDispTm.DisplayTimesData;
IAgObjectLinkCollection accessObjects = duringAccess.AccessObjects;
accessObjects.Add("Facility/Wallops");
accessObjects.Add("Facility/Santiago");
accessObjects.Add("Facility/Baikonur");
accessObjects.AddObject((IAgStkObject)perth);
accessObjects.Add(((IAgStkObject)whitesands).Path);
// 可见性计算,from(卫星ERS1的)传感器 horizon 到地面站 baikonur,并没有计算到所有对象的Access!
// 为什么在完成了Access计算之后再进行约束设置?
access = ((IAgStkObject)horizon).GetAccessToObject((IAgStkObject)baikonur);
access.ComputeAccess();
IAgAccessCnstrMinMax minMax = (IAgAccessCnstrMinMax)horizon.AccessConstraints.AddConstraint(AgEAccessConstraints.eCstrSunElevationAngle);
minMax.EnableMin = true;
minMax.Min = 10;
//minMax.Min = 5;
//minMax.Min = 0;
//minMax.Min = 15;
//minMax.Min = 20;
horizon.AccessConstraints.RemoveConstraint(AgEAccessConstraints.eCstrSunElevationAngle);
minMax = (IAgAccessCnstrMinMax)horizon.AccessConstraints.AddConstraint(AgEAccessConstraints.eCstrRange);
minMax.EnableMax = true;
minMax.Max = 2000;
//minMax.Max = 1500;
//minMax.Max = 1000;
//minMax.Max = 500;
horizon.AccessConstraints.RemoveConstraint(AgEAccessConstraints.eCstrRange);
// 清除Access计算
//access.RemoveAccess();
// 重置仿真时间(到开始时刻)
((IAgAnimation)this.m_STKRoot).Rewind();
//---------------------------------------------------------------------------
// export CZML
// 语法:ExportCZML <ScenarioPath> "<OutputFilePath>" {3D Model Server URL}
// 要点:1)如果目标文件已经存在,则STK会覆盖现有文件;
// 2)必须指定{3D Model Server URL},否则失败,可以在后续对czml文件执行处理替换
filelocation = StkCalCommon.g_czmlLocalPath + "stkprotutorial.czml";
command = "ExportCZML * \"" + filelocation + "\" " + @"http://assets.agi.com/models/";
m_STKRoot.ExecuteCommand(command);
//---------------------------------------------------------------------------
// 关闭场景,释放资源
ReleaseSTKR();
string czmlURL = StkCalCommon.g_czmlURL + "stkprotutorial.czml";
StkCalCommon.packAndResponse(this.Context, 0, "成功执行操作,生成CZML文件。", czmlURL);
}
代码中的其他相关方法列表如下:
统一进行STK进程的初始化管理(InvokeSTK方法)
        // 获取或创建STK进程,并根据需要新建场景
        public bool InvokeSTK(out string description, bool newScenario = true)
        {
            string logging = "---- " + DateTime.Now + " ----\n";
            logging += "STK应用初始化。\n";
            this.m_STKApp = null;
            this.m_STKRoot = null;
            description = "";
            // 获取或创建STK应用(AgUiApplication对象)
            try
            {
                logging += "Looking for an instance of STK...\n";
                // 获取已有STK运行实例
                this.m_STKApp = Marshal.GetActiveObject("STK11.Application") as AgUiApplication;
            }
            catch (System.Runtime.InteropServices.COMException ex1)
            {
                logging += "Failed in looking for an instance of STK.\n";
                logging += ex1.Message + "\n";
                // 获取已有STK实例失败,创建一个新的STK实例
                Guid clsID = typeof(AgUiApplicationClass).GUID;
                Type oType = Type.GetTypeFromCLSID(clsID);
                try
                {
                    logging += "Try to create an instance of STK...\n";
                    StkCalCommon.loggingToFile(logging);
                    this.m_STKApp = Activator.CreateInstance(oType) as AgUiApplication;

                    logging += "Try to load STK personality.\n";
                    StkCalCommon.loggingToFile(logging);
                    // 获取用户设置(此过程应该是执行了有关license的检测)
                    this.m_STKApp.LoadPersonality("STK");
                }
                catch (System.Runtime.InteropServices.COMException ex2)
                {
                    logging += "Failed in creating STK instance or loading STK personality.\n";
                    logging += ex2.Message + "\n";
                    StkCalCommon.loggingToFile(logging);
                    this.m_STKApp = null;
                    description = "获取或创建STK应用实例失败1。\n" + ex2.Message;
                    return false;
                }
            }
            // 加载STK Root(IAgStkObjectRoot接口对象)
            if (!(this.m_STKApp is null))
            {
                try
                {
                    logging += "Loading STK root object (IAgStkObjectRoot).\n";
                    this.m_STKRoot = (IAgStkObjectRoot)this.m_STKApp.Personality2;
                    description = "成功创建STK用户应用并获取STK Root对象。";
                }
                catch (Exception ex3)
                {
                    logging += "加载STK Root Object失败。\n";
                    logging += ex3.Message + "\n";
                    StkCalCommon.loggingToFile(logging);
                    description = "加载STK Root Object失败。\n" + ex3.Message;
                    Marshal.ReleaseComObject(this.m_STKApp);
                    return false;
                }
            }

            if ((this.m_STKApp is null) || (this.m_STKRoot is null))
            {
                // 未能初始化STK应用
                logging += "未能初始化STK应用。\n";
                StkCalCommon.loggingToFile(logging);
                description = "未能初始化STK应用。";
                return false;
            }

            logging += "成功获取或创建了STK应用(AgUiApplication),并获取STK Root对象(IAgStkObjectRoot).\n";
            StkCalCommon.loggingToFile(logging);

            if (newScenario)
            {
                // 创建场景
                // 关闭当前(可能有的)场景
                this.m_STKRoot.CloseScenario();
                // 新建场景
                this.m_STKRoot.NewScenario(this.defualtScenName);
            }

            return true;
        }
其他方法:
       // 释放STK相关进程(资源)
        public void ReleaseSTKR(bool closeSecenario = true)
        {
            // 关闭场景
            this.m_STKRoot.CloseScenario();
            // 退出并关闭STK应用(可选)
            Marshal.ReleaseComObject(this.m_STKRoot);
            Marshal.ReleaseComObject(this.m_STKApp);
            this.m_STKApp = null;
            this.m_STKRoot = null;
        }
        // 设置当前场景单位
        private void SetUnits()
        {
            IAgUnitPrefsDimCollection dimensions = this.m_STKRoot.UnitPreferences;
            // 首先重置,然后设置
            dimensions.ResetUnits();
            dimensions.SetCurrentUnit("DateFormat", "UTCG");
            dimensions.SetCurrentUnit("DistanceUnit", "km");
            dimensions.SetCurrentUnit("TimeUnit", "sec");
            dimensions.SetCurrentUnit("AngleUnit", "deg");
            dimensions.SetCurrentUnit("MassUnit", "kg");
            dimensions.SetCurrentUnit("PowerUnit", "dbw");
            dimensions.SetCurrentUnit("FrequencyUnit", "ghz");
            dimensions.SetCurrentUnit("SmallDistanceUnit", "m");
            dimensions.SetCurrentUnit("latitudeUnit", "deg");
            dimensions.SetCurrentUnit("longitudeunit", "deg");
            dimensions.SetCurrentUnit("DurationUnit", "HMS");
            dimensions.SetCurrentUnit("Temperature", "K");
            dimensions.SetCurrentUnit("SmallTimeUnit", "sec");
            dimensions.SetCurrentUnit("RatioUnit", "db");
            dimensions.SetCurrentUnit("rcsUnit", "dbsm");
            dimensions.SetCurrentUnit("DopplerVelocityUnit", "m/s");
            dimensions.SetCurrentUnit("Percent", "unitValue");
        }
        // 设置仿真时间
        // 参数:UTCG格式的字符串
        private void SetSimuTimes(string startTime, string stopTime, string epoch)
        {
            // 另外还可以通过接口方法 SetTimePeriod()设置
            IAgScenario scene = (IAgScenario)this.m_STKRoot.CurrentScenario;
            scene.StartTime = startTime;
            scene.StopTime = stopTime;
            scene.Epoch = epoch;
        }
        private void AddWaypoint(IAgVeWaypointsCollection waypoints, object Lat, object Lon, double Alt, double Speed, double tr)
        {
            IAgVeWaypointsElement elem = waypoints.Add();
            elem.Latitude = Lat;
            elem.Longitude = Lon;
            elem.Altitude = Alt;
            elem.Speed = Speed;
            elem.TurnRadius = tr;
        }
代码说明:
代码中的变量为m_STKApp和m_STKRoot类全局变量,定义如下:
    public class StkServ : System.Web.Services.WebService
    {
        public AgUiApplication m_STKApp { get; set; }
        public IAgStkObjectRoot m_STKRoot { get; set; }
        private string defualtScenName = "Demo";
……
STKProTutorial实例创建场景流程
获取或创建STK应用(进程)实例;
设置单位(建议每次初始化场景之前均根据实际情况需要设置各计算单位);
设置仿真时间;
通过Children.New()方法创建地面设施(Facility);
从STK安装的本地数据库文件创建地面设施;
创建目标(Target)对象,场景中被搜索的目标(Iceberg);
创建Ship对象,利用大弧预报器(ePropagatorGreatArc)计算船只的运行轨迹。
创建卫星(TDRS),演示了如何使用二体(运动)预报器(ePropagatorTwoBody)计算卫星的轨道。
从STK的数据库文件加载创建卫星(TDRS_3),利用SGP4轨道预报器计算卫星轨道(代码中实际没有执行sgp4.Propagate()方法,但输出还是有卫星的轨道/轨迹,是因为从现有数据库文件加载的吗?还是默认会执行轨道计算?)。
创建卫星(ERS1),这是场景中用于演示区域搜索的主卫星,使用J4摄动(二阶)预报器进行轨道预报(计算)。
创建一个空间站(Shuttle),实际是一个卫星对象(eSatellite),利用J4预报器计算轨道,给空间站的二维显示设置了一个复杂的轮廓,在STK界面中可以看到效果,在输出的CZML文件中没有相关的显示数据。
创建一个表示搜索区域的面目标(AreaTarget),并通过ePattern模式定义搜索区域。
执行从卫星ERS1到搜索区域的Access计算。
给卫星ERS1添加两个传感器,一个用于上行(固定指向),一个用于下行(追踪模式)。
给地面站Wallops添加一个传感器(固定指向)。
重新计算ERS1的轨道,计算周期为24h,并定制了不同时间段的显示特性。
计算(卫星ERS1的)传感器Horizon对到地面设施Baikonur的Access数据。
最后执行Command命令输出CZML文件,代码如下(上述代码行524-526):
      //---------------------------------------------------------------
      // export CZML
      // 语法:ExportCZML <ScenarioPath> "<OutputFilePath>" {3D Model Server URL}
      // 要点:1)如果目标文件已经存在,则STK会覆盖现有文件;
      //       2)必须指定{3D Model Server URL},否则失败,可以在后续对czml文件执行处理替换
      filelocation = StkCalCommon.g_czmlLocalPath + "stkprotutorial.czml";
      command = "ExportCZML * \"" + filelocation + "\" " + @"http://assets.agi.com/models/";
      m_STKRoot.ExecuteCommand(command);
      //-----------------------------------------------------------------
经测试,必须要指定‘ExportCZML’命令的最后一个参数,即默认的3D模型的地址。生成czml文件后可根据应用实际配置替换默认的源。
生成的czml文件,大小约2.6M。
关于结果CZML文件
关于CZML文件的介绍,网络资源甚多,可自行搜索,本文仅列举一CSDN博文做参考。
Cesium学习之CZML的使用:https://blog.csdn.net/Gua_guagua/article/details/125024376
仿真时间
在代码中指定的仿真时间为4小时,代码如下:(注:包括SetSimuTimes方法)
            // 设置仿真时间:startTime, stopTime, epoch
            string startTime = "1 Jul 2002 00:00:00.00";
            string stopTime  = "1 Jul 2002 04:00:00.00";
            string epoch     = "1 Jul 2002 00:00:00.00";
            SetSimuTimes(startTime, stopTime, epoch);

        // 设置仿真时间
        // 参数:UTCG格式的字符串
        private void SetSimuTimes(string startTime, string stopTime, string epoch)
        {
            // 另外还可以通过接口方法 SetTimePeriod()设置
            IAgScenario scene = (IAgScenario)this.m_STKRoot.CurrentScenario;
            scene.StartTime = startTime;
            scene.StopTime = stopTime;
            scene.Epoch = epoch;
        }
CZML文件实际输出的仿真时间有4天多,参见czml文件输出第一个JSON元素的全局设置。
  {
    "id":"document",
    "name":"Demo",
    "version":"1.0",
    "clock":{
      "interval":"2002-07-01T00:00:00Z/2002-07-05T08:01:42.9280226419796Z",
      "currentTime":"2002-07-01T00:00:00Z",
      "multiplier":600,
      "range":"LOOP_STOP",
      "step":"SYSTEM_CLOCK_MULTIPLIER"
    }
  },
……
根据代码分析,输出结果CZML文件的仿真时间由场景中各对象中最大仿真时间输出为准,本例中的仿真时长由Ship对象(Cruise)决定。在场景中,为该对象设置了路径点,并利用大弧预报器计算了该对象的运行轨迹,该轨迹的运行时长决定了整个CZML输出的结束时间,这点可以从Cesium加载czml文件后的仿真运行效果可以直观看出,当Cruise运行到终点时,仿真显示从头开始循环。
参见上面代码第443行,卫星对象ERS1的仿真时间由此确定为24h(计算时长)。
关于传感器(Sensor)
在输出czml文件中,对传感器的描述中有“agi_conicSensor”属性,该属性是AGI专门为传感器在(Cesium)终端显示中定制的属性,网上查了相关资料,也有相关的包支持显示。本实践中经多方尝试,未果,不能在Web浏览器终端显示传感器的(扫描、定位、追踪等)效果。基本原因是因为版本不匹配,Cesium版本迭代更新较快,而为支持传感器显示的JS包已经有六年多没有更新了。
有成功的例子:https://blog.csdn.net/Gua_guagua/article/details/125024376
关于orientation属性
在输出czml文件中,有大量描述场景对象orientation属性的代码,该属性主要约束了对象三维模型显示时的动态指向(方向),如果仅是大颗粒度的场景演示,可以忽略该部分数据,由此可以大大缩减czml文件的大小。
关于对象的3D模型文件
在输出czml文件中搜索关键字‘gltf’或‘glb’,该关键字有关的属性指定了场景中对象的3D显示模型,在Cesium终端中鼠标双击对象会切换到该对象视点,并以三维模型显示该对象。搜索STK安装目录(或搜索本地缓存的网页文件)可以在本地找到相关的模型文件,通过在自己的Web服务目录中发布,可以无需访问AGI的官网实时在线获取文件。
客户端Cesium显示
假定IIS Web服务器地址为192.168.1.111
在本系列上一篇博文的基础上,增加如下代码。
      Sandcastle.addToolbarButtonWy("计算并加载CZML文件场景", function () {
        statusDisplay.innerHTML = "正在执行计算,请耐心等待……";
        $.ajax({
          type : "POST",
          contentType : "application/json; charset:utf-8",
          url : "http://192.168.1.111:8081/StkServ.asmx/CzmlExport",
          success : function (data) {
            // 注:直接返回的是ajax解析生成的JSON对象
            if(data["isSuccess"] == 0) {
              // 计算成功,加载结果czml文件
              viewer.dataSources.removeAll();
              viewer.dataSources.add(Cesium.CzmlDataSource.load(data["calResult"]));
              viewer.camera.flyHome(0);
              statusDisplay.innerHTML = "成功执行计算,结果CZML文件:" + data["calResult"];
            }
            else {
              statusDisplay.innerHTML = "计算失败,原因:" + data["description"];
            }
          },
          error : function(xhr) { // for test
            statusDisplay.innerHTML = xhr.responseText;
          }
        });
      });
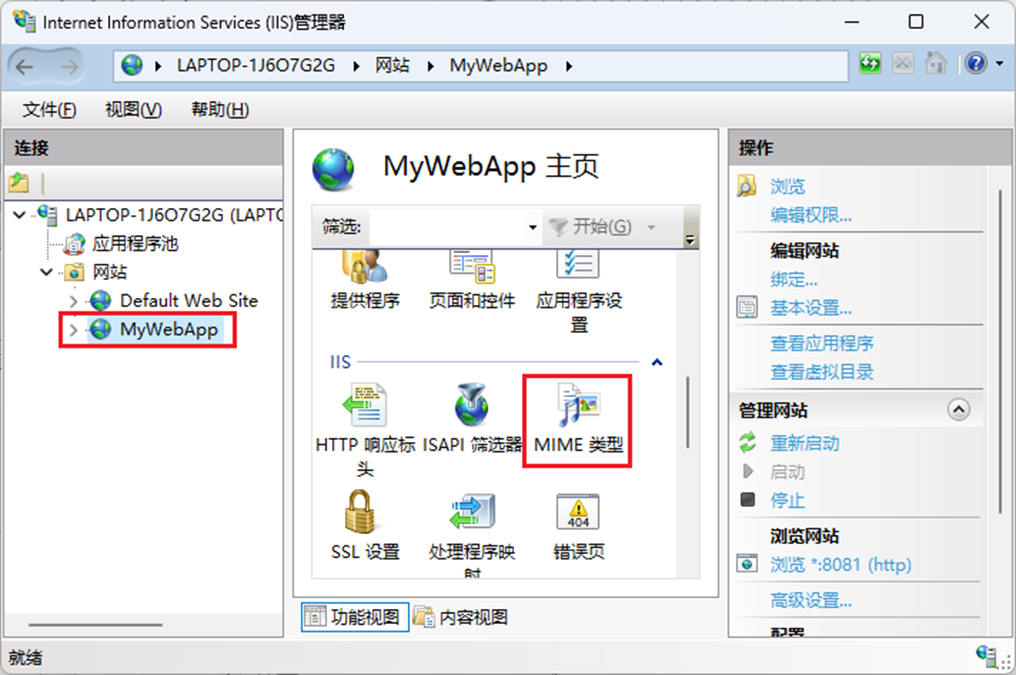
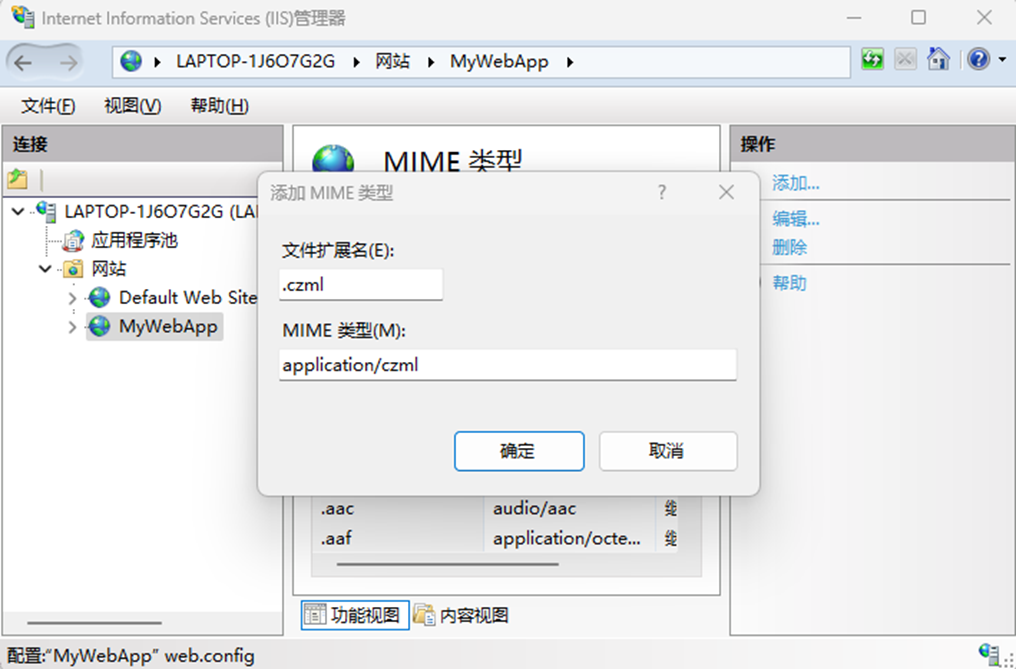
第一次加载失败,查看服务器本地文件目录,czml文件已成功输出。经判断原因为客户端无法加载服务端的czml文件,需要在服务端手动添加IIS的MIME类型,即增加一条‘application/czml’,‘.czml’类型的文件。
IIS管理器中选择MIME类型。
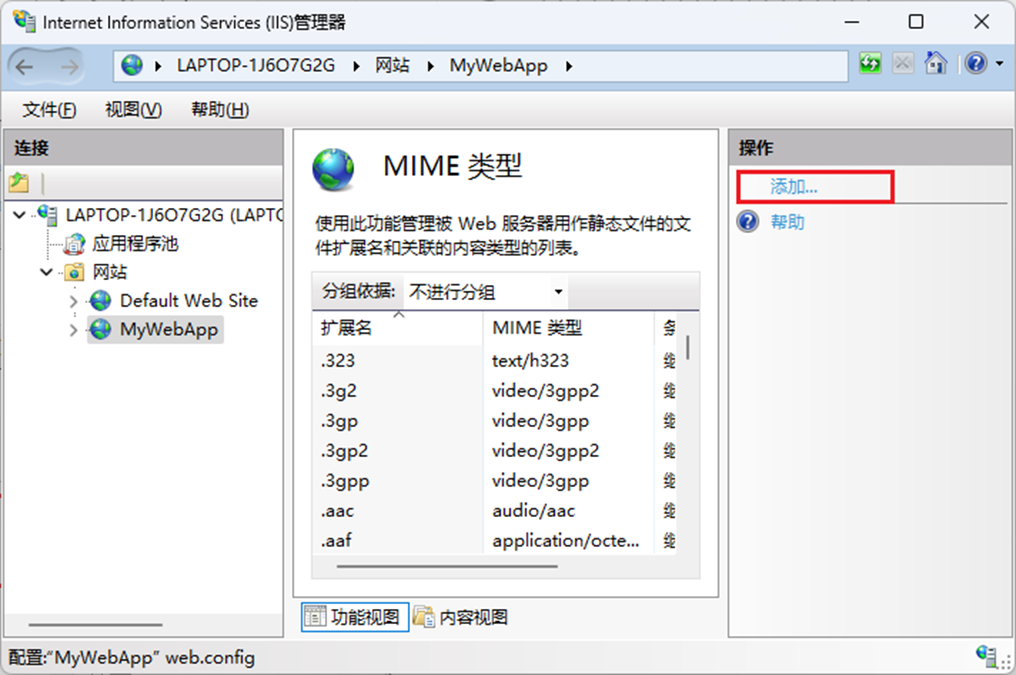
点击‘MIME类型’后,点击右侧‘添加’。
在弹出窗口中输出如下,点击‘确定’按钮保存即可。
Cesium显示界面:

