【编程基础之Python】3、创建Python虚拟环境
- 创建Python虚拟环境
- 为什么需要虚拟环境
- Windows上的Anaconda创建虚拟环境
- conda 命令
- conda env 命令
- 创建虚拟环境
- 切换虚拟环境
- 验证虚拟环境
- Linux上的Anaconda创建虚拟环境
- 创建虚拟环境
- 切换虚拟环境
- 验证虚拟环境
- 总结
创建Python虚拟环境
为什么需要虚拟环境
根据实际开发需求,我们会不断的更新或卸载项目中依赖的Python类库,直接对我们的Python环境操作会让我们的开发环境和项目造成很多不必要的麻烦,并且当我们同时开发多个项目的时候,可能每个项目依赖的同一个Python库的版本还不一样,就会造成版本冲突,管理相当混乱。而虚拟环境独立于真实环境存在,并且可以同时拥有多个虚拟环境,每个虚拟环境都可以安装不同的类库、不同版本的类库,对项目的依赖和版本的控制有着非常重要的作用。
Windows上的Anaconda创建虚拟环境
通过Windows的开始菜单,打开Anaconda Prompt(anaconda3)。可以看到命令提示符前面的(base)符号,说明当前是Anaconda的base虚拟环境。

通过命令:
conda env list
可以列出当前系统中拥有的虚拟环境。从响应结果知道,当前只有一个base环境,其目录就是anaconda的安装目录。

conda 命令
Anaconda提供的conda是一个用来管理和部署应用、环境和包的工具,通过输入conda直接回车可以打印出所有可用的命令以及说明信息。
(base) C:\Users\wux_labs>conda
usage: conda-script.py [-h] [-V] command ...

conda is a tool for managing and deploying applications, environments and packages.

Options:

positional arguments:
  command
    clean        Remove unused packages and caches.
    compare      Compare packages between conda environments.
    config       Modify configuration values in .condarc. This is modeled after the git config command. Writes to the user .condarc file (C:\Users\wux_labs\.condarc) by default. Use the --show-sources flag to display all identified configuration locations on your computer.
    create       Create a new conda environment from a list of specified packages.
    info         Display information about current conda install.
    init         Initialize conda for shell interaction.
    install      Installs a list of packages into a specified conda environment.
    list         List installed packages in a conda environment.
    package      Low-level conda package utility. (EXPERIMENTAL)
    remove       Remove a list of packages from a specified conda environment.
    rename       Renames an existing environment.
    run          Run an executable in a conda environment.
    search       Search for packages and display associated information.The input is a MatchSpec, a query language for conda packages. See examples below.
    uninstall    Alias for conda remove.
    update       Updates conda packages to the latest compatible version.
    upgrade      Alias for conda update.
    notices      Retrieves latest channel notifications.

optional arguments:
  -h, --help     Show this help message and exit.
  -V, --version  Show the conda version number and exit.

conda commands available from other packages:
  build
  content-trust
  convert
  debug
  develop
  env
  index
  inspect
  metapackage
  pack
  render
  repo
  server
  skeleton
  token
  verify

(base) C:\Users\wux_labs>
常用的命令有:
- clean,清理不需要使用的包和缓存
- compare,比较两个虚拟环境的包信息
- config,用来配置Anaconda的配置信息,默认配置在文件
.condarc中。 修改后的配置在用户目录下的.condarc文件中,比如C:\Users\wux_labs\.condarc - create,基于一些特定的包创建一个虚拟环境
- info,显示当前Anaconda的安装信息
- init,初始化Anaconda的Shell配置
- install,在指定的虚拟环境中安装一些包
- list,列出虚拟环境中已经安装了的包
- remove,从一个虚拟环境中移除一些包
- rename,重命名一个已存在的虚拟环境
- run,在一个虚拟环境中运行可执行程序
- search,搜索包并显示相关信息
- uninstall ,
conda remove的一个别名,从一个虚拟环境中移除一些包 - update,将Anaconda的包更新到兼容的最新版本
- upgrade,
conda update的别名
同时,从其他包中还提供了一些其他的命令。
conda env 命令
用来管理系统中的虚拟环境。
conda env 命令的使用方法为:
usage: conda-env-script.py [-h] {create,export,list,remove,update,config} ...

positional arguments:
  {create,export,list,remove,update,config}
    create              Create an environment based on an environment definition file. If using an environment.yml file (the default), you can name the environment in the first line of the file with 'name:envname' or you can specify the environment name in the CLI command using the -n/--name argument. The name specified in the CLI will override the name specified in the environment.yml file. Unless you are in the directory containing the environment definition file, use -f to specify the file path of the environment definition file you want to use.
    export              Export a given environment
    list                List the Conda environments
    remove              Remove an environment
    update              Update the current environment based on environment file
    config              Configure a conda environment

optional arguments:
  -h, --help            Show this help message and exit.
常用的有:
- create 创建虚拟环境
- list 列出已有的虚拟环境
- remove 移出虚拟环境
要创建一个新的虚拟环境,可以直接通过命令进行创建:
conda create --name env_name python=x.x
--name可简写为-n即:
conda create -n env_name python=x.x
创建虚拟环境
通过命令创建一个虚拟环境。
conda create -n PythonBasic python=3.9
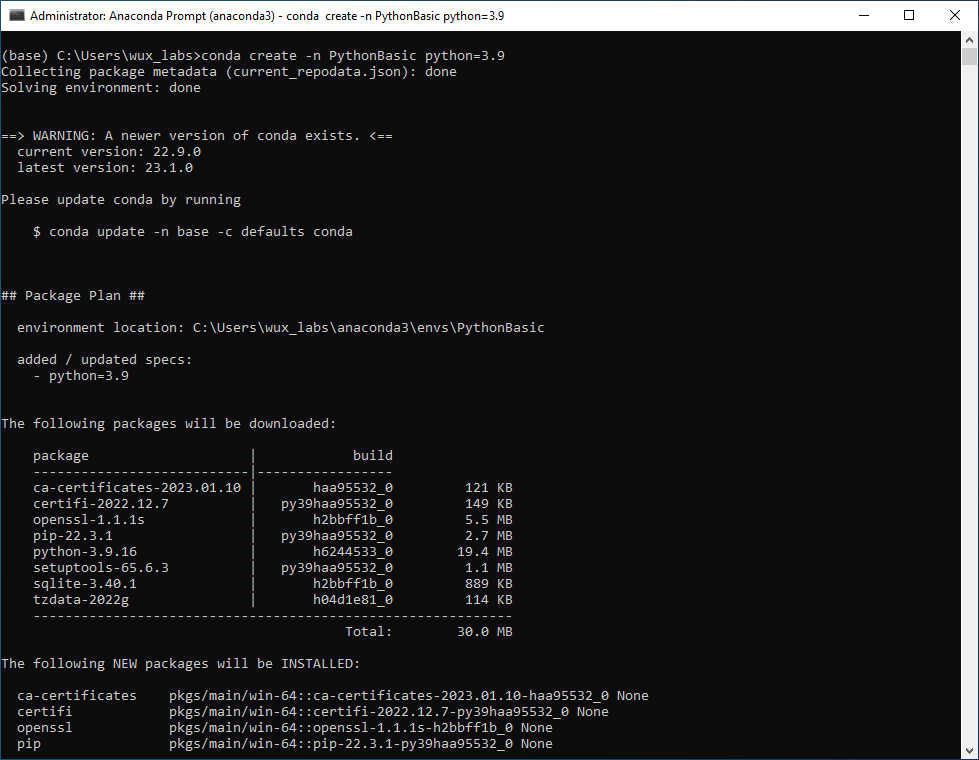
输入y确认需要安装的包,继续完成虚拟环境的创建。
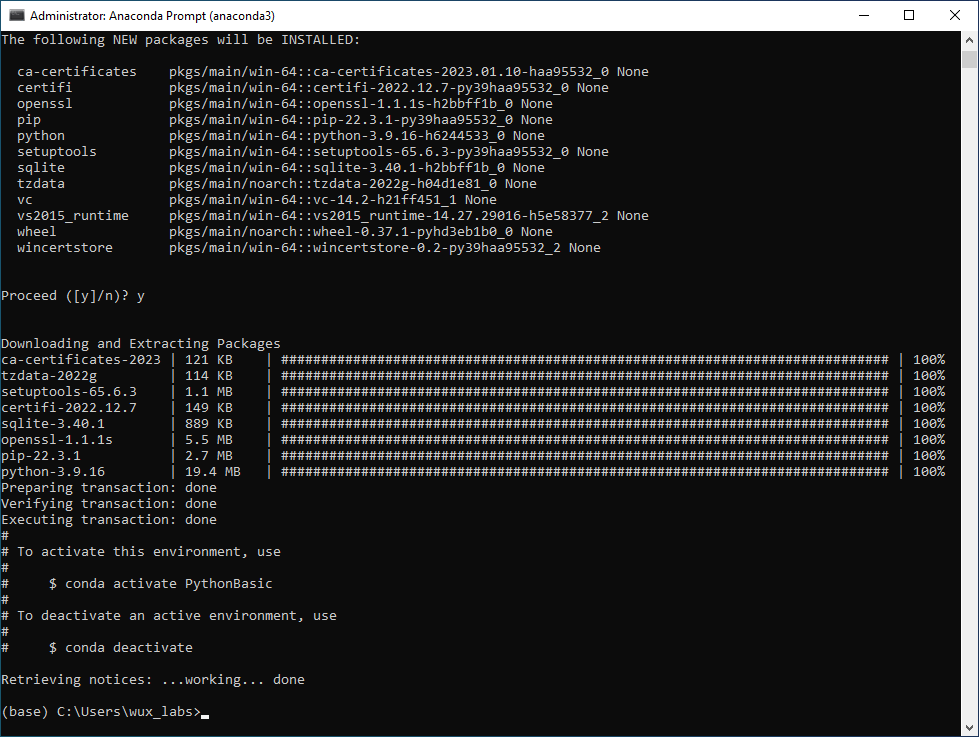
虚拟环境创建完成后,再次通过命令查看当前系统中的虚拟环境信息,*表示当前激活的虚拟环境,当前是base环境。

切换虚拟环境
虚拟环境创建完成后,可以通过以下命令激活虚拟环境:
conda activate PythonBasic
虚拟环境激活以后,命令提示符前面的环境符号会变成PythonBasic。

并且通过命令可以看到当前激活的是PythonBasic环境。

如果要退出当前虚拟环境,可以使用命令:
conda deactivate
验证虚拟环境
通过命令conda list或者pip list可以查看当前虚拟环境中安装好的包。
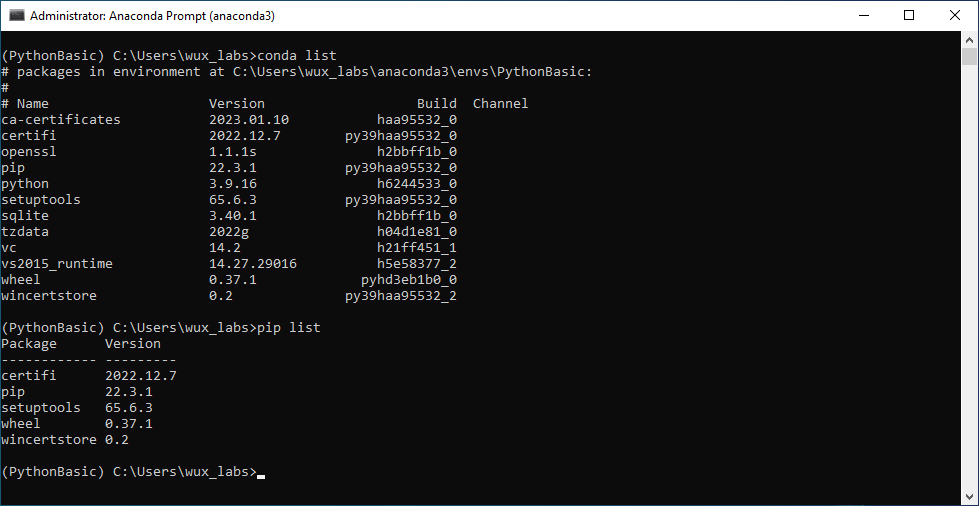
两者的区别在于:
- conda list,会列出当前虚拟环境中安装的包,以及关联虚拟环境中安装的包
- pip list,仅会列出当前虚拟环境中安装的包
使用python命令进入Python解释器环境,编写代码执行验证。
print("Hello Python Basic")

Linux上的Anaconda创建虚拟环境
创建虚拟环境
在Linux系统上创建虚拟环境的命令与Windows系统上的命令一致。
conda create -n PythonBasic python=3.9
创建过程为:
(base) wux_labs@wux-labs-vm:~$ conda create -n PythonBasic python=3.9
Collecting package metadata (current_repodata.json): done
Solving environment: done


==> WARNING: A newer version of conda exists. <==
  current version: 22.9.0
  latest version: 23.1.0

Please update conda by running

    $ conda update -n base -c defaults conda


## Package Plan ##

  environment location: /home/wux_labs/anaconda3/envs/PythonBasic

  added / updated specs:
    - python=3.9


The following packages will be downloaded:

    package                    |            build
    ---------------------------|-----------------
    ca-certificates-2023.01.10 |       h06a4308_0         120 KB
    certifi-2022.12.7          |   py39h06a4308_0         150 KB
    libffi-3.4.2               |       h6a678d5_6         136 KB
    ncurses-6.4                |       h6a678d5_0         914 KB
    openssl-1.1.1s             |       h7f8727e_0         3.6 MB
    pip-22.3.1                 |   py39h06a4308_0         2.7 MB
    python-3.9.16              |       h7a1cb2a_0        25.0 MB
    readline-8.2               |       h5eee18b_0         357 KB
    setuptools-65.6.3          |   py39h06a4308_0         1.1 MB
    sqlite-3.40.1              |       h5082296_0         1.2 MB
    tzdata-2022g               |       h04d1e81_0         114 KB
    xz-5.2.10                  |       h5eee18b_1         429 KB
    zlib-1.2.13                |       h5eee18b_0         103 KB
    ------------------------------------------------------------
                                           Total:        35.9 MB

The following NEW packages will be INSTALLED:

  _libgcc_mutex      pkgs/main/linux-64::_libgcc_mutex-0.1-main None
  _openmp_mutex      pkgs/main/linux-64::_openmp_mutex-5.1-1_gnu None
  ca-certificates    pkgs/main/linux-64::ca-certificates-2023.01.10-h06a4308_0 None
  certifi            pkgs/main/linux-64::certifi-2022.12.7-py39h06a4308_0 None
  ld_impl_linux-64   pkgs/main/linux-64::ld_impl_linux-64-2.38-h1181459_1 None
  libffi             pkgs/main/linux-64::libffi-3.4.2-h6a678d5_6 None
  libgcc-ng          pkgs/main/linux-64::libgcc-ng-11.2.0-h1234567_1 None
  libgomp            pkgs/main/linux-64::libgomp-11.2.0-h1234567_1 None
  libstdcxx-ng       pkgs/main/linux-64::libstdcxx-ng-11.2.0-h1234567_1 None
  ncurses            pkgs/main/linux-64::ncurses-6.4-h6a678d5_0 None
  openssl            pkgs/main/linux-64::openssl-1.1.1s-h7f8727e_0 None
  pip                pkgs/main/linux-64::pip-22.3.1-py39h06a4308_0 None
  python             pkgs/main/linux-64::python-3.9.16-h7a1cb2a_0 None
  readline           pkgs/main/linux-64::readline-8.2-h5eee18b_0 None
  setuptools         pkgs/main/linux-64::setuptools-65.6.3-py39h06a4308_0 None
  sqlite             pkgs/main/linux-64::sqlite-3.40.1-h5082296_0 None
  tk                 pkgs/main/linux-64::tk-8.6.12-h1ccaba5_0 None
  tzdata             pkgs/main/noarch::tzdata-2022g-h04d1e81_0 None
  wheel              pkgs/main/noarch::wheel-0.37.1-pyhd3eb1b0_0 None
  xz                 pkgs/main/linux-64::xz-5.2.10-h5eee18b_1 None
  zlib               pkgs/main/linux-64::zlib-1.2.13-h5eee18b_0 None


Proceed ([y]/n)? y


Downloading and Extracting Packages
tzdata-2022g         | 114 KB    | ########################################################################################################### | 100%
readline-8.2         | 357 KB    | ########################################################################################################### | 100%
pip-22.3.1           | 2.7 MB    | ########################################################################################################### | 100%
python-3.9.16        | 25.0 MB   | ########################################################################################################### | 100%
xz-5.2.10            | 429 KB    | ########################################################################################################### | 100%
sqlite-3.40.1        | 1.2 MB    | ########################################################################################################### | 100%
ncurses-6.4          | 914 KB    | ########################################################################################################### | 100%
openssl-1.1.1s       | 3.6 MB    | ########################################################################################################### | 100%
libffi-3.4.2         | 136 KB    | ########################################################################################################### | 100%
setuptools-65.6.3    | 1.1 MB    | ########################################################################################################### | 100%
ca-certificates-2023 | 120 KB    | ########################################################################################################### | 100%
zlib-1.2.13          | 103 KB    | ########################################################################################################### | 100%
certifi-2022.12.7    | 150 KB    | ########################################################################################################### | 100%
Preparing transaction: done
Verifying transaction: done
Executing transaction: done
#
# To activate this environment, use
#
#     $ conda activate PythonBasic
#
# To deactivate an active environment, use
#
#     $ conda deactivate

Retrieving notices: ...working... done
(base) wux_labs@wux-labs-vm:~$
创建完成后,通过命令可以查看当前虚拟环境列表。

切换虚拟环境
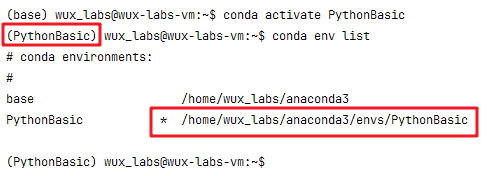
使用命令切换虚拟环境。
conda activate PythonBasic
验证虚拟环境
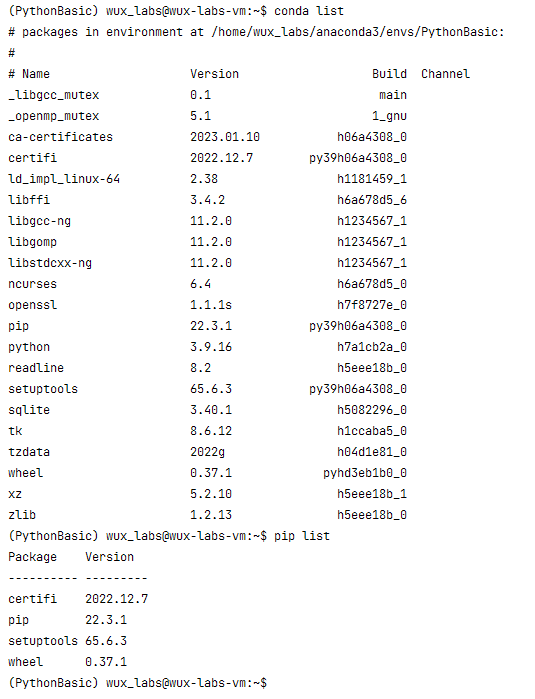
首先还是看看当前虚拟环境中安装的包。
conda list
pip list
由于操作系统不一样,在Linux系统上预安装的包与Windows操作系统上的包会有一些差异。
然后进入Python解释器环境,编写代码验证一下。
print("Hello Python Basic")

总结
Python的虚拟环境可以起到环境隔离的作用,当我们同时开发多个项目、需要使用同一个依赖库的不同版本时,虚拟环境非常有用。创建好虚拟环境后,就可以安装自己需要的包,开发项目了。


