黑马课程
文章目录
- 1. MyBatisPlus入门
- 1.1 MyBatisPlus入门案例
- 步骤1:创建spring boot工程
- 步骤2:配置application.yml
- 步骤3:创建数据库表(重点)
- 步骤4:编写dao层
- 步骤5:测试
- 1.2 标准数据层开发
- 标准CRDU使用
- Lombok
- 分页功能
- 配置MP运行日志
- 2. DQL编程控制 —— 查
- 2.1 条件查询的三种方式
- 2.2 多条件查询
- 2.3 null值处理
- 2.4 查询投影
- 2.5 查询条件
- 环境准备
- 等值查询
- 范围查询
- 模糊匹配
- 排序查询
- 2.6 映射匹配兼容性
- 表名与编码开发设计不同步
- 表字段与编码属性设计不同步
- 编码中添加了数据库中未定义的属性
- 特殊字段不参与查询,如password
- 3. DML编程控制 —— 增删改
- 3.1 新增 —— id生成策略
- 3.2 删除
- 多记录删除
- 逻辑删除 @TableLogic
- 逻辑删除 配置文件方式
- 3.3 修改 —— 乐观锁
- 4. 代码生成器
- 4.1 代码生成器实现
- 步骤1:导入坐标
- 步骤2:编写代码生成器
- 步骤3:测试生成的类
1. MyBatisPlus入门
-
MybatisPlus(简称MP)是基于MyBatis框架基础上开发的增强型工具,旨在
简化开发、提供效率 -
开发方式
- 基于MyBatis使用MyBatisPlus
- 基于Spring使用MyBatisPlus
- 基于SpringBoot使用MyBatisPlus
1.1 MyBatisPlus入门案例
和MyBatis进行比较
步骤1:创建spring boot工程
在选择依赖处,勾选Web/Spring Web和SQL/MySQL Driver
- 注意:这里没有再勾选
SQL/MyBatis Framework,这是因为MP并未被收录到idea的系统内置配置,无法直接选择加入,需要手动在pom.xml中配置添加
pom.xml中依赖如下
<dependencies>
    <!-- 自动生成 -->
    <dependency>
        <groupId>org.springframework.boot</groupId>
        <artifactId>spring-boot-starter-web</artifactId>
    </dependency>
    <dependency>
        <groupId>com.mysql</groupId>
        <artifactId>mysql-connector-j</artifactId>
        <scope>runtime</scope>
    </dependency>
    <dependency>
        <groupId>org.springframework.boot</groupId>
        <artifactId>spring-boot-starter-test</artifactId>
        <scope>test</scope>
    </dependency>
    <!-- 需手动添加 -->
    <dependency>
        <groupId>com.baomidou</groupId>
        <artifactId>mybatis-plus-boot-starter</artifactId>
        <version>3.4.1</version>
    </dependency>
    <dependency>
        <groupId>com.alibaba</groupId>
        <artifactId>druid</artifactId>
        <version>1.1.16</version>
    </dependency>
</dependencies>
mybatis-plus-boot-starter就导入了mybatis相关坐标,以及spring整合mybatis相关坐标
步骤2:配置application.yml
删除原有的application.properties,新建application.yml
spring:
  datasource:
    driver-class-name: com.mysql.jdbc.Driver
    url: jdbc:mysql://localhost:3306/ssm_db?useSSL=false&serverTimezone=UTC
    username: root
    password: 123456
    type: com.alibaba.druid.pool.DruidDataSources
步骤3:创建数据库表(重点)
在之前的项目中,数据库表的表名没有要求
在MyBatisPlus中,数据库表名一定要和domain中的实体类类名相对应!
-
例如:实体类名为
Book,那么数据库表名就应该是book -
id类型应当为 bigint(20)
alter table book modify id bigint(20); -
对应的Book实体类的id也应该是
Long类型
步骤4:编写dao层
package com.example.dao;

@Mapper
public interface BookDao extends BaseMapper<Book> {
}
- 只需要继承
BaseMapper<Book>,无需写SQL注解
步骤5:测试
package com.example;

@SpringBootTest
class MybatisplusApplicationTests {
    @Autowired
    private BookDao bookDao;

    @Test
    void testGetAll(){
        List<Book> bookList = bookDao.selectList(null);
        System.out.println(bookList);
    }
}
- 即便BookDao里面没有写方法,但使用bookDao时,依然会发现许多方法可供使用
- MP提供了默认的一些简单的增删改查方法,从而无需自己编写
1.2 标准数据层开发
标准CRDU使用

package com.example.dao;

@Mapper
public interface BookDao extends BaseMapper<Book> {
}
package com.example;

@SpringBootTest
class MybatisplusApplicationTests {
    @Autowired
    private BookDao bookDao;

    @Test
    void testSave(){
        Book book = new Book();
        book.setType("kk");
        book.setName("kk");
        book.setDescription("kk");
        bookDao.insert(book);
    }
    @Test
    void testDelete(){
        bookDao.deleteById(1619646956185972738L);
    }
    @Test
    void testUpdate(){
        Book book = new Book();
        book.setId(1L);
        book.setType("kk2");
        bookDao.updateById(book);
    }
    @Test
    void testGetById(){
        Book book = bookDao.selectById(1L);
        System.out.println(book);
    }
    @Test
    void testGetAll(){
        List<Book> bookList = bookDao.selectList(null);
        System.out.println(bookList);
    }

}
Lombok
一个Java类库,提供了一组注解,简化POJO实体类开发
步骤1:导入jar包
<dependency>
    <groupId>org.projectlombok</groupId>
    <artifactId>lombok</artifactId>
    <version>1.18.12</version>
</dependency>
报错的话,加上版本号;否则不加
步骤2:在实体类上加上注解
在之前都是需要手动添加getter, setter, toString等方法,现在可以用以下注解替代
package com.example.domain;

@Setter
@Getter
@ToString
@NoArgsConstructor
@AllArgsConstructor
@EqualsAndHashCode//自动生成hashCode
public class Book {
    private Long id;
    private String name;
    private String type;
    private String description;
}
更进一步,可以简化成
package com.example.domain;

@Data
public class Book {
    private Long id;
    private String name;
    private String type;
    private String description;
}
@Data包含除构造器外的其他方法
分页功能
步骤1:编写拦截器
拦截器MP已经提供,只需要将其配置成Spring管理的bean对象即可
package com.example.config;

@Configuration
public class MpConfig {
    @Bean
    public MybatisPlusInterceptor mpInterceptor(){
        //1. 定义MP拦截器
        MybatisPlusInterceptor mpInterceptor = new MybatisPlusInterceptor();
        //2. 添加具体的拦截器
        mpInterceptor.addInnerInterceptor(new PaginationInnerInterceptor());
        return mpInterceptor;
    }
}
步骤2:分页查询
分页查询使用的方法是:
IPage<T> selectPage(IPage<T> page, Wrapper<T> queryWrapper)
- IPage:用来构建分页查询条件,第几页,一页多少行
- Wrapper:用来构建条件查询的条件,目前我们没有可直接传为Null
- IPage:返回值,构建分页条件和方法的返回值都是IPage
@Test
void testGetByPage(){
    IPage page = new Page(1, 5);//查询第1页,每页10行
    bookDao.selectPage(page, null);
    System.out.println("当前页码值:"+page.getCurrent());
    System.out.println("每页显示行数:"+page.getSize());
    System.out.println("一共多少页:"+page.getPages());
    System.out.println("一共多少条数据:"+page.getTotal());
    System.out.println("数据:"+page.getRecords());
}
配置MP运行日志
在application.yml中增加
#开启MP的日志(输出到控制台)
mybatis-plus:
  configuration:
    log-impl: org.apache.ibatis.logging.stdout.StdOutImpl
此时有很多日志输出,但许多暂时用不到,需要将其删除,此时可以新建一个 logback.xml,如下
<?xml version="1.0" encoding="UTF-8"?>
<configuration>
</configuration>
一些日志已经不再显示,现在取消MybatisPlus启动banner图标,在application.yml中增加内容如下
#开启MP的日志(输出到控制台)
mybatis-plus:
  configuration:
    log-impl: org.apache.ibatis.logging.stdout.StdOutImpl
  global-config:
    banner: false
还剩下springboot的banner,如果需要将其删除,在 application.yml 中配置如下
spring:
  datasource:
    driver-class-name: com.mysql.jdbc.Driver
    url: jdbc:mysql://localhost:3306/ssm_db?useSSL=false&serverTimeZone=UTC
    username: root
    password: 123456
    type: com.alibaba.druid.pool.DruidDataSource
  main:
    banner-mode: off

#开启MP的日志(输出到控制台)
mybatis-plus:
  configuration:
    log-impl: org.apache.ibatis.logging.stdout.StdOutImpl
  global-config:
    banner: false
2. DQL编程控制 —— 查
bookDao.selectList(null) 查看selectList源码,发现它需要一个Wrapper<T>的参数
查看wrapper<T>,发现其为一个抽象类
public abstract class Wrapper<T> implements ISqlSegment {...}
ctrl+h 查看其继承类
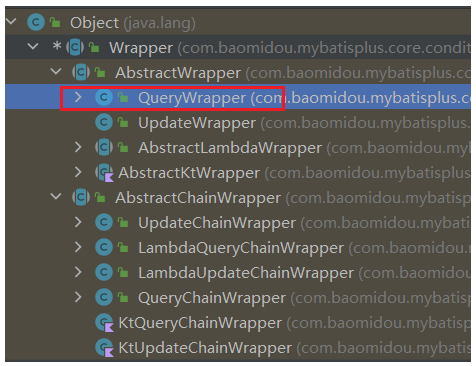
其中 QueryWrapper 即是需要的实现类
2.1 条件查询的三种方式
//查询 id<6 的数据
@Test
void testGetAll(){
    //方式一:按条件查询
    QueryWrapper qw = new QueryWrapper();
    qw.lt("id", 6);

    //方式二:lambda格式按条件查询
    QueryWrapper<Book> qw = new QueryWrapper<Book>();
    qw.lambda().lt(Book::getId, 6);

    //方式三(推荐):lambda格式按条件查询
    LambdaQueryWrapper<Book> lqw = new LambdaQueryWrapper<Book>();
    lqw.lt(Book::getId, 6);

    List<Book> bookList = bookDao.selectList(lqw);
    System.out.println(bookList);
}
2.2 多条件查询
-
and 查询
//查询 id>6 但 <10的数据
lqw.gt(Book::getId, 6).lt(Book::getId, 10);
或者
lqw.gt(Book::getId, 6); lqw.lt(Book::getId, 10); -
or 查询
//查询 id<3 或者 id>10的数据
lqw.lt(Book::getId, 3).or().gt(Book::getId, 10);
2.3 null值处理
//模拟页面传递过来的查询数据:查询 5<id<10的数据
Long idMin = null;
Long idMax = 10L;

LambdaQueryWrapper<Book> lqw = new LambdaQueryWrapper<Book>();
//null判断:先判定是否为null,如果为null,就不连接
lqw.lt(null != idMax, Book::getId, idMax);
lqw.gt(null != idMin, Book::getId, idMin);

List<Book> bookList = bookDao.selectList(lqw);
System.out.println(bookList);
2.4 查询投影
-
查询指定字段
//查询投影:只适应lambda的格式 LambdaQueryWrapper<Book> lqw = new LambdaQueryWrapper<Book>(); lqw.select(Book::getId, Book::getName, Book::getType); List<Book> bookList = bookDao.selectList(lqw); //查询投影:非lambda的格式 QueryWrapper<Book> qw = new QueryWrapper<Book>(); qw.select("id", "name", "type"); List<Book> bookList = bookDao.selectList(qw); -
聚合查询
完成count、max、min、avg、sum的使用
@Test
void testGetAll(){
    QueryWrapper<Book> qw = new QueryWrapper<Book>();
    //1. 计算总记录数
    qw.select("count(*) as count, type");
    //2. 按type分组
    qw.groupBy("type");
    //3. 获取数据
    List<Map<String, Object>> bookList = bookDao.selectMaps(qw);
    System.out.println(bookList);
}
当MyBatisPlus无法处理需要的SQL要求时,仍然可以在bookDao中按老方法进行编写
2.5 查询条件
其他条件查询使用方法可以去官网的指南上查询:https://baomidou.com/
环境准备
准备:user数据库表,User类等
数据库表
CREATE TABLE user (
    id bigint(20) primary key auto_increment,
    name varchar(32) not null,
    password  varchar(32) not null,
    age int(3) not null ,
    tel varchar(32) not null
);
insert into user values(1,'Tom','tom',3,'18866668888');
insert into user values(2,'Jerry','jerry',4,'16688886666');
insert into user values(3,'Jock','123456',41,'18812345678');
insert into user values(4,'玛丽','123456',15,'4006184000');
User实体类
package com.example.domain;

@Data
public class User {
    private Long id;
    private String name;
    private String password;
    private int age;
    private String tel;
}
UserDao
package com.example.dao;

@Mapper
public interface UserDao extends BaseMapper<User> {
}
等值查询
需求:根据用户名和密码查询用户信息
LambdaQueryWrapper<User> lqw = new LambdaQueryWrapper<User>();
lqw.eq(User::getName, "玛丽").eq(User::getPassword, "123456");//实际中密码需要md5加密
User user = userDao.selectOne(lqw);
范围查询
LambdaQueryWrapper<User> lqw = new LambdaQueryWrapper<User>();
lqw.between(User::getAge, 10, 50);
List<User> userList = userDao.selectList(lqw);
模糊匹配
LambdaQueryWrapper<User> lqw = new LambdaQueryWrapper<User>();
lqw.like(User::getName, "J");//匹配 %J%
lqw.likeLeft(User::getName, "J");//匹配 %J
lqw.likeRight(User::getName, "J");//匹配 J%
List<User> userList = userDao.selectList(lqw);
- like():前后加百分号,如 %J%
- likeLeft():前面加百分号,如 %J
- likeRight():后面加百分号,如 J%
排序查询
需求:查询所有数据,然后按照id降序
LambdaQueryWrapper<User> lqw = new LambdaQueryWrapper<>();
/**
 * condition :条件,返回boolean,当condition为true,进行排序,如果为false,则不排序
 * isAsc:是否为升序,true为升序,false为降序
 * columns:需要操作的列
 * 下面表示,进行排序,升序,排序字段是age
 */
lqw.orderBy(true, true, User::getAge);
List<User> userList = userDao.selectList(lqw);
2.6 映射匹配兼容性
表名与编码开发设计不同步
-
准备:将数据库表user修改为 tbl_user,以进行演示
alter table user rename to tbl_user;此时数据库表名为tbl_user,实体类为User,MP将不能正确识别
-
只需要在
User实体类上添加@TableName注解即可
@Data
@TableName("tbl_user")
public class User {
    private Long id;
    private String name;
    private String password;
    private int age;
    private String tel;
}
如果希望对所有实体类都进行这样的替换,可以用全局配置替换@TableName
#替换所有实体类对应的表名
mybatis-plus:
  global-config:
    db-config:
      table-prefix: tbl_user
表字段与编码属性设计不同步
-
准备:将数据库表tbl_user中的字段password改为pwd
alter table user change password pwd varchar(32) not null; -
只需要在
User实体类对应字段加上@TableField注解即可
此时数据库表名为tbl_user,实体类为User,MP将不能正确识别
@Data
public class User {
    private Long id;
    private String name;
    @TableField(value = "pwd")
    private String password;
    private int age;
    private String tel;
}
编码中添加了数据库中未定义的属性
例如:在插入数据时,User实体类中有一个online属性,但数据库表user中没有这个字段,此时将报错,解决方法如下
@TableField(exist = false)
@Data
public class User {
    private Long id;
    private String name;
    private String password;
    private int age;
    private String tel;
    @TableField(exist = false)
    private Integer online;
}
特殊字段不参与查询,如password
password将不参与查询,需要隐藏起来
@Data
public class User {
    private Long id;
    private String name;
    @TableField(value = "pwd", select = false)
    private String password;
    private int age;
    private String tel;
}
这样设置后,查询后password字段将为空
3. DML编程控制 —— 增删改
3.1 新增 —— id生成策略
@Data
public class User {
    @TableId(type = IdType.AUTO)
    private Long id;
}
如果希望设置所有实体类的id生成策略,需要在application.yml文件中配置
#设置id生成策略
mybatis-plus:
  global-config:
    db-config:
      id-type: assign_id
IdType有以下几种
Auto:数据库id自增NONE:不设置id生成策略INPUT:用户手工输入idASSIGN_ID(默认):雪花算法生成id(可兼容数值型与字符串型)ASSIGN_UUID:以UUID生成算法作为id生成策略- 其他的几个策略 ID_WORKER, ID_WORKER_STR, UUID 均已过时,都将被ASSIGN_ID和ASSIGN_UUID代替掉。
雪花算法
生成一个64位的二进制数字,及Long的大小

-
1bit,不用,因为二进制中最高位是符号位,1表示负数,0表示正数。生成的id一般都是用整数,所以最高位固定为0
-
41bit-时间戳,用来记录时间戳,毫秒级
-
10bit-工作机器id,用来记录工作机器id,其中高位5bit是数据中心ID,其取值范围0-31
低位5bit是工作节点ID,其取值范围0-31,两个组合起来最多可以容纳1024个节点 -
序列号占用12bit,每个节点每毫秒0开始不断累加,最多可以累加到4095,一共可以产生4096个ID
3.2 删除
多记录删除
deleteBatchIds
List<Long> list = new ArrayList<>();
list.add(1619725419349172225L);
list.add(6L);
list.add(5L);
userDao.deleteBatchIds(list);
同理,也可以多数据查询:selectBatchIds
逻辑删除 @TableLogic
场景
人员表:删除了人员zhangsan
订单表:zhangsan对应的订单order1,order2成为脏数据,或者跟着一起被删除,因此无法被读取
结果:之后年度汇总,发现订单数量对不上
解决方案:逻辑标记
逻辑删除
为数据设置是否可用状态字段 deleted,删除时设置状态字段为不可用状态,数据保留在数据库中,执行的是update操作
- 使用
@TableLogic注解 标注 删除标识字段 - 设置了标识字段也不会影响
select语句,因此此后在查询时会自动添加如where selected=0 - 如果设置了标识字段,又想看到已被删除的数据,那么需要自己写sql语句
步骤1:为数据库表增加逻辑删除字段 deleted,设置默认值为0,未删除
alter table user add deleted int default 0;
步骤2:在实体类User中增加删除标识字段deleted
@Data
public class User {
    private Long id;
    private String name;
    @TableField(select = false)
    private String password;
    private int age;
    private String tel;
    //增加删除字段:value表示未删除,delval表示已删除
    @TableLogic(value = "0", delval = "1")
    private Integer deleted;
}
步骤3:运行删除方法
userDao.deleteById(1L);
发现执行的是update语句,且数据库该条数据仍存在

逻辑删除 配置文件方式
在 User实体类 中添加删除字段
private Integer deleted;
在 application.yml 中配置
#配置删除字段
mybatis-plus:
  global-config:
    db-config:
      logic-delete-field: deleted
      logic-not-delete-value: 0
      logic-delete-value: 1
3.3 修改 —— 乐观锁
这里的方案适用于小系统,并发在2000以下
- 悲观锁:每次使用共享资源前先上锁
- 乐观锁:通常是在表里加一个版本或时间戳,要更新前检查一下自己保存的版本和表现在的版本对比,如果不一样,说明被更改过了,于是通知操作者重新操作
步骤1:在数据库中增加列version,标记当前版本号
alter table user add version int default 1;
步骤2:在实体类中添加字段 version,并添加注解@Version
package com.example.domain;

@Data
public class User {
    private Long id;
    private String name;
    @TableField(select = false)
    private String password;
    private int age;
    private String tel;
    //增加删除字段:value表示未删除,delval表示已删除
    @TableLogic(value = "0", delval = "1")
    private Integer deleted;
    //增加版本字段
    @Version
    private Integer version;
}
步骤3:添加乐观锁的拦截器
package com.example.config;

@Configuration
public class MpConfig {
    @Bean
    public MybatisPlusInterceptor mpInterceptor(){
        //1. 定义MP拦截器
        MybatisPlusInterceptor mpInterceptor = new MybatisPlusInterceptor();
        //2. 添加之前的分页拦截器
        mpInterceptor.addInnerInterceptor(new PaginationInnerInterceptor());
        //3. 添加乐观锁拦截器
        //作用:修改时,将在SQL语句中添加 set version=version+1
        mpInterceptor.addInnerInterceptor(new OptimisticLockerInnerInterceptor());
        return mpInterceptor;
    }
}
步骤4:测试
//1. 通过要修改的数据id将当前的数据查询处理
User user = userDao.selectById(2L);
//2. 修改属性值
user.setName("Lili");
//3. 进行修改
userDao.updateById(user);
在执行前,表中该条数据的version是1,执行后version为2
- 一定要获取数据,这样来获取到当前的版本号
- 修改时,会将自己目前的版本号和数据库版本号比对,来判断在
该条数据是否被修改过
步骤5:模拟并发情况
@Test
void testUpdate(){
    //1. user1和user2同时访问第1条数据
    User user1 = userDao.selectById(4L); //version = 1;
    User user2 = userDao.selectById(4L); //version = 1;

    //2. user2对第1条数据进行了修改
    user2.setName("user2");
    userDao.updateById(user2); //version = 2;

    //3. user1此时再对第1条数据进行修改:失败
    user1.setName("user1");
    userDao.updateById(user1);
}
user1更新失败,因为它的version=1,而数据库该条数据已经变为 version=2
此时,user1需要重新操作:再获取一次数据,然后再更新
4. 代码生成器
像是BookDao,UserDao,这些类都有相似的结构,可以抽取出来做成模板,这也就是代码生成器的原理
- 模板:MyBatisPlus提供,可以自己提供,但是麻烦,不建议
- 数据库相关配置:读取数据库获取表和字段信息
- 开发者自定义配置:手工配置,比如ID生成策略
4.1 代码生成器实现
步骤1:导入坐标
<dependencies>
    <!-- spring webmvc -->
    <dependency>
        <groupId>org.springframework.boot</groupId>
        <artifactId>spring-boot-starter-web</artifactId>
    </dependency>
    <!-- mysql -->
    <dependency>
        <groupId>com.mysql</groupId>
        <artifactId>mysql-connector-j</artifactId>
        <scope>runtime</scope>
    </dependency>
    <!-- test -->
    <dependency>
        <groupId>org.springframework.boot</groupId>
        <artifactId>spring-boot-starter-test</artifactId>
        <scope>test</scope>
    </dependency>
    <!-- mybatisplus -->
    <dependency>
        <groupId>com.baomidou</groupId>
        <artifactId>mybatis-plus-boot-starter</artifactId>
        <version>3.4.1</version>
    </dependency>
    <!-- druid -->
    <dependency>
        <groupId>com.alibaba</groupId>
        <artifactId>druid</artifactId>
        <version>1.1.16</version>
    </dependency>
    <!-- lombok -->
    <dependency>
        <groupId>org.projectlombok</groupId>
        <artifactId>lombok</artifactId>
        <version>1.18.12</version>
    </dependency>
    <!-- 代码生成器 -->
    <dependency>
        <groupId>com.baomidou</groupId>
        <artifactId>mybatis-plus-generator</artifactId>
        <version>3.4.1</version>
    </dependency>
    <!-- velocity模板引擎 -->
    <dependency>
        <groupId>org.apache.velocity</groupId>
        <artifactId>velocity-engine-core</artifactId>
        <version>2.3</version>
    </dependency>
</dependencies>
步骤2:编写代码生成器
package com.example;

import com.baomidou.mybatisplus.annotation.IdType;
import com.baomidou.mybatisplus.generator.AutoGenerator;
import com.baomidou.mybatisplus.generator.config.DataSourceConfig;
import com.baomidou.mybatisplus.generator.config.GlobalConfig;
import com.baomidou.mybatisplus.generator.config.PackageConfig;
import com.baomidou.mybatisplus.generator.config.StrategyConfig;

public class CodeGenerator {
    public static void main(String[] args){
        //1. 定义一个自动生成器对象
        AutoGenerator autoGenerator = new AutoGenerator();

        //2. 设置数据源
        DataSourceConfig dataSource = new DataSourceConfig();
        dataSource.setDriverName("com.mysql.jdbc.Driver");
        dataSource.setUrl("jdbc:mysql://localhost:3306/ssm_db?useSSL=false&serverTimezone=UTC");
        dataSource.setUsername("root");
        dataSource.setPassword("123456");
        autoGenerator.setDataSource(dataSource);

        //3. 设置全局配置
        GlobalConfig globalConfig = new GlobalConfig();
        globalConfig.setOutputDir(System.getProperty("user.dir")+"/src/main/java");//设置生成的文件的位置为当前项目的java目录下
        globalConfig.setOpen(false);//设置生成完毕后是否打开生成代码所在的目录
        globalConfig.setAuthor("unknown");//设置作者
        globalConfig.setFileOverride(true);//设置是否覆盖原始生成的文件
        globalConfig.setMapperName("%sDao");//设置数据层接口名,%s为占位符,指代模块名称,默认为 %sMapper
        globalConfig.setIdType(IdType.ASSIGN_ID);//设置Id生成策略
        autoGenerator.setGlobalConfig(globalConfig);

        //4. 设置包名相关配置
        PackageConfig packageConfig = new PackageConfig();
        packageConfig.setParent("com.example");//设置生成的包名,与setOutputDir的位置不冲突,二者叠加组成完整路径
        packageConfig.setEntity("domain");//设置实体类包名
        packageConfig.setMapper("dao");//设置数据层包名
        autoGenerator.setPackageInfo(packageConfig);

        //5. 策略配置(核心)
        StrategyConfig strategyConfig = new StrategyConfig();
//        strategyConfig.setInclude("tbl_table1", "tbl_table2");//生成指定的表(必须要存在)
        strategyConfig.setTablePrefix("tbl_");//去掉前缀,如:数据库表名为tbl_book,那么生成的dao就为BookDao,否则为Tbl_bookDao
        strategyConfig.setRestControllerStyle(true);//设置是否启用RESTful风格
        strategyConfig.setEntityLombokModel(true);//设置是否启用Lombok
        strategyConfig.setLogicDeleteFieldName("deleted");//设置逻辑删除字段名
        strategyConfig.setVersionFieldName("version");//设置乐观锁字段
        autoGenerator.setStrategy(strategyConfig);

        //6. 执行生成操作
        autoGenerator.execute();
    }
}
- dao层生成的类还需要添加上
@Mapper注解
步骤3:测试生成的类
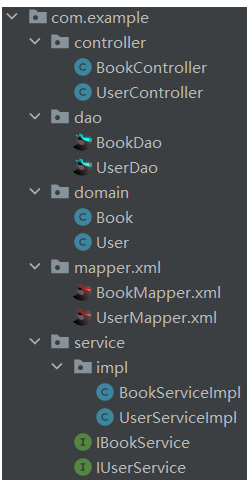
注意:在使用代码生成器时,application.yml中的内容可以为空
但是如果要在测试中使用方法,需要在application.yml中补齐dataSource的配置
代码生成器生成的结果如上,在Test类中测试
@SpringBootTest
class MybatisplusApplicationTests {
    @Autowired
    private IUserService userService;

    @Test
    void contextLoads(){
        User user = userService.getById(2L);
        System.out.println(user);
    }
}
