本文内容来自王松老师的《深入浅出Spring Security》,自己在学习的时候为了加深理解顺手抄录的,有时候还会写一些自己的想法。
Spring Security中默认的登录参数传递的格式是key/value形式,也是表单登录格式。在实际项目中我们可能会通过Json格式来登录来传递参数,这就需要我们自定义登录过滤器来实现。
其实登录参数的提取是在UsernamePasswordAuthenticationFilter中完成的。如果我们要使用Json格式登录,我们只需要模仿UsernamePasswordAuthenticationFilter过滤器定义自己的过滤器,在将自定义的过滤器放到UsernamePasswordAuthenticationFilter所在的文职即可。
我们自定义一个LoginFilter:
/**
 * @author tlh
 * @date 2022/11/23 21:27
 */
public class LoginFilter extends UsernamePasswordAuthenticationFilter {

    @Override
    public Authentication attemptAuthentication(HttpServletRequest request, HttpServletResponse response) throws AuthenticationException {

        //仅支持POST方法
        if (!"POST".equals(request.getMethod())) {
            throw new AuthenticationServiceException("当前认证不支持:" + request.getMethod());
        }
        if (request.getContentType().equalsIgnoreCase(MediaType.APPLICATION_JSON_VALUE) || request.getContentType().equalsIgnoreCase(MediaType.APPLICATION_PROBLEM_JSON_UTF8_VALUE)) {
            try {
                Map<String, String> userInfo = new ObjectMapper().readValue(request.getInputStream(), Map.class);
                String userename = userInfo.get(getUsernameParameter());
                String password = userInfo.get(getPasswordParameter());
                UsernamePasswordAuthenticationToken token = new UsernamePasswordAuthenticationToken(userename, password);
                setDetails(request, token);
                return this.getAuthenticationManager().authenticate(token);
            } catch (IOException e) {
                e.printStackTrace();
            }
        }
        return super.attemptAuthentication(request, response);
    }
}- 首先确保进入该过滤器的请求为POST
- 根据content-type来判断参数是Json的还是key/value格式的,如果是Json格式的就自己处理,如果不是就调用父类的attemptAuthentication方法来处理即可
- 如果还是Json格式的数据,则利用jackson提供的ObjectMapper工具将输入流转为Map对象,然后在Map对象里面提取出用户名和密码,接着构造UsernamePasswordAuthenticationToken对象,然后调用AuthenticationManager的authenticate方法来执行认证操作
其实LoginFilter中,从请求中提取出Json参数之后的逻辑和父类UsernamePasswordAuthenticationFilter中的认证逻辑是一样的,如下是UsernamePasswordAuthenticationFilter获取用户名和密码然后认证的逻辑:
	@Override
	public Authentication attemptAuthentication(HttpServletRequest request, HttpServletResponse response)
			throws AuthenticationException {
		if (this.postOnly && !request.getMethod().equals("POST")) {
			throw new AuthenticationServiceException("Authentication method not supported: " + request.getMethod());
		}
		String username = obtainUsername(request);
		username = (username != null) ? username.trim() : "";
		String password = obtainPassword(request);
		password = (password != null) ? password : "";
		UsernamePasswordAuthenticationToken authRequest = UsernamePasswordAuthenticationToken.unauthenticated(username,
				password);
		// Allow subclasses to set the "details" property
		setDetails(request, authRequest);
		return this.getAuthenticationManager().authenticate(authRequest);
	}
LoginFilter定义完之后,接下来我们将其添加到Spring Security过滤器链中去:
/**
 * @author tlh
 * @date 2022/11/21 21:50
 */
@Configuration
public class SecurityConfig extends WebSecurityConfigurerAdapter {

    @Override
    protected void configure(AuthenticationManagerBuilder auth)
            throws Exception {
        auth.inMemoryAuthentication().withUser("javagirl")
                .password("{noop}123")
                .roles("admin");
    }

    @Bean
    @Override
    public AuthenticationManager authenticationManagerBean() throws Exception {
        return super.authenticationManagerBean();
    }

    @Bean
    LoginFilter loginFilter() throws Exception {
        LoginFilter loginFilter = new LoginFilter();
        loginFilter.setAuthenticationManager(authenticationManagerBean());
        loginFilter.setAuthenticationSuccessHandler((request, response, authentication) -> {
            response.setContentType("application/json;charset=utf-8");
            response.getWriter().write(new ObjectMapper().writeValueAsString(authentication));
        });
        return loginFilter;
    }

    @Override
    protected void configure(HttpSecurity http) throws Exception {
        http.authorizeRequests()
                .anyRequest().authenticated()
                .and()
                .formLogin()
                .and()
                .csrf().disable();
        //表示提起掉原来的UsernamePasswordAuthenticationFilter的位置
        http.addFilterAt(loginFilter(), UsernamePasswordAuthenticationFilter.class);
    }

    @Override
    public void configure(WebSecurity web) throws Exception {
        web.ignoring()
                .antMatchers("/login.html", "/css/**", "/js/**", "/images/**");
    }
}- 首先重写configure(AuthenticationManagerBuilder auth)方法来定义一个用户
- 重写父类的authenticationManagerBean()方法来提供一个AuthenticationManager实例,一会将会配置给LoginFilter
- 配置LoginFilter实例,同时将AuthenticationManager的实例设置给LoginFilter,然后配置登录成功回调。当然这里也可以设置失败回调
- 最后在HttpSecurity中,调用addFilterAt方法将LoginFilter过滤器添加到UsernamePasswordAuthenticationFilter过滤器所在的位置
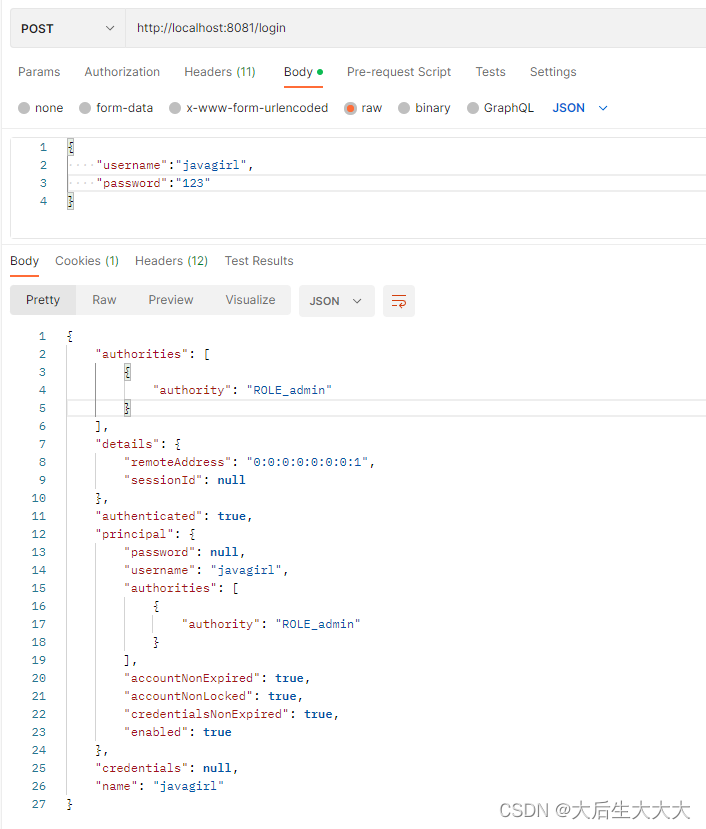
配置完成后,重启项目,此时我们就可以用Json格式的数据来登录系统了:
有小伙伴应该会注意到,当我们想要获得一个AuthenticationManager的实例时有两种方法:
- 重写父类的authenticationManager方法,如下:
@Override protected AuthenticationManager authenticationManager() throws Exception { return super.authenticationManager(); } - 从写父类的authenticationManagerBean方法,如下:
@Override
public AuthenticationManager authenticationManagerBean() throws Exception {
    return super.authenticationManagerBean();
}
表面上两种方法获取的实例都可以在这里运行,但是实际上是有区别的。第一种方法authenticationManager获取到时全局的AuthenticationManager实例,第二种方法获取到的是局部的AuthenticationManager实例。而LoginFilter作为Spring Security过滤器中的一环,显然该配置局部的AuthenticationManager的实例。应为,如果将全局的AuthenticationManager的实例配置给LoginFilter,则局部的AuthenticationManager实例所对应的用户就会失效。
实际上,如果我们想要配置一个AuthenticationManager实例,大部分情况下都是通过重写authenticationManagerBean方法来获取。




![[附源码]java毕业设计研究生管理系统](https://img-blog.csdnimg.cn/83fd3b22199744d78eb2ddd5b51d3396.png)
