一、线程同步
线程同步指的是当一个线程在对某个临界资源进行操作时,其他线程都不可以对这个资源进行操作,直到该线程完成操作,其他线程才能操作,也就是协同步调,让线程按预定的先后次序进行运行。
线程同步的方法有四种:
互斥锁、信号量、条件变量、读写锁。
二、用户级和内核级线程
线程的实现可以分为两类:用户级线程(User-Level Thread, ULT) 和 内核级线程( Kemel-LevelThread, KLT)。后者又称为内核支持的线程或轻量级进程。
1、用户级线程:
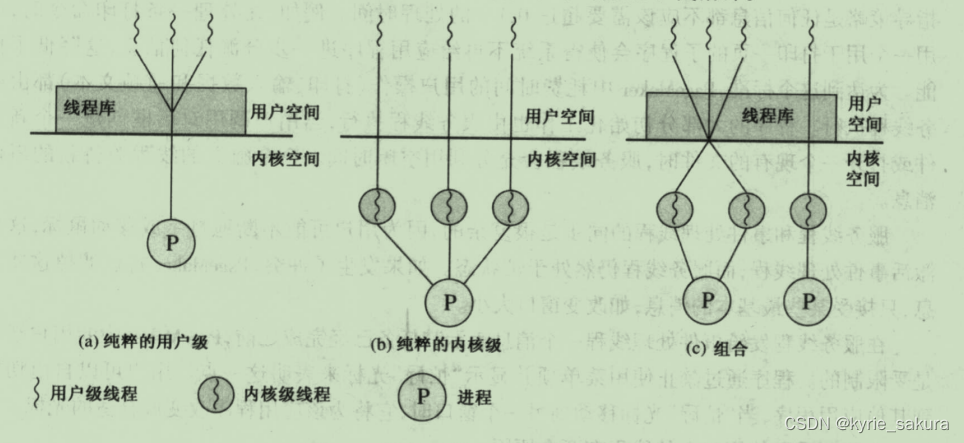
在一个纯粹的用户级线程中,有关线程管理的所有工作都由应用程序完成,内核没有意识到有线程的存在。下图说明了纯粹的用户级线程方法。
任何应用程序可以通过使用线程库设计成多线程程序,线程库是用于用户级线程管理的一个例程包,它包含用于创建和销毁线程的代码、在线程间传递消息和数据的代码、调度线程执行的代码以及保存和恢复线程上下文的代码。
在默认情况下,应用程序从单线程起始,并在该线程中开始运行。该应用程序和它的线程被分配给一个由内核管理的进程,在应用程序正在运行(进程处于运行态)的任何时刻,应用程序都可以创建一个在相同进程中运行的新线程,产生线程是通过调用线程库中的派生( spawn)例程完成的。通过过程调用,控制权被传递给派生例程。线程库为新线程创建-一个数据结构,然后使用某种调度算法,把控制权传递给该进程中处于就绪态的个线程。 当控制权被传递给线程库时,需要保存当前线程的上下文,然后当控制权从线程库中传递给一个线程时 ,将恢复那个线程的上下文。上下文实际上包括用户寄存器的内容、程序计数器和栈指针。
2、内核级线程
内核级线程
在一个纯粹的内核级线程软件中,有关线程管理的所有工作都是由内核完成的,应用程序部分没有进行线程管理的代码,只有一个到内核级线程设施的应用程序编程接口(API)。
W2K、Linux和OS/2都使用这种方法。
上图(b)显示了纯粹的内核级线程方法。任何应用程序都可以设计成多线程程序。一个应用程序的所有线程都在-个进程内。 内核为该进 程及其内部的每个线程维护上下文信息。调度是在内核基于线程架构的基础上完成的。
该方法克服了用户级线程方法的两个基本缺陷:
首先,内核可以同时把同个进程中的多个线程调度到多个处理器中;
再者,如果进程中的一-个线程被阻塞,内核可以调度同一个进程中的另一个线程。内核级线程方法的另-个优点是内核例程自身也可以使用多线程。
三、互斥锁
互斥锁(也称互斥量)可以用于保护关键代码段,以确保其独占式的访问,这有点像一
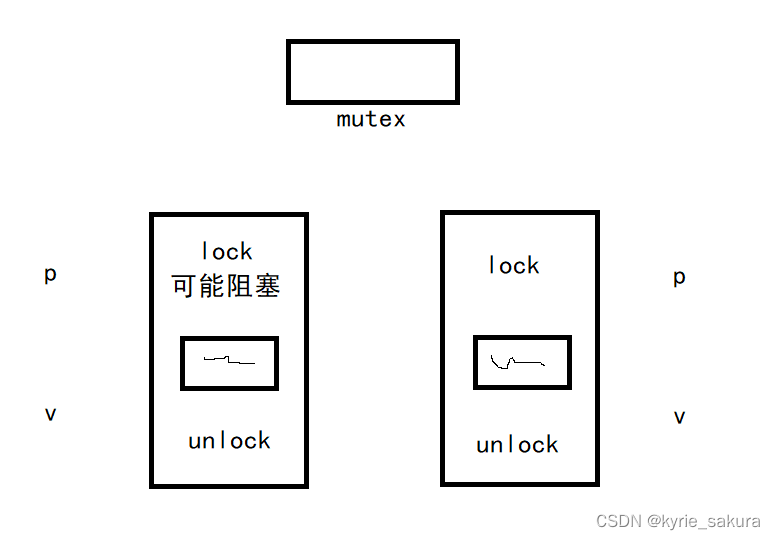
个二进制信号量。当进人关键代码段时,我们需要获得互斥锁并将其加锁,这等价于二进制信号量的P操作;当离开关键代码段时,我们需要对互斥锁解锁,以唤醒其他等待该互斥锁的线程,这等价于二进制信号量的V操作。
1、互斥锁相关接口:
#include <pthread.h>

int pthread_mutex_init(pthread_mutex_t *mutex, pthread_mutexattr_t *attr);
int pthread_mutex_lock(pthread_mutex_t *mutex);
int pthread_mutex_unlock(pthread_mutex_t *mutex);
int pthread_mutex_destroy(pthread_mutex_t *mutex);
这些函数的第-个参数 mutex 指向要操作的目标互斥锁,互斥锁的类型是 pthread_mutex_t 结构体。
pthread_mutex_init 函数用于初始化互斥锁。mutexattr 参数指定互斥锁的属性。如果将它设置为NULL,则表示使用默认属性。我们将在下一小节讨论互斥锁的属性。除了这个函数外,我们还可以使用如下方式来初始化一个互斥锁:
pthread_mutex_t mutex = PTHREAD MUTEX_ INITIALIZER;
宏 PTHREAD_MUTEX_INITIALIZER 实际上只是把互斥锁的各个字段都初始化为0。
pthread_mutex_destroy 函数用于销毁互斥锁,以释放其占用的内核资源。销毁一个已经加锁的互斥锁将导致不可预期的后果。
pthread_mutex_lock 函数以原子操作的方式给一个互斥锁加锁。如果目标互斥 锁已经被锁上,则 pthread_mutex_lock 调用将阻塞,直到该互斥锁的占有者将其解锁。
pthread_mutex_trylock 与 pthread_mutex_lock函数类似,不过它始终立即返回,而不论被操作的互斥锁是否已经被加锁,相当于 pthread_mutex_lock 的非阻塞版本。当目标互斥锁未被加锁时,pthread_mutex_trylock 对互斥锁执行加锁操作。当互斥锁已经被加锁时, pthread_mutex_trylock 将返回错误码EBUSY。需要注意的是,这里讨论的 pthread_mutex_lock 和 pthread_mutex_trylock 的行为是针对普通锁而言的.后面我们将看到,对于其他类型的锁而言,这两个加锁函数会有不同的行为。
pthread_mutex_unlock 函数以原子操作的方式给一个互斥锁解锁。如果此时有其他线程正在等待这个互斥锁,则这些线程中的某-个将获得它。
上面这些函数成功时返回0,失败则返回错误码。
2、示例代码
主线程和函数线程模拟访问打印机,主线程输出第一个字符‘a’表示开始使用打印机,输出第二个字符‘a’表示结束使用,函数线程操作与主线程相同。(由于打印机同一时刻只能被一个线程使用,所以输出结果不应该出现 abab):
未加锁控制的代码
#include <stdio.h>
#include <stdlib.h>
#include <assert.h>
#include <unistd.h>
#include <string.h>

#include <pthread.h>

void* thread_fun1(void *arg)
{
    int i = 0;
    for(;i < 5; i++)
    {
        printf("A");
        fflush(stdout);//刷屏
        int n = rand() % 3;//定义一个随机值,随即睡眠时间
        sleep(n);

        printf("A");
        fflush(stdout);
        n = rand() % 3;
        sleep(n);
    }
}


void* thread_fun2(void *arg)
{
    int i = 0;
    for(;i < 5; i++)
    {
        printf("B");
        fflush(stdout);//刷屏
        int n = rand() % 3;//定义一个随机值,随即睡眠时间
        sleep(n);

        printf("B");
        fflush(stdout);
        n = rand() % 3;
        sleep(n);

    }
}
int main()
{
    pthread_t id1,id2;
    pthread_create(&id1,NULL,thread_fun1,NULL);
    pthread_create(&id2,NULL,thread_fun2,NULL);

    pthread_join(id1,NULL);
    pthread_join(id2,NULL);

    exit(0);
}
运行结果:

加锁控制的代码:
#include <stdio.h>
#include <stdlib.h>
#include <assert.h>
#include <unistd.h>
#include <string.h>

#include <pthread.h>

pthread_mutex_t mutex;//自己定义一个锁

void* thread_fun1(void *arg)
{
    int i = 0;
    for(;i < 5; i++)
    {
        pthread_mutex_lock(&mutex);//可能阻塞

        printf("A");
        fflush(stdout);//刷屏
        int n = rand() % 3;//定义一个随机值,随即睡眠时间
        sleep(n);

        printf("A");
        fflush(stdout);

        pthread_mutex_unlock(&mutex);//进行解锁
        n = rand() % 3;
        sleep(n);
    }
}


void* thread_fun2(void *arg)
{
    int i = 0;
    for(;i < 5; i++)
    {
        pthread_mutex_lock(&mutex);

        printf("B");
        fflush(stdout);//刷屏
        int n = rand() % 3;//定义一个随机值,随即睡眠时间
        sleep(n);

        printf("B");
        fflush(stdout);

        pthread_mutex_unlock(&mutex);
        n = rand() % 3;
        sleep(n);

    }
}
int main()
{
    pthread_mutex_init(&mutex,NULL);//对锁变量进行初始化

    pthread_t id1,id2;
    pthread_create(&id1,NULL,thread_fun1,NULL);
    pthread_create(&id2,NULL,thread_fun2,NULL);

    pthread_join(id1,NULL);
    pthread_join(id2,NULL);

    pthread_mutex_destroy(&mutex);//对锁进行销毁
    exit(0);
}
运行结果:
虽然输出时间不一定相同,但结果是一样的。

四、信号量
1、信号量相关接口:
#include <semaphore.h>

int sem_init(sem_t *sem, int pshared, unsigned int value);
int sem_wait(sem_t *sem);
int sem_post(sem_t *sem);
int sem_destroy(sem_t *sem);
2、示例代码:
信号量实现三个线程轮流运行
示例代码:
#include <stdio.h>
#include <stdlib.h>
#include <unistd.h>
#include <string.h>

#include <pthread.h>
#include <semaphore.h>

//定义三个信号量
sem_t sema;
sem_t semb;
sem_t semc;

void *funa(void* arg)
{
    int i = 0;
    for(; i < 5; i++)
    {
        sem_wait(&sema);//ps1

        printf("A");
        fflush(stdout);

        sem_post(&semb);//vs2
    }
}

void* funb(void* arg)
{
    int i = 0;
    for(; i < 5; i++)
    {
        sem_wait(&semb);//ps2

        printf("B");
        fflush(stdout);

        sem_post(&semc);//vs3
    }
}

void* func(void* arg)
{
    int i = 0;
    for(; i < 5; i++)
    {
        sem_wait(&semc);//ps3

        printf("C");
        fflush(stdout);

        sem_post(&sema);//vs1
    }
}

int main()
{
    //对三个信号量进行初始化
    sem_init(&sema,0,1);
    sem_init(&semb,0,0);
    sem_init(&semc,0,0);

    //创建三个线程
    pthread_t id1,id2,id3;
    pthread_create(&id1,NULL,funa,NULL);
    pthread_create(&id2,NULL,funb,NULL);
    pthread_create(&id3,NULL,func,NULL);

    //等待线程结束
    pthread_join(id1,NULL);
    pthread_join(id2,NULL);
    pthread_join(id3,NULL);

    //销毁信号量
    sem_destroy(&sema);
    sem_destroy(&semb);
    sem_destroy(&semc);

    exit(0);
}
运行结果:

示例代码2:
#include <stdio.h>
#include <stdlib.h>
#include <assert.h>
#include <string.h>
#include <unistd.h>
#include <pthread.h>
#include <semaphore.h>
#include <fcntl.h>

char buff[128] = {0};

sem_t sem1;
sem_t sem2;

void* PthreadFun(void *arg)
{
	int fd = open("a.txt", O_RDWR | O_CREAT, 0664);
	assert(fd != -1);

	//函数线程完成将用户输入的数据存储到文件中
	while(1)
	{
		sem_wait(&sem2);

		if(strncmp(buff, "end", 3) == 0)
		{
			break;
		}

		write(fd, buff, strlen(buff));
		memset(buff, 0, 128);

		sem_post(&sem1);
	}

	sem_destroy(&sem1);
	sem_destroy(&sem2);
}

int main()
{
	sem_init(&sem1, 0, 1);
	sem_init(&sem2, 0, 0);

	pthread_t id;
	int res = pthread_create(&id, NULL, PthreadFun, NULL);
	assert(res == 0);

	//主线程完成获取用户数据的数据,并存储在全局数组 buff 中
	while(1)
	{
		sem_wait(&sem1);

		printf("please input data: ");
		fflush(stdout);

		fgets(buff, 128, stdin);
		buff[strlen(buff) - 1] = 0;

		sem_post(&sem2);

		if(strncmp(buff, "end", 3) == 0)
		{
			break;
		}
	}

	pthread_exit(NULL);
}
五、读写锁
读写锁是对于互斥锁的一个优化。
1、读写锁的相关接口:
#include <pthread.h>

int pthread_rwlock_init(pthread_rwlock_t *rwlock, pthread_rwlockattr_t *attr);  //初始化
int pthread_rwlock_rdlock(pthread_rwlock_t *rwlock); //加读锁
int pthread_rwlock_wrlock(pthread_rwlock_t *rwlock);  //加写锁
int pthread_rwlock_unlock(pthread_rwlock_t *rwlock);  //解锁
int pthread_rwlock_destroy(pthread_rwlock_t *rwlock);  //销毁
2、示例代码
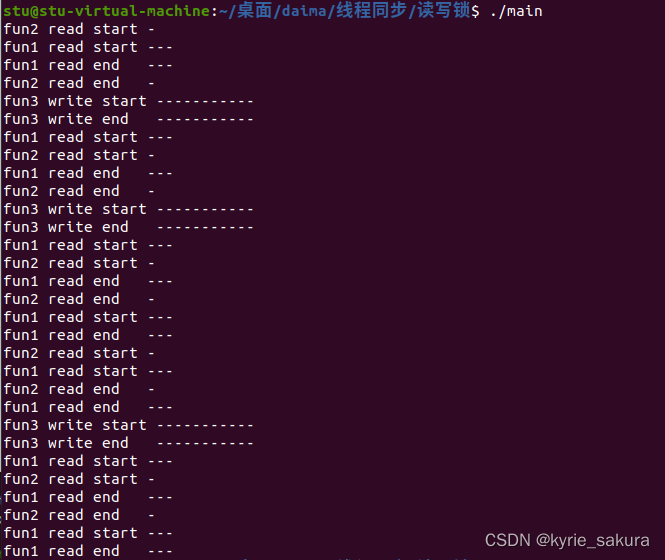
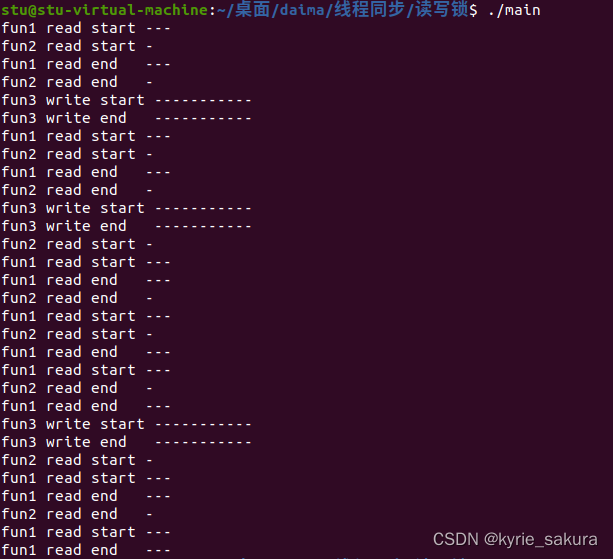
创建三个线程,一个线程写数据,两个线程读数据。两个线程可以同时读,但一旦一个数据那道写数据,那另外两个写数据权限就不能读了。
代码:
#include <stdlib.h>
#include <unistd.h>
#include <string.h>
#include <pthread.h>

//定义一个读写锁变量
pthread_rwlock_t rwlock;

void* fun1(void* arg)//读数据
{
    int i = 0;
    for(; i < 7; i++)
    {
        //先加读锁
        pthread_rwlock_rdlock(&rwlock);
        printf("fun1 read start ---\n");
        sleep(1);

        //解锁
        printf("fun1 read end   ---\n");
        pthread_rwlock_unlock(&rwlock);
        sleep(1);
    }
}

void* fun2(void* arg)//读数据
{
    int i = 0;
    for(; i < 5 ; i++)
    {
        //先加读锁
        pthread_rwlock_rdlock(&rwlock);
        printf("fun2 read start -\n");
        sleep(2);

        //解锁
        printf("fun2 read end   -\n");
        pthread_rwlock_unlock(&rwlock);
        sleep(1);
    }
}

void* fun3(void* arg)//写
{
    int i = 0;
    for(; i < 3; i++)
    {
        //加写锁
        pthread_rwlock_wrlock(&rwlock);
        printf("fun3 write start -----------\n");
        sleep(3);

        //解锁
        pthread_rwlock_unlock(&rwlock);
        printf("fun3 write end   -----------\n");
        sleep(1);
    }
}

int main()
{
    //对读写锁进行初始化
    pthread_rwlock_init(&rwlock,NULL);


    //创建三个线程
    pthread_t id1,id2,id3;
    pthread_create(&id1,NULL,fun1,NULL);
    pthread_create(&id2,NULL,fun2,NULL);
    pthread_create(&id3,NULL,fun3,NULL);

    //等待线程结束
    pthread_join(id1,NULL);
    pthread_join(id2,NULL);
    pthread_join(id3,NULL);

    //对读写锁进行销毁
    pthread_rwlock_destroy(&rwlock);

    exit(0);
}
运行结果:
两个读的操作可以一起运行,但一旦写权限fun3进行,两个读的线程不能运行。
六、条件变量
如果说互斥锁是用于同步线程对共享数据的访问的话,那么条件变量则是用于在线程之间同步共享数据的值。条件变量提供了一种线程间的通知机制:当某个共享数据达到某个值的时候,唤醒等待这个共享数据的线程。
1、条件变量相关接口:
#include <pthread.h>

int pthread_cond_init(pthread_cond_t *cond, pthread_condattr_t *attr);  //初始化
int pthread_cond_wait(pthread_cond_t *cond, pthread_mutex_t *mutex);  //
int pthread_cond_signal(pthread_cond_t *cond);  //唤醒单个线程
int pthread_cond_broadcast(pthread_cond_t *cond);  //唤醒所有等待的线程
int pthread_cond_destroy(pthread_cond_t *cond);  //销毁
这些丽数的第一个参数cond指向要操作的目标条件变量,条件变量的类型是 pthread_cond_t 结构体。
pthread_cond_init 函数用于初始化条件变量。cond_attr 参数指定条件变量的属性。如果将它设置为NULL,则表示使用默认属性。条件变量的属性不多,而且和互斥锁的属性类型相似,所以我们不再赘述。除了pthread_cond_init 函数外,我们还可以使用如下方式来初始化一个条件变量:
pthread_cond_t cond = PTHREAD_COND_INITIALIZER;
宏 PTHREAD_COND_INITIALIZER 实际上只是把条件变量的各个字段都初始化为0。
pthread_cond_destroy 函数用于销毁条件变量,以释放其占用的内核资源。销毁一个正在被等待的条件变量将失败并返回EBUSY。
pthread_cond_broadcast 函数以广播的方式唤醒所有等待目标条件变量的线程。pthread_cond_signal 函数用于唤醒一个等待目标条件变量的线程。至于哪个线程将被唤醒,则取决于线程的优先级和调度策略。有时候我们可能想唤醒-一个指定的线程,但pthread没有对该需求提供解决方法。不过我们可以间接地实现该需求:定义一个能够唯一表示目标线程的全局变量,在唤醒等待条件变量的线程前先设置该变量为目标线程,然后采用广播方式唤醒所有等待条件变量的线程,这些线程被唤醒后都检查该变量以判断被唤醒的是否是自己,如果是就开始执行后续代码,如果不是则返回继续等待。
pthread_cond_wait 函数用于等待目标条件变量。mutex 参数是用于保护条件变量的互斥锁,以确保 pthread_cond_wait 操作的原子性。在调用pthread_cond_wait 前,必须确保互斥锁mutex已经加锁,否则将导致不可预期的结果。pthread_cond_wait 函数执行时,首先把调用线程放人条件变量的等待队列中,然后将互斥锁mutex解锁。可见,从pthread_cond_wait开始执行到其调用线程被放人条件变量的等待队列之间的这段时间内,pthread_cond_signal 和 pthread_cond_broadcast 等函数不会修改条件变量。换言之,pthread_cond_wait函数不会错过目标条件变量的任何变化
。当 pthread_cond_wait 函数成功返回时,互斥锁 mutex 将再次被锁上。
上面这些函数成功时返回0,失败则返回错误码。
2、代码示例
#include <stdio.h>
#include <stdlib.h>
#include <unistd.h>
#include <string.h>

#include <pthread.h>

//定义一个互斥锁和条件变量
pthread_mutex_t mutex;
pthread_cond_t cond;

void* funa(void* arg)
{
    char* s = (char *)arg;

    //先放等待队列中阻塞,有人唤醒再解除阻塞
    while(1)
    {
        pthread_mutex_lock(&mutex);
        pthread_cond_wait(&cond,&mutex);
        pthread_mutex_unlock(&mutex);

        if( strncmp(s,"end",3) == 0 )
        {
            break;
        }

        printf("funa: %s\n",s);
    }
}

void* funb(void* arg)
{
    char* s = (char *)arg;

    while( 1 )
    {
        pthread_mutex_lock(&mutex);
        pthread_cond_wait(&cond,&mutex);
        pthread_mutex_unlock(&mutex);

        if( strncmp(s,"end",3) == 0 )
        {
            break;
        }
        printf("funb: %s\n",s);
    }
}

int main()
{
    //初始化
    pthread_mutex_init(&mutex,NULL);
    pthread_cond_init(&cond,NULL);

    //创建两个线程
    char buff[128] = {0};
    pthread_t id1,id2;
    pthread_create(&id1,NULL,funa,(void*)buff);
    pthread_create(&id2,NULL,funb,(void*)buff);

    while(1)
    {
        //从键盘获取数据
        fgets(buff,128,stdin);
        if( strncmp(buff,"end",3) == 0 )
        {
            //唤醒所有线程
            pthread_cond_broadcast(&cond);
            break;
        }
        else
        {
            //唤醒一个线程
            pthread_cond_signal(&cond);
        }
    }

    //等待线程结束
    pthread_join(id1,NULL);
    pthread_join(id2,NULL);

    //销毁
    pthread_mutex_destroy(&mutex);
    pthread_cond_destroy(&cond);

    exit(0);
}
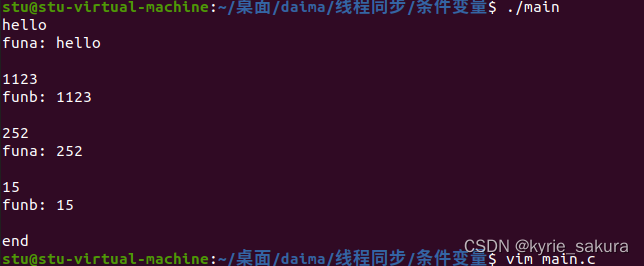
运行结果:






![[AI] LRTA*(K) 搜索算法](https://img-blog.csdnimg.cn/b945c2c962534daebdc25a9dc5103019.png#pic_center)


